1
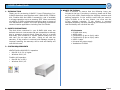
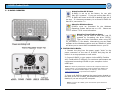
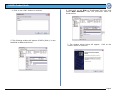
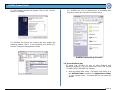
G-RAID3 Product Guide
G-RAID3™
Installation Guide
TABLE OF CONTENTS
1. INTRODUCTION
2. SAFETY PRECAUTIONS
3. SYSTEM REQUIREMENTS
4. WHAT’S IN THE BOX
5. G-RAID3 OVERVIEW
6. INSTALLING G-RAID3
7. INITIALIZING G-RAID3
7.1 Mac OSX
7.2 Windows 2000/XP
7.3 Cross Platform use
8. UNMOUNTING/DISCONNECTING G-RAID3
8.1 Mac OSX
8.2 Windows 2000/XP
9. OPTIMIZING DATA TRANSFER RATES
G-Technology Inc.
10. TECHNICAL SUPPORT
Tel: (310) 449-4599
Fax: (310) 449-4670
[email protected]
11. LIMITED WARRANTY
P/N GR31208 RevA
Page 1
G-RAID3 Product Guide
Page 2
G-RAID3 Product Guide
Page 3
G-RAID3 Product Guide
1. INTRODUCTION
Thank you for purchasing G-RAID3™ from G-Technology, Inc.
G-RAID3 features a quad interface with 3 Gbit eSATA, FireWire
400, FireWire 800 and USB2.0 connectivity, and is available
in storage capacities up to an amazing 3TB! When connected
via eSATA, G-RAID3 provides data transfers rates in excess of
200 MB/second to support the most demanding professional
content creation applications including Final Cut Studio.
2. SAFETY PRECAUTIONS
The disk drives contained in your G-RAID3 disk array are
delicate electronic instruments and are susceptible to damage
due to excessive physical shock. Place the unit in a vented
area away from moisture or liquids. Please handle the unit
with care. Do not open the case. Doing so will void the
warranty. If the product is returned with damage caused by
improper handling, the warranty will be void and liability will
rest with the user.
4. WHAT’S IN THE BOX
Take a moment to ensure that the following items are
included in the box. If anything is missing, please call G-Tech
at (310) 449-4599. Please keep the shipping container and
packing materials. In the unlikely event that you need to
return G-RAID3 to us for any reason, you must use the
G-Tech shipping container. If the product is returned
damaged caused by improper packaging, the warranty will be
void and liability will rest with the user.
Kit Contents:
• G-RAID3 disk array
• eSATA cable
• FireWire 800 (9-pin to 9-pin) cable
• FireWire 400 (6-pin to 6-pin) cable
• USB 2.0 cable
• Universal AC power supply
• Installation CD-ROM
3. SYSTEM REQUIREMENTS
eSATA/FireWire 800/USB 2.0 operation
• Mac OS X 10.3.x or higher
• Windows 2000 / XP
FireWire 400 operation
• Mac OS 9.x or OS X
• Windows 2000 / XP
Page 4
G-RAID3 Product Guide
5. G-RAID3 OVERVIEW
Attention Mac OS X Users
G-RAID3 is set up at the factory for use with
Mac OS X systems. If you are running Mac OS X,
G-RAID3 will mount on the OS X desktop right out of
the box. If it becomes necessary to re-format G-RAID3 for
Mac OS X, see section 7.1.
Attention Windows Users
G-RAID3 must be formatted for the Windows
Operating System before use on a PC. Please see
section 7.2 for more information.
Attention Cross Platform Users
G-RAID3 can be used on both MAC and PC
systems by formatting the drive “FAT32.”
There are some limitations when using FAT
32, see section 7.3 for details. Alternatively you can install
software on the Windows machine such as “MacDrive” which
will allow you to mount MAC formatted drives on your PC.
6. INSTALLING G-RAID3
1. Connect the plug from the power supply “brick” to the
power connector on the rear of G-RAID3 and plug the AC
cable in to a surge protector or wall outlet.
2. Connect G-RAID3 to your system via the eSATA, FireWire
400, FireWire 800 or USB port. For maximum performance we
recommend connecting G-RAID3 to your computer via the
eSATA port.
Note: For maximum performance on Mac and PC computers that do not
support eSATA, it is recommended to install an eSATA PCIe adapter (for
desktops) or an eSATA CardBus adapter (for laptops). Visit G-Tech at
www.g-technology.com to purchase these adapters.
3. Power on G-RAID3 by pressing the power button located on
the back of the unit. G-RAID3 will automatically mount on the
desktop if you are using a Mac computer.
Note: To power off G-RAID3, press and hold the power button for
three seconds.
Page 5
G-RAID3 Product Guide
7. INITIALIZING G-RAID3
G-RAID3 is set up at the factory for
use with Mac OS X systems. If you
are running Mac OS X, G-RAID3 will
mount on the desktop right out of the
box.
If it becomes necessary to re-format G-RAID3, follow the
instructions below.
3. Select the Partition tab to view the partition options as
shown below.
• For Mac OS X installations, proceed to Section 7.1
• For Windows 2000/XP installations, proceed to Section 7.2
• For Cross-Platform use see section 7.3
7.1 Mac OS X
1. Open the Apple Disk Utility. The Apple Disk Utility is in
the Utilities Folder located in the Applications Folder on
the Macintosh HD. Select G-RAID3 by clicking on the entry in
the left-hand column as shown below. Information about
G-RAID3 will be displayed at the bottom.
4. Set the Volume Scheme: to 1 Partition.
Enter a Volume Name under Volume Information
(in this example “G-RAID3”) and set Format to
Mac OS Extended as shown below.
2
Note: Alternatively, G-RAID3 can be set up in multiple volumes by
selecting the desired number of partitions from the Volume
Scheme pull-down menu.
Page 6
G-RAID3 Product Guide
5. Click on the <Partition> button. The dialog box
shown below will appear. Click on the <Partition> button
to continue.
7.2 Windows 2000/XP
1. Power on G-RAID3, wait 10 seconds, then power on your
computer.
2. Open the Disk Management utility by right-clicking on
the My Computer icon on the desktop and selecting
“Manage” from the drop down menu as shown below.
6. When partitioning is complete, G-RAID3 will
displayed in the left-hand panel as shown below.
be
3. The Computer Management console will appear as shown
below. Click on “Disk Management” in the left-hand panel.
G-RAID3 is identified as Disk 1 in this example.
7. Exit the Apple Disk Utility.
8. G-RAID3 will be displayed on the desktop as shown.
Right click on Disk 1 and select Initialize Disk from the
pull-down menu as shown. The window shown on the next
page will appear.
G-RAID3 is now set up for use!!
Page 7
G-RAID3 Product Guide
4. Click on the <OK> button to continue.
5. The following window will appear. G-RAID3 (Disk 1) is now
identified as Basic and Online.
6. Right-click on the Disk 1 “Unallocated” bar entry and
select New Partition… from the pull-down menu as
shown below.
7. The window shown below will appear.
<Next> button to continue.
Click on the
Page 8
G-RAID3 Product Guide
8. The following window will appear. Click on the <Next>
button to continue.
9. The window shown below will appear. Click on the
<Next> button to continue. This will create one large
volume using all of the available space on G-RAID3.
10. Windows will automatically assign a drive letter, in this
example “D”. Accept this assignment and click on the
<Next> button to continue.
11. Enter a Volume Label: (in this example, G-RAID3),
check the Perform a quick format box and click on the
<Next> button to continue.
2
Note: Multiple partitions can be created on G-RAID3. Consult your
Windows documentation for instructions on setting up multiple partitions.
Page 9
G-RAID3 Product Guide
12. The following window will appear. Click on the <Finish>
button to continue.
14. G-RAID3 will now be displayed as an available hard
disk drive under My Computer as shown below.
2
13. Windows will format the volume and then display the
following window. Disk 1 is now identified as G-RAID3 (E:).
Exit the Computer Management console
G-RAID3 is now set up for use!!
7.3. Cross Platform Use
To setup your G-RAID3 for use on both Windows and
Macintosh systems, use the Apple Disk utility and format
G-RAID3 FAT32 (MS-DOS File System).
1. Open the Apple Disk Utility. (The Apple Disk Utility is in
the Utilities Folder located in the Applications Folder
on your system drive). A window like the one below will
appear.
Page 10
G-RAID3 Product Guide
2. Select G-RAID3 from the left-hand column, then select
the “Erase” button at the top as shown. Select MS-DOS
File System from the drop down menu and Enter
“G-RAID3” in the Name field.
WARNING:
THIS WILL ERASE ALL DATA ON YOUR DRIVE.
NOTE: The 'MS-DOS File System' cannot write
files over 4 GB. If you are working with files over
4 GB, you may want to choose a software option
like MacDrive.
MacDrive is Windows software that
enables the Windows OS to mount MAC formatted
drives. (www.macdrive.com)
3. Click on the erase button and the screen on the next
page will appear.
4. Click “Erase” and your drive will be formatted to its full
capacity as FAT32. With this format, you will be able to
READ/WRITE on both windows (2000/XP) and MAC OS
machines. (NOTE: You could format your drive on a
Windows machine FAT32, however Windows currently
limits FAT32 partitions to 32GB in size)
8. UNMOUNTING/DISCONNECTING G-RAID3
A great feature of G-RAID3 is its ability to be connected and
disconnected while your computer is running. To prevent
failures and/or data loss it is important to follow the steps
below when unmounting/disconnecting G-RAID3 from your
computer.
8.1 Mac OS X Computers
1. Before powering down and disconnecting G-RAID3, you
must unmount it from the system by dragging the G-RAID3
icon to the trash located in the dock, or by selecting the
icon and pressing apple+E on the keyboard.
2. It is now safe to power off and remove G-RAID3 from
your system.
8.2 Windows Computers
1. Before powering down and disconnecting G-RAID3,
left-click on the “Safely Remove Hardware” icon shown below.
Page 11
G-RAID3 Product Guide
2. A box like the following will appear. Click on the entry.
10. TECHNICAL SUPPORT
If you encounter any difficulties while installing G-RAID3,
please contact G-Tech Technical Support via one of the
following ways:
Telephone: (310) 449-4599
Fax: (310) 449-4670
E-mail: [email protected]
Internet: http://www.g-technology.com
3. A balloon like the following will appear.
When contacting Technical Support, make sure to be in front
of your computer and have the following information readily
available:
4. It is now safe to power off and remove G-RAID3 from
your system.
9. OPTIMIZING DATA TRANSFER RATES
G-RAID3 can be connected to any Mac or PC equipped
with a eSATA, FireWire 400, FireWire 800 or USB port. For
optimal performance, G-RAID3 should be connected via an
eSATA port.
Note: For maximum performance on Mac and PC computers that do not
support eSATA, it is recommended to install an eSATA PCIe adapter (for
desktops) or an eSATA CardBus adapter (for laptops). Visit G-Tech at
www.g-technology.com to purchase these adapters.
Note: If you wish to use G-RAID3 in conjunction with AJA’s Io, Avid’s Mojo or
any other video editing system that utilizes a FireWire connection, you must
connect G-RAID3 to either an eSATA PCIe adapter or eSATA CardBus adapter
for proper operation.
•
•
•
•
•
Your G-RAID3 serial number (on bottom of unit)
Operating system and version
Computer brand and model
Amount of memory installed
Other devices attached to your computer
Thank you for purchasing G-RAID3. If you have any
comments or questions about this manual or the product,
please call (310) 449-4599, or send an email to
[email protected].
11. LIMITED WARRANTY
G-Technology Inc. (G-Tech) warrants your product against any
defect in material and workmanship, under normal use, for
the designated warranty period.
If the product should
become defective within the warranty period, G-Tech, will at
its discretion, repair or replace the product.
Repair or
replacement parts or products will be furnished on an
exchange basis and will be either new or reconditioned. All
replaced parts or products shall become the property of
G-Tech. This warranty shall not apply if the product has been
damaged by accident, misuse, abuse or as a result of
unauthorized service or parts. Warranty service is available to
the purchaser by obtaining a Return Material Authorization
number (RMA) and by delivering the product during the
warranty period to an authorized G-Tech service facility or to
G-Tech. The purchaser shall bear all shipping, packing and
insurance costs and all other costs, excluding parts and labor,
Page 12
G-RAID3 Product Guide
necessary to effectuate repair, replacement or refund under
this warranty. All returned product must be shipped to
G-Tech in the original shipping container.
For more information on how to obtain warranty service, an
RMA number or to acquire shipping materials, contact G-Tech
at [email protected].
IN THE EVENT A PRODUCT BECOMES DEFECTIVE DURING
THE WARRANTY PERIOD, THE PURCHASER’S EXCLUSIVE
REMEDY SHALL BE REPAIR OR REPLACEMENT AS PROVIDED
ABOVE.
INCIDENTAL
OR
CONSEQUENTAL
DAMAGES,
INCLUDING WITHOUT LIMITATION LOSS OF DATA, ARISING
FROM BREACH OF ANY EXPRESS OR IMPLIED WARRANTY ARE
NOT THE RESPONSIBILITY OF G-TECH AND, TO THE EXTENT
PERMITTED BY LAW, ARE HEREBY EXCLUDED BOTH FOR
PROPERTY
DAMAGE,
AND
TO
THE
EXTENT
NOT
UNCONSCIONABLE, FOR PERSONAL INJURY DAMAGE.
Page 13