1
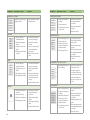
installation guide
1. Turn OFF the printer/copier/fax machine, open the
cover and remove the used cartridge.
remanufactured toner cartridge
user guide
complete the cycle!
For information on how to recycle
your Earthwise toner cartridge
please visit www.imation.com/toner
2. Shake the new Earthwise™ cartridge 5 to 6
times while horizontally level to ensure the powder
inside is loose and even.
3. Grasp the cartridge sealing tape.
4. Pull
Please note that the toner powder may appear
as the seal is removed from the cartridge, this is
normal.
5. Remove shutter tape.
Congratulations on purchasing this Earthwise™ remanufactured
toner cartridge by Imation. This high-performance product
was made at a lower cost with less waste than one-timeuse cartridges—and that is good for the environment!
Because this is a remanufactured product, the outside
plastic container may have scratches or scuffs.
contents
Installation Guide . . . . . . . . . . . . . . 1
Storage & Safety Information . . . . . 2
Troubleshooting Guide . . . . . . . . . . . 3
Warranty Information. . . . . . . . . . . . 9
6. Insert the new cartridge into the printer. Close
the machine cover and turn ON the printer/fax
machine.
7. If an error message appears on the control panel,
please turn the printer off for 2 minutes and
restart the machine.
8. It is recommended to print at least 20 copies first
to achieve the best print quality.
www.imation.com/toner
storage & safety information
troubleshooting guide
storage
Do not expose the toner cartridge to direct sunlight or to extreme
environmental conditions.
-20°C
-4°F
40°C
104°F
This troubleshooting guide helps you diagnose common laser
toner cartridge problems on color laser printer and monochrome
laser printers. If you have any of these problems, please try to
use the methods here to fix them.
Suggested storage temperature -4°F to 104°F (-20°C to 40°C)
safety
Keep the cartridge out of reach of children. Discard plastic wrapping
and bags as soon as the cartridge is installed. The bag may be a
hazard to children and may cause suffocation.
initial checking
DO NOT attempt in any way to disassemble the toner cartridge. The
custom parts/components can not be replaced or repaired by an end
user. Please consult your supplier if a malfunction occurs.
Check the toner cartridge’s compatibility for your printer.
Make sure the cartridge sealing tape is removed.
Check the cartridge is installed and placed in the correct position inside the
printer/ copier/ fax machine. If the cartridge is not positioned correctly the device
may not see the cartridge and will not work.
first aid
Make sure there is no paper jam inside the printer/ copier/ fax machine.
SKIN 1. Rinse skin with water.
2. Consult doctor for treatment advice immediately if irritation occurs.
Clean the inside of the printer/ copier/ fax machine.
Make sure the correct paper type and quality match with the printer paper setting.
EYES 1. Remove contact lenses if applicable.
2. Rinse your eyes with water up to 10 minutes.
3. Consult doctor for medical treatment advice immediately, if
irritation occurs.
Check the driver/printer settings, the Toner Saving or Economic mode is off.
Calibrate the printer and cartridge when new cartridge is installed.
SWALLOWED 1. Go to hospital for immediate medical treatment advice.
2
3
Use the following table to find the specific solution best describing your
problem if the initial checking list cannot correct your problem.
problem
possible cause
solution
2. Drum shutter protective tape
not removed.
3. Cartridge damaged.
possible cause
1. Order another cartridge that
is compatible with your printer.
1. Cartridge is not placed in exact
designated position.
1. Take out and push the cartridge
fully into the printer.
2. Remove the shutter protective
tape usually located at the
bottom side of the cartridge.
2. Toner level in the cartridge may
be low.
2. Take out the cartridge and
shake from side to side and
see if it improves.
3. The paper may be moist or rough.
3. Check the printer if it shows
toner low signal in the panel.
Replace with a new cartridge
when low.
3. Please contact our product
support through the web at
www.imation.com anytime.
4. Try using different type of paper.
Error code or light displayed on the printer
Depends on error code or flashing
signal.
Example:
“10.10.00 Supplies Memory Error”
showing on message Panel.
1. Check the printer user manual
if this is a printer problem or
cartridge problem.
2. Please contact our product
support through the web at
www.imation.com anytime.
3. Error of the cartridge chip
or cartridge chip missing.
Replace the cartridge.
Entire Page Light Print
1. Cartridge is not placed in exact
designated position.
1. Take out and push the cartridge
fully into the printer.
2. Toner density setting of the
printer is low.
2. Increase the toner density
setting of the printer according
to the printer user manual
instruction.
3. The paper may be moist or rough.
4. Toner level in the cartridge may
be low.
2. The cartridge may be defective.
1. Print a Configuration Page
from printer panel. If the print
is normal then check the cable
connecting the printer and the
computer.
2. Replace the cartridge.
5. Check the printer if it shows
toner low signal in the panel.
Replace with a new cartridge
when low.
Vertical Line Deletion or Streaks
1. Blockage in the cartridge.
Blank Print
1. Sealing tape not pulled of new
installed cartridge.
2. Multiple sheets fed from paper
tray while printing 1 page.
3. Print data error from computer.
4. The cartridge may be defective.
3. Try using different type of paper.
4. Take out the cartridge and
shake from side to side and
see if it improves.
Full Color Print (Black, Cyan, Magenta, or Yellow)
1. Print data error from computer.
solution
Partial Light Print
Cartridge does not fit into printer
1. Incorrect cartridge used.
problem
1. Print a Configuration Page
from printer panel. If the print
is normal then check the cable
connecting the printer and the
computer.
2. Replace the cartridge.
2. The paper path may be
contaminated with toner.
1. Remove the cartridge, shake
it from side to side and put it
back to run few more pages.
3. The printer fuser unit may be
at the end of its life.
2. Clean inside of the printer and
run several cleaning pages.
4. The printer laser scanner unit
may be defective.
3. Order and replace a new
printer fuser unit.
5. The cartridge may be defective.
4. Ask for a service repair of the
printer.
5. Replace the defective cartridge.
4
5
problem
possible cause
solution
possible cause
solution
Random Spots or Deletion
Horizontal Line or Streaks
Cartridge is not placing in exact
designated position.
problem
1. The paper type using may not
be suitable.
1. Take out and push the cartridge
fully into the printer.
2. The paper may be moist.
1. Replace the paper that meets
the printer manufacturer’s
specification.
3. The cartridge may be defective
or end of its life.
2. Replace the paper with fresh
dry paper.
3. Replace the cartridge.
Tire Tracks
Partially Fused Image
1. The paper path may be
contaminated with toner.
1. Clean inside of the printer and
run several cleaning pages.
2. The printer fuser unit may be
defective.
2. Replace with a new printer
fuser unit.
3. Cartridge exceeded its rated
life cycle.
3. Replace a new cartridge. Avoid
frequent printing with low
page coverage.
4. The printer transfer roller may
be defective.
2. The paper may be moist.
3. The printer may be located
in an extreme temperature or
humidity environment.
4. The fuser may be defective.
4. Ask for a service repair of the
printer.
Specks
1. The paper path may be
contaminated with toner.
1. Clean inside of the printer and
run several cleaning pages.
2. The paper used may not be
suitable.
2. Replace the paper with fresh
dry paper.
3. The cartridge may be leaking.
3. Remove the cartridge and try
to wipe the spilled toner. If it
keeps leaking, replace a new
cartridge.
4. The cartridge may be defective.
1. Heavy or rough paper type used.
1. Change the paper setting in
the printer panel or the driver
in the computer.
2. Replace the paper with fresh
dry paper.
3. Refer to the printer manual for
the suitable working environment
of the printer.
4. Replace with a new printer
fuser unit.
Recurring Marks, Spots, Lines, or Voids
Either cartridge, transfer roller or
the fuser is defective.
1. Print a few more pages to see
if the problem corrects.
2. Try another cartridge and
check if the problem persists.
3. If step 2 cannot resolve, replace
the fuser and transfer roller.
4. Ask for a service repair of the
printer.
4. Replace the defective cartridge.
Color Background
Blur Print
1. The paper type using may not
be suitable.
2. The paper may be moist.
3. Reuse of one side printed paper.
4. The cartridge may be defective.
1. Replace the paper that meets
the printer manufacturer’s
specification.
2. Replace the paper with fresh
dry paper.
3. Use fresh paper for better print
quality.
4. Replace the defective cartridge.
1. Reuse of one side printed paper.
2. The paper type using may not
be suitable.
3. Printer density setting incorrect.
4. The printer may be located
in an extreme temperature or
humidity environment.
5. The cartridge may be defective
or end of its life.
1. Use fresh paper for better print
quality.
2. Replace the paper that meets
the printer manufacturer’s
specification.
3. Adjust the density setting of the
printer.
4. Refer to the printer manual for
the suitable working environment
of the printer.
5. Replace the cartridge.
6
problem
possible cause
solution
Dark Image Repetition
The printer may be located in an
extreme temperature or humidity
environment.
1. Refer to the printer manual for
the suitable working environment of the printer.
limited warranty
2. Adjust the software application
to rotate the whole page 180°
to print the lighter image first.
Imation warrants that our Earthwise™ remanufactured toner
cartridges will be free from defects in both material and
workmanship for a period of 12 months from the date of purchase
when stored and used under normal conditions. If the product
fails during the warranty period, the product will be repaired or
replaced at Imation’s option. This cartridge is warranted not to
damage a printer, copier or fax when stored, installed and used
in accordance with instructions and under normal conditions.
Light Image Repetition
The printer may be located in an
extreme temperature or humidity
environment.
1. Refer to the printer manual for
the suitable working environment of the printer.
2. Adjust the software application
to rotate the whole page 180°
to print the lighter image first.
This warranty is provided only to the original retail purchaser
and is not transferable. Proof of purchase is required to obtain
warranty service. Imation will not be liable for any indirect,
incidental or consequential damages. Some jurisdictions do not
allow the exclusion or limitation of incidental or consequential
damages, so the above limitation or exclusion may not apply
to you. This warranty gives you specific rights – you may have
other rights that vary from country to country.
Page Skew
Paper tray guide not adjusted
correctly.
1. Adjust the paper guide in the
paper tray according to the
suitable paper size.
1. The paper is not loaded correctly in the appropriate tray.
1. Check the paper is loaded correctly in the appropriate tray.
2. The paper may be in poor
condition.
2. Replace the paper.
Wrinkle Print
3. The paper may be moist.
3. Replace the paper with fresh
dry paper.
4. The fuser may be at the end
of its life.
4. Replace with a new printer
fuser unit.
Imation, the Imation logo, Earthwise and the Earthwise logo are trademarks of Imation Corp. All other
brand names and trademarks are the properties of their respective owners and are referred to here
for descriptive purposes only. Neither Imation nor the reseller is associated with any printer, copier or
fax manufacturer.
Imation Enterprises Corp.
1 Imation Way | Oakdale MN 55128-3414
www.imation.com | www.imation.ca
For technical support contact Imation at www.imation.com/support
© Imation Corp. 2008
66950586-A
8
9