1
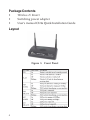
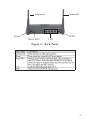
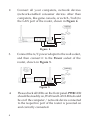
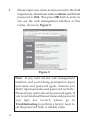
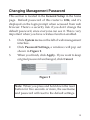
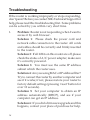
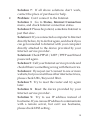
Wireless-N Router
Quick Installation Guide
Introducing the Wireless-N Router
The Wireless-N Router is designed to support sharing
internet access wirelessly with range up to four times
farther than standard Wireless-G.
Features and Benefits
•
•
•
•
•
High Internet Access throughput
Allow multiple users to share a single Internet line
Share a single Cable or xDSL internet connection
Access private LAN servers from the internet
Four wired LAN ports (10/100M) and one WAN
port (10/100M)
System Requirements
•
•
•
•
04-0538B
Internet connection, provided by xDSL or cable
modem wih RJ-45 Ethernet port
Computer or network devices with wired or
wireless network interface card
Web browser (Microsoft Internet Explorer 4.0 or
above, Netscape Navigator 4.7 or above, Opera or
Safari)
Windows® 2000 / XP (32-/64-bit) / Server 2003 &
2008 (32-/64-bit) / Vista (32-/64-bit)
1
Package Contents
•
•
•
Wireless-N Router
Switching power adapter
User's manual CD & Quick Installation Guide
Layout
Figure 1: Front Panel
2
Antenna A
Antenna B
Power
Reset/WPS
LAN
WAN
Figure 2: Back Panel
3
Safety Information
In order to keep the safety of users and your properties,
please follow the following safety instructions.
1.
2.
3.
4.
5.
6.
4
This router is designed for indoor use only. DO
NOT place this router outdoors.
DO NOT put this router at or near hot or humid
places, like kitchen or bathroom. Also, do not leave
this router in the car during summer.
DO NOT pull any connected cable with force;
disconnect cables from the router first.
If you want to place this router at high places or
hang on the wall, please make sure the router is
firmly secured. Falling from high places would
damage the router and its accessories, and warranty
will be voided.
Accessories of this router, like antenna and power
supply, are a danger to small children and could
cause serious injury to them. KEEP THIS ROUTER
OUT THE REACH OF CHILDREN!
The router will become hot when being used for
long time. This is normal and is not a malfunction.
DO NOT put this router on paper, cloth, or other
flammable materials.
7.
8.
9.
There are no user-serviceable parts inside the router.
If you find that the router is not working properly,
please contact your place of purchase for help. DO
NOT disassemble the router, doing so will void the
warranty.
If the router falls into water when it’s powered, DO
NOT use your hand to pick it up. Switch the electrical
power off before you do anything, or contact an
experienced technician for help.
If you smell something strange, or even see some
smoke coming out from the router or power supply,
remove the power supply or switch the electrical
power off immediately, and call dealer of purchase
for help.
System and Network Setup
Please follow the instructions below to build the network
connection between your new wireless router and your
computers, network devices.
1.
Connect your xDSL/cable modem to the WAN
port of router by Ethernet cable, shown in Figure
3.
Figure 3
5
2.
Connect all your computers, network devices
(network-enabled consumer devices other than
computers, like game console, or switch / hub) to
the LAN port of the router, shown in Figure 4.
3.
Connect the A/C power adapter to the wall socket,
and then connect it to the Power socket of the
router, shown in Figure 5.
Figure 4
Figure 5
4.
6
Please check all LEDs on the front panel. PWR LED
should be steadily on, WAN and LAN LEDs should
be on if the computer / network device connected
to the respective port of the router is powered on
and correctly connected.
If PWD LED is not on, or any LED you expected is
not on, please recheck the cabling.
Connecting to Wireless Broadband Router
by Web Browser
After the network connection is built, the next step you
should do is setup the router with proper network
parameters, so it can work properly in your network
environment.
Before you can connect to the router and start configuration
procedures, your computer must be able to get an IP
address automatically (use dynamic IP address). If it’s set
to use static IP address, or you’re unsure, please follow the
following instructions to configure your computer to use
dynamic IP address.
Windows 2000
1.
2.
3.
4.
Click Start, then click Control Panel.
Double click Network and Dial-up Connections,
Local Area Connection, Local Area Connection,
then click Properties.
Select Internet Protocol (TCP/IP), then click
Properties.
Select Obtain an IP address automatically , Obtain
DNS server address automatically, then click OK.
7
Windows XP/Server 2003
1.
2.
3.
4.
Click Start, then click Control Panel.
Double click Network Connections, double click
Local Area Connection, then click Properties.
Select Internet Protocol (TCP/IP) and then click
Properties.
Select Obtain an IP address automatically , Obtain
DNS server address automatically, then click OK.
Windows Vista™
1.
2.
3.
4.
5.
Click Start,then click Control Panel.
Click View Network Status and Tasks, and then
click Manage Network Connections.
Right-click Local Area Network, then select
Properties. Right click Local Area Network, then
click Properties.
Select Internet Protocol Version 4 (TCP / IPv4), and
then click Properties.
Select Obtain an IP address automatically and
Obtain DNS server address automatically, then
click OK.
Windows Server 2008
1.
2.
8
Click Start,then click Control Panel.
Click Classic View, double click Network and
Sharing Center.
3.
4.
5.
6.
7
8.
Click Manage network connections.
Right click Local Area Connection, click Properties.
Select Internet Protocol Version 4 (TCP / IPv4),
and then click Properties.
Select Obtain an IP address automatically and
Obtain DNS server address automatically, then
click OK.
Select Internet Protocol Version 6 (TCP / IPv6),
and then click Properties.
Select Obtain an IP address automatically and
Obtain DNS server address automatically, then
click OK.
9
Router IP Address Lookup
1.
2.
After the IP address setup is complete, please click
Start then Run, type in cmd, then click OK.
At the command prompt, type ipconfig, then press
Enter. Please check the IP address followed by
Default Gateway (In this example, the IP address
of router is 192.168.2.1, please note that this value
may be different), shown in Figure 6.
Figure 6
Note: If the IP address of Gateway is not
displayed, or the address followed by IP
Address begins with 169, please recheck
network connection between your computer
and router, and / or go to the beginning of this
chapter, to recheck every step of network
setup procedure.
10
3.
Connect the router’s management interface by
web browser. After your computer obtained an
IP address from router, please start your web
browser, and input the IP address of router in
address bar, shown in Figure 7.
Figure 7
11
4.
Please input user name and password in the field
respectively, default user name is admin, and default
password is 1234, then press OK button, and you
can see the web management interface of this
router, shown in Figure 8.
Figure 8
Note: If you can’t see the web management
interface, and you’re being prompted to input
user name and password again, it means you
didn’t input username and password correctly.
Please retype user name and password again. If
you’re certain about the user name and password
you type are correct, please go to
Troubleshooting to perform a factory reset, to
set the password back to default value.
12
Changing Management Password
This section is located in the General Setup in the home
page. Default password of this router is 1234, and it’s
displayed on the login prompt when accessed from web
browser. There’s a security risk if you don’t change the
default password, since everyone can see it. This is very
important when you have wireless function enabled.
1.
2.
3.
Click System menu on the left of web management
interface.
Click Password Settings, a windows will pop out
shown in Figure 9.
When you finish, click Apply. If you want to keep
original password unchanged, click Cancel.
Figure 9
Note: When you press and hold down the reset
button for five seconds or more, the username
and password will reset to the default settings.
13
Troubleshooting
If the router is working improperly or stops responding,
don’t panic! Before you contact SIIG Technical Support for
help, please read this troubleshooting first. Some problems
can be solved by you within very short time.
1.
14
Problem: Router is not responding when I want to
access it by web browser.
Solution 1: Please check the power cord and
network cable connection to the router. All cords
and cables should be correctly and firmly inserted
to the router.
Solution 2: If all LEDs on this router are off, please
check the status of A/C power adapter, make sure
it’s correctly powered.
Solution 3: You must use the same IP address
subnet which the router uses.
Solution 4: Are you using MAC or IP address filter?
Try to connect the router by another computer and
see if it works; if not, please restore your router to
factory default settings (pressing ‘reset’ button for
over 10 seconds).
Solution 5: Set your computer to obtain an IP
address automatically (DHCP), and see if your
computer can get an IP address.
Solution 6: If you did a firmware upgrade and this
happens, contact your place of purchase for help.
2.
Solution 7: If all above solutions don’t work,
contact the place of purchase for help.
Problem: Can’t connect to the Internet.
Solution 1: Go to Status, Internet Connection
menu, and check Internet connection status.
Solution 2: Please be patient, sometime Internet is
just that slow.
Solution 3: If you connected a computer to Internet
directly before, try to do that again, and check if you
can get connected to Internet with your computer
directly attached to the device provided by your
Internet service provider.
Solution 4: Check PPPoE / L2TP / PPTP user ID and
password again.
Solution 5: Call your Internet service provide and
check if there’s something wrong with their service.
Solution 6: If you just can’t connect to one or more
website, but you can still use other internet services,
please check URL/Keyword filter.
Solution 7: Try to reset the router and try again
later.
Solution 8: Reset the device provided by your
Internet service provider.
Solution 9: Try to use IP address instead of
hostname. If you can use IP address to communicate
with a remote server, but can’t use hostname,
please check DNS setting.
15
3.
4.
5.
16
Problem: My wireless client cant' locate the router.
Solution 1: Broadcast ESSID set to off.
Solution 2: Check that antennas are properly
secured.
Solution 3: Are you too far from your router? Try
to get closer.
Solution 4: Please remember that you have to
input ESSID on your wireless client manually, if
ESSID broadcast is disabled.
Problem: File download is very slow or breaks
frequently.
Solution 1: Are you using QoS function? Try to
disable it and try again.
Solution 2: Internet is slow sometimes, be patient.
Solution 3: Try to reset the router and see if it’s
better after that.
Solution 4: Find out what other computers are
doing on your local network. If someone’s
transferring big files, other people will think
internet is really slow.
Solution 5: If this never happened before, call your
Internet service provider to find out if there is
something wrong with their network.
Problem: I can’t log onto web management
interface.
Solution: Make sure you’re connecting to the
correct IP address of the router.
6.
7.
8.
Problem: The password is wrong.
Solution 1: Password is case-sensitive. Make sure
the Caps Lock light is not on.
Solution 2: If you forgot the password, do a hard
reset.
Problem: The router becomes hot.
Solution 1: This is not a malfunction, if you can
keep your hand on the router’s case.
Solution 2: If you smell something wrong or see
the smoke coming out from router or A/C power
adapter, please disconnect the router and A/C
power adapter from utility power (make sure it’s
safe before you’re doing this!), and call your dealer
of purchase for help.
Problem: The date and time of all event logs are
wrong
Solution: Adjust the internal clock of router.
17
Blank Page
18
Technical Support and Warranty
QUESTIONS? SIIG’s Online Support has answers! Simply visit our web
site at www.siig.com and click Support. Our online support database is
updated daily with new drivers and solutions. Answers to your questions
could be just a few clicks away. You can also submit questions online and
a technical support analysts will promptly respond.
SIIG offers a 5-year manufacturer warranty with this product. Please see
our web site for more warranty details. If you encounter any problems with
this product, please follow the procedures below.
If it is within the store's return policy period, please return the product to the
store where you purchased from. If your purchase has passed the store's
return policy period, please follow these steps to have the product repaired
or replaced.
Step 1: Submit your RMA request.
Go to www.siig.com, click Support, then RMA to submit a
request to SIIG RMA. If the product is determined to be
defective, an RMA number will be issued.
Step 2: After obtaining an RMA number, ship the product.
• Properly pack the product for shipping. All accessories that came
with the original package must be included.
• Clearly write your RMA number on the top of the returned package.
SIIG will refuse to accept any shipping package, and will not be
responsible for a product returned without an RMA number posted
on the outside of the shipping carton.
• You are responsible for the cost of shipping. Ship the product to the
following address:
SIIG, Inc.
6078 Stewart Avenue
Fremont, CA 94538-3152, USA
RMA #:
•
SIIG will ship the repaired or replaced product via Ground
in the U.S. and International Economy outside of the U.S. at
no cost to the customer.
19
About SIIG, Inc.
Founded in 1985, SIIG, Inc. is a leading computer upgrade manufacturer of I/O
connectivity products, including PCI & ISA serial and parallel ports, USB, Serial
ATA & UltraATA controllers, FireWire (1394a/b), networking, sound cards,
and other accessories. SIIG is the premier one-stop source of upgrades.
SIIG products offer comprehensive user manuals, many user-friendly features,
and are backed by an extensive manufacturer warranty. High-quality control
standards are evident by the overall ease of installation and compatibility of
our products, as well as one of the lowest defective return rates in the industry.
SIIG products can be found in computer retail stores, mail order catalogs,
through major distributors, system integrators, and VARs in the Americas and
the UK, and through e-commerce sites.
PRODUCT NAME
Wireless-N Router
FCC RULES: TESTED TO COMPLY WITH FCC PART 15, CLASS B
OPERATING ENVIRONMENT: FOR HOME OR OFFICE USE
FCC COMPLIANCE STATEMENT:
This device complies with part 15 of the FCC Rules. Operation is subject
to the following two conditions: (1) This device may not cause harmful
interference, and (2) this device must accept any interference received,
including interference that may cause undesired operation.
THE PARTY RESPONSIBLE FOR PRODUCT COMPLIANCE
SIIG, Inc.
6078 Stewart Avenue
Fremont, CA 94538-3152, USA
Ph: 510-657-3308
Wireless-N Router is a trademark of SIIG, Inc. SIIG and the SIIG logo are registered
trademarks of SIIG, Inc. Microsoft, Windows and Windows Vista are either registered
trademarks or trademarks of Microsoft Corporation in the United States and/or other
contries. Other names used in this publication are for identification only and may be
trademarks of their respective companies.
April, 2009
Copyright © 2009 by SIIG, Inc. All rights reserved.