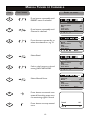
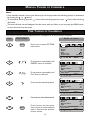
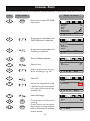
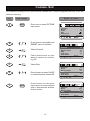
1
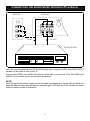
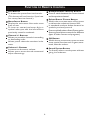
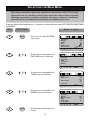
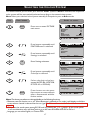
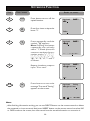
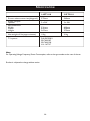
Colour television
14PT2110
21PT2110
Operating Instructions
TABLE OF CONTENTS
Introduction
Safety Information/Useful Tips ........................................................................... 3
Before Calling Service ...................................................................................... 4
Basic Installation/Function
Hooking Up Your TV (Basic Connection) ............................................................. 5
Use/Care of Remote Control .............................................................................. 5
Connecting the Audio/Video Sockets (Playback) ................................................ 6
Functions of Remote Control ............................................................................. 7
Functions of TV Controls ................................................................................... 9
TV Installation
Selecting the Main Menu ................................................................................... 10
Automatic Tuning of Channels ........................................................................... 11
Manual Tuning of Channels ................................................................................ 11
Fine Tuning of Channels .................................................................................... 13
Channel Swap ................................................................................................. 14
Channel Skip .................................................................................................... 15
Favorite Channel Setting ................................................................................... 16
Selecting the Colour System ............................................................................. 17
Adjusting the TV Picture ................................................................................... 18
Smart Picture Control ......................................................................................... 19
Timer Function .................................................................................................. 20
Game Function ................................................................................................. 22
Calendar Function ............................................................................................. 24
Notebook Function ............................................................................................ 25
General
Specification .................................................................................................... 28
Recycling Directive _ To minimise harm to the environment, the batteries
supplied with the TV set do not contain mercury or nickel cadmium. If possible,
when disposing of batteries, use recycling means available to you. Your TV set uses
materials which are reusable or which can be recycled. To minimise the amount of
waste in the environment, specialist companies recover used sets for dismantling and
collection of reusable materials (contact your dealer).
2
SAFETY INFORMATION
AND
USEFUL TIPS
Safety Information
•
_
_
_
Disconnect mains plug when:
the red light below the TV screen is flashing continuously.
a bright white line is displayed across the screen.
cleaning the TV screen. Never use abrasive cleaning agents. Use a slight damp
chamois leather or soft cloth.
_ there is a lightning storm.
_ the set is left unattended for a prolonged period of time.
• No naked flame sources, such as lighted candles, should be placed on top of the TV or
in the vicinity.
• Do not place your TV set under direct sunlight or heat.
• Leave at least 5 cm around each side of TV set to allow for proper ventilation.
• Avoid placing your set (e.g. near the window) where it is likely to be exposed to rain or
water.
• No objects filled with liquids should be placed on top the TV so as to avoid dripping or
splashing of liquids on the set.
Useful Tips
• Do not leave your set on standby mode for a prolonged period of time. Switch off set to
allow it to be demagnetised. A demagnetised set supports good picture quality.
• Do not shift or move the set around when it is switched on. Unevenness in colour in
some parts of the screen may occur.
• Never attempt to repair a defective TV yourself. Always consult a skilled service
personnel.
3
BEFORE CALLING SERVICE
Below is a list of frequently occurred symptoms. Before you call for service, make these
simple checks. Some of these symptoms can easily be rectified if you know what to do.
Symptom
What you should do
Colour patch
(unevenness)
• Switch off the TV by the mains power button. Wait for 20
minutes before switching on again.
• Check the TV is not placed too near speakers or magnetic objects.
No power
• Check the TV’s AC power cord is plugged into the mains
socket. If there is still no power, disconnect plug. Wait
for 60 seconds and re-insert plug. Switch on TV again.
No picture
• Check the antenna connection at the rear of the TV.
• Possible TV station problem. Try another channel.
Good picture
but no sound
• Try increasing the volume.
• Check that the sound is not muted. If it is muted, press
the Mute button on the remote control to restore sound.
Good sound but poor
colour or no picture
• Try increasing the contrast colour and brightness setting.
Snowish picture and
noise
• Check antenna connection at the rear of the TV.
Horizontal dotted lines
• Possible electrical interference e.g. hairdryer, vacuum
cleaner, etc. Switch off appliances.
Double images or
“Ghost” images
• Possible poor positioning of antenna. Using a highly
directional antenna may improve reception.
TV not responding to
remote control handset
• Check life span of batteries of remote control handset.
• Aim remote control handset directly at remote control
sensor lens on the TV.
4
HOOKING UP YOUR TV (BASIC CONNECTION)
Antenna Connection
• Connect the aerial plug to the antenna socket
on the backcover.
T
• Insert the mains plug into the wall socket.
Mains Connection
• For correct mains voltage, refer to type sticker at the
rear of the TV set.
• Consult your dealer if mains supply is different.
Note : This diagram is not representative of the
actual plug and socket.
Switch on the set
• Press the main power button to switch on/off the TV.
• If the set is on standby (indicator is red), press the
Power button on the remote control to switch on
set.
USE/CARE OF REMOTE CONTROL
• Insert the correct type of batteries into the
compartment.
• Ensure the batteries are placed in the right direction.
5
˵Ã÷Êé(ºÏ¶©±¾)-1.p65
5
02-7-31, 14:18
CONNECTING THE AUDIO/VIDEO SOCKETS (PLAYBACK)
SIDE AV
REAR AV
75 OHM
ANTENNA
INPUT
AUDIO
R
R
VIDEO
L
AUDIO
IN1
VIDEO
L
OUT
IN2
AV IN
AV OUT
VCR/VCD/DVD
You can view the playback of VCR/VCD/DVD tapes by using the AUDIO and VIDEO INPUT
sockets on the side or rear of the TV.
Connect the VIDEO and AUDIO IN sockets on the side or rear of the TV to the VIDEO and
AUDIO OUT sockets on the audio/video equipment.
NOTE:
Rear AV input and side AV input can not be used simultaneously. As the Side AV does not
have the Auto priority, users will have to manually go to AV2 with the TV/AV button to receive
video & audio content of videocam.
6
FUNCTION OF REMOTE CONTROL
2
Digit (0-9) Buttons
Press 0-9 buttons to select a channel.
To select 0-9 digits, A-Z(or a-z) letters,
common marks and punctuation marks
when write data or information to be
stored in notebook.
9
3
10
11
12
Notes Button
To activate the notebook function.
4
Caps/Expand Button
To select the input form before data or
information writing between capital and
small letter.
To expand the screen display ratio to 4:3.
5
Sleep Button
Allows you to select a time period after
which the set will switch to standby mode
automatically.This television can be programmed up to 120 minutes (5 minutes
intervals).
6
TV/AV Button
To switch between TV channel and AV input
sources.
7
Mute Button
Mute sound.To restore sound, press button
again.
8
Color System Button
To select color system without going into
submenu.
9
Display Button
Press to display the current channel No.
and function status.
Press the button once again to display the
current time on the screen.
10
Calendar Button
To enter or exit the perpetual calendar
directly.
11
Game Button
To enter or exit the game directly.
5
STANDBY
TV/AV
SLEEP
MUTE
6
7
1
COLOR SYS.
1
+-?
2
3
4
2
3
ABC
DEF
4
5
6
GHI
JKL
MNO
7
8
9
PQR
8
DISPLAY
CALENDAR
STU
VWX
NOTES
0
GAME
EXPAND
YZ
SURF
INS.
CAPS
MENU
13
C+
14
15
V-
15
OK
SMART
PICTURE
A/CH
16
18
C-
SND. SYS.
V+
DEL.
17
14
19
Introduction of key function:
This TV features with a full-function remote
control handset. For a more compact remote
unit design, some of the keys are multiple
with more than one function. The following
text describes the function of keys on remote
control unit. Function related to notebook
operated are marked with a symbol .
1
Standby button
Switch the set off temporarily to standby
mode. (The red light indicator lights up
when the set is on standby mode).
To switch on set from standby mode, press
Channel +/- or TV/AV on the set, or Standby
button on the remote control.
7
FUNCTION OF REMOTE CONTROL
12
Surf Button
To browse the preset favorite channels.
(This button will not function if you have
not set any favorite channel.)
13
Menu/Insert Button
Display the main menu. Also exits menu
from screen.
To insert or overwrite a letter, digit or
symbol when you edit the information
previously stored in notebook.
14
Channel +/- Buttons
Allows you to select channels in ascending
or descending order.
Allows you to select the next item in the
menu.
15
Volume +/- Buttons
Increases or decreases volume.
Allows you to access the sub-menus and
adjust the settings.
8
16
A/CH(alternate channel) Button
Press to switch between the current channel
and the previous channel.
17
Delete/Smart Picture Button
Within the on-screen menu of Sort, press
to delete the undesired channel No..
In notebook mode, to delete the word or
symbols previously stored.
Press to cyclically select a Smart Picture option
(factory-preset picture controls for different
types of video sources and programs.)
18
OK Button
Within the on-screen menu, press to enter
some special function such as game, notebook, calendar and etc.
19
Sound System Button
To directly select sound system without
going into submenu.
FUNCTION OF TV CONTROLS
14PT2110
6
7
5
4
21PT2110
3
2
7
1
6
5
4
3
2
1
1
Main Power button
Switch mains power on or off
2
Remote Sensor
Acts as a sensor for activating the controls of the TV
when remote control handset is aimed at it.
3
Standby light indicator
Indicate red light when standby mode is activated.
4
Channel down/up button
Select channel in descending/ascending order.
Turn on the TV when it is in standby mode.
Select the next item on the menu.
5
Volume down/up button
Adjust sound volume softer/louder.
Access sub-menu and adjusting the settings.
6
Menu button
7
TV/AV button
Enter the main menu.
Press and hold this button for 3 seconds, it will
perform AUTO STORE function.
Switch between TV channel and AV input sources.
Turn on the TV when it is in standby mode.
9
SELECTING THE MAIN MENU
Operating instructions generally explains the operation of the TV set using
the buttons on the remote control unless otherwise stated. Please read the
following instructions carefully and follow the steps as shown to familiarise
yourself with the installations and all features available in your set.
Press the Menu button and Volume +/- buttons to select the main menu PICTURE, FEATURE,TIMER
and PRESET.
Step
1
Press button
MENU
Result on screen
Press once to enter PICTURE
main menu.
Contrast
Bright.
Color
Hue
Sharpness
Color Temp
90
65
50
00
50
Normal
MENU
2
V-
V+
Press button repeatedly until
FEATURE menu is selected.
Settings
CH Swap
Sort
Calendar
Game
MENU
3
V-
V+
Press button repeatedly until
TIMER menu is selected.
0:13
Off
0:00
Off
0:00
Time
Stop Time
Start Time
Channel
0
MENU
4
V-
V+
Press button repeatedly until
PRESET menu is selected.
30
UHF
Up
Off
Up
Channel
Band
Manual Store
Skip
Fine Tune
Auto Store
MENU
5
MENU
Press button to exit menu from
screen.
10
AUTOMATIC TUNING OF CHANNELS
Automatic tuning of channels allows you to store each programme automatically.
Step
1
Press button
Result on screen
Press once to enter PICTURE
main menu.
MENU
90
65
50
00
50
Contrast
Bright.
Color
Hue
Sharpness
Color Temp
Normal
MENU
2
3
4
5
V-
Press button repeatedly until
PRESET menu is selected.
V+
Press button repeatedly until
Auto Store is selected.
C-
C+
OK
Start automatic tuning of
channels.
V-
Press button to stop tuning.
Note: when the tuning is
completed, the menu will quit
automatically.
30
UHF
Up
Off
Up
Channel
Band
Manual Store
Skip
Fine Tune
Auto Store
OK
MENU
AUTO
VHFL
Stop
1
MANUAL TUNING OF CHANNELS
Manual tuning allows you to select your preferred channel number for every available programme.
Step
1
Press button
MENU
Result on screen
Press once to enter PICTURE
main menu.
Contrast
Bright.
Color
Hue
Sharpness
Color Temp
90
65
50
00
50
Normal
MENU
11
MANUAL TUNING OF CHANNELS
Step
2
3
4
Press button
V-
V+
C-
C+
V-
V+
Result on screen
Press button repeatedly until
PRESET menu is selected.
Press button repeatedly until
Channel is selected.
Press button repeatedly to
select the channel no., e.g. 31.
30
UHF
Up
Off
Up
Channel
Band
Manual Store
Skip
Fine Tune
Auto Store
MENU
31
UHF
Up
Off
Up
Channel
Band
Manual Store
Skip
Fine Tune
Auto Store
MENU
5
6
7
C-
C+
V-
V+
C-
C+
Select Band.
Select the frequency band
among VHFL/VHFH/UHF.
Select Manual Store.
31
UHF
Up
Off
Up
Channel
Band
Manual Store
Skip
Fine Tune
Auto Store
MENU
31
UHF
Up
Off
Up
Channel
Band
Manual Store
Skip
Fine Tune
Auto Store
MENU
8
9
V+
V-
Press button to manual tune
upward. Searching stops once
a transmitting signal is found.
Press button to stop manual
tune.
12
Search
Stop
UHF
31
MANUAL TUNING OF CHANNELS
Notes:
If the searched channel is not as your desired, you can simply restart the searching upward or downward
by pressing the
or
button.
To stop manual searching, press the
button when searching upward, or press
button when searching
downward.
The menu will time out and disappear from the screen when you finish, or you can press the MENU button
to clear the menu from the screen.
V+
V-
V+
V-
FINE TUNING OF CHANNELS
This feature allows you to adjust picture reception in areas of weak reception.
Step
1
Press button
MENU
Result on screen
Press once to enter PICTURE
main menu.
Contrast
Bright.
Color
Hue
Sharpness
Color Temp
90
65
50
00
50
Normal
MENU
2
3
4
V-
V+
C-
C+
V+
Press button repeatedly until
PRESET menu is selected.
Press button repeatedly until
Fine Tune is selected.
Fine tune the channel upward.
30
UHF
Up
Off
Up
Channel
Band
Manual Store
Skip
Fine Tune
Auto Store
MENU
30
UHF
Up
Off
Up
Channel
Band
Manual Store
Skip
Fine Tune
Auto Store
MENU
5
6
V-
MENU
Fine tune the channel downward.
Press button to exit menu
from screen or menu will quit
after a few seconds without
further action.
13
30
UHF
Up
Off
Down
Channel
Band
Manual Store
Skip
Fine Tune
Auto Store
MENU
CHANNEL SWAP
This feature allows you to rearrange the channel numbers in which the channels are stored.
Step
1
Press button
MENU
Result on screen
Press once to enter PICTURE
main menu.
Contrast
Bright.
Color
Hue
Sharpness
Color Temp
90
65
50
00
50
Normal
MENU
2
3
V-
6
7
8
9
C-
C+
4
5
V+
V-
C-
V+
C-
C+
V-
V+
C-
C+
Press button repeatedly until
CH Swap is selected.
Settings
CH Swap
Sort
Calendar
Game
OK
MENU
Enter CH Swap submenu.
OK
C+
Press button repeatedly until
FEATURE menu is selected.
10
OK
11
MENU
From
To
Exchange
Select From.
Select the channel no. you
want to change, e.g. 30.
30
40
On
MENU
Select To.
Select the channel no. to be
replaced, e.g. 40, that means
to replace channel 40 by
channel 30.
From
To
Exchange
30
40
Off
MENU
Select Exchange.
Press button to finish the
setting.
Press button to exit menu
from screen or menu will quit
after a few seconds without
further action.
14
From
To
Exchange
MENU
30
40
On
CHANNEL SKIP
This feature allows you to remove fault channels or restore skipped channels from the
channel memory.
Step
1
Press button
MENU
Result on screen
Press once to enter PICTURE
main menu.
Contrast
Bright.
Color
Hue
Sharpness
Color Temp
90
65
50
00
50
Normal
MENU
2
3
4
5
6
V-
C+
V-
C+
V-
V+
C-
V+
C-
V+
Press button repeatedly until
PRESET menu is selected.
Select Channel.
Select the channel no. you
want to remove or restore,
e.g. 30.
30
UHF
Up
Off
Up
Channel
Band
Manual Store
Skip
Fine Tune
Auto Store
MENU
Select Skip.
Press button to select On/Off
to remove/restore channel 30.
30
UHF
Up
On
Up
Channel
Band
Manual Store
Skip
Fine Tune
Auto Store
MENU
7
MENU
Press button to exit menu
from screen or menu will quit
after a few seconds without
further action.
30
UHF
Up
Off
Up
Channel
Band
Manual Store
Skip
Fine Tune
Auto Store
MENU
15
FAVORITE CHANNEL SETTING
This feature allows you to store six favorite channels in memory and preview these channels
by pressing SURF button.
Step
1
Press button
MENU
Result on screen
Press once to enter PICTURE
main menu.
Contrast
Bright.
Color
Hue
Sharpness
Color Temp
90
65
50
00
50
Normal
MENU
2
3
V-
C-
C+
4
5
V+
Press button repeatedly until
Sort is selected.
Settings
CH Swap
Sort
Calendar
Game
OK
MENU
Enter Sort submenu.
OK
C+
Press button repeatedly until
FEATURE menu is selected.
C-
FAV.CH1
FAV.CH2
FAV.CH3
FAV.CH4
FAV.CH5
FAV.CH6
Select FAV.CH1.
01
02
03
-------
DEL. MENU
6
V-
V+
7
8
Select the channel no. you
want to store into this position,
e.g. 08.
Repeat step 5 and 6 to set
other favorite channels.
MENU
FAV.CH1
FAV.CH2
FAV.CH3
FAV.CH4
FAV.CH5
FAV.CH6
08
02
03
-------
DEL. MENU
Press button to exit menu
from screen or menu will quit
after a few seconds without
further action.
Notes:
You can delete the undesired channel no. by pressing the DELETE button when this channel
is highlighted.
16
SELECTING THE COLOUR SYSTEM
This feature allows you to select your desired Color system. If Auto is selected, the respective
color system will be automatically selected according to the transmission system.
Note: Select your desired color system manually if reception is poor at Auto mode.
Step
1
Press button
MENU
Result on screen
Press once to enter PICTURE
main menu.
Contrast
Bright.
Color
Hue
Sharpness
Color Temp
90
65
50
00
50
Normal
MENU
2
3
V-
V+
C-
C+
4
Press button repeatedly until
FEATURE menu is selected.
Settings
CH Swap
Sort
Calendar
Game
Press button repeatedly until
Settings is selected.
OK
Enter Settings submenu.
OK
Bluemute
ColorSys
Snd Sys
Language
5
6
C+
V-
MENU
C-
V+
Press button repeatedly until
ColorSys is selected.
On
AUTO
BG
English
MENU
Select the desired colour
system (AUTO, PAL, NTSC3.58,
NTSC4.43 or SECAM).
Bluemute
ColorSys
Snd Sys
Language
On
PAL
BG
English
Press button to exit menu
from screen or menu will quit
MENU
after a few seconds without
further action.
Notes:The above procedures are also applicable to the following functions:
Bluemute: sets this function on or off. When Bluemute is selected to On mode, it will display a solid blue
screen when a channel is selected that has no signal. The TV set will turn itself off after 10 minutes without
signal.
Snd Sys: sets the sound system among BG, DK and I by pressing the or button. As the sound system
is not auto-detection, users will then have to go to the menu and switch from BG to DK or I.
Language: you can select English, or Chinese OSD.
7
MENU
V-
17
V+
ADJUSTING THE TV PICTURE
This picture menu allows you to make adjustments to the picture.
Step
Press button
1
MENU
Result on screen
Press once to enter PICTURE
main menu.
Contrast
Bright.
Color
Hue
Sharpness
Color Temp
90
65
50
00
50
Normal
MENU
2
C+
C-
Select item.
Contrast
Bright.
Color
Hue
Sharpness
Color Temp
90
65
50
00
50
Normal
MENU
3
V-
V+
Adjust level or select desired
setting.
Bright.
4
MENU
65
Press button to exit menu
from screen or menu will quit
after a few seconds without
further action.
Picture menu items
Activities
Contrast
Increase or decrease contrast level.
Bright.
Increase or decrease brightness level.
Color
Increase or decrease color level.
Hue (for NTSC only, this item
is not selectable for other signal)
Increase or decrease color tone of NTSC picture.
Sharpness
Increase or decrease sharpness level to improve detail
in picture.
Color Temp
Set Color Temperature among Cool, Warm and Normal.
18
SMART PICTURE CONTROL
Whether you are watching a movie or video game, your TV has video control settings
matched to your current program source or content. The Smart Picture feature quickly
resets your TV's video controls of program for a number of different types of
programs and viewing conditions you may have in your home. DVD, Rich, Natural and Soft
are preset at the factory to automatically adjust the TV's Contrast, Brightness, Color and
S h a r p n e s s l ev e l s , w h i l e Pe r s o n a l m o d e c a n b e s e t b y u s e r a c c o rd i n g t o y o u r p e r s o n a l
preference.
Step
1
Press button
SMART
PICTURE
DEL.
Result on screen
Press button repeatedly to
cycle through the 5 settings
n a m e l y , P e r s o n a l , D V D,
Rich, Natural and Soft
and select your desired
picture setting.
Personal
DVD
Definition of Smart Picture settings
Personal
: Picture settings are set to your preference.
DVD
: It is suggested that you select this mode
when inputting external video signals.
Rich
: Emphasize very vibrant colors. This
setting is the optimal setting when
you are viewing TV programmes in a
brightly-lit room.
Natural
: Emphasize original colors.
Soft
: Emphasize warm colors.
(Suitable for dimly-lit room condition
and gives cinema-like effect when light
is switched off).
19
Rich
Natural
Soft
TIMER FUNCTION
Timer function is provided by the microcomputer of TV set. Once it is set, the Start/Stop time
and time displaying functions can start functioning. The TV set will keep the correct time as long
as the main power is on, even if the TV has been turned off into standby mode.
Step
1
Press button
MENU
Result on screen
Press once to enter PICTURE
main menu.
Contrast
Bright.
Color
Hue
Sharpness
Color Temp
90
65
50
00
50
Normal
MENU
2
V-
V+
Press button repeatedly until
TIMER menu is selected.
0:13
Off
0:00
Off
0:00
Time
Stop Time
Start Time
Channel
0
MENU
3
C-
C+
Select Time.
12:15
Off
0:00
Off
0:00
Time
Stop Time
Start Time
4
5
V-
V+
C-
C+
Set the current time, e.g. 12:15.
Select Stop Time.
Channel
0
MENU
12:15
Once
0:00
Off
0:00
Time
Stop Time
Start Time
6
V-
7
8
V+
C-
V-
V+
Select among Off, Once,
Daily.
Channel
If you have selected Once
or Daily in step 6, press the
button to select 0:00.
Time
Stop Time
Set the Stop Time, e.g. 22:00.
0
MENU
12:15
Once
22:00
Off
0:00
Start Time
Channel
0
MENU
20
TIMER FUNCTION
Step
9
Press button
C-
C+
Result on screen
Select Start Time.
12:15
Once
22:00
Once
0:00
Time
Stop Time
Start Time
10
V-
11
V+
C-
Select among Off, Once,
Daily.
Channel
If you have selected Once
or Daily in step 10, press the
button to select 0:00.
Time
Stop Time
0
MENU
12:15
Once
22:00
Once
22:59
Start Time
12
V-
V+
Set the Start Time, e.g. 22:59.
Channel
0
MENU
13
C-
Select Channel.
12:15
Once
22:00
Once
22:59
Time
Stop Time
Start Time
14
15
V-
V+
MENU
Select your desired channel no.,
e.g. 11.
Channel
11
MENU
Press button to exit menu
from screen or menu will quit
after a few seconds without
further action.
Notes:
Off: The Start/Stop Timer is set to off and will not operate.
Once: The Start/Stop Timer is set to turn on/off the TV at that time only one time.
Daily: The Start/Stop Timer is set to turn on/off the TV at that time everyday until otherwise adjusted.
Channel: This is the channel the TV will display at Start Time.
Stop time should be set later than the time set in Time item.
21
GAME FUNCTION
This TV is built-in a game for enjoying in your leisure time.
How to enter the Game:
Short-cut operation:
Step
1
Press button
GAME
Result on screen
Press button to enter the
Game.
GAME
LEVEL
1/20
SELECT
1
: SELECT
OK:START
Menu operation:
Step
1
Press button
MENU
Result on screen
Press once to enter PICTURE
main menu.
Contrast
Bright.
Color
Hue
Sharpness
Color Temp
90
65
50
00
50
Normal
MENU
2
3
4
V-
V+
C-
C+
OK
Press button repeatedly until
FEATURE menu is selected.
Press button repeatedly until
Game is selected.
Settings
CH Swap
Sort
Calendar
Game
OK
Press button to enter the
Game.
GAME
LEVEL
SELECT
: SELECT
22
MENU
1/20
1
OK:START
GAME FUNCTION
How to play the Game:
Step
1
Press button
V-
Result on screen
Select the level from 1 to 20,
e.g. 20.
V+
GAME
LEVEL
20/20
SELECT
20
: SELECT
MENU
2
3
4
C+
C-
V-
V+
C-
V-
20
Press button to start the Game.
OK
C+
OK:START
V+
Press the buttons to control the
moving direction of the CHILD
to push the box into , and the
box will turn into an apple.
MENU
20
After having pushing all the boxes
into , and all the boxes change
into apples as shown, you win
the game for this level, it will
enter next higher level automatically.
MENU
20
Notes:
Playing the game for the first time, only level 1 can be selected and played.
Only when you win the game of one level, you can enter the next higher level, and pressing the
or
button can select from 1 to the level next higher than that you have passed. For example, if you have passed
level11, pressing
or
button can select from 1 to 12, and the higher levels(13-20) above 12 can not
be selected.
If you finish the game of level 20, it will return to level 1 again.
V-
V-
V+
23
V+
CALENDAR FUNCTION
This feature allows you to look up days and years very conveniently.
How to enter the Calendar:
Short-cut operation:
Step
Press button
Result on screen
CALENDAR
1
Press button to enter the
Calendar.
DEC
2002
SU MO TU WE TH FR
1 2 3 4 5 6
8 9 10 11 12 13
15 16 17 18 19 20
22 23 24 25 26 27
29 30 31
SA
7
14
21
28
Menu operation:
Step
1
Press button
MENU
Result on screen
Press once to enter PICTURE
main menu.
Contrast
Bright.
Color
Hue
Sharpness
Color Temp
90
65
50
00
50
Normal
MENU
2
3
4
V-
V+
C-
C+
OK
Press button repeatedly until
FEATURE menu is selected.
Press button repeatedly until
Calendar is selected.
Press button to enter the
Calendar.
24
Settings
CH Swap
Sort
Calendar
Game
OK
MENU
DEC
2002
SU MO TU WE TH FR
1 2 3 4 5 6
8 9 10 11 12 13
15 16 17 18 19 20
22 23 24 25 26 27
29 30 31
SA
7
14
21
28
CALENDAR FUNCTION
How to look up days and years:
Step
1
2
Press button
V-
V+
C-
C+
Result on screen
Select your desired month.
Select your desired year.
JAN
2003
SU MO TU WE TH FR SA
1 2 3 4
5 6 7 8 9 10 11
12 13 14 15 16 17 18
19 20 21 22 23 24 25
26 27 28 29 30 31
NOTEBOOK FUNCTION
This feature allows you to store information such as phone number, leave message and etc,
and can be used as a reminder.
How to input and correct information in notebook:
Example: if you want to input the content: [email protected]
Step
Press button
1
NOTES
2
CAPS
3
2
ABC
Result on screen
Press button to enter the
Notebook.
Press button to turn off the
capital function, and the color
of CAPS on the screen will
turn into blue.
Press twice to input the letter
"a".
Note: Pressing this button
repeatedly can cyclically input
"2", "a", "b" and "c".The same
procedure is applicable to input
other digits or small letters.
4
CAPS
Press again to turn on the
capital function, and the color
of CAPS on the screen will
turn into red.
5
2
Press three times to input the
letter "B".
Note: Pressing this button
repeatedly can cyclically input
"2", "A", "B" and "C". The same
procedure is applicable to input
other digits or capital letters.
ABC
NOTEbook
Note
BOOK
25
OFF
Off
INS
CAPS
NOTEbook
Note
BOOK SAVE ?
a
2abc
NOTEbook
Note
BOOK SAVE ?
aB
2ABC
NOTEBOOK FUNCTION
Step
Press button
6
CAPS
7
2
ABC
8
1
+-?
9
Result on screen
Press button to turn off the
capital function.
Press four times to input the
letter "c".
Note book
SAVE ?
aB
aBc
2abc
Press repeatedly until the
symbol "@" appears.
Note: Pressing this button
repeatedly can cyclically
select "1", blank space, the
common marks and punctuation marks "+", "-", ".",
",", ":", ";", "/", "(", "=", ")",
"@", "%", "$", "#", "!" and "?"
as shown.
Note book
Repeat the above steps to
input "21cn.com".
Note book
SAVE ?
a Bc @
1 +-.,:;/(=)@%$#!?
SAVE ?
@
a Bc @21cn.com
6mno
10
OK
Press button to store the
message. The word "Saving"
appears on the screen.
Note book
Saving
a Bc @21cn.com
Off
INS
CAPS
Notes:
After finishing information writing, you can use DELETE button on the remote control to delete
the unwanted or incorrect word. And press INSERT button on the remote control to select INS
or OVER mode on the screen, then insert word into the stored information or overwrite it.
26
NOTEBOOK FUNCTION
How to utilize notebook function:
If you want to display the message when the TV is turned on:
Step
1
Press button
C-
C+
V-
2
Result on screen
Move the cursor to select the
sign
.
V+
Press button to turn
as shown.
OK
NOTEbook
Note
BOOK
Give your mother a
call.
into
OFF
Off
INS
CAPS
If you want to display the message at a specified time:
Step
1
Press button
C-
C+
V-
2
Result on screen
Move the cursor to select the
sign
.
V+
Press button to turn Off into
0:00.
OK
NOTEbook
Note
BOOK
Meet aunty Li at airport
tonight.
0:00 INS
CAPS
NOTEbook
Note
BOOK
Meet aunty Li at airport
tonight.
3
C+
C-
Set your desired time, e.g. 17:40.
17:40 INS
CAPS
Notes:
The time setting in notebook must be based on the time set in Time of TIMER menu. The time
set in notebook must be later than the time set in Time.
27
SPECIFICATION
14PT2110
21PT2110
370mm
540mm
2 x 2W
2 x 4W
331mm
441mm
367mm
600mm
456mm
372mm
Net weight of Set (approximate)
10kg
21kg
TV system
PAL BG/DK/I
SECAM BG
SECAM DK
AV - NTSC
Picture tube screen size (diagonal)
Audio Output:
speaker
Set Dimension
Width
Depth
Height
Note:
For Operating Voltage, Frequency, Power Consumption, refer to the type number at the rear of the set.
Product is subjected to change without notice.
28