1
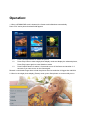
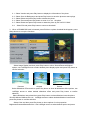
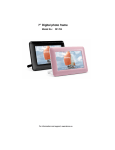
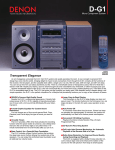
7” Digital photo frame
Model No.: DF700
Manual Languages
English
Dutch
French
German
Spanish
PARTS LIST
1 Setup
2 Exit
3 Right
4 Left
5 Play/Pause/on/off
5 4 3 2 1
OPERATION METHOD
1) Please use the 5V DC power adapter supplied with this product.
2) Please remove the power adapter from the main outlet before cleaning the unit.
3) Clean the case, LCD screen and buttons with slightly damp, soft cloth. DO not use coarse
cloth, sprayers or chemical cleaners such as alcohol, benzene, etc. Do not allow residue to
enter the DC power socket or SD/MMC/MS slot.
PRECAUTIONS
1) Please use the 5V DC power adapter supplied with this product.
2) Please remove the power adapter from the main outlet before cleaning the unit.
3) Clean the case, LCD screen and buttons with slightly damp, soft cloth. DO not use coarse
cloth, sprayers or chemical cleaners such as alcohol, benzene, etc. Do not allow residue to
enter the DC power socket or SD/MMC/MS slot.
TECHNICAL SPECIFICATION
Power:5V 1.2A
FEATURES:
1. 7 inch TFT LCD screen .resolution 480*234
2. Three cards in one card slot
3. Slideshow supporting JPEG files
4. Slideshow intervals adjustable
5. Auto play when insertion memory card
6. Buttons for easy control of inserted card
7. Easy operation
8. Supports Hi-res photos.
9.Supports upright and landscape positions
Operation:
1. When a SD/MMC/MS card is inserted, the frame would slideshow automatically.
Press “Exit” and a photo thumbnail shall appear
1.1
1.2
Press Left/Right Buttons to select the picture
Press Play button to enter single photo display mode and display the selected picture,
Press Play button again to enter slideshow mode
1.3
Press”On&Off”button for about 2-3 seconds to turn off the frame and another 2--3
seconds if you want to turn on the frame again.
Remark: It would take longer time to load the picture when its resolution is bigger than 480*234
2. When in the single photo display (Pause) mode, press Setup button to access utility menu.
2.1
2.2
2.3
2.4
2.5
2.6
Select Version and press Play button to display the information of the photo
Select Save As Background and press Play button to save the photo as start-up logo
Select Delete and press Play button to delete the photo
Select Zoom and press Play button to zoom in or out the photo
Select Rotate and press Play button to rotate the photo by 90°/180°/270°/360°
Select Exit and press Play button to return to thumbnail
3. When a SD/MMC/MS card is inserted, press Exit then a photo thumbnail shall appear, press
Setup button to set up the functions:
Select Image Display and then press Play button to show “Stretch/Panscan/Original
options, use Left/Right arrows to select desired photo display option and press Play button to
confirm selection:
Panscan
Original
Stretch
Select Slideshow Effect and then press Play button to show all slideshow effect options, use
Left/Right arrows to select desired slideshow effect and press Play button to confirm
selection:
Select Slideshow Interval and then press Play button to show slideshow interval options:
3S/10S/1Minute/10Minute.Pls use Left/Right arrows to select desired slideshow interval and
press Play button to confirm selection
Select Color and then press Play button to show options of color properties:
Brightness/Contrast/Saturation/Hue. Use Left/Right arrows to select desired option and press
Play button to confirm selection. A bar shall appear, use Left/Right arrows to adjust the property
and press Play button to confirm. ( Press Exit to leave setting)
Select OSD Language and then press Play button to show OSD options:
English/French/Spanish/ Dutch/German. use Left/Right arrows to select desired OSD language
and press Play button to confirm.
Select Reset Setting and then press Play button, an option of Yes/No shall appear, select
Yes and press Play button to return to factory default setting
Select Firmware version and then press Play button to show the version and time of the firmware
Important Safety Precaution
Keep away from water or moisture and dusty areas
Ambient Temperature 0-400C.Never store in hot and very cold areas
Be carefully to keep it without dropping it or strong impact
Do not try to open the case alone without technical support
Connect the AC adapter to the DC IN jack and to power outlet
Only use attachments/accessories specified by the manufacture
When left unused for a long period of time ,the unit should be unplugged from the household
AC outlet
z Do not place the Digital Photo Frame on an unstable cart ,stand, tripod, bracket, or table. The
unit may fall causing injury to you and serious damage to the product
z Position the Digital Photo Frame away from sources of high heat such as radiators or stoves
Warning: To reduce the risk of the fire or electric shock, do not expose to rain, moisture, dripping
or splashing.
z
z
z
z
z
z
Troubleshooting
No power
z Check to make sure the power plug is plugged into the power outlet
z Make sure there is power to the outlet of the product, when in doubt disconnect and connect
again.
Unable to view photos on the Digital Photo Frame
z Not all JPEG files are compatible, Please open files in the computer and resave them as
JPEG files ( and/or different resolution) and try to playback in the device
z Check if using compatible memory cards
If picture display seems slow
z Use lower resolution picture