1
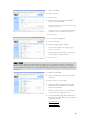
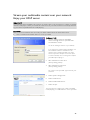
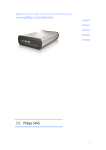
Register your product and get support at www.philips.com/welcome SPD8010CC SPD8015CC SPD8020CC SPD8025CC SPD8030CC EN Philips NAS 1 Table of Contents Your Philips NAS........................................................................................ 3 What’s in the box..................................................................................................................................................................................... 3 Optional Components (not included).......................................................................................................................................... 3 Before you start .......................................................................................... 4 Setup precautions..................................................................................................................................................................................... 4 How to find warranty information? ................................................................................................................................................ 4 WEEE mark: “Information to the Consumer”. ......................................................................................................................... 4 Disposal of your old product............................................................................................................................................................. 4 WARNING.................................................................................................................................................................................................. 5 Overview ........................................................................................................ 6 Connect........................................................................................................... 7 How to connect your Philips NAS to your network router ............................................................................................ 7 Install.................................................................................................................. 9 How to install your Philips NAS on your Windows PC..................................................................................................... 9 How to install your NAS on your Apple Mac....................................................................................................................... 13 Configure ......................................................................................................15 How to access the administration console (PC).................................................................................................................. 15 How to access the administration console (Apple Mac)................................................................................................. 15 How to configure your NAS........................................................................................................................................................... 17 Enjoy ................................................................................................................22 Enjoy your Philips NAS ...................................................................................................................................................................... 22 Explore your NAS through the Internet Enjoy your FTP server................................................................................. 23 Stream your multimedia content over your network Enjoy your UPnP server ................................................ 26 Enjoy your USB host............................................................................................................................................................................ 28 More of your NAS ..................................................................................29 Enjoy your NAS as external storage device............................................................................................................................ 29 How to enjoy your NAS (without a wizard) ......................................................................................................................... 29 Maintenance ................................................................................................31 Firmware update.................................................................................................................................................................................... 31 Troubleshooting........................................................................................33 Online help / Frequently Asked Questions............................................................................................................................. 33 How to reset your NAS.................................................................................................................................................................... 33 2 Your Philips NAS To fully benefit from the support that Philips offers, register your product at www.philips.com/welcome What’s in the box A. NAS B. Vertical stand C. Power adapter D. Power cable E. Network cable F. Software CD (Including manual) G. Quick Start Guide Optional Components (not included) Philips USB Storage Drive 3 Before you start The machine does not contain any user-serviceable parts. Please leave all maintenance work to qualified personnel. Setup precautions Finding a suitable location Place the set on a flat, hard and stable surface. Do not place the set on a carpet. Do not position the set on top of other equipment that might heat it up (e.g., receiver or amplifi er). Do not put anything under the set (e.g., CDs, magazines). Install this unit near the AC outlet and where the AC power plug can be reached easily. Space for ventilation Place the apparatus in a location with adequate ventilation to prevent internal heat build up. Allow at least 10 cm (4”) clearance from the rear and the top of the set and 5 cm (2”) from the left and right to prevent overheating. Avoid high temperatures, moisture, water and dust Apparatus must not be exposed to dripping or splashing. Do not place any sources of danger on the apparatus (e.g., liquid fi lled objects, lighted candles). How to find warranty information? Browse to the Philips warranty folder on the hard disk or look on www.philips.com/support You need Adobe Reader software to open these files. If you don’t have Adobe Reader, you can download it for free on www.adobe.com. The Philips warranty may not apply if damage is caused by accidents, shock, misuse or neglect. “The making of unauthorized copies of copy-protected material including computer programs, files, broadcasts and sound recordings, may be an infringement of copyrights and constitute a criminal offence.This equipment should not be used for such purposes.” WEEE mark: “Information to the Consumer”. Disposal of your old product Your product is designed and manufactured with high quality materials and components, which can be recycled and reused. Please inform yourself about the local separate collection system for electrical and electronic products, including those marked by the crossed-out wheel bin symbol. Please act according to your local rules and do not dispose of your old products with your normal household waste. 4 WARNING Plastic bags can be dangerous To avoid danger of suffocation, keep this bag away from babies and small children. Although this product has been designed with utmost care for long-lasting performance. Philips does advise you to handle electronics with good care: Avoid contact with water, exposure to extreme forces. Please make sure you place the device in a well-ventilated environment, to ensure longest possible lifetime and optimal performance. Philips does not provide any data recovery services and cannot under any circumstance be held responsible for loss of data. It is the customer’s responsibility to back-up all data stored on the Philips disk.All data will be deleted when offering the product to Philips for service. 5 Overview 1. 2. 3. 4. Status LED Status indicator Activity LED Activity indicator On/low power button Switches the Power of the NAS on/low power Reset button Resets the NAS LED behavior: Drive off NAS is powering up Drive on NAS activity 1. 2. 3. LED 1 (Status) Off Blinking On On LED 2 (Activity) Off Blinking Off Blinking USB Port Host 2.0 USB Port Ethernet Port RJ-45 socket for Ethernet network cable (10/100/1000 Mb/s) DC in 5V/12V Power supply socket 6 Connect How to connect your Philips NAS to your network router Need help? Refer to the documentation that came with your router for information about: The devices that you can connect to your router. The type of cables that you can connect to your router. Connect to your network 1. Connect the network cable to your NAS and to your router Use the router ports which are mostly labeled 1 2 3 4. 2. Take the power adapter and plug the connector of the power cable into the POWER port of the device. 3. Plug the power cable into the adapter and the power outlet. 4. The NAS will automatically power up. If the blue LED is not on, press the power button to switch the NAS on. LED behavior and buttons 1. Status LED: On: drive is on Blinking: please wait as the device needs some time to start. Off: drive is off 2. Activity LED 3. On/Low power button 4. Reset button See also ‘Overview 7 5. Wait until the status LED stops blinking. (Approximately 1 minute). 8 Install How to install your Philips NAS on your Windows PC CAUTION Never unplug the power cable or data cable when the NAS is still running. This might lead to data loss. Always use the power button on the front of your NAS to switch it on/off. Need help? Refer to the documentation that came with your operating system for information about: How to install programs on your PC Software Installation 1. Insert the NAS installation CD. 2. The Philips installation wizard will automatically start Please run ‘philips.html’ on the NAS installation CD, if installation does not automatically start. 3. Select a language 4. Select ‘Install NAS’ 9 You may see some security warnings. Choose Yes/Run/Allow to continue. 5. Select ‘Next’ to continue 6. Accept the Software end user license agreement Select ‘Next’ to continue 7. 8. 9. Select a destination where the software should be installed Select ‘Next’ to continue 10. Select a Start menu folder 11. Select ‘Next’ to continue 10 12. Select ‘Create a desktop icon’ 13. Select ‘Next’ to continue 14. Select ‘Install’ to continue 15. Click ‘Finish’ to end the installation of the wizard and start the network Storage wizard Windows Vista will generate an additional warning. Click ‘Continue’ to start the network Storage Wizard 11 Network storage wizard 16. The application ‘Philips network storage wizard’ will automatically start For Windows Vista you need to double click the proposed link Make sure your NAS is connected and has completely finished its startup procedure (the status LED is continuously on) Change the language if necessary 17. Click ‘Next’ to continue 18. Your NAS will automatically be detected If your NAS is not automatically detected, check your connection and make sure your NAS is powered up and press the ‘Refresh’ button 19. Assign a drive letter to your NAS (drive mapping) Default assignment is last available drive letter 20. Click ‘Next’ to continue 21. Select the first and second option to create a desktop icon to manage and explore your NAS 22. Click ‘Close’ to finish installation Install the wizard and follow above steps on all PC’s on your network, which need to access the NAS 12 How to install your NAS on your Apple Mac CAUTION Never unplug the power cable or data cable when the NAS is still running. This might lead to data loss. Always use the power button on the front of your NAS Need help? Refer to the documentation that came with your Apple Mac information about: How to install external devices your Apple Mac 1. 2. Click ‘Go’ at top of the screen. Choose ‘Connect to Server’. 3. Check the label on the back of the NAS for ‘NETBIOS’ 4. Enter ‘smb://’ followed by the ‘NETBIOS’ name you found in the previous step in the server address field. (example : smb://SPD8020-A89205) 5. 6. Click ‘Connect’ to continue Your NAS will automatically be detected 7. 8. Select ‘public’ in the drop down menu Click ‘OK’ to continue Install your NAS on all computers on your network that may access the NAS. 9. You may have to enter your network password. 13 10. You can now access your network hard disk, which is shown as ‘Public’. 14 Configure It is recommended that you configure your NAS on first use. How to access the administration console (PC) 1. Use the ‘Manage’ button in the Philips network storage wizard to open the NAS administration console Or use the ‘Manage’ shortcut on your desktop If no shortcut was created during installation, run the installation wizard as mentioned in the chapter ‘How to install your NAS’, and make sure that you select the first and second option to create a desktop icon to manage and explore your NAS after mapping it. 2. A popup will appear, where you need to fill in your administration console user name and password Factory setting user name: admin Factory setting password: admin See ‘How to reset your NAS’ if you have lost your password How to access the administration console (Apple Mac) This will only work if you first completed ‘How to install your Philips NAS on your Apple Mac’ 1. Click ‘Go’ and choose ‘Utilities’. 15 2. Click on ‘Terminal’. 3. 4. Enter this text: arp –a 5. Check label on the back of the network hard disk for ‘MAC’ 6. Find the line where the MAC address matches with the one found in step 5 (‘:’ are added, leading zeros left out). The 00903EA89205 from step 5 is shown here as 0:90:3E:A8:92:5 7. Remember the IP address mentioned before the MAC address 8. Start your internet browser and enter the IP address from step 9 9. Enter the password for the web interface of your network hard disk Factory setting name: admin Factory setting password: admin 16 10. The administrations console of your NAS opens, allowing you to configure your network hard disk How to configure your NAS System management – Information Here you can find general information on your NAS after you logged in, such as: System Information: System Name IP Address Subnet Mask Workgroup Firmware Version Date Uptime Total Storage Available Storage System management – Setup Here you can configure general settings Date and Time You can either enter the date and time manually or enable an internet time server. To enter the date and time manually: 1. Disable ‘set Clock from internet time server (NTP)’ 2. 3. Fill in the correct date and time Select accept to confirm your changes To use the internet time server : 1. Enable ‘set Clock from internet time server (NTP)’ 2. Fill in one of the below mentioned time server addresses in the NTP server field (corresponding with your region) 3. Select accept to confirm your changes Make sure you are connected to the internet, when you use the internet time server 17 Region North America Europe: Australia: Asia Pacific NTP Server 123.163.4.102 192.5.41.41 192.5.41.209 207.200.81.113 208.184.49.9 129.132.2.21 130.149.17.8 128.250.36.3 137.189.8.174 Languages To change the default language: 1. Select your language in the drop down menu 2. Select ‘accept’ to confirm your changes. Administrator To change the default administrator password: 1. Fill in a new password in the password field 2. Retype the same password in the confirm password field 3. Select accept to confirm your changes. See ‘How to reset your NAS’ when you have lost this password. Enable FTP Server To enable the FTP function: 1. Select ‘Enable FTP Server’ See ‘Enjoy your FTP server’ for more information. System management – LAN Setup To change the default network settings of your NAS: System Name 1. Fill in a new system name (hostname) in the System name field If you change the system name of your NAS, you need to run the Philips network storage wizard again to detect your NAS and map it. Assign IP settings 1. Select ‘Automatically assign IP settings (DHCP)’ or ‘Manually assign IP settings’ 2. When set on ‘manually’, you can configure the fields: IP Address Subnet Mask Default Gateway DNS Server Workgroup 1. Fill in a new Workgroup in the Workgroup field 18 Enable WM5 1. Select enable or disable to activate/deactivate the Windows Mobile 5 function This enables connections to PDA's (that have Windows Mobile 5 running and are connected via WiFi to your home network). It is therefore recommended to have it standard on. DDNS 1. Select enable or disable to activate/deactivate the DDNS function 2. When enabled configure the fields DDNS Service DDNS Username DDNS Password DDNS Host name DDNS Period For more information see ‘Enjoy your FTP server’ System management – Disk Setup Here you can find disk information, such as: Volume name Status Type Total Size Free Size System management – Media Server (UPnP) To enable the media server function: 1. Select ‘Enable Media Server’ For more information see ‘Enjoy your UPnP server’ 19 File sharing To configure your file sharing options: 1. Click on ‘public’ 2. Choose a comment Only letters or numbers are allowed Default is : Defaultshare 3. Choose whether you want to password protect your shared folder 4. Enter a password in the password fields to protect your shared folder When you have lost this password you can enter a new password here This option does not change the password that is needed to access the administration console 5. Select accept to confirm your changes For more information see ‘Enjoy your FTP server’ General Setup – Firmware Update To update your firmware see ‘Firmware update’ General Setup – Reset Standby 1. Select ‘Standby’ to put your NAS in low power mode To switch on the NAS use the power/low power button 2. When the Current System Status (at the bottom of the screen) says ‘The system is in Low power mode’ close the administration console 20 Restart Server As this option only partially resets your NAS, it is recommended that you do not use this option Please refer to ‘How to reset your NAS’ for more information on how to reset the server 21 Enjoy Enjoy your Philips NAS Need help? Refer to the documentation that came with your operating system for information about: How to install programs on your PC 1. 2. 3. Make sure your NAS is connected to your router Make sure your NAS has completely finished its startup procedure (the status LED is continuously on) If the NAS is not powered, press the power button to switch it on. Starting takes around 1 minute. Explore the content of your NAS 1. Use the ‘Explore’ button in the Philips network storage wizard to explore the content of your NAS Or use the ‘Explore’ shortcut on your desktop If no shortcut was created during installation, run the installation wizard as mentioned in the chapter ‘How to install your NAS’, and make sure that you select the first and second option to create a desktop icon to manage and explore your NAS after mapping it. 2. Fill in your ‘File sharing’ password and login when ‘Protect Shared Folder’ has been enabled See subchapter ‘File sharing’ on how to set / reset your password 3. Explore the content of your NAS Explore the content of your NAS installation CD 1. Insert the NAS installation CD 2. The application ‘Philips network storage wizard’ will automatically start Please run philips.html on the NAS installation CD, if installation does not automatically start. 3. After language select, a menu will appear where you can find: the NAS installation software, Philips Intelligent Agent software, this manual, warranty information and information on where to find online help 4. Make your selection 22 Explore your NAS through the Internet Enjoy your FTP server What is FTP Your NAS has FTP capabilities. FTP (File Transfer Protocol) is used to transfer data from one computer to another over the Internet, or through a network. In this chapter you will find more information on how to configure your NAS for FTP Need help? Refer to the documentation that came with your router for information about: How to enable remote user access How to configure automatic redirection of your public IP address to an internal IP address How to enable port forwarding Enable your NAS The NAS configuration should not be done remotely 1. Make sure your NAS and router are connected and switched on 2. Use the ‘Manage’ button in the Philips network storage wizard to open the NAS administration console Or use the ‘Manage’ shortcut on your desktop If no shortcut was created during installation, run the installation wizard as mentioned in the chapter ‘How to install your NAS’, and make sure that you select the first and second option to create a desktop icon to manage and explore your NAS after mapping it. 3. Fill in administrator User name (factory setting: admin) 4. Fill in administrator Password (factory setting: admin) See ‘How to reset your NAS’ if you have lost your password 5. Select ‘System Management’ 6. Select ‘Setup’ 7. Select ‘Enable FTP Server’ 8. Select ‘Accept’ 23 9. Select ‘File sharing’ 10. Click on ‘Public’ 11. Click ‘Accept’ 12. Enter a password in the password fields to protect your shared folder When you have lost this password you can enter a new password here This option does not change the password that is needed to access the administration console 13. Click ‘Accept’ 14. Go to ‘System Management’ 15. Go to ‘LAN setup’ 16. Select ‘Manually assign IP settings’ You need this IP address for configuring your router in a later step By switching to ‘Manually assign IP settings’ you prevent problems with your network 17. Click ‘Accept’ What is DDNS To explore your NAS through the internet you need to know your public IP address. This address is dynamic and can change from time to time. By enlisting for a DDNS service provided by a third party, you alias a dynamic IP address to a static hostname, allowing your NAS to be more easily accessed from the Internet 18. Enable ‘DDNS Enable’ 19. Select a DDNS service provider in the drop down box 20. Click on ‘Go To Provider Site’ 21. Register yourself for DDNS services at the service provider’s website (for example the free service DynDNS) DDNS Username, Password and Hostname are provided during the registration process 22. Complete the fields, with the DDNS service information provided during above mentioned registration process: DDNS Username DDNS Password DDNS Host Name 24 23. Fill in the DDNS Period Recommended value to use for the update period is at least 600 (=600 s) to prevent a free DDNS service account from expiring due to inactivity (e.g. after 30 days) 24. If the DDNS service is working properly, the DDNS status field will provide confirmation (date, time and IP address) What is port forwarding Port forwarding is an option which can be enabled in your router. It forwards remote users from a public IP address/hostname to the NAS Enable your router 1. Configure your router to open TCP port 21, connecting that port to the IP address of the NAS In general this is done in the NAT table / virtual server in your router. See your router manual for details IP address of the NAS is the IP Address mentioned in the administration console in the tab ‘System Management - LAN setup’ Example Default port for FTP is TCP 21, other ports are possible but you need to configure your router and FTP settings accordingly Explore your NAS through the Internet Enjoy your FTP server 1. Open your web browser 2. In the address bar, type ‘FTP://’ followed by your DDNS Hostname Example: ‘FTP://nas.dyndns.org’ You have obtained your DDNS hostname during DDNS service registration as described above 3. Fill in ‘File share’ User name (factory setting: public) 4. Fill in ‘File share’ Password (factory setting: public) 5. Unselect ‘Log on anonymously’ 6. Select ‘Save Password’ 7. Select ‘OK’ When you share your FTP information such as: IP address, DDNS hostname, login and/or password with third parties, these parties could be able to read, change and delete data stored on your NAS 25 Stream your multimedia content over your network Enjoy your UPnP server What is UPnP Your NAS has UPnP capabilities. This means it can stream video, music and photos to a UPnP compatible network media player. When you enable the media server in your NAS, it will be automatically detected by your UPnP compatible network media player(s). Need help? Refer to the documentation that came with your UPnP enabled device for information about: How to enable UPnP enabled devices to access your NAS Enable your NAS 1. Use the ‘Manage’ button in the Philips network storage wizard to open the NAS administration console Or use the ‘Manage’ shortcut on your desktop If no shortcut was created during installation, run the installation wizard as mentioned in the chapter ‘How to install your NAS’, and make sure that you select the first and second option to create a desktop icon to manage and explore your NAS after mapping it. 2. Fill in administrator User name (factory setting: admin) 3. Fill in administrator Password (factory setting: admin) See ‘How to reset your NAS’ if you have lost your password 4. Select ‘System Management’ 5. Select ‘Media Server’ 6. Select ‘Enable Media Server’ 7. Select ‘Accept’ You might need to configure your UPnP compatible media player(s), to enable it/them to access your NAS 26 Need help? Refer to the documentation that came with your router / UPnP enabled device for information about: How to configure your UPnP enabled device(s) How to access with your UPnP enabled device a UPnP server Stream your multimedia content over your network Enjoy your UPnP server 1. Make sure your NAS is connected, switched on and properly configured for UPnP 2. Make sure your router is connected, switched on and properly configured 3. Make sure your UPnP enabled device is connected, switched on and properly configured 4. Enjoy your media files via your UPnP enabled device Supported formats Video Audio Picture AVI MPG VOB WMV MP3 OGG WAV WMA GIF JPG PNG TIFF Not all files in the above mentioned formats will play, as they might need new codecs, which are not supported Examples of Philips UPnP enabled devices 23IF9946/12 42PF9830/69 SL400i SLA5520 SLM5500 WAC3500 WAK3300 Streamium TV Jaguar HeTV Wireless Multimedia Adapter Wireless Music Adapter Wireless Multimedia Adapter Wireless Music Center Wireless Music Station 27 Enjoy your USB host Only USB storage devices can be connected to the NAS USB port Depending on the file system (FAT32, NTFS) of the USB device, which is connected to your NAS USB port, you can read or write on it FAT32 : Read and Write access NTFS : Read-only access 1. Attach a USB hard disk to the USB 2.0 host port of your NAS Printers, webcams or other USB devices are not supported 2. Wait 1 minute for the NAS to recognize the attached USB hard disk. 3. Start the Philips network storage wizard. Or choose: ‘Start’ ‘(All) Programs’ ‘Philips’ ‘network storage wizard’ 4. Confirm the drive letter (or choose another one).The last available letter is proposed. 5. Choose ‘Next’. 6. Enjoy 28 More of your NAS Enjoy your NAS as external storage device Need help? Refer to the documentation that came with your PC / Apple Mac for information about: 1. The devices that you can connect to your PC / Apple Mac . 2. The type of cables that you can connect to your PC / Apple Mac . Connect directly to your PC or Apple Mac 1. Connect the supplied adapter to the NAS and the power outlet 2. Connect the network cable to your NAS and to your PC / Apple Mac 3. See chapter ‘Install’ for instructions on how to install your NAS on PC / Apple Mac 4. Enjoy your NAS as external storage device How to enjoy your NAS (without a wizard) 1. Go to Windows Explorer 2. Select ‘Tools’ 3. Select ‘Map network drive’ 4. Check the label on the back of the NAS for ‘NETBIOS’ The ‘NETBIOS’ name is unique for each network device. 29 5. Enter ‘\\’ followed by the ‘NETBIOS’ name you found in the previous step in the folder field. (example : \\spd8020-A89205) 6. Select ‘Reconnect at logon’ to reuse this mapping after restarting your computer 7. Click ‘Finish’ 30 Maintenance Firmware update CAUTION 1. Never turn off your NAS during the firmware update procedure. This may damage your device. If for any reason (E.g. Power supply failure during firmware update) the procedure fails, you may not be able to operate your device. 2. Always use Philips firmware. Option 1 – Automatic firmware download The Philips Intelligent Agent searches automatically the correct update for your drive in only a few simple steps 1. Visit the Philips Intelligent Agent website at www.storageupdates.philips.com/en/pia.html 2. Read the instructions mentioned on the page, on how to install and run the Philips Intelligent Agent 3. Proceed at ‘Firmware update’ below The Philips Intelligent Agent can also be found on your installation CD Option 2 – Manual firmware download 1. Visit the Philips support website at www.philips.com/storageupdates 2. Go to the section of the NAS 3. Download the latest firmware (zipfile) to your PC 4. Proceed at ‘Firmware update’ below Firmware update 1. Extract the firmware image file from the zipfile 2. Connect your NAS to your network 3. Switch on the NAS 4. Use the ‘Manage’ button in the Philips network storage wizard to open the NAS administration console Or use the ‘Manage’ shortcut on your desktop If no shortcut was created during installation, run the installation wizard as mentioned in the chapter ‘How to install your NAS’, and make sure that you select the first and second option 31 to create a desktop icon to manage and explore your NAS after mapping it. 5. Fill in User name (factory setting: admin) 6. Fill in Password (factory setting: admin) See ‘How to reset your NAS’ if you have lost your password 7. Select ‘General Setup’ 8. Select ‘browse’ to search for the image file to be uploaded. (firmware.bin) 9. Select Update firmware 10. The NAS will upload the last firmware, and the upload process can be followed with the process bar at the bottom of the page: 11. After the NAS uploaded the image file, it will mention: ‘File Uploaded’, Rebooting’ 12. To complete the firmware update close Windows explorer and wait until the NAS is rebooted. Starting takes around 1 minute. Shutting down takes around 10 seconds 32 Troubleshooting Online help / Frequently Asked Questions Refer to www.philips.com/support or www.philips.com/storageupdates for: Interactive help Frequently asked questions Firmware updates How to reset your NAS CAUTION Never unplug the power cable or data cable when the NAS is still running. This might lead to data loss. Always use the power button on the front of your NAS If the NAS behaves strangely, a reset might help Option 1 – Soft reset 1. Press the reset button and keep it pressed for 5 seconds This will reset the NAS but your settings will remain Option 2 – Hard reset (reset factory settings) 1. Switch the NAS off 2. Unplug the power cable 3. Press the reset button and keep this pressed 4. Plug in the power cable and keep the reset button pressed for 5 seconds The NAS will start up again using factory settings Starting takes around 1 minute Shutting down takes around 10 seconds 33 For warranty information and product support please visit www.philips.com/welcome www.philips.com/storageupdates Specifications subject to change without notice. All dimensions shown are approximate. © 2007 Koninklijke Philips Electronics N.V. All rights reserved. Reproduction, copying, usage, modifying, hiring, renting, public performance, transmission and/or broadcasting in whole or part is prohibited without the written consent of Philips Electronics N.V. 9305 125 2500.4 34