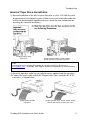
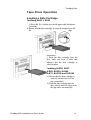
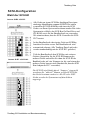
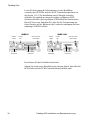
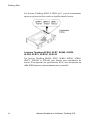
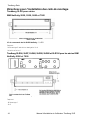
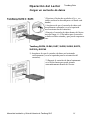
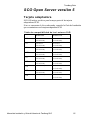
1
TANDBERG SLR
TAPE INFORMATION STORAGE SOLUTION
Installation and User's Guide
PC-BACKUP-SYSTEME
Installation und Benutzeranleitung
SOLUTION DE STOCKAGE DE DONNÉES
SUR BANDE MAGNÉTIQUE
Manuel d'installation et guide de l'utilisateur
SOLUCIÓN DE ALMACENAMIENTO DE DATOS
EN CINTA MAGNÉTICA
Manual de Instalación y Guía del Usuario
© Tandberg Data ASA
Part No. 43 18 55-07
August
2003
Related publications available from our Marketing Department:
Drive Series
Tandberg SLR
Publ. No.
Part. No.
Title
9048
6028
6047
43 05 08
42 26 86
42 30 42
9084
43 15 65
9033
43 01 37
9031
43 04 44
9063
43 07 43
9100
9144
43 17 88
43 21 67
Tandberg SLR Product Line Reference Manual
Tandberg SLR Product Line Maintenance Manual
Tandberg SLR Product Line SCSI-2 Interface Functional
Specifications
Tandberg SLR Product Line - SLR5 4.0/8.0GB Product
Verification Reports
Tandberg SLR Product Line - SLR4 (TDC 4220) Product
Verification Reports
Tandberg SLR7,SLR24, SLR40, SLR50, SLR60, SLR75
SLR100 and SLR140 Reference Manual
Tandberg SLR7, SLR24, SLR40, SLR50, SLR60, SLR75
SLR100 and SLR140 - SCSI Interface Functional
Specifications
Tandberg SLR50 (MLR3) PVR Manual
9148
9149
9156
43 22 23
43 22 22
42 22 46
9162
43 23 17
Tandberg SLR100, SLR60 and SLR40
PVR Manual - Internal
Tandberg SLR24-100 PVR Manual - External
Tandberg SLR2-5 PVR Manual - External
Tandberg SLR24 and SLR50 PVR Manual - Internal
(VU2000)
Tandberg SLR7 PVR Manual - Internal
Please Note
This publication may describe designs for which patents are granted or pending. By
publishing this information, Tandberg Data ASA conveys no license under any patent
or any other rights.
Every effort has been made to avoid errors in text and diagrams. However,
Tandberg Data ASA assumes no responsibility for any errors, which may appear in
this publication.
It is the policy of Tandberg Data ASA to improve products as new techniques and
components become available. Tandberg Data ASA therefore reserves the right to
change specifications at any time.
We would appreciate any comments on this publication.
IMPORTANT!
The Tandberg SLRx equipment must be connected to an earthed
mains socket outlet!
VIKTIG!
Apparatet må kun tilkobles jordet stikkontakt!
WICHTIGE
SICHERHEITSHINWEISE!
Benutzen Sie stets das werkseitig mitgelieferte Netzkabel und
verbinden Sie es ausschließlich mit geerdeten Netzsteckdosen!
VIKTIGT!
Apparaten får endast anslutas till jordat uttag!
Tandberg Data
Table of Contents
Introduction
1
Solution Contents
3
Information
5
Tape Drive Naming Convention
Tape Drive Capacity
Tape Drive Performance
Media Specifications
Tape Format Compatibility
Data Compression
5
5
6
6
6
7
Tape Drive Installation
9
SCSI Controller Board Installation
SCSI Configuration
External SLR2 - SLR140:
SCSI-bus Termination - Internal Tape Drives
SCSI-bus Termination - External Tape Drives
Mounting the Internal Tape Drive
Mounting a Tabletop Tape Drive
Tape Drive Operation
How to Rewind a Data Cartridge
9
11
12
13
15
15
19
21
23
Software Installation
27
Windows NT
29
SCSI Host Adapter
Tape Driver
Windows NT 4.0 Tape Driver Installation
Backup Applications
Computer Associates ARCserveIT for Windows NT
Veritas Software Server CD-ROM
Legato Networker for Windows NT
29
29
29
31
32
35
39
Windows 2000
41
SCSI Host Adapter
Tape Driver
Windows 2000 Tape Driver Installation
Backup Applications
41
41
41
43
Novell NetWare
45
Host Adapter
Backup Applications
Veritas Software Server CD-ROM
45
45
49
Windows 95
Host Adapter
Tandberg SLR Installation and User's Guide
51
51
i
Tandberg Data
ii
Backup Applications
51
Veritas Software Desktop CDROM
52
Windows 98 Windows 98 2nd Edition
Host Adapter
Backup Applications
Veritas Software Desktop CD-ROM
53
SCO Open Server Release 5
55
Host Adapter
Backup Applications
55
57
SCO UnixWare
59
Host Adapter
Backup Applications
59
59
Sunsoft Solaris
61
Tape Drive Installation
Backup Applications
61
62
Apple Macintosh
65
Backup Applications
65
IBM RS/6000
67
Tape Drive Installation
Backup Applications
67
68
HP/UX
71
Tape Drive
Backup Applications
71
72
Linux
73
SCSI Host Adapter
Backup Applications
73
74
Tape Drive Utility Disk
77
Troubleshooting
79
Hardware Checking
Software Checking
Verifying Recent Changes
Correcting Intermittent Failures
Software Troubleshooting
79
79
80
80
80
Appendix
81
Regulatory Compliance Notices
81
Glossary of Terms
83
53
53
54
Tandberg SLR Installation and User's Guide
Tandberg Data
Introduction
Congratulations on your new
Tandberg Data SLR tape storage
solution!
Total customer satisfaction is of the most importance to
Tandberg Data. We guarantee that this product left our
premises defect free. If you are not satisfied the quality of this
product, please contact your distributor, dealer or the nearest
Tandberg Data office to have your problem resolved quickly.
If you need technical support or have any problem with your
SLR tape storage solution, phone, fax and addresses can be
found on the back cover of this manual, ask for Customer
Services.
Tandberg Data ASA is a leading global supplier of advanced, tapebased information data storage products for the professional
market. The company offers a wide range of products and
solutions for data protection and other user applications within
data storage management.
Tandberg Data supplies Travan NS™, SLR™ and DLT™
branded tape drives and tape storage solutions to the world's
leading OEMs and through a worldwide channel sales network.
On the following pages, before the installation guide starts,
there is some brief information about the Tandberg Data SLR
tape storage solutions. Also listed is what is included with the
Tandberg Data product you have purchased.
All documentation referred to in this Product Line installation
guide, is available as a downloadable PDF file from the
Tandberg Data web site:
www.tandberg.com
Tandberg SLR Installation and User's Guide
1
Tandberg Data
This Page Intentionally Left Blank
2
Tandberg SLR Installation and User's Guide
Tandberg Data
Solution Contents
Please Check the Package Contents
before Beginning the Installation!
For the Internal Solution:
· Internal Tandberg SLR tape drive (SLR2-140)
• Internal SCSI cable (with removable LVD/SE terminator for
Tandberg SLR24, SLR7, SLR40, SLR50, SLR60, SLR75,
SLR100 and SLR140)
· Data cartridge (1 or 5 depending on type of kit/solution)
· Cleaning cartridge (Tandberg SLR5, SLR24, SLR7,
SLR40, SLR50, SLR60, SLR75, SLR100 and SLR140)
· Application software
· Installation and User's Guide
· Warranty Card
For the Tabletop Solution:
· Tabletop Tandberg SLR tape drive with power cord
· External LVD/SE SCSI terminator (Tandberg SLR24,
SLR7, SLR40, SLR50, SLR60, SLR75, SLR100 and SLR140)
· External SCSI cable
· Data cartridge (1 or 5 depending on type of kit/solution)
· Cleaning cartridge (Tandberg SLR24, SLR7, SLR40,
SLR50, SLR60, SLR75, SLR100 and SLR140)
· Application software
· Installation and User's Guide
· Warranty Card
NOTE:
See also our website: www.tandberg.com.
Tandberg SLR Installation and User's Guide
3
Tandberg Data
This Page Intentionally Left Blank
4
Tandberg SLR Installation and User's Guide
Tandberg Data
Information
Tape Drive Naming Convention
The following table gives the equivalence between the original
tape drive name and their associated SLR naming.
Tandberg SLR Name Convention
Previous Tape Drive Name
Tandberg SLR2
Tandberg TDC 3820
Tandberg SLR3
Tandberg TDC 4120
Tandberg SLR4
Tandberg TDC 4220
Tandberg SLR4-DC
Tandberg TDC 4222
Tandberg SLR5
NA
Tandberg SLR24
Tandberg SLR6
Tandberg SLR7
NA
Tandberg SLR40
NA
Tandberg SLR50
Tandberg MLR3
Tandberg SLR60
NA
Tandberg SLR75
NA
Tandberg SLR100
NA
Tandberg SLR140
NA
Tape Drive Capacity
Tandberg Data Tape Drive Model
Tandberg SLR2
Tandberg SLR3
Tandberg SLR4
Tandberg SLR4-DC
Tandberg SLR5
Tandberg SLR24
Tandberg SLR7
Tandberg SLR40
Tandberg SLR50
Tandberg SLR60
Tandberg SLR75
Tandberg SLR100
Tandberg SLR140
(TDC 3820)
(TDC 4120)
(TDC 4220)
(TDC 4222)
(SLR5 4/8 GB)
(SLR6 12/24 GB)
(MLR3 25/50 GB)
Capacity
525 MB
1.2GB
2.5GB
2.5GB/5.0*GB
4.0GB/8.0*GB
12GB/24*GB
20 GB/40GB*
20GB/40*GB
25GB/50*GB
30GB/60*GB
38 GB/75*GB
50GB/100*GB
70GB/140*GB
* Using 2:1 Hardware Compression
Tandberg SLR Installation and User's Guide
5
Tandberg Data
Tape Drive Performance
Tandberg Data Tape Drive Model
Per Minute
(TDC 3820)
(TDC 4120)
(TDC 4220)
(TDC 4222)
(SLR5 4/8 GB)
(SLR6 12/24 GB)
Tandberg SLR2 525MB
Tandberg SLR3 1.2GB
Tandberg SLR4 2.5GB
Tandberg SLR4-DC 5GB
Tandberg SLR5
Tandberg SLR24
Tandberg SLR7
Tandberg SLR40
Tandberg SLR50
Tandberg SLR60
Tandberg SLR75
Tandberg SLR100
Tandberg SLR140
Per Hour
12 MB/min
18 MB/min
18 MB/min
18/36* MB/min
24/48* MB/min
72/144* MB/min
180/360* MB/min
180/360* MB/min
120/240* MB/min
240/480* MB/min
240/480* MB/min
300/600* MB/min
360/720* MB/min
(MLR3 25/50 GB)
720 MB
1.08 GB
1.08 GB
2.16 GB
2.88 GB
8.64 GB
21.6 GB
21.6 GB
14.4 GB
28.8 GB
28.8 GB
36.0 GB
43.2 GB
* Using 2:1 Hardware Compression
Media Specifications
DC 6250 or equivalent
1020
DC 6525 or equivalent
1020
250
525
MAGNUS 1.2 or equivalent
950
1200
MAGNUS 2.5 or equivalent
1200
2500
SLR5 8GB *
1500
4000
SLRtape24 24 GB *
1130
12 000
SLRtape7 40 GB*
1545
20 000
SLRtape40 40 GB*
600
20 000
SLRtape50 50 GB *
1515
25 000
SLRtape60 60 GB*
900
30 000
SLRtape75 75 GB*
1150
38 000
SLRtape100 100 GB*
1500
50 000
SLRtape140 140 GB*
1670
70 000
* Using 2:1 Hardware Compression
Tape Format Compatibility
Tape
Native
Drive
SLR140
SLR100
SLR75
SLR60
SLR50
SLR40
SLR7
SLR32
Media Type
SLRtape140
SLRtape100
SLR24
SLR5
SLR4
SLR3
SLR2
SLR1
SLRtape60
SLRtape50
SLRtape40
SLRTape7
SLR32,
MLR1-26GB,
Accuscribe 13GB
SLRtape24
SLR5
Magnus 2.5,
Magnus 2.0,
DC 92xx, QD 92xx
Magnus 1.2,
Magnus 1.0,
DC 91xx, QD 91xx
DC6525, DC6320
DC6250, DC6150
Tape Drive Compatibility
SLR140 SLR100 SLR75 SLR60 SLR50 SLR40 SLR7 SLR32 SLR24 SLR5 SLR4 SLR3 SLR2
R/W
R
R/W
R
R/W
R/W
R
R/W
R/W
R/W
R
R/W
R/W
R/W
R/W
R
R/W
R/W
R/W
R/W
R
R*
R
R*
R*
R/W
R
R
R
R/W
R
R/W
R
R
R
R
R
R
R
R/W
R
R
R
R
R
R/W
R/W
R/W
R/W
R
R
R/W
RW
R/W
R/W
R/W
R/W
R/W
R/W
R/W
R/W
R/W
R
à Read only
R/W à Read and Write compatible
*SLR7 read capability available in F/W 04.30 or greater
6
Tandberg SLR Installation and User's Guide
R/W
R/W
Tandberg Data
Data Compression
Data Compression is a way to increase capacity on a storage
device. Compression ratios are normally specified to be 2:1,
meaning that it is possible to store twice as much data on the tape
as normal without data compression. However, the
compression rate is depending on the type of data, e.g. ordinary
text files can be compressed in a much higher rate than
program files.
There are two ways to compress data, hardware compression
and software compression. The storage device very often does
hardware compression, and software compression means that
the program is compressing the data before it is sent to the
storage device. Hardware compression is much more efficient,
and works much faster than software compression.
The Tandberg Data SLR4-DC, SLR5, SLR24, SLR7, SLR40,
SLR50, SLR60, SLR75, SLR100 and SLR140 use ALDC
Hardware compression to compress data. This feature is
enabled per default but the user may turn off data compression
through the application software or specific Software Tools.
(Please refer to the Tandberg SCSI tools chapter at the end of
this manual for more information).
Tandberg SLR Installation and User's Guide
7
Tandberg Data
This Page Intentionally Left Blank
8
Tandberg SLR Installation and User's Guide
Tandberg Data
Tape Drive Installation
SCSI Controller Board Installation
All Tandberg Data SLR tape drives uses a SCSI interface to the
host system.
Before any SCSI device can be installed it is necessary to have a
SCSI controller board installed. Please pay attention to the
following points.
• Make sure your computer is turn off before proceeding to the
installation.
• If you computer is equipped with an onboard SCSI
controller, before proceeding with the installation, you
must first locate the SCSI connector on the computer
motherboard.
• Refer to the documentation provided with your computer to
find out where this connector is located.
• If multiple SCSI connectors are available, you can choose any of
them, except if your computer documentation mentions
something different.
· When done, firmly connect the SCSI connector to the Mainboard connector and refer to the section Mounting the Tape
Drive to install your internal SLR.
• If your PC/Server needs a separate SCSI controller, you need
to make sure it is properly installed before connecting your
SLR tape drive.
Tandberg SLR Installation and User's Guide
9
Tandberg Data
· You will also need a software driver from the SCSI controller
vendor to activate the SCSI Controller. Please make sure you
have the latest software driver for your SCSI controller
loaded, and that the SCSI controller board is properly installed.
Software drivers can be downloaded from the vendors' web
site. Refer to the README file for installation.
Please refer to the PC/Server documentation for further
information on how to install additional boards in the
PC/Server. Or ask your local dealer for assistance.
10
Tandberg SLR Installation and User's Guide
Tandberg Data
SCSI Configuration
SCSI-ID Selection
All devices on a SCSI-bus need their own unique
identification, called SCSI-ID. If a SCSI-ID conflict
exists, some of the SCSI devices will not be recognized
by your system. In many systems it is common to
use the SCSI-bus for the hard-drive and CD-ROM,
as well as the tape drive. Remember that the SCSI
Controller uses SCSI-ID 7.
If the tape drive is the only device on the SCSI bus, you do not need to do anything. The tape drive
will be recognized automatically. (All Tandberg
Data tape drives are delivered with SCSI-ID 2 as
default.)
Internal SLR7 - SLR140
If the tape drive is going to share the SCSI-bus with
other devices, check the SCSI-ID numbers used by
the other devices, then set the drive’s SCSI-ID to a
number that is not being used by any of the other
devices (remember the SCSI host adapter uses ID 7).
The SCSI-ID is often set by “jumpers” where
you can “read out” which SCSI-ID the device has
been set up for. All SCSI device ID's are
displayed on the screen during system startup.
Tandberg SLR Installation and User's Guide
11
Tandberg Data
SCSI-ID Selection
External SLR2 ® SLR140:
For the external tabletops, you will find the SCSI-ID setting thumb-wheel switch
on the rear end of the unit box:
12
SLR2-5
SLR7-140
SCSI-ID Thumb-wheel Switch
SCSI-ID Thumb-wheel Switch
Tandberg SLR Installation and User's Guide
Tandberg Data
SCSI-bus Termination - Internal
Tape Drives
Termination in General
A SCSI-bus is susceptible to interference, such as noise from
electrical motors and other electromagnetic devices. Also due
to the speed of the data on the SCSI-bus, it is of outmost
importance to terminate the SCSI-bus properly. “Termination” is
used to define the ends of the SCSI-bus.
Tandberg SLR2 ® SLR5
Will your new tape drive be the last or only SCSI device on a SCSI
cable?
SCSI termination
where the tape
drive is the last or
only SCSI device.
SCSI termination
in a system with
three internal
SCSI devices.
• If your drive will be the last device on
the SCSI cable or the only device on the
cable, as shown to the left, make sure
that the SCSI termination packs are
installed in the drive (Factory default).
• If your tape drive will be in the middle of
a SCSI chain, as shown to the left, you
must disable SCSI termination on the
drive. To disable SCSI termination on
the tape drive, remove the termination
resistor packs from the drive (see figure
on the following page). Make sure that
the last SCSI device on the cable has
termination enabled.
Tandberg SLR Installation and User's Guide
13
Tandberg Data
The Tandberg SLR2 ® SLR5 drives have 3 passive termination
resistor packages that can be removed or installed inside the
drive.
Tandberg SLR24, SLR7, SLR40, SLR50, SLR60
SLR75, SLR100 and SLR140
The Tandberg SLR24, SLR7, SLR40, SLR50, SLR60, SLR75,
SLR100 and SLR140 tape drives are supplied with no internal
drive termination capability. To comply with PC99
specifications, TD supplies an internal SCSI cable with a
removable active terminator to facilitate termination
requirements in internal applications.
14
Tandberg SLR Installation and User's Guide
Tandberg Data
SCSI-bus Termination - External
Tape Drives
If the Tape drive is the only device on the external SCSI-bus, it
must be terminated using the external SCSI termination
provided with the solution. See figure:
SCSI Host
Adapter
SLR Tape Drive (Must
be terminated)
If other external device(s) is/are present, the
Tandberg SLR tape drive can be installed in any position on the
SCSI-bus, the SLR tape drive must be terminated if installed at
the end of the SCSI-bus. See figure:
Mounting the Internal Tape Drive
Wide/Narrow Configuration
All SLR internal tape drives can be connected either to a 16 bit
Wide SCSI or an 8-bit Narrow SCSI host adapter. SLR25 is
provided with an internal cable with a narrow connector. SLR7-140
internal tape drives are supplied with a WIDE connector. If you plan
to use SLR2-5 with a WIDE SCSI host adapter you will need a
Narrow SCSI host adapter Narrow to WIDE converter for the
internal cable supplied with your SLR2-5 tape storage solution. If
you plan to use SLR7-140 with a narrow SCSI host adapter you will
need a Wide to Narrow converter.
Tandberg SLR Installation and User's Guide
15
Tandberg Data
More detailed information regarding these converters and connecting
8 bit narrow SCSI peripherals to 16 bit wide SCSI host adapter and 16
bit WIDE SCSI peripherals to 8 bit narrow host adapters as well as
purchasing these converters, can be found at the following website.
www.adaptec.com/products/solutions/cables.html
NOTE:
When mounting a Tandberg SLR24, SLR7, SLR40, SLR50, SLR60,
SLR75, SLR100 or SLR140 tape drive on an 8-bit SCSI host adapter, using
the Wide/Narrow converter, check that the WIDE Negotiation feature is
disabled from the SCSI host adapter Bios. Refer to the SCSI adapter
manual for more information.
Tandberg Data
Internal Tape Drive Installation
1) Internal installation of the drive requires that there is a free 5.25-inch bay with
an open front in your computer system. Obtain access to the removable media bay
(refer to the documentation supplied with your system for more information on
accessing the removable media bay).
Tandberg SLR2 ® SLR5
Tape Drives
Tandberg SLR24, SLR40, SLR50, SLR60,
SLR75, SLR100 and SLR140 Tape Drives
NOTE:
A mounting kit may be necessary for mounting the tape drive into the bay. Please refer to
www.tandberg.com > SUPPORT >SLR Support > Hardware Compatibility for more information
on obtaining the kit.
3) Secure the tape drive to the bay (use only the screws supplied with the tape drive)
4) Connect the power cable and the SCSI signal cable (and eventually the SCSI
converter), as shown below:
Tandberg SLR2 ® SLR5
Tape Drives
Tandberg SLR Installation and User's Guide
Tandberg SLR24, SLR7, SLR40, SLR50, SLR60,
SLR75, SLR100 and SLR140 Tape Drives
17
Tandberg Data
Mounting Rail Installation Instructions
Tandberg SLR5 Drives for
IBM Netfinity 5000, 5500, 5600 and 7000 Series
SLR5 Netfinity Kit ordering no.: P/N 432126
Including:
- 2 x mounting rails - left hand and right hand side - 4 x
screws
- 1 x Installation Instructions
Tandberg SLR24, SLR7, SLR40, SLR50, SLR60, SLR75, SLR100 and
SLR140 Drives for IBM Netfinity 5000 and 7000 Series (xSeries)
Netfinity Kit ordering no.: P/N 431950
Including:
- 1 x mounting rail
- 2 x screws
- 1 x Installation Instructions
18
Tandberg SLR Installation and User's Guide
Tandberg Data
Mounting a Tabletop Tape Drive
Wide/Narrow Configuration
All SLR external tabletop tape drives can be connected either to a
16 bit Wide SCSI or an 8-bit Narrow SCSI host adapter. SLR2-5
is provided with an external cable with a narrow connector. SLR7140 tape drives are supplied with a WIDE external connector. If
you plan to use SLR2-5 with a WIDE SCSI host adapter you will
need a Narrow SCSI host adapter Narrow to WIDE converter for
the external cable supplied with your SLR2-5 tape storage solution.
If you plan to use SLR7-140 with a narrow SCSI host adapter you
will need a Wide ®Narrow converter. More detailed information
regarding these converters and connecting 8 bit narrow SCSI
peripherals to 16 bit wide SCSI host adapter and 16 bit WIDE SCSI
peripherals to 8 bit narrow host adapters as well as purchasing
these converters, can be found at the following website.
www.adaptec.com/products/solutions/cables.html
External Tape Drive Installation
After the SCSI controller board has been installed and is
working properly, the tape drive can be installed. Before starting,
make sure the power Is turn off.
NOTE:
Do not apply or insert power cord until all connections have been made.
Tandberg SLR Installation and User's Guide
19
Tandberg Data
Please carefully read the Information about the SCSI-ID conflicts and SCSI
termination paragraph on pages 11-14. To install a tabletop tape drive, simply
connect the tape drive to your PC/Server with the enclosed SCSI cable to any of the
two available SCSI connectors. Remember to place the termination on the free
connector on the back of the tape drive, and to select a unique SCSI-ID.
SLR7-140
SLR2-5
ON/OFF
Switch
AC Power
Receptacle
Cooling
Fan
SCSI-ID Thumbwheel Switch
SCSI Interface
Connectors
ON/OFF
Switch
AC Power
Receptacle
Cooling
Fan
SCSI-ID Thumbwheel Switch
SCSI Interface
Connectors
Connect it then to the power outlet.
When you power up the system for the first time, and check that
all your SCSI devices are visible for the SCSI controller board.
20
Tandberg SLR Installation and User's Guide
Tandberg Data
Tape Drive Operation
Loading a Data Cartridge
Tandberg SLR2 ® SLR5
1) Press the Eject button (see detail upper right for button
location).
2) Ensure that the data cartridge is correctly oriented (see left
for
tape
orientation).
3) Push the data cartridge Into the
drive until you hear a click that
indicates that the data cartridge is
locked in place.
Tandberg SLR24, SLR7,
SLR40, SLR50, SLR60,
SLR75, SLR100 and SLR140
1) Ensure that the data cartridge is
correctly oriented (see left for
tape orientation).
2) Push the data cartridge into the
drive slowly until it is taken in by
the tape drive automatically.
Tandberg SLR Installation and User's Guide
21
Tandberg Data
Unloading a Data Cartridge
Tandberg SLR2 ® SLR5
1) Wait for any tape activity to
finish.
2) Press the Eject button (see left for
button location).
3) When the front of the tape drive
opens, remove the data cartridge.
4) Manually close the front of the
tape drive.
Tandberg SLR24, SLR7, SLR40, SLR50, SLR60,
SLR75, SLR100 and SLR140
Eject button
1) Wait for any tape activity to
finish.
2) Press the Eject button (see left for
button location).
3) The data cartridge will be ejected
automatically.
Handling a Data Cartridge
To improve data reliability and data cartridge lifetime, please
respect the following:
· Do not drop data cartridges
· Make sure the air around the tape drive and the data cartridge
storage area is clean
· Before using any data cartridge, expose it to the actual
operating environment for at least four hours
· Replace worn or excessively noisy data cartridges
Storing Data Cartridges
The best practice to store a data cartridge is to rewind it to the
beginning of tape before storing it in its protective case.
22
Tandberg SLR Installation and User's Guide
Tandberg Data
How to Rewind a Data Cartridge
Tandberg SLR7 ® SLR140
The SLR7-140 drives automatically perform this operation
when the Eject button is pressed.
Tandberg SLR2® SLR5
Unix System Command
Using the system command, a rewind operation has to be
performed using the MT command. (Refer to the MT documentation for details)
Unix System/PC System Using Backup
Application
To make sure the tape is at Beginning Of Tape, a retension
command has to be executed, prior to ejecting the tape.
When this operation is completed:
Eject the tape from the drive and then store it in its protective
case.
Storage Condition
Avoid high temperature (>25C/77F) and high humidity (>50 %
RH)
Store the data cartridge in a cool and dry environment.
Do not store the data cartridge near devices with strong
magnetic fields, such as computer monitors, TV sets, or
loudspeakers.
Conditioning
Prior to use, the data cartridge should be adapted to the
operating environment for a time at least equal to the period it has
been out of the operating environment (up to a maximum of 8
hours).
Tandberg SLR Installation and User's Guide
23
Tandberg Data
Retentioning Condition
A Retention MUST be performed in any of the following cases:
· First use of brand new data cartridge.
· After prolonged operation over a limited tape length,
meaning excessive start/stop operations.
· When the cartridge has been exposed to a
decrease/increase in temperature of 16°C (30° F)
· When the cartridge has been dropped.
· The occurrence of excessive soft write errors, excessive
soft read errors (also named ECC error by some backup
applications).
Cleaning
Before use, please make sure that the cleaning cartridge is stored
for 24 hours in the temperature and humidity of the environment
in which it will be used.
Recommended Cleaning Intervals
In general, the tape drive should be cleaned after 50 hours of
tape movement for SLR2-5, and every 100 hours for SLR7 140.
A weekly cleaning routine is highly recommended, as well as
cleaning the tape drive immediately after using a brand new tape
cartridge.
NOTE:
If your product is the Tandberg SLR24, SLR7, SLR40, SLR50, SLR60,
SLR75, SLR100 or SLR140, cleaning is required when the rightmost front
LED being illuminated a steady AMBER color.
24
Tandberg SLR Installation and User's Guide
Tandberg Data
Cleaning Procedure
1) Load the cleaning cartridge into the SLR tape drive.
2) The cleaning process will begin automatically. This is
indicated by the front LEDs on the product as follows:
Tandberg SLR2 ® SLR5
· Flashing GREEN front panel LED.
3) Wait for all LED activity to finish and manually eject the
data cartridge from the tape drive (around 30 seconds).
Tandberg SLR7 ® SLR140
· Leftmost LED OFF, center GREEN LED flashing,
rightmost LED steady AMBER.
3) The cartridge will be ejected when cleaning has
completed (around 3 minutes).
Cleaning Cartridge replacement
The SLR cleaning cartridge has to be replaced when:
Tandberg SLR2 ® SLR5
· Steady GREEN front panel LED (for SLR2, SLR3,
SLR4, and SLR4DC).
· Steady AMBER front panel LED (for SLR5).
Tandberg SLR24, SLR7, SLR40, SLR50, SLR60,
SLR75, SLR100 and SLR140
· No LED activity and tape is automatically ejected.
Tandberg SLR Installation and User's Guide
25
Tandberg Data
Front Panel LED Indicators
Tandberg SLR2 ® SLR5
There is one LED (Light Emitting Diode) for the Tandberg
SLR2, SLR3, SLR4, SLR4-DC and SLR5 indicating the following
tape drive status:
LED State
Meaning
OFF
No activity / no cartridge loaded
Steady GREEN
Blinking GREEN
Steady AMBER
Steady GREEN
No activity / cartridge loaded
Tape drive activity
Media or hardware error
Cleaning cartridge exhausted - cleaning cartridge
must be changed (SLR2--> SLR4)
Cleaning cartridge exhausted - cleaning cartridge
must be changed (SLR5)
Steady AMBER
Steady RED
Fatal error *
* Contact Tandberg Data Customer Services
Tandberg SLR24, SLR7, SLR40, SLR50, SLR60,
SLR75, SLR100 and SLR140
There are three LEDs for the Tandberg SLR24, SLR7, SLR40,
SLR50, SLR60, SLR75, SLR100 and SLR140 indicating the
following tape drive status:
LED State
Meaning
Green
Amber
Blinking
OFF
OFF
Power up self test/Diagnostic Activity
OFF
OFF
OFF
No activity / no cartridge loaded
OFF
OFF
ON
Cartridge not loaded/Cleaning required
ON
OFF
OFF
No activity / cartridge loaded
ON
Blinking
OFF
Tape drive activity
ON
OFF
ON
Tape Loaded/Cleaning required
ON
Blinking
ON
Tape Activity/Cleaning required
OFF
OFF
Blinking
Unrecoverable Drive Failure*
Blinking
Blinking
Blinking
Fatal Error *
* Contact Tandberg Data Customer Services
26
Tandberg SLR Installation and User's Guide
Tandberg Data
Software Installation
This chapter contains information for installing SLR Tape
Drives in the following operating system environments:
- Windows NT 4.X (Server/Workstation) 0 Windows 2000
- Novell NetWare 4.X/5.0 Windows 95 - Windows 98
- Windows 98 Second Edition SCO Open Server Release 5 SCO UnixWare Version 7.X Sunsoft Solaris 2.x, 7.0
- Apple Macintosh System 7 and higher IBM AIX Version 4.x - HP UX Version
10.20/11.0 - Linux
Tandberg SLR Installation and User's Guide
27
Tandberg Data
This Page Intentionally Left Blank
28
Tandberg SLR Installation and User's Guide
Tandberg Data
Windows NT
SCSI Host Adapter
Windows NT includes a driver for most SCSI host adapters. If you
cannot find the appropriate driver, please refer to the
installation guide provided with the SCSI host adapter or
contact your computer supplier.
Tape Driver
Windows NT 4.0 includes a tape driver that supports the SLR2,
SLR3, SLR4, and SLR4DC for all versions of Windows NT
and Service Pack.
SLR5 support is provided by Service Pack 6A. (Available from
www.microsoft.com).
The SLR24, SLR7, SLR40, SLR50, SLR60, SLR75, SLR100
and SLR140 require an additional tape driver that is available
from the Tandberg website at www.tandberg.com.
Windows NT 4.0 Tape Driver
Installation
1) Double-click on the “Tape Devices” icon from the
Control Panel.
NT will detect automatically which Tandberg SLR tape
drive is installed on the system and prompts you to install the
driver.
Tandberg SLR2, SLR3, SLR4, SLR4-DC and SLR5
Installation
2) Select “Tandberg 3660, 3820, 4120, 4220, 4222”.
3) Select OK and follow the instruction on the screen.
Tandberg SLR Installation and User's Guide
29
Tandberg Data
Tandberg SLR24, SLR7, SLR40, SLR50, SLR60,
SLR75, SLR100 and SLR140 Installation
2) Click on Have a Disk.
3) Insert a disk in drive A when requested to so:
4) Select Tandberg Data SLR2-140 driver.
5) Select Install and follow the instruction on the screen.
During the copy process, you may receive the following
warning:
Always choose New
This will replace the existing tape driver with the latest version
that supports the Tandberg SLR tape drive you are using.
30
Tandberg SLR Installation and User's Guide
Tandberg Data
Backup Applications
NT Embedded Application
The NT Backup application (NTBackup) is included in the
Windows NT 4.0 Operating System.
Installation
Before running the application, make sure the tape driver for
your SLR tape drive is properly installed. Please refer to the tape
driver installation on page 29.
To start the application:
· Click on START.
· Click on Programs.
· Click on Administrative tools.
· Select Backup.
NOTE:
For any questions related to the use of this application or its installation,
please refer the Microsoft NT documentation
Tandberg SLR Installation and User's Guide
31
Tandberg Data
Computer Associates ARCserveIT
for Windows NT
ARCserveIT is one of the market leaders for NT backup
software. It is sold in three different versions: ARCserveIT
Workgroup Edition, ARCserveIT Advanced Edition and
ARCserveIT Enterprise Edition.
ARCserveIT Workgroup Edition
Primarily designed for small to midsize organizations and
single-server installations, CA's Workgroup Edition for NT
enable users to reap the benefits of powerful technology at a
price point and level of functionality that fits their needs.
Features
·
·
·
·
Autoloader support included
Parallel Streaming
Automated media management
Unlimited Windows 3.1x, Windows 95/98, Windows NT
workstation client support
ARCserveIT Advanced Edition
Created to meet the distinct IT needs of most midsize organizations, ARCserveIT Advanced Edition combine industryproven technology and ease-of-use with advanced features and
scalability to deliver a new breed of solutions. Advanced Edition
provide centralized management of IT solutions, support for
multi-servers (with unlimited clients), and scalability for
dynamic environments.
32
Tandberg SLR Installation and User's Guide
Tandberg Data
ARCserveIT Enterprise Edition
Designed for mid- to large-size organizations, CA's Enterprise
Edition products offer virtually unlimited scalability and crossplatform interoperability for large heterogeneous environments.
Flexible licensing makes Enterprise Edition solutions an ideal
choice for the larger users. Tandberg Data bundles products with
ARCserveIT Work Group and Advanced Edition.
Installation
1) Insert the Server CD-ROM. 2)
Open My Computer.
3) Double-click on the CD-ROM icon.
4) A Browser automatically appears.
5) Select the version ARCserveIT for Windows NT you
want to Install
or
6) Click on the install icon.
7) Follow the instructions on the screen.
NOTE:
For any questions related to this application or its installation, please refer to
the online documentation included on the CD-ROM.
Tandberg SLR Installation and User's Guide
33
Tandberg Data
Veritas Backup Exec for Windows NT
Workstation
· Veritas Backup Exec is comprehensive, easy to use 32-bit data
protection for Windows NT Workstations 4.0. Builtin device
detection automates setup and the simple push of a button
launches backups or restores. It reliably protects NetWare data,
including Bindery and Trustee Information as well as
guarantees consistent and reliable unattended backups with
advanced Scheduling and the AutoProtect feature.
· Veritas Backup Exec uses its own tape driver so that the
Windows NT tape driver does not need to be installed.
Installation
1)
2)
3)
4)
5)
6)
7)
Insert the Desktop CD-ROM.
Open My Computer.
Double-click on the CD-ROM icon.
A Browser will automatically appear.
Select Backup Exec for Windows NT Workstation.
Click on the install icon.
Follow the instructions on the screen.
NOTE:
For any questions related to this application or its installation, please refer to
the online documentation provided on the Veritas Software CD-ROM.
34
Tandberg SLR Installation and User's Guide
Tandberg Data
Veritas Software Server CD-ROM
Backup Exec for Windows NT
Veritas Backup Exec for Windows NT Single/Enterprise Edition
Backup Exec is one of the market leaders for NT backup
software.
It is sold in two different versions: Single Server and Multi
Server.
Backup Exec’s powerful suite of management tools provides
the functionality you demand, while its feature rich design
makes local and remote backup completely hassle-free.
Tape Driver Installation
Before running the application, make sure the tape driver for
your SLR tape drive is properly installed.
1) Select "Control Panel" from the "Settings" menu.
2) Double click on the "Tape Devices" icon. Choose the
"Drivers" tab.
3) Make a note of the type of drivers currently installed. For
each of the tape drivers you want to update, sequentially
select each driver and click "Remove" to remove the
driver from list. If you are initially adding new drivers,
please skip this step.
4) Select "Add..." from the "Drivers" tab.
5) Select the "Have Disk..." button.
6) Enter the drive/path to the directory where the desired
"oemsetup.inf" file is stored on disk. (<CDROM Letter>:\
WINNT\Drivers\I386
7) Select "OK" in the "Install From Disk" window.
8) Select one of the options in the "Choose the driver you want to
install, and then click OK." list in the "Install Driver" window;
i.e., select the description of the set of tape drives that you
want load a device driver for.
Tandberg SLR Installation and User's Guide
35
Tandberg Data
9) Select "OK" in the "Install Driver" window.
10) If the option appears, then select "New" in the
"Windows NT Setup" dialog; then enter the
samedrive/path that was entered in step #6 above.
IMPORTANT!
Always select "New" if it appears -- do NOT select "Current"
11) If you wish to install other tape device drivers, select "No"
in the "System Settings Change - Do you want to restart
your computer now?" window and repeat steps 4 to 10. After
all the needed device drivers have been installed, select "Yes"
in this window to shutdown and restart Windows NT. This will
activate the changes made.
Software Installation
1)
2)
3)
4)
5)
6)
7)
Insert the Server CD-ROM.
Open My Computer.
Double-click on the CD-ROM icon.
A Browser automatically appears.
Select Backup Exec for Windows NT.
Click on the install icon.
Follow the instructions on the screen.
NOTE:
For any questions related to this application or its installation, please refer to
the online documentation included on the CD-ROM.
36
Tandberg SLR Installation and User's Guide
Tandberg Data
Veritas Backup Exec Small Business Server
Suite
Veritas Backup Exec Small Business Server Suite for Windows NT is a complete data protection solution designed
specifically for Microsoft Small Business Server for Windows
NT. Through transparent integration into the administration
console, Backup Exec provides an easy-to-use application
supporting virus protection, backup, restore, and disaster
recovery.
Tape Driver Installation
Before running the application, make sure the tape driver for
your SLR tape drive is properly installed.
1) Select "Control Panel" from the "Settings" menu.
2) Double click on the "Tape Devices" icon. Choose the
"Drivers" tab.
3) Make a note of the type of drivers currently installed. For
each of the tape drivers you want to update,
sequentially select each driver and click "Remove" to
remove the driver from list. If you are initially adding new
drivers, please skip this step.
4) Select "Add..." from the "Drivers" tab.
5) Select the "Have Disk..." button.
6) Enter the drive/path to the directory where the desired
"oemsetup.inf" file is stored on disk. (<CDROM
Letter>:\ WINNT\Drivers\I386
7) Select "OK" in the "Install From Disk" window.
8) Select one of the options in the "Choose the driver you want to
install, and then click OK." list in the "Install Driver" window;
i.e., select the description of the set of tape drives that you
want load a device driver for.
9) Select "OK" in the "Install Driver" window.
10) If the option appears, then select "New" in the
"Windows NT Setup" dialog; then enter the same
drive/path that was entered in step #6 above.
IMPORTANT!
Always select "New" if it appears -- do NOT select "Current"
Tandberg SLR Installation and User's Guide
37
Tandberg Data
11) If you wish to install other tape device drivers, select "No" in
the "System Settings Change - Do you want to restart your
computer now?" window and repeat steps 4 to 10. After all
the needed device drivers have been installed, select "Yes" in
this window to shutdown and restart Windows NT. This will
activate the changes made.
Software Installation
Insert the Server CD-ROM.
Open My Computer.
Double-click on the CD-ROM icon.
A Browser automatically appears.
Select Backup Exec for Windows NT Small Business
Server Suite.
Click on the install icon.
Follow the instructions on the screen.
NOTE:
For any questions related to this application or its installation, please refer to
the online documentation included on the CD-ROM.
38
Tandberg SLR Installation and User's Guide
Tandberg Data
Legato Networker for Windows NT
All released SLR tape drives from SLR7 and up are certified
with Legato Networker Version 5.5 and higher.
· Legato Networker is a highly reliable, enterprise-strength
storage management solution for distributed networks.
Networker is highly scalable and delivers superior
manageability, availability and performance. Legato
Networker provides built-in support for client connections
and includes client software to protect systems with the same
operating system as the server.
Installation
Before running the application, make sure the tape driver for
your SLR tape drive is properly installed. Please refer to the tape
driver installation on page 29.
1) Insert the Server CD-ROM.
2) Open My Computer.
3) Double-click on the CD-ROM icon.
4) Double-click on the SETUP.EXE file.
5) Follow the instructions on the screen
NOTE:
For any questions related to this application or its installation, please refer to
the online documentation included on the Legato CD-ROM.
Tandberg SLR Installation and User's Guide
39
Tandberg Data
This Page Intentionally Left Blank
40
Tandberg SLR Installation and User's Guide
Tandberg Data
Windows 2000
SCSI Host Adapter
Windows 2000 includes a driver for most SCSI host adapters.
If you cannot find the appropriate driver, please refer to the
installation guide provided with the SCSI host adapter or
contact your computer supplier.
Tape Driver
Windows 2000 includes a tape driver that supports the SLR2,
SLR3, SLR4, and SLR4DC for all versions of Windows 2000
and Service Pack.
The SLR24, SLR7, SLR40, SLR50, SLR60, SLR75,
SLR100 and SLR140 require an additional tape driver that is
available from the Tandberg website at www.tandberg.com.
Windows 2000 Tape Driver
Installation
1) Right click on My Computer.
2) Select Manage, you should see the tape drive under
“Other deices” with a “?”.
Tandberg SLR Installation and User's Guide
41
Tandberg Data
3) Select the device, right click and properties.
4) Select the appropriate driver location.
5) Follow the instructions on the screen.
42
Tandberg SLR Installation and User's Guide
Tandberg Data
Backup Applications
Windows 2000 Embedded Application
The Backup application is included in the Windows 2000
Operating System.
Installation
Before running the application, make sure the tape driver for your
SLR tape drive is properly installed. Please refer to the tape driver
installation on page 47.
To start the application:
·
·
·
·
·
Click on START.
Click on Programs.
Click on Accessories.
Click on System tools.
Select Backup.
Please see Windows NT section for other backup
applications.
Tandberg SLR Installation and User's Guide
43
Tandberg Data
This Page Intentionally Left Blank
44
Tandberg SLR Installation and User's Guide
Tandberg Data
Novell NetWare
Host Adapter
Novell NetWare includes the necessary drivers for most SCSI
host adapters.
If the appropriate driver cannot be found, please refer to the
installation guide provided with the SCSI host adapter.
Most of the Backup applications on Novell NetWare require
the use of the Advanced SCSI Programming Interface (ASPI).
The ASPI driver (ASPITRAN.LNM on Novell 4.1x and
NWASPI.CDM on Novell 4.x and 5) is part of the Operating
System and is normally automatically installed when the SCSI
board is setup on your system.
If you have any problem to install the SCSI host adapter or
install the ASPI compatible driver on this operating system,
please refer to the installation guide provided with the SCSI
host adapter.
Backup Applications
NetWare Embedded Backup Applet on
Novell 4.1x
Installation
On the Server console, type:
LOAD TAPEDAI
SCAN FOR NEW DEVICES*
LIST DEVICES (The SLR appears on screen.)
LOAD TSA410**
LOAD SBACKUP
* When this command is executed, you may see the
following warning:
Tandberg SLR Installation and User's Guide
45
Tandberg Data
Please ignore this warning; Tandberg Data has certified the
SLR tape drives and test reports are available upon request.
** Novell 4.10 and IntranetWare 4.11 only.
NetWare Embedded Backup Applet on
Novell 4.2 and 5
· Novell Sbackup (SBCON for Novell 5) provides simple
Backup and Restore operations.
· This application requires a specific driver to be loaded. (See
next paragraph: Installation)
Installation
On the Server console, type:
NWTAPE.CDM
LOAD TSA500
QMAN NEW*
LOAD SBCON (SBACKUP for Novell 4.2)
* The NEW option is only requested the first time you run this command. This will create
a default queue that will be used by the Backup applet.
NOTE:
For any questions related to this application or its installation, please refer to
the online documentation included on the CD-ROM.
46
Tandberg SLR Installation and User's Guide
Tandberg Data
Computer Associates ARCserveIT for
NetWare 6.61
Computer Associates ARCserveIT for NetWare:
ARCserveIT Single Server for NetWare
Primarily designed for small to midsize organizations and
single-server installations, CA's Single Server for NetWare
products enable users to reap the benefits of powerful
technology at a price point and level of functionality that fits
their needs.
Features
1) Backup Unlimited DOS, OS2, Windows 3.X, Windows 95/98
workstations.
2) Support for Novell Netware 3.x, 4.x, 5.x 3)
Parallel Streaming
4) Automated media management
ARCserveIT Enterprise Edition for Netware A Solution for Multiple Servers
Designed for mid- to large-size organizations, CA's Enterprise
Edition products offer virtually unlimited scalability and crossplatform interoperability for large heterogeneous environments.
Flexible licensing makes Enterprise Edition solutions an ideal
choice for the larger users.
Tandberg SLR Installation and User's Guide
47
Tandberg Data
Tandberg Data bundles products with ARCserveIT Single
Server and Enterprise Edition.
For proper installation, ARCserveIT requires a workstation
(Windows 9x/NT) connected to the Novell Server.
1) Insert the ARCserveIT CD-ROM.
2) Open My Computer.
3) Double-click on the CD-ROM icon
4) A Browser will automatically appear.
5) Select ARCserveIT for NetWare.
6) Click on the install icon.
7) Follow the instructions on the screen.
NOTE:
For any questions related to this application or its installation, please refer to
the online documentation provided on the ARCserveIT CD-ROM.
48
Tandberg SLR Installation and User's Guide
Tandberg Data
Veritas Software Server CD-ROM
Backup Exec for NetWare
Backup Exec is one of the market leaders for NT backup
software.
It is sold in two different versions: Single Server and Multi
Servers.
VERITAS Backup Exec for NetWare provides the latest
backup and restore technology for quickly, reliably and simply
protecting server data. Complete NDS support provides
powerful data protection for large and small businesses alike.
NOTES:
- When Backup Exec for NetWare is installed on Novell 4.1X, both
versions 7.5 and 8.0 can be installed.
- When Backup Exec is installed on Novell 5, only version 8.0 can be
installed.
- Backup Exec version 8.5 is required for compatibility with Novell 5.1.
Installation
Server based installation
Please insert the Installation CD-ROM into the Server's CDROM drive and type at the server console prompt:
CD MOUNT VERITAS
LOAD VERITAS:NETWARE/BEINSTL
Follow the instructions on the screen.
Tandberg SLR Installation and User's Guide
49
Tandberg Data
Workstation based installation
Please insert the installation CD-ROM into the workstation CDROM drive and perform the following steps:
à Under Windows NT, Windows 95, Windows 98,
Windows 98 Second Edition
1)
2)
3)
4)
5)
6)
Open My Computer.
Double-click on the CD-ROM icon
A Browser will automatically appear.
Select Backup Exec for NetWare.
Click on the install icon.
Follow the instructions on the screen.
à Under Windows 3.1X
1)
2)
3)
4)
5)
6)
7)
Open the Windows File Manager.
Click on the drive letter assigned to the CD-ROM.
Double-click on the “setup.exe” file.
A Browser will automatically appear.
Select Backup Exec for NetWare.
Click on the install icon.
Follow the instructions on the screen.
NOTE:
For any questions related to this application or its installation, please refer to
the online documentation provided on the Veritas Software CD-ROM.
50
Tandberg SLR Installation and User's Guide
Tandberg Data
Windows 95
Host Adapter
Windows 95 includes a driver for most SCSI host adapters. Since
most host adapters support Plug-And-Play functionality, the
SCSI interface will be automatically detected after its
installation and the necessary driver(s) copied to the hard disk.
If the host adapter is not automatically detected, please refer to the
installation guide provided with the SCSI host adapter.
Windows 95 Embedded Backup Applet
Windows 95 embedded backup Applet does not contain any
drivers that support SCSI tape drives.
Backup Applications
Since the Windows 95 embedded backup applet does not
include any tape driver that supports SCSI Tape drives, a third
party application is needed to use any of the SLR tape drives.
(For example Veritas Backup Exec for Windows 95/98)
The tape driver is provided by the backup application. For this
reason, after installing your SLR tape drive, it will appear as
"unknown device" by the Windows 95 Device Manager. Please
ignore this information and proceed with the backup software
installation.
Tandberg SLR Installation and User's Guide
51
Tandberg Data
Veritas Software Desktop CDROM
Veritas Backup Exec for Windows 95/98
· Veritas Backup Exec for Windows 95/98 provides a powerful
feature-set with the easiest-to-use interface for reliable,
automated Windows 95/98 data protection. Integrated
Emergency Recovery feature rebuilds your entire system
without reinstalling the operating system or the backup
software. Selectively locate files with the File Find feature for
specific data restores.
· Veritas Backup Exec uses a System tape driver that is copied to
your hard disk during the installation process. This will allow
Windows 95/98 to recognize your SLR tape drive.
Installation
1)
2)
3)
4)
5)
6)
7)
Insert the Desktop CD-ROM.
Open My Computer.
Double-click on the CD-ROM icon.
A Browser will automatically appear.
Select Backup Exec for Windows 95/98.
Click on the install icon.
Follow the instructions on the screen.
NOTE:
For any questions related to this application or its installation, please refer to
the online documentation provided on the Veritas Software CD-ROM.
52
Tandberg SLR Installation and User's Guide
Tandberg Data
Windows 98
Windows 98 2nd Edition
Host Adapter
Windows 98 and Windows 98 Second Edition include a driver
for most SCSI host adapters. Since most SCSI host adapters
support Plug-And-Play functionality, The SCSI interface it will
be automatically detected after its installation and the necessary
driver(s) copied to the hard disk.
If the host adapter is not automatically detected, please refer to
the installation guide or the Read-Me file provided with the
SCSI board.
Backup Applications
Windows 98 Embedded Backup Applet
·
This application provides complete protection for your data,
including automatic backup operation. (Scheduled Operation)
· A Backup Wizard helps you performing all operations you
want to do with the SLR tape drive.
• The embedded backup applet supports Tandberg SLR2, SLR3,
SLR4, SLR4DC and SLR5 tape drives. For SLR24 and
SLR50, tape drives, Veritas Backup Exec for Windows 95/98
is required. (SLR7, SLR40, SLR60, SLR75, SLR100 and SLR140
may work but are not qualified by Tandberg Data)
Installation
To start the Backup application:
1) Click on START.
2) Click on Programs.
3) Click on Accessories.
4) Click on System Tools.
5) Select Backup.
Tandberg SLR Installation and User's Guide
53
Tandberg Data
Veritas Software Desktop CD-ROM
Veritas Backup Exec for Windows 95/98
· Veritas Backup Exec provides a powerful feature-set with an
easy to-use interface for reliable, automated data protection.
Integrated Emergency Recovery feature rebuilds your entire
system without reinstalling the operating system or the backup
software. Selectively locate files with the File Find feature for
specific data restores.
· Veritas Backup Exec uses a System tape driver that is copied to
your hard disk during the installation process. This will allow
Backup Exec to recognize your SLR Tape drive.
Installation
1) Insert the Desktop CD-ROM.
2) Open My Computer.
3) Double-click on the CD-ROM icon.
4) A Browser will automatically appear.
5) Select Backup Exec for Windows 95/98.
6) Click on the install icon.
7) Follow the instructions on the screen.
NOTE:
This version of the application is fully compatible with Windows 98 Second
Edition.
54
Tandberg SLR Installation and User's Guide
Tandberg Data
SCO Open Server Release 5
Host Adapter
SCO OS includes a driver for most SCSI host adapters.
If you can’t find the appropriate driver, please refer to the installation
guide provided with the SCSI host adapter.
SLR Tape Drive Compatibility Chart
Please see www.tandberg.com Software Compatibility for the most current
information
SCO OS 5
Release 5.0.4
SCO OS 5
Release 5.0.5
SCO certified
Tandberg certified
SCO certified
Tandberg certified
SCO certified
Tandberg certified
SCO certified
Tandberg certified
SCO certified
Tandberg certified
SCO certified
Tandberg certified
SCO certified
Tandberg certified
SCO certified
Tandberg certified
SLR5
SCO certified
Tandberg certified
SCO certified
Tandberg certified
SLR24
SCO certified
Tandberg certified
Tandberg certified
SCO certified
Tandberg certified
SCO certified
Tandberg certified
SCO certified
Tandberg certified
SCO certified
Tandberg certified
Tandberg certified
SLR2
SLR3
SLR4
SLR4DC
SLR40
SLR60
SCO certified
Tandberg certified
Tandberg Certified
SLR75
Tandberg certified
SLR100
Tandberg certified
SCO certified
Tandberg certified
SLR140
Tandberg certified
Tandberg certified
SLR50
Tandberg SLR Installation and User's Guide
55
Tandberg Data
Installation
1) Login as root.
2) Type the following command: MKDEV TAPE.
3) Select Install a SCSI Tape Drive.
4) Enter the prefix of the SCSI host adapter that supports
this device.
(Typing h gives you a list of the supported SCSI host
adapter).
5) Which SCSI host adapter supports this device?
(If only one SCSI host adapter in installed select 0. If
two SCSI host adapter of the same type are installed,
select 1).
6) What is the target ID for this device? (2 is the Tandberg
default SCSI-ID)
7) What is the LUN of this device?
(Must be set to 0).
8) Update the SCSI Configuration?
(Check first that the table on the screen is conformed to
the Tape Drive configuration).
NOTES:
- The Kernel has to be rebuilt to reflect the new Hardware configuration,
and a reboot is mandatory before you can use your SLR tape drive. For any questions related to this operating system or its embedded
Backup applet, please refer to the documentation provided on the
SCO OS CD-ROM.
56
Tandberg SLR Installation and User's Guide
Tandberg Data
Backup Applications
SCO Open Server System Commands
TAR, CPIO and DD allow simple backup, verify or restore
operations to be performed.
2 different device drivers can be used:
· A Non Rewind device driver (used to perform append Backup)
· A Rewind device driver (used only to perform overwrite
backup)
For a complete explanation on how to use the system commands,
please refer to the SCO Open Server documentation, or the online
help. (MAN command).
Tar command examples:
tar cvf /dev/rStp0 /etc will perform the backup of the /etc
directory
tar tvf /dev/rStp0 will read the data on the tape
tar xvf /dev/rStp0 will restore the data from the tape to the
current directory tree
SCO Open Server Backup Manager
Installation
SCO Open Server Graphic Interface 1) Click on
System Administration.
2) Double-click on Backup Manager.
SCO Open Server Console 1) Login
as Root.
2) Type SCOADMIN.
3) Select Backup Manager.
Tandberg SLR Installation and User's Guide
57
Tandberg Data
ARCserve Open Lite for SCO Open Server
· Embedded with SCO Open Server Release 5, ARCserve Open Lite
offers simple, comprehensive Backup and Restore for your SCO
System.
· The full-featured version of ARCserve Open provides advanced
backup and restore Services, including support for NetWare Server
and Windows 95/98 client.
· The SLR2, SLR3 and SLR4 are supported.
NOTE:
ARCserve Open Full-featured version is required for the support of the
SLR5, SLR24, SLR7, SLR40, SLR50, SLR60, SLR75, SLR100 and
SLR140 products. Please refer to the Computer Associates Compatibility
Guide at www.cai.com and Tandberg Compatibility Guide at
www.tandberg.com for more information.
Installation
The installation of ARCserve Open Lite is included in the SCO
Open Server Setup.
If it was not selected during the O/S setup, you can use the Software
Manager to install it.
SCO OS Graphic Interface
1) Double-click on Software Manager. 2)
Select Software, then Install New.
3) Follow the instructions on the screen.
SCO OS Console
1) Login as Root.
2) Type SCOADMIN.
3) Select Software Manager, then Software and Install New.
4) Follow the instructions on the screen.
NOTE:
For any questions related to this application or its installation, please refer to
the online documentation provided on the SCO CD-ROM.
58
Tandberg SLR Installation and User's Guide
Tandberg Data
SCO UnixWare
Host Adapter
SCO UnixWare includes a driver for most SCSI host adapters.
If the appropriate driver cannot be found, please refer to the
installation guide provided with the SCSI host adapter.
Installation
1) Install the SLR Tape Drive. 2)
Turn On the PC.
3) During the boot process, SCO UnixWare automatically detects
the SLR and install the correct tape driver.
NOTE:
For any questions related to this operating system or its embedded Backup
applet, please refer to the documentation provided on the SCO CD-ROM.
Backup Applications
SCO UnixWare System Command
TAR, CPIO and DD allow simple backup, Verify or Restore
operation to be performed.
2 different device drivers can be used:
· A Non Rewind device driver (used to perform append Backup)
· A Rewind device driver (used only to perform overwrite
backup)
For a complete explanation on how to use the system commands,
please refer to the SCO UnixWare documentation, or the online
help. (MAN command).
Tandberg SLR Installation and User's Guide
59
Tandberg Data
Tar command examples:
tar cvf /dev/rmt/c0s0 /etc will perform the backup of the /etc
directory
tar tvf /dev/rmt/c0s0 will read the data on the tape
tar xvf /dev/rmt/c0s0 will restore the data from the tape to the
current directory tree
SCO UnixWare ARCserveIT
• Embedded with SCO UnixWare 7, Computer Associates
ARCserveIT Enterprise Edition offers complete and
comprehensive Backup and Restore for your SCO System.
• The SLR5, SLR24, SLR7, SLR40, SLR50, SLR60, SLR75,
SLR100 and SLR140 are supported. Please refer to the latest
compatibility information from our web site at
www.tandberg.com.
Installation
The installation of ARCserveIT is included in the SCO UnixWare
setup.
If it was not selected during the O/S setup, you must use the
Software Management to install it.
SCO UnixWare Graphic Interface 1)
Double-click on SCO Admin.
2) Select Software Management.
3) Select application Installer.
4) Follow the instructions on the screen.
SCO UnixWare Console
1) Login as Root.
2) Type SCOADMIN.
3) Select Software Management.
4) Select application Installer.
5) Follow the instructions on the screen.
NOTE:
For any questions related to this application or its installation, please refer to
the online documentation provided on the SCO UnixWare CD-ROM.
60
Tandberg SLR Installation and User's Guide
Tandberg Data
Sunsoft Solaris
Tape Drive Installation
1) Install the SLR Tape Drive.
2) Turn on the SUN workstation or server.
3) Use Boot –r .
This will reconfigure the /devices directory for the SLR to work
properly on the machine.
For improved performance using the SLR24, SLR7, SLR40, SLR50,
SLR60, SLR75, SLR100 and SLR140, a specific system file can be
modified:
/kernel/drv/st.conf
ST.CONF File entries for Tandberg SLR24, SLR7, SLR40,
SLR50, SLR60, SLR75, SLR100 and SLR140:
"TANDBERGSLR6","Tandberg SLR24","TANDBERG",
"TANDBERGMLR3","Tandberg SLR50","TANDBERG",
"TANDBERGSLR7","Tandberg SLR7","TANDBERG",
"TANDBERGSLR40","Tandberg SLR40","TANDBERG",
"TANDBERGSLR60","Tandberg SLR60","TANDBERG",
"TANDBERGSLR75","Tandberg SLR60","TANDBERG",
"TANDBERGSLR100","Tandberg SLR100","TANDBERG",
"TANDBERGSLR140","Tandberg SLR140","TANDBERG",
TANDBERG = 1,0x37,0,0x963b,1,0,0;
NOTE:
Updated configuration file (ST.CONF) can be downloaded from the Tandberg
WEB at www.tandberg.com. Please refer to the Readme provided with the file
for more information on the installation process.
Tandberg SLR Installation and User's Guide
61
Tandberg Data
Backup Applications
Sun System Command
TAR, CPIO and DD allows simple backup, verify or restore
operations to be performed.
2 different device drivers can be used:
· A Non Rewind device driver (used to perform append Backup)
· A Rewind device driver (used only to perform overwrite backup)
Tar command examples:
tar cvf /dev/rmt/0 /etc will perform the backup of the /etc
directory
tar tvf /dev/rmt/0 will read the data on the tape
tar xvf /dev/rmt/0 will restore the data from the tape to the current
directory tree.
For a complete explanation on how to use the system commands,
please refer to the Sun documentation, or the online help. (MAN
command).
Legato NetWorker for Solaris
All SLR tape drives (from SLR7 to SLR140) are certified with
Legato Networker Version 5.5 and higher.
• Legato Networker is a highly reliable, enterprise-strength storage
management solution for distributed networks. Networker is highly
scalable and delivers superior manageability, availability and
performance. Legato Networker provides built-in support for
client connections and includes client software to protect systems
with the same operating system as the server.
62
Tandberg SLR Installation and User's Guide
Tandberg Data
Installation
Before running the application, make sure the tape driver for your
SLR tape drive is properly installed. Please refer to the tape driver
installation on page 61.
1) Login as root.
2) Locate the Solaris directory on the installation CD.
3) Set the PATH environment for the user root to the
location where NetWorker executables reside.
4) Enter ”pkgadd –d ./” to install NetWorker.
5) Follow the instructions on the screen
Please refer to the Installation documentation provided on the
Legato CD-ROM for additional information.
Tandberg SLR Installation and User's Guide
63
Tandberg Data
This Page Intentionally Left Blank
64
Tandberg SLR Installation and User's Guide
Tandberg Data
Apple Macintosh
Backup Applications
Dantz Retrospect
Dantz Retrospect offers the following features:
· Automatic Setup with EasyScript Uses answers to a few
simple questions to create backup scripts that run automatically
with multiple sources, destinations, file selection criteria, and
schedules.
•
Fully Automated Backups
Launches automatically to run unattended backups on any schedule
(daily, weekly, etc.).
· One-step Restore
Restore an entire hard disk in a single step even after multiple
incremental backups. Or, restore any part of your hard disk exactly
the way it was after any backup session.
•
Disaster Recovery
Emergency bootable CD aids in disaster recovery in the event of
complete hard drive failure.
Note: SLR 2-5 tape drives are supported in the native version. For the
Tandberg SLR24, SLR40, SLR50, SLR60, SLR75, SLR100 and
SLR140 an Advanced Driver Kit is required, available from Dantz.
(www.dantz.com)
Retrospect Installation
1) Insert Disk 1 (or the Retrospect CDROM depending on
the version you purchased).
2) Double click on the Install icon.
3) Follow the instructions on the screen.
NOTE:
For any questions related to this application or its installation, please refer to the
online documentation provided with the application.
Tandberg SLR Installation and User's Guide
65
Tandberg Data
This Page Intentionally Left Blank
66
Tandberg SLR Installation and User's Guide
Tandberg Data
IBM RS/6000/pSeries
Tape Drive Installation
To install any of the SLR tape drives on IBM AIX, the Smit utility
must be used.
1) Be sure the SCSI-ID of the tape drive is not used in the SCSI SubSystem.
2) Install the SLR tape drive.
3) Login as root.
4) Run smit devices.
5) Select Install/Configure Devices Added after IPL.
6) Follow the instructions on the screen.
For improved performance on SLR24, SLR7, SLR40, SLR50, SLR60,
SLR75, SLR100 and SLR140, the default block size should be set to 0.
1) Run smit devices.
2) Select Change/Show characteristics of a tape drive.
3) Select the tape driver you want to modify.
4) Set the BLOCK size to 0.
Tandberg SLR Installation and User's Guide
67
Tandberg Data
Backup Applications
IBM AIX System Command
TAR, CPIO and DD allow simple backup, Verify or Restore
operation to be performed.
2 different device drivers can be used:
· A Non Rewind device driver (used to perform append Backup)
· A Rewind device driver (used only to perform overwrite
backup)
Please refer to the IBM AIX documentation for more information.
Tar command examples:
tar cvf /dev/rmt0 /etc will perform the backup of the /etc
directory
tar tvf /dev/rmt0 will read the data on the tape
tar xvf /dev/rmt0 will restore the data from the tape to the
current directory tree
IBM AIX Storage Manager
Installation
This application is part of the operating system.
1) Open the System Administrator Window.
2) Double-click on Storage Manager.
3) The list of the available tape device(s) appears on the
screen.
4) Follow the instructions on the screen to continue.
NOTE:
For any questions related to this application or its installation, please refer to the
IBM online documentation.
68
Tandberg SLR Installation and User's Guide
Tandberg Data
Legato Networker for AIX
Tandberg SLR24, SLR7, SLR40, SLR50, SLR60, SLR75, SLR100 and
SLR140 tape drives are certified with Legato Networker Version 5.5
and higher.
· Legato NetWorker is a highly reliable, enterprise-strength storage
management solution for distributed networks. NetWorker is highly
scalable and delivers superior manageability, availability and
performance. Legato NetWorker provides built-in support for
client connections and includes client software to protect systems
with the same operating system as the server.
· Legato Networker uses the AIX system tape driver. Please refer
to page 57 for installation.
Installation
The installation is depending on the version of the AIX operating
system. Please refer to the Installation documentation provided on the
Legato CD-ROM.
NOTE:
For any questions related to this application or its installation, please refer to
the online documentation included on the CD-ROM.
Quadratec Time Navigator for AIX
Time Navigator is the professional Enterprise-wide Backup and
Archival solution.
Time Navigator is a software that backs up automatically and
archives data. It also provides safe data restoration on several
locations whose backup requirements and constraints are identical.
Installation
Please refer to the Installation documentation provided for
instructions and additional information.
Tandberg SLR Installation and User's Guide
69
Tandberg Data
Arkeia Backup Software for AIX
Arkeia is a software that backs up and archives data. It has a simple
interface, but very powerful features.
Installation
Please refer to the Installation documentation provided for
instructions and additional information.
70
Tandberg SLR Installation and User's Guide
Tandberg Data
HP/UX
Tape Drive
- When the HP Server or workstation is equipped with GSC Bus
Architecture, the HPUX System tape driver can be used by all
backup applications.
NOTE:
A patch must be downloaded on the Tandberg WEB for this environment.
Please refer to the Readme file provided with the patch for more information.
- When the HP Server or Workstation is equipped with PB Bus
Architecture (Precision Bus), a tape driver is available on the
Tandberg WEB at www.tandberg.com. Please refer to the
Installation Procedure provided with the driver for more
information.
Tape Drive Installation (GSC-bus Only)
To install the SLR tape drives, the SAM utility must be used.
1) Login as root.
2) Run SAM.
3) Select Peripheral Devices.
4) Select Action/Add.
The SLR will be automatically detected and the necessary drivers
installed.
Tandberg SLR Installation and User's Guide
71
Tandberg Data
Backup Applications
HP/UX System Command
TAR, CPIO and dd allows simple backup, verify or restore
operations to be performed.
2 different device drivers can be used:
· A Non Rewind device driver (used to perform append Backup)
· A Rewind device driver (used only to perform overwrite
backup)
Tar command examples:
tar cvf /dev/rmt0 /etc will perform the backup of the /etc
directory
tar tvf /dev/rmt0 will read the data on the tape
tar xvf /dev/rmt0 will restore the data from the tape to the
current directory tree
For a complete explanation on how to use the system commands,
please refer to the HPUX documentation, or the online help. (MAN
command).
72
Tandberg SLR Installation and User's Guide
Tandberg Data
Linux
SCSI Host Adapter
Linux contains a driver for most SCSI host adapters.
If the driver cannot be found, please refer to the documentation
provided with the SCSI host adapter.
Tape Drive Installation
1) Install the SLR Tape Drive. 2)
Turn On the PC.
3) During the boot process, Linux automatically detects the SLR
and install the correct tape driver.
NOTE:
For any questions related to this operating system or its embedded backup
applet, please refer to the documentation provided on the Linux CDROM.
Tandberg SLR Installation and User's Guide
73
Tandberg Data
Backup Applications
Linux System Command
TAR, CPIO and DD allows simple backup, verify or restore
operations to be performed.
2 different device drivers can be used:
· A Non Rewind device driver (used to perform append Backup)
· A Rewind device driver (used only to perform overwrite backup)
Tar command examples:
tar cvf /dev/st0 /etc will perform the backup of the /etc
directory
tar tvf /dev/st0 will read the data on the tape
tar xvf /dev/st0 will restore the data from the tape to the current
directory tree
For a complete explanation on how to use the system commands,
please refer to the Linux documentation, or the online help. (MAN
command).
Legato Networker for Linux
Tandberg SLR24, SLR7, SLR40, SLR50, SLR60, SLR75, SLR100 and
SLR140 tape drives are certified with Legato Networker Version 5.5
and higher.
• Legato NetWorker is a highly reliable, enterprise-strength storage
management solution for distributed networks. NetWorker is highly
scalable and delivers superior manageability, availability and
performance. Legato NetWorker provides built-in support for
client connections and includes client software to protect systems
with the same operating system as the server.
74
Tandberg SLR Installation and User's Guide
Tandberg Data
· Legato Networker uses the Linux system tape driver. Please refer
to page 70 for installation.
Installation
1) Insert the NetWorker installation CD-ROM.
2) Open the Linux Console.
3) Locate the Linux directory on the installation CD.
4) Type “./NWInstall” to install NetWorker.
5) Follow the instructions on the screen.
Please refer to the Installation documentation provided on the
Legato CD-ROM for additional information.
Quadratec Time Navigator for Linux
Time Navigator is the professional Enterprise-wide Backup and
Archival solution.
Time Navigator is a software that backs up automatically and
archives data. It also provides safe data restoration on several
locations whose backup requirements and constraints are identical.
Installation
Please refer to the Installation documentation provided for
instructions and additional information.
Tandberg SLR Installation and User's Guide
75
Tandberg Data
Computer Associates ARCServeIT for
Linux
ARCServeIT is the professional Enterprise-wide Backup and
Archival solution in one package.
Installation
Please refer to the Installation documentation provided for
instructions and additional information.
EST Inc. BRU Pro for Linux
BRU PRO is a software that backs up automatically and archives
data. It also provides safe data restoration on several locations whose
backup requirements and constraints are identical.
Installation
Please refer to the Installation documentation provided for
instructions and additional information.
Arkeia Backup Software for Linux
Arkeia is a software that backs up and archives data. It has a simple
interface, but very powerful features.
Installation
Please refer to the Installation documentation provided for
instructions and additional information.
76
Tandberg SLR Installation and User's Guide
Tandberg Data
Tape Drive Utility Disk
Provided with each Tandberg SLR tape drive kit and solution, the
Tandberg Tape Drive Utility Disk/Resource CD offers the following
utilities:
- Tandberg Tape Drive Optimizer
This utility is used for tuning the SLR performance on SLR24 and
SLR50 only.
SLR7, SLR40, SLR60, SLR75, SLR100 and SLR140 have an
"Auto-sensing" transfer rate and will automatically adjust to optimize
performance on most systems.
A Dos, Windows 95/98 (Second Edition included) and Windows NT
version is included.
- FlashIt
This utility is used for updating the SLR firmware.
A Dos, Windows 95/98 (Second Edition included) and Windows NT
version is included. For SLR7, 40, SLR60, SLR75, SLR100, SLR140,
an updated version is available on the Tandberg WEB at
www.tandberg.com.
- Tandberg Tape Drive Viewer
This utility gives detailed information on the SLR configuration.
A Windows 95/98(Second Edition Included) and Windows NT
version is included.
NOTE:
For any information regarding this utility disk or its installation, please refer to the
README file available on the disk.
Tandberg SLR Installation and User's Guide
77
Tandberg Data
This Page Intentionally Left Blank
78
Tandberg SLR Installation and User's Guide
Tandberg Data
Troubleshooting
In case of problems with operation of your SLR tape drive and
before contacting the Customer Services Group, please be sure to
check the following:
Hardware Checking
• Check that the system recognizes the tape drive during the boot
process.
• Check that the SCSI host adapter recognizes the tape drive
during its initialization.
· Did you check the tape drive Front Panel LED status?
· Check that the tape drive has been configured correctly.
• Check that the SCSI-ID of the drive is not conflicting on the SCSIbus.
· Check that the power cable is inserted correctly.
· Check that the SCSI cable connections are made correctly.
Software Checking
• Check that the operating system does not report a problem
during the boot.
• Check that the correct Tape Device Driver has been installed
properly.
• Check that the driver for the SCSI host adapter is present
and loaded properly.
• Check that the Backup software does not report an error message
when loading.
· Reinstall the Backup Software and check that the SLR is
recognized.
Tandberg SLR Installation and User's Guide
79
Tandberg Data
Verifying Recent Changes
If the SLR has been installed previously and operating correctly but
is now incurring a problem, verify any recent changes to the system
to ensure that these changes are not causing the problem. Try the
following:
1) If the system configuration has changed, remove the change
to see if it affected the tape drive.
2) If an operating system corrective patch has been installed,
remove it to see if it affected the tape drive.
3) If a SCSI device has been added, check for SCSI-ID
conflicts.
4) If a SCSI device has been added, check if the SCSI
termination has been properly set.
Correcting Intermittent Failures
If the SLR fails intermittently:
1) Clean the tape drive.
2) Check the SCSI termination on the SCSI Bus.
If the problem occurs in the middle of an operation:
1) Try with a different data cartridge.
2) If the error occurs when the software scans for the files to
be backed-up, please operate a SCANDISK operation to
check the state of the File Systems(s) and hard disk.
If the error occurs always on the same file or directory:
1) Try to remove the file or directory from the Backup
operation to see if that corrects the problem.
2) Try with a different data cartridge.
Software Troubleshooting
A complete Software Troubleshooting Guide is available on the
Tandberg WEB at the following URL: www.tandberg.com.
80
Tandberg SLR Installation and User's Guide
Tandberg Data
Appendix
Regulatory Compliance Notices
Manufacturer Declaration of Conformity:
™
This is to certify that the SLR Tape Backup Systems: Internal
™
SLR models:
Tandberg SLRx
Tandberg SLRxx
Internal Tape Drive
Internal Tape Drive
EC Certificate of Conformity Tandberg SLRxxx
Intern
al Tape Drive
™
External SLR models:
Tandberg SLRx Ext. External Tape Solution Tandberg
SLRxx Ext. External Tape Solution Tandberg SLRxxx Ext.
External Tape Solution
Comply with the provisions of the Directive of the Council of the European Communities on
the approximation of the laws of the Member States relating to electromagnetic
compatibility (EMC Directive 89/336/EEC of 3. May 1989). These products also comply with
the Low Voltage Directive (73/23/EEC of 19. February 1973).
This declaration of conformity of the European Communities is the result of an examination
carried out by the Quality Assurance Department of Tandberg Data ASA in accordance
with European Standards EN 50081-1 and 50082-1, as laid down in Article 10 of the
™
Directive. The SLRx Tape Backup System complies with the limits for Class B computing
device pursuant to subpart B of Part 15 of the FCC Rules. Only equipment complying with
Class B limits may be attached to this backup system.
Operation with non-complying equipment is likely to result in interference to radio and TV
reception.
™
The SLRx Tape Backup System complies with the Safety Standards: EN 60950,
UL 1950, CSA 950 and TÜV 60950.
Tandberg SLR Installation and User's Guide
81
Tandberg Data
This Page Intentionally Left Blank
82
Tandberg SLR Installation and User's Guide
Tandberg Data
Glossary of Terms
Active Termination
ALDC
Enhanced SCSI termination that provides better
stability and noise immunity of the electrical signals on
the SCSI-bus lines.
Adaptive Lossless Data Compression. The hardware
data compression method used with SLR4DC, 5, 24, 7,
40, 50, 60, 75, 100 and 140 tape drives.
Append When data is written after previously
recorded data, as opposed to overwriting the
previously recorded data.
ASPI
Advanced SCSI Programming Interface. Standard SCSI
software that acts as a liaison between host adapters and
SCSI device drivers. ASPI enables host adapters and
device drivers to share a single SCSI hardware interface.
Auto sensing
SLR feature that allow detection of the best transfer rate to
use for optimizing performance on the SCSI-bus.
BOT
of Tape
Designated by a specific hole pattern on quarterBeginning
inch data cartridge media.
Data Compression
There are two ways to compress data on tape. Through the
software data compression feature for the SLR2, SLR3
and SLR4 or using hardware data compression on the
SLR4-DC, SLR5, SLR24, SLR40, SLR50, SLR60,
SLR75, SLR100 and SLR140.
Device Driver
A software program that enables a computer to
communicate with peripheral devices such as a hard disk or
tape drives. Each type of device needs a different device
driver. Device drivers are stored on a computer's hard disk
and are typically loaded into memory at boot time.
Tandberg SLR Installation and User's Guide
83
Tandberg Data
EEPROM
GUI
ID
LVD
Overwrite
Electrically Erasable Programmable Read Only. An integrated
circuit typically used to store configuration information.
Graphical User Interface. Software which interacts with
the user.
See SCSI-ID.
LVD stands for Low Voltage Differential.
LVD provides better stability and noise immunity of the
electrical signals on the SCSI-bus lines. LVD also allows
longer SCSI Bus length.
A method of recording over data previously written on tape
without performing a erase operation before.
PNP
Plug-and-Play
RWW
A hardware and software mechanism that provides
an automatic way for the system to self-configure system
resources such as I/O ports, IRQ, and DMA channels
between PNP cards and other devices in the system.
Read While Write: All Tandberg Tape drive automatically
and internally read the data just being written to the tape to
avoid writing to bad block.
SCAM
Configured
AutoMagically
SCSI-ID
84
A SCSI protocol that assigns automatically SCSISCSI
IDs to SCAM capable devices such as the SLR
Tape Drives when you boot the system.
A unique identifier assigned to SCSI devices that enables
them to communicate with a computer when they are
attached to a host adapter via the SCSI-bus. Each SCSI
host adapter Board has eight available SCSI-IDs with
numbers 0 through 7 (or 0 through 15 for Wide SCSI
adapters). Usually the host adapter itself is assigned SCSIID 7.
Tandberg SLR Installation and User's Guide
Tandberg Data
SLR™
Ultra/Ultra2
Scaleable Linear Recording.
16 bit WIDE SCSI/LVD interface used with SLR7,
24, 40, 50, 60, 75, 100 and 140 tape drives.
SLR™ is a registered trademark of Tandberg Data.
Veritas Software, Veritas Backup, Veritas Backup Exec are trademarks of Veritas Software Inc. in the United States. Computer
Associates, ARCserveIT are trademarks of Computer Associates Inc. in the United States.
Windows NT, Windows 95, Windows 98, MS-DOS, Windows are registered trademarks of Microsoft Corporation in the United
States.
Novell NetWare is a registered trademark of Novell Inc.
All other trademarks are registered marks of their respective owners.
Tandberg SLR Installation and User's Guide
85
Tandberg Data
This Page Intentionally Left Blank
86
Tandberg SLR Installation and User's Guide
TANDBERG SLR
PC-BACKUP-SYSTEME
Installation und Benutzeranweisung
© Tandberg Data ASA
Teil-Nr.
August
43 18 55-07
2003
Bei unserer Marketingabteilung erhalten Sie folgende Publikationen:
Serie
Publ.- Nr.
Teil- Nr. Titel
Tandberg SLR
9048
6028
6047
43 05 08
42 26 86
42 30 42
9084
43 15 65
9033
43 01 37
9031
43 04 44
9063
43 07 43
9100
9144
43 17 88
43 21 67
9148
9149
9156
43 22 23
43 22 22
42 22 46
9162
43 23 17
Tandberg SLR Product Line Reference Manual
Tandberg SLR Product Line Maintenance Manual
Tandberg SLR Product Line SCSI-2 Interface Functional
Specifications
Tandberg SLR Product Line - SLR5 4.0/8.0GB Product
Verification Reports
Tandberg SLR Product Line - SLR4 (TDC 4220) Product
Verification Reports
Tandberg SLR7, SLR24, SLR40, SLR50, SLR60
SLR75, SLR00 and SLR140 Reference Manual
Tandberg SLR7, SLR24, SLR40, SLR50, SLR60
SLR75, SLR00 and SLR140 - SCSI Interface Functional
Specifications
Tandberg SLR50 (MLR3) PVR Manual
Tandberg SLR100, SLR60 and SLR40
PVR Manual - Internal
Tandberg SLR24-100 PVR Manual - External
Tandberg SLR2-5 PVR Manual - External
Tandberg SLR24 and SLR50 PVR Manual - Internal
(VU2000)
Tandberg SLR7 PVR Manual - Internal
Hinweis:
Die vorliegende Publikation kann Designelemente enthalten, für die Patente erteilt worden
sind oder noch anstehen. Durch die Veröffentlichung dieser Informationen überträgt
TANDBERG DATA ASA keine Lizenz für irgendein Patent oder irgendwelche anderen
Rechte.
TANDBERG DATA ASA übernimmt für eventuelle Fehler in dieser Publikation keine
Verantwortung.
Das Anliegen von TANDBERG DATA ASA ist die ständige Verbesserung der Produkte,
sobald neue Techniken und Komponenten zur Verfügung stehen. TANDBERG DATA
ASA behält sich deshalb das Recht vor, die Spezifikationen jederzeit abzuändern.
Für eventuelle Kommentare zu dieser Publikation sind wir dankbar.
IMPORTANT!
The Tandberg SLRx equipment must be connected to an earthed mains
socket outlet!
VIKTIG!
Apparatet må kun tilkobles jordet stikkontakt!
WICHTIGE
SICHERHEITSHINWEISE!
Benutzen Sie stets das werkseitig mitgelieferte Netzkabel und verbinden Sie
es ausschließlich mit geerdeten Netzsteckdosen!
VIKTIGT!
Apparaten får endast anslutas till jordat uttag!
Tandberg Data
Inhaltsverzeichnis
Einleitung
1
Inhalte dieser Lösung
3
Information
5
Bezeichnungen der Laufwerke
Kapazität der Laufwerke
Leistung der Laufwerke
Medien-Spezifikationen
Kompatibilität des Bandformats
Daten-Komprimierung
5
5
6
6
6
7
Installation des Laufwerks
9
Installation der SCSI-Controller-Board
SCSI-Konfiguration
Externe SLR2 ® SLR140:
SCSI-Bus-Termination bei internen Bandlaufwerken
SCSI-Bus-Termination bei externen Laufwerken im
Beistellgehäuse
Montage des internen Laufwerks
Montage des Bandlaufwerks
Montage des Tabletop-Laufwerks
Betrieb des Bandlaufwerks
Zurückspulen einer Daten-Cartridge
9
11
12
13
15
15
17
19
21
23
Installation der Software
27
Windows NT
29
SCSI-Host-Adapter
Treiber
Installation bei Windows NT 4.0 Treiber
Backup-Anwendungen
Computer Associates ARCserveIT für Windows NT
Veritas-Software-Server-CD-ROM
Legato Networker für Windows NT
29
29
29
31
32
35
39
Windows 2000
41
SCSI-Host-Adapter
Treiber
Installation des Windows 2000-Treibers
Backup Anwendungen
41
41
41
43
Novell NetWare
45
Host-Adapter
Backup-Anwendungen
Veritas-Software-Server-CD-ROM
45
45
49
Tandberg SLR Installation und Benutzeranweisung
i
Tandberg Data
ii
Windows 95
51
Host-Adapter
Backup-Anwendungen
Veritas-Software-Desktop-CD-ROM
Windows 98 Windows 98 2nd Edition
Host-Adapter
Backup-Anwendungen
Veritas-Software-Desktop-CD-ROM
51
51
52
53
53
53
54
SCO-Open-Server Release 5
55
Host-Adapter
Backup-Anwendungen
55
57
SCO-UnixWare
59
Host-Adapter
Backup-Anwendungen
Sunsoft-Solaris
Installation des Laufwerks
Backup-Anwendungen
59
59
61
61
62
Apple Macintosh
65
Backup-Anwendungen
65
IBM RS/6000
67
Installation des Laufwerks
Backup-Anwendungen
67
68
HP/UX
71
Laufwerk
Backup-Anwendungen
71
72
Linux
73
SCSI-Host-Adapter
Backup-Anwendungen
73
74
Laufwerk Utility Disk
77
Problemlösung
79
Hardware-Kontrolle
Software-Kontrolle
Verifizierung der letzten Änderungen
Behebung von sporadischen Fehlern
Software-Problemlösung
79
79
80
80
80
Anhang
81
Hinweise zu Zulassungsrichtlinien
81
Terminologie
83
Tandberg SLR Installation und Benutzeranweisung
Tandberg Data
Einleitung
Herzlichen Glückwunsch zu Ihrer
neuen Tandberg Data SLR-Band
Speicherlösung!
Für Tandberg Data hat die Zufriedenheit der Kunden höchste Priorität.
Wir garantieren, dass Ihr Produkt unsere Fabrik ohne jeglichen Defekt
verlassen hat. Sollten Sie dennoch mit der Qualität Ihres Produkts nicht
zufrieden sein, nehmen Sie zur Behebung Ihres Problems bitte
unverzüglich Kontakt mit Ihrem Agenten, Händler oder mit der nächsten
Tandberg-Niederlassung auf.
Sollten Sie bei Problemen mit Ihrem SLR-Bandspeichergerät technische
Hilfestellung brauchen, genügt ein Anruf oder ein Telefax an eine der
Adressen, die Sie auf der Rückseite Ihres Handbuchs finden. Fragen Sie
dort nach dem Kundendienst.
Tandberg Data ASA ist für den professionellen Markt der weltweit
führende
Lieferant
von
hochentwickelten
Produkten
zur
Datenspeicherung auf Band. Das Unternehmen bietet ein breites
Spektrum an Produkten und Lösungen für den Datenschutz und andere
Benutzeranwendungen im Bereich der Datenspeicherung.
Tandberg Data liefert über gut ausgebaute Verkaufskanäle an weltweit
führende OEMs Bandlaufwerke der Markenzeichen Travan NS™, SLR™
und DLT™ sowie Datenspeicherungslösungen auf Band.
Sie finden auf den folgenden Seiten vor Beginn des
Installationshandbuchs einige kurzgefasste Informationen über das
Tandberg Data-SLR Bandspeichergerät, sowie eine Liste darüber, was zu
dem von Ihnen gewählten Produkt gehört.
Alle in diesem Handbuch erwähnten Dokumentationen können als PDFDatei von der Tandberg Data Website heruntergeladen werden:
www.tandberg.com
Tandberg SLR Installation und Benutzeranweisung
1
Tandberg Data
Diese Seite bleibt leer
2
Tandberg SLR Installation und Benutzeranwe isung
Tandberg Data
Inhalte dieser Lösung
Bitte überprüfen Sie den Inhalt Ihres Pakets,
bevor Sie mit der Installation beginnen!
Bei interner Lösung:
· Internes Tandberg SLR-Bandlaufwerk (SLR2-SLR140)
· Internes SCSI-Kabel (mit entfernbaren LVD/SE Terminator für
Tandberg SLR24, SLR7, SLR40, SLR50, SLR60, SLR75, SLR100 und SLR140)
· Daten-Cartridge (1 oder 5 abhängig vom Typ des Kit oder der Lösung)
· Reinigung der Cartridge (Tandberg SLR24, SLR7, SLR40, SLR50, SLR60, SLR75,
SLR100 und SLR140)
· Anwendungssoftware
· Installation und Benutzerhandbuch
· Garantiekarte
Für die Tabletop-Lösung:
• Externes Tandberg SLR-Bandlaufwerk im Beistellgehäuse mit
Netzkabel
· Externer SCSI LVD/SE-Terminator (Tandberg SLR24, SLR7, SLR40, SLR50,
SLR60, SLR75, SLR100 und SLR140)
· Externes SCSI-Kabel
· Daten-Cartridge (1 oder 5 abhängig vom Typ des Kits oder der Lösung)
· Reinigungskassette (Tandberg SLR24, SLR7, SLR40, SLR50, SLR60, SLR75,
SLR100 und SLR140)
· Anwendungssoftware
· Installation und Benutzerhandbuch
· Garantiekarte
Beachten Sie auch unsere Website im Internet: www.tandberg.com.
Tandberg SLR Installation und Benutzeranweisung
3
Tandberg Data
Diese Seite bleibt leer
4
Tandberg SLR Installation und Benutzeranwe isung
Tandberg Data
Information
Bezeichnungen der Laufwerke
Die folgende Tabelle enthält die Äquivalenzen der ursprünglichen
Bezeichnungen der Laufwerke und ihrer dazugehörigen SLRBezeichnung.
Tandberg SLR-Bezeichnung
Frühere Laufwerk-Bezeichnung
Tandberg SLR2
Tandberg TDC 3820
Tandberg SLR3
Tandberg TDC 4120
Tandberg SLR4
Tandberg TDC 4220
Tandberg SLR4-DC
Tandberg TDC 4222
Tandberg SLR5
NA
Tandberg SLR24
Tandberg SLR6
Tandberg SLR7
NA
Tandberg SLR40
NA
Tandberg SLR50
Tandberg MLR3
Tandberg SLR60
NA
Tandberg SLR75
NA
Tandberg SLR100
NA
Tandberg SLR140
NA
Kapazität der Laufwerke
Tandberg Data Laufwerk-Modell
Tandberg SLR2
Tandberg SLR3
Tandberg SLR4
Tandberg SLR4-DC
Tandberg SLR5
Tandberg SLR24
Tandberg SLR7
Tandberg SLR40
Tandberg SLR50
Tandberg SLR60
Tandberg SLR75
Tandberg SLR100
Tandberg SLR140
(TDC 3820)
(TDC 4120)
(TDC 4220)
(TDC 4222)
(SLR5 4/8 GB)
(SLR6 12/24 GB)
(MLR3 25/50 GB)
Kapazität
525 MB
1.2GB
2.5GB
2.5GB/5.0*GB
4.0GB/8.0*GB
12GB/24*GB
20 GB/40GB*
20GB/40*GB
25GB/50*GB
30GB/60*GB
38 GB/75*GB
50GB/100*GB
70GB/140*GB
* 2:1 Hardware-Komprimierung
Tandberg SLR Installation und Benutzeranweisung
5
Tandberg Data
Leistung der Laufwerke
Tandberg Data Laufwerk-Modell
Tandberg SLR2 525MB
Tandberg SLR3 1.2GB
Tandberg SLR4 2.5GB
Tandberg SLR4-DC 5GB
Tandberg SLR5
Tandberg SLR24
Tandberg SLR7
Tandberg SLR40
Tandberg SLR50
Tandberg SLR60
Tandberg SLR75
Tandberg SLR100
Tandberg SLR140
Leistung
(TDC 3820)
(TDC 4120)
(TDC 4220)
(TDC 4222)
(SLR5 4/8 GB)
(SLR6 12/24 GB)
Pro Std.
12 MB/min
18 MB/min
18 MB/min
18/36* MB/min
24/48* MB/min
72/144* MB/min
180/360* MB/min
180/360* MB/min
120/240* MB/min
240/480* MB/min
240/480* MB/min
300/600* MB/min
360/720* MB/min
(MLR3 25/50 GB)
720 MB
1.08 GB
1.08 GB
2.16 GB
2.88 GB
8.64 GB
21.6 GB
21.6 GB
14.4 GB
28.8 GB
28.8 GB
36.0 GB
43.2 GB
* 2:1 Hardware-Komprimierung
Medien-Spezifikationen
Medien-Typ
Länge (in Fuß)
Unkomprimierte Kapazität
(MB)
DC 6250 or equivalent
1020
250
DC 6525 or equivalent
1020
525
MAGNUS 1.2 or equivalent
950
1200
MAGNUS 2.5 or equivalent
1200
2500
SLR5 8GB *
1500
4000
SLRtape24 24 GB *
1130
12 000
SLRtape7 40 GB*
1545
20 000
SLRtape40 40 GB*
600
20 000
SLRtape50 50 GB *
1515
25 000
SLRtape60 60 GB*
900
30 000
SLRtape75 75 GB*
1150
38 000
SLRtape100 100 GB*
1500
50 000
SLRtape140 140 GB*
1670
70 000
* 2:1 Hardware-Komprimierung
Kompatibilität des Bandformats
Laufwerk
Modell
SLR140
SLR100
SLR75
SLR60
SLR50
SLR40
SLR7
SLR32
Kompatibilitãt des Laufwerks
Medien-Typ
SLRtape140
SLRtape100
SLR140 SLR100 SLR75 SLR60 SLR50 SLR40 SLR7 SLR32 SLR24 SLR5 SLR4 SLR3 SLR2
R/W
R
R/W
R
R/W
R/W
R
R/W
R/W
R/W
R
R/W
R/W
R/W
R/W
R
R/W
R/W
R/W
R/W
R
R*
R
R*
R*
R/W
R
R
R
R/W
R
R/W
SLRtape60
SLRtape50
SLRtape40
SLRTape7
SLR32,
MLR1-26GB,
Accuscribe 13GB
SLR24
SLRtape24
R
SLR5
SLR5
SLR4
Magnus 2.5,
Magnus 2.0,
DC 92xx, QD 92xx
SLR3
Magnus 1.2,
Magnus 1.0,
DC 91xx, QD 91xx
SLR2
DC6525, DC6320
SLR1
DC6250, DC6150
L à Nur Lesekompatibilität
L/S à Lese- und Schreibkompatibilität
* SLR7 Lese-Kapazität in F/W 04.30 oder höher erhältlich.
6
R
R
R
R
R
R
R/W
R
R
R
R
R
R/W
R/W
R/W
R/W
R
R
R/W
RW
R/W
R/W
R/W
R/W
R/W
R/W
R/W
R/W
R/W
R/W
R/W
Tandberg SLR Installation und Benutzeranwe isung
Tandberg Data
Daten-Komprimierung
Daten-Komprimierung ist ein Weg, die Kapazität eines
Speichergeräts zu erhöhen. Die Verdichtungsrate wird normalerweise
mit 2:1 gekennzeichnet, d.h. es können doppelt so viele Daten auf
dem Band gespeichert werden wie normalerweise ohne
Datenkomprimierung. Dennoch ist die Verdichtungsrate von dem
Datentyp abhängig, z.B. können normale Textdateien stärker
komprimiert werden als Programmdateien.
Es gibt zwei Arten der Datenkomprimierung, die Hardwareund die
Software-Komprimierung. Meistens verwendet das Speichergerät
eine Hardware-Komprimierung. SoftwareKomprimierung bedeutet,
dass das Progamm die Daten verdichtet, bevor es sie zum
Speichergerät sendet. HardwareKomprimierung ist effizienter und
arbeitet schneller als Software-Komprimierung.
Die Tandberg Data-Streamer SLR4-DC, SLR5, SLR24, SLR7,
SLR40, SLR50, SLR60, SLR75, SLR100 und SLR140 haben eine
ALDC Hardware Datenkomprimierung. Dieses Leistungsmerkmal ist
standardmäßig aktiviert, kann vom Benutzer jedoch durch die
Anwendungs-Software oder durch spezifische Software-Tools
ausgeschaltet werden. (Näheres hierzu finden Sie im Tandberg SCSITool-Kapitel am Ende dieses Handbuchs.)
Tandberg SLR Installation und Benutzeranweisung
7
Tandberg Data
Diese Seite bleibt leer
8
Tandberg SLR Installation und Benutzeranwe isung
Tandberg Data
Installation des
Laufwerks
Installation der SCSI-Controller
Board
Alle Tandberg Data SLR-Laufwerke benutzen eine SCSISchnittstelle
zum Host-System.
Vor Installation eines jeden SCSI-Geräts ist die Installation einer
SCSI-Controller-Board notwendig. Bitte, beachten Sie die folgenden
Punkte.
· Vergewissern Sie sich, dass Ihr Computer ausgeschaltet ist, bevor Sie
die Installation beginnen.
· Falls Ihr Computer mit einem Onboard-SCSI-Controller ausgestattet
ist, müssen Sie vor Beginn der Installation zuerst den SCSI-Stecker
an der Motherboard des Computers anbringen.
· In der Dokumentation zum Computer ist angegeben, wo sich
dieser Stecker befindet.
· Falls mehrere SCSI-Stecker verfügbar sind, können Sie irgendeinen
davon auswählen, es sei denn, in Ihrer Dokumentation steht etwas
anderes.
• Stecken Sie danach den SCSI-Stecker fest in den Stecker der
Mainboard und lesen Sie im Abschnitt Montage des
Bandlaufwerks, nach, wie Sie Ihren internen SLR installieren.
· Falls Ihr PC/Server einen separaten SCSI-Controller erfordert,
müssen Sie sich vergewissern, dass dieser vorschriftsmäßig
installiert ist, bevor Sie Ihr SLRBandlaufwerk anschließen.
Tandberg SLR Installation und Benutzeranweisung
9
Tandberg Data
· Sie brauchen vom Lieferanten des SCSI-Controllers ebenfalls einen
Software-Treiber, um diesen zu aktivieren. Vergewissern Sie sich
bitte, dass Sie den neuesten Software-Treiber geladen haben und
dass die SCSIController-Board vorschriftsmäßig installiert ist.
SoftwareTreiber können von der Website des Lieferanten geladen
werden. Vgl.: README-Datei für Installation.
Entnehmen Sie der PC/Server-Dokumentation weitere
Informationen über die Installation von zusätzlichen Boards in
Ihrem PC/Server, oder bitten Sie Ihren Händler vor Ort um Hilfe.
10
Tandberg SLR Installation und Benutzeranwe isung
Tandberg Data
SCSI-Konfiguration
Wahl der SCSI-ID
Interne SLR2 ® SLR5:
Alle Geräte an einem SCSI-Bus benötigen Ihre eigene
eindeutige Identifikation, genannt SCSI-ID. Bei einem
eventuellen SCSI-ID-Konflikt wird eines der SCSIGeräte von Ihrem System nicht erkannt werden. Bei vielen
Systemen ist es üblich, den SCSI-Bus für Hard-Drive und
CD-ROM, sowie für das Bandlaufwerk zu verwenden.
Wir erinnern daran, dass der SCSI-Controller die SCSIID 7 benutzt.
Ist das Bandlaufwerk das einzige Gerät am SCSIBus,
brauchen Sie nichts zu tun. Das Bandlaufwerk wird
automatisch erkannt. (Alle Tandberg Data-Laufwerke
werden standardmäßig mit der SCSI-ID 2 geliefert.)
Interne SLR7 ® SLR140:
Teilt das Bandlaufwerk den SCSI-Bus mit weiteren
Geräten, überprüfen Sie die SCSI-IDNummern der
anderen Geräte und stellen Sie dann die SCSI-ID des
Bandlaufwerks auf eine Nummer ein, die von keinem der
anderen Geräte benutzt wird. (Beachten Sie, dass der SCSI
Host-Adapter die ID 7 verwendet).
Die SCSI-ID wird häufig durch “Jumpers” eingestellt,
von denen Sie “ablesen” können, welche SCSI-ID für
das Gerät bestimmt worden ist. Alle ID’s der SCSIGeräte werden bei Systemstart auf dem Schirm
angezeigt.
Tandberg SLR Installation und Benutzeranweisung
11
Tandberg Data
Wahl der SCSI-ID
Externe SLR2 ® SLR140:
Bei externen Tabletop-Versionen befindet sich der DaumenradSchalter zum
Einstellen der SCSIID auf der Rückseite der Einheit:
12
SLR2-5
SLR7-140
SCSI-ID Thumb-wheel Switch
SCSI-ID Thumb-wheel Switch
Tandberg SLR Installation und Benutzeranwe isung
Tandberg Data
SCSI-Bus-Termination bei
internen Bandlaufwerken
Allgemeines zur Termination
Ein SCSI-Bus ist empfindlich gegenüber Interferenzen wie Lärm von
elektrischen Motoren oder anderen elektromagnetischen Geräten.
Auch aufgrund der Datengeschwindigkeit im SCSI-Bus ist es von größter
Wichtigkeit, dass der SCSI-Bus vorschriftsmäßig abgeschlossen ist.
Mit “Termination” definiert man die Enden eines SCSI-Bus’.
Tandberg SLR2 ® SLR5
Ist Ihr neues Bandlaufwerk das letzte oder einzige SCSIGerät am
SCSI-Kabel?
SCSI-Terminierung
wenn das Bandlaufwerk das einzigste oder letzte
Device am SCSIBus
ist.
· Ist Ihr Laufwerk das letzte oder einzige
Gerät am SCSI-Kabel, wie links
abgebildet, vergewissern Sie sich, dass
die SCSI-Terminatoren im Laufwerk
installiert sind (Standard ab Fabrik).
• Befindet sich Ihr Laufwerk in der Mitte
einer SCSI-Kette, wie links abgebildet,
müssen Sie die SCSI-Terminierung am
SCSI-Terminierung in
einem System mit drei Bandlaufwerk ausschalten. Dazu entfernen
internen
SCSI- Sie die Widerstandsnetzwerke vom
Geräten.
Laufwerk (vgl. Abb. unten). Vergewissern
Sie sich, dass die Terminierung am letzten
SCSI-Gerät am Kabel eingeschaltet ist.
Tandberg SLR Installation und Benutzeranweisung
13
Tandberg Data
Die Tandberg-Laufwerke SLR2 ® SLR5 haben 3 passive
Terminator-Sets, die im Laufwerk installiert oder daraus entfernt
werden können.
Tandberg SLR24, SLR7, SLR40, SLR50, SLR60,
SLR75, SLR100, SLR140
Die Tandberg-Laufwerke SLR24, SLR7, SLR40, SLR50, SLR60,
SLR75, SLR100 und SLR140 sind nicht mit einer LaufwerkTermination ausgestattet. Zur Erfüllung der PC99Spezifikationen
wird jetzt ein internes SCSI-Kabel mit aufsteckbarem Terminator
mitgeliefert.
14
Tandberg SLR Installation und Benutzeranwe isung
Tandberg Data
SCSI-Bus-Termination bei
externen Laufwerken im
Beistellgehäuse
Wenn das Laufwerk das einzige Gerät am externen SCSIBus ist, ist
es durch die zu dieser Lösung gehörenden externen SCSITermination abzuschließen. Vgl. Abbildung:
SCSI-HostAdapter
SLR-Laufwerk (muss
abgeschlossen werden)
Sind weitere externe
Geräte vorhanden, kann das
Tandberg SLR-Laufwerk in jeder beliebigen Position am SCSI-Bus
installiert werden, wobei das SLR-Laufwerk abgeschlossen werden
muss, wenn es sich am Ende des SCSI-Bus’ befindet. Vgl.
Abbildung:
Anderes externes Gerät
(muss abgeschlossen
werden)
Anderes externes
Gerät
SCSI-HostAdapter
SLR-Tape-Drive
(Muß abgeschlossen werden)
Montage des internen
Laufwerks
Wide/Narrow-Konfiguration
Alle internen SLR-Laufwerke können entweder an einen 16Bit Wide
SCSI oder an einen 8-Bit Narrow SCSI-Host-Adapter angeschlossen
werden. Die Laufwerke SLR2-5 sind mit einem internen Kabel mit
Narrow-Stecker versehen. Die internen Laufwerke SLR7-140 sind mit
einem WIDE-Stecker versehen. Beabsichtigen Sie die Verwendung
eines SLR2-5 mit einem WIDE-SCSI-Host-Adapter, brauchen Sie
einen Narrow-SCSI-Host-Adapter
Narrow-to-WIDE
Tandberg SLR Installation und Benutzeranweisung
15
Tandberg Data
Konverter für das interne Kabel, das zusammen mit Ihrem SLR2-5Bandspeichergerät geliefert wurde. Beabsichtigen Sie die
Verwendung eines SLR7-140 mit einem Narrow SCSI-HostAdapter, dann brauchen Sie einen Wide-toNarrow-Konverter.
Ausführlichere Informationen zu diesen Konvertern, zum Anschluss
von 8-Bit-Narrow-SCSI-Peripheriegeräten an 16Bit-Wide-SCSIHost-Adapter und zum Anschluss von 16Bit-WIDE SCSIPeripheriegeräten an 8-Bit-Narrow-HostAdapter, sowie zur
Beschaffung solcher Konverter finden Sie auf der folgenden
Website.
www.adaptec.com/products/solutions/cables.html
Beachten Sie:
Überprüfen Sie bei der Montage eines Tandberg SLR24, SLR7, SLR40,
SLR50, SLR60, SLR75, SLR100 oder SLR140-Laufwerks an einen 8-Bit
SCSI-HostAdapter, mit Hilfe eines Wideà Narrow-Konverters, dass die
WIDEOption vom SCSI-Host-Adapter Bios ausgeschaltet ist. Weitere
Informationen dazu entnehmen Sie bitte dem SCSI-Adapter-Handbuch.
16
Tandberg SLR Installation und Benutzeranwe isung
Tandberg Data
Montage des Bandlaufwerks
1) Die interne Installation des Laufwerks erfordert in Ihrem Computersystem einen freien
5.25 Zoll Schacht mit einer offenen Vorderseite. Verschaffen Sie sich Zugang zum
Schacht für das austauschbare Medium (Weitere Informationen hierzu entnehmen Sie
bitte der Ihrem System anliegenden Dokumentation).
2) Schieben Sie das Laufwerk in das Fach, wie in den folgenden zwei bbildungen
dargestellt:
SLR60, SLR75, SLR100, SLR140 Laufwerke
HINWEIS
Für die Montage des Laufwerks in die Öffnung kann ein Kit erforderlich sein. Sie finden weitere
Informationen, wo das Kit erhältlich ist, in www.tandberg.com SUPPORT>SLR Support>Hardware
Compatibility
3) Sichern Sie das Bandlaufwerk im Fach! (Verwenden Sie nur werkseitig mit dem
Laufwerk gelieferte Schrauben.)
4) Schließen Sie das Netzkabel und das SCSI-Signalkabel (evtl. auch den SCSIKonverter), wie unten dargestellt, an:
SLR75, SLR100, SLR140 Laufwerke
Tandberg SLR Installation und Benutzeranweisung
17
Tandberg Data
Anweisungen zur Montage der Schieneneinheit
Tandberg SLR5-Laufwerke für
IBM Netfinity 5000, 5500, 5600 und für die 7000er Serie
SLR5-Netfinity-Kit Bestell-Nr.: P/N 432126
Einschließlich:
- 2 x Montageschienen – linke und rechte Seite - 4 x
Schrauben
- 1 x Installations-Anweisungen
Tandberg SLR24, SLR7, SLR40, SLR50, SLR60, SLR75, SLR100 und
SLR140 Laufwerke für IBM Netfinity 5000 und die 7000er Serie
Netfinity-Kit-Bestell-Nr.: P/N 431950
Einschließlich:
- 1 x Montageschiene - 2 x
Schrauben
- 1 x Installations-Anweisungen
18
Tandberg SLR Installation und Benutzeranwe isung
Tandberg Data
Montage des Tabletop-Laufwerks
Wide/Narrow-Konfiguration
Alle externen SLR-Tabletop-Laufwerke können entweder an einen 16Bit-Wide-SCSI- oder an einen 8-Bit-Narrow-SCSIHost-Adapter
angeschlossen werden. Die Laufwerke SLR2-5 werden mit einem
externen Kabel mit Narrow-Stecker geliefert. Die Laufwerke SLR24140 werden mit einem externen WIDE-Stecker geliefert.
Beabsichtigen Sie die Verwendung eines SLR2-5 mit einem WIDESCSI-HostAdapter, benötigen Sie einen Narrow-SCSI-Host-Adapter
Narrow-to-WIDE-Konverter für das externe Kabel, das zusammen mit
Ihrem SLR2-5 Bandspeichergerät geliefert wurde. Beabsichtigen Sie
die Verwendung eines SLR24-100 mit einem Narrow-SCSI-HostAdapter, benötigen Sie einen
Wide ®Narrow-Konverter.
Ausführlichere Informationen zu diesen Konvertern, zum Anschluss
von 8-Bit-Narrow-SCSI-Peripheriegeräten an 16Bit Wide SCSI-HostAdapter und zum Anschluss von 16Bit- WIDE-SCSIPeripheriegeräten an 8-BitNarrow-HostAdapter, sowie zur
Beschaffung solcher Konverter finden Sie auf der folgenden
Website.
www.adaptec.com/products/solutions/cables.html
Externe Laufwerk-Installation
Nach Installation der SCSI-Controller-Board und deren
einwandfreier Funktion kann das Laufwerk installiert werden.
Vergewissern Sie sich vor Beginn, dass der Strom ausgeschaltet ist.
BEACHTEN SIE:
Stecken Sie das Netzkabel nicht ein, bevor nicht alle Verbindungen
hergestellt sind.
Tandberg SLR Installation und Benutzeranweisung
19
Tandberg Data
Lesen Sie bitte genau die Informationen zu den Konflikten
zwischen den SCSI-IDs und den SCSI-Terminationsabschnitt auf
den Seiten 11-14. Zur Installation eines TabletopLaufwerks,
schließen Sie einfach an einem der beiden verfügbaren SCSISteckern mit Hilfe des beigefügten SCSI-Kabels das Laufwerk an
Ihren PC/Server an. Beachten Sie, dass Sie die Terminierung am
freien Stecker auf der Rückseite des Laufwerks anbringen und eine
eindeutige SCSI-ID wählen.
SLR7-140
SLR2-5
ON/OFF
Switch
AC Power
Receptacle
Cooling
Fan
SCSI-ID Thumbwheel Switch
SCSI Interface
Connectors
ON/OFF
Switch
Cooling
Fan
AC Power
Receptacle
SCSI-ID Thumbwheel Switch
SCSI Interface
Connectors
Jetzt können Sie das Netzkabel einstecken.
Achten Sie beim ersten Einschalten des System darauf, dass alle Ihre
SCSI-Geräte auf der SCSI-Controller-Board sichtbar sind.
20
Tandberg SLR Installation und Benutzeranwe isung
Tandberg Data
Betrieb des Bandlaufwerks
Einlegen der Cartridge
1) Drücken Sie die Eject-Taste
(Vgl. Abb. oben rechts).
2) Vergewissern Sie sich, dass die Cartridge
richtig eingelegt wird (Vgl. links
Ausrichtung der Cartridge).
3) Schieben Sie die Cartridge in das
Laufwerk hinein, bis Sie einklickt, was
anzeigt, dass die Cartridge in Ihrer
Position befestigt ist.
Tandberg SLR24, SLR7, SLR40, SLR50,
SLR60, SLR75, SLR100, SLR140
1) Vergewissern Sie sich, dass die
Cartridge richtig ausgerichtet ist (Vgl.
linke Abb.).
2) Schieben Sie die Cartridge langsam in
das Laufwerk hinein, bis sie
automatisch vom Laufwerk erfasst
wird.
Tandberg SLR Installation und Benutzeranweisung
21
Tandberg Data
Entnahme der Cartridge
Tandberg SLR2 ® SLR5
1) Warten Sie, bis jegliche Bandaktivität
beendet ist.
2) Drücken Sie die Eject-Taste (vgl.
Tastenposition auf linker Abb.).
3) Entnehmen Sie die Cartridge, wenn die
Vorderseite des Laufwerks sich öffnet.
4) Schließen Sie die Vorderseite des
Laufwerks wieder manuell.
Tandberg SLR24, SLR7, SLR40, SLR50, SLR60, SLR75, SLR100, SLR140
1) Warten Sie, bis jegliche Bandaktivität
beendet ist.
2) Drücken Sie die Eject-Taste (vgl. linke
Abb.).
3) Die Daten-Cartridge wird automatisch
ausgeworfen.
Benutzung der DatenCartridge
Zur Verbesserung der Datenzuverlässigkeit und Lebensdauer der Cartridge,
beachten Sie bitte folgendes:
· Lassen Sie die Cartidges nicht fallen.
· Vergewissern Sie sich, daß Laufwerk und Cartrigde in sauberer
Umgebung aufbewahrt werden.
· Vor Benutzung einer Cartridge, sollten Sie diese mindestens vier
Stunden lang der aktuellen Betriebsumgebung aussetzen.
· Keine abgenutzten oder besonders lauten Cartridges verwenden.
Lagerung von Daten-Cartridges
Sie lagern Daten-Cartridges am besten, wenn Sie das Band bis zum
Bandanfang zurückspulen, bevor Sie die Cartridge in ihre
Schutzhülle legen.
22
Tandberg SLR Installation und Benutzeranwe isung
Tandberg Data
Zurückspulen einer Daten
Cartridge
Tandberg SLR7 ® SLR140
Die Laufwerke SLR7-140 führen bei Drücken der EjectTaste diesen
Arbeitsgang automatisch aus.
Tandberg SLR2® SLR5
Unix System Command
Über Systembefehle ist das Zurückspulen mittels eines MTBefehls
auszuführen. (Einzelheiten dazu entnehmen Sie bitte der MTDokumentation)
Unix System/PC System Using Backup
Application
Um sicherzustellen, dass das Band sich am Bandanfang befindet,
muss vor Auswerfen ein Befehl zum Umspulen gegeben werden
(retension command) werden.
Nach Beendigung dieser Operation:
Nehmen Sie das Band aus dem Laufwerk und verwahren Sie es in
seiner Schutzhülle.
Lagerungsbedingungen
Vermeiden Sie hohe Temperaturen (>25C/77F) und hohe
Luftfeuchtigkeit (>50 % RH).
Lagern Sie Cartridges nur in kühler und trockener Umgebung.
Lagern Sie Cartridges nie in der Nähe von Geräten mit starken
magnetischen Feldern, wie z.B. Computer-Monitore, TV-Geräte oder
Lautsprecher.
Anpassung
Ein Daten-Cartridge sollte vor Gebrauch mindestens genau so lange
der Betriebsumgebung angepasst werden wie sie aus dieser entfernt war
(bis zu max. 8 Stunden).
Tandberg SLR Installation und Benutzeranweisung
23
Tandberg Data
Umspulen des Bandes
(Retension Condition)
In jedem der folgenden Fälle MUSS das Band umgespult werden:
è Bei erstmaligem Gebrauch einer fabrikneuen Cartridge.
è Bei Betrieb über die Bandlänge hinaus, d.h. bei
übermäßigen Start/Stop-Vorgängen.
è Wenn die Cartridge einem Temperaturabfall/-anstieg von 16°C (30°
F) ausgesetzt war.
è Wenn die Cartridge einem Fall ausgesetzt war.
è Bei Eintritt von übermäßigen Soft-Write-Errors,
übermäßigen Soft-Read-Errors (die von einigen Back-upAnwendungen auch ECC-Error genannt werden).
Reinigung
Vergewissern Sie sich vor Gebrauch der Reinigungskassette, dass
diese sich, was Temperatur und Feuchtigkeit anbelangt, 24 Stunden
lang in der gleichen Umgebung befunden hat wie im
Anwendungsbereich.
Empfohlene Reinigungsintervalle
Normalerweise sollte das Laufwerk nach 50 Stunden BandBetriebzeit gereinigt werden beim SLR2-5, und nach 100 Stunden
beim SLR7-140.
Ein wöchentlicher Reinigungsvorgang wird stärkstens empfohlen,
ebenso wie eine Reinigung nach Gebrauch eines fabrikneuen Bandes.
BEACHTEN SIE:
Haben Sie einen Tandberg SLR24, SLR7, SLR40, SLR50, SLR60, SLR75,
SLR100 oder einen SLR140, ist eine Reinigung notwendig, wenn die
GELBE LEDAnzeige ganz rechts auf der Vorderseite konstant leuchtet.
24
Tandberg SLR Installation und Benutzeranwe isung
Tandberg Data
Reinigung
1) Legen
Sie die Reinigungscartridge in das SLR-Laufwerk ein.
2) Der Reinigungsvorgang beginnt automatisch, was von den
vorderen LEDs wie folgt angezeigt wird:
Tandberg SLR2 ® SLR5
è GRÜNE LED-Anzeige an der Vorderseite blinkt.
3) Warten Sie, bis jegliche LED-Aktivität beendet ist, und nehmen
Sie manuell die Cartridge aus dem Laufwerk (nach etwa 30 Sek.).
Tandberg SLR7 ® SLR140
è Linke LED OFF, mittlere GRÜNER LED blinkt, rechte
LED leuchtet GELB.
3) Die Cartridge wird ausgeworfen, sobald die Reinigung ausgeführt
ist (nach etwa 3 Min.).
Austausch der Reinigungs-Cartridge
Die SLR-Reinigungscartridge ist auszutauschen, wenn:
Tandberg SLR2 ® SLR5
è die GRÜNE LED-Anzeige konstant leuchtet (bei SLR2,
SLR3, SLR4 und SLR4DC).
è die GELBE Anzeige konstant leuchtet (beim SLR5).
Tandberg SLR24, SLR7, SLR40, SLR50, SLR60,
SLR75, SLR100 und SLR140
è keine LED-Anzeige leuchtet und das Band automatisch
ausgeworfen wird.
Tandberg SLR Installation und Benutzeranweisung
25
Tandberg Data
LED-Anzeigen auf der Vorderseite des
Laufwerks
Tandberg SLR2 ® SLR5
Es gibt nur eine LED-Anzeige (Light Emitting Diode) für den Tandberg
SLR2, SLR3, SLR4, SLR4-DC und den SLR5, die die folgenden
Betriebszustände des Laufwerks anzeigt:
LED Status
Beschreibung
OFF/AUS
Keine Aktivität / Keine Cartridge im Laufwerk
Konstant Grün
Grün blinkt
Konstant Gelb
Keine Aktivität / Cartridge eingelegt
Laufwerk in Betrieb
Medium oder Hardware fehlerhaft
Konstant Grün
Reinigungskassette abgenutzt – Sie muss
ausgetauscht werden (SLR2--> SLR4)
Reinigungskassette abgenutzt – Sie muss
ausgetauscht werden (SLR5)
Konstant Gelb
Konstant Rot
Schwerwiegender Fehler *
* Wenden Sie sich an den TANDBERG DATA-Kundendienst
Tandberg SLR24, SLR7, SLR40, SLR50, SLR60,
SLR75, SLR100, SLR140
Es gibt drei verschiedene LEDs für die Tandberg SLR24, SLR7,
SLR40, SLR50, SLR60, SLR75, SLR100 und SLR140, die die
folgenden Betriebszustände des Laufwerks anzeigen:
LED Status
Beschreibung
Grün
Grün
Gelb
Blinkt
OFF/AUS
OFF
OFF/AUS
OFF
OFF/AUS
OFF/AUS
OFF/AUS
ON/EIN
ON/EIN
OFF/AUS
OFF/AUS
Keine Bandbewegung/Cartridge im
Laufwerk
ON/EIN
ON/EIN
ON/EIN
Blinkt
OFF/AUS
Blinkt
OFF/AUS
ON/EIN
ON/EIN
Laufwerk in Aktivität
Band geladen/Reinigung notwendig
Band-Bewegung/ Reinigung notwendig
OFF/AUS
Blinkt
OFF/AUS
Blinkt
Blinkt
Blinkt
Laufwerkausfall*
Schwerwiegender Fehler *
Selbsttest/Fehlersuche
Keine Bandbewegung/Keine Cartridge
im Laufwerk
Keine Cartridge im Laufwerk/Reinigung
erforderlich
* Bei jedem Betriebszustand
** Wenden Sie sich an den TANDBERG DATA-Kundendienst
26
Tandberg SLR Installation und Benutzeranwe isung
Tandberg Data
Installation der Software
Dieses Kapitel enthält Informationen zur Installation von SLRLaufwerken bei folgenden Operativssytemen:
- Windows NT 4.X (Server/Workstation) Windows 2000
- Novell NetWare 4.X/5.0 Windows 95 - Windows 98
- Windows 98 Second Edition - SCO
Open Server Release 5 - SCO
UnixWare Version 7.X - Sunsoft
Solaris 2.x, 7.0
- Apple Macintosh System 7 und höher - IBM
AIX Version 4.x - HPUX Version 10.20/11.0 Linux
Tandberg SLR Installation und Benutzeranweisung
27
Tandberg Data
Diese Seite bleibt leer
28
Tandberg SLR Installation und Benutzeranwe isung
Tandberg Data
Windows NT
SCSI-Host-Adapter
Windows NT enthält einen Treiber für die meisten SCSIHostAdapter.
Falls Sie den entsprechenden Treiber nicht finden, finden Sie
diesbezügliche Hinweise im Installations-Handbuch zum SCSI-HostAdapter.
Treiber
Windows NT 3.5x und 4.0 haben einen Treiber, der die Laufwerke
SLR2, SLR3, SLR4 und SLR4DC aller Versionen von Windows NT
sowie Service-Pakete unterstützt.
SLR5-Hilfe ist von Service Pack 6A erhältlich.
(www.microsoft.com).
Die Laufwerke SLR24, SLR7, SLR40, SLR50, SLR60, SLR75,
SLR100 und SLR140 erfordern einen zusätzlichen Treiber, der über
die Website von Tandberg unter www.tandberg.com erhältlich ist.
Die Laufwerke SLR5, SLR24, SLR7, SLR40, SLR50, SLR60,
SLR75, SLR100 und SLR140 erfordern einen zusätzlichen Treiber,
der über das Internet www.tandberg.com erhältlich ist.
Installation bei Windows NT 4.0
Treiber
1) Klicken Sie das “Tape Devices”-Symbol im Control Panel
zweimal an.
NT wird automatisch erkennen, welches Tandberg SLRLaufwerk
im System installiert ist und Sie zur Installation des Treibers
auffordern.
Tandberg SLR Installation und Benutzeranweisung
29
Tandberg Data
Installation der Tandberg-Laufwerke SLR2, SLR3, SLR4,
SLR4-DC und SLR5
2) Wählen Sie “Tandberg 3660, 3820, 4120, 4220, 4222”.
3) Bestätigen Sie mit OK und befolgen Sie die Anweisungen auf
dem Schirm.
Installation der Tandberg-Laufwerke SLR24, SLR7,
SLR40, SLR50, SLR60, SLR75, SLR100 und SLR140
2) Klicken Sie “Have a Disk” an.
3) Falls das Einlegen einer Diskette in das Laufwerk A verlangt
wird:
4) Wählen Sie den Treiber Tandberg Data SLR2-100.
4) Wählen Sie Install und befolgen Sie die Anweisungen auf dem
Schirm.
Wählen Sie immer New.
Dies ersetzt den bestehenden Treiber durch die letzte Version, die
das von Ihnen benutzte Tandberg SLR-Laufwerk unterstützt.
30
Tandberg SLR Installation und Benutzeranwe isung
Tandberg Data
Backup-Anwendungen
NT-integrierte Anwendung
Die NT-Backup-Anwendung (NTBackup) ist im Operativsystem von
Windows NT 4.0 enthalten.
Installation
Vergewissern Sie sich vor Ablauf dieser Anwendung, dass der Treiber
Ihres SLR-Laufwerks vorschriftsmäßig installiert ist. Die
Beschreibung der Installation des Treibers finden Sie auf Seite 29.
Beginn der Anwendung:
·
·
·
·
START anklicken.
Programs anklicken.
Administrative tools anklicken.
Backup wählen.
HINWEIS:
Genauere Informationen zu dieser Anwendung oder deren Installation finden
Sie in Ihrem Microsoft NT-Handbuch.
Tandberg SLR Installation und Benutzeranweisung
31
Tandberg Data
Computer Associates ARCserveIT
für Windows NT
Der ARCserveIT ist einer der Marktführer im Bereich der NT-BackupSoftware. Er ist in drei unterschiedlichen Versionen erhältlich:
ARCserveIT Workgroup Edition, ARCserveIT Advanced Edition
sowie ARCserveIT Enterprise Edition.
ARCserveIT Workgroup Edition
Da die CA's Workgroup Edition für NT in erster Linie für kleine und
mittlere Organisationen sowie Einzel-Server Installationen entworfen
wurde, bietet sie ihren Benutzern alle Vorteile einer starken
Technologie zu guten Preisen und mit bester Funktionalität.
Leistungsmerkmale
·
·
·
·
Autoloader-Support inbegriffen
Parallel-Streaming
Automatisches Medien-Management
Unbegrenzter Workstation-Kunden-Support bei Windows 3.1x,
Windows 95/98, Windows NT
ARCserveIT Advanced Edition
Die ARCserveIT Advanced Edition wurde für die besonderen ITAnsprüche der meisten mittleren Organisationen entworfen und
verbindet industriell erprobte Technologie und Benutzerfreundlichkeit
mit fortschrittlichen Leistungsmerkmalen und Skalabilität - eine völlig
neue Art von Lösungen. Die Versionen der Advanced Edition bieten
ein zentralisiertes Management von IT-Lösungen, Hilfeleistungen für
Multi-Servers (mit unbegrenzter Kundenzahl), sowie Skalabilität für
dynamische Umgebungen.
32
Tandberg SLR Installation und Benutzeranwe isung
Tandberg Data
ARCserveIT Enterprise Edition
Die CA's Enterprise-Edition-Produkte sind für mittlere und große
Organisationen entworfen und bieten großen heterogenen
Umgebungen virtuell unbegrenzte Skalabilität und plattformübergreifende Funktionstüchtigkeit. Die flexible Lizenz-vergabe
macht Enterprise-Edition-Lösungen zur ideellen Lösung für große
Anwender. Tandberg Data bündelt Produkte mit der ARCserveIT
Work Group und Advanced Edition.
Installation
1) Legen Sie die Desktop-CD-ROM ein.
2) Öffnen Sie My Computer.
3) Klicken Sie das CD-ROM-Symbol zweimal an.
4) Automatisch wird ein Browser erscheinen.
5) Wählen Sie die ARCserveIT Version für Windows NT ,
die Sie installieren möchten
oder
6) Klicken Sie das Install-Symbol an.
7) Befolgen Sie die Anweisungen auf dem Bildschirm.
BEACHTEN SIE:
Antworten auf Fragen zu dieser Anwendung oder deren Installation finden Sie in
der Online-Dokumentation der CD-ROM.
Tandberg SLR Installation und Benutzeranweisung
33
Tandberg Data
Veritas Backup-Exec für die Windows
NT- Workstation
· Veritas-Backup-Exec ist ein umfassender, benutzerfreundlicher 32Bit-Datenschutz für die Windows NT-Workstations 4.0. Die
eingebaute Geräteerfassung automatisiert das Setup, und ein
einfacher Knopfdruck läßt Backups und Restores ablaufen. Sie
schützt verläßlich NetWare-Daten, einschließlich der Bindery- und
Trustee-Informationen und garantiert ständige und verläßliche
unbediente Backups nach avanciertem Zeitplan und nach dem
Autoprotect-Leistungsmerkmal.
· Veritas Backup Exec benutzt einen eigenen Tape-Treiber, so daß der
Windows NT-Tape-Treiber nicht gesondert installiert werden muß.
Installation
1) Legen Sie die Desktop-CD-ROM ein.
2) Öffnen Sie My Computer.
3) Klicken Sie das CD-ROM-Symbol zweimal an.
4) Automatisch wird ein Browser erscheinen.
5) Wählen Sie Backup Exec for Windows NT
Workstation.
6) Install anklicken.
7)
Befolgen Sie danach die Anweisungen auf dem Schirm.
HINWEIS:
Genauere Informationen über diese Anwendung oder deren Installation
finden Sie im Online-Handbuch auf der Veritas- Software-CD-ROM.
34
Tandberg SLR Installation und Benutzeranwe isung
Tandberg Data
Veritas-Software-Server-CD-ROM
Backup-Exec für Windows NT
Veritas Backup-Exec für Windows NT Single/Enterprise Edition
Backup-Exec ist einer der Marktführer der NT-Backup-Software und
in zwei verschiedenen Versionen erhältlich: für Single-Server und
Multi-Server.
Die leistungsstarke Abfolge von Management-Tools der Backup
Exec’s Software gewährleistet die von Ihnen geforderte
Funktionalität, während ein an Leistungsmerkmalen reichhaltiges
Design für problemlose lokale und Remote-Backups sorgt.
Treiber-Installation
Vergewissern Sie vor Ablauf der Anwendung, dass der Treiber Ihres
SLR-Laufwerks vorschriftsmäßig installiert ist.
1) Wählen Sie vom "Settings"-Menü aus "Control Panel".
2) Doppelklicken Sie das "Tape Devices"-Symbol. Wählen
Sie jetzt "Drivers" tab.
3) Notieren Sie sich den bisher installierten Treibertyp Wählen Sie
für jeden der zu aktualisierenden Treiber der Reihe nach jeden
einzelnen Treiber und klicken Sie "Remove", um den Treiber von
der Liste zu entfernen. Falls Sie von Anfang an neue Treiber
hinzufügen, entfällt dieser Schritt.
4) Wählen Sie "Add..." vom "Drivers" tab.
5) Drücken Sie die Taste "Have Disk...".
6) Geben Sie das Laufwerk/den Directory-Pfad ein, wo die gewünschte
"oemsetup.inf"-Datei auf der Festplatte gespeichert ist. (<CDROM
Letter>:\ WINNT\Drivers\I386
7) Wählen Sie "OK" im Fenster "Install From Disk".
Tandberg SLR Installation und Benutzeranweisung
35
Tandberg Data
8) Wählen Sie im Fenster "Install Driver" eine der Möglichkeiten aus
der Liste "Choose the driver you want to install, and then click
OK."; z.B. die Beschreibung der Einstellung der Laufwerke, für
die Sie einen Treiber laden möchten. [o.k.]
9) Drücken Sie "OK" im Fenster "Install Driver".
10)Wählen Sie bei Erscheinen einer Option "New" im Dialag für
"Windows NT Setup"; und geben Sie dann das gleiche
Laufwerke/Pfad wie im vorhergehenden Schritt #6 ein.
WICHTIG!
Wählen Sie bei Erscheinen einer Option immer "New" – NIE
"Current"!
11)Möchten Sie Treiber anderer Bandgeräte installieren, wählen Sie
"No" im Fenster "System Settings Change - Do you want to
restart your computer now?" und wiederholen Sie die Schritte 4
bis 10. Nachdem alle benötigten Treiber installiert sind, wählen
Sie in diesem Fenster "Yes", um Windows NT auszuschalten
und neu zu starten. Dies aktiviert die vorgenommenen
Änderungen.
Software-Installation
1) Legen Sie die Desktop-CD-ROM ein.
2) Öffnen Sie My Computer.
3) Klicken Sie das CD-ROM-Symbol zweimal an. 4)
Automatisch wird ein Browser erscheinen. 5) Wählen Sie
Backup Exec for Windows NT. 6) Klicken Sie das InstallSymbol an.
7) Befolgen Sie die Anweisungen auf dem Bildschirm.
BEACHTEN SIE:
Weitere Informationen zu dieser Anwendung und deren Installation finden
Sie in der Online-Dokumentation der CD-ROM.
36
Tandberg SLR Installation und Benutzeranwe isung
Tandberg Data
Veritas Backup-Exec-Small-Business-ServerSuite
Die Veritas-Backup-Exec-Small-Business-Server-Suite für Windows
NT ist eine komplette, eigens für Microsoft-SmallBusiness-Server für
Windows NT entworfene Datenschutzlösung. Durch die transparente
Integration in die Administrator-Konsole, liefert das Backup-Exec eine
benutzerfreundliche Anwendung, die Virusschutz, Backup, Restore
und Disaster Recovery unterstützt.
Treiber-Installation
Vergewissern Sie sich vor Ablauf dieser Anwendung, dass der
Treiber Ihres SLR-Laufwerks vorschriftsmäßig installiert ist.
1) Wählen Sie vom "Settings"-Menü aus "Control Panel". 2)
Doppelklicken Sie das "Tape Devices"-Symbol und wählen Sie
"Drivers" tab.
3) Markieren Sie den bisher installierten Treibertyp. Wählen Sie für
jeden der zu aktualisierenden Treiber der Reihe nach jeden
einzelnen Treiber und klicken Sie "Remove", um den Treiber von
der Liste zu entfernen. Falls Sie von Anfang an neue Treiber
hinzufügen, entfällt dieser Schritt.
4) Wählen Sie "Add..." vom "Drivers" tab.
5) Drücken Sie die Taste "Have Disk...".
6) Geben Sie das Laufwerk/den Directory-Pfad ein, wo die
gewünschte "oemsetup.inf"-Datei auf der Festplatte gespeichert
ist. (<CDROM Letter>:\ WINNT\Drivers\I386
7) Wählen Sie "OK" im Fenster "Install From Disk".
8) Wählen Sie im Fenster "Install Driver" eine der Möglichkeiten aus
der Liste "Choose the driver you want to install, and then click
OK."; z.B. die Beschreibung der Einstellung der Laufwerke, für
die Sie einen Treiber laden möchten.
9) Drücken Sie "OK" im Fenster "Install Driver".
10)Wählen Sie bei Erscheinen einer Option "New" im Dialag für
"Windows NT Setup"; und geben Sie dann das gleiche
Laufwerke/Pfad wie im vorhergehenden Schritt #6 ein.
Tandberg SLR Installation und Benutzeranweisung
37
Tandberg Data
WICHTIG!
Wählen Sie bei Erscheinen einer Option immer "New" – NIE
"Current"!
11) Möchten Sie Treiber anderer Bandgeräte installieren, wählen Sie
"No" im Fenster "System Settings Change - Do you want to
restart your computer now?" und wiederholen Sie die Schritte 4
bis 10. Nachdem alle benötigten Treiber installiert sind, wählen
Sie in diesem Fenster "Yes", um Windows NT auszuschalten
und neu zu starten. Dies aktiviert die vorgenommenen
Änderungen.
Software-Installation
1) Legen Sie die Server-CD-ROM ein.
2) Öffnen Sie My Computer.
3) Klicken Sie zweimal das CD-ROM-Symbol an.
4) Der Browser erscheint automatisch.
5) Wählen Sie ARCserve for Windows NT.
6) Klicken Sie das Install-Symbol an.
7) Befolgen Sie die Anweisungen auf dem Bildschirm.
HINWEIS:
Genauere Informationen zu dieser Anwendung oder deren Installation
finden Sie im Online-Handbuch auf der CD-ROM.
38
Tandberg SLR Installation und Benutzeranwe isung
Tandberg Data
Legato Networker für Windows NT
Die SLR-Laufwerke sind zertifiziert für die Legato Networker Version
5.5 und ältere Versionen.
• Diese Anwendung bietet Ihrem NT Server einen kompletten
Schutz, einschließlich automatischer Backups (nach Zeitplan).
· Der Legato Networker benutzt einen Windows NTTreiber.
Vergleichen Sie vorstehenden Abschnitt über die Installation
Installation
1) Legen Sie die Desktop-CD-ROM ein.
2) Öffnen Sie My Computer.
3) Klicken Sie das CD-ROM-Symbol zweimal an.
4) Klicken Sie die Datei SETUP.EXE zweimal an.
5) Befolgen Sie die Anweisungen auf dem Bildschirm.
BEACHTEN SIE:
Weitere Informationen zu dieser Anwendung und deren Installation finden Sie in
der Online-Dokumentation der Legato CD-ROM.
Tandberg SLR Installation und Benutzeranweisung
39
Tandberg Data
Diese Seite bleibt leer
40
Tandberg SLR Installation und Benutzeranwe isung
Tandberg Data
Windows 2000
SCSI-Host-Adapter
Windows 2000 enthält einen Treiber für die meisten SCSI HostAdapter.
Falls Sie den entsprechenden Treiber nicht finden können, finden Sie
diesbezügliche Hinweise im Installationshandbuch, oder kontakten Sie
Ihren Computer-Lieferanten.
Treiber
Windows 2000 enthält einen Treiber, der die Laufwerke SLR2,
SLR3, SLR4 und SLR4DC aller Windows 2000Versionen sowie
Service Pack unterstützt.
Die Laufwerke SLR24, SLR7, SLR40, SLR50, SLR60, SLR75,
SLR100 und SLR140 erfordern einen zusätzlichen Treiber, der über
die Tandberg-Website www.tandberg.com erhältlich ist.
Installation des Windows 2000
Treibers
1) My Computer mit rechter Maustaste anklicken.
2) Wählen Sie Manage, und Sie sehen das Bandlaufwerk unter
“Other devices” mit einem “?”.
Tandberg SLR Installation und Benutzeranweisung
41
Tandberg Data
3) Wählen Sie das Gerät, rechter Mausklick und
Eigenschaften.
4) Wählen Sie eine passende Treiber-Platzierung.
5) Befolgen Sie die Anweisungen auf dem Schirm.
42
Tandberg SLR Installation und Benutzeranwe isung
Tandberg Data
Backup Anwendungen
Windows 2000
Integrierte Anwendungen
Die Backup-Anwendung ist Bestandteil des Operativ-systems von
Windows 2000.
Installation
Vergewissern Sie sich vor Ablauf dieser Anwendung, dass der Treiber
Ihres SLR-Laufwerks vorschriftsmäßig installiert ist. Die
Beschreibung der Installation des Treibers finden Sie auf Seite 47.
Beginn der Anwendung:
àSTART anklicken.
· Programs anklicken.
· Accessories anklicken.
· System tools anklicken.
· Backup wählen.
Für andere Backup-Anwendungen vgl. Sie bitte den
Abschnitt Windows NT
Tandberg SLR Installation und Benutzeranweisung
43
Tandberg Data
Diese Seite bleibt leer
44
Tandberg SLR Installation und Benutzeranwe isung
Tandberg Data
Novell NetWare
Host-Adapter
Die Novell-NetWare enthält die erforderlichen Treiber für die meisten
SCSI-Host-Adapter.
Falls der entsprechende Treiber nicht gefunden werden kann, finden
Sie diesbezügliche Hinweise im InstallationsHandbuch für den SCSIHost-Adapter.
Die meisten Backup-Anwendungen der Novell- NetWare erfordern
die Anwendung von Advanced SCSIProgramming-Interface (ASPI).
Der ASPI-Treiber (ASPITRAN.LNM bei Novell 4.1x und
NWASPI.CDM bei Novell 4.x und 5) ist Teil des Operativsystems
und normalerweise automatisch installiert, wenn die SCSI-Board
Ihres System eingestellt ist.
Sollten Sie bei der Installation des SCSI-Host-Adapters oder des
ASPI-kompatiblen
Treibers
in
diesem
Operativsystem
Schwierigkeiten haben, finden Sie entsprechende Hinweise im
Installations-Handbuch für den SCSI-Host-Adapter.
Backup-Anwendungen
NetWare-integriertes Backup-Applet für
Novell 4.1x
Installation
Geben Sie an der Server-Konsole ein:
LOAD TAPEDAI
SCAN FOR NEW DEVICES*
LIST DEVICES (SLR erscheint auf dem Bildschirm.) LOAD
TSA410**
LOAD SBACKUP
* Sobald der Befehl ausgeführt ist, kann folgende Warnung
erscheinen:
Tandberg SLR Installation und Benutzeranweisung
45
Tandberg Data
Sie brauchen diese Warnung nicht zu beachten, da TANDBERG
DATA die SLR-Laufwerke zertifiziert hat. Testberichte sind auf
Anfrage erhältlich sind.
** Nur für Novell 4.10 und IntranetWare 4.11.
NetWare-integriertes Backup-Applet für
Novell 4.2 und 5
· Das Novell Sbackup (SBCON für Novell 5) liefert einfache
Backup- und Restore-Funktionen.
·
Für diese Anwendung ist ein besonderer Treiber erforderlich.
(Vgl. nächsten Abschnitt: Installation)
Installation
Geben Sie an der Server-Konsole ein:
NWTAPE.CDM
LOAD TSA500
QMAN NEW*
LOAD SBCON (SBACKUP für Novell 4.2)
* Die Option NEW ist nur erforderlich beim erstmaligen Ausführen dieses Befehls. Dies errichtet
eine Standard-Warteschlange, die vom Backup-Applet benutzt wird.
HINWEIS:
Genauere Informationen zu dieser Anwendung oder deren Installation finden
Sie im Online-Handbuch auf der CD-ROM.
46
Tandberg SLR Installation und Benutzeranwe isung
Tandberg Data
Computer Associates ARCserveIT für
NetWare 6.61
Computer Associates ARCserveIT für NetWare:
ARCserveIT Single Server für NetWare
Der CA's Single-Server für NetWare-Produkte, in erster Linie für
kleine und mittlere Organisationen und Single-ServerInstallationen
entworfen, bietet seinen Benutzern die Vorteile leistungsstarker
Technologie zu wettbewerbsfähigen Preisen und mit guter
Funktionalität.
Leistungsmerkmale
1) Backup Unlimited DOS, OS2, Windows 3.X, Windows
95/98 Workstationen.
2) Support für Novell Netware 3.x, 4.x, 5.x 3)
Parallel-Streaming 4) Automatisiertes MedienManagement
ARCserveIT Enterprise Edition für Netware –
Eine Lösung für Multiple-Server
CA's Enterprise-Edition-Produkte sind für mittlere und große
Organisationen entworfen und bieten großen heterogenen
Umgebungen virtuell unbegrenzte Skalabilität und plattformübergreifende Funktionstüchtigkeit. Die flexible Lizenzvergabe macht
Enterprise-Edition-Lösungen zur ideellen Lösung für große
Anwender.
Tandberg SLR Installation und Benutzeranweisung
47
Tandberg Data
Tandberg Data bündelt Produkte mit ARCserveIT Single Server und
Enterprise Edition.
Bei vorschriftsmäßiger Installation erfordert der ARCserveIT eine an
den Novell-Server angeschlossene Workstation (Windows 9x/NT).
1) Legen Sie die Desktop-CD-ROM ein.
2) Öffnen Sie My Computer.
3) Klicken Sie das CD-ROM-Symbol zweimal an.
4) Ein Browser erscheint automatisch.
5) Wählen Sie ARCserveIT for NetWare.
6) Klicken Sie das Install-Symbol an.
7) Befolgen Sie die Anweisungen auf dem Bildschirm.
BEACHTEN SIE:
Weitere Informationen zu dieser Anwendung und deren Installation finden Sie in
der Online-Dokumentation der ARCserveIT CD-ROM.
48
Tandberg SLR Installation und Benutzeranwe isung
Tandberg Data
Veritas-Software-Server-CD-ROM
Backup-Exec für NetWare
Backup Exec ist einer der Marktführer der NT-BackupSoftware und
in zwei unterschiedlichen Versionen im Verkauf: Single-Server und
Multi-Server. VERITAS Backup Exec für NetWare bietet die neueste
Backup- und Restore-Technologie für schnellen, zuverlässigen und
einfachen Schutz der Serverdaten. Der komplette NDS-Support bietet
einen leistungsstarken Datenschutz für große und kleine
Unternehmen.
HINWEIS:
- Wenn die Backup-Exec für NetWare für Novell 4.1X installiert ist,
können sowohl die Versionen 7.5 als auch 8.0 installiert werden. Wenn das Backup-Exec für Novell 5 installiert ist, kann nur die
Version 8.0 installiert werden.
- Um mit Novell 5.1 kompatibel zu sein, ist die Backup Exec-Version 8.5
erforderlich.
Installation
Server-basierte Installation
Legen Sie bitte die Installations-CD-ROM in das CD-ROMLaufwerk
des Servers und geben Sie in das Feld der ServerKonsole folgendes
ein:
CD MOUNT VERITAS
LOAD VERITAS:NETWARE/BEINSTL
Befolgen Sie die Anweisungen auf dem Schirm.
Tandberg SLR Installation und Benutzeranweisung
49
Tandberg Data
Workstation-basierte Installation
Legen Sie bitte die Installations-CD-ROM in das CD-ROMLaufwerk
der Workstation ein und führen Sie die folgenden Schritte aus:
à Bei Windows NT, Windows 95, Windows 98, Windows 98
Second Edition
1) Öffnen Sie My Computer.
2) Klicken Sie zweimal das CD-ROM-Symbol an.
3) Ein Browser erscheint automatisch.
4) Wählen Sie Backup Exec for NetWare.
5) Klicken Sie das Install-Symbol an.
6) Befolgen Sie die Anweisungen auf dem Bildschirm.
à Bei Windows 3.1X
1) Öffnen Sie den Windows “File Manager”.
2) Klicken Sie den zur CD-Rom gehörigen Buchstaben an.
3) Klicken Sie zweimal die “setup.exe”-Datei an.
4) Ein Browser wird automatisch erscheinen.
5) Wählen Sie jetzt Backup Exec for NetWare.
6) Klicken Sie das Install-Symbol an.
7) Befolgen Sie die Anweisungen auf dem Bildschirm.
HINWEIS:
Genauere Informationen zu dieser Anwendung oder deren Installation finden
Sie im Online-Handbuch auf Veritas-Software-CD-ROM.
50
Tandberg SLR Installation und Benutzeranwe isung
Tandberg Data
Windows 95
Host-Adapter
Windows 95 enthält einen Treiber für die meisten SCSIHostAdapter.
Da die meisten Host-Adapter die Plug-And-PlayFunktionalität
unterstützen, wird die SCSI-Schnittstelle nach ihrer Installation
automatisch erfaßt und der erforderliche Treiber auf die Festplatte
kopiert.
Wenn der Host-Adapter nicht automatisch erkannt wird, finden Sie
Hinweise dazu im Installations-Handbuch für das SCSI-Board.
Windows 95 integriertes Backup Applet
Das in Windows 95 integrierte Backup-Applet enthält keine Treiber,
die SCSI-Laufwerke unterstützen.
Backup-Anwendungen
Da das in Windows 95 integrierte Backup-Applet keine Treiber
enthält, die SCSI-Laufwerke unterstützen, ist eine dritte PartyAnwendung notwendig, um SLR-Laufwerke benutzen zu können.
(Z.B. Veritas Backup Exec für Windows 95/98)
Der Treiber ist Teil der Backup-Anwendung und wird nach
Installation Ihres SLR-Laufwerks vom Windows 95 Device Manager
als "unknown device" angezeigt. Ignorieren Sie diese Information
und setzen Sie die Installation Ihrer Backup-Software fort.
Tandberg SLR Installation und Benutzeranweisung
51
Tandberg Data
Veritas-Software-Desktop-CD-ROM
Veritas-Backup-Exec für Windows 95/98
· Veritas-Backup-Exec für Windows 95/98 liefert ein starkes
Leistungsspektrum mit benutzerfreundlicher Schnittstelle für den
verläßlichen, automatischen Windows 95/98-Datenschutz.
Integriertes Disaster Recovery baut Ihr gesamtes System ohne NeuInstallation des Operativsystems oder der Backup-Software wieder
auf. Einzeln finden Sie die Dateien mit der File-Find-Funktion für
besondere Daten-Restores.
· Veritas-Backup-Exec benutzt einen System-Tape-Treiber, der
während des Installationsvorgangs kopiert wird. Demnach wird
Windows 95/98 SLR-Laufwerk erkennen.
Installation
1) Legen Sie die Desktop-CD-ROM ein.
2) Öffnen Sie My Computer.
3) Klicken Sie zweimal das CD-ROM-Symbol an.
4) Ein Browser wird automatisch erscheinen.
5) Wählen Sie Backup Exec for Windows 95/98.
6) Klicken Sie das Install-Symbol an.
7) Befolgen Sie die Anweisungen auf dem Bildschirm.
HINWEIS:
Genauere Informationen zu dieser Anwendung oder deren Installation finden
Sie im Online-Handbuch auf der Veritas Software CD-ROM.
52
Tandberg SLR Installation und Benutzeranwe isung
Tandberg Data
Windows 98
Windows 98 2nd Edition
Host-Adapter
Windows 98 und Windows 98 Second Edition enthalten Treiber für
die meisten SCSI-Host-Adapter. Da die meisten SCSI-Host-Adapter
die Plug-And-PlayFunktionalität unterstützen, wird die SCSISchnittstelle automatisch nach ihrer Installation erfaßt und der/die
erforderliche/n Treiber auf die Festplatte kopiert.
Wenn der Host-Adapter nicht automatisch erkannt wird, finden Sie
die entsprechenden Hinweise im InstallationsHandbuch oder in der
Datei Read-Me zum SCSI-Board.
Backup-Anwendungen
Windows 98 Integriertes Backup-Applet
· Diese Anwendung liefert kompletten Datenschutz einschließlich
automatischer, planmäßiger Backups.
· Ein Backup-Assistent hilft Ihnen bei der Ausführung aller
gewünschten Abläufe mit dem SLR-Laufwerk.
• Die integrierte Backup-Applet-Anwendung unterstützt die
Tandberg-Laufwerke SLR2, SLR3, SLR4, SLR4DC und SLR5. Für
die Laufwerke SLR24 und SLR50 ist das Veritas-Backup-Exec
für Windows 95/98 erforderlich. (SLR40, SLR60, SLR75, SLR100
und SLR140 können auch funktionieren, sind aber von Tandberg
Data nicht zugelassen).
Installation
Um die Backup-Anwendung zu starten:
1) Klicken Sie START an.
2) Klicken Sie Programs an.
3) Klicken Sie Accessories an.
4) Klicken Sie System Tools an.
5) Wählen Sie Backup.
Tandberg SLR Installation und Benutzeranweisung
53
Tandberg Data
Veritas-Software-Desktop-CD-ROM
Veritas-Backup-Exec für Windows 95/98
· Veritas-Backup-Exec bietet ein starkes Leistungsspektrum mit einer
leicht zu handhabenden Schnittstelle für verläßlichen, automatisch
ablaufenden Datenschutz. Das integrierte “Emergency Recovery”
baut Ihr gesamtes System wieder auf, ohne Neu-Installation des
Operativsystems oder der Backup-Software. Einzeln finden Sie die
Dateien mit der File-Find-Funktion für besondere DatenRestores.
· Veritas-Backup-Exec benutzt einen System–TapeTreiber, der
während des Installationsvorgangs kopiert wird. Dadurch wird die
Backup Exec Ihr SLR Laufwerk erkennen.
Installation
1) Legen Sie die Desktop-CD-ROM ein.
2) Öffnen Sie My Computer.
3) Klicken Sie das CD-ROM-Symbol zweimal an.
4) Ein Browser erscheint automatisch.
5) Wählen Sie Backup Exec for Windows 95/98.
6) Klicken Sie das Install–Symbol an.
7) Befolgen Sie die Anweisungen auf dem Bildschirm.
HINWEIS:
Die Version der Anwendung ist mit Windows 98 Second Edition voll
kompatibel.
54
Tandberg SLR Installation und Benutzeranwe isung
Tandberg Data
SCO-Open-Server Release 5
Host-Adapter
Der SCO enthält einen Treiber für die meisten SCSI- HostAdapter.
Falls Sie den entsprechenden Treiber nicht finden können, finden Sie
diesbezügliche Hinweise im InstallationsHandbuch für den SCSIHost-Adapter.
Kompatibilitäts-Diagramm des SLR- Laufwerks
SLR2
SLR3
SLR4
SLR4DC
SLR5
SLR24
SLR40
SCO OS 5
Version 5.0.4
SCO OS 5
Version 5.0.5
SCO zertifiziert
SCO zertifiziert
Tandberg zertifiziert
Tandberg zertifiziert
SCO zertifiziert
SCO zertifiziert
Tandberg zertifiziert
Tandberg zertifiziert
SCO zertifiziert
SCO zertifiziert
Tandberg zertifiziert
Tandberg zertifiziert
SCO zertifiziert
SCO zertifiziert
Tandberg zertifiziert
Tandberg zertifiziert
SCO zertifiziert
SCO zertifiziert
Tandberg zertifiziert
Tandberg zertifiziert
SCO zertifiziert
SCO zertifiziert
Tandberg zertifiziert
Tandberg zertifiziert
Tandberg Zertifiziert
SCO zertifiziert
Tandberg zertifiziert
SLR50
SLR60
SCO zertifiziert
SCO zertifiziert
Tandberg zertifiziert
Tandberg zertifiziert
Tandberg zertifiziert
SCO zertifiziert
Tandberg zertifiziert
SLR75
Tandberg zertifiziert
Tandberg SLR Installation und Benutzeranweisung
Tandberg zertifiziert
55
SLR100
Tandberg zertifiziert
SCO zertifiziert
Tandberg zertifiziert
SLR140
Tandberg zertifiziert
Tandberg zertifiziert
Tandberg Data
Installation
1) Einloggen in der Root.
2) Geben Sie den folgenden Befehl ein: MKDEV TAPE.
3) Wählen Sie Install a SCSI Laufwerk.
4) Geben sie das Präfix des SCSI-Host-Adapters ein,
der dieses Gerät unterstüzt.
(Die Eingabe von h gibt Ihnen eine Liste des
unterstützten SCSI-Host-Adapters).
5) Welcher SCSI-Host-Adapter unterstützt dieses
Gerät?
(Wenn nur ein SCSI-Host-Adapter installiert ist, wählen Sie 0.
Wenn zwei SCSI-Host-Adapter des gleichen Typs installiert
sind, wählen Sie 1).
6) Welches ist die Target-ID für dieses Gerät? (2 ist die
Tandberg-Standard-SCSI-ID)
7) Welches ist die LUN für dieses Gerät? (0
einstellen!)
8) Aktualisierung der SCSI-Konfiguration? (Überprüfen
Sie zuerst, ob die Tabelle auf dem Bildschirm mit der
Laufwerk-Konfiguration übereinstimmt.)
HINWEIS:
- Der Kern des System muß neu aufgebaut werden, um die neue HardwareKonfiguration anzuzeigen, und ein Reboot (neuer Start) ist notwendig,
bevor Sie Ihr SLR-Laufwerk benutzen können.
- Nähere Informationen zu diesem Betriebssystem oder zu seinem
integrierten Backup-Applet finden Sie im Handbuch auf der SCO OSCDROM.
56
Tandberg SLR Installation und Benutzeranwe isung
Tandberg Data
Backup-Anwendungen
Systembefehle der SCO Open Server
TAR, CPIO und DD ermöglichen einfache Backup-, Verifyoder
Restore-Abläufe.
Zwei unterschiedliche Geräte-Treiber können verwendet werden:
· Ein Non Rewind-Geräte-Treiber (zur Durchführung von
angehängten Sicherungen)
• Ein Rewind – Geräte-Treiber (nur zur Durchführung von
überschreibenden Sicherungen)
Eine vollständige Erläuterung zu den Systembefehlen finden Sie in
den Installationshinweisen für den SCO-Open-Server oder in der
Online-Hilfe. (MAN-Befehl).
Beispiele für Tar-Befehle:
tar cvf /dev/rStp0 /etc führt das Backup des /etc Directory durch
tar tvf /dev/rStp0 liest die Daten auf dem Band
tar xvf /dev/rStp0 führt ein Restore vom Band auf den
jeweiligen Directory-Baum aus
SCO Open Server-Backup-Manager
Installation
SCO Open Server - Graphische Schnittstellen 1)
Klicken Sie System Administration an. 2) Klicken Sie den
Backup Manager zweimal an.
SCO Open Server – Konsole
1) Einloggen in der Root.
2) Geben Sie SCOADMIN ein.
3) Wählen Sie den Backup Manager.
Tandberg SLR Installation und Benutzeranweisung
57
Tandberg Data
SCO-ARCserve-Open-Lite für SCO Open Server
· Als Bestandteil der SCO-Open-Server-Release 5, bietet das SCOARCserveOpen-Lite Ihrem SCO-System einfachen und umfassenden Backup und
Restore.
· Die vollständige Version des SCO-ARCserve-Open liefert fortgeschrittene
Backup- und Restoredienste, einschließlich der Unterstützung für den
NetWare-Server und Windows 95/98-Client.
· Die Laufwerke SLR2, SLR3 und SLR4 werden unterstützt.
HINWEIS:
Zur Unterstützung der Laufwerke SLR5, SLR24, SLR7, SLR40, SLR50, SLR60,
SLR75, SLR100 und SLR140 ist die vollständige Version des ARCserve-Open
erforderlich. Nähere Informationen sind dem Computer-Associates-Handbuch oder dem
Tandberg Compatibility Guide zur Kompatibilität zu entnehmen.
Installation
Die Installation des ARCserve Open Lite ist im Setup des SCO-OpenServer
enthalten.
Falls dies nicht der Fall sein sollte, benutzen Sie den Software Manager zur
Installation.
SCO – Graphische Schnittstellen
1) Klicken Sie den Software Manager zweimal an.
2) Wählen Sie Software.
3) Wählen Sie Install New.
4) Befolgen Sie danach die Anweisungen auf dem Bildschirm.
SCO - Konsole
1) Einloggen in die Root.
2) Geben Sie SCOADMIN ein .
3) Wählen Sie den Software Manager.
4) Wählen Sie Software.
5) Wählen Sie Install New.
6) Befolgen Sie danach die Anweisungen auf dem Bildschirm.
HINWEIS:
Nähere Informationen zu dieser Anwendung oder deren Installation finden Sie im
Online-Handbuch auf Ihrer SCO- CD-ROM.
58
Tandberg SLR Installation und Benutzeranwe isung
Tandberg Data
SCO-UnixWare
Host-Adapter
SCO-UnixWare enthält einen Treiber für die meisten SCSIHostAdapter.
Falls Sie den entsprechenden Treiber nicht finden können, finden Sie
diesbezügliche Hinweise im InstallationsHandbuch für den SCSIHost-Adapter.
Installation des Laufwerks
1) Installieren Sie das SLR-Laufwerk.
2) Schalten Sie den Computer ein.
3) Während des Startablaufs entdeckt die SCO- UnixWare
automatisch das SLR-Laufwerk und installiert den
richtigen Tape-Treiber.
HINWEIS:
Nähere Informationen zu diesem Operativsystem oder seinem integrierten
Backup-Applet finden Sie in der Beschreibung auf der SCO-CD-ROM.
Backup-Anwendungen
Systembefehle der SCO UnixWare Anwendung
Die Befehle TAR, CPIO und DD ermöglichen den Ablauf der
einfachen Backup-, Verify- oder Restore-Funktionen.
Zwei unterschiedliche Geräte-Treiber können verwendet werden:
· Ein Non Rewind- Treiber (zur Durchführung von
angehängten Sicherungen)
· Ein Rewind- Treiber (nur zur Durchführung von
überschreibenden Sicherungen)
Eine vollständige Erläuterung zu den Systembefehlen finden Sie in
der Beschreibung der SCO-UnixWare oder in der OnlineHilfsfunktion (MAN-Befehl).
Tandberg SLR Installation und Benutzeranweisung
59
Tandberg Data
Beispiele für Tar-Befehle:
tar cvf /dev/rmt/c0s0 /etc führt ein Backup des /etc Directory durch
tar tvf /dev/rmt/c0s0 liest die Daten vom Band
tar xvf /dev/rmt/c0s0 führt ein Restore der Daten vom Band auf den
jeweiligen Direktory-Baum durch
SCO UnixWare ARCserveIT
• Integriert in SCO UnixWare 7, bietet die Computer Associates ARCserveIT
Enterprise Edition ihrem SCO-System komplette und verständliche
Backups und Restores.
• Die Laufwerke SLR5, SLR24, SLR40, SLR50, SLR60, SLR75,
SLR100 und SLR140 werden unterstützt. Neueste Informationen zur
Kompatibilität erhalten Sie von unserer Website:
www.tandberg.com.
Installation
Die Installation der ARCserveIT ist im Setup der SCO-UnixWare
eingeschlossen.
Falls dies nicht der Fall sein sollte, müssen Sie die Installation mit dem
Software Management vornehmen.
SCO UnixWare-Graphische Schnittstelle
1) Klicken Sie SCO Admin zweimal an.
2) Wählen Sie das Software Management.
3) Wählen Sie den Application Installer.
4) Befolgen Sie danach die Anweisungen auf dem Bildschirm.
SCO UnixWare-Konsole
1) Einloggen in die Root.
2) Geben Sie SCOADMIN ein.
3) Wählen Sie den Software Management.
4) Wählen Sie den Application Installer.
5) Befolgen Sie danach die Anweisungen auf dem Bildschirm.
HINWEIS:
Nähere Informationen zu dieser Anwendung oder deren Installation finden Sie im
Online-Handbuch auf der SCO- UnixWare-CD-ROM.
60
Tandberg SLR Installation und Benutzeranwe isung
Tandberg Data
Sunsoft-Solaris
Installation des Laufwerks
1) Installieren Sie das SLR-Laufwerk.
2) Schalten Sie die SUN-Workstation oder den Server ein. 3)
Benutzen Sie Boot –r .
Dies wird das /devices-Directory neu konfigurieren, damit das
SLR-Laufwerk richtig in der Maschine arbeitet.
Zur Verbesserung der Leistungsfähigkeit bei SLR24, SLR40, SLR50,
SLR60, SLR75, SLR100 und SLR140 kann eine eigene Systemdatei
geändert werden:
/kernel/drv/st.conf
ST.CONF-Datei-Eingänge für Tandberg SLR24, SLR40, SLR50,
SLR60, SLR75, SLR100 und SLR140:
"TANDBERGSLR6","Tandberg SLR24","TANDBERG",
"TANDBERGMLR3","Tandberg SLR50","TANDBERG",
"TANDBERGSLR40","Tandberg SLR40","TANDBERG",
"TANDBERGSLR60","Tandberg SLR60","TANDBERG",
"TANDBERGSLR75","Tandberg SLR60","TANDBERG",
"TANDBERGSLR100","Tandberg SLR100","TANDBERG",
"TANDBERGSLR140","Tandberg SLR140","TANDBERG",
TANDBERG = 1,0x37,0,0x963b,1,0,0;
HINWEIS:
Eine aktualisierte Konfigurationsdatei (ST.CONF) kann von der Tandberg Website
www.tandberg.com geladen werden. Hinweise dazu finden Sie in “Readme” in der
Datei mit weiteren Informationen zur Installation.
Tandberg SLR Installation und Benutzeranweisung
61
Tandberg Data
Backup-Anwendungen
Befehle des Sun-Systems
Die Befehle TAR, CPIO und DD ermöglichen den Ablauf der
einfachen Backup-, Verify- oder Restore-Funktionen.
Zwei unterschiedliche Geräte-Treiber können verwendet werden:
· Ein Non Rewind-Treiber (zur Durchführung von
angehängten Sicherungen)
· Ein Rewind-Treiber (nur zur Durchführung von
überschreibenden Sicherungen)
Beispiele für Tar-Befehle:
tar cvf /dev/rmt/0 /etc führt ein Backup des /etc Directory durch
tar tvf /dev/rmt/0 liest die Daten vom Band
tar xvf /dev/rmt/0 führt ein Restore der Daten vom Band auf den
jeweiligen Direktory-Baum durch
Eine vollständige Erläuterung zu den Systembefehlen finden Sie im
SUN-Handbuch oder in der Online-Hilfsfunktion (MAN-Befehl).
Legato NetWorker für Solaris
Alle SLR-Laufwerke (vom SLR7 bis zum SLR140) sind für die Legato
Networker Version 5.5 und neuere Versionen zertifiziert.
· Der Legato Networker ist eine äußerst zuverlässige,
unternehmensstarke Speichermanagement-Lösung für verteilte
Netzwerke. Er ist hoch-skalierbar und bietet höchste
Anpassungsfähigkeit, Verfügbarkeit und Leistungsfähigkeit. Er
bietet außerdem integrierten Support für Kunden-Verbindungen
und enthält ClientSoftware zur Sicherung von gleichen Operativsystemen wie der Server.
62
Tandberg SLR Installation und Benutzeranwe isung
Tandberg Data
Installation
Vergewissern Sie sich vor Ablauf der Anwendung, dass der Treiber
Ihres SLR-Laufwerks vorschriftsmäßig installiert ist. Vergleichen Sie
mit der Treiber-Installation auf S. 61.
1) Einloggen in die Root.
2) Finden Sie das Solaris-Verzeichnis auf der InstallationsCD.
3) Legen Sie die Pfad-Umgebung für die Benutzer-Root an die Stelle,
wo die NetWorker Programme (executables) liegen.
4) Geben Sie ”pkgadd –d ./” ein, um NetWorker zu
installieren.
5) Befolgen Sie die Anweisung auf dem Schirm.
Zusätzliche Informationen finden Sie in den Installationshinweisen
auf der CD-ROM.
Tandberg SLR Installation und Benutzeranweisung
63
Tandberg Data
Diese Seite bleibt leer
64
Tandberg SLR Installation und Benutzeranwe isung
Tandberg Data
Apple Macintosh
Backup-Anwendungen
Dantz-Retrospect
Dantz-Retrospect bietet folgende Leistungsmerkmale:
· Automatisches Setup mit EasyScript Benutzer-Antworten auf
einige wenige Fragen zur Einrichtung von Backup-Skripts, die automatisch
mit mehreren Quellen, Zielen, Datenauswahlkriterien und Zeitplänen
ablaufen.
· Vollautomatische Backups Automatische, unbediente Backups in
beliebigen Zeitabständen werden in Gang gesetzt (täglich, wöchentlich
usw.).
· Ein-Schritt-Restore
Dieser Restore stellt die gesamte Festplatte in einem Schritt noch einmal her
– selbst nach mehrfachen zusätzlichen Backups. Oder er stellt alle Teile
Ihrer Festplatte genau so wieder her, wie sie nach jedem Backup-Vorgang
waren.
• Disaster Recovery
Eine Emergency-Start-CD hilft bei der Behebung von Ausfallschäden
nach vollständigem Festplatten-Zusammenbruch.
HINWEIS:
SLR 2-5-Laufwerke werden in unkomprimierter Version unterstützt. Für die
Tandberg-Laufwerke SLR24, SLR40, SLR50, SLR60 und SLR100 ist ein Advanced
Driver Kit erforderlich, erhältlich von Dantz. (www.dantz.com)
Installation der Retrospect-Anwendung
1) Legen Sie die Diskette 1 ein (oder die Retrospect-CD-ROM Ihrer eigenen
Version).
2) Klicken Sie das Install-Symbol zweimal an.
3) Befolgen Sie die Anweisungen auf dem Bildschirm.
HINWEIS:
Nähere Informationen zu dieser Anwendung oder deren Installation finden Sie im OnlineHandbuch dieser Anwendung.
Tandberg SLR Installation und Benutzeranweisung
65
Tandberg Data
Diese Seite bleibt leer
66
Tandberg SLR Installation und Benutzeranwe isung
Tandberg Data
IBM RS/6000
Installation des Laufwerks
Zur Installation jedes SLR-Laufwerks im Operativsystem IBM AIX
muß die Smit-Utility verwendet werden.
1) Vergewissern Sie sich, daß die SCSI-ID des Laufwerks
nicht im SCSI-Sub-System verwendet worden ist.
2) Installieren Sie das SLR-Laufwerk.
3) Einloggen in die Root.
4) Lassen Sie smit devices ablaufen.
5) Wählen Sie Install/Configure Devices Added after IPL.
6) Befolgen Sie die Anweisungen auf dem Schirm.
Zur Verbesserung der Leistungsfähigkeit der Laufwerke SLR24,
SLR7, SLR40, SLR50, SLR60, SLR75, SLR100 und SLR140 sollte
die Standard-Block-Größe auf 0 eingestellt sein.
1) Lassen Sie smit devices ablaufen.
2) Wählen Sie Change/Show characteristics of a tape drive.
3) Wählen Sie den Treiber, den Sie ändern möchten.
4) Stellen Sie die Block-Größe auf 0 ein.
Tandberg SLR Installation und Benutzeranweisung
67
Tandberg Data
Backup-Anwendungen
Systembefehle des IBM AIX
Die Befehle TAR, CPIO und DD ermöglichen die Durchführung
einfacher Backup-, Verify- oder Restore-Abläufe.
Zwei verschiedene Geräte-Treiber können verwendet werden:
· Ein Non Rewind-Treiber (zur Durchführung von
angehängten Sicherungen)
· Ein Rewind -Treiber (nur zur Durchführung von
überschreibenden Sicherungen)
Nähere Informationen entnehmen Sie bitte dem IBM AIX Handbuch.
Beispiele für Tar-Befehle:
tar cvf /dev/rmt0 /etc führt ein Backup des /etc Directory durch
tar tvf /dev/rmt0 liest die Daten vom Band
tar xvf /dev/rmt0 führt ein Restore der Daten vom Band auf den
jeweiligen Direktory-Baum durch
IBM AIX-Storage-Manager
Installation
Diese Anwendung ist Teil des Operativsystems.
1) Öffnen Sie das System-Administrator-Fenster.
2) Klicken Sie den Storage Manager zweimal an.
3) Eine Liste mit verfügbaren Bandgeräten erscheint auf dem
Schirm.
4) Befolgen Sie danach die Anweisungen auf dem Schirm.
HINWEIS:
Nähere Informationen zu dieser Anwendung oder deren Installation finden Sie im
IBM-Online-Handbuch.
68
Tandberg SLR Installation und Benutzeranwe isung
Tandberg Data
Legato Networker für AIX
Die Tandberg-Laufwerke SLR24, 7, 50, 60, 75, 100 und 140 sind für
die Legato Networker Version 5.5 und neuere Versionen zertifiziert.
· Der Legato NetWorker ist eine äußerst zuverlässige,
unternehmensstarke Speichermanagement-Lösung für verteilte
Netzwerke. Sie[die Lösung] ist skalierbar und bietet höchste
Anpassungsfähigkeit, Verfügbarkeit und Leistungsfähigkeit. Sie
bietet außerdem integrierten Support für Client-Verbindungen
und enthält ClientSoftware, um Systeme mit gleichem
Operativsytem wie der Server zu sichern.
· Legato Networker verwendet den AIX-System-Treiber. Die
Installation ist auf Seite 57 beschrieben.
Installation
Die Installation ist abhängig von der Version des AIX-Operativsystems. Bitte vergleichen Sie die Dokumentation auf der
Legato CD-ROM.
BEACHTEN SIE:
Weitere Informationen zu dieser Anwendung und deren Installation finden Sie in
der Online-Dokumentation der CD-ROM.
Quadratec Time Navigator für AIX
Der Time-Navigator ist eine professionelle unternehmensdeckende
Backup- und Archivierungslösung. Der Time Navigator ist eine
Software, die automatisch Daten speichert und archiviert sowie sichere
Daten-Restores an verschiedenen Stellen mit identischen BackupAnforderungen und Begrenzungen ausführt.
Installation
Zusätzliche Informationen entnehmen Sie bitte den
Installationshinweisen.
Tandberg SLR Installation und Benutzeranweisung
69
Tandberg Data
Arkeia Backup Software für AIX
Arkeia ist eine Software zum Archivieren und Sichern (Backups) von
Daten. Sie verfügt über eine einfache Schnittstelle, hat jedoch starke
Leistungsmerkmale.
Installation
Zusätzliche Informationen entnehmen Sie bitte den
Installationshinweisen.
70
Tandberg SLR Installation und Benutzeranwe isung
Tandberg Data
HP/UX
Laufwerk
- Sind HP-Server oder Workstation mit einer GSC-BusArchitektur
ausgestattet, dann kann der HP/UX SystemTreiber von allen
Backup- Anwendungen verwendet werden.
HINWEIS:
Für diese Ausstattung muß eine Korrekturroutine (Patch) von der TandbergWEB geladen werden. Nähere Informationen enthält die dortige ReadmeDatei.
- Sind HP-Server oder Workstations mit einer PB-BusArchitektur
(Precision Bus) ausgestattet, dann ist ein Treiber auf der Tandberg
WEB unter www.tandberg.com erhältlich.
Informationen entnehmen Sie bitte der Installationsbeschreibung zum Treiber.
Installation des
Laufwerks (Nur bei GSC
Bus)
Zur Installation der SLR-Laufwerke, muß die SAM-Utility benutzt
werden.
1) Einloggen in die Root.
2) SAM ablaufen lassen.
3) Wählen Sie Peripheral Devices. 4)
Wählen Sie Action/Add.
Das SLR-Laufwerk wird automatisch erfaßt und die notwendigen
Treiber werden installiert.
Tandberg SLR Installation und Benutzeranweisung
71
Tandberg Data
Backup-Anwendungen
Systembefehle des HP/UX
Die Befehle TAR, CPIO und DD ermöglichen die Durchführung
einfacher Backup-, Verify- oder Restore-Abläufe.
Zwei unterschiedliche Geräter-Treiber können verwendet werden:
· Ein Non Rewind -Treiber (zur Durchführung von
angehängten Sicherungen)
· Ein Rewind -Treiber (nur zur Durchführung von
überschreibenden Sicherungen)
Beispiele für Tar-Befehle:
tar cvf /dev/rmt0 /etc führt ein Backup des /etc Directory durch
tar tvf /dev/rmt0 liest die Daten vom Band
tar xvf /dev/rmt0 führt ein Restore der Daten vom Band auf den
jeweiligen Direktory-Baum durch
Eine vollständige Erklärung zur Verwendung der Systembefehle
finden Sie im HPUX-Handbuch oder bei der Online-Hilfe. (MANBefehl).
72
Tandberg SLR Installation und Benutzeranwe isung
Tandberg Data
Linux
SCSI-Host-Adapter
Linux enthält einen Treiber für die meisten SCSI-HostAdapter.
Falls der Treiber nicht gefunden werden kann, finden Sie
diesbezügliche Hinweise im Handbuch zum SCSI-Board.
Installation des Laufwerks
1) Installieren Sie das SLR-Laufwerk.
2) Schalten Sie den PC an.
3) Während des Starts entdeckt Linux automatisch das
SLR-Laufwerk und installiert den richtigen Treiber.
HINWEIS:
Nähere Informationen zu diesem Operativsystem oder dessen integriertem BackupApplet finden Sie in der Beschreibung auf der Linux-CD-ROM.
Tandberg SLR Installation und Benutzeranweisung
73
Tandberg Data
Backup-Anwendungen
Systembefehle des Linux
Die Befehle TAR, CPIO und DD ermöglichen einfache Backup-,
Verify- oder Restore-Abläufe.
Zwei verschiedene Geräte-Treiber können verwendet werden:
· Ein Non Rewind-Treiber (zur Durchführung von
angehängten Sicherungen)
· Ein Rewind -Treiber (nur zur Durchführung von
überschreibenden Sicherungen)
Beispiele für Tar-Befehle:
tar cvf /dev/st0 /etc führt ein Backup des /etc Directory durch
tar tvf /dev/st0 liest die Daten vom Band
tar xvf /dev/st0 führt ein Restore der Daten vom Band auf den
jeweiligen Direktory-Baum durch
Eine vollständige Erklärung zu den Systembefehlen finden Sie im
Linux-Handbuch oder bei der Online-Hilfe. (MANBefehl).
Legato Networker für Linux
Die Tandberg-Laufwerke SLR24, SLR40, SLR50, SLR60, SLR75,
SLR100 und SLR140 sind für die Legato Networker Version 5.5 und
neuere Versionen zertifiziert.
· Der Legato Networker ist eine äußerst zuverlässige,
unternehmensstarke Speichermanagement-Lösung für verteilte
Netzwerke. Er ist hoch-skalierbar und bietet höchste
Anpassungsfähigkeit, Verfügbarkeit und Leistungsfähigkeit. Er
bietet außerdem integrierten Support für Kunden-Verbindungen
und enthält ClientSoftware zur Sicherung von gleichen
Operativ-systemen wie der Server.
74
Tandberg SLR Installation und Benutzeranwe isung
Tandberg Data
· Der Legato Networker benutzt den Treiber des LinuxSystems.
Siehe Installationshinweise auf S. 70.
Installation
1) Legen sie die NetWorker Installations-CD-ROM ins Laufwerk
ein.
2) Öffnen Sie die Linux-Konsole.
3) Finden Sie das Linux-Verzeichnis auf der Installations CD.
4) Geben Sie “./NWInstall” ein, um NetWorker zu
installieren.
5) Befolgen Sie die Anweisungen auf dem Schirm.
Zusätzliche Informationen enthalten die Installationshinweise auf der
Legato CD-ROM.
Quadratec Time Navigator für Linux
Der Time-Navigator ist die professionelle unternehmensdeckende
Backup- und Archivierungslösung. Der Time Navigator ist eine
Software, die automatisch Daten speichert und archiviert sowie
sichere Daten-Restores an verschiedenen Stellen mit identischen
Backup-Anforderungen und Begrenzungen ausführt.
Installation
Zusätzliche Informationen entnehmen Sie bitte den Installationshinweisen.
Tandberg SLR Installation und Benutzeranweisung
75
Tandberg Data
Computer Associates ARCServeIT für
Linux
ARCServeIT ist die professionelle unternehmensdeckende Backupund Archivierungslösung in einem Paket.
Installation
Nähere Informationen zu dieser Anwendung finden Sie in den
anliegenden Installationshinweisen.
EST Inc. BRU Pro für Linux
BRU PRO ist eine Software, die Daten automatisch sichert und
archiviert. Sie bietet ebenfalls sichere Daten-Restores an verschiedenen
Stellen mit identischen Backup-Anforderungen und Begrenzungen.
Installation
Nähere Informationen zu dieser Anwendung finden Sie in den
anliegenden Installationshinweisen.
Arkeia Backup Software für Linux
Arkeia ist eine Software zum Sichern (Backups) und Archivieren von
Daten. Sie hat eine einfache Schnittstelle, jedoch starke
Leistungsmerkmale.
Installation
Nähere Informationen zu dieser Anwendung finden Sie in den
anliegenden Installationshinweisen.
76
Tandberg SLR Installation und Benutzeranwe isung
Tandberg Data
Laufwerk Utility Disk
Als Bestandteil Tandberg SLR Laufwerks bietet der Tandberg TapeDrive-UtilityDisk/Resource
CD
die
folgenden
Anwendungsmöglichkeiten:
- Tandberg Tape-Drive-Optimizer
Diese “Utility” dient der Optimierung der SLR- Leistung nur bei den
SLR24- und SLR50-Laufwerken. Das SLR7/40/60/75/100/ 140
Laufwerk verfügt über eine "Auto sensing"-Übertragungsrate und
wird sich automatisch anpassen, um die Leistung der meisten Systeme
zu optimieren.
Eine DOS-, Windows 95/98 (einschließlich Second Edition)sowie
eine Windows NT-Version sind inbegriffen.
- FlashIt
Diese “Utility” dient der Aktualisierung der SLR-Firmware. Eine
DOS-, Windows 95/98 (einschließlich Second Edition) - und
Windows NT-Version ist inbegriffen. Für die Laufwerke SLR7,
SLR40, SLR60, SLR75, SLR100 und SLR140 ist eine aktualisierte
Version auf der Tandberg-Website www.tandberg.com erhältlich.
- Tandberg Tape-Drive-Viewer
Diese “Utility” gibt detaillierte Informationen über die SLRKonfiguration.
Eine Windows 95/98 (einschließlich der Second Edition)und eine
Windows NT-Version sind inbegriffen.
HINWEIS:
Hinweise zu diesem Utility-Disk oder dessen Installation finden Sie in der
README-Datei auf dem Disk.
Tandberg SLR Installation und Benutzeranweisung
77
Tandberg Data
Diese Seite bleibt leer
78
Tandberg SLR Installation und Benutzeranwe isung
Tandberg Data
Problemlösung
Falls Sie mit Ihrem SLR-Laufwerk Probleme haben, beachten Sie bitte
die folgenden Hinweise, bevor Sie sich an den Kundendienst
wenden.
Hardware-Kontrolle
· Überprüfen Sie, ob das System beim Startablauf das Laufwerk
erkennt.
· Überprüfen Sie, ob der SCSI-Host-Adapter das Laufwerk
während der Initialisierung erkennt.
· Haben Sie den Status der LED-Anzeigen an der LaufwerkVorderseite überprüft?
· Überprüfen Sie, ob das Laufwerk richtig konfiguriert worden ist.
· Überprüfen Sie, daß die SCSI-ID des Laufwerks nicht mit dem
SCSI-Bus in Konflikt gerät.
· Überprüfen Sie, daß das Netzkabel richtig eingesteckt ist.
· Überprüfen Sie die Richtigkeit der SCSI-KabelAnschlüsse.
Software-Kontrolle
· Überprüfen Sie, daß das Operativsystem während des Startablaufs
keinen Fehler anzeigt.
· Überprüfen Sie, daß der richtige Bandgerät-Treiber
vorschriftsmäßig installiert ist.
· Überprüfen Sie, daß der Treiber für den SCSI-HostAdapter
vorhanden und vorschriftsmäßig geladen ist.
· Überprüfen Sie, daß die Backup-Software beim Laden keinen
Fehler anzeigt.
· Installieren Sie die Backup-Software erneut und prüfen Sie, ob
das SLR-Laufwerk erkannt ist.
Tandberg SLR Installation und Benutzeranweisung
79
Tandberg Data
Verifizierung der letzten Änderungen
Falls Ihr SLR früher installiert wurde, bisher einwandfrei funktionierte und erst jetzt
Probleme entstehen, überprüfen Sie alle letzten Änderungen am System, um herauszufinden,
ob diese Änderungen das Problem verursachen können. Versuchen Sie folgendes:
1) Hat sich die System-Konfiguration geändert, machen Sie die Änderung
rückgängig, um zu sehen, ob diese das Laufwerk beeinflußt hat.
2) Ist eine Korrekturroutine (Patch) des Operativsystems installiert worden, machen Sie
diese rückgängig, um zu sehen, ob sie das Laufwerk beeinflußt hat.
3) Falls ein SCSI-Gerät hinzugefügt wurde, kontrollieren Sie evtl. Konflikte zwischen
SCSI-ID’s.
4) Falls ein SCSI-Gerät hinzugefügt wurde, überprüfen Sie, ob die SCSITermination ordentlich angebracht ist.
Behebung von sporadischen Fehlern
Treten am SLR-Laufwerk sporadische Fehler auf:
1) Reinigen Sie das Bandlaufwerk.
2) Überprüfen Sie die SCSI-Termination am SCSI-Bus.
Tritt das Problem mitten in einem Betriebsvorgang auf:
1) Nehmen Sie eine andere Cartridge.
2) Tritt der Fehler auf, während die Software die Dateien für Backups scannt, lassen Sie
einen SCANDISK laufen, um den Status des Dateiensystems und der Festplatte zu
überprüfen.
Tritt der Fehler immer wieder bei derselben Datei oder beim selben Verzeichnis auf:
1) Versuchen Sie die Datei oder das Verzeichnis von dem Backup-Vorgang zu
entfernen, um zu sehen, ob dadurch das Problem behoben würde. 2) Nehmen Sie eine
andere Data-Cartridge.
Software-Problemlösung
Die vollständigen Software-Problemlösungs-Hinweise sind von der TandbergWEB
www.tandberg.com erhältlich.
80
Tandberg SLR Installation und Benutzeranwe isung
Tandberg Data
Anhang
Hinweise zu Zulassungsrichtlinien
Werksbescheinigung des Herstellers:
Hiermit wird bescheinigt, daß die SLR Tape-Backup-Systeme:
Interne SLR™-Modelle:
EC Werks
bescheinigung
Tandberg SLRx Internes Laufwerk Tandberg SLRxx
Internes Laufwerk Tandberg SLRxxx
Internes
Laufwerk
Externe SLR-Modelle:
Tandberg SLRx Ext. Externe Tape-Lösung Tandberg
SLRxx Ext. Externe Tape-Lösung Tandberg SLRxxx Ext.
Externe Tape-Lösung
den Bestimmungen der Richtlinie des Rates der Europäischen Gemeinschaften über die Annäherung der Gesetze der
Mitgliedsstaaten im Bereich der elektromagnetischen Kompatibilität (EMR-Richtlinie 89/336/EEC vom 3. Mai 1989)
entsprechen. Diese Produkte entsprechen ebenso den Bestimmungen der Richtlinie zur Regelung von Niederspannung
(73/23/EWG vom 19. Februar 1973).
Diese Konformitätserklärung der Europäischen Gemeinschaften ist das Ergebnis einer von der
Qualitätssicherungsabtteilung von TANDBERG DATA ASA durchgeführten Prüfung gemäß der Europäischen Norm EN 50081-1
und50082-1, wie in Art. 10 der Richtlinie festgelegt.
Das SLRx-Tape-Backup-System entspricht den Grenzwerten für Datenverarbeitungsgeräte der Klasse B gemäß
Untergruppe B von Teil 15 der FCC-Vorschriften. Ausschließlich Geräte, die den Grenzwerten der Klasse B
entsprechen, dürfen an dieses Backup-System angeschlossen werden.
Eine Inbetriebnahme mit nicht vorschriftsmäßigen Geräten wird aller Wahrscheinlichkeit nach zu Interferenzen beim
Rundfunk- und Fernsehempfang führen.
Das SLRx-Tape-Backup-System entspricht den Sicherheitsnormen EN 60950, UL 1950, CSA 950 und TÜV 60950.
Tandberg SLR Installation und Benutzeranweisung
81
Tandberg Data
Diese Seite bleibt leer
82
Tandberg SLR Installation und Benutzeranwe isung
Tandberg Data
Terminologie
Active Termination Verbesserte SCSI-Termination, die bessere Stabilität
und Lärmimmunität der elektrischen Signale an den
SCSI-Bus-Linien bietet.
ALDC
Adaptive Lossless Data Compression. Die HardwareDaten-Komprimierungsmethode, die bei den SLR4DC, 5,
24, 7, 40, 50, 60, 75, 100 und 140 Laufwerken verwendet
wird.
Append/Angehängt Wenn Daten nach vorher aufgenommenen Daten
geschrieben werden, im Gegensatz zum Überschreiben
vorher aufgenommener Daten.
ASPI
Advanced SCSI Programming Interface. Eine StandardSCSI-Software, die als Verbindung zwischen HostAdaptern und Treibern von SCSIGeräten fungiert. Die
ASPI versetzt Host-Adapter und Geräte-Treiber in die Lage,
eine einzige SCSIHardware-Schnittstelle zu teilen.
Auto sensing
Ein SLR Leistungsmerkmal, das die beste
Übertragungsrate für die optimale Leistungs
fähigkeit am SCSI-Bus herausfindet.
BOT
Spezifiziert durch ein spezielles Lochmuster auf
B
e
Quarter-Inch-Cartrigde-Medien.
g
inning of Tape
Daten-Komprimierung Es bestehen zwei Möglichkeiten der Daten-
komprimierung auf Bändern. Entweder durch das
Leistungsmerkmal der Software-Datenkomprimierung
bei den Laufwerken SLR2, SLR3 und SLR4 oder durch
die Hardware-Datenkomprimierung bei den Laufwerken
SLR4-DC, SLR5, SLR24, SLR7, SLR50, SLR75,
SLR100 und SLR140.
Tandberg SLR Installation und Benutzeranweisung
83
Tandberg Data
Geräte-Treiber
Ein Software-Programm, dass einen Computer in die Lage
versetzt, mit Periphäriegeräten wie eine Festplatte oder
Laufwerken zu kommunizieren. Jeder Gerätetyp braucht
einen anderen GeräteTreiber. Geräte-Treiber sind auf der
Festplatte eines Computers gespeichert und werden
normalerweise beim Start in den Speicher geladen.
EEPROM
Electrically Erasable Programmable Read Only. Ein
integrierter Stromkreis für die Lagerung der
Konfigurations-Informationen.
GUI
Graphical User Interface. Eine mit dem Benutzer
kommunizierende Software.
ID
Vgl. SCSI ID.
LVD
LVD heißt Low Voltage Differential.
LVD bietet bessere Stabilität und Lärmimmunität der
elektrischen Signale an den SCSI-Bus-Linien. LVD
ermöglicht auch eine größere SCSI-BusLänge.
Overwrite/
Überschreiben
Eine Methode zum Überspielen von Daten, die
früher auf das Band geschrieben wurden, ohne
vorher eine Lösch-Operation vorzunehmen.
PNP
Plug-and-Play
84
Ein Hardware- und Software-Mechanismus, der
dem System einen automatischen Weg ermöglicht,
Systemressourcen wie I/O-Parallelschnittstellen, IRQ- und
DMA-Kanäle zwischen PNP-Karten und anderen Geräten
selbst in das System zu konfigurieren.
RWW
Read While Write: Alle Tandberg Laufwerke lesen
automatisch die gerade auf das Band geschriebenen Daten,
um zu vermeiden, dass die Daten in den falschen Block
geschrieben werden.
SCAM
SCSI Configured
AutoMagically
Ein SCSI-Protokoll, dass beim Starten des
Systems die SCSI-Identitäten automatisch den
SCAM-angepaßten Geräten wie den PantherLaufwerken zuordnet.
Tandberg SLR Installation und Benutzeranwe isung
Tandberg Data
SCSI-ID
Ein einzigartiger, SCSI-Geräten zugeteilter Identifikator,
der diese in die Lage versetzt, mit einem Computer zu
kommunizieren, wenn diese über einen SCSI-Bus mit
einem Host-Adapter verbunden sind. Jedes SCSI- HostAdapter-Board verfügt über acht mögliche SCSI-IDs mit
Nummern von 0 bis 7 (oder 0 bis 15 bei WideSCSIAdaptern). Der Host-Adapter selbst hat normalerweise die
SCSI-ID 7.
SLR™
Scaleable Linear Recording.
Ultra/Ultra2 16-Bit-WIDE-SCSI/LVD-Schnittstelle, die bei den Laufwerken SLR24,
7, 40, 50, 60, 75, 100 und 140 verwendet wird.
SLR™ ist ein eingetragenes Warenzeichen der Tandberg Data.
Veritas Software, Veritas Backup, Veritas Backup Exec sind Warenzeichen der Veritas Software Inc. in den Vereinigten
Staaten.
Cheyenne Software, ARCserveIT sind Warenzeichen der Computer Associates Inc. in den Vereinigten Staaten.
Windows NT, Windows 95, Windows 98, MS-DOS, Windows sind eingetragene Warenzeichen der Microsoft Corporation
in den Vereinigten Staaten.
Novell NetWare ist ein eingetragenes Warenzeichen der Novell Inc.
Alle anderen Warenzeichen sind eingetragene Marken ihrer jeweiligen Eigentümer.
Tandberg SLR Installation und Benutzeranweisung
85
Tandberg Data
Diese Seite bleibt leer
86
Tandberg SLR Installation und Benutzeranwe isung
TANDBERG SLR
SOLUTION DE STOCKAGE DE DONNEES
SUR BANDE MAGNETIQUE
Manuel d'installation et guide de l'utilisateur
Tandberg Data ASA
Module N
Août 2003
43 18 55-07
Liste des publications disponibles auprès de notre département commercial :
Séries de Lecteur Publ. N°.
Part. N°. Titre
Tandberg SLR
9048
43 05 08
6028
6047
42 26 86
42 30 42
9084
43 15 65
9033
43 01 37
9031
43 04 44
9063
43 07 43
9100
43 17 88
9144
43 21 67
9148
43 22 23
9149
9156
43 22 22
42 22 46
9162
43 23 17
Tandberg SLR Product Line Reference Manual
Tandberg SLR Product Line Maintenance Manual
Tandberg SLR Product Line SCSI-2 Interface Functional
Specifications
Tandberg SLR Product Line - SLR5 4.0/8.0GB Product
Verification Reports
Tandberg SLR Product Line - SLR4 (TDC 4220) Product
Verification Reports
Tandberg SLR7, SLR24, SLR40, SLR50, SLR60,
SLR75, SLR100 and SLR140 Reference Manual
Tandberg SLR7, SLR24, SLR40, SLR50, SLR60,
SLR75, SLR100 and SLR140 - SCSI Interface Functional
Specifications
Tandberg SLR50 (MLR3) PVR Manual
Tandberg SLR100, SLR60 and SLR40
PVR Manual - Internal
Tandberg SLR24-100 PVR Manual - External
Tandberg SLR2-5 PVR Manual - External
Tandberg SLR24 and SLR50 PVR Manual - Internal
(VU2000)
Tandberg SLR7 PVR Manual - Internal
Veuillez noter que :
Cette publication est susceptible de dévoiler les principales caractéristiques de certains brevets d élivrés ou sur le point
de l être. En publiant ces informations,TANDBERG DATA ASA naccorde aucune licence sous aucun brevet, ni aucun autre
droit.
Tout a été mis en œuvre pour éviter que des erreurs se glissent dans les textes et les illustrations. N éanmoins,
TANDBERG DATA ASA nentend assumer aucune responsabilité quant aux erreurs pouvant appara ître dans cette
publication.
TANDBERG DATA ASA sefforce daméliorer constamment ses produits, dès que de nouvelles techniques ou de nouveaux
composants sont disponibles. Par conséquent, TANDBERG DATA ASA se r éserve le droit de modifier ces spécifications à
tout moment.
Tout commentaire de votre part, relatif à cette publication, sera le bienvenue.
IMPORTANT !
Les équipements Tandberg SLRx doivent être alimentés par une prise
secteur reliée à la terre.
Tandberg Data
Table des Matières
Introduction
1
Contenu des solutions
3
Information
5
Convention de dénomination des lecteurs
Capacité des lecteurs
Performances des lecteurs
Spécifications médias
Compatibilité de format de bande
Compression de données
5
5
6
6
6
7
Installation du lecteur
9
Installation de la carte contrôleur SCSI
Configuration SCSI
SLR2 externe® SLR140 :
Terminaison Bus SCSI – Lecteurs internes
Terminaison bus SCSI – Lecteurs externes
Montage du lecteur interne
Installation du lecteur interne
Montage d’un lecteur externe
Opération sur le lecteur
Comment rembobiner une cartouche de stockage de
données
9
11
12
13
15
15
17
19
21
Installation des logiciels
27
Windows NT
29
Carte hôte SCSI
Dérouleur
Installation du dérouleur Windows NT 4.0
Applications de Sauvegarde
Computer Associates ARCserveIT pour Windows NT
CD-ROM Veritas Software Server
Legato NetWorker pour Windows NT
29
29
29
31
32
35
39
Windows 2000
41
Carte hôte SCSI
Dérouleur
Installation du dérouleur Windows 2000
Applications de sauvegarde
41
41
41
43
Novell NetWare
Carte hôte
Applications de Sauvegarde
CD-ROM Veritas Software Server
45
45
45
49
Manuel d'installation et d'utilisateur Tandberg SLR
23
i
Tandberg Data
ii
Windows 95
51
Carte hôte SCSI
Applications de sauvegarde
CDROM Veritas Software Desktop
51
51
52
Windows 98 et sa 2e édition
53
Carte hôte
Applications de Sauvegarde
CD-ROM Veritas Software Desktop
53
53
54
SCO Open Server version 5
55
Carte hôte
Applications de Sauvegarde
55
57
SCO UnixWare
Carte hôte
Applications de sauvegarde
59
59
59
Sunsoft Solaris
61
Installation du lecteur
Applications de sauvegarde
61
62
Apple Macintosh
65
Applications de sauvegarde
65
IBM RS/6000
Installation du lecteur
Applications de sauvegarde
67
67
68
HP/UX
Lecteur
Applications de sauvegarde
71
71
72
Linux
Carte d’interface SCSI
Applications de sauvegarde
73
73
74
Disque d’utilitaires de lecteur
77
Problèmes techniques
79
Contrôle matériel
Contrôle logiciel
Vérifier de récents changements
Corriger des dysfonctionnements intermittents
Problèmes techniques de logiciel
79
79
80
80
80
Appendice
81
Notices réglementaires de conformité
81
Glossaire des termes employés
83
Manuel d'installation et d'utilisateur Tandberg SLR
Tandberg Data
Introduction
Félicitations pour votre nouvelle formule
de cartouche de stockage de données
Tandberg Data SLR !
Tandberg Data attache la plus haute importance à la pleine satisfaction de sa
clientèle. Nous garantissons que ce produit a quitté nos installations exempt de
tout défaut. Si vous n’êtes pas satisfait(e) de la qualité de ce produit, veuillez
prendre contact avec votre distributeur, votre fournisseur, ou le bureau de
représentation de Tandberg Data le plus proche, pour qu’une solution rapide soit
apportée à votre problème.
Si vous avez besoin d’un support technique ou que vous avez des difficultés
avec votre unité de stockage de données SLR, vous trouverez à la fin de ce
manuel, en quatrième de couverture, les numéros de téléphone et de télécopieur
ainsi que les adresses qui vous sont nécessaires. Demandez notre Service
clientèle.
Tandberg Data ASA est l’un des principaux fournisseurs globaux d’unités de
stockage de données sur bande magnétique, à la pointe de la technique, destinés
au marché des professionnels. Dans le domaine de la gestion du stockage de
données, notre société offre une vaste gamme de produits et de solutions de
protection des données, et autres applications utilisateur.
Tandberg Data fournit aux principaux fabricants du monde achetant en OEM, des
dérouleurs de bande magnétique de marque Travan NS™, SLR™ et DLT™ ainsi
que des systèmes de stockage de données, à travers un vaste réseau mondial de
circuits de vente.
Sur les pages qui suivent, précédant le guide d’installation, vous trouverez des
informations succinctes sur les solutions de cartouche de stockage de données
SLR de Tandberg Data, ainsi qu’une liste des éléments inclus dans le produit
Tandberg Data que vous avez acheté.
Toute la documentation à laquelle il est référé dans le guide d’installation de la
ligne de produits est disponible sous forme de fichier PDF, chargeable à partir du site
Web de Tandberg Data :
www.tandberg.com
Manuel d'installation et d'utilisateur Tandberg SLR
1
Tandberg Data
Cette page a été laissée intentionnellement en blanc
2
Manuel d'installation et d'utilisateur Tandberg SLR
Tandberg Data
Contenu des solutions
Veuillez contrôler le contenu du kit avant
de commencer l’installation !
Solution du lecteur interne :
· Lecteur interne Tandberg (SLR2-SLR140)
• Câble interne SCSI (avec résistance de bouclage LVD/SE pour
Tandberg SLR24, SLR7, SLR40, SLR50, SLR60, SLR75, SLR100
et SLR140)
• Cartouche de données (1 ou 5 selon le type de
kit/solution)
• Cartouche de nettoyage (Tandberg SLR24, SLR7, SLR40,
SLR50, SLR60, SLR75, SLR100 et SLR140)
· Logiciel d’application
· Manuel d’installation et guide de l’utilisateur
· Carte de garantie
Solution du lecteur externe :
· Lecteur externe Tandberg SLR avec cordon d’alimentation
• Terminaison SCSI externe LVD/SE (Tandberg SLR24, SLR7,
SLR40, SLR50, SLR60, SLR75, SLR100 et SLR140)
· Câble SCSI externe
• Cartouche de données (1 ou 5 selon le type de
kit/solution)
• Cartouche de nettoyage (Tandberg SLR24, SLR7, SLR40,
SLR50, SLR60, SLR75, SLR100 et SLR140)
· Logiciel d’application
· Manuel d’installation et guide de l’utilisateur
· Carte de garantie
REMARQUE : Consultez aussi notre site Web : www.tandberg.com
Manuel d'installation et d'utilisateur Tandberg SLR
3
Tandberg Data
Cette page a été laissée intentionnellement en blanc
4
Manuel d'installation et d'utilisateur Tandberg SLR
Tandberg Data
Information
Convention de dénomination des
lecteurs
Le tableau suivant donne l’équivalence entre les noms originels des
lecteurs et leur dénomination associée aux SLR.
Dénomination originelle
Équivalence Tandberg SLR
Tandberg SLR2
Tandberg TDC 3820
Tandberg SLR3
Tandberg TDC 4120
Tandberg SLR4
Tandberg TDC 4220
Tandberg SLR4-DC
Tandberg TDC 4222
Tandberg SLR5
NA
Tandberg SLR24
Tandberg SLR6
Tandberg SLR7
NA
Tandberg SLR40
NA
Tandberg SLR50
Tandberg MLR3
Tandberg SLR60
NA
Tandberg SLR75
NA
Tandberg SLR100
NA
Tandberg SLR140
NA
Capacité des lecteurs
Modèle de lecteur Tandberg Data
Tandberg SLR2
Tandberg SLR3
Tandberg SLR4
Tandberg SLR4-DC
Tandberg SLR5
Tandberg SLR24
Tandberg SLR7
Tandberg SLR40
Tandberg SLR50
Tandberg SLR60
Tandberg SLR75
Tandberg SLR100
Tandberg SLR140
(TDC 3820)
(TDC 4120)
(TDC 4220)
(TDC 4222)
(SLR5 4/8 GB)
(SLR6 12/24 GB)
(MLR3 25/50 GB)
Capacité
525 MB
1.2GB
2.5GB
2.5GB/5.0*GB
4.0GB/8.0*GB
12GB/24*GB
20 GB/40GB*
20GB/40*GB
25GB/50*GB
30GB/60*GB
38 GB/75*GB
50GB/100*GB
70GB/140*GB
* Utilisant un taux de compression matérielle de 2:1
Manuel d'installation et d'utilisateur Tandberg SLR
5
Tandberg Data
Performances des lecteurs
Modèle de lecteur Tandberg Data
Tandberg SLR2 525MB
Tandberg SLR3 1.2GB
Tandberg SLR4 2.5GB
Tandberg SLR4-DC 5GB
Tandberg SLR5
Tandberg SLR24
Tandberg SLR7
Tandberg SLR40
Tandberg SLR50
Tandberg SLR60
Tandberg SLR75
Tandberg SLR100
Tandberg SLR140
Performance Par heure
(TDC 3820)
(TDC 4120)
(TDC 4220)
(TDC 4222)
(SLR5 4/8 GB)
(SLR6 12/24 GB)
12 Mo/min
18 Mo/min
18 Mo/min
18/36* Mo/min
24/48* Mo/min
72/144* Mo/min
180/360* Mo/min
180/360* Mo/min
120/240* Mo/min
240/480* Mo/min
240/480* Mo/min
300/600* Mo/min
360/720* Mo/min
(MLR3 25/50 GB)
720 Mo
1.08 Go
1.08 Go
2.16 Go
2.88 Go
8.64 Go
21.6 Go
21.6 Go
14.4 Go
28.8 Go
28.8 Go
36.0 Go
43.2 Go
* Utilisant un taux de compression matérielle de 2:1
Spécifications médias
Longueur (pied)
Capacité native (Mo)
DC 6250 or equivalent
1020
250
DC 6525 or equivalent
1020
525
MAGNUS 1.2 or equivalent
950
1200
Type de média
MAGNUS 2.5 or equivalent
1200
2500
SLR5 8GB *
1500
4000
SLRtape24 24 GB *
1130
12 000
SLRtape7 40 GB*
1545
20 000
SLRtape40 40 GB*
600
20 000
SLRtape50 50 GB *
1515
25 000
SLRtape60 60 GB*
900
30 000
SLRtape75 75 GB*
1150
38 000
SLRtape100 100 GB*
1500
50 000
SLRtape140 140 GB*
1670
70 000
* Utilisant un taux de compression matérielle de 2:1
Compatibilité de format de bande
Modèle de
Type de
Lecteur
SLR140
SLR100
SLR75
SLR60
SLR50
SLR40
SLR7
SLR32
Média
SLRtape140
SLRtape100
SLR24
SLR5
SLR4
SLR3
SLR2
SLR1
SLRtape60
SLRtape50
SLRtape40
SLRTape7
SLR32,
MLR1-26GB,
Accuscribe 13GB
SLRtape24
SLR5
Magnus 2.5,
Magnus 2.0,
DC 92xx, QD 92xx
Magnus 1.2,
Magnus 1.0,
DC 91xx, QD 91xx
DC6525, DC6320
DC6250, DC6150
Compatibilité des Lecteurs
SLR140 SLR100 SLR75 SLR60 SLR50 SLR40 SLR7 SLR32 SLR24 SLR5 SLR4 SLR3 SLR2
L/E
L
L/E
L
L/E
L/E
L
L/E
L/E
L/E
L
L/E
L/E
L/E
L/E
L
L/E
L/E
L/E
L/E
L
L*
L
L*
L*
L/E
L
L
L
L/E
L
L/E
L
L
L
L
L
L
L
L/E
L
L
L
L
L
L/E
L/E
L/E
L/E
L
L
L/E
L/E
L/E
L/E
L/E
L/E
L/E
L/E
L/E
L/E
L/E
L à Lecture seule
L/E à Compatible en Lecture et Écriture
* SLR7 : lecture disponible en version F/W 04.30 ou supérieure.
6
Manuel d'installation et d'utilisateur Tandberg SLR
L/E
L/E
Tandberg Data
Compression de données
La compression de données est un moyen d’augmenter la capacité
de l’unité de stockage. Les taux de compression sont normalement
spécifiés par 2:1, ce qui signifie qu’il est possible de stocker deux
fois plus d’informations sur la bande que ce n’est le cas sans
compression. Cependant, le taux de compression dépend du type de
données : les fichiers de textes ordinaires peuvent être comprimés
selon un taux beaucoup plus élevé que les fichiers de programmes.
Il existe deux façons de comprimer : compression matérielle et
compression logicielle. L’unité de stockage de données effectue
souvent la compression matérielle. On entend par compression
logicielle la compression des données avant leur envoi à l’unité de
stockage. La compression matérielle est beaucoup plus efficace et
s’opère beaucoup plus rapidement que la compression logicielle.
Les modèles Tandberg Data SLR4-DC, SLR5, SLR24, SLR7,
SLR40, SLR50, SLR60, SLR75, SLR100 et SLR140 utilisent la
compression matérielle ALDC pour compresser les données. Cette
fonction est disponible par défaut, mais l’utilisateur doit désactiver
la compression de données dans le cas d’applications logicielles, ou
d’outils logiciels spécifiques. (Pour plus amples informations,
veuillez vous référer au chapitre outils Tandberg SCSI, à la fin de ce
manuel).
Manuel d'installation et d'utilisateur Tandberg SLR
7
Tandberg Data
Cette page a été laissée intentionnellement en blanc
8
Manuel d'installation et d'utilisateur Tandberg SLR
Tandberg Data
Installation du lecteur
Installation de la carte contrôleur
SCSI
Tous les lecteurs de bande Tandberg Data SLR utilisent une interface
SCSI vers le système hôte.
Avant l’installation de toute unité SCSI il est nécessaire d’installer
préalablement une carte contrôleur SCSI. Veuillez prêter attention
aux points suivants :
· Assurez-vous que votre ordinateur est hors tension avant de
procéder à l’installation.
• Si votre ordinateur est équipé d’un contrôleur SCSI intégré, vous
devez, en premier lieu, localiser le connecteur SCSI sur la carte
mère de l’ordinateur avant de procéder à l’installation.
· Référez-vous à la documentation fournie avec votre ordinateur
pour trouver l’endroit où se trouve localisé ce connecteur.
• Si plusieurs connecteurs SCSI sont disponibles, vous pouvez choisir
n’importe lequel d’entre eux, sous réserve que la documentation de
votre ordinateur n’en dispose autrement.
· Une fois cette opération exécutée, reliez fermement le connecteur
SCSI au connecteur de la carte principale, et reportez-vous à la
section Mounting the Tape Drive en page 14 pour installer votre
lecteur SLR interne.
• Si votre ordinateur/serveur nécessite un contrôleur SCSI séparé,
vous devez vous assurer qu’elle est correctement installée avant de
connecter votre lecteur SLR.
Manuel d'installation et d'utilisateur Tandberg SLR
9
Tandberg Data
· Pour activer le contrôleur SCSI, vous aurez également besoin de vous
procurer un pilote auprès du vendeur qui vous a fourni le contrôleur
SCSI. Assurez-vous que la dernière version du logiciel pilote
correspondant à votre contrôleur SCSI se trouve chargée, et que la
carte contrôleur SCSI est correctement installée. (Les pilotes peuvent
être chargés à partir du site Web du vendeur.) Veuillez vous référer
au fichier Readme pour son installation.
Pour plus amples informations sur la façon d’installer des cartes
supplémentaires dans l’ordinateur/le serveur, veuillez vous référer à
la documentation relative à l’ordinateur/au serveur, ou vous adresser
à votre fournisseur local pour obtenir de l’aide.
10
Manuel d'installation et d'utilisateur Tandberg SLR
Tandberg Data
Configuration SCSI
Sélection SCSI-ID
SLR2 interne® SLR5 :
Tous les périphériques sur bus SCSI ont besoin d’un
numéro d’identification unique, dit SCSI-ID. S’il existe un
conflit d’identification SCSI, les périphériques SCSI ne
pourront être reconnus par votre système. Dans de nombreux
systèmes, il est courant d’utiliser le bus SCSI pour le disque dur
et le CD-ROM, ainsi que pour le lecteur de bande.
N’oubliez pas que le contrôleur SCSI utilise le numéro
d’identification SCSI 7.
Si le lecteur est le seul périphérique sur le bus SCSI, vous
n’avez pas besoin de faire quoi que ce soit. Le lecteur sera
automatiquement reconnu. (Tous les lecteurs Tandberg Data
sont livrés avec un numéro d’identification SCSI 2 par
défaut.)
SLR7 interne ® SLR140 :
Si le lecteur doit partager le bus SCSI avec d’autres
périphériques, vérifiez les numéros d’identification SCSI
utilisés pour les autres périphériques, puis attribuez un
numéro qui n’est utilisé par aucun autre des périphériques.
(N’oubliez pas que la carte hôte SCSI utilise le numéro
7.)
Le numéro SCSI-Id est souvent fixé par des
« cavaliers » permettant de « lire » le numéro SCSI-ID
qui a été attribué au périphérique. Tous les numéros
d’identification de périphériques SCSI s’affichent à
l’écran durant le démarrage du système.
Manuel d'installation et d'utilisateur Tandberg SLR
11
Tandberg Data
Sélection SCSI-ID
SLR2 externe® SLR140 :
Pour les lecteurs externes, vous trouverez à l’arrière du boîtier de l’unité un bouton à
molette destiné au réglage du numéro d’identification SCSI.
12
SLR2-5
SLR7-140
Commutateur SCSI-ID à molette
Commutateur SCSI-ID à molette
Manuel d'installation et d'utilisateur Tandberg SLR
Tandberg Data
Terminaison Bus SCSI – Lecteurs
internes
Terminaison en général
Le bus SCSI est sensible aux interférences telles que le bruit de
moteurs électriques et autres unités électro-magnétiques. En fonction
de la vitesse des données sur le bus SCSI, il est également essentiel
que la terminaison du bus SCSI soit adaptée. Le terme « terminaison
» est utilisé pour désigner l’ensemble des terminaisons du bus SCSI.
Lecteur Tandberg SLR2 à SLR5
Votre nouveau lecteur sera-t-il le dernier ou le seul périphérique sur
le câble SCSI ?
Schéma SCSI lorsque le
lecteur est le dernier ou
le seul périphérique
SCSI.
Schéma SCSI, dans un
système à trois
périphérique iinternes
SCSI.
• Si votre lecteur est le dernier, ou le seul
périphérique sur le câble SCSI, ainsi qu’il
est indiqué à gauche, assurez-vous qu’une
résistance de bouclage SCSI est bien
installée sur le lecteur (option montée par
défaut en usine).
• Si votre lecteur se trouve au milieu de la
chaîne SCSI, ainsi qu’il est indiqué à
gauche, vous devez désactiver le port SCSI
sur le lecteur, en retirant du lecteur la
résistance de bouclage (voir la figure ciaprès). Assurez-vous que la terminaison du
dernier périphérique SCSI sur le câble est
bien disponible.
Manuel d'installation et d'utilisateur Tandberg SLR
13
Tandberg Data
Les lecteurs Tandberg SLR2 ® SLR5 ont 3 jeux de terminaisons
passives qui peuvent être retirés ou installés dans le lecteur.
Lecteurs Tandberg SLR24, SLR7, SLR40, SLR50,
SLR60, SLR75, SLR100, SLR140
Les lecteurs Tandberg SLR24, SLR7, SLR40, SLR50, SLR60,
SLR75, SLR100 et SLR140 sont fournis sans terminaison de
lecteur. Pour répondre aux spécifications PC99, nous fournissons un
câble SCSI interne avec une terminaison active amovible.
14
Manuel d'installation et d'utilisateur Tandberg SLR
Tandberg Data
Terminaison bus SCSI – Lecteurs
externes
Si le lecteur est le seul périphérique sur le bus SCSI externe, il doit
être terminé en utilisant la terminaison SCSI externe fournie avec le
lecteur. Voir la
figure :
Lecteur SLR (doit être terminé)
Carte hôte SCSI
Si un autre/d’autres périphérique(s) est/sont présents, le lecteur
Tandberg SLR peut être installé dans n’importe quelle position sur le
bus SCSI ; le lecteur SLR doit être terminé s’il est installé en fin de
bus SCSI. Voir figure :
Autre périphérique externe
(doit être terminé)
Lecteur SLR (Non
terminé)
Carte hôte SCSI
Autre périphérique
externe
Lecteur SLR
(doit être terminé)
Carte hôte SCSI
Montage du lecteur interne
Configuration large/étroite
Tous les lecteurs SLR internes peuvent être connectés soit à une carte
hôte WIDE SCSI (large) de 16 bits, soit à une carte hôte Narrow SCSI
(étroite) de 8 bits. Le lecteur SLR2-5 est fourni avec un câble interne
à connecteur étroit. Les lecteurs internes SLR7-140 sont livrés avec
un connecteur WIDE. Si vous envisagez d’utiliser un lecteur SLR2-5
avec une carte hôte SCSI large vous aurez besoin d’un convertisseur
de Narrow à WIDE pour le câble interne fourni avec votre solution de
stockage SLR2-5. Si vous envisagez d’utiliser un lecteur SLR7-140
avec une carte hôte SCSI étroite vous aurez besoin d’un convertisseur
de WIDE à Narrow.
Manuel d'installation et d'utilisateur Tandberg SLR
15
Tandberg Data
Pour plus amples informations concernant les convertisseurs et la
connexion de périphériques SCSI étroits (8 bits) à une carte hôte large
(16 bits), et de périphériques WIDE SCSI (16 bits) à des cartes hôtes
étroites (8 bits), ainsi que l’achat de convertisseurs, veuillez vous
référer au site Web suivant :
www.adaptec.com/products/solutions/cables.html
REMARQUE :
Lors de l’installation d’un lecteur Tandberg SLR24, SLR7, SLR40, SLR50,
SLR60, SLR75, SLR100 ou SLR140 sur une carte hôte SCSI 8-bits, en
utilisant un convertisseur de WIDEà Narrow, vérifiez que le dispositif de
négociation WIDE du Bios de la carte hôte SCSI est désactivée. Pour plus
amples informations, veuillez vous référer au manuel de la carte hôte SCSI.
16
Manuel d'installation et d'utilisateur Tandberg SLR
Tandberg Data
Installation du lecteur interne
1) L’installation interne du lecteur requiert l’accès à une baie libre de 5,25 pouces avec une ouverture à
l’avant de votre ordinateur. Accédez à la baie d’installation. (Pour plus amples informations sur l’accès
à la baie, veuillez vous référer à la documentation fournie avec votre système.)
Lecteurs Tandberg SLR2 ® SLR5
Lecteurs Tandberg SLR24, SLR7,
SLR40, SLR50, SLR60, SLR75, SLR100, SLR140
REMARQUE :
Un kit de montage peut être nécessaire pour installer le lecteur dans la baie. Pour plus amples
informations au sujet de ce kit, veuillez vous référer à la www.tandberg.com >SUPPORT>SLR
Support> Hardware Compatibility.
SLR40, SLR50, SLR60, SLR75, SLR100, SLR140
Manuel d'installation et d'utilisateur Tandberg SLR
17
Tandberg Data
Directives pour l’installation des rails de montage
Tandberg SLR5 pour séries
IBM Netfinity 5000, 5500, 5600 et 7000
N° de commande du kit SLR5 Netfinity : P/N 432126
Comprenant :
- Rails de montage x 2 à main droite et à main gauche - Vis x 4
- Notice dinstallation x 1
Tandberg SLR24, SLR7, SLR40, SLR50, SLR60 et SLR100 pour les séries IBM
Netfinity 5000 et 7000
N° de commande du kit Netfinity : P/N 431950
Comprenant :
- Rail de montage x 1
- Vis x 2
18
Manuel d'installation et d'utilisateur Tandberg SLR
- Notice dinstallation x 1
Tandberg Data
Montage d’un lecteur externe
Configuration large/étroite
Tous les lecteurs externes SLR peuvent être connectés soit à une carte
hôte WIDE SCSI (16 bits) ou à une carte Narrow SCSI (8 bits). Le
lecteur SLR2-5 est fourni avec un câble externe à connecteur étroit. Les
lecteurs SLR24-140 sont fournis avec un connecteur externe WIDE. Si
vous envisagez d’utiliser un lecteur SLR2-5 avec une carte hôte WIDE
SCSI vous aurez besoin d’un convertisseur SCSI de Narrow à WIDE
pour le câble externe fourni avec votre solution de stockage SLR2-5. Si
vous envisagez d’utiliser un lecteur SLR7-140 avec une carte hôte SCSI
étroite vous aurez besoin d’un convertisseur de WIDE à Narrow.
Pour plus amples informations concernant les convertisseurs et la
connexion de périphériques SCSI étroits (8 bits) à une carte hôte large
(16 bits), et de périphériques WIDE SCSI (16 bits) à des cartes hôtes
étroites (8 bits), ainsi que l’achat de convertisseurs, veuillez vous référer
au site Web suivant :
www.adaptec.com/products/solutions/cables.html
Installation du lecteur externe
Une fois que vous avez installé la carte hôte SCSI et que vous vous
êtes assuré de son bon fonctionnement, procédez à l’installation du
lecteur lui-même. Avant de commencer, veuillez vous assurer que
l’alimentation est éteinte.
REMARQUE :
N’utilisez ni n’insérez de cordon d’alimentation avant que toutes les
connexions n’aient été établies.
Manuel d'installation et d'utilisateur Tandberg SLR
19
Tandberg Data
Veuillez lire attentivement les informations contenues dans les paragraphes
concernant les conflits d’identification SCSI et la terminaison SCSI, pages 11 à
14. Pour installer un lecteur externe, il suffit de connecter le lecteur à votre
ordinateur/serveur, à l’aide du câble SCSI fourni, à l’un des des connecteurs
SCSI disponibles.
N’oubliez pas de placer la terminaison sur le connecteur libre, à l’arrière du
lecteur, et de sélectionner un numéro d’identification SCSI unique.
SLR7-140
SLR2-5
Bouton Ventilateur de
ON/OFF refroidissement
Rèceptacle
alimentation CA
Commutateur
SCSI-ID à molette
Bouton Ventilateur de
ON/OFF refroidissement
Rèceptacle
alimentation CA
Connecteurs
D´interface SCSI
Commutateur
SCSI-ID à molette
Connecteurs
D´interface SCSI
Puis, branchez-le à la prise de courant.
Lorsque vous mettez le système sous tension pour la première fois, vérifiez que
vos unités SCSI sont correctement énumérées par votre carte de contrôleur SCSI.
20
Manuel d'installation et d'utilisateur Tandberg SLR
Tandberg Data
Opération sur le lecteur
Charger une cartouche de stockage données
1) Appuyez sur le bouton Eject (voir en
haut à droite le détail de
l’emplacement du bouton éjecter).
2) Assurez-vous que la cartouche de
données est correctement orientée
(voir à gauche l’orientation de la
cartouche).
3) Enfoncez la cartouche de données dans
le dérouleur jusqu’à ce que vous
entendiez un déclic qui indique que la
cartouche est bien verrouillée dans
son logement.
Tandberg SLR24, SLR7, SLR40, SLR50, SLR60, SLR75, SLR100, SLR140
1) Assurez-vous que la cartouche est correctement orientée (voir à gauche l’orientation
de la bande).
2) Enfoncez avec précaution la
cartouche dans le dérouleur jusqu’à ce
qu’elle soit automatiquement saisie par
le lecteur.
Manuel d'installation et d'utilisateur Tandberg SLR
21
Tandberg Data
Décharger une cartouche de stockage de données
Tandberg SLR2 à SLR5
Bouton EJECT
1) Attendez que la bande s’immobilise. 2)
Appuyez sur le bouton Eject (voir à
gauche l’emplacement du bouton). 3)
Lorsque l’avant du lecteur s’ouvre,
retirer la cartouche.
4) Fermez manuellement l’avant du
lecteur.
Tandberg SLR24, SLR7, SLR40, SLR50, SLR60, SLR75, SLR100, SLR140
1) Attendez que la bande s’immobilise.
2) Appuyez sur le bouton Eject (voir à
gauche l’emplacement du bouton). 3)
La cartouche sera éjectée
automatiquement.
Maniement d’une cartouche de
stockage de données
Pour améliorer la fiabilité des données et la durée de vie des cartouches,
veuillez respecter les consignes suivantes :
· Évitez de laisser tomber les cartouches
· Assurez-vous que l’atmosphère autour du lecteur et des cartouches de
stockage est saine
· Avant toute utilisation, laissez votre cartouche reposer dans
l’environnement de travail pendant au moins quatre heures
· N’utilisez pas de cartouches usées ou excessivement bruyantes
Entreposage de cartouches de stockage
de données
Le meilleur moyen de conserver une cartouche de données est de la
rembobiner avant de la ranger dans son boîtier de protection.
22
Manuel d'installation et d'utilisateur Tandberg SLR
Tandberg Data
Comment rembobiner une
cartouche de stockage de
données
Tandberg SLR7 à SLR140
Les lecteurs SLR7-140 effectuent automatiquement cette opération
lorsque l’on appuie sur le bouton Eject.
Tandberg SLR2 à SLR5
Commande système Unix
Si vous utilisez cette commande système, vous devez effectuer
l’opération de rembobinage à l’aide de la commande MT. (Pour plus
de détails, veuillez vous référer à la documentation MT.)
Système Unix/Système ordinateur utilisant une
application de sauvegarde
Pour vous assurer que la bande est bien à son début, vous devez
utiliser une commande pour la retendre, préalablement à son éjection.
Lorsque l’opération est terminée, éjectez la bande du lecteur et
rangez-la dans son boîtier.
Conditions d’entreposage
Évitez les températures élevées (>25 °C / 77 °F) et les conditions de
forte humidité (>50 % RH)
Entreposez les cartouches dans un endroit frais et sec.
N’entreposez jamais les cartouches près de périphériques ayant un
champ magnétique élevé, tels que des écrans d’ordinateur, des
appareils de télévision ou des hautparleurs.
Adaptation à l’environnement
Avant toute utilisation, la cartouche doit s’adapter à l’environnement
de travail pour une durée au moins égale à la période durant laquelle
elle s’est trouvée hors de cet environnement (et au maximum 8
heures).
Manuel d'installation et d'utilisateur Tandberg SLR
23
Tandberg Data
Conditions pour retendre la bande
La tension de la bande DOIT être effectuée dans tous les cas suivants :
è Première utilisation d’une bande de stockage neuve.
è Après une opération prolongée sur une longueur limitée de la bande,
ce qui suppose des opérations marche/arrêt répétées.
è Lorsque la cartouche a été exposée à des baisses et/ou des
augmentations de température de 16 °C (30 °F).
è Lors d’une chute de la cartouche.
è L’occurrence excessive d’erreurs d’écritures et de lecture
(également dénommée « Error Check and Correcting/ECC
error » par certaines applications de sauvegarde).
Nettoyage
Avant toute utilisation, veuillez vous assurer que la cartouche a été
entreposée pendant 24 heures dans les conditions de température et
d’humidité de l’environnement dans lequel elle doit être utilisée.
Périodicité de nettoyage recommandée
Il convient en général de nettoyer le lecteur après 50 heures d’activité
de la bande pour les SLR2-5, et après 100 heures pour les SLR7-140.
Nous recommandons vivement d’effectuer une procédure de
nettoyage hebdomadaire, et de nettoyer le lecteur immédiatement
après l’utilisation d’une cartouche neuve.
REMARQUE :
Si votre produit est un Tandberg SLR24, SLR7, SLR40, SLR50, SLR60,
SLR75, SLR100 ou SLR140, un nettoyage est nécessaire lorsque le voyant
avant à l’extrême droite s’éclaire d’une couleur ORANGE fixe.
24
Manuel d'installation et d'utilisateur Tandberg SLR
Tandberg Data
Nettoyage
1) Introduisez la cartouche de nettoyage dans le dérouleur de la bande SLR.
2) La procédure de nettoyage démarrera automatiquement. Les voyants avant se trouvant
sur l’unité réagiront comme suit :
Tandberg SLR2 à SLR5
· Le voyant VERT, sur la face avant du panneau, clignote.
3) Attendez que tous les voyants actifs s’immobilisent, et éjectez
manuellement du dérouleur du lecteur la cartouche de stockage de
données 7 (environ 30 secondes).
Tandberg SLR7 à SLR140
· Voyant à l’extrême gauche OFF, voyant central VERT clignotant,
voyant ORANGE à l’extrême droite fixe.
3) La cartouche sera éjectée lorsque le nettoyage aura été effectué
(environ 3 minutes).
Remplacement de la cartouche de nettoyage
La cartouche de nettoyage SLR doit être remplacée lorsque :
Tandberg SLR2 ® SLR5
· Le voyant VERT, sur la face avant du panneau, est
fixe (pour SLR2, SLR3, SLR4, et SLR4DC).
· Le voyant ORANGE, sur la face avant du panneau, est fixe (pour
SLR5).
Tandberg SLR24, SLR7, SLR40, SLR50, SLR60, SLR75,
SLR100 et SLR140
· Le VOYANT est inactif, et la bande est
automatiquement éjectée.
Manuel d'installation et d'utilisateur Tandberg SLR
25
Tandberg Data
Voyants sur l’avant de l’unité
Tandberg SLR2 à SLR5
Les lecteurs Tandberg SLR2, SLR3, SLR4, SLR4-DC et SLR5 sont
équipés d’un seul voyant qui indique les états du lecteur comme suit
:
État du voyant
Signification
OFF
Inactif, aucune cartouche nest chargée
VERT fixe
VERT clignotant
ORANGE fixe
Inactif, cartouche chargée
Lecteur actif
Erreur matérielle du média
VERT fixe
Cartouche de nettoyage vide la cartouche de
nettoyage doit être changée (SLR2--> SLR4)
ORANGE fixe
Cartouche de nettoyage vide la cartouche de
ROUGE fixe
Erreur fatale *
* Contactez le Service clientèle de Tandberg Data
Tandberg SLR24, SLR7, SLR40, SLR50, SLR60,
SLR75, SLR100, SLR100
Les lecteurs Tandberg SLR24, SLR7, SLR40, SLR50, SLR60,
SLR75, SLR100 et SLR140 sont équipés de trois voyants qui
indiquent les états du lecteur comme suit :
État du voyant (LED)
Signification
Vert
Clignotant
OFF
OFF
Vert
OFF
OFF
OFF
Orange
OFF
OFF
ON
Autodiagnostic en cours
Inactif, cartouche non chargée
Cartouche non chargée, nettoyage
ON
ON
ON
OFF
Clignotant
OFF
OFF
OFF
ON
nécessaire
Inactif, cartouche chargée
Lecteur actif
Inactif, cartouche chargée,
nettoyage nécessaire
ON
Clignotant
ON
Actif, nettoyage nécessaire
OFF
OFF
Clignotant
Erreur de lecteur irrémédiable*
Clignotant
Clignotant
Clignotant
Erreur fatale *
* Contactez le Service clientèle de Tandberg Data
26
Manuel d'installation et d'utilisateur Tandberg SLR
Tandberg Data
Installation des logiciels
Ce chapitre contient les informations relatives à l’installation des
lecteurs SLR dans les environnements de systèmes d’exploitation
suivants :
- Windows NT 4.X (Serveur/Station de travail)
- Windows 2000
- Novell NetWare 4.X/5.0 Windows 95 - Windows 98
- Windows 98, deuxième édition - SCO
Open Server version 5 - SCO
UnixWare version 7.X - Sunsoft Solaris
2.x, 7.0
- Apple Macintosh System version 7 ou supérieure - IBM
AIX version 4.x
- HPUX version 10.20/11.0 - Linux
Manuel d'installation et d'utilisateur Tandberg SLR
27
Tandberg Data
Cette page a été laissée intentionnellement en blanc
28
Manuel d'installation et d'utilisateur Tandberg SLR
Tandberg Data
Windows NT
Carte hôte SCSI
Windows NT comprend un pilote pour la plupart des cartes hôtes
SCSI.
Si vous ne parvenez pas à trouver le pilote approprié, veuillez vous
référer au guide d’installation fourni avec la carte hôte SCSI.
Dérouleur
Windows NT 3.5x et 4.0 comprennent un dérouleur qui supporte les
modèles SLR2, SLR3, SLR4, et SLR4DC pour toutes les versions de
Windows NT et Service Packs. Un support pour le modèle SLR5 est
fourni par Service Pack 6A. (Disponible sur le site Web de Microsoft
: www.microsoft.com).
Les lecteurs SLR24, SLR7, SLR40, SLR50, SLR60, SLR75,
SLR100 et SLR140 requièrent un dérouleur supplémentaire qui
est disponible sur le site Web de Tandberg :
www.tandberg.com.
Installation du dérouleur Windows
NT 4.0
1) Double-cliquez sur l’icône “Tape Devices” à partir du
Control Panel.
NT détecte automatiquement celui des lecteurs Tandberg SLR qui se
trouve installé sur le système, et vous suggère d’installer le pilote.
Installation des Tandberg SLR2, SLR3, SLR4, SLR4DC et SLR5
2) Sélectionnez “Tandberg 3660, 3820, 4120, 4220, 4222”.
3) Sélectionnez OK et suivez les instructions à l’écran.
Manuel d'installation et d'utilisateur Tandberg SLR
29
Tandberg Data
Installation des Tandberg SLR24, SLR7, SLR40,
SLR50, SLR60, SLR100
2) Cliquez sur Have a Disk.
3) Lorsqu’il vous est demandé d’insérer une disquette dans le lecteur
A:
4) Sélectionnez le pilote Tandberg Data SLR2-140.
5) Sélectionnez Install et suivez les instructions s’affichant à l’écran.
Pendant le processus de copie, il est possible que vous receviez les
avertissements suivants :
Choisissez toujours New.
Ceci remplacera le dérouleur existant par la dernière version qui
supporte le lecteur Tandberg SLR que vous utilisez.
30
Manuel d'installation et d'utilisateur Tandberg SLR
Tandberg Data
Applications de Sauvegarde
Application NT incluse
L’application de sauvegarde NT (NTBackup) est intégrée au système
d’exploitation de Windows NT 4.0.
Installation
Avant de lancer l’application, assurez-vous que le dérouleur de votre
lecteur SLR est correctement installé. Veuillez vous référer à
l’installation du dérouleur page 29.
Pour lancer l’application :
·
·
·
·
Cliquez sur START.
Cliquez sur Programs.
Cliquez sur Administrative tools.
Sélectionnez Backup.
REMARQUE :
Pour toute question relative à cette application ou à son installation, veuillez
vous référer à la documentation Microsoft NT.
Manuel d'installation et d'utilisateur Tandberg SLR
31
Tandberg Data
Computer Associates ARCserveIT
pour Windows NT
ARCserveIT est l’un des produits leaders sur le marché pour le
logiciel de sauvegarde NT. Il est vendu en trois versions différentes :
ARCserveIT Workgroup Edition, ARCserveIT Advanced Edition
et ARCserveIT Enterprise Edition.
ARCserveIT Workgroup Edition
Il est essentiellement conçu pour des petites et moyennes entreprises
et des installations monoserveur. CA's Workgroup Edition for NT
permet aux utilisateurs de récolter les fruits d’une technologie
performante, à un niveau de prix et de fonctionnalité qui convient à
leurs besoins.
Caractéristiques
· Supporte un robot chargeur
· Déroulement en parallèle
· Gestion automatique de média
• Supporte un nombre illimité de stations de travail client sous
Windows 3.1x, Windows 95/98 et Windows NT
ARCserveIT Advanced Edition
Créé pour répondre aux besoins particuliers en technologie de
l’information de la plupart des moyennes entreprises. Alliant une
technologie industrielle qui a fait ses preuves à des dispositifs faciles
d’utilisation et à des solutions évolutives, ARCserveIT Advanced
Edition offre ainsi une nouvelle génération de solutions. Advanced
Edition fournit une gestion centralisée des solutions informatiques,
un support pour les installations à serveurs multiples (avec un
nombre illimité de clients), et des solutions évolutives pour des
environnements dynamiques.
32
Manuel d'installation et d'utilisateur Tandberg SLR
Tandberg Data
ARCserveIT Enterprise Edition
Conçus pour de moyennes et de grandes entreprises, les produits de
CA's Enterprise Edition offrent une évolutivité virtuellement illimitée
et une interopérabilité entre différentes plateformes, qui conviennent
à de vastes environnements hétérogènes. Grâce à un système de
licence flexible, les solutions d’Enterprise Edition sont un choix idéal
pour les grandes entreprises.
Tandberg Data livre ses produits avec les applications ARCserveIT
Work Group et ARCserveIT Advanced Edition.
Installation
1) Insérez le CD-ROM Server.
2) Ouvrez My Computer.
3) Double-cliquez sur l’icône CD-ROM.
4) Un explorateur apparaîtra automatiquement.
5) Sélectionnez la version ARCserveIT pour Windows NT
que vous désirez installer
ou
6) Cliquez sur l’icône Install.
7) Suivez les instructions s’affichant à l’écran.
REMARQUE :
Pour toute question liée à cette application ou à son installation, veuillez vous
référer à la documentation en ligne fournie sur le CD-ROM.
Manuel d'installation et d'utilisateur Tandberg SLR
33
Tandberg Data
Veritas Backup Exec pour station de
travail Windows NT
· Veritas Backup Exec est une solution 32-bits complète et facile
d’utilisation pour la protection de données, destinée aux stations de
travail Windows NT 4.0. La détection automatique des périphériques
facilite l’installation, et la simple pression d’un bouton lance les
procédures de sauvegarde et de restauration. Cette application
protège de manière fiable les données NetWare, y compris les
informations sur les liens et les ayants droit, et garantit la consistance
et la fiabilité des sauvegardes sans intervention humaine, grâce à une
fonction avancée de programmation des intervalles de sauvegarde et
à une fonction d’autoprotection.
· Veritas Backup Exec utilise son propre dérouleur, de sorte que le
dérouleur Windows NT n’a pas besoin d’être installé.
Installation
1) Insérez le CD-ROM pour station de travail.
2) Ouvrez My Computer.
3) Double-cliquez sur l’icône CD-ROM.
4) Un explorateur apparaîtra automatiquement.
5) Sélectionnez Backup Exec for Windows NT Workstation.
6) Cliquez sur l’icône Install.
7) Suivez les instructions s’affichant à l’écran.
REMARQUE :
Pour toute question relative à cette application ou à son installation, veuillez vous
référer à la documentation en ligne fournie sur le CD-ROM Veritas Software.
34
Manuel d'installation et d'utilisateur Tandberg SLR
Tandberg Data
CD-ROM Veritas Software Server
Backup Exec pour Windows NT
Edition Veritas Backup Exec pour Windows NT
Single/Enterprise
Backup Exec est l’un des produits leaders sur le marché pour le
logiciel de sauvegarde NT. Il est vendu en deux versions différentes :
Single Server (un seul serveur) et Multi Server (plusieurs serveurs).
La puissante série d’outils de gestion Backup Exec fournit la
fonctionnalité que vous recherchez, et sa conception aux fonctions
multiples permet une sauvegarde locale ou à distance dépourvue de
tout problème.
Installation du dérouleur
Avant de lancer l’application, assurez-vous que le dérouleur de votre
lecteur SLR est correctement installé.
1) Sélectionnez Control Panel à partir du menu Settings.
2) Double-cliquez sur l’icône Tape Devices. Choisissez l’onglet
Drivers.
3) Notez les types de dérouleur actuellement installés. Pour chacun des
dérouleurs que vous voulez remplacer, sélectionnez le dérouleur
concerné et cliquez sur Remove pour le supprimer de la liste. Si
vous commencez par ajouter des dérouleurs, veuillez sauter cette
étape.
4) Cliquez sur Add à partir de l’onglet Drivers.
5) Cliquez sur Have Disk.
6) Saisir le nom complet du répertoire dans lequel se trouve le
fichier
oemsetup.inf
(<CDROM
Letter>:\
WINNT\Drivers\I386).
7) Cliquez sur OK dans la fenêtre Install From Disk.
8) Dans la liste Choose the driver you want to install, and then click
OK, contenue dans la fenêtre Install Driver, sélectionnez le pilote
désiré, c’est-à-dire la description de la série de lecteurs pour laquelle
vous désirez installer un pilote.
Manuel d'installation et d'utilisateur Tandberg SLR
35
Tandberg Data
9) Cliquez sur OK dans la fenêtre Install Driver.
10)Le cas échéant, sélectionnez New dans le dialogue
Windows NT Setup. Puis saisir le même répertoire qu’à
l’étape #6 ci-dessus.
IMPORTANT !
Toujours sélectionner « New » si cette option apparaît – NE PAS
sélectionner « Current » !
11) Si vous désirez installer d’autres pilotes de dérouleur de bande
magnétique, sélectionnez No dans la fenêtre System Settings
Change - Do you want to restart your computer now? et
répéter les étapes 4 à 10. Après avoir fini d’installer tous les pilotes
désirés, sélectionnez Yes dans la fenêtre pour fermer, et
redémarrez Windows NT. Cette procédure activera les
modifications introduites.
Installation du logiciel
1)
2)
3)
4)
5)
6)
7)
Insérez le CD-ROM pour serveur.
Ouvrez My Computer.
Double-cliquez sur l’icône CD-ROM.
Un explorateur apparaîtra automatiquement.
Sélectionnez Backup Exec for Windows NT.
Cliquez sur l’icône Install.
Suivez les instructions s’affichant à l’écran.
REMARQUE :
Pour toute question liée à cette application ou à son installation, veuillez
vous référer à la documentation en ligne fournie sur le CD-ROM.
36
Manuel d'installation et d'utilisateur Tandberg SLR
Tandberg Data
Suite Veritas Backup Exec pour petits serveurs
professionnels
La suite Veritas Backup Exec Small Business Server pour Windows
NT est une solution complète de protection de données, spécialement
conçue pour Microsoft Small Business Server pour Windows NT.
Au travers d’une intégration transparente à la console de gestion,
Backup Exec fournit des applications faciles d’utilisation supportant la
protection antivirus ainsi que la sauvegarde, la restauration et la
récupération de données dans les cas critiques.
Installation du dérouleur
Avant de lancer l’application, assurez-vous que le dérouleur de votre
lecteur SLR est correctement installé.
1) Sélectionnez Control Panel à partir du menu Settings.
2) Double-cliquez sur l’icône Tape Devices. Choisissez l’onglet
Drivers.
3) Notez les types de dérouleur actuellement installés. Pour chacun des
dérouleurs que vous voulez remplacer, sélectionnez le dérouleur
concerné et cliquez sur Remove pour le supprimer de la liste. Si
vous commencez par ajouter des dérouleurs, veuillez sauter cette
étape.
4) Cliquez sur Add à partir de l’onglet Drivers.
5) Cliquez sur Have Disk.
6) Saisir le nom complet du répertoire dans lequel se trouve le
fichier
oemsetup.inf
(<CDROM
Letter>:\
WINNT\Drivers\I386).
7) Cliquez sur OK dans la fenêtre Install From Disk.
8) Dans la liste Choose the driver you want to install, and then click
OK, contenue dans la fenêtre Install Driver, sélectionnez le pilote
désiré, c’est-à-dire la description de la série de lecteurs pour laquelle
vous désirez installer un pilote.
Manuel d'installation et d'utilisateur Tandberg SLR
37
Tandberg Data
9) Cliquez sur OK dans la fenêtre Install Driver.
10) Le cas échéant, sélectionnez New dans le dialogue
Windows NT Setup. Puis saisir le même répertoire qu’à
l’étape #6 ci-dessus.
IMPORTANT !
Toujours sélectionner « New » si cette option apparaît – NE PAS
sélectionner « Current » !
11) Si vous désirez installer d’autres pilotes de dérouleur de bande
magnétique, sélectionnez No dans la fenêtre System Settings
Change - Do you want to restart your computer now? et
répéter les étapes 4 à 10. Après avoir fini d’installer tous les
pilotes désirés, sélectionnez Yes dans la fenêtre pour fermer, et
redémarrez Windows NT. Cette procédure activera les
modifications introduites
Installation du logiciel
1) Insérez le CD-ROM pour serveur.
2) Ouvrez My Computer.
3) Double-cliquez sur l’icône CD-ROM.
4) Un Explorateur apparaîtra automatiquement.
5) Sélectionnez ARCserve for Windows NT.
6) Cliquez sur l’icône Install.
7) Suivez les instructions s’afficahant à l’écran.
REMARQUE :
Pour toute question relative à cette application ou à son installation, veuillez
vous référer à la documentation en ligne fournie sur le CD-ROM.
38
Manuel d'installation et d'utilisateur Tandberg SLR
Tandberg Data
Legato NetWorker pour Windows
NT
Tous les lecteurs SLR (de SRL7 à SRL100) sont certifiés pour une
utilisation avec Legato NetWorker version 5.5 ou supérieure.
· Legato NetWorker est une solution de gestion de stockage de
données extrêmement fiable, destinée aux réseaux distribués.
NetWorker est très évolutif et offre une remarquable facilité de
manœuvre, une grande disponibilité et des performances de haute
qualité. Legato NetWorker offre également un support intégré pour
la connexion de clients, et incorpore les logiciels clients pour les
protéger avec le même système d’exploitation que celui du serveur.
Installation
Avant de lancer l’application, assurez-vous que le dérouleur de votre
lecteur SLR est correctement installé. Veuillez vous référer à
l’installation du dérouleur page 29.
1) Insérez le CD-ROM pour serveur.
2) Ouvrez My Computer.
3) Double-cliquez sur l’icône CD-ROM.
4) Double-cliquez sur le fichier SETUP.EXE.
5) Suivez les instructions s’affichant à l’écran.
REMARQUE :
Pour toute question relative à cette application ou à son installation, veuillez vous
référer à la documentation en ligne incluse sur le CD-ROM Legato.
Manuel d'installation et d'utilisateur Tandberg SLR
39
Tandberg Data
Cette page a été laissée intentionnellement en blanc
40
Manuel d'installation et d'utilisateur Tandberg SLR
Tandberg Data
Windows 2000
Carte hôte SCSI
Windows 2000 comporte un pilote pour la plupart de ses cartes hôte
SCSI.
Si vous ne parvenez pas à trouver le pilote approprié, veuillez consulter
le guide d’installation fourni avec la carte hôte SCSI ou vous
adresser au fournisseur de votre ordinateur.
Dérouleur
Windows 2000 comporte un dérouleur qui supporte les modèles
SLR2, SLR3, SLR4 et SLR4DC pour toutes les versions de
Windows 2000 et Service Pack.
Les modèles SLR24, SLR7, SLR40, SLR50, SLR60, SLR75,
SLR100 et SLR140 nécessitent un utilitaire supplémentaire, disponible
sur le site Web de Tandberg : www.tandberg.com.
Installation du dérouleur
Windows 2000
1) Cliquez sur My Computer avec le bouton de droite de la souris.
2) Selectionnez Manage ; vous devriez voir apparaître le lecteur
sous « Other devices » avec un « ? ».
Manuel d'installation et d'utilisateur Tandberg SLR
41
Tandberg Data
3) Sélectionnez l’utilitaire ; cliquez sur le bouton de droite de la
souris et choississez « Properties ».
4) Selectionnez la localisation du lecteur approprié.
5) Suivez les instructions s’affichant à l’écran.
42
Manuel d'installation et d'utilisateur Tandberg SLR
Tandberg Data
Applications de sauvegarde
Application intégrée à Windows 2000
L’application de sauvegarde est intégrée au système d’exploitation de
Windows 2000.
Installation
Avant de lancer l’application, assurez-vous que le dérouleur de votre
lecteur SLR est correctement installé. Veuillez vous référer à
l’installation du dérouleur page 47.
Pour lancer l’application :
·
·
·
·
·
Cliquez sur START.
Cliquez sur Programs.
Cliquez sur Accessories.
Cliquez sur System tools.
Selectionnez Backup.
Veuillez vous reporter à la section Windows NT pour les autres
applications concernant les sauvegardes.
Manuel d'installation et d'utilisateur Tandberg SLR
43
Tandberg Data
Cette page a été laissée intentionnellement en blanc
44
Manuel d'installation et d'utilisateur Tandberg SLR
Tandberg Data
Novell NetWare
Carte hôte
Novell NetWare inclut les pilotes nécessaires pour la plupart des
cartes hôtes SCSI.
Si le pilote approprié ne peut être trouvé, veuillez vous référer au guide
d’installation fourni avec la carte hôte SCSI.
La plupart des applications de sauvegarde sur Novell NetWare
requièrent l’utilisation de Advanced SCSI Programming Interface
(ASPI). Le pilote ASPI (ASPITRAN.LNM sur Novell 4.1x et
NWASPI.CDM sur Novell 4.x et 5) fait partie du système
d’exploitation et, normalement, il est automatiquement installé
lorsqu’une carte de contrôleur SCSI est présente dans votre système.
Si vous avez quelques problèmes pour installer la carte hôte SCSI ou
installer le pilote compatible ASPI sur votre système, veuillez vous
référer au guide d’installation fourni avec la carte hôte SCSI.
Applications de Sauvegarde
Application de sauvegarde NetWare
incluse sur Novell 4.1x
Installation
Sur la console du serveur, tapez :
LOAD TAPEDAI
SCAN FOR NEW DEVICES*
LIST DEVICES (Le SLR apparaît à l’écran.) LOAD
TSA410**
LOAD SBACKUP
* Lorsque cette commande est exécutée, vous devriez voir s’afficher
l’avertissement suivant :
Manuel d'installation et d'utilisateur Tandberg SLR
45
Tandberg Data
Veuillez l’ignorer. Tandberg Data a certifié les lecteurs SLR et les
rapports de test sont disponibles sur demande.
** Novell 4.10 et IntranetWare 4.11 seulement.
Application de sauvegarde NetWare
incluse sur Novell 4.2 et 5
• La sauvegarde Novell Sbackup (SBCON pour Novell 5) fournit des
sauvegardes simples et des opérations de restauration.
·
Cette application requiert le chargement d’un pilote spécifique.
(Voir le prochain paragraphe : Installation)
Installation
Sur la console du serveur, tapez :
NWTAPE. CDM
LOAD TSA500
QMAN NEW*
LOAD SBCON (SBACKUP pour Novell 4.2)
* L’option NEW est seulement demandée la première fois que vous lancez la commande.
Ceci créera une file d’attente par défaut qui sera utilisée par l’application de
sauvegarde.
REMARQUE :
Pour toute question relative à cette application ou à son installation, veuillez vous
référer à la documentation en ligne fournie sur le CD-ROM.
46
Manuel d'installation et d'utilisateur Tandberg SLR
Tandberg Data
Computer Associates ARCserveIT pour
NetWare 6.61
Computer Associates ARCserveIT pour NetWare :
ARCserveIT Single Server pour NetWare
Il est essentiellement conçu pour des petites et moyennes entreprises
et des installations monoserveur. CA's Workgroup Edition for NT
permet aux utilisateurs de récolter les fruits d’une technologie
performante, à un niveau de prix et de fonctionnalité qui convient à
leurs besoins.
Caractéristiques
1) Supporte un nombre illimité de stations de travail DOS,
OS2, Windows 3.X et Windows 95/98. 2)
Support for Novell Netware 3.x, 4.x, 5.x 3)
Déroulement en parallèle
4) Gestion automatique des médias
ARCserveIT Enterprise Edition pour Netware – Une
solution pour serveurs multiples
Conçus pour des moyennes et grandes entreprises, les produits de
CA's Enterprise Edition offrent une évolutivité virtuellement
illimitée et une interopérabilité entre différentes plateformes, qui
conviennent à de vastes environnements hétérogènes. Grâce à son
système de licence flexible, les solutions d’Enterprise Edition sont un
choix idéal pour les grandes entreprises.
Manuel d'installation et d'utilisateur Tandberg SLR
47
Tandberg Data
Tandberg Data livre ses produits avec les applications ARCserveIT
Work Group et ARCserveIT Advanced Edition.
Pour pouvoir être correctement installé, ARCserveIT requiert une
station de travail (Windows 9x/NT) connectée au serveur Novell.
1) Insérer le CD-ROM ARCserveIT.
2) Ouvrez My Computer.
3) Double-cliquez sur l’icône CD-ROM.
4) Un explorateur apparaîtra automatiquement.
5) Sélectionnez ARCserveIT for NetWare.
6) Cliquez sur l’icône Install.
7) Suivez les instructions s’affichant à l’écran.
REMARQUE :
Pour toute question relative à cette application ou à son installation, veuillez vous
référer à la documentation en ligne fournie sur le CD-ROM ARCserveIT.
48
Manuel d'installation et d'utilisateur Tandberg SLR
Tandberg Data
CD-ROM Veritas Software Server
Backup Exec pour NetWare
Backup Exec est l’un des produits leaders sur le marché pour le
logiciel de sauvegarde NT.
Il est vendu en deux versions différentes : Single Server (un seul
serveur), Multi Server (plusieurs serveurs).
VERITAS Backup Exec pour NetWare fournit la dernière
technologie existant en matière de sauvegarde et de restauration pour
une protection rapide, fiable et simple des données d’un serveur. Le
support NDS complet assure une protection efficace des données pour
les petites comme pour les grandes entreprises.
NOTES :
Lorsque Backup Exec pour NetWare est installé sur Novell 4.1X,
chaque version 7.5 et 8.0 peut être installée.
- Lorsque Backup Exec est installé sur Novell 5, seule la version 8.0 peut
être installée.
- La version Backup Exec 8.5 est requise pour assurer la compatibilité avec
Novell 5.1.
Installation
Installation sur le serveur
Veuillez insérer le CD-ROM d’installation dans le lecteur de CDROM du serveur et, à l’invitation de la console du serveur, tapez :
CD MOUNT VERITAS
LOAD VERITAS : NETWARE/BEINSTL
Suivez les instructions s’affichant à l’écran.
Manuel d'installation et d'utilisateur Tandberg SLR
49
Tandberg Data
Installation sur la station de travail
Veuillez insérer le CD-ROM d’installation dans le lecteur de CDROM de la station de travail et exécuter les étapes suivantes :
à Sous Windows NT, Windows 95, Windows 98 ainsi que sa deuxième
édition
1)
2)
3)
4)
5)
6)
Ouvrez My Computer.
Double-cliquez sur l’icône CD-ROM.
Un Explorateur apparaîtra automatiquement.
Sélectionnez Backup Exec for NetWare.
Cliquez sur l’icône Install.
Suivez les instructions s’affichant à l’écran.
à Sous Windows 3.1X
1)
2)
3)
4)
5)
6)
7)
Ouvrez le gestionnaire de fichier Windows.
Cliquez sur la lettre assignée au CD-ROM.
Double-cliquez sur le fichier SETUP.EXE.
Un Explorateur apparaîtra automatiquement.
Sélectionnez Backup Exec for NetWare.
Cliquez sur l’icône Install.
Suivez les instructions s’affichant à l’écran.
REMARQUE :
Pour toute question relative à cette application ou à son installation, veuillez vous
référer à la documentation en ligne fournie sur le CD-ROM Veritas.
50
Manuel d'installation et d'utilisateur Tandberg SLR
Tandberg Data
Windows 95
Carte hôte SCSI
Windows 95 inclut un pilote pour la plupart des cartes hôtes SCSI.
Étant donné que la plupart des cartes hôtes supportent la fonction
Plug-And-Play, l’interface SCSI sera automatiquement détectée
après son installation, et le ou les pilote(s) nécessaire(s) copiés sur le
disque dur.
Si la carte hôte n’est pas automatiquement détectée, veuillez vous
référer au guide d’installation fourni avec la carte hôte SCSI.
Application de sauvegarde intégrée
de Windows 95
L’application de sauvegarde intégrée à Windows 95 ne contient aucun
pilote pouvant supporter les lecteurs SCSI.
Applications de sauvegarde
Étant donné que l’application de sauvegarde intégrée à Windows 95
ne comporte aucun pilote supportant les lecteurs SCSI, une
application fournie par un tiers est nécessaire pour utiliser l’un des
lecteurs SLR (par exemple Veritas Backup Exec pour Windows
95/98).
Le pilote est fourni par l’application de sauvegarde. C’est pour cette
raison que, lorsque vous aurez installé votre lecteur SLR, celui-ci sera
mentionné comme unknown device (« unité inconnue ») par le
gestionnaire de périphériques de Windows 95. Veuillez ignorer cette
information et poursuivre l’installation de votre logiciel de sauvegarde.
Manuel d'installation et d'utilisateur Tandberg SLR
51
Tandberg Data
CDROM Veritas Software Desktop
Veritas Backup Exec pour Windows 95/98
· Veritas Backup Exec pour Windows 95/98 fournit un ensemble de
fonctions performant, avec une interface d’utilisation conviviale,
pour fiabiliser la protection automatisée de données sous Windows
95/98. La fonction intégrée Emergency Recovery (Restauration en
cas d’urgence) reconstruit entièrement votre système sans
réinstallation du système d’exploitation ou du logiciel de
sauvegarde. Des fichiers sélectivement alloués avec la fonction File
Find (Recherche de fichiers) existent pour la restauration de
données spécifiques.
· Veritas Backup Exec utilise un système de dérouleur de bande
magnétique qui est copié pendant le processus d’installation, ce qui
permet à Windows 95/98 de reconnaître votre lecteur SLR.
Installation
1)
2)
3)
4)
5)
6)
7)
Insérez le CD-ROM pour station de travail.
Ouvrez My Computer.
Double-cliquez sur l’icône CD-ROM.
Un explorateur apparaîtra automatiquement.
Sélectionnez Backup Exec for Windows 95/98.
Cliquez sur l’icône Install.
Suivez les instructions s’affichant à l’écran.
REMARQUE :
Pour toute question relative à cette application ou à son installation, veuillez vous
référer à la documentation en ligne fournie sur le CD-ROM Veritas Software.
52
Manuel d'installation et d'utilisateur Tandberg SLR
Tandberg Data
Windows 98 et sa
2e
édition
Carte hôte
La version Windows 98 et sa deuxième édition comportent un pilote pour la
plupart des cartes hôtes SCSI.
Étant donné que la plupart des cartes hôtes supportent la fonction Plug-AndPlay, l’interface SCSI sera automatiquement détectée après son installation, et le
ou les pilote(s) nécessaire(s) copiés sur le disque dur.
Si la carte hôte n’est pas automatiquement détectée, veuillez vous référer au
guide d’installation, ou au fichier Readme fourni avec le contrôleur SCSI.
Applications de Sauvegarde
Application de Sauvegarde Windows 98 Incluse
· Cette application fournit une protection totale de vos données, incluant
l’opération automatique de sauvegarde (programmation des intervalles de
sauvegarde).
· Une aide en ligne contextuelle de sauvegarde vous aide à réaliser toutes vos
opérations avec le lecteur SLR.
• L’Application de Sauvegarde incluse supporte les lecteurs Tandberg SLR2,
SLR3, SLR4, SLR4DC et SLR5. Pour les lecteurs SLR24 et SLR50 Veritas
Backup Exec pour Windows 95/98 est requis. (Les lecteurs SLR7, SLR40,
SLR60, SLR75, SLR100 et SLR140 sont susceptibles de fonctionner, mais sans
que Tandberg Data les aient certifiés comme tel).
Installation
Pour démarrer l’application de sauvegarde :
1)
2)
3)
4)
5)
Cliquez sur START.
Cliquez sur Programs.
Cliquez sur Accessories.
Cliquez sur System Tools.
Sélectionnez Backup.
Manuel d'installation et d'utilisateur Tandberg SLR
53
Tandberg Data
CD-ROM Veritas Software Desktop
Veritas Backup Exec pour Windows 95/98
· Veritas Backup Exec fournit un ensemble performant de fonctions,
avec une interface très conviviale, pour assurer la protection fiable et
automatique de vos données sous Windows 95/98. La fonction
intégrée Emergency Recovery (Récupération en cas critique)
reconstruit entièrement votre système sans réinstaller le système
d’exploitation ou le logiciel de sauvegarde. Pour restaurer des
données spécifiques, localisez et sélectionnez vos fichiers avec la
fonction File Find (Recherche de fichiers).
· Veritas Backup Exec utilise un système de dérouleur qui est copié
pendant le processus d’installation. Cela permettra à Backup Exec
de reconnaître votre lecteur SLR.
Installation
1)
2)
3)
4)
5)
6)
7)
Insérez le CD-ROM pour station de travail.
Ouvrez My Computer.
Double-cliquez sur l’icône CD-ROM.
Un Explorateur apparaîtra automatiquement.
Sélectionnez Backup Exec for Windows 95/98.
Cliquez sur l’icône Install.
Suivez les instructions s’affichant à l’écran.
REMARQUE :
Cette version de l’application est entièrement compatible avec la deuxième version de
Windows 98.
54
Manuel d'installation et d'utilisateur Tandberg SLR
Tandberg Data
SCO Open Server version 5
Carte hôte
SCO OS inclut un pilote pour la plupart des cartes hôtes SCSI. Si
vous ne trouvez pas le pilote approprié, veuillez vous référer au guide
d’installation fourni avec la carte hôte.
Tableau de compatibilité des lecteurs SLR
SLR2
SLR3
SLR4
SLR4DC
SLR5
SLR24
SLR40
SCO OS 5
SCO OS 5
Version 5.0.4
Version 5.0.5
Certifié SCO
Certifié SCO
Certifié Tandberg
Certifié Tandberg
Certifié SCO
Certifié SCO
Certifié Tandberg
Certifié Tandberg
Certifié SCO
Certifié SCO
Certifié Tandberg
Certifié Tandberg
Certifié SCO
Certifié SCO
Certifié Tandberg
Certifié Tandberg
Certifié SCO
Certifié SCO
Certifié Tandberg
Certifié Tandberg
Certifié SCO
Certifié SCO
Certifié Tandberg
Certifié Tandberg
Certifié Tandberg
Certifié SCO
Certifié Tandberg
SLR50
SLR60
Certifié SCO
Certifié SCO
Certifié Tandberg
Certifié Tandberg
Certifié Tandberg
Certifié SCO
Certifié Tandberg
SLR75
Certifié Tandberg
Manuel d'installation et d'utilisateur Tandberg SLR
Certifié Tandberg
55
SLR100
Certifié Tandberg
Certifié SCO
Certifié Tandberg
SLR140
Certifié Tandberg
Certifié Tandberg
Tandberg Data
Installation
1) Connectez-vous comme utilisateur root.
2) Tapez la commande suivante : mkdev tape. 3)
Sélectionnez Install a SCSI Tape Drive.
4) Entrez le préfixe de la carte hôte SCSI à laquelle le
périphérique est rattaché.
(Taper h pour obtenir une liste des cartes hôtes SCSI
supportées).
5) À quelle carte hôte SCSI ce périphérique est-il rattaché
?
(Si une seule carte hôte SCSI est installée, sélectionnez 0. Si deux cartes
du même type sont installées, sélectionnez 1.)
6) Quelle est l’identification SCSI de ce périphérique ?
(L’identification par défaut des unités Tandberg est 2)
7) Quel est le numéro d’unité logique de ce
périphérique ?
(Il doit être 0).
8) Mise à jour de la configuration SCSI ?
(Contrôler d’abord que le récapitulatif affiché à l’écran est
conforme à la configuration du lecteur).
REMARQUES :
- Le kernel doit être reconstruit pour refléter la nouvelle configuration matérielle, et
une ré-initialisation doit impérativement être effectuée avant de pouvoir utiliser
votre lecteur SLR.
- Pour toute question relative à ce système, son application de sauvegarde incluse,
veuillez vous référer à la documentation fournie sur le CD-ROM SCO OS).
56
Manuel d'installation et d'utilisateur Tandberg SLR
Tandberg Data
Applications de Sauvegarde
Commande système SCO Open Server
Les pilotes tar, cpio et dd permettent de procéder sans
difficulté à des opérations de sauvegarde, de vérification et de
restauration.
Le pilote présente deux points d’accès différents :
· Un point d’accès non-rewinding (utilisé pour réaliser une
sauvegarde complémentaire, sans rembobinage)
· Un point d’accès rewinding (utilisé pour réinscrire
complètement une sauvegarde, avec rembobinage)
Pour une explication exhaustive de l’utilisation des commandes
système, veuillez vous référer à la documentation SCO Open
Server, ou à l’aide en ligne (commande man).
Exemples d’utilisation de la commande tar :
tar cvf/dev/rmt/0/etc effectuera une sauvegarde du répertoire
/etc
tar tvf/dev/rmt/0 donnera une liste des données sur la bande
tar xvf/dev/rmt/0 restaurera les données de la bande dans le
répertoire courant
Gestionnaire de Sauvegarde
SCO Open Server
Installation
Interface graphique SCO Open Server
1) Cliquez sur System Administration.
2) Double-cliquez sur Backup Manager.
Console SCO Open Server
1) Connectez-vous comme utilisateur root.
2) Tapez scoadmin.
3) Sélectionnez Backup Manager.
Manuel d'installation et d'utilisateur Tandberg SLR
57
Tandberg Data
SCO ARCserve Open Lite pour
SCO Open Server
• Inclus dans la SCO Open Server version 5, SCO ARCserve
Open Lite offre une solution de sauvegarde et de restauration
complète pour votre système SCO.
· La version complète de SCO ARCserve Open fournit des
fonctions de sauvegarde et de restauration avancées, y compris le
support pour NetWare Server et Windows 95/98 client.
· Les lecteurs SLR2, SLR3 et SLR4 sont supportés.
REMARQUE :
La version complète de ARCserve Open est requise pour le support des
produits SLR5, SLR24, SLR7, SLR40, SLR50, SLR60, SLR75, SLR100 et
SLR140. Pour plus amples informations, veuillez vous référer au Guide de
compatibilité "Computer Associates Guide", www.cai.com, et au Guide de
compatibilité "Tandberg Compatibility Guide", URL www.tandberg.com.
Installation
L’installation de ARCserve Open Lite est incluse dans celle de
SCO Open Server.
Si cela n’est pas le cas, vous devez utiliser Software Manager
pour l’installer.
Interface Graphique SCO
1) Double-cliquez sur Software Manager.
2) Sélectionnez Software.
3) Sélectionnez Install New.
4) Suivez les instructions s’affichant à l’écran.
Console SCO
1) Connectez-vous comme utilisateur root.
2) Tapez scoadmin.
3) Sélectionnez Software Manager. 4)
Sélectionnez Software.
5) Sélectionnez Install New.
6) Suivez les instructions s’affichant à l’écran.
REMARQUE :
Pour toute question relative à cette application ou à son installation, veuillez
vous référer à la documentation en ligne fournie sur le CD-ROM SCO.
58
Manuel d'installation et d'utilisateur Tandberg SLR
Tandberg Data
SCO UnixWare
Carte hôte
SCO UnixWare inclut un pilote pour la plupart des cartes hôtes
SCSI.
Si vous ne trouvez pas le pilote approprié, veuillez vous référer au
guide d’installation fourni avec la carte hôte SCSI.
Installation du Lecteur
1) Installez le lecteur SLR.
2) Allumez le PC.
3) Pendant le processus de démarrage, SCO UnixWare détecte
automatiquement le lecteur SLR et installe le dérouleur de
bande correct.
Applications de sauvegarde
REMARQUE :
Pour toute question relative à ce système, son application de sauvegarde
incluse, veuillez vous référer à la documentation fournie sur le CD-ROM
SCO.
Système de commande SCO UnixWare
Les pilotes tar, cpio et dd permettent de procéder sans
difficulté à des opérations de sauvegarde, de vérification et de
restauration.
Le pilote présente deux points d’accès différents :
· Un point d’accès non-rewinding (utilisé pour réaliser une
sauvegarde complémentaire, sans rembobinage)
· Un point d’accès rewinding (utilisé pour réinscrire
complètement une sauvegarde, avec rembobinage)
Pour une explication exhaustive de l’utilisation des
commandes système, veuillez vous référer à la documentation
SCO UnixWare, ou à l’aide en ligne (commande man).
Exemples d’utilisation de la
commande tar :
tar cvf/dev/rmt/0/etc effectuera une
sauvegarde du répertoire/etc
Manuel d'installation et d'utilisateur Tandberg SLR
59
Tandberg Data
tar tvf/dev/rmt/0 donnera une liste des données sur la bande
tar xvf/dev/rmt/0 restaurera les données de la bande dans
le répertoire courant
SCO UnixWare ARCserveIT
• Intégré à SCO UnixWare 7, Computer Associates
ARCserveIT Enterprise Edition offre une solution de
sauvegarde et de restauration complète et étendue pour votre
système SCO.
• Les lecteurs SLR5, SLR24, SLR40, SLR7, SLR50, SLR60, SLR75,
SLR100 et SLR140 sont supportés. Veuillez vous référer aux
dernières informations en matière de compatibilité figurant sur
notre site Web : www.tandberg.com.
Installation
L’installation de ARCserveIT est incluse dans l’installation de
SCO UnixWare.
S’il n’a pas été sélectionné pendant l’installation du programme
d’installation O/S, vous devez utiliser Software Management
pour l’installer.
Interface graphique SCO UnixWare
1) Double-cliquez sur SCO Admin.
2) Sélectionnez Software Management.
3) Sélectionnez Application Installer.
4) Suivez les instructions s’affichant à l’écran.
Console SCO UnixWare
1) Connectez-vous comme utilisateur root.
2) Tapez scoadmin.
3) Sélectionnez Software Management.
4) Sélectionnez Application Installer.
5) Suivez les instructions s’affichant à l’écran.
REMARQUE :
Pour toute question relative à ce système, son application de sauvegarde
incluse, veuillez vous référer à la documentation fournie sur le CD-ROM SCO
UnixWare.
Manuel d'installation
SLR
et d'utilisateur Tandberg SLR 61
60Manuel d'installation et d'utilisateur Tandberg
Tandberg Data
Sunsoft Solaris
Installation du lecteur
1) Installez le lecteur SLR.
2) Mettre sous tension la station de travail ou le serveur SUN.
3) Utilisez Boot–r.
Cela reconfigurera le répertoire/les unités du répertoire pour
permettre au lecteur SLR de fonctionner correctement sur la
machine.
Pour améliorer les performances d’utilisation des lecteurs SLR7,
SLR24, SLR40, SLR50, SLR60, SLR75, SLR100 et SLR140, il
convient de modifier un fichier système particulier :
/kernel/drv/st.conf
Entrées du fichier ST.CONF pour les lecteurs Tandberg SLR7,
SLR24, SLR40, SLR7, SLR50, SLR60, SLR75, SLR100 et
SLR140 :
"TANDBERGSLR6","Tandberg SLR24","TANDBERG",
"TANDBERGMLR3","Tandberg SLR50","TANDBERG",
"TANDBERGSLR7","Tandberg SLR7","TANDBERG",
"TANDBERGSLR40","Tandberg SLR40","TANDBERG",
"TANDBERGSLR60","Tandberg SLR60","TANDBERG",
"TANDBERGSLR75","Tandberg SLR60","TANDBERG",
"TANDBERGSLR100","Tandberg SLR100","TANDBERG",
"TANDBERGSLR140","Tandberg SLR140","TANDBERG",
TANDBERG = 1,0x37,0,0x963b,1,0,0;
REMARQUE :
Une mise à jour du fichier de configuration ST.CONF peut être téléchargée à partir
du site de Tandberg : www.tandberg.com. Pour plus amples informations sur la
procédure d’installation, veuillez vous référer au Readme fourni avec le fichier.
Tandberg Data
Applications de sauvegarde
Commande Système Sun
Les pilotes tar, cpio et dd permettent de procéder sans
difficulté à des opérations de sauvegarde, de vérification et de
restauration.
Le pilote présente deux points d’accès différents :
· Un point d’accès non-rewinding (utilisé pour réaliser une
sauvegarde complémentaire, sans rembobinage)
· Un point d’accès rewinding (utilisé pour réinscrire
complètement une sauvegarde, avec rembobinage)
Exemples d’utilisation de la commande tar :
tar cvf/dev/rmt/0/etc effectuera une sauvegarde du répertoire
/etc.
tar tvf/dev/rmt/0 donnera une liste des données sur la bande
tar xvf/dev/rmt/0 restaurera les données de la bande dans le
répertoire courant
Pour une explication exhaustive de l’utilisation des commandes
système, veuillez vous référer à la documentation SUN, ou à l’aide
en ligne (commande man).
Legato NetWorker pour Solaris
Tous les lecteurs SLR (modèles SLR7 à SLR140) sont certifiés
pour une utilisation avec Legato Networker version 5.5 ou
supérieure.
• Legato Networker est une solution de gestion de stockage de
données extrêmement fiable, destinée aux réseaux distribués.
NetWorker est très évolutif et offre une remarquable facilité de
manœuvre, une grande disponibilité et des performances de haute
qualité. Legato NetWorker offre également un support intégré
pour la connexion de clients, et incorpore les logiciels clients pour
les protéger avec le même système d’exploitation que celui du
serveur.
62
Manuel d'installation et d'utilisateur Tandberg SLR
Installation
Tandberg Data
Avant de lancer l’application, assurezvous que le dérouleur de votre lecteur SLR est correctement
installé. Pour son installation, veuillez vous référer à la page 61.
1) Connectez-vous comme utilisateur root.
2) Recherchez le répertoire Solaris sur le CD d’installation.
3) Inclure le répertoire dans lequel se trouvent les exécutables de
NetWorker dans la variable PATH de l’utilisateur root.
4) Entrez « pkgadd –d ./ » pour installer NetWorker.
5) Suivez les instructions s’affichant à l’écran.
Pour plus amples informations, veuillez vous reporter aux
consignes d’installation se trouvant dans la documentation fournie
sur le CD-ROM de Legato.
Manuel d'installation et d'utilisateur Tandberg SLR
63
Tandberg Data
Cette page a été laissée intentionnellement en blanc
64
Manuel d'installation et d'utilisateur Tandberg SLR
Apple
Macintosh
Tandberg Data
Applications de sauvegarde
Dantz Retrospect
Dantz Retrospect offre les fonctions suivantes :
• Installation automatique avec EasyScript
Utilise les réponses à beaucoup de questions simples pour créer
des scripts de sauvegarde qui fonctionnent automatiquement avec
de multiples sources, destinations, critères de sélection de fichier,
et programmation d’intervalles
de sauvegarde.
• Sauvegardes complètement automatisées
Lancements automatiques de sauvegardes sans intervention
humaine quelle que soit la périodicité programmée
(quotidienne, hebdomadaire, etc.).
• Restauration en une seule étape
Restaure un disque dur entier en une seule étape même après de
multiples sauvegardes. Ou bien restaure n’importe quelle partie
de votre disque dur exactement dans l’état où elle se trouvait
après toute session de sauvegarde.
• Récupération d’urgence
Un CD-ROM de récupération d’urgence permet de restaurer les
REMARQUE :
Les lecteurs SLR 2-5 sont supportés dans la version native. Un kit de lecteur
avancé est nécessaire pour les Tandberg SLR24, SLR40, SLR7, SLR50, SLR60,
SLR75, SLR100 et SLR140, et disponible à partir du site de Dantz.
(www.dantz.com)
données en cas de défaillance complète du disque dur.
Installation de Retrospect
1) Insérez le Disque 1 (ou le CD-ROM Retrospect suivant la
version que vous avez achetée).
2) Double-cliquez sur l’icône Install.
3) Suivez les instructions s’affichant à l’écran.
REMARQUE :
Pour toute question relative à cette application ou à son installation, veuillez vous
référer à la documentation en ligne fournie avec l’application.
Manuel d'installation et d'utilisateur Tandberg SLR
65
Tandberg Data
Cette page a été laissée intentionnellement en blanc
66
Manuel d'installation et d'utilisateur Tandberg SLR
IBM RS/6000
Tandberg Data
Installation du lecteur
Utilisez l’utilitaire smit pour installer l’un des lecteurs SLR sur IBM
AIX.
1) Assurez-vous que le SCSI-ID n’est pas déjà utilisé dans le soussystème SCSI.
2) Installez le lecteur SLR.
3) Connectez-vous comme utilisateur root.
4) Lancez smit devices.
5) Sélectionnez Install/Configure Devices Added after IPL.
6) Suivez les instructions s’affichant à l’écran.
Pour améliorer les performances sur les lecteurs SLR24, SLR40,
SLR7, SLR50, SLR60, SLR75, SLR100 et SLR140, la taille du
bloc par défaut doit être mise à 0.
1) Lancez smit devices.
2) Sélectionnez Change/Show pour modifier ou faire
apparaître les caractéristiques d’un lecteur.
3) Sélectionnez le pilote de périphérique que vous désirez
modifier.
4) Mettez la taille du bloc sur 0.
Manuel d'installation et d'utilisateur Tandberg SLR
67
Tandberg Data
Applications de sauvegarde
Système de Commande IBM AIX
Les pilotes tar, cpio et dd permettent de procéder sans
difficulté à des opérations de sauvegarde, de vérification et de
restauration.
Le pilote présente deux points d’accès différents :
· Un point d’accès non-rewinding (utilisé pour réaliser une
sauvegarde complémentaire, sans rembobinage)
· Un point d’accès rewinding (utilisé pour réinscrire
complètement une sauvegarde, avec rembobinage)
Pour plus amples informations, veuillez vous référer à la
documentation IBM AIX.
Exemples d’utilisation de la commande tar :
tar cvf/dev/rmt/0/etc effectuera une sauvegarde du répertoire
/etc
tar tvf/dev/rmt/0 donnera une liste des données sur la bande
tar xvf/dev/rmt/0 restaurera les données de la bande dans le
répertoire courant
IBM AIX Storage Manager
Installation
Cette application est une partie du système d’exploitation.
1) Ouvrez la fenêtre System Administrator Window.
2) Double-cliquez sur Storage Manager.
3) La liste de la ou des unité(s) de bande magnétique apparaît à
l’écran.
4) Suivez, pour continuer, les instructions s’affichant à
l’écran.
REMARQUE :
Pour toute question relative à cette application ou à son installation, veuillez
vous référer à la documentation en ligne IBM fournie avec l’application.
68
Manuel d'installation et d'utilisateur Tandberg SLR
Legato NetWorker pour AIX
Tandberg Data
Les lecteurs Tandberg SLR24, 40, 7, 50, 60, 75, 100 et 140 sont
certifiés pour Legato NetWorker version 5.5 ou supérieure.
· Legato NetWorker est une solution de gestion de stockage de
données extrêmement fiable, destinée aux réseaux distribués.
NetWorker est très évolutif et offre une remarquable facilité de
manœuvre, une grande disponibilité et des performances de haute
qualité. Legato NetWorker offre également un support intégré
pour la connexion de clients, et incorpore les logiciels clients pour
les protéger avec le même système d’exploitation que celui du
serveur.
· Legato Networker utilise le dérouleur du système AIX. Pour son
installation, veuillez vous référer à la page 58.
Installation
La procédure d’installation dépend de la version du système
d’exploitation AIX. Veuillez vous référer à la documentation fournie
sur le CD-ROM Legato.
REMARQUE :
Pour toute question relative à cette application ou à son installation, veuillez vous
référer à la documentation en ligne fournie sur le CD-ROM.
Quadratec Time Navigator pour AIX
Time Navigator est une solution professionnelle de sauvegarde et
d’archivage très performante destinée aux entreprises.
Time Navigator est un logiciel de sauvegarde et d’archivage
automatiques de données. Il permet également de restaurer de
façon fiable des données dans divers répertoires dont les conditions
de sauvegarde et les contraintes sont identiques.
Installation
Quant aux consignes d’installation et à l’obtention de plus amples
informations, veuillez vous référer à la documentation fournie.
Manuel d'installation et d'utilisateur Tandberg SLR
69
Tandberg Data
Logiciel de sauvegarde Arkeia pour AIX
Arkeia est un logiciel de sauvegarde et d’archivage de données. Il
allie à une interface utilisateur simple des fonctions
particulièrement puissantes.
Installation
Quant aux consignes d’installation et à l’obtention de plus amples
informations, veuillez vous référer à la documentation fournie.
70
Manuel d'installation et d'utilisateur Tandberg SLR
HP/UX
Tandberg Data
Lecteur
- Si le serveur ou la station de travail HP est équipé d’une architecture
GSC Bus, le dérouleur du système HP/UX peut être utilisé par
toutes les applications de sauvegarde.
REMARQUE :
Un utilitaire de correction, conçu pour cet environnement, peut être chargé à partir du
site Web de Tandberg. Pour plus amples informations, veuillez vous référer au
fichier Readme fourni avec cet utilitaire.
- Si le serveur ou la station de travail HP est équipé d’une
Architecture PB Bus (Precision Bus), un dérouleur est
disponible sur le site Web de Tandberg : ww.tandberg.com.
Pour plus amples informations, veuillez vous référer à la
procédure d’installation fournie avec l’utilitaire.
Installation du lecteur
(Bus GSC uniquement)
Pour installer les lecteurs SLR, l’utilitaire SAM doit être utilisé.
1)
2)
3)
4)
Connectez-vous comme utilisateur root.
Lancez SAM.
Sélectionnez Peripheral Devices.
Sélectionnez Action/Add.
Le SLR sera automatiquement détecté et les dérouleurs nécessaires
installés.
Manuel d'installation et d'utilisateur Tandberg SLR
71
Tandberg Data
Applications de sauvegarde
Commande Système HP/UX
Les pilotes tar, cpio et dd permettent de procéder sans
difficulté à des opérations de sauvegarde, de vérification et de
restauration.
Le pilote présente deux points d’accès différents :
· Un point d’accès non-rewinding (utilisé pour réaliser une
sauvegarde complémentaire, sans rembobinage)
· Un point d’accès rewinding (utilisé pour réinscrire
complètement une sauvegarde, avec rembobinage)
Exemples d’utilisation de la commande tar :
tar cvf/dev/rmt/0/etc effectuera une sauvegarde du répertoire
/etc
tar tvf/dev/rmt/0 donnera une liste des données sur la bande
tar xvf/dev/rmt/0 restaurera les données de la bande dans le
répertoire courant
Pour une explication exhaustive de l’utilisation des commandes
système, veuillez vous référer à la documentation HP/UX, ou à
l’aide en ligne (commande man).
72
Manuel d'installation et d'utilisateur Tandberg SLR
Linux
Tandberg Data
Carte d’interface SCSI
Linux contient un pilote pour la plupart des cartes hôtes SCSI.
Si le pilote ne peut être trouvé, veuillez vous référer à la
documentation fournie avec la carte hôte SCSI.
Installation du lecteur
1) Installez le lecteur SLR.
2) Mettez l’ordinateur en marche.
3) Durant le processus de démarrage, Linux détecte
automatiquement le SLR et installe l’utilitaire correct.
REMARQUE :
Pour toute question relative au système, y compris son application de sauvegarde,
veuillez vous référer à la documentation fournie sur le CDROM Linux.
Manuel d'installation et d'utilisateur Tandberg SLR
73
Tandberg Data
Applications de sauvegarde
Commande Système Linux
Les pilotes tar, cpio et dd permettent de procéder sans
difficulté à des opérations de sauvegarde, de vérification et de
restauration des données.
Le pilote présente deux points d’accès différents :
· Un point d’accès non-rewinding (utilisé pour réaliser une
sauvegarde complémentaire, sans rembobinage)
· Un point d’accès rewinding (utilisé pour réinscrire
complètement une sauvegarde, avec rembobinage)
Exemples d’utilisation de la commande tar :
tar cvf/dev/rmt/0/etc effectuera une sauvegarde du répertoire
/etc
tar tvf/dev/rmt/0 donnera une liste des données sur la bande
tar xvf/dev/rmt/0 restaurera les données de la bande dans le
répertoire courant
Pour une explication exhaustive de l’utilisation des commandes
système, veuillez vous référer à la documentation Linux, ou à l’aide
en ligne (commande man).
Legato NetWorker pour Linux
Les lecteurs Tandberg SLR24, SLR7, SLR40, SLR50, SLR60,
SLR75, SLR100 et SLR140 son certifiés pour une utilisation avec
Legato NetWorker version 5.5 ou supérieure.
• Legato NetWorker est une solution de gestion de stockage de
données extrêmement fiable, destinée aux réseaux distribués.
NetWorker est très évolutif et offre une remarquable facilité de
manœuvre, une grande disponibilité et des performances de haute
qualité. Legato NetWorker offre également un support intégré
pour la connexion de clients, et incorpore les logiciels clients pour
les protéger avec le même système d’exploitation que celui du
serveur.
74
Manuel d'installation et d'utilisateur Tandberg SLR
· Legato NetWorker utilise le pilote du
Tandberg Data
système Linux. Pour son installation,
veuillez vous référer à la page 70.
Installation
1)
2)
3)
4)
5)
Insérez le CD-ROM d’installation NetWorker.
Ouvrez la console Linux.
Recherchez le répertoire Linux sur le CD d’installation.
Entrez « ./NWInstall » pour installer NetWorker.
Suivez les consignes s’affichant à l’écran.
Pour plus amples informations, veuillez vous reporter aux
consignes d’installation se trouvant dans la documentation fournie
sur le CD-ROM de Legato.
Quadratec Time Navigator pour Linux
Time Navigator est une solution professionnelle très performante,
conjugant sauvegarde et archivage, qui est destinée aux
entreprises.
Time Navigator est un logiciel de sauvegarde et d’archivage
automatiques de données. Il permet également de restaurer de
façon fiable des données en divers emplacements dont les conditions
de sauvegarde et les contraintes sont identiques.
Installation
Quant aux consignes d’installation et à l’obtention de plus amples
informations, veuillez vous référer à la documentation fournie.
Manuel d'installation et d'utilisateur Tandberg SLR
75
Tandberg Data
ARCServeIT de Computer Associates
pour Linux
ARCServeIT est un système professionnel de haute performance
intégrant sauvegarde et archivage, destiné aux environnements
hétérogènes.
Installation
Quant aux consignes d’installation et à l’obtention de plus amples
informations, veuillez vous référer à la documentation fournie.
EST Inc. BRU Pro pour Linux
BRU PRO est un logiciel de sauvegarde et d’archivage
automatiques de données. Il permet également de restaurer de
façon fiable des données dans divers répertoires dont les conditions
de sauvegarde et les contraintes sont identiques.
Installation
Quant aux consignes d’installation et à l’obtention de plus amples
informations, veuillez vous référer à la documentation fournie.
Logiciel de sauvegarde Arkeia pour
Linux
Arkeia est un logiciel de sauvegarde et d’archivage de données. Il
allie à une interface utilisateur simple des fonctions
particulièrement puissantes.
Installation
Quant aux consignes d’installation et à l’obtention de plus amples
informations, veuillez vous référer à la documentation fournie.
76
Manuel d'installation et d'utilisateur Tandberg SLR
Disque
d’utilitaires de
lecteur
Tandberg Data
Fourni avec chacun des lecteurs SLR24, SLR40, SLR7, SLR50,
SLR60, SLR75, SLR100 et SLR140, le Disque d’utilitaires de
lecteurs Tandberg offre les applications suivantes :
- Optimizer pour lecteur Tandberg
Cet utilitaire sert à syntoniser la performance SLR seulement sur
les lecteurs SLR24 et SLR50.
Le lecteur SLR40/7/60/75/100/140 étant équipé d’un dispositif
automatique de mesure du taux de transfert, il s’ajustera
automatiquement pour optimiser les performances de la plupart
des systèmes.
Une version DOS, une version Windows 95/98 (deuxième édition
comprise) et une version Windows NT sont incluses.
- FlashIt
Cet utilitaire sert à mettre à jour le microprogramme SLR. Une
version DOS, une version Windows 95/98 (deuxième édition
comprise) et une version Windows NT sont incluses. Pour les
lecteurs SLR7, SLR60, SLR75, SLR100 et SLR140, une version
mise à jour est disponible sur le site Web de Tandberg :
www.tandberg.com.
- Viewer pour Lecteur Tandberg
Cet utilitaire donne des informations détaillées sur la configuration
SLR.
Une version Windows 95/98 (deuxième édition comprise) et une
version Windows NT sont incluses.
REMARQUE :
Pour toute information concernant ce disque d’utilitaires ou son installation,
veuillez vous référer au fichier Readme disponible sur le disque.
Manuel d'installation et d'utilisateur Tandberg SLR
77
Tandberg Data
Cette page a été laissée intentionnellement en blanc
78
Manuel d'installation et d'utilisateur Tandberg SLR
Problèmes
techniques
Tandberg Data
En cas de problèmes avec votre lecteur SLR et avant de contacter
le Service clientèle, veuillez utiliser le tableau suivant :
Contrôle matériel
·
Contrôlez que le système reconnaît le lecteur pendant le
processus de démarrage.Contrôlez que la carte hôte SCSI
reconnaît le lecteur pendant l’initialisation.
· Avez-vous contrôlé l’état des voyants sur l’avant du lecteur ?
· Contrôlez que le lecteur a été correctement configuré.
· Vérifiez que le numéro d’identification SCSI du lecteur n’est
pas en conflit sur le bus SCSI.
·
Contrôlez que le câble d’alimentation est correctement
raccordé.
· Contrôlez que les connexions du câble SCSI sont faites
correctement.
Contrôle logiciel
·
Contrôlez que le système ne signale pas de problème pendant
le démarrage.
·
Contrôlez que le pilote du lecteur approprié a été correctement
installé.
·
Contrôlez que le pilote de la carte hôte SCSI est présent et
correctement chargé.
·
Contrôlez que le logiciel de sauvegarde ne signale pas d’erreur
pendant le chargement.
· Réinstallez le logiciel de sauvegarde et contrôlez que le SLR est
reconnu.
Manuel d'installation et d'utilisateur Tandberg SLR
79
Tandberg Data
Vérifier de récents changements
Si le lecteur SLR était installé précédemment et qu’il fonctionnait
correctement, mais qu’un problème survient par la suite, vérifiez
d’éventuels changements récents sur le système pour vous assurer
que les dits changements ne sont pas la cause de ce problème.
Essayez les procédures suivantes :
1) Si la configuration du système a changé, annulez ce
changement pour voir si cela affecte le lecteur.
2) Si un utilitaire de correction d’erreur du système a été
installé, retirez-le pour voir si cela affecte le lecteur.
3) Si un périphérique SCSI a été ajouté, contrôlez les
conflits de numéros d’identification SCSI.
4) Si un périphérique SCSI a été ajouté, contrôlez si la
terminaison SCSI a été proprement effectuée.
Corriger des dysfonctionnements
intermittents
Si, de manière intermittente, le SLR présente des
dysfonctionnements:
1) Nettoyez le lecteur.
2) Contrôlez la terminaison SCSI sur le bus SCSI.
Si ce problème intervient au milieu d’une opération :
1) Essayez avec une cartouche différente.
2) Si l’erreur intervient pendant que le logiciel recherche les
fichiers à sauvegarder, veuillez effectuer une opération
SCANDISK pour contrôler l’état du système fichier et du
disque dur.
Si l’erreur continue de se manifester sur le même fichier ou
répertoire :
1) Essayez de retirer le fichier ou le répertoire du contenu à
sauvegarder, pour voir si cela résout le problème.
2) Essayez avec une cartouche de stockage de données
différente.
Problèmes techniques de logiciel
Un guide complet sur les Problèmes techniques de logiciel est
disponible sur le site Web de Tandberg : www.tandberg.com.
80
Manuel d'installation et d'utilisateur Tandberg SLR
Appendice
Tandberg Data
Notices réglementaires de
conformité
Déclaration de conformité Fabricant :
Nous déclarons la conformité des solutions de sauvegarde SLR :
™
Modèles internes SLR :
Certificat de
Conformité CE
Tandberg SLRx Lecteur interne Tandberg
SLRxx Lecteur interne Tandberg SLRxxx
Lecteur interne
Modèles externes SLR :
Tandberg SLRx Ext. Solution externe Tandberg
SLRxx Ext. Solution externe Tandberg SLRxxx
Ext. Solution externe
aux dispositions de la directive du Conseil de lUnion Européenne concernant le rapprochement des législations des
États membres, relatives à la compatibilité électromagnétique (Directive EMC 89/336/EEC du 3 mai 1989), ainsi quaux
dispositions de la directive relative au matériel électrique destin é à être employé dans certaines limites de tension
(73/23/EEC du 19 février 1973).
Cette déclaration de conformité aux règles définies par lUnion Européenne est le résultat des essais menés par le
service dAssurance Qualité de TANDBERG DATA ASA, suivant les normes européennes EN 50081-1 et EN 50082,
définies dans larticle 10 de la directive.
Les systèmes de sauvegarde SLRx se soumettent aux termes définis pour la Classe B des périphériques de calcul,
conformément à la sous-partie B de la partie 15 des Règles FCC. Seuls, les équipements r épondant aux termes
définis de la Classe B peuvent être rattachés à ce système de sauvegarde.
Une opération avec un équipement non conforme occasionne probablement des interf érences avec la réception radio ou
TV.
Les systèmes de sauvegarde SLRx sont conformes aux Standards de Sécurité :
EN 60950, UL 1950, CSA 950 et TÜV 60950.
Manuel d'installation et d'utilisateur Tandberg SLR
81
Tandberg Data
Cette page a été laissée intentionnellement en blanc
82
Manuel d'installation et d'utilisateur Tandberg SLR
Glossaire des
termes
employés
Tandberg Data
Active Termination
Terminaison active SCSI qui fournit une meilleure stabilité et une
meilleure protection contre le bruit des signaux électriques sur les
lignes du bus SCSI.
ALDC
Adaptive Lossless Data Compression. Méthode de compression
matérielle des données utilisée avec les lecteurs SLR4DC, 5, 24, 40,
7, 50, 60, 75, 100 et 140.
Append
Lorsque les informations sont écrites
après des données déjà enregistrées
sur la bande.
ASPI
Advanced SCSI Programming Interface.
Logiciel standard permettant la liaison
entre la carte hôte SCSI et les gestionnaires
de périphériques SCSI. L'ASPI permet aux
cartes hôtes et aux gestionnaires de
périphériques de partager la même
interface SCSI.
Auto sensing
Dispositif automatique du lecteur
SLR100 permettant de détecter le meilleur
taux de transfert à utiliser pour optimiser
les performances sur le bus SCSI.
BOT
Beginning of Tape
Data Compression
Manuel d'installation et d'utilisateur Tandberg SLR
Désigne une séquence spécifique de
perforation sur
la bande magnétique permettant de
localiser le début de bande.
Il y a deux façons de compresser les
données sur une cartouche :
- Soit de manière logicielle pour
le Tandberg SLR2, SLR3 et
SLR4
- Soit de manière matérielle sur SLR4DC, SLR5, SLR24, SLR40, SLR7,
SLR50, SLR60, SLR75, SLR100 et
SLR140.
83
Tandberg Data
Device Driver
Pilote de périphérique permettant à
l'ordinateur de communiquer avec des unités
périphériques telles que disque dur ou
lecteurs de bande. Chaque type d’unité a
son propre gestionnaire. Ces gestionnaires
sont généralement installés sur le disque dur
et chargés au démarrage du système
d’exploitation
EEPROM
Electrically Erasable Programmable
Read Only Memory. Mémoire EEPROM
intégrée permettant de stocker des
informations (code).
GUI
Graphic User Interface. Logiciel qui tire
profit de l’interface utilisateur.
ID
Voir SCSI-ID.
LVD
LVD est l’abréviation de Low Voltage
Differential. Le LVD fournit une meilleure
stabilité et une meilleure protection contre le
bruit des signaux électriques sur les lignes du
bus SCSI. Il permet également d’utiliser des
bus SCSI plus longs.
Overwrite
Opération qui consiste à enregistrer des
données par-dessus des données
préexistantes sur la bande, ceci sans avoir
besoin d’effacer la bande au préalable.
PNP
Plug-and-Play
84
Mécanisme logiciel ou matériel qui fournit
au
système un moyen automatique pour
configurer ses ressources, telles que les
adresses d’entrées/sorties, les niveaux
d'interruption, ou les canaux DMA entre les
cartes PNP et d’autres unités du système.
RWW
Read While Write : Tous les lecteurs de
bande Tandberg lisent, automatiquement et
en interne, les données juste après les avoir
écrites, ce qui évite les problèmes
d’écriture sur la bande.
SCAM
SCSI Configured AutoMatically.
Manuel d'installation et d'utilisateur Tandberg SLR
Protocole SCSI SCSI Configured qui
assigne automatiquement une adresse
SCSI à AutoMagically un périphérique
lorsque vous démarrez votre système.
Tandberg Data
SCSI ID
Numéro
d'identification
unique assigné à chaque unité SCSI, qui
permet le dialogue avec un ordinateur
lorsque les unités sont rattachées à une carte
hôte SCSI via un bus SCSI. Chaque carte
hôte de contrôleur SCSI dipsose de 8
numéros SCSI-ID, de 0 à 7 (ou 16
numéros, de 0 à 15, pour les cartes WIDE
SCSI). En général, le numéro 7 est assigné
à la carte hôte SCSI.
SLR™
Ultra/Ultra2
Scaleable Linear Recording.
Interface 16 bits WIDE SCSI/LVD utilisée
avec les lecteurs SLR24, 40, 7, 50, 60, 75,
100 et 140.
SLR™ est une marque déposée de Tandberg Data.
Veritas Software, Veritas Backup, Veritas Backup Exec sont des marques déposées de Veritas
Software Inc. aux USA.
Cheyenne Software, ARCserveIT sont des marques déposées de Computer Associates Inc. aux USA.
Windows NT, Windows 95, Windows 98, MS-DOS, Windows sont des marques déposées de
Microsoft Corporation aux USA.
Novell NetWare est une marque déposée de Novell Inc.
Toutes les autres marques sont la propriété de leurs dépositaires respectifs.
Manuel d'installation et d'utilisateur Tandberg SLR
85
Tandberg Data
Cette page a été laissée intentionnellement en blanc
86
Manuel d'installation et d'utilisateur Tandberg SLR
TANDBERG SLR
SOLUCIÓN DE ALMACENAMIENTO DE DATOS
EN CINTA MAGNÉTICA
Manual de Instalación y Guía del Usuario
Tandberg Data ASA
Parte No. 43 18 55-07
Septiembre
2003
Lista de publicaciones disponibles en nuestro Departamento comercial:
Series de Lector Publ. No. Parte. N Título
Tandberg SLR
9048
43 05 08
Tandberg SLR Product Line Reference
Manual
Tandberg SLR Product Line Maintenance
l SLR Product Line SCSI-2 Interface
Tandberg
Functional Specifications
6028
6047
42 26 86
42 30 42
9084
43 15 65
Tandberg SLR Product Line - SLR5
4.0/8.0GB Product Verification Reports
9033
43 01 37
Tandberg SLR Product Line - SLR4 (TDC
4220) Product Verification Reports
9031
43 04 44
9063
43 07 43
9144
43 21 67
9148
9149
9156
43
43 22
22 23
22
42 22 46
9162
43 23 17
Tandberg SLR24, SLR40, SLR7, SLR50,
SLR60, SLR75, SLR100 and SLR140
Reference Manual
Tandberg SLR24, SLR40, SLR7, SLR50,
SLR60, SLR75, SLR100 and SLR140 SCSI
Interface Functional Specifications
Tandberg SLR50 (MLR3) PVR Manual
Tandberg SLR100, SLR60 and SLR40 PVR
Manual - Internal
Tandberg SLR24-100 PVR Manual - External
Tandberg SLR2-5 PVR Manual - External
Tandberg SLR24 and SLR50 PVR Manual (VU2000) Internal
Tandberg SLR7 PVR Manual - Internal
Se ruega observar lo siguiente:
Es posible que esta publicación describa las principales
características de patentes concedidas o a punto de serlo. Al publicar
esta información, Tandberg Data ASA no otorga licencia alguna, ni
cualquier otra forma de autorización.
Se han hecho todos los esfuerzos para evitar errores en los textos y
los diagramas. Ello no obstante, Tandberg Data ASA no se hace
responsable de los errores que puedan aparecer en esta
publicación.Tandberg Data ASA se esfuerza por mejorar
constantemente la calidad de sus productos a medida que van
siendo disponibles nuevas tecnologías y nuevos dispositivos. En
consecuencia, Tandberg Data ASA se reserva el derecho de modificar
sus especificaciones en cualquier momento.
Todo comentario de su parte acerca de esta publicación será
bienvenido.
IMPORTANT!
The Tandberg SLRx equipment must be connected to an earthed
mains socket outlet!
VIKTIG!
Apparatet må kun tilkobles jordet stikkontakt!
WICHTIGE
SICHERHEITSHINWEISE!
Benutzen Sie stets das werkseitig mitgelieferte Netzkabel und
verbinden Sie es ausschließlich mit geerdeten Netzsteckdosen!
¡IMPORTANTE!
Los equipos SRLx deben estar alimentados por una toma conectada a
tierra.
VIKTIG!
Apparatet må kun tilkobles jordet stikkontakt!
Tabla de materias
Tandberg Data
Introducción
1
Contenido de la Solución
3
Información
5
Convención sobre la Denominación
de los Lectores
Capacidad de los Lectores
Prestaciones de los Lectores
Compatibilidad de Formato de Cinta
Compresión de Datos
5
5
5
6
6
7
Instalación del Lector
9
Instalación de la Controladora SCSI
Configuración SCSI
SLR2 ® SLR140 externo:
Terminación bus SCSI – Lectores internos
Terminación bus SCSI – Lectores externos
Montaje del Lector interno
Montaje de un Lector externo
Operación del Lector
Rebobinado del cartucho de datos
9
11
12
13
15
15
19
21
23
Instalación de Software
27
Windows NT
29
Tarjeta adaptadora SCSI
Driver
Instalación del driver Windows NT 4.0
Aplicaciones de Backup de datos
ARCserveIT de Computer Associates para Windows NT
CD-ROM Veritas Software Server
Legato NetWorker para Windows NT
29
29
29
31
32
35
39
Windows 2000
41
Tarjeta adaptadora SCSI
Driver
Instalación del driver de Windows 2000
Aplicación de Backup
41
41
41
43
Novell NetWare
45
Tarjeta adaptadora
Aplicaciones de Backup de datos
CD-ROM Veritas Software Server
45
45
49
Windows 95
51
Tarjeta adaptadora
51
Manual de Instalación y Guía del Usuario de Tandberg SLR
ii
Tandberg Data
Aplicaciones de Backup de datos
51
CD-ROM Veritas Software Desktop
52
Windows 98 Windows 98 2ND Edition
Tarjeta adaptadora
Aplicaciones de Backup de datos
CD-ROM Veritas Software Desktop
Veritas Backup Exec para Windows 95/98
53
53
53
54
54
SCO Open Server versión 5
55
Tarjeta adaptadora
Aplicaciones de Backup de datos
Comando sistema SCO Open Server
55
57
57
SCO UnixWare
59
Tarjeta adaptadora
Aplicaciones de Backup de datos
59
59
Sunsoft Solaris
61
Instalación del Lector
Aplicaciones de Backup de datos
61
62
Apple Macintosh
65
Aplicaciones de Backup de datos
65
IBM RS/6000
67
Instalación del Lector
Aplicaciones de Backup de datos
67
68
HP/UX
71
Lector
Aplicaciones de Backup de datos
71
72
Linux
73
Tarjeta adaptadora SCSI
Aplicaciones de Backup de datos
73
74
Disco de Utilidades del Lector
77
Localización y Solución de Problemas Técnicos
79
Control del hardware
Control del software
Comprobación de cambios recientes
Corrección de fallos intermitentes
Localización y solución de problemas técnicos de software
79
79
80
80
80
Apéndice
81
Anuncio Reglamentario de Conformidad
81
Glosario de términos
83
Manual de Instalación y Guía del Usuario de Tandberg SLR
Introducción
Tandberg Data
¡Le felicitamos por su nueva solución
de almacenamiento de datos
Tandberg Data SLR!
La satisfacción de nuestros clientes es nuestra única
preocupación. Le garantizamos que este producto ha salido de
nuestros locales libre de faltas. En el caso de que no esté
totalmente satisfecho, le rogamos ponerse en contacto con su
distribuidor o con el agente de Tandberg más cercano, quienes le
ayudarán rápidamente a resolver su problema. Para pedir
asistencia técnica o si tiene algún problema con su solución de
almacenamiento de datos SLR, sírvase encontrar los números de
teléfono y de fax y las direcciones pertinentes en la pasta
posterior de este manual. Pregunte por el Servicio de Atención al
Cliente.
Tandberg Data ASA es un distribuidor líder a nivel mundial de
productos destinados al almacenamiento de datos informáticos en
cinta magnética para el mercado profesional. La empresa ofrece
una amplia gama de productos y soluciones para la protección de
datos y otras aplicaciones de uso en la gestión del almacenamiento de
datos
Tandberg Data suministra lectores y soluciones de
almacenamiento de datos en cinta magnética de las marcas
Travan NS™, SLR™ y DLT™ a las firmas OEM líderes
mundiales a través de su red mundial de canales de venta.
En las páginas siguientes, previas a las del Manual de Instalación,
se incluye una breve información sobre las soluciones de
almacenamiento de datos SRL de Tandberg Data. También se
incluye una lista de cuanto acompaña al producto de Tandberg
Data adquirido.
La documentación a que hace referencia el Manual de Instalación
de esta Línea de Productos se puede descargar en formato de
archivo PDF del sitio web de Tandberg Data:
www.tandberg.com
Manual de Instalación y Guía del Usuario de Tandberg SLR
1
Tandberg Data
Esta página ha sido dejada en blanco intencionadamente
2
Manual de Instalación y Guía del Usuario de Tandberg SLR
Tandberg Data
Contenido de la
Solución
¡Verifique el contenido del paquete antes
de comenzar la instalación!
Para la Solución Interna:
· Lector interno Tandberg (SLR2-140)
· Cable interno SCSI (con terminador retirable LVD/SE para
los Lectores Tandberg SLR24, SLR40, SLR7, SLR50, SLR60,
SLR75, SLR100 y SLR140)
· Cartucho de datos (1 ó 5, dependiendo del tipo de
kit/solución)
· Cartucho de limpieza (Lectores Tandberg SLR5, SLR24,
SLR40, SLR7, SLR50, SLR60, SLR75, SLR100 y SLR140)
· Software de aplicación
· Manual de Instalación y Guía del Usuario
· Tarjeta de Garantía
Para la Solución Externa:
· Lector externo Tandberg SLR con cable de alimentación
· Terminador externo LVD/SE SCSI (Lectores Tandberg
· SLR7, SLR24, SLR40, SLR50, SLR60 y SLR100)
· Cable externo SCSI
· Cartucho de datos (1 ó 5, dependiendo del tipo de
kit/solución)
· Cartucho de limpieza (Lectores Tandberg SLR24, SLR40,
SLR7, SLR50, SLR60, SLR75, SLR100 y SLR140)
· Software de aplicación
· Manual de Instalación y Guía del Usuario
· Tarjeta de Garantía
NOTA:
Ver también nuestro sitio web: www.tandberg.com.
Manual de Instalación y Guía del Usuario de Tandberg SLR
3
Tandberg Data
Esta página ha sido dejada en blanco intencionadamente
4
Manual de Instalación y Guía del Usuario de Tandberg SLR
Información
Tandberg Data
Convención sobre la Denominación
de los Lectores
El cuadro siguiente presenta la correspondencia entre los
nombres originales de los Lectores y su nombre equivalente SLR.
Denominación original
Equivalencia
Tandberg SLR
Tandberg SLR2
Tandberg TDC 3820
Tandberg SLR3
Tandberg TDC 4120
Tandberg SLR4
Tandberg TDC 4220
Tandberg SLR4-DC
Tandberg TDC 4222
Tandberg SLR5
NA
Tandberg SLR24
Tandberg SLR6
Tandberg SLR7
NA
Tandberg SLR40
NA
Tandberg SLR50
Tandberg MLR3
Tandberg SLR60
NA
Tandberg SLR75
NA
Tandberg SLR100
NA
Tandberg SLR140
NA
Capacidad de los Lectores
Lector de Tandberg Data
Tandberg SLR2
Tandberg SLR3
Tandberg SLR4
Tandberg SLR4-DC
Tandberg SLR5
Tandberg SLR24
Tandberg SLR7
Tandberg SLR40
Tandberg SLR50
Tandberg SLR60
Tandberg SLR75
Tandberg SLR100
Tandberg SLR140
Capacidad
(TDC 3820)
(TDC 4120)
(TDC 4220)
(TDC 4222)
(SLR5 4/8 GB)
(SLR6 12/24 GB)
(MLR3 25/50 GB)
525 MB
1.2GB
2.5GB
2.5GB/5.0*GB
4.0GB/8.0*GB
12GB/24*GB
20 GB/40GB*
20GB/40*GB
25GB/50*GB
30GB/60*GB
38 GB/75*GB
50GB/100*GB
70GB/140*GB
* Usando factor de Compresión Material 2:1
Manual de Instalación y Guía del Usuario de Tandberg SLR
5
Tandberg Data
Prestaciones de los Lectores
Lector de Tandberg Data
Tandberg SLR2 525MB
Tandberg SLR3 1.2GB
Tandberg SLR4 2.5GB
Tandberg SLR4-DC 5GB
Tandberg SLR5
Tandberg SLR24
Tandberg SLR7
Tandberg SLR40
Tandberg SLR50
Tandberg SLR60
Tandberg SLR75
Tandberg SLR100
Tandberg SLR140
(TDC 3820)
(TDC 4120)
(TDC 4220)
(TDC 4222)
(SLR5 4/8 GB)
(SLR6 12/24 GB)
(MLR3 25/50 GB)
Por minuto
Por hora
12 MB/min
18 MB/min
18 MB/min
18/36* MB/min
24/48* MB/min
72/144* MB/min
180/360* MB/min
180/360* MB/min
120/240* MB/min
240/480* MB/min
240/480* MB/min
300/600* MB/min
360/720* MB/min
720 MB
1.08 GB
1.08 GB
2.16 GB
2.88 GB
8.64 GB
21.6 GB
21.6 GB
14.4 GB
28.8 GB
28.8 GB
36.0 GB
43.2 GB
* Usando factor de Compresión Hardware 2:1
Especificaciones de medias
Largo (pies)
Capacidad Nativa (MB)
DC 6250 or equivalent
Tipo de media
1020
250
DC 6525 or equivalent
1020
525
MAGNUS 1.2 or equivalent
950
1200
MAGNUS 2.5 or equivalent
1200
2500
SLR5 8GB *
1500
4000
SLRtape24 24 GB *
1130
12 000
SLRtape7 40 GB*
1545
20 000
SLRtape40 40 GB*
600
20 000
SLRtape50 50 GB *
1515
25 000
SLRtape60 60 GB*
900
30 000
SLRtape75 75 GB*
1150
38 000
SLRtape100 100 GB*
1500
50 000
SLRtape140 140 GB*
1670
70 000
* Usando factor de Compresión Hardware 2:1
Compatibilidad de Formato de Cinta
Tipo de
Tipo de
Lector
SLR140
SLR100
SLR75
SLR60
SLR50
SLR40
SLR7
SLR32
Media
SLRtape140
SLRtape100
SLR24
SLR5
SLR4
SLR3
SLR2
SLR1
Compatibilidad de los Lectores
SLRtape60
SLRtape50
SLRtape40
SLRTape7
SLR32,
MLR1-26GB,
Accuscribe 13GB
SLRtape24
SLR5
Magnus 2.5,
Magnus 2.0,
DC 92xx, QD 92xx
Magnus 1.2,
Magnus 1.0,
DC 91xx, QD 91xx
DC6525, DC6320
DC6250, DC6150
SLR140 SLR100 SLR75 SLR60 SLR50 SLR40 SLR7 SLR32 SLR24 SLR5 SLR4 SLR3 SLR2
L/E
L
L/E
L
L/E
L/E
L
L/E
L/E
L/E
L
L/E
L/E
L/E
L/E
L
L/E
L/E
L/E
L/E
L
L*
L
L*
L*
L/E
L
L
L
L/E
L
L/E
L
L
L
L
L
L
L
L/E
L
L
L
L
L
L/E
L/E
L/E
L/E
L
L
L/E
L/E
L/E
L/E
L/E
L/E
L/E
L/E
L/E
L/E
L/E
L
à Lectura sólo
L/E
à Compatible en Lectura y Escritura
*SLR7 lectura disponible en versión F/W 04.30 o superiores
6
Manual de Instalación y Guía del Usuario de Tandberg SLR
L/E
L/E
Compresión de Datos
Tandberg Data
La compresión de datos es un modo de aumentar la capacidad de
un dispositivo de almacenamiento. Los factores de compresión
están normalmente especificados en 2:1, lo cual significa que es
posible almacenar en la cinta el doble de datos de lo que sería
normal sin compresión de datos. No obstante, el factor de
compresión dependerá del tipo de datos en cuestión. Por ejemplo,
los ficheros de textos ordinarios permiten un factor de
compresión mucho más elevado que los ficheros de programas.
Existen dos métodos para comprimir datos: la compresión for
hardware y la compresión por software. El dispositivo de
almacenamiento efectúa, frecuentemente, la compresión por
hardware. La compresión por software significa que el programa
comprime los datos antes de transmitirlos al dispositivo de
almacenamiento. La compresión por hardware es mucho más eficaz
y se realiza con mucha mayor rapidez que la compresión por
software.
Los Lectores Tandberg Data SLR4-DC, SLR5, SLR24, SLR40,
SLR7, SLR50, SLR60, SLR75, SLR100 y SLR140 utilizan
compresión por hardware ALDC para comprimir los datos. Esta
función está ímplicita, pero el usuario puede desactivar la
compresión de datos por medio del software de aplicación de
determinadas herramientas de software. (Para mayor información
consulte el capítulo sobre herramientas Tandberg SCSI al final
del presente Manual).
Manual de Instalación y Guía del Usuario de Tandberg SLR
7
Tandberg Data
Esta página ha sido dejada en blanco intencionadamente
8
Manual de Instalación y Guía del Usuario de Tandberg SLR
Instalación del
Lector
Tandberg Data
Instalación de la Controladora
SCSI
Todos los Lectores Tandberg Data SLR utilizan una interfaz
SCSI con el sistema anfitrión (Host). Para poder instalar
cualquier unidad SCSI será necesario instalar previamente una
controladora SCSI. Se ruega prestar atención a los siguientes
puntos.
· Antes de proceder a la instalación, asegúrese de que su
ordenador esté OFF.
· Si su ordenador está equipado de una controladora SCSI
integrada, debe Vd., antes de proceder a la instalación,
localizar el conector SCSI en la tarjeta madre del ordenador.
·
Consulte la documentación entregada con el ordenador para
conocer la posición exacta del conector.
· Si están disponibles varios conectores SCSI, puede escoger
cualquiera de ellos, excepto que la documentación del
ordenador disponga otra cosa.
· Una vez hecho lo anterior, conecte firmemente el conector SCSI
al conector de la tarjeta principal y consulte el capítulo Montaje
del Lector, página 14, para instalar su SLR interno.
· Si su PC/Servidor requiere una controladora SCSI aparte,
deberá Vd asegurarse de que está adecuadamente instalada
antes de conectar su Lector SLR.
· También tendrá que adquirir un driver de software en la tienda
donde compró la controladora SCSI para activarla. Asegúrese de
que tiene cargado el último driver de software de la controladora
SCSI y de que la carta controladora esté instalada adecuadamente.
Las drivers de software pueden cargarse en el sitio web del
vendedor. Consulte el fichero Read Me para la instalación.
Manual de Instalación y Guía del Usuario de Tandberg SLR
9
Para más información, consulte la documentación del PC/Servidor
sobre el modo de instalar tarjetas adicionales en el PC/Servidor. O
diríjase al distribuidor local para pedir asistencia.
Configuración SCSI
Tandberg Data
Selección SCSI-ID
Todos los periféricos sobre bus SCSI necesitan un número de
identificación único, llamado SCSIID. Si existe un conflicto de
identificación SCSI, su sistema no reconocerá los periféricos
SCSI. En muchos sistemas es corriente utilizar el bus SCSI para
el disco duro y el CD-ROM, y también para el Lector de cinta. No
olvidar que la controladora SCSI utiliza el número de
identificación SCSI 7.
Jumper Block/Bloc de
Cavaliers/ Bloque de Jumpers
SLR7 - SLR140 interno:
Si el Lector es el único periférico sobre el bus SCSI, entonces
no necesitará hacer nada. El Lector será reconocido
inmediatamente. (Todos los Lectores de Tandberg Data están
equipados de un número de identificación SCSI 2
predeterminado.)
Si el Lector debe compartir el bus SCSI con otros periféricos,
verifique los números de identificación SCSI utilizados por los
otros periféricos. Después, atribuya un número que no esté siendo
utilizado por ninguno de ellos (no olvide que la tarjeta adaptadora
SCSI utiliza el número 7).
El número de identificación SCSI está fijado frecuentemente
por “jumpers” en los que se puede “leer” el SCSI-ID atribuido
al periférico. Todos los números de identificación de periféricos
SCSI aparecen en pantalla durante el arranque del sistema.
Jumper Block/Bloc de
Cavaliers/ Bloque de Jumpers
Manual de Instalación y Guía del Usuario de Tandberg SLR
11
Tandberg Data
Selección SCSI-ID
SLR2 ® SLR140 externo:
Para las soluciones de Lector externo, encontrará Vd. en la espalda de la caja
de la unidad una rueda selectora destinada a regular el número de
identificación SCSI:
12
SLR2-5
SLR7-140
Rueda selectora movida por el
dedo
Rueda selectora movida por el
Manual de Instalación y Guía del Usuario de Tandberg SLR
Terminación bus SCSI
– Lectores internos
Tandberg Data
Terminación en general
Un bus SCSI es sensible a las interferencias, como por ejemplo al
ruido de motores eléctricos y a otras unidades electromagnéticas.
Además, debido a la velocidad de los datos sobre el bus SCSI, es
esencial que la terminación del bus SCSI sea la adecuada. La
“terminación” se usa para definir el conjunto de los extremos del
bus SCSI.
Lectores Tandberg SLR2 ® SLR5
Su nuevo Lector ¿será el último, o el único periférico del cable
SCSI?
• Si el Lector es el último, o el único periférico del cable
SCSI, como se muestra a la izquierda, asegúrese de
que los paquetes de terminación SCSI estén
Terminación SCSI en la que
instalados en el Lector (opción predeterminada en
el Lector es el último o el
fábrica).
único periférico SCSI
device.
Terminación SCSI en un sistema con
tres periféricos SCSI internos.
• Si el Lector se encuentra en el centro de la cadena
SCSI, como se muestra a la izquierda, tiene Vd. que
desactivar la terminación SCSI del Lector. Para
desactivar la terminación SCSI del Lector, extraiga
de ella los paquetes de terminación (ver la figura más
abajo). Asegúrese de que la terminación del último
periférico SCSI del cable esté disponible.
Manual de Instalación y Guía del Usuario de Tandberg SLR
13
Tandberg Data
Los Lectores Tandberg SLR2 ® SLR5 poseen 3 juegos de
terminaciones pasivas que pueden ser retiradas o instaladas en el
Lector.
Lectores Tandberg SLR24, SLR40, SLR7, SLR50,
SLR60, SLR75, SLR100 y SLR140
Los Lectores Tandberg SLR24, SLR40, SLR7, SLR50, SLR60,
SLR75, SLR100 y SLR140 se suministran sin terminación. Para
cumplir con las especificaciones PC99, entregamos ahora un
cable SCSI interno con terminación activa desmontable.
14
Manual de Instalación y Guía del Usuario de Tandberg SLR
Terminación bus SCSI
– Lectores externos
Tandberg Data
Si el Lector es el único periférico del bus SCSI externo, debe
terminarse usando la terminación SCSI externa suministrada con
el Lector. Ver la figura:
De haber otros periféricos externos, el Lector Tandberg SLR puede
ser instalado en cualquier posición en el bus SCSI. El Lector SLR
tiene que estar terminado, si está instalado en el extremo del bus
SCSI. Ver la figura:
Montaje del Lector interno
Configuración ancha/estrecha
Todos los Lectores SLR internos pueden ser conectados a una tarjeta
adaptadora WIDE SCSI (ancha) de 16 bits, o a una tarjeta adaptadora
NARROW SCSI (estrecha) de 8 bits. El Lector SLR2-5 se suministra
con un cable interno que posee un conector estrecho. Los Lectores
internos SLR7 - 140 se suministran con un conector WIDE. Si
piensa utilizar SLR2-5 con una tarjeta adaptadora SCSI ancha,
necesitará un conversor de la tarjeta adaptadora SCSI de ancho a
estrecho para el cable interno suministrado con la solución para el
almacenamiento de datos en cinta magnética SLR2-5. Si piensa utilizar
un Lector SLR7-140 con una tarjeta adaptadora SCSI estrecha,
necesitará un conversor de ancho a estrecho.
Manual de Instalación y Guía del Usuario de Tandberg SLR
15
Tandberg Data
Información más detallada con respecto a estos conversores y a la
conexión por periféricos SCSI estrechos (8 bits) a una tarjeta
adaptadora SCSI ancha (16 bits) y de periféricos WIDE SCSI (16
bits) a adaptadoras estrechas (8 bits), e igualmente sobre dónde
comprar estos conversores, la encontrará en la página web
siguiente:
www.adaptec.com/products/solutions/cables.html
NOTA:
Al montar un Lector Tandberg SLR24, SLR40, SLR7, SLR50, SLR60,
SLR75, SLR100 o SLR140 sobre una tarjeta adaptadora SCSI de 8 bits
usando un conversor WIDEà Narrow, verifique que el dispositivo de
negociación WIDE del Bios de la tarjeta adaptadora SCSI esté desactivado.
Para más información, consulte el Manual de la tarjeta adaptadora SCSI.
16
Manual de Instalación y Guía del Usuario de Tandberg SLR
Instalación de un Lector
interno
Tandberg Data
1) La instalación interna del Lector requiere que haya una bahía libre
de 5,25 pulgadas con una abertura en el frontal de su sistema informático.
Acceda a la bahía para unidad removible (Para más información sobre
acceso a la bahía para unidad removible, consulte la documentación
suministrada junto con su sistema).
Lectores Tandberg SLR2 ® SLR5
Lectores Tandberg SLR24, SLR40, SLR7, SLR50, SLR60,
SLR75, SLR100 y SLR100
3) Fije el Lector a la bahía (utilice sólo los tornillos que se suministran con el
Lector)
4) Conecte el cable de alimentación y el cable para transmisiones SCSI
(y eventualmente también el conversor SCSI), como se muestra más abajo:
Lectores Tandberg SLR2 ® SLR5
LectoresTandberg SLR24, SLR40, SLR7,
SLR50, SLR60, SLR75, SLR100 y SLR140
NOTA:
Para montar el Lector en la bahía será necesario disponer de un kit de montaje. Para más
información acerca de dónde adquirir el kit consulte www.tandberg.com > SUPPORT >
SLR Support >Hardware Compatibility
Manual de Instalación y Guía del Usuario de Tandberg SLR
17
Tandberg Data
Instrucciones para la instalación de raíles
de montaje
Lectores Tandberg SLR5 para
las series IBM Netfinity 5000, 5500, 5600 y 7000
SLR5 Netfinity Kit no de referencia pedidos: P/N 432126
Incluye:
- 2 x raíles de montaje lado de la izquierda y de la derecha - 4 x tornillos
- 1 x Instrucciones de instalación
Lectores Tandberg SLR24, SLR40, SLR7, SLR50, SLR60,
SLR75, SLR100 y SLR140 para las series IBM Netfinity
5000 y 7000
Netfinity Kit no de referencia para pedidos: P/N 431950
Incluye:
- 1 x raíl de montaje - 2 x tornillos
- 1 x Instrucciones de instalación
18
Manual de Instalación y Guía del Usuario de Tandberg SLR
Montaje de un Lector
externo
Tandberg Data
Configuración ancha/estrecha
Los Lectores SLR externos pueden ser conectados bien a una tarjeta
adaptadora WIDE SCSI (16 bits), o a una tarjeta adaptadora Narrow
SCSI (8 bits). El SLR2-5 se sumistra con un cable externo con
conector estrecho. Los Lectores SLR7-140 se suministran con un
conector externo WIDE. Si Vd. piensa utilizar un Lector SLR2-5
con una tarjeta adaptadora WIDE SCSI, necesitará una tarjeta
adaptadora SCSI de Narrow a WIDE para el cable externo que se
suministra con la solución de almacenamiento de datos en cinta
magnética SLR2-5. Si Vd. piensa usar un Lector SLR7-140 con una
tarjeta adaptadora SCSI estrecha, necesitará un conversor de
WIDE a Narrow.
Para información detallada con respecto a los conversores y a la
conexión de periféricos SCSI estrechos (8 bits) a una tarjeta
adaptadora SCSI ancha (16 bits) y periféricos WIDE SCSI (16 bits) a
adaptadoras estrechas (8 bits), e igualmente sobre la adquisición de
conversores, ver el siguiente sitio web:
www.adaptec.com/products/solutions/cables.html
Instalación de un Lector externo
Una vez instalada y funcionando adecuadamente la controladora
SCSI, se puede proceder a instalar el Lector. Antes de comenzar,
asegurarse de que el aparato esté desconectado.
NOTA:
No fijar ni insertar el cable de alimentación hasta que no estén hechas
todas las conexiones.
Manual de Instalación y Guía del Usuario de Tandberg SLR
19
Tandberg Data
Se ruega leer detenidamente la información relativa a los conflictos de identificación SCSI y el párrafo sobre la terminación
SCSI en las páginas 11-14. Para instalar un Lector externo basta
con conectarlo al PC/Servidor con el cable SCSI de uno de los
dos conectores SCSI a disposición.
No olvide colocar la terminación en el conector libre situado en
la parte posterior de la caja del Lector y seleccionar una sóla
identificación SCSI.
SLR2-5
ON/OFF
Conmutador
Receptáculo de
alimentatión
Ventilador
SLR7 - 140
Rueda selectora
movida por el dedo
Conectores de
interfaz SCSI
ON/OFF
Conmutador
Receptáculo de
alimentatión
Rueda selectora
movida por el dedo
Ventilador
Conectores de
interfaz SCSI
Conectar seguidamente la toma de corriente.
Cuando ponga en marcha el sistema por primera vez verifique que
todas las unidades SCSI estén correctamente enumeradas en la
controladora SCSI.
20
Manual de Instalación y Guía del Usuario de Tandberg SLR
Operación del Lector
Tandberg Data
Cargar un cartucho de datos
1) Presione el botón de expulsión (Eject, ver
detalles arriba a la derecha para ver dónde está
situado).
2) Asegúrese de que el cartucho de datos esté
correctamente orientado (ver a la izquierda
para la orientación del cartucho).
3) Empuje el cartucho de datos dentro del lector
hasta que haga clic. Ello indica que el cartucho
de datos está bien situado y que puede empezar a
girar.
Tandberg SLR24, SLR40, SLR7, SLR50, SLR60, SLR75,
SLR100 y SLR140
1) Asegúrese de que el cartucho de datos esté orientado
correctamente (ver a la izquierda para la orientación del
cartucho).
2) Empuje el cartucho de datos lentamente
en el lector hasta que quede situado
automáticamente dentro del Lector.
Manual de Instalación y Guía del Usuario de Tandberg SLR
21
Tandberg Data
Descargar un cartucho de datos
Tandberg SLR2 ® SLR5
Botón Eject
1) Espere a que la cinta se detenga por
completo.
2) Presione el botón de expulsión (Eject,
ver a la izquierda dónde está situado).
3) Cuando se abra el Lector por su frontal,
extraiga el cartucho de datos.
4) Cierre manualmente el frontal del
Lector.
Tandberg SLR24, SLR40, SLR7, SLR50,
SLR60, SLR75, SLR100 y SLR140
1) Espere a que la cinta se detenga por
completo.
2) Presione el botón de expulsión (Eject, ver a
la izquierda dónde está situado).
3) El cartucho de datos saldrá expulsado
automáticamente.
Manejo de un cartucho de
datos
Para la mayor fiabilidad y duración del
cartucho de datos, respetar lo siguiente:
· Los cartuchos de datos no se deben dejar
caer al suelo.
· Asegúrese de que el entorno ambiental del
Lector y el
lugar de almacenamiento de los cartuchos
estén limpios.
· Exponga los cartuchos al entorno de
operación durante al
menos cuatro horas antes de usarlos.
· Sustituya los cartuchos de datos
desgastados o que
hagan un ruido excesivo.
22
Manual de Instalación y Guía del Usuario de Tandberg SLR
Almacenamiento de cartuchos
de datos
La mejor práctica para el almacenamiento de
un cartucho de datos es rebobinar la cinta
hasta el principio y meterla seguidamente en
su estuche protector.
Rebobinado del
cartucho de datos
Tandberg Data
Tandberg SLR7 ® SLR140
Los Lectores SLR7-140 realizan automáticamente esta operación
cuando se presiona el botón Eject.
Tandberg SLR2® SLR5
Comando Unix System
Usando este sistema de comandos, Vd. debe efectuar la operación
de rebobinado por medio del comando MT. (Para más detalles,
consulte la documentación MT).
Sistema Unix/Sistema PC usando una aplicación de
Backup de datos
Para asegurarse de que la cinta esté rebobinada al principio, Vd.
debe ejecutar un comando para la retención de la cinta antes de
expulsarla.
Una vez completa la operación: Expulsar la cinta de la unidad y
guardarla en su estuche protector.
Condiciones de almacenamiento
Evitar las altas temperaturas (>25C/77F) y un grado de humedad
alto (>50 % RH).
Almacenar los cartuchos de datos en ambiente fresco y seco.
No almacenar jamás los cartuchos de datos en la proximidad de
periféricos que posean campos magnéticos potentes, como por
ejemplo monitores de ordenadores, equipos de televisión y
altavoces.
Acondicionamiento
Antes de usarlo, el cartucho de datos debe adaptarse al entorno de
trabajo a razón de un tiempo igual al periodo de tiempo que ha
estado fuera de dicho entorno (que no debe exceder de 8 horas).
Manual de Instalación y Guía del Usuario de Tandberg SLR
23
Tandberg Data
Condiciones para retensar la cinta
En cualquiera de los casos siguientes, TENDRÁ QUE efectuarse
la tensión de la cinta:
è Al utilizar por primera vez un cartucho de datos.
è Después de una operación prolongada sobre un segmento
limitado de la cinta, que implique parar/hacer correr la cinta
repetido número de veces.
è Cuando el cartucho haya estado expuesto a diferencias
(alzas/bajas) de temperatura de 16°C (30° F).
è Cuando el cartucho se haya caído al suelo.
è Si ocurren excesivos errores de escritura y de lectura (igualmente
denominados “Error Check and Correcting/EEC error” en ciertas
aplicaciones de backup de datos ).
Limpieza
Previo a su utilización, asegúrese de que el cartucho de limpieza
haya estado almacenado durante 24 horas a la temperatura y
humedad ambiente del lugar en donde haya de usarse.
Intervalos de limpieza recomendados
Es por lo general conveniente limpiar el Lector tras 50 horas de uso
en el caso de SLR2-5, 100 horas en el caso de SLR7 - 140. Se
recomienda especialmente proceder a la operación de limpieza una
vez a la semana, e igualmente limpiar el Lector inmediatamente
después de utilizar un cartucho nuevo.
NOTA: Se hace observar que los productos Tandberg SLR24, SLR40, SLR7, SLR50,
SLR60, SLR75, SLR100 y SLR140 indican cuando se debe proceder a la operación de
limpieza. El DIODO EMISOR DE LUZ (en adelante llamado LED) situado en el extremo
derecho del aparato se encenderá con una luz sin destellos de color
ANARANJADO.
24
Manual de Instalación y Guía del Usuario de Tandberg SLR
Procedimiento de limpieza
Tandberg Data
1) Inserte el cartucho de limpieza en el Lector SRL
2) El procedimiento de limpieza comenzará automáticamente. Esto se
indica en el LED del producto de la manera siguiente:
Tandberg SLR2 ® SLR5
· LED del panel frontal, luz VERDE intermitente.
3) Espere a que el LED cese de emitir luz y expulse manualmente
del Lector el cartucho de datos (a los 30 segundos,
aproximadamente).
Tandberg SLR7 ® SLR140
· LED extremo izquierdo, OFF, LED central, luz VERDE
intermitente, LED extremo derecho, luz
ANARANJADA sin destellos.
3) El cartucho saldrá expulsado una vez terminada la
operación de limpieza (al cabo de unos 3 minutos).
¿Cuándo hay que usar un cartucho de limpieza
nuevo?
El cartucho de limpieza SLR no puede usarse más en caso de:
Tandberg SLR2 - SLR5
· Luz VERDE sin destellos, LED panel frontal (se refiere a
SLR2, SLR3, SLR4 y SLR4DC).
· Luz ANARANJADA sin destellos, LED panel frontal (se
refiere a SLR5).
Tandberg SLR24, SLR40, SLR7, SLR50, SLR60,
SLR75, SLR100 y SLR140
· Ningúna reacción del LED. La cinta saldrá expulsada
automáticamente.
Manual de Instalación y Guía del Usuario de Tandberg SLR
25
Tandberg Data
LED del panel frontal
Lectores Tandberg SLR2 ® SLR5
Los Lectores Tandberg SLR2, SLR3, SLR4, SLR4-DC y SLR5
poseen un único LED (Light Emitting Diode) que indica el
siguiente estado del lector:
Estado del LED
Significado
OFF
Inactivo / ningún cartucho cargado
VERDE sin
destellos
VERDE
intermitente
ANARANJADO sin
destellos
VERDE sin
destellos
ANARANJADO sin
destellos
Inactivo / cartucho cargado
Lector activo
Fallo del aparato o del hardware
Cartucho de limpieza gastado sustituirlo por uno
nuevo (SLR2--> SLR4)
Cartucho de limpieza gastado sustituirlo por uno
nuevo (SLR5)
ROJO sin destellos
Error fatal *
* Ponerse en contacto con el Servicio de Atención al Cliente de Tandberg Data
Tandberg SLR24, SLR40, SLR7, SLR50, SLR60,
SLR75, SLR100 y SLR100
Los Lectores Tandberg SLR24, SLR40, SLR7, SLR50, SLR60,
SLR75, SLR100 y SLR140 poseen tres LED que indican los
siguientes estados del Lector:
Estado del LED
Verde
Verde
Significado
Anaranjado
IntermiTente
OFF
OFF
Test automático conectado/
Actividad de diagnóstico
OFF
OFF
OFF
OFF
OFF
ON
ON
ON
OFF
IntermiTente
OFF
OFF
OFF
Inactivo / Ningún cartucho cargado
Ningún cartucho cargado/Limpieza
necesaria
Inactivo /Cartucho cargado
Lector activo
ON
ON
ON
Cartucho cargado/Limpieza
necesaria
Activo/Limpieza necesaria
IntermiON
tente
OFF
OFF
Intermi-tente
Fallo irreparable del Lector*
IntermiIntermiIntermi-tente
Error Fatal *
tente
tente
* Ponerse en contacto con el Servicio de Atención al Cliente de Tandberg Data
26
Manual de Instalación y Guía del Usuario de Tandberg SLR
Tandberg Data
Instalación de Software
Este capítulo contiene información relativa a la instalación de los
Lectores SLR en los siguientes entornos de sistemas operativos:
- Windows NT 4.X (Servidor/Estación de trabajo) Windows 2000
- Novell NetWare 4.X/5.0 Windows 95 - Windows 98
- Windows 98 Second Edition - SCO
Open Server Release 5 - SCO
UnixWare Versión 7.X - Sunsoft
Solaris 2.x, 7.0
- Apple Macintosh System 7 y superior - IBM
AIX Versión 4.x - HP UX Versión 10.20/11.0
- Linux
Manual de Instalación y Guía del Usuario de Tandberg SLR
27
Tandberg Data
Esta página ha sido dejada en blanco intencionadamente
28
Manual de Instalación y Guía del Usuario de Tandberg SLR
Tandberg Data
Windows NT
Tarjeta adaptadora SCSI
Windows NT comprende un driver para la mayor parte de las
tarjetas adaptadoras SCSI. Si no puede encontrar el driver
apropiado, consulte la Guía de Instalación que se suministra con la
tarjeta adaptadora SCSI o contacte al distribuidor del ordenador.
Driver
Windows NT 4.0 comprende un driver que soporta los Lectores
SLR2, SLR3, SLR4, y SLR4DC en todas las versiones de Windows
NT y Service Packs.
El soporte para el modelo SLR5 lo proporciona Service Pack 6A.
(Disponible en www.microsoft.com).
Los Lectores SLR24, SLR7, SLR40, SLR50, SLR60, SLR75,
SLR100 y SLR140 requieren un driver adicional, que está disponible
en el sitio web de Tandberg Data: www.tandberg.com.
Instalación del driver
Windows NT 4.0
1) Haga doble clic en el icono “Tape Devices” del Control Panel.
NT detecta automáticamente el de los Lectores Tandberg SRL que se
encuentra instalado en el sistema y le indica instalar el driver.
Instalación de los Lectores Tandberg SLR2, SLR3,
SLR4, SLR4-DC y SLR5
2) Seleccione “Tandberg 3660, 3820, 4120, 4220, 4222”.
3) Seleccione OK y siga las instrucciones que aparecen en pantalla.
Manual de Instalación y Guía del Usuario de Tandberg SLR
29
Tandberg Data
Instalación de los Lectores Tandberg SLR24, SLR7,
SLR40, SLR50, SLR60, SLR75, SLR100 y SLR140
Haga clic en Have a Disk.
2) Cuando así se le indique, introduzca un disquete en el Lector A:
3) Seleccionar el driver de Tandberg Data SLR2-140.
4) Seleccionar Install y seguir las instrucciones que aparecen
en pantalla.
Durante el proceso de copia, podrá aparecer la siguiente
advertencia:
Escoger siempre New.
Esto cambiará el driver existente por la última versión que soporta el
Lector Tandberg SLR que esté utilizando.
30
Manual de Instalación y Guía del Usuario de Tandberg SLR
Tandberg Data
Aplicaciones de Backup de datos
Aplicación NT incrustada
La aplicación de backup NT (NTBackup) está incrustada en el
sistema operativo Windows NT 4.0.
Instalación
Antes de ejecutar la aplicación asegúrese de que el driver del Lector
SLR esté correctamente instalado. Consulte la instalación del driver en
la página 29.
Para comenzar la aplicación:
· Haga clic en START.
· Haga clic en Programs.
· Haga clic en Administrative tools.
· Seleccione Backup.
NOTA:
Para cualquier cuestión relativa al uso de esta aplicación, consulte la
documentación Microsoft NT
Manual de Instalación y Guía del Usuario de Tandberg SLR
31
Tandberg Data
ARCserveIT de Computer
Associates para Windows NT
ARCserveIT es uno de los productos líderes del mercado de
software de backup NT. Está a la venta en tres diferentes versiones:
ARCserveIT Workgroup Edition, ARCserveIT Advanced Edition
y ARCserveIT Enterprise Edition.
ARCserveIT Workgroup Edition
Diseñado en principio para pequeñas o medianas empresas e
instalaciones informáticas con un sólo servidor, Workgroup Edition
for NT de CA permite a los usuarios beneficiarse de una potente
tecnología a un nivel de precio y de funcionalidad que atiende a sus
necesidades.
Características
·
·
·
•
Soporta un robot cargador (Autoloader)
Streaming paralelo
Gestión automática de medias
Soporta un número ilimitado de estaciones de trabajo cliente bajo
Windows 3.1x, Windows 95/98, y Windows NT.
ARCserveIT Advanced Edition
Creado para atender a las diferentes necesidades con respecto a
Tecnología de la Información de las medianas empresas,
ARCserveIT Advanced Edition combina su tecnología, probada en
la industria y de fácil uso, con características avanzadas y
escalabilidad en el suministro de soluciones de nueva generación.
ARCserveIT Advanced Edition proporciona una gestión centralizada
de soluciones informáticas, un soporte para instalaciones con varios
servidores (multiservidores, con un número ilimitado de clientes) y
soluciones escalables para entornos dinámicos.
32
Manual de Instalación y Guía del Usuario de Tandberg SLR
Tandberg Data
ARCserveIT Enterprise Edition
Diseñados para medianas y grandes empresas, los productos Enterprise
Edition de CA ofrecen una escalabilidad practicamente ilimitada y
una interoperabilidad entre diferentes plataformas en grandes
entornos heterogéneos. Por su flexibilidad de licencia, las
soluciones Enterprise Edition son la opción ideal de empresas que
poseen numerosos usuarios.
Tandberg Data suministra sus productos con las aplicaciones
ARCserveIT Work Group y ARCserveIT Advanced Edition.
Instalación
1) Inserte el CD-ROM servidor. 2)
Abra My Computer.
3) Haga doble clic en el icono CD-ROM.
4) Un explorador aparecerá automáticamente.
5) Seleccione la versión ARCserveIT for Windows NT que
desee instalar
o
6) Haga clic en el icono install.
7) Siga las instrucciones que aparecen en pantalla.
NOTA:
Para cualquier cuestión relativa a esta aplicación o a su instalación, consulte la
documentación online que se suministra con el CD-ROM.
Manual de Instalación y Guía del Usuario de Tandberg SLR
33
Tandberg Data
Veritas Backup Exec para estaciones de
trabajo Windows NT
· Veritas Backup Exec es una protección de datos de 32 bits, completa y
de fácil uso, para las estaciones de trabajo Windows NT 4.0. La
detección automática de periféricos facilita la instalación y pulsando
simplemente un botón, se ponen en marcha procedimientos de
backup y de restauración de datos. Esta aplicación protege de manera
fiable los datos NetWare, inclusive la información sobre enlaces y
fideicomisarios, y garantiza la consistencia y fiabilidad del backup
sin intervención humana, gracias a una función avanzada de
programación de intervalos de backup y a una función de
autoprotección.
· Veritas Backup Exec utiliza su propio driver, de manera que no es
necesario instalar el driver de Windows NT.
Instalación
1) Inserte el CD-ROM.
2) Abra My Computer.
3) Hacer doble clic en el icono CD-ROM.
4) Un explorador aparecerá automáticamente.
5) Seleccione Backup Exec for Windows NT Workstation.
6) Haga clic en el icono install.
7) Siga las instrucciones que aparecen en pantalla.
NOTA:
Para cualquier cuestión relativa a esta aplicación o a su instalación,
consulte la documentación online que se suministra con el CD-ROM
Veritas Software.
34
Manual de Instalación y Guía del Usuario de Tandberg SLR
Tandberg Data
CD-ROM Veritas Software Server
Backup Exec para Windows NT
Edición Veritas Backup Exec para Windows NT
Single/Enterprise
Backup Exec es uno de los líderes del mercado de software NT de
backup de datos. Está a la venta en dos diferentes versiones: Single
Server (un sólo servidor) y Multi Server (varios servidores).
La potente suite de herramientas de desarrollo Backup Exec le
proporciona la funcionalidad que usted buscaba, mientras que sus
funciones múltiples le permiten diseñar el backup local y remoto de
forma completamente libre.
Instalación del driver
Antes de ejecutar la aplicación, asegúrese de que el driver del Lector
SLR esté correctamente instalado.
1) Seleccione Control Panel en el menú Settings.
2) Haga doble clic en el icono Tape Devices. Elegir la ficha
Drivers.
3) Anotar el tipo de drivers instalados actualmente. Por
cada driver que desee reemplazar, seleccione
secuencialmente el driver en cuestión y haga clic en
Remove para eliminar el driver de la lista. Si para
empezar agrega nuevos drivers, pase al siguiente punto.
4) Seleccione Add en la ficha de los drivers.
5) Seleccione Have Disk.
6) Entre el nombre completo del directorio en el que se encuentra el
fichero oemsetup.inf (<CDROM Letter>:\
WINNT\Drivers\I386).
7) Seleccione OK en la ventana Install From Disk.
8) Seleccione una de las opciones de la lista Choose the driver
you want to install, and then click OK, y después haga clic en
OK, en la ventana Install Driver, seleccione el driver deseado,
es decir la descripción de la serie de Lectores para la que desee
cargar un driver.
Manual de Instalación y Guía del Usuario de Tandberg SLR
35
Tandberg Data
9) Seleccione OK en la ventana Install Driver.
10) Si aparece la opción, seleccione New en el diálogo
Windows NT Setup; después entre el mismo directorio
que en el punto 6 más arriba.
¡IMPORTANTE!
Seleccione siempre "New" si aparece -- NO seleccionar "Current"
11) Si desea instalar otros drivers de dispositivo de cinta,
seleccione No en la ventana System Settings Change - Do
you want to restart your computer now? y repita los puntos 4
a 10. Una vez instalados los drivers que necesite, seleccione Yes
en esta ventana y reinicie Windows NT. Con ello se activarán
los cambios realizados.
Instalación de Software
1)
2)
3)
4)
5)
6)
Inserte el CD-ROM para servidor.
Abra My Computer.
Haga doble clic en el icono CD-ROM
Un explorador aparecerá automáticamente.
Seleccione Backup Exec para Windows NT.
Haga clic en el icono install.
7) Siga las instrucciones que aparecen en pantalla.
NOTA:
Para cualquier cuestión relativa a esta aplicación o a su instalación,
consulte la documentación online que se suministra con el CD-ROM.
36
Manual de Instalación y Guía del Usuario de Tandberg SLR
Tandberg Data
Suite Veritas Backup Exec para pequeños
servidores profesionales
La suite Veritas Backup Exec Small Business Server para Windows
NT es una solución completa de protección de datos, diseñada
específicamente para Microsoft Small Business Server para
Windows NT. Mediante una integración transparente en la consola de
administración, Backup Exec proporciona una aplicación de fácil uso
que soporta proteccion antivirus, salvaguardia, backup, restauración y
recuperación de datos.
Instalación del driver
Antes de ejecutar la aplicación, asegúrese de que el driver de su Lector
SRL esté correctamente instalado.
1. Seleccione Control Panel en el menú Settings.
2. Haga doble clic en el icono Tape Devices. Elegir la ficha Drivers.
3. Anotar el tipo de drivers instalados actualmente. Por cada driver que
desee reemplazar, seleccione secuencialmente el driver en cuestión
y haga clic en Remove para eliminar el driver de la lista. Si para
empezar agrega nuevos drivers, pase al siguiente punto.
4. Seleccione Add en la ficha de los drivers.
5. Seleccione Have Disk.
6. Entre el nombre completo del directorio en el que se encuentra el
fichero oemsetup.inf (<CDROM Letter>:\
WINNT\Drivers\I386).
7. Seleccione OK en la ventana Install From Disk.
8. Seleccione una de las opciones de la lista Choose the driver you
want to install, and then click OK, y después haga clic en OK, en
la ventana Install Driver, seleccione el driver deseado, es decir la
descripción de la serie de Lectores para la que desee cargar un driver.
Manual de Instalación y Guía del Usuario de Tandberg SLR
37
Tandberg Data
Seleccione OK en la ventana Install Driver.
Si aparece la opción, seleccione New en el
diálogoWindows NT Setup; después entre el mismo
directorio que en el punto 6 más arriba.
¡IMPORTANTE!
Seleccione siempre "New" si aparece -- NO seleccionar "Current"
11. Si desea instalar otros drivers de dispositivo de cinta, seleccione
No en la ventana System Settings Change - Do you want to restart
your computer now? y repita los puntos 4 a 10. Una vez instalados
los drivers que necesite, seleccione Yes en esta ventana y reinicie
Windows NT. Con ello se activarán los cambios realizados.
Instalación de Software
Inserte el CD-ROM para servidor.
Abra My Computer.
Haga doble clic en el icono del CD-ROM.
Un explorador aparecerá automáticamente.
Seleccione Backup Exec para Windows NT.
Haga clic en el icono install.
Siga las instrucciones que aparecen en pantalla.
NOTA:
Para cualquier cuestión relativa a esta aplicación o a su instalación,
consulte la documentación online que se suministra con el CD-ROM.
38
Manual de Instalación y Guía del Usuario de Tandberg SLR
Tandberg Data
Legato NetWorker para Windows
NT
Todos los Lectores SLR (de SLR7 a SLR140) están certificados
para utilización con Legato NetWorker 5.5 y superiores.
· Legato NetWorker es una solución de gestión de almacenamiento
de datos sumamente fiable, destinada a redes distribuídas. Legato
NetWorker es altamente escalable y proporciona una destacable
facilidad de maniobra, una gran disponibilidad y prestaciones de
alta calidad. Legato NetWorker ofrece igualmente soporte integrado
para la conexión de clientes e incorpora software clientes para
protegerlos con el mismo sistema operativo que el del servidor.
Instalación
Antes de ejecutar la aplicación, asegúrese de que el driver de su Lector
SLR esté correctamente instalado. Consulte la instalación del driver en
la página 29.
1) Inserte el CD-ROM para servidor.
2) Abra My Computer.
3) Haga doble clic en el icono CD-ROM.
4) Haga doble clic en el fichero SETUP.EXE.
5) Siga las instrucciones que aparecen en pantalla.
NOTA:
Para cualquier cuestión relativa a esta aplicación o a su instalación,
consulte la documentación online que se suministra con el CD-ROM
Legato.
Manual de Instalación y Guía del Usuario de Tandberg SLR
39
Tandberg Data
Esta página ha sido dejada en blanco intencionadamente
40
Manual de Instalación y Guía del Usuario de Tandberg SLR
Tandberg Data
Windows 2000
Tarjeta adaptadora SCSI
Windows 2000 comprende un driver para la mayor parte de las
tarjetas SCSI.
Si no encuentra el driver apropiado, consulte la Guía de Instalación
suminitrada con la tarjeta adaptadora SCSI o contacte al distribuidor
del ordenador.
Driver
Windows 2000 comprende un driver que soporta los Lectores
SLR2, SLR3, SLR4 y SLR4DC para todas las versiones de
Windows 2000 y Service Pack.
Los Lectores SLR24, SLR7, SLR40, SLR50, SLR60, SLR75,
SLR100 y SLR140 requieren un driver suplementario que está
disponible en el sitio web de Tandberg: www.tandberg.com.
Instalación del driver de
Windows 2000
1) Haga clic con la parte derecha del ratón en My Computer.
2) Seleccione Manage, y el driver deberá aparecer en “Other
devices” marcado con “?”.
Manual de Instalación y Guía del Usuario de Tandberg SLR
41
Tandberg Data
3) Seleccione el driver, haga clic con la parte derecha del ratón y
properties.
4) Seleccione el directorio correcto del driver.
5) Siga las instrucciones en pantalla.
42
Manual de Instalación y Guía del Usuario de Tandberg SLR
Tandberg Data
Aplicación de Backup
incrustada en Windows 2000
La aplicación de Backup está incrustada en el sistema operativo
Windows 2000.
Instalación
Antes de ejecutar la aplicación asegúrese de que el Lector de cinta
magnética SLR esté correctamente instalado. Consulte las instrucciones
de instalación del driver en la página 47.
Para comenzar la aplicación:
·
·
·
·
·
Haga clic en START.
Haga clic en Programs.
Haga clic en Accessories.
Haga clic en System tools.
Seleccione Backup.
Para información sobre otras aplicaciones de Backup,
consulte el apartado relativo a Windows NT.
Manual de Instalación y Guía del Usuario de Tandberg SLR
43
Tandberg Data
Esta página ha sido dejada en blanco intencionadamente
44
Manual de Instalación y Guía del Usuario de Tandberg SLR
Tandberg Data
Novell NetWare
Tarjeta adaptadora
Novell NetWare incluye los drivers necesarios para la mayoría de las
tarjetas adaptadoras SCSI.
Si no se encuentra el driver adecuado, consulte la Guía de Instalación
que acompaña a la tarjeta adaptadora SCSI .
La mayor parte de las aplicaciones de backup incluidas en Novell
NetWare demandan el uso de un Advanced SCSI Programming
Interface (ASPI). El driver ASPI (ASPITRAN.LNM en Novell 4.1x y
NWASPI.CDM en Novell 4.x y 5) forma parte del sistema operativo y,
normalmente, es automáticamente instalado cuando la adaptadora SCSI
está presente en su sistema.
Si tiene algún problema para instalar el driver compatible con ASPI en
su sistema operativo, consulte la Guía de Instalación que se suministra
con la tarjeta adaptadora SCSI.
Aplicaciones de Backup de datos
NetWare Embedded Backup Applet en
Novell 4.1x
Instalación
En la consola del servidor, teclee:
LOAD TAPEDAI
SCAN FOR NEW DEVICES*
LIST DEVICES (El SLR aparece en pantalla.) LOAD
TSA410**
LOAD SBACKUP
· Una vez ejecutado el comando, tendrá Vd. que ver la siguiente
advertencia:
Manual de Instalación y Guía del Usuario de Tandberg SLR
45
Tandberg Data
Haga caso omiso de ella; Tandberg Data ha certificado los Lectores
SRL y los informes de las pruebas están disponibles a petición de
los interesados.
** Novell 4.10 e IntranetWare 4.11 sólo.
Aplicación de backup NetWare incluída
en Novell 4.2 y 5
· Novell Sbackup (SBCON para Novell 5) proporciona backup
simple y operaciones de restauración de datos.
· Esta aplicación requiere la carga de un driver específico. (Ver el
párrafo que sigue: Instalación)
Instalación
En la consola del servidor, teclear:
NWTAPE.CDM
LOAD TSA500
QMAN NEW*
LOAD SBCON (SBACKUP para Novell 4.2)
* La opción NEW sólo se se requiere la primera vez que se ejecuta el comando. Ello creará un
fichero de espera que será utilizado por la aplicación de backup.
NOTA:
Para cualquier cuestión relativa a esta aplicación o a su instalación, consulte la
documentación online que se suministra con el CD-ROM.
46
Manual de Instalación y Guía del Usuario de Tandberg SLR
Tandberg Data
Computer Associates ARCserveIT para
NetWare 6.61
Computer Associates ARCserveIT para NetWare:
ARCserveIT Single Server para NetWare
Diseñado en principio para pequeñas o medianas empresas e
instalaciones con un sólo servidor, el servidor único de CA para
productos NetWare permite a los usuarios beneficiarse de una
poderosa tecnología a un nivel de precio y de funcionalidad que
atiende a sus necesidades.
Características
1) Soporta un número ilimitado de estaciones de trabajo DOS,
OS2, Windows 3.X y Windows 95/98.
2) Soporta Novell Netware 3.x, 4.x, 5.x
3) Streaming paralelo
4) Gestión automática de medias.
ARCserveIT Enterprise Edition para Netware – Una
solución para varios servidores
Diseñados para medianas y grandes empresas, los productos
Enterprise Edition de CA ofrecen una escalabilidad practicamente
ilimitada y una interoperabilidad entre diferentes plataformas en
grandes entornos heterogéneos. Por su flexibilidad de licencia, las
soluciones Enterprise Edition son la opción ideal de empresas que
poseen numerosos usuarios.
Manual de Instalación y Guía del Usuario de Tandberg SLR
47
Tandberg Data
Tandberg Data suministra sus productos con las aplicaciones
ARCserveIT Single Server y Enterprise Edition. Para su correcta
instalación, ARCserveIT requiere que una estación de trabajo
(Windows 9x/NT) esté conectada al servidor Novell.
1) Inserte el CD-ROM ARCserveIT.
2) Abra My Computer.
3) Haga doble clic en el icono CD-ROM.
4) Un explorador aparecerá automáticamente.
5) Seleccione ARCserveIT for NetWare.
6) Haga clic en el icono install.
7) Siga las instrucciones en pantalla.
NOTA:
Para cualquier cuestión relativa a esta aplicación o a su instalación,
consulte la documentación que se suministra con el CD-ROM
ARCserveIT
48
Manual de Instalación y Guía del Usuario de Tandberg SLR
Tandberg Data
CD-ROM Veritas Software Server
Backup Exec para NetWare
Backup Exec es uno de los productos líderes del mercado de
software de backup NT.
Está a la venta en dos diferentes versiones: Single Server (un sólo
servidor) y Multi Server (varios servidores).
VERITAS Backup Exec para NetWare proporciona la última
tecnología existente en cuanto a backup y restauración para una
protección rápida, fiable y simple de los datos del servidor. El
soporte NDS completo asegura una protección eficaz de los datos,
tanto a las pequeñas como a las grandes empresas.
NOTAS:
- Cuando Backup Exec para NetWare está instalado en Novell 4.1X, se
pueden instalar las versiones 7.5 y 8.0.
- Cuando Backup Exec está instalado en Novell 5, sólo la versión 8.0
puede ser instalada.
- Se requiere la versión Backup Exec 8.5 para asegurar la
compatibilidad con Novell 5.1.
Instalación
Instalación en el servidor
Inserte el CD-ROM de instalación en el lector de CD-ROM del
servidor y, cuando se lo indique la consola del servidor, teclee:
CD MOUNT VERITAS
LOAD VERITAS:NETWARE/BEINSTL
Siga las instrucciones en pantalla.
Manual de Instalación y Guía del Usuario de Tandberg SLR
49
Tandberg Data
Instalación en la estación de trabajo
Introduzca el CD-ROM de instalación en el lector de CDROM de la
estación de trabajo y siga los siguientes pasos:
à Bajo Windows NT, Windows 95, Windows 98 y
Windows 98 Second Edition
1)
2)
3)
4)
5)
6)
Abra My Computer.
Haga doble clic en el icono CD-ROM.
Un explorador aparecerá automáticamente.
Seleccione Backup Exec for NetWare.
Haga clic en el icono install.
Siga las instrucciones en pantalla.
à Bajo Windows 3.1X
1)
2)
3)
4)
5)
6)
7)
Abra el Windows File Manager.
Haga clic en la letra asignada al CD-ROM.
Haga doble clic en el fichero “setup.exe”.
Un explorador aparecerá automáticamente.
Seleccione Backup Exec for NetWare.
Haga clic en el icono install.
Siga las instrucciones en pantalla.
NOTA:
Para cualquier cuestión relativa a esta aplicación o a su instalación, consulte
la documentación online que se suministra con el CD-ROM del Software
Veritas.
50
Manual de Instalación y Guía del Usuario de Tandberg SLR
Tandberg Data
Windows 95
Tarjeta adaptadora
Windows 95 incluye un driver para la mayoría de las tarjetas
adaptadoras SCSI.
Dado que la mayor parte de las tarjetas adaptadoras soportan la función
Plug-And-Play, la interfaz SCSI será detectada inmediatamente
después de su instalación y el (los) driver (s) necesario (s) copiado
(s) al disco duro.
Si la tarjeta adaptadora no es automáticamente detectada, consulte la
Guía de Instalación que se suministra con la tarjeta adaptadora SCSI.
Aplicación de Backup incrustada en
Windows 95
La aplicación de backup incrustada en Windows 95 no contiene
ningún driver que soporte los Lectores SCSI.
Aplicaciones de Backup de datos
Dado que la aplicación de backup incrustada en Windows 95 no
contiene ningún driver que soporte los Lectores SCSI, se requiere
una aplicación, suministrada por terceros, para poder usar cualquiera
de los Lectores SLR. (Por ejemplo Veritas Backup Exec para
Windows 95/98).
El driver lo proporciona la aplicación de backup. Por esta razón,
cuando haya Vd. instalado el Lector SLR, éste aparecerá como
unknown device (dispositivo desconocido) en el Device Manager de
Windows 95. Hacer caso omiso de esta información y proseguir la
instalación del software de backup de datos.
Manual de Instalación y Guía del Usuario de Tandberg SLR
51
Tandberg Data
CD-ROM Veritas Software Desktop
Veritas Backup Exec para Windows
95/98
· Veritas Backup Exec para Windows 95/98 proporciona un conjunto
de potentes características dotado de interfaz de protección de datos
para fiabilizar la protección automatizada de datos en Windows
95/98. La función integrada Integrated Emergency Recovery
(Restauración en caso de urgencia) reconstruye por completo su
sistema informático, sin tener que instalar de nuevo el sistema
operativo o el software de backup. Existen ficheros colocados de
manera selectiva con la función File Find (Busca de ficheros) para
la restauración de datos específicos.
· Veritas Backup Exec utiliza un driver de sistema que es copiado al
disco duro durante el proceso de instalación, lo que permite a
Windows 95/98 reconocer su Lector SLR.
Instalación
1)
2)
3)
4)
5)
6)
7)
Inserte el CD-ROM para la estación de trabajo.
Abra My Computer.
Haga doble clic en el icono CD-ROM.
Un explorador aparecerá automáticamente.
Seleccione Backup Exec for Windows 95/98.
Haga clic en el icono install .
Siga las instrucciones en pantalla.
NOTA:
Para cualquier cuestión relativa a esta aplicación o a su instalación, consulte
la documentación online que se suministra con el CD-ROM de Veritas
Software.
52
Manual de Instalación y Guía del Usuario de Tandberg SLR
Tandberg Data
Windows 98
Windows 98
2ND
Edition
Tarjeta adaptadora
Windows 98 y Windows 98 Second Edition incluyen un driver para
la mayoría de las tarjetas adaptadoras.
Dado que la mayor parte de las tarjetas adaptadoras SCSI soportan la
función Plug-And-Play, la interfaz SCSI será detectada
automáticamente después de su instalación y el (los) driver (s)
necesario (s) será (n) copiado (s) en el disco duro.
Si la tarjeta adaptadora no es automáticamente detectada, consulte la
Guía de Instalación o el fichero Read Me correspondiente a la
controladora SCSI.
Aplicaciones de Backup de datos
Aplicación de Backup incrustada en
Windows 98
· Esta aplicación proporciona una protección total de sus datos,
inclusive la operación automática de backup (Programación de los
intervalos de backup).
· Un asistente de backup online le ayuda a efectuar todas las
operaciones que desee realizar con el Lector SLR.
• La aplicación de backup incrustada soporta los Lectores de cinta
magnética Tandberg SLR2, SLR3, SLR4, SLR4DC y SLR5.
Los Lectores SLR24 y SLR50 requieren el Veritas Backup Exec
para Windows 95/98 (Los Lectores SLR7, SLR40, SLR60, SLR75,
SLR100 y 140 pueden funcionar, pero Tandberg Data no lo
certifica).
Instalación
Para iniciar la aplicación de backup de datos:
1)
2)
3)
4)
5)
Haga clic en START.
Haga clic en Programs.
Haga clic en Accessories.
Haga clic en System Tools.
Seleccione Backup.
Manual de Instalación y Guía del Usuario de Tandberg SLR
53
Tandberg Data
CD-ROM Veritas Software Desktop
Veritas Backup Exec para Windows 95/98
· Veritas Backup Exec para Windows 95/98 proporciona un conjunto
de potentes características dotado de interfaz de protección de datos
para fiabilizar la protección automatizada de datos en Windows
95/98. La función integrada Integrated Emergency Recovery
(Restauración en caso de urgencia) reconstruye por completo su
sistema informático, sin tener que instalar de nuevo el sistema
operativo o el software de backup. Existen ficheros colocados de
manera selectiva con la función File Find (Busca de ficheros) para
la restauración de datos específicos.
· Veritas Backup Exec utiliza un driver de sistema que es copiado al
disco duro durante el proceso de instalación. Esto permite a Backup
Exec reconocer su Lector SLR.
Instalación
1)
2)
3)
4)
5)
6)
7)
Inserte el CD-ROM para estación de trabajo.
Abra My Computer.
Haga doble clic en el icono CD-ROM.
Un explorador aparecerá automáticamente.
Seleccione Backup Exec for Windows 95/98.
Haga clic en el icono install.
Siga las instrucciones en pantalla.
NOTA:
Esta versión de la aplicación es totalmente compatible con Windows 98
Second Edition.
54
Manual de Instalación y Guía del Usuario de Tandberg SLR
Tandberg Data
SCO Open Server versión 5
Tarjeta adaptadora
SCO OS incluye un driver para la mayor parte de las tarjetas
adaptadoras SCSI.
Si no se encuentra el driver adecuado, consulte la Guía de Instalación
que se suministra con la tarjeta adaptadora SCSI.
Tabla de compatibilidad de los Lectores SLR
SLR2
SLR3
SLR4
SLR4DC
SLR5
SLR24
SLR40
SCO OS 5
Versión 5.0.4
SCO OS 5
Versión 5.0.5
Certificada SCO
Certificada SCO
Certificada Tandberg
Certificada Tandberg
Certificada SCO
Certificada SCO
Certificada Tandberg
Certificada Tandberg
Certificada SCO
Certificada SCO
Certificada Tandberg
Certificada Tandberg
Certificada SCO
Certificada SCO
Certificada Tandberg
Certificada Tandberg
Certificada SCO
Certificada SCO
Certificada Tandberg
Certificada Tandberg
Certificada SCO
Certificada SCO
Certificada Tandberg
Certificada Tandberg
Certificada Tandberg
Certificada SCO
Certificada Tandberg
SLR50
SLR60
Certificada SCO
Certificada SCO
Certificada Tandberg
Certificada Tandberg
Certificada Tandberg
Certificada SCO
Certificada Tandberg
Manual de Instalación y Guía del Usuario de Tandberg SLR
55
SLR75
Certificada Tandberg
Certificada Tandberg
SLR100
Certificada Tandberg
Certificada SCO
Certificada Tandberg
SLR140
Certificada Tandberg
Certificada Tandberg
Tandberg Data
Instalación
1)
2)
3)
4)
Conéctese como usuario root.
Teclee el siguiente comando: mkdev tape.
Seleccione Install a SCSI Tape Drive.
Entre el prefijo de la tarjeta adaptadora SCSI que soporta
este periférico. (Tecleando h se obtiene una lista de los
adaptadores del Host soportados).
5) ¿Qué tarjeta adaptadora SCSI soporta este periférico? (Si
hubiera instalado una sóla tarjeta adaptadora SCSI, seleccionar 0. Si
hubiera instalados dos adaptadoras SCSI, seleccionar 1).
6) ¿Cuál es la identificación SCSI de este periférico? (2 es el
número SCSI predeterminado de Tandberg)
7) ¿Cuál es el LUN de este periférico? (Debe ser 0).
8) ¿Actualizar la configuración SCSI? (Controlar, en primer lugar,
que la tabla en pantalla sea conforme a la configuración del Lector)
NOTAS:
- El Kernel tiene que ser reconstruido para reflejar la nueva
configuración de hardware y es imperativo volver a arrancar el
ordenador antes de poder usar su Lector SLR.
- Para cualquier cuestión relativa a este sistema operativo o a la aplicación
de backup de datos incrustada, consulte la documentación que se
suministra con el CD-ROM SCO OS.
56
Manual de Instalación y Guía del Usuario de Tandberg SLR
Tandberg Data
Aplicaciones de Backup de datos
Comando sistema SCO Open
Server
tar, cpio y dd permiten proceder sin dificultad a operaciones de
simple backup, de verificación o de restauración de datos.
Se pueden usar 2 clases diferentes de drivers:
· Un driver de non-rewinding (usado para realizar el
append Backup (suplementario), sin rebobinado)
· Un driver de rewinding (usado sólo para realizar el
overwrite Backup, con rebobinado)
Para información completa sobre el uso de los comandos sistema,
consulte la documentación de SCO Open Server, o la ayuda online
(Comando man).
Ejemplos de utilización del comando tar:
tar cvf/dv/rStp0/etc efectuará el backup del directorio/etc.
tar tvf /dev/rStp0 dará una lista de los datos en la cinta.
tar xvf /dev/rStp0 restaurará los datos de la cinta en el
directorio de que se trate.
SCO Open Server Backup Manager
Instalación
Interfaz gráfica SCO Open Server
1) Haga clic en System Administration.
2) Haga doble clic en Backup Manager.
Consola SCO Open Server
1) Conéctese como usuario Root.
2) Teclee SCOADMIN.
3) Seleccione Backup Manager.
Manual de Instalación y Guía del Usuario de Tandberg SLR
57
Tandberg Data
SCO ARCserve Open Lite para SCO
Open Server
· Incluido en SCO Open Server Versión 5, ARCserve Open Lite
ofrece una aplicación de simple backup de datos y de restauración
completa para el sistema SCO.
• La versión completa de SCO ARCserve Open proporciona
aplicaciones de backup y de restauración de datos avanzadas,
inclusive el soporte para NetWare Server y Windows 95/98 cliente.
· Los Lectores SLR2, SLR3 y SLR4 son soportados.
NOTA:
Para el soporte de los productos SLR5, SLR24, SLR7, SLR40, SLR50,
SLR60, LSR75, SLR100 y SLR140 se requiere la versión completa de
ARCserve Open. Para más información consulte la Guía de Compatibilidades
de Computer Associates en www.cai.com y la Guía de Compatibilidades
“Tandberg Compatibility Guide”,
URL: www.tandberg.com.
Instalación
La instalación de ARCserve Open Lite está incluida en la de SCO
Open Server.
De no ser tal el caso, podrá hacer la instalación utilizando el
Software Manager.
Interfaz gráfica SCO OS
1) Haga doble clic en Software Manager.
2) Seleccione Software, a continuación Install New.
3) Siga las instrucciones en pantalla.
Consola SCO OS
1) Conéctese como usuario Root.
2) Teclee SCOADMIN.
3) Seleccione Software Manager, a continuación Software y
después Install New.
4) Siga las instrucciones en pantalla.
NOTA:
Para cualquier cuestión relativa a esta aplicación o a su instalación,
consulte la documentación online que se suministra con el SCO CDROM.
58
Manual de Instalación y Guía del Usuario de Tandberg SLR
Tandberg Data
SCO UnixWare
Tarjeta adaptadora
SCO UnixWare incluye drivers para la mayor parte de las tarjetas
adaptadoras SCSI.
Si no encuentra el driver adecuado, consulte la Guía de Instalación
que se suministra con la tarjeta adaptadora SCSI.
Instalación
1) Instale el Lector SLR.
2) Encienda el PC.
3) Durante el proceso de arranque, SCO UnixWare detecta
automáticamente el Lector SLR e instala el driver correcto.
NOTA:
Para cualquier cuestión relativa a este sistema operativo o su aplicación de
backup incrustada, consulte la documentación que se suministra con el CDROM SCO.
Aplicaciones de Backup de datos
SCO UnixWare System Command
tar, cpi y dd permiten operaciones de simple backup, de verificación
o de restauración de datos.
Se pueden usar 2 clases diferentes de drivers:
· Un driver de non-rewinding (usado para realizar append
Backup (suplementario), sin rebobinado).
· Un driver de rewinding (usado sólo para realizar
overwrite Backup, con rebobinado).
Para información completa sobre el modo de usar los comandos
sistema, consulte la documentación SCO UnixWare, o la ayuda
online. (Comando man).
Manual de Instalación y Guía del Usuario de Tandberg SLR
59
Tandberg Data
Ejemplos de la utilización del comando tar: tar
cvf/dev/rmt/c0s0 /etc efectuará el backup del directorio/etc.
tar tvf /dev/rmt/c0s0 dará una lista de los datos en la cinta.
tar xvf /dev/rmt/c0s0 restaurará los datos de la cinta en el
directorio de que se trate.
SCO UnixWare ARCserveIT
• Integrado a SCO UnixWare 7, el ARCserveIT Enterprise Edition
de Computer Associates ofrece una aplicación de backup y
restauración de datos, completa y exhaustiva, para su sistema SCO.
• Los Lectores SLR5, SLR24, SLR7, SLR40, SLR50, SLR60,
SLR75, SLR100 y SLR140 son soportados. Consulte la
información más reciente sobre compatibilidad en nuestra página
web www.tandberg.com.
Instalación
La instalación de ARCserveIT está incluida en la instalación de SCO
UnixWare.
De no ser este el caso, tendrá que hacer la instalación usando el Software
Management.
Interfaz gráfica SCO UnixWare
1) Haga doble clic en SCO Admin.
2) Seleccione Software Management.
3) Seleccione application Installer.
4) Siga las instrucciones en pantalla.
Consola SCO UnixWare
1) Conéctese como usuario Root.
2) Teclee SCOADMIN.
3) Seleccione Software Management.
4) Seleccione application Installer.
5) Siga las instrucciones en pantalla.
NOTA:
Para cualquier cuestión relativa a esta aplicación o a su instalación, consulte la
documentación online que se suministra con el CD-ROM SCO Unix Ware.
60
Manual de Instalación y Guía del Usuario de Tandberg SLR
Tandberg Data
Sunsoft Solaris
Instalación del Lector
3) Instale el Lector SLR
4) Encienda la estación de trabajo o el servidor SUN .
5) Use Boot –r .
Con ello se dará una nueva configuración a las unidades del
directorio, al objeto de que el Lector SLR trabaje adecuadamente
con la máquina.
Para mejorar las prestaciones de uso de los Lectores SLR24, SLR7,
SLR40, SLR50, SLR60, SLR75, SLR100 y SLR140 conviene modificar
un fichero de sistema específico:
/kernel/drv/st.conf
Entradas del fichero ST.CONF para los Lectores SLR24,
SLR7, SLR40, SLR50, SLR60, SLR75, SLR100 y SLR140:
"TANDBERGSLR6","Tandberg SLR24","TANDBERG",
"TANDBERGMLR3","Tandberg SLR50","TANDBERG",
"TANDBERGSLR7","Tandberg SLR7","TANDBERG",
"TANDBERGSLR40","Tandberg SLR40","TANDBERG",
"TANDBERGSLR60","Tandberg SLR60","TANDBERG",
"TANDBERGSLR75","Tandberg SLR60","TANDBERG",
"TANDBERGSLR100","Tandberg SLR100","TANDBERG",
"TANDBERGSLR140","Tandberg SLR140","TANDBERG",
TANDBERG = 1,0x37,0,0x963b,1,0,0;
NOTA:
Una actualización del archivo de configuración (ST.CONF) puede ser bajada de la
WEB de Tandberg: www.tandberg.com. Para más información sobre el proceso de
instalación consulte el README que se suministra con el fichero.
Manual de Instalación y Guía del Usuario de Tandberg SLR
61
Tandberg Data
Aplicaciones de Backup de datos
Comando Sistema Sun
tar, cpio y dd permiten operaciones de simple backup, de verificación
o de restauración de datos.
Se pueden usar 2 clases diferentes de drivers:
· Un driver de non-rewinding (usado para realizar append
Backup (suplementario), sin rebobinado).
· Un driver de rewinding (usado sólo para realizar
overwrite backup, con rebobinado).
Ejemplos de utilización del comando tar: tar cvf
/dev/rmt/0 /etc realizará el backup de datos del directorio /etc.
tar tvf /dev/rmt/0 dará una lista de los datos en la cinta.
tar xvf /dev/rmt/0 restaurará los datos de la cinta en el
directorio de que se trate.
Para información completa sobre como usar los comandos sistema,
consulte la documentación SUN, o la ayuda online. (Comando man).
Legato NetWorker para Solaris
Todos los Lectores SLR (del SLR7 al SLR100) están certificados para
utilización con Legato NetWorker Version 5.5 y superiores.
• Legato NetWorker es una solución de gestión de almacenamiento
de datos sumamente fiable, destinada a redes distribuidas. Legato
NetWorker es altamente escalable y proporciona una destacable
facilidad de maniobra, una gran disponibilidad y prestaciones de
alta calidad. Legato NetWorker ofrece igualmente soporte integrado
para la conexión de clientes e incorpora software clientes para
protegerlos con el mismo sistema operativo que el del servidor.
62
Manual de Instalación y Guía del Usuario de Tandberg SLR
Tandberg Data
Instalación
Antes de ejecutar la aplicación asegúrese de que el driver de su
Lector SRL esté correctamente instalado. Consulte las instrucciones
de instalación del driver en la página 61.
1)
2)
3)
4)
5)
Conéctese como usuario root.
Localice el directorio de Solaris en el CD de instalación.
Incluya el directorio en el que están los ejecutables de
NetWorker en la variable PATH del usuario root.
Introduzca ”pkgadd –d./” para instalar NetWorker. Siga
las instrucciones en pantalla.
Para más información sobre la instalación consulte los documentos
suministrados con el CD-ROM Legato.
Manual de Instalación y Guía del Usuario de Tandberg SLR
63
Tandberg Data
Esta página ha sido dejada en blanco intencionadamente
64
Manual de Instalación y Guía del Usuario de Tandberg SLR
Tandberg Data
Apple Macintosh
Aplicaciones de Backup de datos
Dantz Retrospect
Dantz Retrospect ofrece las funciones siguientes:
•
Instalación automática con EasyScript
Usa las respuestas a unas serie de cuestiones muy simples para crear
scripts de backups que son ejecutados de forma automática, con
múltiples fuentes, destinos, criterios de selección de fichero y
programación de intervalos de backup.
• Backups completamente automáticos Ejecuciones
automáticas de backups sin intervención humana, sea cual sea la
periodicidad programada (diaria, semanal, etc.).
•
Restauración en una sola etapa
Restaura un disco duro entero en una sola etapa, incluso después de
operaciones de backup múltiples. O restaura cualquier parte del
disco duro, exactamente en el estado en que se encontraba antes
del backup.
•
Recuperación de Desastres
Un CD-ROM de recuperación de urgencia ayuda a restaurar los
datos en caso de fallo completo del disco duro.
NOTA:
Los Lectores SLR 2 a 5 son soportados por la versión nativa. Para los
Lectores Tandberg SLR24, SLR7, SLR40, SLR50, SLR60, SLR75,
SLR100 y SLR140 se requiere un Advanced Driver Kit, a disposición en el
sitio web de Dantz. (www.dantz.com)
Instalación de Retrospect
1) Inserte el disco 1 (o el CD-ROM Retrospect, según la versión que
haya comprado).
2) Haga doble clic en el icono Install.
3) Siga las instrucciones en pantalla.
NOTA:
Para cualquier cuestión relativa a esta aplicación o a su instalación,
consulte la documentación online entregada con la aplicación.
Manual de Instalación y Guía del Usuario de Tandberg SLR
65
Tandberg Data
Esta página ha sido dejada en blanco intencionadamente
66
Manual de Instalación y Guía del Usuario de Tandberg SLR
Tandberg Data
IBM RS/6000 (pSeries)
Instalación del Lector
Para instalar cualquiera de los Lectores SRL de Tandberg en IBM AIX,
se tiene que usar la utilidad Smit.
1) Asegúrese de que el número de identificación SCSI del Lector no
se utilice en el subsistema SCSI.
2)
3)
4)
5)
6)
Instale el Lector SLR.
Conéctese como usuario root.
Ejecute smit devices.
Seleccione Install/Configure Devices Added after IPL.
Siga las instrucciones en pantalla.
Para mejorar el rendimiento de los Lectores SLR24, SLR7, SLR40,
SLR50, SLR60, SLR75, SLR100 y SLR140, el tamaño del block
predeterminado debe ponerse en cero (0).
1) Ejecute smit devices.
2) Seleccione Change/Show para modificar o hacer aparecer las
características de un Lector.
3) Seleccione el driver que desee modificar.
4) Poner el tamaño del BLOCK en 0.
Manual de Instalación y Guía del Usuario de Tandberg SLR
67
Tandberg Data
Aplicaciones de Backup de datos
Sistema de comando IBM AIX
tar, cpio y dd permiten operaciones de simple backup, de
verificación o de restauración de datos.
Se pueden usar 2 clases diferentes de drivers :
· Un driver de non-rewinding (usado para realizar operaciones de
append Backup (suplementario), sin rebobinado).
· Un driver de rewinding (usado sólo para realizar el overwrite
Backup, con rebobinado).
Para más información, consulte la documentación de IBM AIX.
Ejemplos de utilización del comando tar:
tar cvf /dev/rmt0 /etc efectuará el backup del directorio/etc.
tar tvf /dev/rmt0 dará una lista de los datos en la cinta.
tar xvf /dev/rmt0 restaurará los datos de la cinta en el
directorio de que se trate.
IBM AIX Storage Manager
Instalación
Esta aplicación es parte del sistema operativo.
1) Abra la ventana System Administrator.
2) Haga doble clic en Storage Manager.
3) La lista de la (las) unidad (es) de cinta magnética
disponible (s) aparece en pantalla.
4) A continuación, siga las instrucciones en pantalla.
NOTA:
Para cualquier cuestión relativa a esta aplicación o a su instalación, consulte la
documentación online de IBM entregada con la aplicación.
68
Manual de Instalación y Guía del Usuario de Tandberg SLR
Tandberg Data
Legato NetWorker para AIX
Los Lectores Tandberg SLR24, 7, 50, 60, 75, 100 y 140 están
certificados para utilización con Legato NetWorker Version 5.5 y
superiores.
· Legato NetWorker es una solución de gestión de almacenamiento
de datos sumamente fiable, destinada a redes distribuídas. Legato
NetWorker es altamente escalable y proporciona una destacable
facilidad de maniobra, una gran disponibilidad y prestaciones de
alta calidad. Legato NetWorker ofrece igualmente soporte integrado
para la conexión de clientes e incorpora software clientes para
protegerlos con el mismo sistema operativo que el del servidor.
· Legato NetWorker usa el driver del sistema AIX . Consulte
la página 58 para la instalación.
Instalación
La instalación depende de la versión del sistema operativo AIX.
Consulte la documentación para la instalación entregada con el CDROM Legato.
NOTA:
Para cualquier cuestión relativa a esta aplicación o a su instalación, consulte la
documentación online que se suministra con el CD-ROM.
Quadratec Time Navigator para AIX
Time Navigator es una solución profesional destinada a las empresas
que combina las funciones de Backup y archivado de datos.
Time Navigator es un software que efectúa automáticamente el
Backup y el archivado. También proporciona la restauración segura
de datos en diversos directorios con idénticas necesidades de Backup
y limitaciones.
Instalación
Para detalles sobre la instalación e información adicional, consulte la
documentación suministrada.
Manual de Instalación y Guía del Usuario de Tandberg SLR
69
Tandberg Data
Arkeia Backup Software para AIX
Arkeia es un software que efectúa el Backup y el archivado de datos.
Dispone de un interfaz simple y tiene características muy potentes.
Instalación
Para detalles sobre la instalación e información adicional, consulte la
documentación suministrada.
70
Manual de Instalación y Guía del Usuario de Tandberg SLR
Tandberg Data
HP/UX
Lector
- Si el servidor o la estación de trabajo HP están equipados con una
arquitectura GSC Bus, el driver del sistema HPUX puede ser
usado por todas las aplicaciones de backup de datos.
NOTA:
Se debe descargar un utilitario de corrección de la WEB de Tandberg para
este entorno. Para más información, consulte el fichero README que
acompaña al utilitario.
- Si el servidor o la estación de trabajo HP están equipados con una
arquitectura PB Bus (Precision Bus), un driver está disponible en
la WEB de Tandberg: www.tandberg.com.
Para más información, consulte el Procedimiento de
Instalación que acompaña al driver.
Instalación del Lector (sólo Bus GSC)
Para instalar los Lectores SLR se tiene que usar la utilidad SAM.
1) Conéctese como usuario root. 2)
Ejecute SAM.
3) Seleccione Peripheral Devices. 4)
Seleccione Action/Add.
El Lector SLR será automáticamente detectado y los drivers
necesarios, instalados.
Manual de Instalación y Guía del Usuario de Tandberg SLR
71
Tandberg Data
Aplicaciones de Backup de datos
Comando sistema HP/UX
tar, cpio y dd permiten la ejecución de operaciones de simple backup,
de verificación o restauración de datos .
Se pueden utilizar 2 clases de drivers diferentes:
· Un driver de non-rewinding (usado para efectuar operaciones de
append backup (suplementario), sin rebobinado).
· Un driver de rewinding (usado sólo para efectuar el overwrite
backup, con rebobinado).
Ejemplos de utilización del comando tar: tar cvf
/dev/rmt0 /etc efectuará el backup de datos del directorio/etc.
tar tvf /dev/rmt0 dará una lista de los datos en la cinta.
tar xvf /dev/rmt0 restaurará los datos de la cinta en el
directorio de que se trate.
Para una explicación completa sobre la utilización del comando
sistema, consulte la documentación de HP/UX, o la ayuda online.
(Comando man).
72
Manual de Instalación y Guía del Usuario de Tandberg SLR
Tandberg Data
Linux
Tarjeta adaptadora SCSI
Linux incluye un driver que sirve para la mayor parte de las tarjetas
adaptadoras SCSI.
Si no encuentra el driver, consulte la documentación entregada con la
tarjeta adaptadora SCSI.
Instalación del Lector
1) Instale el Lector SLR.
2) Encienda el PC.
3) Durante el proceso de arranque, Linux detecta
automáticamente el Lector SLR e instala el driver adecuado.
NOTA:
Para cualquier cuestión relativa a este sistema operativo o a la aplicación de
backup incrustada, consulte la documentación que se suministra con el CDROM Linux.
Manual de Instalación y Guía del Usuario de Tandberg SLR
73
Tandberg Data
Aplicaciones de Backup de datos
Comando Sistema Linux
tar, cpio y dd permiten efectuar operaciones de backup simple de
verificación o restauración de datos.
Se pueden usar 2 clases de drivers diferentes:
· Un driver de non-rewinding (usado para realizar operaciones de
append Backup (suplementario), sin rebobinado).
· Un driver de rewinding (usado sólo para el overwrite Backup,
con rebobinado).
Ejemplos de utilización del comando tar: tar cvf
/dev/st0 /etc efecuará el backup de datos del directorio /etc.
tar tvf /dev/st0 dará una lista de los datos en la cinta.
tar xvf /dev/st0 restaurará los datos de la cinta en el
directorio de que se trate.
Para una explicación completa sobre la manera de usar los comandos
sistema, consulte la documentación Linux, o la ayuda online.
(Comando man).
Legato NetWorker para Linux
Los Lectores SLR24, SLR7, SLR40, SLR50, SLR60, SLR75,
SLR100 y SLR140 de Tandberg están certificados para utilización
con Legato NetWorker Version 5.5 y superiores.
•
74
Legato NetWorker es una solución de gestión de almacenamiento
de datos sumamente fiable, destinada a redes distribuidas. Legato
NetWorker es altamente escalable y proporciona una destacada
facilidad de maniobra, una gran disponibilidad y prestaciones de alta
calidad. Legato NetWorker ofrece igualmente soporte integrado
para la conexión de clientes e incorpora software clientes para
protegerlos con el mismo sistema operativo que el del servidor.
Manual de Instalación y Guía del Usuario de Tandberg SLR
Tandberg Data
· Legato NetWorker usa el driver del sistema Linux. Consulte la
página70 para la instalación.
Instalación
1)
2)
3)
4)
5)
Inserte el CD-ROM de instalación NetWorker.
Abra la consola Linux.
Localice el directorio Linux en el CD de instalación.
Inserte “./NWInstall” para instalar NetWorker.
Siga las instrucciones en pantalla.
Para más detalles sobre la instalación, consulte los documentos
suministrados con el CD-ROM Legato.
Quadratec Time Navigator para Linux
Time Navigator es una solución profesional destinada a las empresas
que combina las funciones de Backup y archivado de datos.
Time Navigator es un software que efectúa automáticamente el Back
up y el archivado. También proporciona la restauración segura de
datos en diversos directorios con idénticas necesidades de Backup y
limitaciones.
Instalación
Para detalles sobre la instalación e información adicional, consulte la
documentación suministrada.
Manual de Instalación y Guía del Usuario de Tandberg SLR
75
Tandberg Data
Computer Associates ARCServeIT para
Linux
ARCServeIT es una solución profesional destinada a entornos
heterogéneos que combina las funciones de Backup y archivado de
datos en un solo paquete.
Instalación
Para detalles sobre la instalación e información adicional, consulte la
documentación suministrada.
EST Inc. BRU Pro para Linux
BRU PRO es un software que efectúa el Backup y el archivado.
También proporciona la restauración segura de datos en diversos
directorios con idénticas necesidades de Backup y limitaciones.
Instalación
Para detalles sobre la instalación e información adicional, consulte la
documentación suministrada.
Arkeia Backup Software para Linux
Arkeia es un software que efectúa el Backup y el archivado de datos.
Dispone de un interfaz simple y tiene características muy potentes.
Instalación
Para detalles sobre la instalación e información adicional, consulte la
documentación suministrada.
76
Manual de Instalación y Guía del Usuario de Tandberg SLR
Tandberg Data
Disco de Utilidades del
Lector
Suministrado con los Lectores Tandberg SLR24 y SLR50, el disco
de utilidades ofrece las aplicaciones siguientes:
- Optimizer para Lector Tandberg
Esta utilidad sirve para afinar el rendimiento SLR en los Lectores SLR24
y SLR50.
Los Lectores SLR7, SLR40, SLR60, SLR75, SLR100 y SLR140 está
equipado de un dispositivo automático de medida de la tasa de
transferencia y se ajustará automáticamente para optimizar las
prestaciones de la mayor parte de los sistemas.
Están incluidas una versión para DOS, una versión Windows 95/98
(inclusive Second Edition) y una versión Windows NT.
- FlashIt
Esta utilidad sirve para actualizar el firmware SLR.
Están incluidas una versión DOS, una versión Windows 95/98
(inclusive Second Edition) y una versión Windows NT.
Está disponible una versión actualizada para los Lectores SLR7,
SLR40, SLR60SLR75, SLR100 y SLR140 en la página web de
Tandberg: www.tandberg.com.
- Viewer para Lector Tandberg
Esta utilidad da información detallada sobre la configuración SLR.
Están incluidas una versión para Windows 95/98 (inclusive Second
Edition) y una versión Windows NT.
NOTA:
Para cualquier información relativa a este disco de utilidades o a su
instalación, consulte el fichero README disponible en el disco.
Manual de Instalación y Guía del Usuario de Tandberg SLR
77
Tandberg Data
Esta página ha sido dejada en blanco intencionadamente
78
Manual de Instalación y Guía del Usuario de Tandberg SLR
Tandberg Data
Localización y Solución de
Problemas Técnicos
En caso de problemas al operar el Lector SLR y antes de ponerse en contacto con el
Servicio de Atención al Cliente, asegúrese de comprobar lo siguiente:
Control del hardware
·
·
Controle que el sistema reconoce al Lector durante el proceso de carga inicial.
Controle que la tarjeta adaptadora SCSI reconoce el Lector durante la iniciación.
·
¿Ha controlado Vd. el estado del LED frontal del Lector?
·
Controle que el Lector haya sido correctamente configurado.
·
Controle que el SCSI-ID del Lector no esté en conflicto con el bus SCSI.
·
Controle que el cable de alimentación esté correctamente insertado.
·
Controle que las conexiones del cable SCSI estén correctamente hechas.
Control del software
·
Controle que el sistema operativo no informe de problemas al hacer la carga inicial.
·
·
Controle que el driver correcto del Lector esté instalado adecuadamente.
Controle que el driver de la tarjeta adaptadora SCSI esté presente y cargado
adecuadamente.
Controle que el software de backup no presente un mensaje de error al cargar.
Instalar de nuevo el software de backup y controlar que el Lector SLR sea
reconocido.
·
·
Manual de Instalación y Guía del Usuario de Tandberg SLR
79
Tandberg Data
Comprobación de cambios recientes
Si el SLR, previamente instalado, funcionaba correctamente y ahora presenta problemas,
verifique los cambios más recientes del sistema para estar seguro de que no sean dichos
cambios los causantes del problema. Intente lo siguente:
1) Si la configuración del sistema ha sido cambiada, retire el cambio
incorporado, para si ver era eso lo que afectaba al Lector.
2) Si ha sido instalado un utilitario de corrección de sistemas operativos, retírelo
para ver si era eso lo que afectaba al Lector.
3) Si ha sido agregado un periférico SCSI, controle que no haya conflictos de
números de identificación SCSI.
4) Si ha sido agregado un periférico SCSI, controle que la terminación SCSI esté
correctamente colocada.
Corrección de fallos intermitentes
Si la unidad SLR falla de manera intermitente:
1) Limpie el Lector.
2) Controle la terminación SCSI del bus SCSI.
Si el problema ocurre en medio de una operación:
1) Intente con un cartucho nuevo.
2) Si el error ocurre cuando el software escanea los archivos antes del backup,
opere SCANDISK para controlar el estado de los ficheros de sistemas y el
disco duro.
Si el error ocurre siempre en el mismo fichero o directorio:
1) Intente retirar el fichero o directorio en cuestión de la operación de backup para
ver si desaparece el problema.
2) Intente con otro cartucho de datos.
Localización y solución de problemas
técnicos de software
Una guía completa de localización y solución de problemas técnicos de software está
disponible en la página web de Tandberg en la siguiente URL: www.tandberg.com.
80
Manual de Instalación y Guía del Usuario de Tandberg SLR
Tandberg Data
Apéndice
Anuncio Reglamentario de
Conformidad
Declaración de Conformidad del Fabricante:
Por la presente se certifica que las aplicaciones de backup de SLR :
™
Lectores internos SLR :
Certificado CE de
Conformidad
Tandberg SLRx Lector interno Tandberg SLRxx
Lector interno Tandberg SLRxxx Lector interno
Lectores externos SLR™:
Tandberg SLRx Ext. Solución externa Tandberg
SLRxx Ext. Solución externa Tandberg SLRxxx Ext.
Solución externa
Son conformes a las disposiciones de la Directiva del Consejo de la Uni ón Europea sobre la convergencia de las Leyes de los
Estados Miembros relativas a la compatibilidad electromagnética (Directiva EMC 89/336/CEE de 3 de mayo de 1989) y a las de la
Directiva sobre el material eléctrico destinado a utilizarse con determinados límites de tensión (Directiva 73/23/CEE de 19
de febrero de 1973).
Esta Declaración de Conformidad con las reglas definidas por la Unión Europea es el resultado de los ensayos llevados a
cabo por el Departamento de Control de la Calidad de Tandberg Data ASA, siguiendo las Normas Europeas EN 50081-1 y 50082-1,
definidas en el Artículo 10 de la Directiva.
El sistema de backup de datos SLRx se somete a los límites de los dispositivos de ordenadores de Clase B, conformemente a
la subparte B de la Parte 15 de las Reglas FCC. Sólo los equipos que respondan a los t érminos definidos para la Clase B podrán ser
conectados a estesistema de backup de datos.
La operación con sistemas no conformes podrá causar interferencias en la recepción de radio o de televisión.
El sistema de Backup SLRx es conforme a las Normas de Seguridad: EN 60950, UL 1950, CSA 950 y TÜV 60950.
Manual de Instalación y Guía del Usuario de Tandberg SLR
81
Tandberg Data
Esta página ha sido dejada en blanco intencionadamente
82
Manual de Instalación y Guía del Usuario de Tandberg SLR
Tandberg Data
Glosario de términos
Active Termination
Terminación SCSI activa que aporta una mayor
estabilidad y protección contra el ruido de las
señales eléctricas en las líneas del bus SCSI.
ALDC
Adaptive Lossless Data Compression. El método de
compresión de datos de hardware usado con los
Lectores SLR4DC, 5, 24, 7, 40, 50, 60, 75, 100 y
140.
Append
Cuando los datos nuevos son escritos a continuación de los
datos previamente grabados en la cinta.
ASPI
Advanced SCSI Programming Interface.
Es un software estándar que permite el enlace entre la tarjeta
SCSI y los restantes periféricos SCSI. ASPI permite a varios
periféricos compartir la misma interfaz SCSI.
Auto sensing
Dispositivo automático del Lector SLR100 que permite
detectar la tasa más alta de transferencia utilizable para
optimizar las prestaciones del bus SCSI.
BOT
Indica una secuencia específica de perforación en la cinta magnética que permite
identificar el comienzo de la cinta.
Beginning of Tape
Hay dos maneras de comprimir
los datos de un cartucho: por medio de la compresión por
el software, para los Tandberg SLR2, SLR3 y SLR4 o por
medio de la compresión por el hardware, para los
Tandberg SLR4-DC, SLR5, SLR24, SLR7, SLR40,
SLR50, SLR60SLR75, SLR100 y SLR140.
Data Compression
Device Driver
Programa de software que permite al ordenador comunicar
con periféricos, tales como un disco duro o Lectores de
banda magnética. Cada tipo de periférico tiene su propio
driver. Estos drivers están, por regla general, instalados en el
disco duro y son cargados al arrancar el sistema operativo.
Manual de Instalación y Guía del Usuario de Tandberg SLR
83
Tandberg Data
EEPROM
Electrically Erasable Programmable Read Only.
Memoria integrada que permite almacenar
informaciones (código).
GUI
Graphical User Interface. Software que interactúa con el
usuario.
ID
LVD
Ver SCSI-ID.
LVD significa Low Voltage Differential.
El LVD proporciona una mayor estabilidad y protección
contra el ruido a las señales eléctricas de las líneas del bus
SCSI. El LVD permite también utilizar bus SCSI más
largos.
84
Overwrite
Método de grabación que consiste en grabar los nuevos
datos sobre otros, previamente grabados en la cinta, sin
borrar la cinta de antemano.
PNP
Plug-and-Play
(Conectar y listo) Mecanismo de hardware y
software que proporciona al sistema un medio automático
para configurar sus recursos, tales como las direcciones de
entrada/salida, los niveles de interrupción, o los canales
DMA entre las tarjetas PNP y otras unidades del sistema.
RWW
Read While Write: Todas las unidades de cinta Tandberg
leen, de manera automática y en interno, los datos nada más
son escritos, con lo cual se evitan los problemas de escritura
sobre la cinta.
SCAM
Configured
AutoMagically
Protocolo SCSI que asigna automáticamente una SCSI
dirección SCSI a un periférico al arrancar su
sistema.
SCSI-ID
Número de identificación único asignado a los dispositivos
SCSI que les permite comunicarse con un ordenador
cuando están conectados a una tarjeta adaptadora por
medio de un bus SCSI. Cada tarjeta adaptadora SCSI tiene a
disposición ocho números SCSI-ID, del 0 al 7 (ó del 0 al 15
en el caso de las adaptadoras SCSI WIDE). Normalmente
la tarjeta adaptadora SCSI lleva asignado el número 7.
SLR™
Scaleable Linear Recording.
Manual de Instalación y Guía del Usuario de Tandberg SLR
Tandberg Data
Ultra/Ultra2
Interfaz de 16 bits WIDE SCSI/LVD usada con los
Lectores SLR 24, 7, 40, 50, 60, 75, 100 y 140.
SLR™ es una marca registrada propiedad de Tandberg Data.
Veritas Software, Veritas Backup, Veritas Backup Exec son marcas registradas propiedad de Veritas Software Inc. , EE UU.
Cheyenne Software, ARCserveIT son marcas registradas propiedad de Computer Associates Inc., EE UU.
Windows NT, Windows 95, Windows 98, MS-DOS, Windows son marcas registradas propiedad de Microsoft Corporation,
EE UU.
Novell NetWare es una marca registrada de Novell Inc.
Las restantes marcas son propiedad de sus registradores respectivos.
Manual de Instalación y Guía del Usuario de Tandberg SLR
85
Tandberg Data
Esta página ha sido dejada en blanco intencionadamente
86
Manual de Instalación y Guía del Usuario de Tandberg SLR