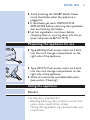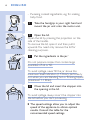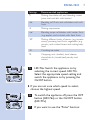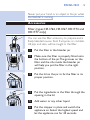
1
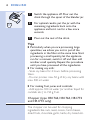
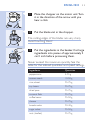
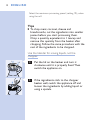
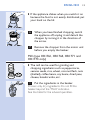
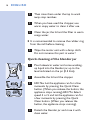
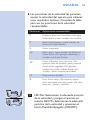
Comfort
HR177X, HR176X
2
3
ENGLISH 4
HR177X, HR176X
ESPAÑOL 20
4
ENGLISH
Important
◗ Read the instructions for use and look at the
illustrations before you start using the
appliance.
◗ Check if the voltage indicated on the
appliance corresponds to the local mains
voltage (110 - 127V or 220 - 240V) before
you connect the appliance.
◗ Never use accessories or parts from other
manufactures or that have not been
specifically advised by Philips.Your guarantee
will become invalid if such accessories or
parts have been used.
◗ If the mains cord of this appliance is damaged,
it must always be replaced by Philips or a
service centre authorised by Philips, as special
tools and/or parts are required.
◗ Do not use the appliance if the mains cord,
the plug or other parts are damaged.
◗ Do not exceed the quantities and preparation
times indicated in the tables.
◗ Assemble the appliance properly before
putting the plug in the wall socket.
◗ Keep the appliance out of the reach of
children.
◗ Never immerse the motor unit in water or
any other fluid, nor rinse it under the tap. Use
only a moist cloth to clean the motor unit.
◗ When the jar unit or the optional accessories
(mill and chopper, not supplied with this
appliance) have been properly fixed onto the
motor unit, you will hear a click.
ENGLISH
◗ Avoid touching the SHARP blades. Never
touch the blades when the appliance is
plugged in.
◗ If the blades get stuck, UNPLUG THE
APPLIANCE before removing the ingredients
that are blocking the blades.
◗ Let hot ingredients cool down before
chopping them or pouring them into the jar
(max. temperature 80cC/175cF).
Preparing the appliance for use
HR176x: Push excess mains cord back
C ◗ Type
into the cord storage compartment on the
right side of the appliance.
HR177x: Push excess mains cord back
C ◗ Type
into the cord storage compartment on the
right side of the appliance.
◗ Wash all accessories and detachable parts
(see section 'Cleaning').
Using the appliance
Blender
The blender is intended for:
- Blending fluids, e.g. dairy products, sauces, fruit
juices, soups, mixed drinks, shakes.
- Mixing soft ingredients, e.g. pancake batter and
mayonnaise.
5
ENGLISH
6
- Pureeing cooked ingredients, e.g. for making
baby food.
1
2
C
1
Take the handgrip in your right hand and
mount the jar unit onto the motor unit.
2 Open the lid.
C Open
the lid by pressing the projection on the
side of the handle.
To remove the lid, open it and then pull it
upwards.You need only remove the lid for
cleaning purposes.
C
3
Put the ingredients in the jar.`
Do not prepare recipes that contain large
quantities of oil or fat.
To avoid spillage, never fill the jar above the
maximum level indication (1.5 litres), particularly
not when you are blending hot or foaming liquids
(maximum 1.1 litres).
C
4
Close the lid and insert the stopper into
the opening in the lid.
To avoid spillage, always insert the stopper into
the lid before you start processing.
◗ The speed settings allow you to adjust the
speed of the appliance to obtain optimal
results. Consult the table for the
recommended speed settings.
ENGLISH
HR176x
C
Settings
Recommended applications
J
Making chocolate milk and blending instant
juices and cocktails with alcohol
K
Blending soft fruits and milkshakes with soft
fruits
:
|
Making mayonnaise
V
Making different kinds of sauces (e.g. tomato
sauce), pureeing hard fruits, vegetables (e.g.
carrots) and cooked beans and making baby
food
Z
C
Crushing ice cubes
5
HR177x
Blending soups, milkshakes with harder fruits
(e.g. apples) and cocktails with fresh fruits
Chopping nuts (shelled), hard cheese,
chocolate, dry bread, beef, parsley and
onions
HR176x: Switch the appliance on by
selecting the correct speed. HR177x:
Select the appropriate speed setting and
switch the appliance on by pressing the
On/Off button.
◗ If you are not sure which speed to select,
choose the highest speed.
HR176x
C
6
To switch the appliance off, press the OFF
button (HR176x) or the On/OFF button
(HR177x)
7
If you want to use the "Pulse" function:
HR177x
7
8
ENGLISH
- HR176x: Press the "Pulse" button.The appliance
will run at max. speed and it will stop as soon
as you release the "Pulse"button.
- HR177x: Select the appropriate speed by
pressing the corresponding speed button and
then press the "Pulse" button.The appliance will
run at the selected speed and will stop as soon
as you release the "Pulse" button.
Tips
the blender is running, you can pull the
C ◗ While
stopper of the lid and pour liquid ingredients
into the blender jar.
◗ Do not let the blender run for more than 3
minutes at a time. If you have not finished
blending after 3 minutes, switch the appliance
off for one minute before you continue
blending.
◗ Cut solid ingredients into smaller pieces
before putting them into the blender. Feed a
series of small amounts into the jar rather
than processing a large quantity at once.
◗ If you are not satisfied with the results when
blending solid ingredients, switch the blender
off and let it run briefly a number of times by
using the pulse setting. If this doesn't help, stir
the ingredients with a spatula (not while the
blender is running), or reduce the contents of
the jar and start processing smaller amounts.
◗ To crush ice cubes, remove the stopper and
drop the ice cubes into the jar while the
blender is running. Keep the lid on the jar
during processing.
ENGLISH
9
Never put your hand or an object in the jar while
the blender is running.
Accessories
Filter (types HR1764, HR1767, HR1774 and
HR1777 only)
You can use the filter accessory to prepare extra
finely blended sauces, fresh fruit juices or cocktails.
All pips and skins will be caught in the filter.
C
C
1
Put the filter in the blender jar.
2
Make sure the filter is properly fitted onto
the bottom of the jar.The grooves on the
filter and the ribs inside the blender jar
will help you put the filter in the right
position.
C
3
Put the lid on the jar to fix the filter in its
proper position.
C
4
Put the ingredients in the filter through the
opening in the lid.
5
Add water or any other liquid.
6
Put the stopper in place and switch the
appliance on. Select the highest speed and
let the appliance run for 40 seconds.
10
ENGLISH
C
7
Switch the appliance off. Pour out the
drink through the spout of the blender jar.
8
For optimal results, put the jar with the
remaining ingredients back onto the
appliance and let it run for a few more
seconds.
9
Pour out the rest of the drink.
Tips
◗ Particularly when you are processing large
quantities, we advise you not to put all the
ingredients in the filter at the same time. Start
processing a small quantity, let the appliance
run for a moment, switch it off and then add
another small quantity. Repeat this procedure
until you have processed all the ingredients.
◗ For making soy milk:
- Soak soy beans for 4 hours before processing
them.
- You can process max. 50 g of dry soy beans with
max. 500 ml water.
◗ For making fruit juices and cocktails:
- Add approx. 300 ml water (or another liquid for
cocktails etc.) to 150 g fruit.
Chopper (type HR1762, HR1763, HR1772
and HR1773 only)
The chopper can be used for chopping
ingredients like nuts, meat, onions, hard cheese,
dried fruits, chocolate, garlic, herbs, dry bread etc.
ENGLISH
11
C
1
Place the chopper on the motor unit.Turn
it in the direction of the arrow until you
hear a click.
C
2
Put the blade unit in the chopper.
1
2
The cutting edges of the blades are very sharp
Avoid touching them!
C
3
Put the ingredients in the beaker. Cut large
ingredients into pieces of approximately 2
cm/1 inch before processing them.
Never exceed the maximum quantity. See the
table for the advised quantities and speed settings.
Ingredients
Quantities
peppercorns
5-25 g
sesame seeds
10-50 g
rice, wheat
25-75 g
soy beans
25-75 g
dried peas
25-75 g
coconut flesh
25-75 g
coffee beans
25-50 g
cheese
25-75 g
breadcrumbs
20-40 g
sugar cubes
25-50 g
nuts (shelled)
25-75 g
12
ENGLISH
Select the maximum processing speed (setting Z) when
using the mill.
Tips
◗ To chop meat, coconut, cheese and
breadcrumbs, cut the ingredients into smaller
pieces before you start processing them.
Chop a quantity equivalent to 1 teacup and
remove this quantity from the beaker after
chopping. Follow the same procedure with the
rest of the ingredients to be chopped.
Use the blender for mixing liquids, not the
chopper.
1
2
C
4
Put the lid on the beaker and turn it
clockwise until it is properly fixed.Then
switch the appliance on.
C
5
If the ingredients stick to the chopper
beaker wall, switch the appliance off and
loosen the ingredients by adding liquid or
using a spatula.
ENGLISH
13
the appliance shakes when you switch it on
C ◗ Ifbecause
the food is not evenly distributed, put
your hand on the lid.
3
2
C
6
When you have finished chopping, switch
the appliance off, unplug it and detach the
chopper by turning it in the direction of
the arrow.
7
Remove the chopper from the motor unit
before you empty the beaker.
1
Mill (type HR1761, HR1763, HR1771 and
HR1773 only)
mill can be used for grinding and
C ◗ The
chopping ingredients such as peppercorns,
sesame seeds, rice, wheat, coconut flesh, nuts
(shelled), coffee beans, soy beans, dried peas,
cheese, breadcrumbs, etc.
1 Put the ingredients in the beaker.
C Process
only dry ingredients. Do not fill the
beaker beyond the 'MAX' indication.
See the table for the advised quantities.
14
ENGLISH
Ingredients
Quantities
onions
50-100 g
meat (lean, uncooked)
50-200 g
parsley
10-20 g
fruits
75-150 g
vegetables (uncooked)
75-150 g
cheese (firm, crustless)
50-100 g
baby food
100-200 g
nuts (shelled)
25-150 g
Use the C setting for chopping soft ingredients, e.g.
onions and herbs.When chopping hard ingredients, it is
recommended to press the Pulse setting several times at
the end of the processing job to obtain a very fine
chopping result.
C
1
2
2
Place the rubber ring on the blade unit.
the blade unit onto the beaker.
C If3this Screw
requires some effort, moisten the rubber
ring with a drop of water.
ENGLISH
1
15
C
4
Turn the assembled mill upside down and
screw it onto the motor unit in the
direction of the arrow.
C
5
Preferably use the mill at pulse position.
2
processing, you can use the shaker lid to
C ◗ After
sprinkle the ingredients evenly onto a dish.
Cleaning
Cleaning of the appliance, its parts and the
accessories is easiest immediately after use.
Never clean the accessories or the parts of the
appliance in the dishwasher.
Clean the motor unit with a moist cloth.
Do not use abrasives, scourers, alcohol, etc.
1
Unplug the appliance, detach the
accessories and parts you have used and
clean them in warm, soapy water.
16
ENGLISH
2
Then rinse them under the tap to wash
away soap residues.
3
When you have used the chopper, use
warm soapy water to clean it after use.
4
Clean the jar, the lid and the filter in warm
soapy water.
◗ It is recommended to remove the rubber ring
from the mill before cleaning.
5
Wipe the motor unit with a damp cloth.
Do not immerse this part in water!
Quick cleaning of the blender jar
C
HR1764
C
1
Pour lukewarm water and some washingup liquid into the blender jar, up to the
level indicated on the jar (0.5 litre).
2
Assemble the lid and the stopper.
3
HR176x: Let the appliance run for a few
moments by pressing the Quick Clean
button. (When you release the button, the
appliance stops running).HR177x: Select
speed 4 or 5 and let the appliance run for
a few moments by pressing the Quick
Clean button. (When you release the
button, the appliance stops running).
4
Detach the blender jar and rinse it with
clean water.
HR1774
ENGLISH
17
Guarantee & service
If you need information or if you have a problem,
please visit the Philips Web site at
www.philips.com or contact the Philips Customer
Care Centre in your country (you will find its
phone number in the worldwide guarantee
leaflet). If there is no Customer Care Centre in
your country, turn to your local Philips dealer or
contact the Service Department of Philips
Domestic Appliances and Personal Care BV.
Recipes
Do not exceed the recommended processing
times.
Let the appliance cool down to room
temperature after completing each recipe.
Broccoli soup
|Z
- 50 g Gouda cheese
- 250 g cooked broccoli
- 2 cooked potatoes
- 2 stock cubes (chicken or vegetable)
- a dash of cream
- a pinch of curry
- salt
- pepper
- nutmeg
B
First cook the broccoli and retain 3/4 l of the
water in which the broccoli has been cooked.
Shred the cheese. Put the cooked broccoli with a
18
ENGLISH
little of the cooking water and the potatoes in the
blender jar and process at maximum speed
(setting Z). Put the broccoli puree and the stock
cubes in the rest of the cooking water and bring to
the boil. Add the cheese and season the soup with
salt, pepper, nutmeg and a dash of cream. Serve
with croutons.
Cheesecake
Z
- 4 eggs
- 525 ml milk
- 75g margarine
- 90g Parmesan cheese cut into 1-cm cubes
- 440g sugar
- 290g corn flour
- 250g wheat flour
- 1 tbsp dried yeast
B
B
Put the eggs, milk, margarine, Parmesan cheese
and sugar in the jar. Let the appliance run at
maximum speed (Z) for 10 seconds.
Add the corn flour spoon by spoon and let the
appliance run for 20 seconds at maximum speed
(Z).Then add the wheat flour spoon by spoon
and let the appliance run for another 30 seconds
at maximum speed (Z). Add the dried yeast and
let the appliance run for 10 more seconds.Then
turn the appliance off. Put the mixture in a baking
tin that has been greased with oil or margarine
and then floured. Bake the cheesecake in the oven
at 200c -210cC for approximately 35-40
minutes.
ENGLISH
19
Gazpacho
V
- 250 g tomatoes
- 2 slices of white bread
- 1 large clove of garlic
- 15 ml red wine vinegar
- 150 ml tomato juice
- 100 g fresh red pepper
- 1 small onion
- 1/2 cucumber
- 15 ml olive oil
- salt
- pepper
B
Put the tomato juice, olive oil and vinegar in the
jar.Then add all the other ingredients. Blend the
ingredients until you have obtained a smooth
soup. Serve chilled.
Milkshakes
K
- 200 ml milk
- 30 g banana
- 30 g papaya
- 30 g apple
- 30 g sugar
B
Peel the fruits and cut them into pieces. First put
the milk in the jar, then add the fruits and the
sugar. Blend approx. 30 seconds at the K setting.
20
ESPAÑOL
Importante
◗ Antes de empezar a usar el aparato, lea las
instrucciones de uso y miren las ilustraciones.
◗ Antes de enchufar el aparato a la red,
comprueben si el voltaje indicado en el
aparato se corresponde con el voltaje de su
hogar (110-127 V ó 220-240 V).
◗ No usen nunca accesorios o piezas de otros
fabricantes o que no hayan sido
específicamente recomendadas por Philips. Su
garantía quedará invalidada si han usado tales
accesorios o piezas.
◗ Si el cable de red de este aparato se
deteriora, siempre debe ser sustituido por
Philips o por un Servicio de Asistencia Técnica
de Philips ya que se precisan herramientas y/o
piezas especiales.
◗ No usen el aparato si el cable de red, la clavija
u otras piezas están deterioradas.
◗ No excedan las cantidades y los tiempos de
preparación indicados en las tablas.
◗ Antes de enchufar el aparato a la red,
móntenlo adecuadamente.
◗ Mantengan el aparato fuera del alcance de los
niños.
◗ No sumerjan nunca la unidad motora en agua
o en cualquier otro líquido ni la enjuaguen
bajo el grifo. Para limpiar la unidad motora
usen solo un paño húmedo.
◗ Oirán un "click" cuando la unidad de la jarra o
los accesorios opcionales (Molinillo y Picador
no suministrados con este aparato) hayan sido
adecuadamente fijados a la unidad motora.
ESPAÑOL
21
◗ Eviten tocar las AFILADAS cuchillas. No
toquen nunca las cuchillas cuando el aparato
esté enchufado a la red.
◗ Si las cuchillas se atoran, DESENCHUFEN EL
APARATO antes de quitar los ingredientes
que estén bloqueando las cuchillas.
◗ Dejen que los ingredientes se enfríen antes de
picarlos o hacer puré con ellos en la jarra
(Temperatura máxima 80cC/175cF).
Cómo preparar el aparato para el uso
HR 176X : Empujen el exceso de
C ◗ Modelo
cable de red en el compartimento para
guardar el cable situado a la derecha del
aparato.
HR 177X : Empujen el exceso de
C ◗ Modelo
cable de red en el compartimento para
guardar el cable situado a la derecha del
aparato.
◗ Laven todos los accesorios y las piezas
desmontables (Vean la sección "Limpieza")
Cómo usar el aparato
Licuadora
La licuadora está destinada a :
- Batir líquidos, por ejemplo, productos de
lechería, salsas, jugos de fruta, sopas, mezclar
bebidas, batidos.
ESPAÑOL
22
- Mezclar ingredientes suaves, por ejemplo, pasta
para tartas y mayonesa.
- Hacer puré de ingredientes cocidos, por
ejemplo, para preparar comida de bebes.
1
2
C
1
Tome la empuñadura con su mano derecha
y monten la unidad de la jarra en la unidad
motora.
2 Abran la tapa.
C Abran
la tapa presionando el saliente del lateral
del mango. Para quitar la tapa, abrán y jale hacia
arriba. Solo necesitarán quitar la tapa cuando
quieran limpiar.
C
3
Pongan los ingredientes en la jarra.
No preparen recetas que contengan gran
cantidad de aceite o de grasa.
Para evitar las salpicaduras, no llenen nunca la
jarra por encima de la indicación de nivel máximo
(1,5 litros), especialmente cuando estén batiendo
líquidos calientes o que hagan espuma (Máximo
1,1 litros)
C
4
Cierren la tapa y pongan el obturador en
la abertura de la tapa.
Para evitar derrames, pongan siempre el
obturador en la tapa antes de empezar el
proceso.
ESPAÑOL
23
◗ Las posiciones de la velocidad les permiten
ajustar la velocidad del aparato para obtener
unos resultados óptimos. Consulten la tabla
para ver las posiciones de la velocidad
recomendadas.
Posiciones
Aplicaciones recomendadas
J
Preparar leche con chocolate, batir jugos
instantáneos y batir cócteles con alcohol
J
Batir frutos blandos y hacer batidos de
leche con frutas blandas
:
|
Hacer mayonesa
V
Hacer diferentes tipos de salsas (Por
ejemplo, salsa de tomate), hacer puré de
frutas duras, vegetales (Por ejemplo,
zanahorias), judias (Habas, alubias, etc.)
cocidas, y hacer comida para bebes.
Z
C
Picar cubitos de hielo
Batir sopas y hacer batidos de leche con
frutos duros (Por ejemplo, manzanas) y
cócteles con frutas frescas.
Picar frutos secos (Sin cáscara), queso
duro, chocolate, pan seco, carne (De vaca,
buey, etc.), perejil y cebollas.
HR176x
C
HR177x
5
HR176x: Seleccionen la adecuada posición
de la velocidad y pongan el aparato en
marcha. HR177x: Seleccionen la adecuada
posición de la velocidad y presionen el
botón Prendido/Apagado (ON/OFF).
24
ESPAÑOL
◗ Si no están seguros de que velocidad
seleccionar, siempre pueden usar la velocidad
más alta.
HR176x
HR177x
C
6
Para parar el aparato: HR176x: presionen
el botón Apagado (OFF), HR177x:
presionen el botón Prendido/Apagado
(ON/OFF).
7 Para usar el botón "Turbo" (Pulse):
- HR176x: Presionando el botón de "Turbo"
(Pulse). El aparato funciona a la máxima
velocidad y cuando suelten el botón, el aparato
se parará.
- HR177x: Seleccionen la adecuada posición de
la velocidad y presionen el botón de "Turbo"
(Pulse). El aparato funciona a la velocidad de su
selección y se parará cuando suelten el botón.
Consejos
la licuadora esté en funcionamiento,
C ◗ Mientras
pueden sacar el obturador en la tapa y verter
los ingredientes líquidos en la jarra batidora.
◗ No dejen que la licuadora funcione durante
más de 3 minutos cada vez. Si no han
terminado el batido después de 3 minutos,
paren el aparato durante 1 minuto antes de
continuar batiendo.
◗ Corten los ingredientes sólidos a trozos
pequeños antes de ponerlos en la licuadora.
Es mejor que procesen una serie de pequeñas
cantidades en la jarra que procesar una gran
cantidad de una vez.
ESPAÑOL
25
◗ Si, al batir ingredientes sólidos, no quedan
satisfechos con los resultados, paren el
aparato y háganlo funcionar brevemente
algunas veces usando la posición "Turbo"
(Pulse). Si esto no es suficiente, remuevan los
ingredientes con una espátula (No lo haga
mientras el aparato esté funcionando) o
reduzcan el contenido de la jarra y empiecen
procesando cantidades más pequeñas.
◗ Para picar cubitos de hielo, quiten el
obturador y dejen caer los cubitos en la jarra
mientras la licuadora esté en marcha. Durante
el proceso, mantengan puesta la tapa en la
jarra.
No pongan nunca su mano o cualquier objeto en
la jarra mientras la licuadora esté en marcha.
Accesorios
Filtro (Solo modelos HR 1764, HR 1767,
HR 1774 y HR 1777)
Pueden usar el accesorio filtro para preparar
salsas batidas muy finamente, jugos de frutas
frescas o cócteles.Todas las semillas y las pieles
quedarán en el filtro.
C
1
Pongan el filtro en la jarra de la licuadora.
26
ESPAÑOL
C
2
Asegúrense de que el filtro esté
adecuadamente fijado sobre el fondo de la
jarra. Las ranuras del filtro y los rebordes
del interior de la jarra de la licuadora les
ayudarán a poner el filtro en su posición
correcta.
C
3
Para fijar el filtro en su posición correcta,
pongan la tapa en la jarra.
C
4
A través de la abertura de la tapa, pongan
los ingredientes en el filtro
5
Añadan agua o cualquier otro líquido.
6
Coloquen el obturador en su lugar y
pongan el aparato en marcha. Seleccionen
la velocidad más alta y dejen que el
aparato funcione durante 40 segundos.
7
Paren el aparato.Viertan la bebida a través
del pico vertedor de la jarra de la
licuadora.
8
Para unos resultados óptimos, vuelvan a
poner la jarra, con el resto de ingredientes,
en el aparato y háganlo funcionar durante
unos pocos segundos más.
9
Viertan el resto de la bebida.
C
ESPAÑOL
27
Consejos
◗ Especialmente cuando estén procesando
grandes cantidades, les aconsejamos no poner,
al mismo tiempo, todos los ingredientes en el
filtro. Empiecen procesando una pequeña
cantidad , hagan que el aparato funcione un
momento, párenlo y, entonces, añadan otra
pequeña cantidad. Repitan este procedimiento
hasta que hayan procesado todos los
ingredientes.
◗ Para hacer leche de soya
- Antes de procesarlas, ponga remojar las semillas
de soya durante 4 horas.
- Pueden procesar un máximo de 50 g de semillas
secas de soya con un máximo de 500 ml de agua.
◗ Para hacer jugos de fruta y cócteles
- Añadan unos 300 ml de agua (O de cualquier
otro líquido para cócteles, etc.) a 150 g de fruta.
Picador (Solo modelos HR 1762, HR 1763,
HR 1772 y HR 1773)
El accesorio Picador puede usarse para picar
ingredientes tales como frutos secos, carne,
cebolla, queso duro, frutas tostadas, chocolate, ajo,
hierbas, pan seco, etc.
C
1
2
1
Coloquen el accesorio Picador en la
unidad motora. Háganlo girar en la
dirección de la flecha hasta que oigan un
"click".
28
ESPAÑOL
C
2
Pongan la unidad de cuchillas en el
accesorio Picador.
Los filos de las cuchillas están muy afilados ¡ Eviten
tocarlos !
C
3
Pongan los ingredientes en el recipiente.
Corten los ingredientes grandes en trozos
de unos 2 cm (1 pulgada) antes de
procesarlos.
No superen nunca la cantidad máxima.Vean en la
tabla las aconsejadas cantidades y posiciones de la
velocidad.
Ingredientes
Cantidades
Granos de pimienta
5 - 25 g
Semillas de sésamo
10 - 50 g
Arroz, trigo
25 - 75 g
Granos de soya
25 - 75 g
Guisantes tostados
25 - 75 g
Pulpa de coco
25 - 75 g
Granos de café
25 - 50 g
Queso
25 - 75 g
Migas de pan
20 - 40 g
Terrones de azúcar
25 - 50 g
Frutos secos (Sin cáscara)
25 - 75 g
Cuando usen el Molinillo, seleccionen la máxima
velocidad de procesado (Posición Z).
ESPAÑOL
29
Consejos
◗ Para picar carne, coco, queso y migas de pan,
corten los ingredientes a trozos más
pequeños antes de empezar a procesarlos.
Piquen una cantidad equivalente a una taza de
té y quiten esa cantidad del recipiente
después de picarla. Sigan el mismo
procedimiento con el resto de los
ingredientes que deseen picar.
Para mezclar líquidos, usen la licuadora, no el
accesorio Picador
1
2
C
4
Pongan la tapa en el recipiente y háganla
girar en sentido de las manecillas del reloj
hasta que esté adecuadamente fijada y,
después, pongan en marcha el aparato.
C
5
Si los ingredientes se fijan a la pared del
recipiente, paren el aparato y
desengánchenlos añadiendo líquido o
usando una espátula.
debido a que los alimentos no están
C ◗ Si,uniformemente
distribuidos, el aparato
traquetea al ponerlo en marcha, coloquen su
mano sobre la tapa.
30
ESPAÑOL
3
2
C
6
Cuando hayan acabado el picado, paren el
aparato, desenchúfenlo de la red y
desmonten el accesorio Picador
haciéndolo girar en la dirección de la
flecha.
7
Antes de vaciar el recipiente, quiten el
accesorio Picador de la unidad motora.
1
Molinillo (Solo modelos HR 1761, HR 1763,
HR 1771 y HR1773)
Molinillo puede usarse para moler y picar
C ◗ Elingredientes
tales como granos de pimienta,
semillas de sésamo, arroz, trigo, pulpa de coco,
frutos secos (Pelados), granos de café, semillas
de soya, guisantes secos, queso, migas de pan,
etc.
1 Pongan los ingredientes en el recipiente.
C Procesen
solo ingredientes secos. No llenen el
vaso por encima de la indicación "MAX".
Vean la tabla para las cantidades aconsejadas.
Ingredientes
Cantidades
Cebollas
50 - 100 g
Carne (Magra y sin cocer)
50 - 200 g
Perejil
10 - 20 g
Frutas
75 - 150 g
Vegetales (Crudos)
75 - 150 g
ESPAÑOL
Ingredientes
Cantidades
Queso (Firme y sin corteza)
50 - 100 g
Comida para bebe
100 - 200 g
Frutos secos (Sin cáscara)
25 - 150 g
31
Usen la posición C para picar ingredientes blandos, por
ejemplo, hierbas y cebollas. Cuando piquen ingredientes
duros, es recomendable pulsar algunas veces la posición
"Turbo"(Pulse) al final del procesado para obtener unos
muy finos resultados del picado.
1
C
2
C
3
2
C
1
2
Coloquen el anillo de goma sobre la
unidad de cuchillas.
Enrosquen la unidad de cuchillas en el
recipiente.
Si ello requiere un poco de esfuerzo, humedezcan
el anillo de goma con una gota de agua.
4
Den la vuelta al accesorio Molinillo ya
montado y enrósquenlo en la unidad
motora siguiendo la dirección de la flecha.
32
ESPAÑOL
C
5
Preferiblemente, usen el accesorio
Molinillo con la posición "Turbo" (Pulse).
de procesarlos, pueden usar la tapa
C ◗ Después
agitadora para espolvorear los ingredientes
uniformemente sobre un plato.
Limpieza
La limpieza del aparato, sus piezas y los accesorios
es más fácil inmediatamente después del uso.
No limpien nunca los accesorios o las piezas del
aparato en el lavavajillas.
Limpien la unidad motora con un paño húmedo.
No usen abrasivos, desengrasadores, alcohol, etc.
1
Desenchufen el aparato de la red,
desmonten los accesorios y piezas que
hayan usado y límpienlos con agua caliente
y jabonosa.
2
Enjuáguenlos bajo el grifo para eliminar los
resíduos jabonosos.
ESPAÑOL
33
3
Cuando hayan usado el accesorio Picador,
usen agua caliente y jabonosa para
limpiarlo después del uso.
4
Limpien la jarra, la tapa y el filtro con agua
caliente y jabonosa.
◗ Es recomendable quitar el anillo de goma del
molinillo antes de limpiarlo.
5
Froten la unidad motora con un paño
húmedo. ¡ No sumerjan esta pieza en
agua !
Limpieza rápida de la jarra de la
licuadora.
C
HR1764
HR1774
C
1
Pongan agua tibia y un poco de liquido
limpiador en la jarra de la licuadora hasta
el nivel indicado en la jarra (0,5 litros).
2
Monten la tapa y el obturador.
3
HR176x: Presionando el botón de
Limpieza Rápida (Quick Clean), hagan que
el aparato funcione durante unos pocos
momentos (Cuando suelten el botón, el
aparato se parará). HR177x: Seleccionen la
velocidad 4 o 5, presionen el botón de
Limpieza Rápida (Quick Clean), hagan que
el aparato funcione durante unos pocos
momentos (Cuando suelten el botón, el
aparato se parará).
34
ESPAÑOL
4
Desmonten la jarra de la licuadora y
enjuáguenla con agua limpia.
Garantía y Servicio
Si necesitan información o si tienen un problema,
visiten la página Web de Philips en
www.philips.com o contacten con el Servicio
Philips de Atención al Cliente de su país (Hallarán
el número de teléfono en el folleto de Garantía
Mundial). Si en su país no hay Servicio Philips de
Atención al Cliente, diríjanse a su distribuidor
local Philips o contacten con el Service
Department of Philips Domestic Appliances and
Personal Care BV.
Recetas
No superen los tiempos de preparación
indicados.
Dejen que el aparato se enfríe (temperatura de
cuarto) después de preparar cada receta.
Sopa de borcolí
|Z
- 50 g de queso Gouda
- 250 g de borcolí cocido
- 2 patatas cocidas
- 2 cubitos de caldo concentrado( De pollo o
vegetal)
- Una pizca de nata
- Una pizca de salsa Curry
- Sal
ESPAÑOL
35
- Pimienta
- Nuez moscada
B
Primero cuezan el borcolí y guarden 750 ml del
agua de cocerlo. Rallen el queso. Pongan el borcolí
cocido con un poco del agua de cocerlo y las
patatas en la jarra de la licuadora y procésenlo a
la velocidad máxima (Posición Z). Pongan el puré
de borcolí y los cubitos de caldo concentrado en el
resto del agua de cocer el borcolí y háganlo hervir.
Añadan el queso y sazonen la sopa con sal,
pimienta, nuez moscada y una pizca de nata.
Servir con pan rallado.
Pastel de queso
Z
- 4 huevos
- 525 ml de leche
- 75 g de margarina
- 90 g de queso Parmesano cortado a cubitos de
1 cm
- 440 g de azúcar
- 290 g de polenta
- 250 g de harina de trigo
- 1 cucharada sopera de levadura seca
B
B
Pongan los huevos, la leche, la margarina, el queso
Parmesano y el azúcar en la jarra. Dejen que el
aparato funcione durante 10 segundos a la
velocidad máxima (Z).
Añadan la polenta, cucharada a cucharada, y
dejen que el aparato funcione durante 20
segundos a la velocidad máxima (Z). Después,
36
ESPAÑOL
añadan la harina de trigo, cucharada a cucharada,
y dejen que el aparato funcione durante otros 30
segundos a la velocidad máxima (Z). Añadan la
levadura seca y dejen que el aparato funcione
durante 10 segundos más. Después, paren el
aparato. Pongan la mezcla en un molde para
hornear que haya sido engrasado con aceite o
margarina y, después, enharinado. Horneen el
pastel de queso durante unos 35 - 40 minutos en
un horno a 200c -210cC .
Gazpacho
V
- 250 g de tomates
- 2 rebanadas de pan blanco
- 1 diente de ajo grande
- 15 ml de vinagre de vino tinto
- 150 ml de jugo de tomate
- 100 g de pimiento rojo fresco
- 1 cebolla pequeña
- 1/2 pepino
- 15 ml de aceite de oliva
- Sal
- Pimienta
B
Pongan el jugo de tomate, el aceite de oliva y el
vinagre en la jarra. Añadan, entonces, todos los
demás ingredientes. Batan los ingredientes hasta
obtener una sopa suave. Servir frío.
Batidos de leche
K
- 200 ml de leche
- 30 g de plátano
ESPAÑOL
37
- 30 g de papaya
- 30 g de manzana
- 30 g de azúcar
B
Pelen las frutas y córtenlas a trozos. Pongan
primero la leche en la jarra y después añadan las
frutas y el azúcar. Batan durante unos 30
segundos a la posición K.
38
39
u
www.philips.com
4222 002 23474