1
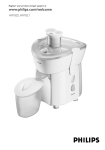
Comfort HR1821,HR1820
2
3
N
M
L
K
I
J
G
H
F
E
D
C
B
A
0
1
4
5
ENGLISH 6
FRANÇAIS 11
ESPAÑOL 16
PORTUGUÊS 21
BAHASA INDONESIA 26
BAHASA MELAYU 31
TI”NG VI◊T 36
41
48
53
58
á«Hô©dG
HR1821, HR1820
73
67
6
ENGLISH
Important
◗ Please read these instructions carefully and look at the illustrations
before using the appliance.
◗ Do not throw these instructions away, but keep them for further
reference.
◗ This appliance is intended for household use only.
◗ Check whether the voltage indicated on the appliance
corresponds to the mains voltage in your home before connecting
the appliance.
◗ Do not use the appliance when the mains cord, the plug or other
components are damaged.
◗ If the mains cord of this appliance is damaged, it must always be
replaced by Philips or a service centre authorised by Philips, as
special tools and/or parts are required.
◗ Never use accessories or parts made by other manufacturers or
that have not been specifically recommended by Philips.Your
guarantee will become invalid if you use such parts or accessories.
◗ Check the sieve every time you want to use the appliance. If you
detect any cracks or damage, do not use the appliance and contact
the nearest Philips service centre.
◗ Make sure all parts are correctly mounted before you switch on
the appliance.
◗ Only use the appliance when both latches are locked.
◗ Do not let the appliance run more than 2 minutes without
interruption. If you have not yet finished making juice, let the
appliance cool down for 2 minutes before switching it on again.
◗ Keep the appliance out of the reach of children. Do not let
children operate the appliance without supervision.
◗ Never let the appliance operate unattended.
◗ Never reach into the feed tube with your fingers or an object
while the appliance is running.
◗ Only unlock the latches after you have switched off the appliance
and the sieve has stopped rotating.
◗ The pulp container cannot be removed when the appliance is in
operation.
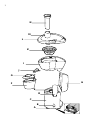
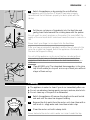
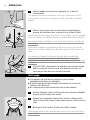
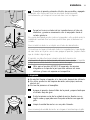
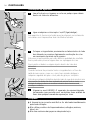
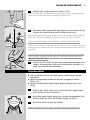
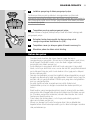
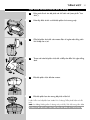
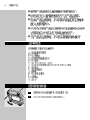
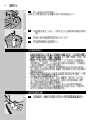
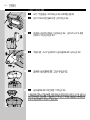
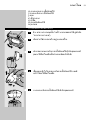
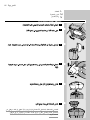
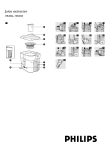
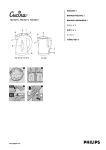
General description
Please fold out the exploded diagram on page 3.
A Cord storage
B On/off button
C Motor unit
D Lid latches
E Driving shaft
F Juice cup (type HR1821 only)
G Juice cup lid with integrated foam separator (type HR1821 only)
H Pulp container
I Pulp collector
J Spout
K Sieve
ENGLISH
7
L Lid
M Feed tube
N Pusher
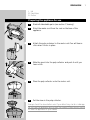
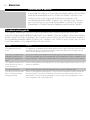
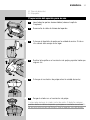
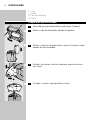
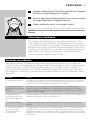
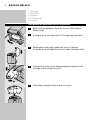
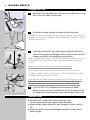
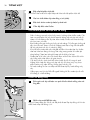
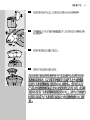
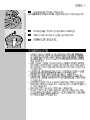
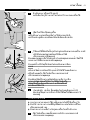
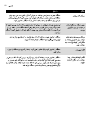
Preparing the appliance for use
1
Wash all detachable parts (see section 'Cleaning').
C
2
Wind the mains cord from the reel on the base of the
appliance.
C
3
Attach the pulp container to the motor unit.You will hear a
click when it locks in place.
C
4
Slide the spout into the pulp collector and push it until you
hear a click.
C
5
Place the pulp collector onto the motor unit.
C
6
Put the sieve in the pulp collector.
2
1
Always check the sieve before use. If you detect any cracks or damage
do not use the appliance and contact the nearest Philips service centre
or take the appliance to your dealer.
8
ENGLISH
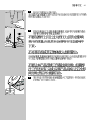
C
2
1
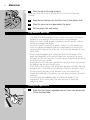
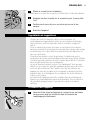
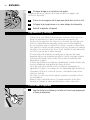
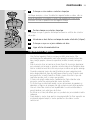
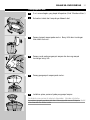
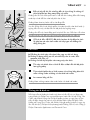
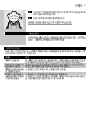
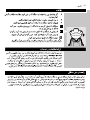
7 Place the lid on the pulp collector.
Make sure that the hook on the lid fits into the hole of the pulp
collector.
8
Snap the two latches onto the lid to lock it into place (click).
9
Place the juice cup or a glass under the spout.
10
Put the plug in the wall socket.
Ingredients and tips
- Use fresh fruit and vegetables; they contain more juice. Particularly
suitable for processing in the juice extractor are pineapples,
beetroots, celery stalks, apples, cucumbers, carrots, spinach, melons,
tomatoes, oranges and grapes.
- You don't have to remove thin peels or skins. Only thick peels, e.g.
those of oranges, pineapples and uncooked beetroots need to be
removed. Also remove the white pith of citrus fruits because it has a
bitter taste.
- When preparing apple juice, remember that the thickness of the
apple juice depends on the kind of apple you are using.The juicier
the apple the thinner the juice. Choose a kind of apple that produces
the type of juice you prefer.
- Apple juice turns brown very quickly.You can slow down this process
by adding a few drops of lemon juice.
- Fruits that contain starch, such as bananas, papayas, avocados, figs and
mangoes are not suitable for processing in the juice extractor. Use a
food processor, blender or bar blender to process these fruits.
- Leaves and leafstalks of e.g. lettuce can also be processed in the juice
extractor.
- Drink the juice immediately after you have extracted it. If it is
exposed to air for some time, the juice will lose its taste and
nutritional value.
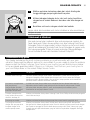
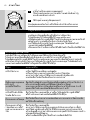
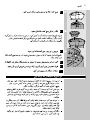
Using the appliance
C
1
Wash the fruit and/or vegetables and cut them into pieces that
fit into the feed tube.
ENGLISH
C
0
9
2 Switch the appliance on by pressing the on/off button.
This appliance will only function if all parts have been properly
mounted and the lid has been properly locked in place with the
latches.
1
C
3
Put the pre-cut pieces of ingredients into the feed tube and
gently press them towards the rotating sieve with the pusher.
Do not exert too much pressure on the pusher; this could affect the
quality of the end result and it could even cause the sieve to come to a
halt.
Never insert your fingers or an object into the feed tube.
After you have processed all ingredients and the flow of juice into the
juice cup or glass has stopped, switch the appliance off and wait until
the sieve has stopped rotating.
Do not let the appliance run for more than two minutes without
interruption. If you have not finished extracting juice, switch the
appliance off and allow it to cool down for two minutes before you
continue.
C
4
(Type HR1821 only) The integrated foam separator in the juice
cup lid will enable you to pour a nice cup of fresh juice without
a layer of foam on top.
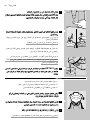
Cleaning
◗ The appliance is easier to clean if you do so immediately after use.
◗ Do not use abrasive cleaning agents, scourers, acetone, alcohol etc.
◗ Do not clean any of the parts in a dishwasher.
C
1
Switch the appliance off, remove the plug from the wall socket
and wait until the sieve has stopped rotating.
2
Remove the dirty parts from the motor unit, clean them with a
soft brush in soapy water and rinse them under a tap.
3
Clean the motor unit with a damp cloth.
Never immerse the motor unit in water nor rinse it under the tap.
10
ENGLISH
Information & service
If you need information or if you have a problem, please visit the Philips
Web site at www.philips.com or contact the Philips Customer Care
Centre in your country (you will find its phone number in the
worldwide guarantee leaflet). If there is no Customer Care Centre in
your country, turn to your local Philips dealer or contact the Service
Department of Philips Domestic Appliances and Personal Care BV.
Troubleshooting guide
This chapter summarises the most common problems you could encounter with your juice
extractor. Please read the different sections for more details. If you are unable to solve the problem,
please contact the Philips Customer Care Centre in your country (you will find its phone number in
the worldwide guarantee leaflet). If there is no Customer Care Centre in your country, turn to your
local Philips dealer or the nearest Philips Service Centre.
Problem
Solution
The appliance does not
work.
The appliance is equipped with a safety system. It won't work if the parts have not been
mounted properly. Check whether the parts have been attached in the right way, but
switch off the appliance before you do so.
The motor unit gives off an
unpleasant smell the first
few times the appliance is
used.
This is not unusual. If the appliance continues to give off this smell after a few times,
check the quantities you are processing and the processing time. After the appliance has
been running for 2 minutes, you should switch it off and let it cool down for 2 minutes.
The appliance makes a lot of Switch off the appliance and unplug it.Turn to the nearest Philips service centre or your
noise, smells, is too hot to
dealer for assistance.
touch, smokes etc.
The sieve is blocked.
Switch off the appliance, clean the feed tube and process a smaller quantity.
The sieve touches the feed
tube or vibrates strongly
during processing.
Switch off the appliance and unplug it. Check if the sieve has been properly placed into
the pulp collector.The ribs in the bottom of the sieve should fit properly onto the
driving shaft. Check if the sieve is damaged. Cracks, crazes, a loose grating disc or any
other irregularity may cause malfunction.
FRANÇAIS
11
Important
◗ Lisez attentivement les instructions ainsi que les illustrations avant
d'utiliser votre appareil.
◗ Gardez ce mode d'emploi pour un usage ultérieur.
◗ Cet appareil est destiné à un usage domestique uniquement.
◗ Avant de brancher l'appareil, vérifiez que la tension indiquée sur
l'appareil correspond à la tension du secteur de votre logement.
◗ N'utilisez pas l'appareil si le cordon d'alimentation, la fiche ou les
autres pièces sont détériorées.
◗ Si le cordon d'alimentation est endommagé, il doit être remplacé
par Philips ou un Centre Service Agréé, car des outils et/ou
composants spéciaux sont nécessaires.
◗ N'utilisez jamais des accessoires ou des composants autres que
ceux d'origine et recommandés par Philips. Philips décline toute
responsabilité si ce n'était pas le cas.
◗ Vérifiez le tamis chaque fois que vous voulez utiliser l'appareil.
N'utilisez jamais la centrifugeuse si le tamis est défectueux;
contactez un Centre Service Agréé Philips.
◗ Avant de mettre l'appareil en marche, vérifiez si tous les
composants ont été correctement montés.
◗ Utilisez l'appareil lorsque les deux loquets sont abaissés.
◗ Ne laissez pas l'appareil fonctionner pendant 2 minutes sans
interruption. Si vous n'avez pas terminé de préparer le jus, laissez
l'appareil refroidir pendant 2 minutes avant de le mettre en marche
à nouveau.
◗ Tenez l'appareil hors de portée des enfants. Ne laissez jamais les
enfants utiliser l'appareil.
◗ Ne laissez jamais l'appareil fonctionner sans surveillance.
◗ Ne mettez jamais vos doigts ou tout autre objet, dans la cheminée
de remplissage sans avoir au préalable arrêté l'appareil.
◗ Déverrouillez les loquets seulement après avoir arrêté l'appareil, et
si le tamis ne tourne plus.
◗ Le sélecteur de pulpe ne peut pas être retiré lorsque l'appareil
fonctionne.
Description générale
Dépliez la vue en page 3.
A Rangement du cordon
B Bouton marche/arrêt
C Bloc moteur
D Loquets du couvercle
E Axe d'entraînement
F Verre à jus (type HR1821 uniquement)
G Couvercle du verre à jus avec séparateur de mousse intégré (type
HR1821 uniquement)
H Sélecteur de pulpe
I Tambour
J) Bec verseur
K Tamis
FRANÇAIS
12
L Couvercle
M Cheminée de remplissage
N Poussoir
Préparation à l'emploi
1
Lavez les pièces détachables (voir chapitre 'Nettoyage').
C
2
Enroulez le cordon d'alimentation sur la base de l'appareil.
C
3
Fixez le sélecteur de pulpe sur le bloc moteur.Vous entendrez
clic lorsqu'il est correctement fixé.
C
4
Faites glisser le bec verseur dans le tambour jusqu'à ce que
vous entendiez un clic.
C
5
Positionnez le tambour sur le bloc moteur.
C
6
Mettez le tamis dans le tambour.
2
1
Vérifiez toujours le tamis avant utilisation. N'utilisez jamais la
centrifugeuse si le tamis est défectueux; contactez un Centre Service
Agréé Philips.
FRANÇAIS
C
2
13
7 Placez le couvercle sur le tambour.
Vérifiez que le crochet du couvercle soit fixé dans l'orifice du tambour.
8
Abaissez les deux loquets sur le couvercle pour le verrouiller
(clic).
9
Positionnez le verre à jus ou un autre verre sous le bec
verseur.
10
Branchez l'appareil.
1
Ingrédients et suggestions
- Utilisez des fruits et légumes fraîs; Ils sont plus juteux. La
centrifugeuse est appropriée surtout pour les ananas, betteraves,
céleri, pommes, carottes, épinards, melons, tomates, oranges et
raisins.
- Vous ne devez pas enlever les peaux ou les pelures.Vous devez
éplucher seulement les pelures, plus grosses, des oranges, des ananas
ou betteraves non cuites. Retirez la peau blanche des agrumes car
elle a un goût amer.
- Quand vous préparez un jus de pommes, n'oubliez pas que la
consistance du jus de pommes dépend du type de pommes utilisées.
Certains types de pommes sont plus juteux que d'autres. Choisissez
donc le type de pomme en conséquence.
- Le jus de pommes devient marron très rapidement.Vous pouvez
ralentir ce processus en ajoutant quelques gouttes de jus de citron.
- Les fruits qui contiennent de l'amidon, tels que les bananes, les
papayes, les avocats, les figues et les mangues ne doivent pas être
préparés dans la centrifugeuse. Pour préparer ces fruits, utilisez un
robot ou un mixeur.
- Les feuilles de salade peuvent être traitées dans la centrifugeuse.
- Buvez le jus immédiatement après la préparation. S'il est exposé à
l'air pendant quelque temps, le jus perd son goût et sa valeur
nutritive.
Utilisation de l'appareil
C
1
Lavez les fruits et/ou les légumes et coupez-les en morceaux
vous pourrez ainsi les introduire dans la cheminée de
remplissage plus facilement.
14
FRANÇAIS
C
0
2
Mettez l'appareil en marche en appuyant sur le bouton
marche/arrêt.
Cet appareil fonctionne seulement si tous les composants ont été
correctement montés et si le couvercle a été verrouillé à l'aide des
loquets.
1
C
3
Mettez les morceaux dans la cheminée de remplissage et
pressez-les lentement avec le poussoir sur le tamis rotatif.
N'exercez pas une pression trop forte sur le poussoir, car il est possible
de ne plus obtenir un résultat optimal, et le tamis peut même s'arrêter.
Ne mettez jamais vos doigts ou tout autre objet, dans la cheminée de
remplissage.
Après avoir préparé les ingrédients et que tout le jus se soit écoulé
dans le verre, arrêtez l'appareil et attendez jusqu'à l'arrêt complet du
tamis.
Ne laissez pas l'appareil fonctionner plus de deux minutes sans
interruption. Si vous n'avez pas terminé de préparer le jus, laissez
l'appareil refroidir pendant deux minutes avant de le mettre en marche
à nouveau.
C
4
(Type HR 1821 uniquement) Le séparateur de mousse intégré
dans le couvercle du verre à jus vous permet de verser un
verre de jus frais sans une couche de mousse.
Nettoyage
◗ Cet appareil est plus facile à nettoyer si vous le faites
immédiatement après son utilisation.
◗ N'utilisez pas des produits abrasifs, des tampons à récurer, de
l'acétone, de l'alcool, etc.
◗ Ne nettoyez aucun des accessoires dans le lave-vaisselle.
C
1
Arrêtez l'appareil, retirez la fiche de la prise murale et attendez
jusqu'à ce que le tamis soit arrêté.
2
Enlevez les composants sales du bloc moteur, nettoyez-les à
l'aide d'une brosse à l'eau chaude savonneuse et rincez-les sous
l'eau.
3
Nettoyez le bloc moteur à l'aide d'un chiffon humide.
N'immergez jamais le bloc moteur dans l'eau et ne le rincez pas sous
l'eau non plus.
FRANÇAIS
15
Information et service
Pour toute réparation/information, ou en cas de problème, visitez notre
website: www.philips.com ou veuillez contacter le Service
Consommateurs Philips de votre pays (vous trouverez le numéro de
téléphone dans le dépliant sur la garantie internationale). S'il n'y a
aucun Service Consommateurs Philips dans votre pays, contactez votre
distributeur ou le Service Department of Philips Domestic Appliances
and Personal Care BV.
En cas de problèmes
Ce chapitre résume les problèmes les plus communs que vous pouvez rencontrer avec votre
centrifugeuse.Veuillez lire tous les chapitres pour plus détails. Si vous ne pouvez pas résoudre le
problème à l'aide du petit guide, adressez-vous au Service Consommateurs Philips de votre pays
(vous trouverez le numéro de téléphone dans le dépliant sur la garantie internationale). S'il n'y a
aucun Service Consommateurs Philips dans votre pays, contactez votre distributeur ou un Centre
Service Agréé Philips.
Problème
Solution
L'appareil ne fonctionne
pas.
L'appareil est doté d'un système de sécurité. Il ne fonctionne pas si les composants
n'ont pas été correctement attachés. Avant de vérifier s'ils sont correctement attachés,
arrêtez l'appareil.
Lors des premières
utilisations, une odeur
émane de l'appareil.
C'est tout à fait normal. Si l'odeur persiste après plusieurs utilisations, vérifiez les
quantités préparées et les durées de préparation. Arrêtez l'appareil et laissez-le refroidir
pendant 2 minutes.
L'appareil fait du bruit, de la Arrêtez l'appareil et débranchez-le. Contactez un Centre Service Agréé Philips pour
fumée, sent le chaud ou est réparations.
très chaud au toucher, etc.
Le tamis est bloqué.
Arrêtez l'appareil, nettoyez la cheminée de remplissage et préparez une quantité plus
faible.
Le tamis touche la
cheminée de remplissage ou
vibre fortement pendant le
fonctionnement.
Arrêtez l'appareil et débranchez-le.Vérifiez si vous avez placé correctement le tamis
dans le tambour. Les nervures au fond du tamis doivent être correctement fixées sur
l'arbre moteur.Vérifiez si le tamis n'est pas cassé. L'appareil peut mal fonctionner s'il y a
des craquelures, fêlures, un disque à râper oublié ou toute autre anomalie.
16
ESPAÑOL
Importante
◗ Lea atentamente estas instrucciones y mire las ilustraciones antes
de utilizar el aparato.
◗ No tire las instrucciones, guárdelas para consultarlas en el futuro.
◗ Este aparato está concebido únicamente para uso doméstico.
◗ Antes de enchufar el aparato, compruebe que el voltaje indicado
en el mismo se corresponde con el de su hogar.
◗ No utilice el aparato si el cable, el enchufe u otros componentes
están dañados.
◗ Si el cable del aparato está dañado, lo debe cambiar siempre Philips
o un centro de servicio autorizado por Philips, ya que se necesitan
herramientas especiales.
◗ No utilice nunca piezas o accesorios de otro fabricante o que no
hayan sido específicamente recomendados por Philips. La garantía
quedará anulada si utiliza otras piezas o accesorios.
◗ Compruebe el estado del colador siempre que quiera usar el
aparato. Si detecta cualquier grieta o daño no lo utilice y póngase
en contacto con el centro de servicio más cercano de Philips.
◗ Asegúrese de que todas las piezas están bien montadas antes de
conectar el aparato.
◗ Utilice únicamente el aparato si los dos seguros están cerrados.
◗ El aparato no debe funcionar durante más de 2 minutos sin
interrupción. Si aún no ha terminado de hacer zumo, deje que el
aparato se enfríe durante 2 minutos antes de volverlo a conectar.
◗ Mantenga el aparato fuera del alcance de los niños. No deje que
los niños manejen el aparato sin supervisión.
◗ No deje que el aparato funcione sin supervisión.
◗ Nunca meta los dedos o un objeto en el tubo de alimentos
mientras el aparato esté en funcionamiento.
◗ No quite los seguros hasta que el aparato esté apagado y el
colador haya dejado de girar.
◗ No se puede quitar el depósito de pulpa si el aparato está en
funcionamiento.
Descripción general
Despliegue el gráfico de las piezas de la página 3.
A Recogida de cable
B Botón de encendido y apagado
C Unidad de motor
D Seguros de la tapa
E Eje motor
F Jarra para zumo (sólo para el modelo HR1821)
G Tapa de la jarra para zumo con separador de espuma integrado
(sólo para el modelo HR1821)
H Depósito de pulpa
I Recolector de pulpa
J Boquilla
K Colador
L Tapa
ESPAÑOL
17
M Tubo de alimentos
N Empujador
Preparación del aparato para su uso
1
Lave todas las partes desmontables (véase el capítulo
'Limpieza')
C
2
Desenrolle el cable de la base del aparato.
C
3
Coloque el depósito de pulpa en la unidad de motor. Oirá un
clic cuando éste encaje en su lugar.
C
4
Deslice la boquilla en el recolector de pulpa y apriete hasta que
oiga un clic.
C
5
Coloque el recolector de pulpa sobre la unidad de motor
C
6
Ponga el colador en el recolector de pulpa.
2
1
Compruebe siempre el colador antes de usarlo. Si detecta cualquier
grieta o daño no utilice el aparato y póngase en contacto con el centro
de servicio más cercano de Philips o lleve el aparato a su distribuidor.
18
ESPAÑOL
C
2
1
7 Coloque la tapa en el recolector de pulpa.
Asegúrese de que el gancho de la tapa encaja en el agujero del
recolector de pulpa.
8
Cierre los dos seguros de la tapa para fijarla bien (oirá un clic).
9
Coloque la jarra para zumo o un vaso debajo de la boquilla.
10
Enchufe el aparato a la pared.
Ingredientes y consejos
- Utilice frutas y hortalizas frescas, ya que contienen más zumo. Las
piñas, las remolachas, los apios, las manzanas, los pepinos, las
zanahorias, las espinacas, los melones, los tomates, las naranjas y las
uvas son especialmente adecuados para licuar en esta liquadora.
- No es necesario pelar los alimentos si tienen una piel o cáscara fina.
Sólo pélelos si tienen una piel gruesa, como por ejemplo las naranjas,
las piñas o las remolachas sin cocer. Quite también la capa blanca de
los cítricos, ya que da un sabor amargo.
- Al hacer zumo de manzana, recuerde que el espesor del zumo
depende del tipo de manzana que utilice. Cuanto más jugo tenga la
manzana, más líquido será el zumo. Elija el tipo de manzana más
adecuado a su gusto.
- El zumo de manzana se oxida muy rápidamente. Puede retrasar este
proceso añadiendo unas gotitas de zumo de limón.
- Las frutas que tienen fécula como los plátanos, las papayas, los
aguacates, los higos o los mangos no son adecuadas para licuarlas en
la liquadora. Utilice un robot de cocina o una batidora para licuar
este tipo de fruta.
- Las hojas y los troncos de lechuga, por ejemplo, se pueden triturar
en la liquadora.
- Beba el zumo nada más hacerlo. Si queda expuesto al aire libre
durante un tiempo, el zumo perderá sabor y valor nutricional.
Cómo usar el aparato
C
1
Lave las frutas u hortalizas y córtelas en trozos que quepan por
el tubo de alimentos.
ESPAÑOL
C
19
2 Conecte el aparato pulsando el botón de encendido y apagado.
El aparato sólo funcionará si se han montado todas las piezas
correctamente y si la tapa se ha cerrado bien con los seguros.
0
1
C
3
Ponga los trozos cortados de los ingredientes en el tubo de
alimentos y presione suavemente con el empujador hacia el
colador giratorio.
No ejerza demasiada presión sobre el empujador; esto podría variar la
calidad del resultado final e incluso podría hacer que se detuviera el
colador.
Nunca meta los dedos o un objeto en el tubo de alimentación.
Una vez que se hayan introducido todos los ingredientes y haya dejado
de caer zumo en la jarra o en el vaso, apague el aparato y espere hasta
que el colador deje de girar.
El aparato no debe funcionar durante más de 2 minutos sin
interrupción. Si aún no ha terminado de hacer zumo, apague el aparato
y deje que se enfríe durante 2 minutos antes de seguir.
C
4
(Sólo para el modelo HR1821) El separador de espuma
integrado en la tapa de la jarra permite obtener un zumo
delicioso y fresco sin espuma en la superficie.
Limpieza
◗ Es más fácil limpiar el aparato si lo hace justo después de utilizarlo.
◗ No utilice productos de limpieza abrasivos, estropajos, acetona,
alcohol, etc.
◗ No lave las piezas en el lavavajillas.
C
1
Apague el aparato, desenchúfelo de la pared y espere hasta que
el colador deje de girar.
2
Quite las piezas sucias de la unidad de motor, lávelas con un
cepillo suave y agua jabonosa. Después aclárelas con agua del
grifo.
3
Limpie la unidad de motor con un paño húmedo.
Nunca sumerja la unidad de motor en el agua ni la aclare bajo el grifo.
20
ESPAÑOL
Información y Servicio
Si necesita información o tiene algún problema, visite la página Web de
Philips en www.philips.com, o contacte con el Servicio Philips de
Atención al Cliente de su país (hallará el número de teléfono en el
folleto de la Garantía Mundial). Si en su país no hay Servicio Philips de
Atención al Cliente, diríjase a su distribuidor local Philips o contacte
con el Service Department of Philips Domestic Appliances and
Personal Care BV.
Solución de problemas
En este capítulo se resumen los problemas más comunes que se puede encontrar al utilizar esta
liquadora. Lea los diferentes apartados para obtener más información. Si no puede resolver el
problema, contacte con el Centro de Atención al Cliente de Philips de su país (hallará el número de
teléfono en el folleto de la Garantía Mundial). Si en su país no hay Centro de Atención al Cliente de
Philips, diríjase a su distribuidor local de Philips o al Centro de Servicio Philips más cercano.
Problema
Solución
El aparato no funciona
El aparato está equipado con un sistema de seguridad. No funcionará si no se han
montado correctamente todas las piezas. Compruebe que todas las piezas se han
colocado bien, pero antes apague el aparato.
La unidad de motor
desprende un olor
desagradable las primeras
veces que se utiliza el
aparato.
Eso es frecuente. Si el aparato continúa desprendiendo ese olor después de utilizarlo
unas cuantas veces, verifique las cantidad que introduce y los tiempos. Cuando el
aparato ha funcionado durante 2 minutos seguidos, debe apagarlo y dejar que se enfríe
otros 2 minutos.
El aparato hace mucho
ruido, huele, está muy
caliente, sale humo, etc.
Apague el aparato y desenchúfelo. Consulte a su distribuidor o acuda al centro de
servicio Philips más cercano.
El colador está bloqueado.
Apague el aparato, limpie el tubo de alimentos e introduzca una cantidad más pequeña.
El colador da contra el tubo
de alimentos o vibra mucho
mientras está en
funcionamiento.
Apague el aparato y desenchúfelo. Compruebe si el colador se ha colocado bien en el
recolector de pulpa. Las varillas inferiores del colador deben encajar bien en el eje
motor. Compruebe si el colador está dañado. Las grietas, las fisuras, un disco suelto o
que chirríe, cualquier irregularidad puede hacer que el aparato funcione mal.
PORTUGUÊS
21
Importante
◗ Por favor, leia estas instruções com atenção e observe as
ilustrações antes de se servir do aparelho pela primeira vez.
◗ Não deite este modo de emprego fora. Guarde-o para uma
eventual consulta futura.
◗ Este aparelho destina-se apenas a uma utilização doméstica.
◗ Antes de ligar, verifique se a voltagem indicada no aparelho
corresponde à corrente eléctrica de sua casa.
◗ Não se sirva do aparelho se o cabo de alimentação, a ficha ou
outro componente se encontrar danificado.
◗ Se o cabo de alimentação estiver estragado, deverá ser substituído
apenas pela Philips ou por um concessionário autorizado pela
Philips, uma vez que é necessário utilizar ferramentas e/ou peças
especiais.
◗ Nunca use acessórios ou peças de outros fabricantes ou que não
tenham sido especificamente recomendados pela Philips.A sua
garantia tornar-se-á inválida se aplicar tais peças ou acessórios.
◗ Verifique o crivo sempre que pretender servir-se do aparelho. Se
detectar alguma fenda ou dano, não use o aparelho e contacte o
centro de assistência Philips mais próximo.
◗ Certifique-se que todas as peças estão correctamente montadas
antes de ligar o aparelho à corrente.
◗ Só deve usar o aparelho se ambas as molas estiverem fechadas.
◗ Não deixe o aparelho trabalhar mais do que 2 minutos sem
interrupção. Se ainda não tiver terminado de preparar o sumo,
deixe arrefecer durante 2 minutos antes de voltar a ligar.
◗ Mantenha fora do alcance das crianças. Não deixe as crianças
mexerem no aparelho sem a sua supervisão.
◗ Nunca deixe o aparelho a trabalhar sozinho.
◗ Nunca introduza os dedos ou algum objecto dentro do tubo dos
alimentos com a máquina em funcionamento.
◗ Os fechos só devem ser abertos depois de se desligar a máquina e
com o crivo totalmente parado.
◗ O contentor da polpa não pode ser retirado com o aparelho a
trabalhar.
Descrição geral
Por favor, desdobre o diagrama da página 3.
A Compartimento para o fio
B Interruptor ligar/desligar
C Motor
D Fechos da tampa
E Eixo motor
F Copo (apenas no mod. HR1821)
G Tampa do copo com separador de espuma integrado (apenas no
mod. HR1821)
H Contentor da polpa
I Colector da polpa
J Bico
PORTUGUÊS
22
K
L
M
N
Crivo
Tampa
Tubo dos alimentos
Pressor
Preparação para utilização
1
Lave todas as peças desmontáveis (vidé secção 'Limpeza').
C
2
Enrole o cabo de alimentação da base do aparelho.
C
3
Monte o contentor da polpa sobre o motor. Ouvirá um 'clique'
quando ele ficar encaixado.
C
4
Deslize o bico para o colector da polpa e empurre até ouvir
um 'clique'.
C
5
Coloque o colector da polpa sobre o motor.
2
1
PORTUGUÊS
C
6
23
Coloque o crivo sobre o colector da polpa.
Verifique sempre o crivo. Se detectar alguma fenda ou dano, não se
sirva do aparelho e contacte o centro de assistência Philips mais
próximo ou leve o aparelho ao seu agente Philips.
C
2
1
7 Ponha a tampa no colector da polpa.
Certifique-se que o gancho da tampa encaixa no orifício do colector
da polpa.
8
Introduza os dois fechos na tampa de modo a fechá-la ('clique').
9
Coloque o copo ou o jarro debaixo do bico.
10
Ligue a ficha à tomada eléctrica.
Ingredientes e sugestões
- Use fruta e legumes frescos porque contêm mais sumo. São
particularmente adequados para este aparelho: ananás, beterraba,
aipo, maçãs, pepino, cenoura, espinafres, melão, tomate, laranjas e
uvas.
- Não é preciso tirar as cascas se forem finas. Só é preciso descascar,
por exemplo, as laranjas, o ananás e a beterraba crua.Também deve
retirar a casca branca dos citrinos porque confere um gosto amargo.
- Quando preparar sumo de maçã, lembre-se que a espessura do
sumo dependerá do tipo de maçã que estiver a usar. Quanto mais
sumarenta for a maçã, mais fino ficará o sumo. Escolha o tipo de
maçã de acordo com o sumo que preferir.
- O sumo de maçã oxida muito rapidamente. Para retardar esse
processo, junte-lhe umas gotas de sumo de limão.
- Os frutos que contenham amido, como as bananas, as papaias, os
abacates, os figos e as mangas não são próprios para este aparelho.
Use um robot de cozinha, um liquidificador ou uma misturadora
para trabalhar com este tipo de frutos.
- As folhas e os talos, da alface, por ex., podem ser processados nesta
máquina.
- Deve beber o sumo logo após a sua preparação. Se ficar exposto ao
ar durante algum tempo, o sumo perderá o seu sabor e valor
nutricional.
24
PORTUGUÊS
Utilização do aparelho
C
C
1
Lave a fruta e/ou os legumes e corte em pedaços que caibam
dentro do tubo dos alimentos.
2 Ligue a máquina no interruptor 'on/off' (ligar/desligar).
Este aparelho só funciona se todas as peças estiverem correctamente
colocadas e se a tampa estiver bem montada e fechada.
0
1
C
3
Coloque os ingredientes previamente cortados dentro do tubo
dos alimentos e pressione ligeiramente na direcção do crivo
em movimento, servindo-se do pressor.
Não exerça muita pressão para não afectar a qualidade do resultado
final e para evitar provocar algum dano ou a paragem do crivo.
Nunca meta os dedos ou algum objecto dentro do tubo dos
alimentos.
Quando terminar de processar todos os ingredientes e o fluxo de
saída do sumo para o copo ou o jarro tiver cessado, desligue a
máquina e aguarde até que o crivo páre de girar por completo.
Não deixe a máquina trabalhar durante mais do que dois minutos sem
interrupção. Se ainda não tiver acabado de extrair todo o sumo
desligue a máquina, deixe-a arrefecer durante dois minutos e depois
prossiga o trabalho.
C
4
(Apenas no mod. HR1821). O separador de espuma integrado
na tampa do copo permite servir um óptimo sumo acabado de
fazer sem qualquer camada de espuma por cima.
Limpeza
◗ A limpeza torna-se muito mais fácil se for efectuada imediatamente
após cada utilização.
◗ Não utilize produtos de limpeza abrasivos, esfregões, acetona,
álcool, etc.
◗ Não lave nenhuma das peças na máquina da loiça.
PORTUGUÊS
C
25
1
Desligue a máquina, retire a ficha da tomada eléctrica e aguarde
até que o crivo páre de girar por completo.
2
Retire as peças sujas da máquina, lave-as com uma escova macia
com água e detergente e enxague à torneira.
3
Limpe a unidade do motor com um pano húmido.
Nunca mergulhe a unidade do motor dentro de água nem a enxague à
torneira.
Informações e assistência
Se necessitar de informações ou se tiver algum problema, por favor
visite a página da Philips na Internet em www.philips.com ou contacte
o Centro de Informação ao Consumidor Philips do seu país (o número
de telefone encontra-se no folheto da garantia mundial). Se não existir
um Centro de Informação ao Consumidor no seu país, dirija-se ao seu
agente Philips ou contacte o Departamento de Service da Philips
Domestic Appliances and Personal Care BV.
Resolução de problemas
Este capítulo sumariza os problemas mais comuns que poderá encontrar no seu extractor de
sumos. Por favor, leia as diferentes secções para obter mais informação. Se não conseguir resolver o
problema, por favor contacte o Centro de Informação ao Consumidor Philips do seu país (o
número de telefone encontra-se no folheto da garantia mundial). Se não existir um Centro de
Informação ao Consumidor no seu país, dirija-se ao agente Philips ou a um Concessionário Philips
Autorizado.
Problema
Solução
O aparelho não funciona.
Este aparelho está equipado com um sistema de segurança. Se as peças não estiverem
montadas correctamente, não funcionará.Verifique se as peças foram colocadas na
posição certa. Não se esqueça de desligar primeiro a máquina!
O motor deita um cheiro
desagradável nas primeiras
utilizações.
Não é anormal. Se o aparelho continuar a deitar esse cheiro passadas algumas
utilizações, verifique as quantidades e os tempos de processamento. Se o aparelho
estiver a trabalhar durante 2 minutos, deverá desligá-lo e deixar arrefecer 2 minutos
antes de retomar o trabalho.
A máquina faz muito
barulho, deita cheiro, fica
muito quente, deita fumo,
etc.
Desligue a máquina e retire a ficha da tomada eléctrica. Dirija-se ao concessionário ou
ao agente Philips mais próximo e peça assistência.
O crivo está bloqueado.
Desligue o aparelho, limpe o tubo dos alimentos e processe uma quantidade mais
pequena.
O crivo toca no tubo dos
alimentos ou vibra
fortemente durante o
processamento.
Desligue a máquina e retire a ficha da tomada.Verifique se ˇˇˇˇivo está correctamente
colocado sobre o colector da polpa. Os encaixes da parte inferior do crivo devem
estar bem introduzidos no eixo motor.Veja se o crivo está em boas condições. Fendas,
estaladuras, um disco solto ou qualquer outra irregularidade poderão provocar um mau
funcionamento.
26
BAHASA INDONESIA
Penting
◗ Bacalah petunjuk ini dengan baik dan lihat ilustrasi gambar sebelum
menggunakan alat.
◗ Jangan membuang petunjuk ini, tapi simpanlah sebagai referensi anda.
◗ Alat ini hanya untuk keperluan rumah tangga.
◗ Periksalah apakah voltase yang tertera pada alat sesuai dengan
voltase di rumah anda sebelum menghubungkannya dengan listrik.
◗ Jangan menggunakan alat bila kabel, stopkontak atau komponen
lainnya rusak.
◗ Jika kabel alat rusak, yang boleh mengganti hanya Philips atau pusat
servis yang diberi wewenang oleh Philips, karena diperlukan
peralatan atau sparepart khusus.
◗ Jangan menggunakan assesori atau sparepart yang dibuat oleh
perusahaan lain atau tidak direkomendasi Philips. Garansi tidak
berlaku bila sparepart atau assesori tersebut digunakan.
◗ Periksalah pisau pemarut setiap kali alat akan digunakan. Bila retak
atau rusak, jangan gunakan alat dan segera hubungi Pusat service
Philips terdekat.
◗ Pastikan semua bagian sudah dipasang dengan benar sebelum alat
dijalankan.
◗ Hanya menggunakan alat bila kedua pengunci sudah dikunci.
◗ Jangan biarkan alat bekerja lebih dari 2 menit tanpa henti. Jika anda
belum selesai membuat jus, biarkan alat mendingin selama 2 menit
sebelum dijalankan lagi.
◗ Simpanlah alat diluar jangkauan anak-anak. Jangan biarkan anakanak menjalankan alat tanpa pengawasan.
◗ Jangan biarkan alat bekerja tanpa diawasi.
◗ Jangan memasukkan tangan anda atau benda lain ke dalam tabung
pengisi selama alat bekerja.
◗ Pengunci hanya dibuka setelah alat dimatikan dan pisau pemarut
sudah berhenti berputar.
◗ Tempat ampas tidak dapat dilepaskan ketika alat sedang bekerja.
Gambaran umum
Bukalah rincian bagian-bagian alat di hal 3.
A Tempat penyimpanan kabel
B Tombol on/off
C Motor
D Pengunci tutup
E Poros penggerak
F Cangkir jus (untuk tipe HR 1821)
G Tutup cangkir jus dengan pemisah busa (untuk tipe HR 1821)
H Tempat ampas
I Penyimpan ampas
J Cerat
K Pisau pemarut
L) Tutup
M Tabung pengisi
N Pendorong
BAHASA INDONESIA
27
Menyiapkan alat
1
Cuci semua bagian yang dapat dilepaskan (lihat 'Membersihkan')
C
2
Keluarkan kabel dari tempatnya dibawah alat
C
3
Pasang tempat ampas pada motor. Bunyi klik akan terdengar
bila sudah terkunci.
C
4
Pasang cerat pada pengumpul ampas dan dorong sampai
terdengar bunyi klik
C
5
Pasang pengumpul ampas pada motor.
C
6
Letakkan pisau pemarut pada pengumpul ampas
2
1
Periksalah pisau pemarut sebelum digunakan. Jika ada retak atau
kerusakan, jangan gunakan alat dan hubungi pusat servis Philips terdekat
atau bawalah ke dealer anda.
28
BAHASA INDONESIA
C
2
1
7 Letakkan tutup pada pengumpul ampas.
Pastikan bahwa kait pada tutup cocok dengan lubang pada pengumpul
ampas.
8
Katupkan kedua pengunci pada tutup hingga terkunci (clik)
9
Letakkan cangkir jus atau gelas dibawah cerat.
10
Pasang steker pada stopkontak.
Bahan-bahan dan tip
- Gunakan buah dan sayuran segar; karena mengandung lebih banyak
air. Yang cocok di proses dalam juice extrator terutama adalah nanas,
bit, seledri, apel, ketimun, wortel, bayam, melon, tomat, jeruk dan
anggur.
- Anda tidak perlu mengupas kulit tipis. Hanya kulit tebal seperti jeruk,
nanas dan bit mentah yang harus dikupas. Juga bersihkan serat putih
dari buah jeruk karena berasa pahit.
- Bila membuat jus apel, ingatlah bahwa kepekatan jus apel tergantung
dari jenis apel yang digunakan. Semakin banyak mengandung air,
semakin encer jus yang dihasilkan. Pilihlah jenis apel sesuai dengan
jenis jus yang anda inginkan.
- Jus apel cepat berubah warna menjadi coklat. Anda dapat
memperlambat proses ini dengan menambahkan beberapa tetes air
jeruk lemon.
- Buah-buahan yang mengandung tepung, seperti pisang, pepaya,
alpukat, ara dan mangga tidak cocok diproses dengan alat ini.
Gunakan food processor, blender atau bar blender untuk
memprosesnya.
- Daun-daunan dan tangkai daun seperti selada dapat diproses dengan
alat ini.
- Minumlah jus segera setelah anda memprosesnya. Jika dibiarkan
berinteraksi dengan udara terlalu lama, jus akan kehilangan rasa dan
nilai gizinya.
Menggunakan alat
C
1
Cucilah buah dan/atau sayuran dan potong-potong sehingga
dapat dimasukkan ke dalam tabung pengisi.
BAHASA INDONESIA
C
29
2 Jalankan alat dengan menekan tombol on/off.
Alat ini hanya akan berfungsi bila semua bagian sudah dipasang dengan
benar dan tutup sudah terkunci dengan penguncinya.
0
1
C
3
Masukkan bahan yang sudah dipotong-potong ke dalam tabung
pengisi dan tekanlah pelan-pelan dengan pendorong.
Jangan menekan terlalu keras pada pendorong, ini akan mempengaruhi
mutu dan dapat mengakibatkan pisau pemarut berhenti berputar.
Jangan masukkan tangan atau benda lain ke dalam tabung pengisi.
Setelah semua bahan sudah diproses dan aliran jus ke cangkir atau gelas
sudah terhenti, matikan alat dan tunggu sampai pisau pemarut berhenti
berputar.
Jangan biarkan alat bekerja lebih dari dua menit tanpa henti. Jika anda
belum selesai, matikan alat dan biarkan mendingin selama dua menit
sebelum dilanjutkan lagi.
C
4
(Untuk tipe HR 1821) Pemisah busa yang terpasang pada tutup
cangkir memungkinkan anda untuk menuangkan secangkir jus
segar tanpa lapisan busa diatasnya.
Membersihkan
◗ Alat mudah dibersihkan jika anda segera melakukannya setelah
digunakan.
◗ Jangan menggunakan pembersih abrasive, penggosok, aseton,
alkohol dll.
◗ Jangan membersihkan bagian-bagian apapun dengan mesin cuci
piring.
C
1
Matikan alat, cabut steker dari stopkontak dan tunggu sampai
pisau pemarut berhenti berputar.
2
Bersihkan bagian-bagian yang kotor dengan menggunakan sikat
lembut dalam air sabun dan bilaslah dengan air bersih.
3
Bersihkan motor dengan lap lembab.
Jangan merendam motor dalam air atau membilasnya dengan air.
30
BAHASA INDONESIA
Informasi dan service
Jika anda memerlukan informasi atau jika anda menghadapi masalah,
silahkan kunjugi Website Philips di www.philips.com atau hubungi Pusat
Pelayanan Pelanggan Philips di negara anda (anda dapat menemukan
telponnya di kartu garansi). Jika tidak ada Pusat Pelayanan Pelanggan di
negara anda, bawalah ke dealer Philips setempat atau hubungi Bagian
Service Philips DAP.
Troubleshooting guide
This chapter summarises the most common problems you could encounter with your juice
extractor. Please read the different sections for more details. If you are unable to solve the problem,
please contact the Philips Customer Care Centre in your country (you will find its phone number in
the worldwide guarantee leaflet). If there is no Customer Care Centre in your country, turn to your
local Philips dealer or the nearest Philips Service Centre.
Masalah
Solusi
Alat tidak bekerja
Alat dilengkapi dengan sistim pengaman. Jadi tidak dapat bekerja bila ada bagian yang
pemasangannya tidak benar. Periksalah apakah bagian-bagian tersebut sudah dipasang
dengan benar, tapi matikan alat sebelum anda melakukannya.
Motor mengeluarkan bau
yang tidak enak saat baru
beberapa kali digunakan.
Ini tidak biasanya. Jika alat terus mengeluarkan bau setelah beberapa kali digunakan,
periksalah berapa banyak bahan yang diproses dan waktu memprosesnya. Setelah alat
bekerja selama 2 menit, matikan alat dan biarkan mendingin selama 2 menit.
Alat bunyinya berisik, bau
dan panas bila dipegang,
berasap, dll.
Matikan alat dan lepaskan steker dari stopkontak. Bawalah ke pusat servis Philips
terdekat atau ke dealer anda.
Pisau pemarut macet
Matikan alat, bersihkan tabung pengisi dan proses dalam jumlah sedikit.
Pisau pemarut menyentuh
Matikan alat dan lepaskan steker dari stopkontak. Periksalah apakah pisau pemarut
tabung pengisi atau bergetar sudah dipasang dengan benar pada pengumpul ampas. Sirip dibawah pisau pemarut
kencang selama proses.
harus tepat berada pada poros penggerak. Periksalah apakah pisau pemarut rusak.
Retak, kehilangan alat parut atau ketidakberesan lainnya dapat mengakibatkan alat tidak
berfungsi.
BAHASA MELAYU
31
Penting
◗ Sila baca arahan-arahan berikut dengan teliti dan perhatikan
gambarajah-gambarajah sebelum menggunakan perkakas itu.
◗ Jangan buang arahan-aharan ini. Simpan untuk rujukan di masa
hadapan.
◗ Alat ini cuma untuk penggunaan di rumah.
◗ Sebelum memasang perkakas itu, periksa sama ada kuasa voltan
yang dipaparkan pada perkakas itu serasi dengan kuasa voltan suis
utama di kediaman anda.
◗ Jangan gunakan perkakas itu semasa kord suis utama, palam, atau
komponen-komponen lain rosak.
◗ Kord wayar alat ini yang rosak cuma boleh digantikan oleh Philips
atau pusat servis yang disahkan oleh Philips, kerana penggantian
membutuhkan peralatan dan/atau bahagian yang spesial.
◗ Jangan sekali-kali menggunakan aksesori atau bahagian yang dibuat
oleh pengeluar-pengeluar lain, ataupun yang tidak disarankan khas
oleh Phillips. Jaminan anda akan menjadi tidak sah sekiranya anda
menggunakan aksesori atau bahagian sebegitu.
◗ Periksa penyaring setiap kali mahu menggunakan perkakas itu. Jika
anda mengesan apa-apa keretakan atau kerosakan, jangan gunakan
perkakas itu dan hubungilah pusat servis Phillips yang terdekat.
◗ Pastikan semua bahagian dipasang dengan betul sebelum anda
menghidupkan perkakas itu.
◗ Hanya gunakan perkakas apabila kedua-dua penyelak terkunci.
◗ Jangan biarkan perkakas hidup melebihi 2 minit tanpa henti. Jika
anda belum selesai menyari jus, biarkan perkakas menyejuk selama
2 minit sebelum menghidupkannya semula.
◗ Jauhkan perkakas itu dari kanak-kanak. Jangan biarkan kanak-kanak
mengendalikan perkakas tanpa penyeliaan.
◗ Jangan sekali-kali membiarkan perkakas beroperasi tanpa diawasi.
◗ Jangan sekali-kali memasukkan jari atau objek ke dalam tiub
penyuap sewaktu perkakas sedang berjalan.
◗ Buka kunci penyelak hanya selepas mematikan perkakas itu dan
selepas penyaring berhenti memutar.
◗ Bekas pulpa tidak boleh dialihkan ketika perkakas sedang
beroperasi.
Deskripsi Am
Sila buka diagram terlipat pada muka surat 3.
A Penstoran Kord
B Hidup/Mati
C Unit motor
D Penyelak penutup
E Aci penggerak
F Cawan jus (jenis HR1821 sahaja)
G Penutup cawan jus dengan pengasing busa bersepadu (jenis HR1821
sahaja)
H Bekas pulpa
I Pengumpul pulpa
32
BAHASA MELAYU
J
K
L)
M
N
Muncung
Penyaring
Penutup
Tiub penyuap
Penolak
Menyediakan perkakas untuk digunakan
1
Basuh kesemua bahagian yang boleh tercerai (lihat seksyen
Pembersihan).
C
2
Gulungkan kord suis utama dari kili-kili pada dasar perkakas.
C
3
Sambungkan bekas pulpa kepada unit motor.Anda akan
terdengar bunyi klik apabila ia terkunci dalam kedudukan betul.
C
4
Gelongsorkan muncung ke dalam pengumpul pulpa dan tolak
sehingga anda terdengar bunyi klik.
C
5
Tempatkan pengumpul pulpa di atas unit motor.
2
1
BAHASA MELAYU
C
6
33
Letakkan penyaring di dalam pengumpul pulpa.
Sentiasa periksa penyaring sebelum menggunakannya. Jika anda
mengesan sebarang keretakan atau kerosakan, jangan guna perkakas itu
dan hubungilah pusat servis Phillips yang terdekat atau bawa perkakas
itu kepada pengedar.
C
7 Tempatkan penutup pada pengumpul pulpa.
Pastikan bahawa cangkuk pada penutup muat ke dalam lubang pada
pengumpul pulpa.
8
Katupkan kedua-dua penyelak ke atas penutup untuk
menguncinya dalam kedudukan itu (klik).
9
Tempatkan cawan jus ataupun gelas di bawah muncung itu.
10
Masukkan palam ke dalam soket dinding.
Bahan dan petua
- Gunakan buah-buahan dan sayur-sayuran segar kerana ia
mengandungi jus yang lebih. Nenas, ubi bit, batang saderi, epal, timun,
lobak, bayam, tembikai, tomato, oren dan buah anggur semuanya
sesuai diproses dalam penyari jus.
- Anda tidak perlu mengupas kulit-kulit buah yang nipis. Hanya kulit
tebal, contohnya kulit buah oren, nenas dan ubi bit yang tidak dimasak
perlu dikupas. Empulur putih buah-buahan sitrus juga perlu dikupas
kerana rasanya pahit.
- Semasa menyediakan jus epal, beringatlah bahawa kepekatan jus epal
bergantung kepada jenis epal yang digunakan. Semakin berjus epal itu,
semakin cair jus yang dihasilkan. Pilihlah epal yang akan menghasilkan
jenis jus yang anda suka.
- Jus epal cepat bertukar menjadi warna coklat. Anda boleh
melambatkan proses ini dengan menambahkan beberapa titik jus
lemon.
- Buah-buahan yang mengandungi kanji, seperti pisang, betik, avokado,
pisang salai dan mangga tidak sesuai untuk diproses di dalam penyari
jus. Gunakan pemproses makanan, blender atau blender bar untuk
memproses buah-buahan ini.
- Daun-daun dan batang daun, contohnya pada salad juga boleh
diproses di dalam penyari jus.
- Minum jus dengan serta-merta selepas disari. Jika ia didedahkan
kepada udara untuk beberapa waktu, jus itu akan kehilangan rasa dan
nilai pemakanannya.
34
BAHASA MELAYU
Penggunaan alat
C
C
0
1
Bersihkan buah dan/atau sayur dan potong menjadi bentuk yang
boleh muat ke dalam tiub penyuap.
2 Hidupkan perkakas dengan menekan butang hidup/mati.
Perkakas itu akan berfungsi hanya jika kesemua bahagian telah dipasang
dengan betul dan penutup dikunci dalam kedudukan yang betul dengan
penyelak-penyelaknya.
1
C
3
Letakkan bahan-bahan yang telah dipotong terlebih dahulu ke
dalam tiub penyuap dan dengan perlahan, tekan bahan-bahan itu
dengan penolak ke arah penyaring yang berputar.
Jangan menggunakan tekanan berlebihan pada penolak kerana ini boleh
menjejaskan kualiti hasil dan mungkin juga menyebabkan penyaring
terhenti.
Jangan masukkan jari atau objek ke dalam tiub penyuap.
Selepas anda telah memproses kesemua bahan dan jus berhenti
mengalir ke dalam cawan jus atau gelas, matikan perkakas dan tunggu
sehingga penyaring berhenti berputar.
Jangan biarkan perkakas berjalan melebihi dua minit tanpa henti. Jika
anda belum selesai menyari jus, matikan perkakas dan biarkan ia
menyejuk selama dua minit sebelum anda meneruskan penyarian.
C
4
(Type HR1821 only) Pengasing busa bersepadu di dalam
penutup cawan jus akan membolehkan anda menuang secawan
jus dengan elok tanpa selapisan busa pada bahagian atas jus itu.
Pembersihan
◗ Perkakas lebih mudah dibersihkan sekiranya anda
membersihkannya dengan segera selepas digunakan.
◗ Jangan gunakan agen pembersih lelas, penggosok, aseton, alkohol,
dll..
◗ Jangan bersihkan mana-mana bahagian perkakas di dalam mesin
basuh pinggan.
BAHASA MELAYU
C
1
Matikan perkakas, keluarkan palam dari soket dinding dan
tunggu sehingga penyaring berhenti berputar.
2
Alihkan bahagian-bahagian kotor dari unit motor, bersihkan
dengan berus lembut dalam air bersabun dan bilas dengan air
paip.
3
Bersihkan unit motor dengan sehelai kain lembab.
35
Jangan sekali-kali merendam unit motor di dalam air atau membilasnya
dengan air paip.
Maklumat & khidmat
Jika anda memerlukan maklumat atau anda mempunyai masalah, sila
lawat tapak web Philips di www.phillips.com atau hubungi Pusat Servis
Pelanggan Philips di negera anda (nombor telefonnya tertera di risalah
jaminan antarabangsa). Jika tiada Pusat Servis Pelanggan di negara anda,
sila hubungi pengedar Philips di tempat anda atau hubungi Bahagian
Servis Perkakas Rumah dan Peralatan Peribadi Phillips BV.
Troubleshooting guide
This chapter summarises the most common problems you could encounter with your juice
extractor. Please read the different sections for more details. If you are unable to solve the problem,
please contact the Philips Customer Care Centre in your country (you will find its phone number
in the worldwide guarantee leaflet). If there is no Customer Care Centre in your country, turn to
your local Philips dealer or the nearest Philips Service Centre.
Masalah
Penyelesaian
Perkakas tidak berfungsi.
Perkakas dipasang dengan suatu sistem keselamatan. Ia tidak akan berfungsi jika
bahagian-bahagiannya tidak dipasangkan dengan betul. Periksa sama ada bahagianbahagiannya telah dipasang dalam cara yang betul, tetapi pastikan anda mematikan
perkakas dahulu sebelum melakukan demikian.
Unit motor mengeluarkan
bau yang kurang
menyenangkan sewaktu
perkakas digunakan untuk
beberapa kali pertama.
Ini tidak luar biasa. Jika perkakas terus mengeluarkan bau selepas beberapa kali
digunakan, periksa kuantiti yang anda proses serta tempoh pemprosesan. Setelah
perkakas sudah berjalan selama 2 minit, anda sepatutnya mematikannya dan
membiarkan ia menyejuk selama 2 minit.
Perkakas mengeluarkan
bunyi, terlalu panas untuk
disentuh, berasap, dll.
Matikan perkakas dan buka palam. Hubungi Pusat Servis Phillips terdekat atau pengedar
untuk bantuan lanjut.
Penyaring tersumbat.
Matikan perkakas, bersihkan tiub penyuap, dan proses kuantiti yang lebih kecil.
Penyaring bersentuhan
dengan tiub penyuap atau
bergetar dengan kuat
semasa pemprosesan.
Matikan perkakas dan buka palam. Periksa sama ada penyaring telah ditempatkan
dengan betul di dalam pengumpul pulpa. Rusuk di bawah penyaring mesti muat dengan
betul pada aci penggerak. Periksa sama ada penyaring rosak. Retak, cakera jeriji yang
longgar atau apa-apa keluarbiasaan yang lain boleh menyebabkan kegagalan berfungsi
dengan betul.
36
TI”NG VI◊T
L∑u Ω
◗ Xin Û¶c kø cÄc h∑≠ng dèn vÅ xem hùnh minh h¶a tr∑≠c khi s∫
d∂ng mÄy.
◗ Nìn giª kø cÄc h∑≠ng dèn nÅy Ûô tiõn tham khÖo.
◗ MÄy Û∑±c thiót kó chü Ûô d≥ng trong gia Ûùnh.
◗ Tr∑≠c khi nßi mÄy v≠i ngu®n Ûiõn, kiôm tra xem Ûiõn thó cµa mÄy
c° ph≥ h±p v≠i Ûiõn thó ngu®n Ø nhÅ hay kh£ng.
◗ Kh£ng nìn s∫ d∂ng mÄy khi dÇy Ûiõn chúnh, Ûçu cám hoãc nhªng
thÅnh phçn khÄc b† h•ng.
◗ Nóu dÇy Ûiõn chúnh cµa mÄy b† h•ng, bÜn phÖi mang Ûón thay tÜi
hÉng Philips hoãc trung tÇm bÖo hÅnh cµa Philips vù cçn phÖi c° cÄc
d∂ng c∂ vÅ/hoãc b´ phên Ûãc biõt.
◗ Kh£ng s∫ d∂ng ph∂ kiõn hoãc b´ phên cµa cÄc nhÅ sÖn xuåt khÄc
hoãc kh£ng Û∑±c Philips khuyìn d≥ng. Nóu s∫ d∂ng cÄc ph∂ kiõn
hoãc ph∂ t≥ng nÅy, chó Û´ bÖo hÅnh cµa mÄy sî kh£ng c¢n hiõu lºc.
◗ Kiôm tra b´ phên l¶c m™i khi s∫ d∂ng mÄy. Nóu phÄt hiõn thåy vót
n∏t hoãc h∑ h•ng, kh£ng nìn s∫ d∂ng mÄy mÅ hÉy liìn hõ v≠i
trung tÇm bÖo hÅnh Philips gçn nhåt.
◗ PhÖi bÖo ÛÖm tåt cÖ cÄc b´ phên Û∑±c láp Ûãt Û≤ng tr∑≠c khi bêt
mÄy.
◗ Chü s∫ d∂ng mÄy khi cÖ hai chßt kh°a ÛÉ Û°ng.
◗ Kh£ng nìn Ûô mÄy hoÜt Û´ng quÄ 2 ph≤t liìn t∂c. Nóu bÜn vèn ch∑a
xay hót trÄi cÇy, hÉy cho mÄy nghü trong 2 ph≤t tr∑≠c khi bêt lÜi.
◗ Ùô mÄy xa tçm tay trï em. Kh£ng nìn cho trï s∫ d∂ng mÄy mÅ
kh£ng giÄm sÄt.
◗ Kh£ng cho mÄy hoÜt Û´ng khi kh£ng c° ng∑Æi.
◗ Kh£ng chÜm tay hoãc Û∑a vêt lÜ vÅo miõng ßng dèn n∑≠c ëp khi
mÄy Ûang hoÜt Û´ng.
◗ Chü mØ cÄc chßt kh°a khi ÛÉ tát mÄy vÅ b´ phên l¶c ÛÉ ngπng
quay.
◗ BÜn kh£ng Û∑±c låy b´ phên ch∏a bÉ ra khi mÄy Ûang hoÜt Û´ng.
M£ tÖ t©ng quÄt
Xin mØ bÖn biôu Û® Ø trang 3.
A B´ phên ch∏a dÇy Ûiõn
B N≤t on/off
C Motor
D Chßt kh°a náp
E Tr∂c xoay
F TÄch ch∏a n∑≠c ëp (chü c° Ø kiôu HR1821)
G Náp Ûêy tÄch ch∏a n∑≠c ëp c° b´ phên tÄch b¶t (chü c° Ø kiôu
HR1821)
H B´ phên ch∏a bÉ
I B´ phên nhên bÉ
J V¢i
K B´ phên l¶c
L Náp Ûêy
M ›ng dèn
N N≤t nhån
TI”NG VI◊T
37
QuÄ trùnh chuén b† tr∑≠c khi s∫ d∂ng
1
R∫a sÜch tåt cÖ cÄc b´ phên c° thô tÄch rÆi (xem phçn "Lau
ch≥i").
C
2
Këo dÇy Ûiõn chúnh ra kh•i b´ phên ch∏a trong mÄy
C
3
Gán b´ phên ch∏a bÉ vÅo motor. BÜn sî nghe m´t tióng tÄch
khi kh≠p vÅo v† trú.
C
4
Tr∑±t v¢i vÅo b´ phên nhên bÉ vÅ Ûéy cho Ûón khi nghe tióng
tÄch.
C
5
Ùãt b´ phên nhên bÉ vÅo motor.
C
6
Ùãt b´ phên l¶c vÅo trong b´ phên nhên bÉ.
2
1
Lu£n kiôm tra b´ phên l¶c tr∑≠c khi s∫ d∂ng. Nóu phÄt hiõn c° vót
n∏t
hoãc h∑ h•ng, kh£ng nìn s∫ d∂ng mÄy mÅ hÉy liìn hõ trung tÇm bÖo
hÅnh Philips gçn nhåt hoãc Ûem mÄy Ûón ÛÜi lΩ Ûô Û∑±c s∫a chªa.
38
TI”NG VI◊T
C
2
1
7 Ùêy náp b´ phên nhên bÉ.
PhÖi ÛÖm bÖo m°c trìn náp kh≠p v≠i khe trìn b´ phên nhên bÉ.
8
GÜt hai chßt kh°a náp vÅo Û≤ng v† trú (tÄch).
9
Ùãt tÄch ch∏a n∑≠c ëp hoãc ly d∑≠i v¢i.
10
Cám dÇy Ûiõn vÅo © cám.
CÄc thÅnh phçn vÅ mño khi s∫ d∂ng
- Nìn s∫ d∂ng rau quÖ vÅ trÄi cÇy t∑¨i vù ch≤ng ch∏a nhiòu n∑≠c. CÄc
loÜi rau quÖ hoãc trÄi cÇy thúch h±p khi d≥ng v≠i mÄy ëp trÄi cÇy lÅ
th¨m, cµ cÖi Û∑Æng, cçn tÇy, tÄo, d∑a chu´t, cÅ rßt, rau bina, d∑a tÇy,
cÅ chua, cam vÅ nho.
- BÜn kh£ng cçn g¶t nhªng trÄi cÇy c° v• m•ng. Chü cçn g¶t nhªng v•
dÅy nh∑ v• cam, th¨m vÅ cµ cÖi Û∑Æng t∑¨i. BÜn c¥ng nìn b• phçn
l§i cµa cÄc loÜi trÄi cÇy vù n° c° v† Ûáng.
- Khi chó bión n∑≠c tÄo, nìn nh≠ Û´ c£ Ûãc cµa n∑≠c tÄo t≥y thu´c
vÅo loÜi tÄo bÜn Ûang s∫ d∂ng.TÄo cÅng m¶ng n∑≠c thù n∑≠c ëp
cÅng loÉng. Ch¶n loÜi tÄo ph≥ h±p v≠i sØ thúch cµa bÜn.
- N∑≠c tÄo sî b† sêm mÅu råt nhanh. BÜn c° thô lÅm chêm tión trùnh
nÅy bàng cÄch cho thìm vÅi gi¶t chanh.
- CÄc loÜi trÄi cÇy ch∏a tinh b´t nh∑ chußi, Ûu Ûµ, lì, sung vÅ xoÅi
kh£ng thúch h±p khi d≥ng mÄy ëp trÄi cÇy. S∫ d∂ng mÄy xay thºc
phém hoãc mÄy tr´n Ûô xay nhªng loÜi trÄi cÇy nÅy.
- LÄ hoãc cußng lÄ cµa rau dióp c° thô Û∑±c ëp låy n∑≠c bàng mÄy
nÅy.
- Ußng ngay sau khi ëp. Nóu Ûô ngoÅi kh£ng khú lÇu, n∑≠c ëp sî måt
Ûi h∑¨ng v† vÅ b© d∑∞ng.
CÄch s∫ d∂ng mÄy
C
C
0
1
1
R∫a sÜch trÄi cÇy vÅ/hoãc rau quÖ r®i cát thÅnh mióng vπa v≠i
ßng dèn.
2 Nhån n≤t on/off Ûô bêt mÄy.
MÄy chü hoÜt Û´ng khi tåt cÖ cÄc b´ phên Û∑±c láp rÄp Û≤ng vÅ khi cÄc
chßt kh°a náp vÅo Û≤ng v† trú.
TI”NG VI◊T
C
39
3
Ù© trÄi cÇy ÛÉ cát sän vÅo ßng dèn vÅ nhñ nhÅng ån ch≤ng vò
phúa b´ phên l¶c Ûang xoay bàng n≤t nhån.
Kh£ng nìn ån n≤t nhån quÄ mÜnh vù c° thô Önh h∑Øng Ûón chåt l∑±ng
n∑≠c ëp vÅ c° thô lÅm cho b´ phên l¶c b† kñt.
Kh£ng Û∑±c cho tay hoãc vêt lÜ vÅo ßng dèn.
Sau khi ÛÉ ëp tåt cÖ cÄc thÅnh phçn vÅ n∑≠c ëp chÖy vÅo tÄch hoãc ly
ngπng hân, tát mÄy vÅ Û±i Ûón khi b´ phên l¶c ngπng xoay.
Kh£ng nìn Ûô mÄy hoÜt Û´ng quÄ hai ph≤t liìn t∂c. Nóu bÜn vèn ch∑a
ëp hót trÄi cÇy, hÉy Ûô mÄy nghü trong hai ph≤t tr∑≠c khi tióp t∂c.
C
4
(Chü c° Ø kiôu HR1821) B´ phên l¶c b¶t Ø náp Ûêy cµa tÄch
sî gi≤p bÜn c° m´t tÄch n∑≠c trÄi cÇy ngon mÅ kh£ng cçn
d≥ng mÅng l¶c.
Lau ch≥i
◗ Dö dÅng lau ch≥i mÄy nóu thºc hiõn ngay sau khi s∫ d∂ng.
◗ Kh£ng s∫ d∂ng mióng c¶ n®i, cÄc chåt téy r∫a Ñn m¢n, chåt
acetone, chåt c®n, v.v...
◗ Kh£ng r∫a båt kæ b´ phên nÅo trong mÄy r∫a chën.
C
1
Tát mÄy, r≤t phúch cám ra kh•i © Ûiõn vÅ Û±i Ûón khi b´ phên
l¶c ngπng xoay.
2
ThÄo cÄc b´ phên d¨ ra kh•i motor, r∫a ch≤ng bàng bÅn chÖi
mòm nh≤ng n∑≠c xÅ b£ng vÅ r∫a d∑≠i v¢i n∑≠c.
3
Lau motor bàng vÖi ém.
Kh£ng Û∑±c nh≤ng motor vÅo n∑≠c hoãc r∫a d∑≠i v¢i n∑≠c.
Th£ng tin & d†ch v∂
Nóu bÜn cçn c° th£ng tin hoãc mÄy bÜn c° vån Ûò, xin vui l¢ng vÅo
trang Web cµa Philips sau www.philips.com hoãc liìn hõ v≠i Trung TÇm
ChÑm s°c KhÄch HÅng cµa Philips Ø qußc gia bÜn c∑ ng∂ (bÜn sî tùm
thåy sß Ûiõn thoÜi cµa n¨i nÅy trìn tÆ bÖo hÅnh kháp thó gi≠i). Nóu
kh£ng c° Trung TÇm ChÑm s°c KhÄch HÅng Ø qußc gia bÜn c∑ ng∂, xin
liìn hõ v≠i ÛÜi lΩ Philips Ø Û†a ph∑¨ng hoãc Ph¢ng D†ch V∂ cµa C£ng Ty
Philips Domestic Appliances and Personal Care.
40
TI”NG VI◊T
H∑≠ng dèn khác ph∂c sº cß
Phçn nÅy t©ng h±p nhªng sº cß th∑Æng gãp khi s∫ d∂ng mÄy ëp trÄi cÇy. Xin Û¶c nhªng phçn khÄc
nhau Ûô c° th£ng tin c∂ thô. Nóu bÜn kh£ng thô giÖi quyót sº cß, hÉy liìn hõ Trung tÇm ChÑm s°c
KhÄch hÅng cµa Philips Ø qußc gia bÜn c∑ ng∂ (bÜn sî tùm thåy sß Ûiõn thoÜi cµa n¨i nÅy trìn tÆ bÖo
hÅnh kháp thó gi≠i). Nóu kh£ng c° Trung TÇm ChÑm s°c KhÄch HÅng Ø qußc gia bÜn c∑ ng∂, xin liìn
hõ v≠i ÛÜi lΩ Philips Ø Û†a ph∑¨ng hoãc Trung tÇm BÖo hÅnh cµa Philips gçn nhåt.
Sº cß
CÄch khác ph∂c
MÄy kh£ng hoÜt Û´ng.
MÄy Û∑±c trang b† m´t hõ thßng an toÅn. MÄy sî kh£ng hoÜt Û´ng khi cÄc b´ phên ch∑a
Û∑±c láp Û≤ng. Kiôm tra cÄc b´ phên ÛÉ Û∑±c láp Û≤ng ch∑a, nh∑ng phÖi nh≠ tát mÄy
tr∑≠c khi tión hÅnh.
Motor thÖi ra m≥i kh° ch†u
trong vÅi lçn s∫ d∂ng Ûçu
tiìn.
Ùiòu nÅy lÅ bùnh th∑Æng. Nóu mÄy vèn c¢n thÖi ra m≥i nÅy sau vÅi lçn nªa, hÉy kiôm tra
l∑±ng trÄi cÇy vÅ thÆi gian xay. Sau khi mÄy hoÜt Û´ng Û∑±c 2 ph≤t, bÜn nìn tát mÄy vÅ Ûô
mÄy nghü trong 2 ph≤t.
MÄy hoÜt Û´ng råt ®n, c°
m≥i, quÄ n°ng, c° kh°i v.v...
HÉy tát mÄy vÅ r≤t phúch cám. Mang mÄy Ûón ÛÜi lΩ hoãc trung tÇm bÖo hÅnh cµa Philips
gçn nhåt Ûô Û∑±c s∫a chªa.
B´ phên l¶c b† kñt
HÉy tát mÄy, lau ch≥i ßng dèn vÅ ëp m´t l∑±ng út h¨n.
B´ phên l¶c chÜm vÅo ßng
dèn hoãc rung mÜnh khi
hoÜt Û´ng.
HÉy tát mÄy vÅ r≤t phúch cám. Kiôm tra xem b´ phên l¶c ÛÉ gán Û≤ng vÅo b´ phên nhên
bÉ ch∑a. Nhªng khung Ø phúa d∑≠i b´ phên l¶c nìn Û∑±c láp kh≠p v≠i tr∂c xoay. Kiôm tra
xem b´ phên l¶c c° b† h∑ h•ng hay kh£ng. Nhªng vót n∏t, vót rÜn, l∑≠i l¶c b† l•ng hoãc
nhªng Ûiòu båt th∑Æng khÄc Ûòu c° thô lÅm mÄy hoÜt Û´ng kh£ng ©n Û†nh.
41
◗
◗
◗
◗
◗
◗
◗
◗
◗
◗
◗
◗
42
◗
◗
◗
◗
◗
1
C
2
43
C
3
C
4
C
5
C
6
2
1
44
C
7
C
8
2
1
9
10
C
1
45
C
2
C
3
C
4
0
1
46
◗
◗
◗
1
C
2
3
47
HR1821/ 1820
2002/05
48
◗
◗
◗
◗
◗
◗
◗
◗
◗
◗
◗
◗
◗
◗
◗
◗
49
1
C
2
C
3
C
4
C
5
C
6
2
1
50
C
7
C
8
2
1
9
10
C
1
51
C
2
C
3
C
4
0
1
◗
◗
◗
1
C
2
3
52
53
◗
◗
◗
◗
◗
◗
◗
◗
◗
◗
◗
◗
◗
◗
◗
◗
54
C
C
C
2
1
C
C
55
C
2
1
C
56
C
C
0
1
C
C
◗
◗
◗
57
C
58
◗ !
"
#
#$
◗ %
#&"
%
*(
◗ #$
))*#+*+,",#
#,
◗ (*
",))*"#$
(,
"$"-.+
$#*" ,/
◗ +#$
))*+*) ,/
+
*
"
$-
◗ +*)
#$
- # $+$"%,)0 %*1
+
21"%((,
)0 %*1 #$
#3(
-.
+
%*#4!5
◗ +
-.1#*% +
%*(*%
$ +
56$"%,
)0 %*1% ,",
-.#37+-.
-.1#*% +
%*, ◗ (*
"$
-,$(
#$
+!"
(
+
!"- #$
(%(
21"%
)0 %*1$ $*-
◗ (*
"-%*,"(%(,
8(
#0*%(1#$
◗ #$
#$
(, &
, 2 , &
#,
◗ ++#$
2 (%(
, +-.,*,
:; #*& "+#$
#& #3# 2
#0*%(1+#$
,
◗ #&"#$
*,++#& +#&#$
!,
◗ + +#$
"-
◗ ++%+
,(8- #(%
+.$#$
◗ (, &
+ ,0*%(1#$
#$
$
+-+- %* -.1(<
$;!+ 3 "
A) $#&"*)
B) *%(1#0-0
C) -
#(
C
D) (, &
E
E) ,"
F) 8
:;,; *, (#4!- HR1821 #,)
G) E08*
:;,; *,!
$)
(#4!- HR1821
#,)
H) #
;,; I) #&" #
;,; J) !
K) $
L) E0
M) S
#(%;,; N) #(#$
#!$
1
*
-%*$*88
(+,
"*
")
C
2
*)
"%#.V
#$
C
3
"
,"#
;,; #,"-
#(
1
-.%#* %#$
" &
#$ C
4
# $
!##&"#
;,; ,
#%#* %
C
5
#&"#
;,; #,"-
#(
1
2
1
59
60
C
6
$
#&"#
;,; (*
"$
#*
+!"
+
- +#$
(%(
21"% )0 %*1$ $*+
#$
$(,+
C
2
1
7 E0"#&"#
;,; (*
"+
&
E
"#!
,
"
#&"#
;,; 8
&
(, &
,*
,#,"E0 ( %)
9
8
:;,; *, +
(!
10
#*"; ,/#(,"
*;* #&
- ;, ; *56$: ;,; $#+,"*, *,
" " #5 # $ #0\ ( ;,
# #
#2 * #)-
- -.#3(
# $"
#4!;,
; # +#, # * *," "$,
;+-( *
; !*
#$
*
- #$
#(:
#0\ :
#0\ 6
,
"%
#0\ $-.# %$#3
#0\ $
:
#0\ $%$*
- :
#0\ # $#3*:( #&
-.*8 # $*#(%: 2-3 + - ; $*
# )0 S
S#+$*,:#$
*,
+#$
#(;*
+ #$
]^
- " $(%,""
;,*8*,#$
- $:$*,, #$
:;,; $*,
*_#**(% -.
+#$
%+6$
61
%`#$
C
C
1
;, / +
; (,
#3%# &<+*8* *
+
#$
2 #0*%(1 0-#0
#$
#$
(
#$
-%*
"#,
"#$
8(
&
E(, &
#,
0
1
C
3
*;,; $(,#3%< ;
#(%
+
#$
,
6
<;,; , ,
$
56$+-
+#%#!
*; (
-.!
:*,$
+$
,+-+-
++% +
,(8-
$ #(%
+#3
+ ,*,:;,; :$*,+ 8(
+
+ 0*%(1#$
,
$$
+-+-
+ +#$
(%(
,#% 2 +
*,:;,; #*& +0*%(1#$
+#$
#& #3# 2 $#%$
:;,; (
C
4
(- HR1821 #,) $)
E
8(:*,
+-.*8%:$*,)
:*,
*
◗ *
6+,$#$
#*&
◗ +**
$b`%c,
;, 5(
+
d
1 e e
◗ +*
%*<
#$
#$
1
0*%(1#$
8
,/
#(," ,
$$
+-+-
62
C
2
%*$# -
#(
1
*
%*#+ ,:*"
:
3
;-":+<#&-
#(
1
+--
#(
1 : +
#0: *#3
#!%$#(% "%
+(
#!%$#(% +
#$
*"]_+<
#$#&"5(1
)0 %*1$ www.philips.com
+
(%(
21"% )0 %*1#2
-. (+# 2,
!1
#
*;!,"#$,",",,$ )
+21"% #2
-. (%(
(,
+; %(,.f1)0 %*1
+
;"%*%#
$ ))*,#
%
# & )0 % *1 BV
]_+#4!+*
+,
"]_+,$$-.
!","#$
*,:;,; #
#!%$#(%+,
(< +,*8]_+*
(%(
21"% )0 %*1#2
-. (+# 2,!1
#
*;!,
"#$,",",,$ ) +21"% #2
-. (%(
(,
+; %(,.f1)0 %*1 +
21"%)0 %*1$ $*-
]_+
*
#$
#$
*,""#!$
,
#$
+
"%*(<8(
(*
"%*(<,"
"
8(
(
0*%(1#$
$(*
"
%$
-
#( 8
#3#$
;%(% +#$
, %$
+ , 2-3
, (*
"%.;, ; $-. ,*,
1 2-3 ,
# $*, + ,#$
. 2 #$
#$
-.0*%(1 +#& #3# 2 #$
#*, %$
, , e e
0*%(1#$
8
,/ #$
,21"% )0 %*1
+
(,+; %(,.f1)0 %*1$ $*-
$
+- 0*%(1#$
*
#(%
+ *,:;,
; %.
<
$
*,;,
*
#(%
+ +
*,
$
.
*,
0*%(1#$
8
,/
(*
"
"$
#,"#&" #
;,
; 8(
+
5$($
"#,
","!
(*
"$
-+
( ;#
;,; + +
;%(%
$<$+#$
;%(%+
á«Hô©dG
áeóÿGh äÉeƒ∏©ŸG
≈∏Y ¢ùÑ«∏«a áëØ°U IQÉjR ∂æe ƒLôf á∏µ°ûe ájCG »à¡LGh hCG áeóN ájCG ¤G »àéàMG GPG
áeóÿ ¢ùÑ«∏«a õcôà ∫É°üJ’G hCG www.philips.com ¿GƒæY â– âfÎf’G
⁄ GPG .(»ŸÉ©dG ¿Éª°†dG ≥ë∏e øe ∞JÉ¡dG ºbQ ≈∏Y ∫ƒ°ü◊G ∂æµÁ ) ∑ó∏H ‘ øFÉHõdG
äÉéàæe π«cƒH »∏°üJEG ,¬«a ø£≤J …òdG ó∏ÑdG ‘ øFÉHõdG áeóN õcôe ∑Éæg øµj
.á«°üî°ûdG ájÉæ©dGh á«dõæŸG äGhOCÓd ¢ùÑ«∏«a áeóN õcôà »∏°üJEG hCG ¢ùÑ«∏«a
πcÉ°ûŸG πM π«dO
π◊G
á∏µ°ûŸG
πµ°ûH QƒJƒŸG IóMƒH áàÑãe ÒZ ¬JÉ≤ë∏e âfÉc GPEÉa ¿ÉeCÓd ΩɶæH Ohõe RÉ¡÷G Gòg
ʃµJ ¿CG ó©H RÉ¡÷ÉH äÉ≤ë∏ŸG π«°UƒJ áeÓ°S øe …ócCÉJ .πª©j ød RÉ¡÷G ¿EÉa º«∏°S
.RÉ¡÷G âØbhG ób
πª©j ’ RÉ¡÷G
øe …ócCÉJ ,á¡jôµdG áëFGôdG äôªà°SG GPG øµd ájGóÑdG ‘ RÉ¡÷GG ∫ɪ©à°SG óæY »©«ÑW Gòg
𫨰ûàdG ±É≤jG Öéj ,Úà≤«bO IóŸ RÉ¡÷G 𫨰ûJ ó©H .Ö∏£àŸG âbƒdGh ΩÉ©£dG ᫪c
.Úà≤«bO IóŸ OÈj ¬«YOh
óæY á¡jôc áëFGQ Qó°üj QƒJƒŸG
¬FGô°T ó©H á∏«∏b äGôŸ ¬dɪ©à°SG
¢ùÑ«∏«a iód AÓª©dG áeóN º°ù≤H »∏°üJG »FÉHô¡µdG QÉ«àdG øY ¬«∏°üaGh RÉ¡÷G »ØbhG
.IóYÉ°ùª∏d ¢ùÑ∏«a áeóN õcôe hG ¢ùÑ«∏«a Öàµe hCG ,ô°TÉÑŸG ∞JÉ¡dG ≈∏Y
íFGhQh kÉ«dÉY kÉé«é°V Qó°üj RÉ¡÷G
áfƒî°ùdG ójó°T ƒgh IÒãc
.πbCG ᫪c ô°ü©H »eƒbh ájò¨àdG ܃ÑfG »Ø¶fh ,RÉ¡÷G »ØbhG
IOhó°ùe Ò°ü©dG IÉØ°üe
” ób Ò°ü©dG IÉØ°üe ¿CG øe …ócCÉJ .»FÉHô¡µdG QÉ«àdG øY ¬«∏°üaGh RÉ¡÷G »ØbhG
¿CG Ò°ü©dG IÉØ°üe πØ°SCG ‘ ´Ó°VC’G ≈∏Y Öéj .á¡cÉØdG Öd ájhÉM ‘ Gó«L É¡Ñ«côJ
øµÁ .âØ∏J ób Ò°ü©dG IÉØ°üe âfÉc GPG Ée »°üëaEG .ôjhóàdG IóMh πNGO ΩɵMEÉH ÖcôJ
.RÉ¡÷G ‘ ∫É£YCG ÖÑ°ùj ¿CG »îJôe ¢Uôb hCG ≥≤°ûJ hCG ô°ùc …C’
ájò¨àdG ܃ÑfG ¢ùeÓJ Ò°ü©dG IÉØ°üe
ô°ü©dG á«∏ªY AÉæKCG GÒãc œôJ hCG
63
64
á«Hô©dG
±É≤j’E G / 𫨰ûàdG QR ≈∏Y §¨°†dÉH ád’B G »∏¨°T
ΩɵMGh í«ë°üdG πµ°ûdÉH É¡«a É¡FGõLG áaÉc ™«ªŒ ∫ÉM ‘ §≤a πª©J ád’B G √òg
.Ú°†Ñ≤ŸÉH ¬à«ÑãàH ¬©°Vƒe ‘ kGó«L AÉ£¨dG πØb
2
B
0
1
IQGhódG IÉØ°üŸG √ÉŒÉH ∞£∏H É¡«£¨°VGh º«≤∏àdG ܃ÑfG ‘ á¡cÉØdG ™£b »©°V 3
.™aódG IGOÉH
∞bƒJh Ò°ü©dG IOƒL ≈∏Y ôKDƒj ób ∂dP ¿C’ ™aódG IGOG ≈∏Y §¨°†dG øe …ójõJ ’
.πª©dG øY IÉØ°üŸG
.º«≤∏àdG ܃ÑfG ‘ ¢VôZ …G hG ∂∏eÉfG »∏NóJ ’
B
πª©dG øY ádB’G »ØbhG Ò°ü©dG ≥aóJ ∞bƒJh áHƒ∏£ŸG á¡cÉØdG ™£b πc ô°üY ó©H
.¿GQhódG øY IÉØ°üŸG ∞bƒàJ ≈àM …ô¶àfGh
‘ áÑZôdG ∫ÉM ‘ .´É£≤fG ¿hóH Úà≤«bO øe ÌcC’ πª©J ádB’G »cÎJ ’
ádB’G OÈJ ≈àM Úà≤«bO IóŸ ∫ɪ©à°S’G øY ∞bƒàdG Öéj ô°ü©dG ‘ QGôªà°S’G
.iôNCG Iôe É¡dɪ©à°SG πÑb
Ò°ü©dG ܃c AÉ£Z ‘Ò°ü©dG øY IƒZôdG π°üa IGOG ¿G :(§≤a HR1821 RGôW) 4
≈∏Y IƒZôdG øe á≤ÑW ºcGôJ ¿hO êRÉ£dG Ò°ü©dG øe òjòd ܃c Öµ°S øe ∂浓
.¬ë£°S
B
∞«¶æàdG
.∫ɪ©à°SE’G ó©H Iô°TÉÑe ÌcCG RÉ¡÷G ∞«¶æJ π¡°ùj .ïdG ,¿ƒà«°SCG hCG ∫ƒëc hCG ᣰTÉc ∞«¶æJ OGƒe »eóîà°ùJ ’ .¿ƒë°üdG ádÉ°ùZ ‘ ™£≤dG øe …CG ∞«¶æàH »eƒ≤J ’ ¿GC ¤G …ô¶àfGh §FÉ◊G øe »FÉHô¡µdG ¢ùÑ≤ŸG π°üaGh ,RÉ¡÷G 𫨰ûJ »ØbhGC 1
.¿GQhódG øY Ò°ü©dG IÉØ°üe ∞bƒàJ
™e IÒ¨°U IÉ°Tôa ᣰSGƒH É¡Ø«¶æàH ºbh ∑ôÙG IóMh øe áî°ùàŸG ™£≤dG »YõfG 2
.…QÉ÷G QƒÑæ°üdG AÉe â– É¡«Ø£°TG ºK ¿ƒHÉ°Uh AÉe
.á∏∏Ñe ¢Tɪb á©£b ᣰSGƒH ∑ôÙG IóMh ∞«¶æàH »eƒb 3
.QƒÑæ°üdG AÉe â– É¡«Ø£°ûJ ’h GóHG AÉŸG πNGO ∑ôÙG IóMh …ôª¨J ’
B
á«Hô©dG
Ö∏dG ™ªL AÉYh ¥ƒa AÉ£¨dG »©°V 7
AÉYƒdG ‘ Ö≤ãdG πNGO AÉ£¨dG ∂Ñ°ûe ¥ÓZG øe …ócCÉJ
B
2
(''∂«∏c'' 䃰üdG »©ª°ùJ ≈àM) ¬«a ɪ¡«àÑKh AÉ£¨dG »∏Y AÉ£¨dG »°†Ñ≤e »©aOG 8
1
Ò°ü©dG ≥aóJ ágƒa â–Ò°ü©dG áLÉLR hG ܃c »©°V 9
.QGó÷G ‘ á«FÉHô¡µdG ábÉ£dG Qó°üe ‘ ád’B G ¢ùÑ≤e »∏NOG 10
Ió«Øe äGOÉ°TQGh Ò°ü©dG äÉfƒµe
ÌcG Ò°üY ≈∏Y …ƒà– É¡fC’ áLRÉW QÉ°†Nh á¡cÉa »∏ª©à°SG ¢ùaôµdG ¿É°üZGh Qó檰ûdGh ¢SÉfÉf’G :IQÉ°ü©dG √òg ‘ ô°ü©∏d áÑ°SÉæŸG á¡cÉØdG .Öæ©dGh ∫É≤JÈdGh ºWɪ£dGh Ωɪ°ûdGh ïfÉÑ°ùdGh Qõ÷Gh ¢ùÿGh ìÉØàdGh
∞«ãµdG ô°û≤dG äGP á¡cÉØdG AÉæãà°SÉH Égô°üY πÑb ô°û≤dG á≤«bôdG á¡cÉØdG …ô°q û≤J ’ πÑb ÉgÒ°û≤J Öéj »àdG ¥ƒ∏°ùŸG ÒZ hG A»ædG Qó檰ûdGh ¢SÉfÉfB’Gh ∫É≤JÈdG πãe
.º©£dG Iôe É¡fC’ äÉ«°†ªë∏d AÉ°†«ÑdG á«∏NGódG Iô°û≤dG ádGRG ≈∏Y »°UôMG ∂dòc .Égô°üY
¿Éc ɪ∏µa ìÉØàdG ´ƒf ≈∏Y óªà©J Ò°ü©dG áaÉãc ¿G …ôcòJ ìÉØàdG Ò°üY Ò°†– óæY ´ƒf ∂«£©j …òdG ìÉØàdG …QÉàNG.áaÉãc πbG Ò°ü©dG ¿Éc ɪ∏c Ò°ü©dÉH kÉ«æZ ìÉØàdG
.¬æ«∏°†ØJ …òdG Ò°ü©dG
øe äGô£≤dG ¢†©H áaÉ°VÉH í°üæj Gòd áYô°ùH »æÑdG ¿ƒ∏dG ¤G ∫ƒëàj ìÉØàdG Ò°üY .¿ƒª«∏dG Ò°üY
ɨfÉŸGh ÚàdGh hOÉcƒaC’Gh ÉjÉHÉÑdGh RƒŸÉc AÉ°ûf ≈∏Y …ƒà– »àdG á¡cÉØdG ´GƒfG •ÓN hG kÉWÓN hG ΩÉ©W Ò°†– áæ«cÉe »∏ª©à°SG .IQÉ°ü©dG ‘ ô°ü©∏d áÑ°SÉæe ÒZ
.á¡cÉØdG √òg øe ÜGô°T Ò°†ëàdäÉHhô°ûe
.á¡cÉØdG IQÉ°üY ‘ ¢ùÿG πãe á«bQƒdG QÉ°†ÿG ô°üY øµÁ √ó≤Øj âbƒdG ¢†©Ñd AGƒ¡∏d ¬°Vô©J ¿C’ IQÉ°ü©dÉH √ô°üY Qƒa Ò°ü©dG ∫hÉæàH í°üæj .á«FGò¨dG ¬àª«bh ¬ª©W
RÉ¡÷G ΩGóîà°SGE
ºéM Ö°SÉæJ ™£b ¤G É¡«©£b ºK Égô°ü©H ÚÑZôJ »àdG QÉ°†ÿGh á¡cÉØdG »∏°ùZG 1
º«≤∏àdG ܃ÑfG
B
65
66
á«Hô©dG
AÉ£¨dG L
ájò¨àdG ܃ÑfG M
™aódG IóMh N
∫ɪ©à°SÓ
E d RÉ¡÷G Ò°†–
.(∞«¶æàdG Iô≤a »©LGQ) IQÉ°ü©dG äÉ≤ë∏e áaÉc »∏°ùZG 1
.ád’B G πØ°SG ‘ øjõîàdG IóYÉb øe ád’B G ∂∏°S »µa 2
B
.É¡«a É¡à«ÑãJ 䃰U »©ª°ùJ ¿G ¤G ∑ôÙG IóMƒH á¡cÉØdG Öd ájhÉM »∏°UhG 3
B
É¡à«ÑãJ 䃰U »©ª°ùJ ≈àM Ö∏dG ™«ªŒ IóMh ‘ Ò°ü©dG ≥aóJ ágƒa »∏NOG 4
.É¡«a
B
2
1
.∑ôÙG IóMh ≈∏Y Ö∏dG ™«ªŒ IóMh »©°V 5
B
.Ö∏dG ™ªL AÉYh ‘ IÉØ°üŸG »©°V 6
B
øY »ØbƒJ ∞∏J hG ¥ƒ≤°T ájG äóLh GPEÉa ∫ɪ©à°SB’G πÑb ɪFGO IÉØ°üŸG »°üëaG
π«cƒdG¤G hG ¢ùÑ«∏«a øe óªà©e áeóN õcôe ÜôbCÉH »∏°üJGh ádB’G ∫ɪ©à°SG
.∂jód óªà©ŸG
á«Hô©dG
kGóL º¡e
,
,
,
,
,
,
,
,
,
,
,
,
,
,
,
.ádB’G 𫨰ûJ πÑb äÉeƒ°SôdG ¤G …ô¶fGh ábóH äɪ«∏©àdG √òg …CGôbG
∫ɪ©à°SÓd kÉ©Lôe ¿ƒµàd É¡«¶ØMG πH É¡æe »°ü∏îàJ hG äɪ«∏©àdG òg »eôJ ’
.§≤a ‹õæŸG ∫ɪ©à°SBÓd »g ádB’G √òg
‘ á«FÉHô¡µdG ábÉ£dG Qó°üe ¿G øe …ócCÉJ »FÉHô¡µdG QÉ«àdÉH ádB’G π«°UƒJ πÑb
.ádBÓd Ö°SÉæe ∫õæŸG
.∞∏à∏d É¡d Ú©HÉàdG ¢ùÑ≤ŸG hG »FÉHô¡µdG ∂∏°ùdG ¢Vô©J ∫ÉM ‘ ádB’G »∏ª©à°ùJ ’
iód ¬dGóÑà°SG ≈∏Y ɪFGO »°UôMG ∞∏à∏d ádBÓd »FÉHô¡µdG ∂∏°ùdG ¢Vô©J ∫ÉM ‘
™£b hG äGhOG ∫ɪ©à°SG Ö∏£àj ∂dP ¿G å«M ¢ùÑ«∏«a øe óªà©e áeóN õcôe hG ¢ùÑ«∏«a
.á°UÉN
ádBÓd »∏°UC’G ™æ°üŸG ÒZ iôNG áYÉæ°U øe äGQGƒ°ù°ùcG hG ™£b ∫ɪ©à°SG øe …QòMG
äGQGƒ°ù°ùcE’G hG ™£≤dG √òg πãe ∫ɪ©à°SG ∫ÉM ‘ . ¢ùÑ«∏«a πÑb øe Ióªà©e ÒZ hG
.á«Z’ ádÉصdG Èà©J
hG ¥ƒ≤°T ájG äóLh GPEÉa .ádB’G ∫ɪ©à°SG äOQG ɪ∏c ádB’G ‘ Ò°ü©dGIÉØ°üe »°üëaG
..¢ùÑ«∏«a øe óªà©e áeóN õcôe ÜôbCÉH »∏°üJGh ádB’G ∫ɪ©à°SG øY »ØbƒJ ∞∏J
.É¡dɪ©à°SG πÑb ádB’G ‘ ™£≤dG áaÉc â«ÑãJ áeÓ°S øe …ócCÉJ
.Ú∏Ø≤e ¿É°†Ñ≤ŸG ¿ƒµj ÉeóæY §≤a ádB’G »∏ª©à°SG
QGôªà°S’G ‘ áÑZôdG ∫ÉM ‘ .´É£≤fG ¿hóH Úà≤«bO øe ÌcC’ πª©J ádB’G »cÎJ ’
É¡dɪ©à°SG πÑb ádB’G OÈJ ≈àM Úà≤«bO IóŸ ∫ɪ©à°S’G øY ∞bƒàdG Öéj ô°ü©dG ‘
iôNCG Iôe
áÑbGôe ¿hO É¡fƒ∏ª©à°ùj º¡«cÎJ ’, ∫ÉØW’G ∫hÉæàe øY ádB’G …ó©HG
É¡àÑbGôe ¿hO QhóJ ádB’G »cÎJ ’
.ádB’G 𫨰ûJ AÉæKG á¡cÉØdG º«≤∏J ܃ÑfG ‘ ôNBG ¢VôZ …G hG ∂©Ñ°UG »∏NóJ ’
¿GQhódG øY áµÑ°ûdG ∞bƒJh πª©dG øY ádB’G ±É≤jG πÑb ádB’G AÉ£Z »°†Ñ≤e »µØJ ’
IQÉ°ü©dG πªY AÉæKG á¡cÉØdG Öd ájhÉM ≠jôØJ Öéj ’
RÉ¡é∏d ΩÉY ∞°Uh
∂∏°ùdG ¿õfl
±É≤jE’G / 𫨰ûàdG ìÉàØe
∑ôÙG IóMh
AÉ£¨dG ¢†Ñ≤e
IQGO’G OƒªY
(§≤a HR1821 RGôW) Ò°ü©dG ܃c
IƒZô∏d »∏NGO π°UÉa ™e Ò°ü©dG ܃c AÉ£Z
á¡cÉØdG Öd ájhÉM
Ö∏dG ™ªL IGOG
Ò°ü©dG ≥aóJ ágƒa
Ò°ü©dG IÉØ°üe
A
B
C
D
E
F
G
H
I
J
K
67
68
69
70
0
1
71
2
1
72
2
1
73
u
www.philips.com
4222 002 27771