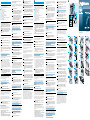
1
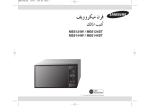
and the spot where the comb is in contact with the skin (fig. 5). ENGLISH General Description A 2D Contour Tracking Comb B 3-Dimensional Rounded Chromium Steel Blades C Hair Length Selector D On/Off Switch E Socket for Appliance Plug F Cleaning Brush G Barber's Comb H Charge Indication Light I Mains plug with Transformer J Appliance Plug K Nose/ear/eyebrow Grooming Attachment L Storage Stand M Trimming Attachment Important ◗ Check if the voltage indicated on the appliance corresponds to the mains voltage in your home before you connect the appliance. ◗ Make sure that the appliance does not get wet. ◗ This appliance is only designed for trimming the human beard and grooming nose hair, ear hair, eyebrows, moustache and sideburns. ◗ Keep the appliance out of the reach of children. B If you are using the trimmer for the first time, start at the maximum trimming length setting: setting 5 with big comb. 3 To trim in the most effective way, move the trimmer against the direction of hair growth. Make sure the surface of the comb always stays in contact with the skin (fig. 6). 4 If a lot of hair has accumulated in the comb, remove the comb attachment and blow and/or shake the hair out of the comb.The selected trimming length setting will not change when you do this (fig. 7). 1 Remove the comb attachment by pulling it off the appliance (fig. 8). 2 Blow and/or shake hairs out of the grooming attachment. 3 Reassemble one of the two attachments on the appliance (fig. 19). Replacing the cutting unit Never pull at the flexible top of the comb attachment. Always pull at the bottom part. Cutting without comb attachment (or with position '0') will result in a very short stubble beard. 3 Make well-controlled movements.Touch the hair lightly with the trimmer (fig. 9). 1 Make sure the appliance is switched off. 2 Insert the appliance plug into the appliance (Fig. 2). Do not use the attachment with a damaged or broken cutting or grooming attachment as injury may occur. 3 Put the mains plug into the wall socket. Use the grooming attachment A fully charged appliance has a cordless trimming time of up to 40 minutes. 1 Remove the grooming attachment by pushing it backwards (fig. 18). FRANÇAIS ◗ For trimming nose hair, ear hair and eyebrows: 1 Move the comb into position '0' and remove the trimming attachment (fig. 10). 2 Assemble the grooming attachment by inserting it's hook into the housing and push it back until you hear a click (fig. 11). Cutting nose hair A worn or damaged cutting unit should only be replaced with an original Philishave cutting unit, available from authorised Philips service centres. 1 Remove the old cutting unit. 2 Put the new cutting unit back onto the appliance until you hear a click. A Contour Tracking Comb en 2 dimensions B Unité de Coupe 3 dimensions à Bords Arrondies en Acier Chromé en 3 dimensions C Sélecteur de Coupe D Bouton Marche/Arrêt E Prise Connecteur F Brosse de Nettoyage G Peigne H Témoin de Charge I Prise Secteur avec Transformateur J Fiche Connecteur K Accessoire de Soins pour couper les poils du nez/oreilles/sourcils L Support de Rangement M Tondeuse Important ◗ Avant de brancher l'appareil, vérifiez que la tension indiquée sur le cordon d'alimentation correspond bien à la tension de votre secteur. ◗ Assurez-vous que l'appareil ne soit pas mouillé. ◗ L'appareil a été conçu pour tailler la barbe exclusivement et pour couper les poils du nez, des oreilles, des sourcils, la moustache et les favoris. ◗ Tenez l'appareil hors de portée des enfants. Charge Storage 1 Store the appliance and attachments in the stand to prevent damaging (fig. 20). Environment The built-in rechargeable battery contains substances that may harm the environment. Chargez l'appareil complètement avant de l'utiliser pour la première fois. 1 Assurez-vous que l'appareil est bien sur la position arrêt. Do not throw the battery away with the normal household waste but hand it in at an official collection point. You can also take the appliance to a Philips service centre, where the staff will be happy to help you remove the battery and dispose of it in an environmentally safe way. Si vous utilisez la tondeuse pour la première fois, commencez par le réglage maximum: Réglage 5 avec le grand peigne. Pour optimiser la durée de vie de l'appareil, ne le chargez pas plus de 24 heures. Un appareil correctement rechargé offre une autonomie de 40 minutes environ. 3 Pour tailler d'une manière efficace, taillez dans le sens inverse de la pousse des poils. Assurez-vous que la surface du guide de coupe est toujours en contact avec la peau (fig. 6). 4 Si des cheveux se sont accumulés dans le peigne du guide de coupe, retirez-le et enlevez les cheveux en secouant et/ou soufflant. La position sélectionnée ne changera pas (fig. 7). To optimise the lifetime of the rechargeable battery, we advise you to use the appliance until the battery is completely empty when the appliance has been charged for the first time. Do not recharge the appliance in between trimming sessions. Continue using the appliance until the motor almost stops running during a session.Then recharge the battery. Follow this procedure at least twice a year. 4 If the battery is empty and you want to trim your beard, charge the appliance for at least 1.5 hours and you will have enough power for one trimming session. Trimming 1 Switch the groomer on. 2 Insert the groomer in one nostril and slowly move it in and out.Turning it around the same time to remove unwanted hair (fig. 12). For best results, make sure the side of the tip is firm against skin.This will reduce the tickling effect than can occur during trimming nose hair. Do not insert the tip more than 0.5 centimetres into your nostril. Cutting ear hair Clean outer area of ear and make sure it is free of wax. Always comb the beard, moustache and/or sideburns with the attached Barber's Comb before you start trimming. 1 Switch the groomer on. Do not move the appliance too fast. Make smooth and gentle movements. 2 Move the tip softly around the edge of ear to remove hairs extending beyond the outer ear.Then carefully insert the tip into outer ear (fig. 13) ◗ To trim with the appliance disconnected from the mains: Cutting eyebrows Trimming with comb attachment Put on one of the exchangeable combs.To assemble the comb, insert the hook of the comb into the appliance and push it down until you hear a click. 1 Slide the adjustment comb to the desired trimming length setting (fig. 4). The chosen setting is indicated by the arrow. It is not recommended that you use the groomer to define or trim the entire eyebrow. 1 Switch the groomer on. 2 Use the tip to cut individual eyebrow hairs (fig. 14). 3 Put on the groomer at the root of the nose and move it along the eyebrow into the direction of hairgrowth (fig. 15). Do not trim your eyelash, be careful not to get too close to your eyelashes and eyes. Cleaning Length setting table The trimmer has 2 exchangeable comb attachments with 5 settings each, resulting in 10 different hairlengths that can be cut: ◗ Small comb (setting 1-5): resulting in a hairlength of 1.5 - 9 mm . ◗ Big comb (setting 1-5): resulting in a hairlength of 10 - 17 mm. ◗ The resulting hairlength corresponds with the smallest distance between the cutting blade 2 Slide in the Guide Comb Attachment. Pull cutting unit back to remove it (fig. 21). 3 Put a screw driver between the housing part and the metal eccentric part and push it down until the housing part will be opened (fig. 22). 4 Pull the rechargeable battery (1) and the on/off circuit board (2) out of the housing (fig. 23). 5 Insert the screwdriver into the small slot in the printed circuit board marked with an arrow. Push the screwdriver down until part of the printed circuit board breaks off (fig. 24). 6 Remove the battery form the plastic part using a screwdriver. Do not attempt to replace battery. 7 Discard the appliance. Do not insert the tip more than 0.5 centimetres into your ear as this could damage the eardrum. 1 Unplug trimmer from the outlet. The flexible combs (2D-Contour Tracking System) adjust to the contours of the face, the trimmer is easy to manoeuvre. Demanding areas, such as the chin- and throat area, are treated easily and an even cut is obtained. 1 Disconnect the appliance from the mains and let the appliance run until the motor stops. Do not use abrasives, scourers or liquids such as alcohol, petrol or acetone to clean the appliance. Do not immerse the appliance into water. 1 Make sure the appliance is switched off and disconnected from the mains before you start cleaning it. 2 Remove the comb attachment. Do not connect the appliance to the mains again after the battery has been removed. Service und Information If you need information or if you have a problem, please visit the Philips Web site at www.philips.com or contact the Philips Customer Care Centre in your country (you will find its phone number in the worldwide guarantee leaflet). If there is no Customer Care Centre in your country, turn to your local Philips dealer or contact the Service Department of Philips Domestic Appliances and Personal Care BV. B Pour optimiser la durée de vie des accumulateurs, il est conseillé d'utiliser l'appareil jusqu'à ce que les accumulateurs soient complètement déchargés après avoir chargé l'appareil pour la première fois. Ne rechargez pas l'appareil entre les séances de taille. Laissez l'appareil fonctionner jusqu'à ce que le moteur s'arrête. Ensuite rechargez les accumulateurs. Effectuez cette opération au moins deux fois par an. 4 Si les accumulateurs sont complètement déchargés et que vous voulez tondre votre barbe, chargez l'appareil au moins 1 heure. Cela suffit pour une séance. B Personal grooming set Set de soins de toilette personnel A 3 Ouvrez l'unité de coupe en poussant vers l'arrière (1) (fig. 16). Faites attention que l'élément coupant ne vous échappe pas. C D F 4 Nettoyez l'unité de coupe et l'intérieur de l'appareil avec la brosse fournie (2). 5 Remontez l'unité de coupe en insérant l'ergot dans l'appareil jusqu'à ce que vous entendiez un clic (fig. 17). M K L J H I Nettoyage de l'accessoire de soins Taille sans guide de coupe 1 Retirez l'accessoire de soins (fig. 18). 1 Retirez le guide de coupe de l'appareil (fig. 8). Ne tirez jamais sur la partie supérieure flexible du guide de coupe.Tirez toujours sur la partie inférieure. Vous obtiendrez une barbe de plusieurs jours si vous taillez sans guide de coupe (ou avec le réglage '0'). 2 Mettez l'appareil en marche. 3 Faites toujours des mouvements précis. Touchez légèrement les poils avec la tondeuse (fig. 9). Soins personnels N'utilisez pas l'accessoire avec une unité de coupe ou un accessoire de soins endommagé ou cassé car vous pouvez vous blesser. ◗ Pour tailler les poils du nez, des oreilles et des sourcils: 1 Positionnez le peigne sur la position 'O' et retirez la tondeuse (fig. 10). 2 Assemblez l'accessoire de soins en insérant l'ergot dans le boîtier et poussez-le jusqu'à ce que vous entendiez un clic (fig. 11). Couper les poils du nez Make sure nasal passages are clean B G 2 Mettez l'appareil en marche. Utilisation de l'accessoire de soins ◗ Après quelques instants, le témoin vert s'allume pour indiquer que l'appareil est en charge (fig. 3). Une charge complète dure environ 10 heures. 1 Avant de commencer à nettoyer l'appareil, assurez-vous de l'avoir éteint et débranché. 2 Retirez le guide de coupe. 2 Insérez le connecteur dans l'appareil (fig. 2). 3 Insérez la fiche dans la prise de courant. Remove the rechargeable battery when you discard the appliance. B Description Générale Trimming without comb attachment Grooming To optimise the lifetime of the appliance, do not charge it for more than 24 hours. 5 Reassemble the cutting unit by inserting the hook onto the appliance and pushing it back onto the appliance until you hear a click (fig. 17). Cleaning grooming attachment 2 Switch the appliance on. ◗ After a few moments the green pilot light will go on to indicate that the appliance is charging (fig. 3). It will take approx. 10 hours to fully charge the battery. 4 Clean the cutting unit and the inside of the appliance with the brush supplied (2) 2 Switch the appliance on. Charging Charge the appliance fully before you start using it for the first time. 3 Open the cutting unit by pushing it backwards (fig. 16). Be careful that the cutting element does not drop down. Assurez-vous que les fosses nasales soient propres. 1 Mettez l'accessoire de soins en marche. 2 Insérez l'accessoire dans une narine et remuez le vers l'intérieur et l'extérieur en le tournant pour couper les poils (fig. 12). Pour obtenir les meilleurs résultats, pressez le bout de l'accessoire fermement contre la peau. Cela diminue la sensation de chatouillement causée par la tondeuse. N'introduisez pas le bout plus de 0,5 cm dans la narine. 2 Soufflez et/ou secouez les poils de l'accessoire de soins. E 3 Remontez un des accessoires sur l'appareil (fig. 19). Remplacement de l'unité de coupe Si l'unité de coupe est usée ou endommagée, elle ne doit être remplacée que par une unité de coupe Philips d'origine, disponible chez votre revendeur ou auprès d'un Centre Service Agréé Philips. www.philips.com u 2 3 14 15 4 5 16 17 6 7 18 19 8 9 20 21 1 Retirez l'unité de rasage usée. 2 Repoussez l'unité de coupe dans l'appareil jusqu'à ce que vous entendiez un clic. Rangement 1 Rangez l'appareil et les accessoires sur le support pour éviter de les endommager. Environnement Les accumulateurs rechargeables incorporés contiennent des substances qui peuvent polluer l'environnement. Lorsque vous vous séparerez de votre appareil en fin de vie, retirez la batterie. Ne jetez pas les accumulateurs dans les ordures ménagères mais dans un endroit assigné à cet effet. Vous pouvez également déposer votre appareil dans un Centre Service Agréé Philips, qui s'en chargera avec plaisir. 2 2 1 1 Débranchez l'appareil de la prise de courant, et laissez le fonctionner jusqu'à qu'à l'arrêt complet du moteur. 2 Coulissez le Guide de Coupe.Tirez sur l'unité de coupe pour la retirer (fig. 21). 1 10 11 22 2 3 Placez un tournevis entre le boîtier et la partie métallique et poussez-le vers le bas jusqu'à ce que le boîtier soit ouvert (fig. 22). 1 Utilisation de la tondeuse Couper les poils des oreilles Peignez toujours la barbe, la moustache et ou les favoris à l'aide du Peigne avant de commencer à utiliser la tondeuse. Ne faites pas des mouvements rapides avec l'appareil. Faites des mouvements uniformes et en douceur. ◗ Pour tailler avec l'appareil (hors secteur): Nettoyez la zone extérieure de l'oreille et assurez-vous qu'elle n'a pas de cérumen. 1 Mettez l'accessoire de soins en marche. 2 Déplacez légèrement le bout autour du bord de l'oreille pour couper les poils de l'oreille externe. Insérez le bout avec précaution dans l'oreille (fig. 13). 1 Débranchez la tondeuse. Taille avec guide de coupe Les guides de coupe flexibles (2D-Contour Tracking System) suivent le contour du visage et la tondeuse est facile à manoeuvrer. Les contours de la barbe sur le cou et sur les joues sont facilement suivis et les résultats obtenus seront uniformes. Montez un des guides de coupe interchangeables. Insérez le peigne dans l'appareil et poussez-le jusqu'à ce que vous entendiez un clic. 1 Réglez le guide de coupe sur la position désirée (fig. 4). Le réglage sélectionné est indiqué par la flèche. Réglages de la hauteur de coupe La tondeuse a deux guides de coupe interchangeables avec 5 positions chacun, donc vous pouvez obtenir 10 longueurs des cheveux différentes. ◗ Petit peigne (réglage 1-5): pour une longueur des cheveux de 1,5 - 9 mm. ◗ Grand peigne (réglage 1-5): pour une longueur des cheveux de 10 - 17 mm. ◗ La longueur résultée correspond à la plus courte distance entre la lame etl´endroit où le peigne est en contact avec la peau (fig.5). Attention: N'introduisez pas le bout plus de 0,5 cm dans votre oreille car il pourrait affecter le tympan. Couper les sourcils Il n'est pas recommandé d'utiliser l'accessoire de soins pour contourner tout le sourcil. 1 Mettez l'accessoire de soins en marche. 2 Utilisez le bout pour couper les poils rebelles des sourcils (fig. 14). 3 Positionnez l'accessoire de soins depuis la base du nez et déplacez-le tout le long du sourcil dans la direction de la pousse des poils (fig. 15). Ne coupez pas les cils, faites attention de ne pas déplacer l'appareil près des cils ou des yeux. Nettoyage N'utilisez pas de produits abrasifs, de tampons à récurer ou des substances telles que l'alcool ou l'acétone pour nettoyer l'appareil. Ne plongez pas l'appareil dans l'eau. 4203 000 51541 4 Retirez les accumulateurs rechargeables (1) et les composants (2) du boîtier (fig. 23). 5 Insérez le tournevis dans la petite fente du circuit imprimé marquée d'une flèche. Poussez le tournevis vers le bas jusqu'à ce que la partie du circuit imprimé se casse (fig. 24). 6 Retirez les accumulateurs de la partie en plastique à l'aide du tournevis (fig. 25). N'essayez pas de remplacer les accumulateurs. 7 Jetez l'appareil. Ne branchez jamais l'appareil sur le secteur après avoir retiré les accumulateurs! Service et informations Pour plus d'informations, visitez notre Philips Web site : www.philips.com ou veuillez contacter le Service Consommateurs Philips de votre pays (vous trouverez le numéro de téléphone dans le dépliant sur la garantie internationale). S'il n'y a aucun Service Consommateurs Philips dans votre pays, contactez votre distributeur ou le Service Department of Philips Domestic Appliances and Personal Care BV. 12 24 13 MAX 0.5cm MAX 0.5cm 23 ™£≤dG IóMh •ƒ≤°S øe QòMG á°UÉÿG IÉ°TôØdÉH ádB’G øe »NGódG Aõ÷Gh ¢ü≤dG IóMh ∞¶f 4 .( 2) IOhõŸG ™ª°ùJ ¿G ¤G ádB’G ‘ ∂Ñ°ûŸG ∫ÉNOEÉH ¢ü≤dG IóMh ™«ªŒ óYG 5 .(17 º°SQ) É¡«a É¡à«ÑãJ 䃰U ô©°ûdG Öjò¡J ≥ë∏e ∞«¶æJ .(18 º°SQ) ∞∏ÿG ¤G ¬©aóH ô©°ûdG Öjò¡J ≥ë∏e Öë°SG 1 á«Hô©dG ≈°übC’G Öjò°ûàdG ∫ƒ£H CGóHG , Iôe ∫hC’ Üò°ûŸG πª©à°ùJ âæc GPG .ÒѵdG §°ûª∏d 5 ™°VƒdG ∫ɪ©à°SÉH ádB’G πq¨°T 2 ócCÉJ . ô©°ûdG ƒ‰ √ÉŒÉH Üò°ûŸG ∑ ∑qqôM ôM :ÌcCG á«dÉ©ØH Öjò°ûà∏d 3 .(6 º°SQ) Iô°ûÑ∏d Ék ªFGO ¢ùeÓe §°ûŸG í£°S ¿G øe øe ≥ë∏ŸG §°ûŸG Öë°SG §°ûŸG ‘ IÒÑc ô©°T ᫪c ™ªŒ óæY 4 Öjò°ûàdG ™°Vh ¿G .ô©°ûdG ádGR’ ¬°†ØfG hG ¬«∏Y ïØfGh ádB’G .(7 º°SQ) √òg ∞«¶æàdG á«∏ªY AÉæKG Ò¨àj ød QÉàıG .§°ûŸG ≥ë∏e ¿hóH Öjò°ûàdG .(19 º°SQ) ádB’G »Ø Ú≤ë∏ŸG óMG ™«ªŒ óYG 3 .(8 º°SQ) ádB’G øe ¬Ñë°ùH §°ûŸG ≥ë∏e ´õfG 1 øe á«∏°UG ¢üb IóMƒH q’G áØdÉàdG ¢ü≤dG IóMh ∫óÑà°ùJ ’ .Ióªà©ŸG ¢ùÑ«∏«a áeóN õcGôe ‘ Iôaƒàe »gh ,∞«°û«∏«a ≈∏Ø°ùdG á¡÷G øe πH ,¿ôŸG ÖfÉ÷G øe §°ûŸG ≥ë∏e Öë°ùJ ’ .kɪFGO ∫ƒ°ü◊G øe ∂æµÁ (O ™°VƒdÉH ) §°ûŸG ≥ë∏e ¿hóH Öjò°ûàdG ¿G .áHGòLh kGóL IÒ°üb á«◊ ≈∏Y A B C D E F G H I J K L M C D F J M K L 6 17 H 7 I 18 GóL º¡e 19 ∞«ØN πµ°ûH ô©°ûdG ¢ùeÓj Üò°ûŸG ´O .ó«L ºµëàH ádB’GôM 3 .(9 º°SQ) »FÉHô¡µdG QÉ«àdÉH ádB’G ≈∏Y »FÉHô¡µdG QÉ«àdG áªFÓe øe ócCÉJ .ádB’G ∫ɪ©à°SG πÑb ∂dõæe ‘ .AÉŸÉH RÉ¡÷G ∫ÓàHG ΩóY øe ócCÉJ .á«ë∏dG Öjò°ûàd §≤a ᪪°üe ádB’G √òg .∫ÉØWC’G ∫hÉæàe øY ádB’G √òg ó©HCG 5 6 7 8 9 9 2 , , , øjõîàdG 4 8 E , .ádB’G π¨°T 2 A B C D E F G H I J K L M 16 A øjó©H hP ¬LƒdG π«°UÉØJ ™Ñàj §°ûe OÉ©HC’G á«KÓK á«fGQhO á«fó©e ¢üb äGôØ°T ô©°ûdG ∫ƒW QÉ«àNG ìÉàØe ±É≤jE’G/𫨰ûàdG ìÉàØe RÉ¡÷G ¢ùHÉ≤d ¢ùÑ≤e ∞«¶æJ IÉ°Tôa ¥ÓM §°ûe »FÉHô¡µdG øë°û∏d ô°TDƒe Aƒ°V ∫ƒfi ™e »FÉHô¡c ¢ùÑ≤e RÉ¡é∏d ¢ùÑ≤e ÖLÉ◊Gh ¿PC’Gh ∞fC’G ô©°T ¢üb ≥ë∏e øjõîà∏d IóYÉb Öjò°ûà∏d ≥ë∏e áÁó≤dG ¢ü≤dG IóMh Öë°SG 1 É¡à«ÑãJ 䃰U ™ª°ùJ ¿CG ¤G ádB’G ‘ Iójó÷G ¢ü≤dG IóMh ™°V 2 .É¡«a 3 B ΩÉY ∞°Uh .¬æeô©°ûdG ádGR’ ¢†ØædG hG ïØædÉH ¬Ø¶f 2 ¢ü≤dG IóMh ∫GóÑà°SG 2 G 1 10 á«ë∏dG Öjò¡J 11 »FÉHô¡µdG øë°ûdG áÄ«ÑdG ô°†J ób ô°UÉæY ≈∏Y øë°û∏d á∏HÉ≤dG á«∏NGódG äÉjQÉ£ÑdG …ƒà– .áÄ«ÑdÉH å«M kGQƒ°ùµe hG kÉØdÉJ ¿Éc GPG ™£≤dG hG Öjò¡àdG ≥ë∏e πª©à°ùJ ’ .ìhôéH ∂àHÉ°UG ¤G …ODƒj ¬fCG 2 .¤hC’G Iôª∏d É¡dɪ©à°SG πÑb Gó«L ádB’G øë°TG . πª©dG øY áØbƒàe ádB’G ¿CG øe ócCÉJ 1 1 Öjò¡àdG ≥ë∏e ∫ɪ©à°SG ÚÑLÉ◊Gh ÚfPC’Gh ∞fC’G ô©°T Öjò°ûàd , É¡°Vô©J Öæéàd É¡H ¢UÉÿG πeÉ◊G ‘ É¡JÉ≤ë∏eh ádB’G ¿q¿õqõN N1 .(20 º°SQ) ∞∏à∏d 2 .(2 º°SQ) ádB’G ‘ »FÉHô¡µdG ¢ùÑ≤ŸG πNOG 2 .(10 º°SQ) Öjò°ûàdG ≥ë∏e ∫RGh "O" ™°VƒH §°ûŸG ∑ôq ∑ôM q 1 .QGó÷G ‘ »FÉHô¡µdG QÉ«àdÉH ádB’G ¢ùÑ≤e πNOG 3 ¤G ¬©aOGh ¬fɵe ‘ ¬µÑ°ûe ∫ÉNOEÉH Öjò°ûàdG ≥ë∏e ™™qqªL ªL 2 .(11 º°SQ) ¬«a ¬à«ÑãJ 䃰U ™ª°ùJ ≈àM ∞∏ÿG IQÉ°TEÉc ¢Vô©dG á°TÉ°T ‘ ô°†NC’G Aƒ°†dG ≈°†«°S äɶ◊ ó©H .(3 º°SQ) øë°ûdG AóÑd äÉYÉ°S 10 ‹GƒM kÓeÉc kÉæë°T ájQÉ£ÑdG øë°T ¥ô¨à°ùj 12 13 MAX 0.5cm 20 .É¡æe ¢ü∏îàdG óæY ádB’G øe äÉjQÉ£ÑdG ´õfG É¡côJGh »FÉHô¡µdG QÉ«àdG Qó°üe øe É¡Ñë°SG ºK πª©dG øY ádB’G G 1 .É«FÉ¡f QƒJƒŸG ∞bƒàj ≈àM QhóJ ∞∏ÿG ¤G ¤G ¢ü≤dG IóMh Öë°SG ºK §°ûŸG ≥ë∏e π«dO πNOG 2 .(21 º°SQ) É¡àdGR’ ¤G ¬©aOGh Êó©ŸG º°ù≤dGh IQƒ°ü≤ŸG ÚH »ZGôH ∂Øe ™°V 3 .(22 º°SQ) IQƒ°ü≤ŸG íàØJ ≈àM πØ°SC’G ∞fC’G ô©°T ¢üb »ØfC’G Ö«÷G äGô‡ áaɶf øe ócCÉJ Öjò¡àdG ádBG π¨°T 1 á«FÉHô¡µdG áMƒ∏dG ‘ IÒ¨°üdG áëàØdG ‘ »ZGÈdG ∂Øe πNOG 5 ¤G πØ°SC’G ¤G »ZGÈdG ∂Øe ™aOG .º¡°ùH É¡«dG QÉ°ûŸG áYƒÑ£ŸG .(24 º°SQ) áYƒÑ£ŸG á«FÉHô¡µdG áMƒ∏dG øe AõL ô°ùc ºàj ¿G ’ .»ZGôH ∂Øe ᣰSGƒH »µ«à°SÓÑdG Aõ÷G øe ájQÉ£ÑdG ´õfG 6 ájQÉ£ÑdG ∫GóÑà°SG ∫hÉ– 10 .∞fC’G áëàa ‘ º°S ∞°üf øe ÌcCG ¤G ádB’G ¢SCGQ πNóJ ’ .™ª°ûdG øe Égƒ∏N øe ócCÉJh ¿PE’G øe á«LQÉÿG á≤£æŸG ∞¶f 14 15 16 17 18 19 20 21 .áYÉ°S 24 øe ÌcC’ É¡æë°ûJ ’ ádB’G ôªY ádÉWE’ 11 π«°UƒJ ¿hóH πeɵdÉH áfƒë°ûe âfÉc GPG ád’G ∫ɪ©à°SG øµÁ .á≤«bO 40 IóŸ »FÉHô¡c §°SƒdG ‘ É¡côMh ∞fC’G »àëàa ióMG ‘ Öjò¡àdG ádBG πNOG 2 .(12 º°SQ) ¬«a ܃ZôŸG ÒZ ô©°ûdG ádGRE’ óMGh âbh ‘ ÖfGƒ÷Gh ÚfPC’G ô©°T ¢üb ±É≤jE’G 𫨰ûàdG áMƒdh ( 1) øë°û∏d á∏HÉ≤dG ájQÉ£ÑdG Öë°SG 4 .(23 º°SQ) IQƒ°ü≤ŸG øe (2) , á¡L ¤G É¡ª∏°S πH ∫õæŸG ‘ äÉjÉØædG ¢ù«c ‘ äÉjQÉ£ÑdG ΩôJ ’ á≤jô£H É¡æe ¢ü∏îà∏d ¢ùÑ«∏«a áeóN ôcGôe øe …G ¤G hG .áÑ°SÉæe .áÄ«ÑdÉH ô°†J ’ áæeBG MAX 0.5cm 3 ¿G ¤G ádB’G ∫ɪ©à°SÉH í°üæj áeƒë°ûŸG ájQÉ£ÑdG ôªY ádÓWE’ ádB’G ∫ɪ©à°SG ™HÉJ .Iôe ∫hC’ É¡æë°T óæY kÉeÉ“ ájQÉ£ÑdG ÆôØJ √òg ™ÑJG . ájQÉ£ÑdG øë°TG ºK ÉeÉ“ É¡«a QƒJƒŸG ∞bƒàj ¿G ¤G .πbC’G ≈∏Y áæ°ùdG ‘ ÚJôe á≤jô£dG 12 IóŸ É¡æë°TG áZQÉaádB’G ájQÉ£H âfÉch ∂à«◊ Öjò°ûJ äOQCG GPG 3 .IóMGh Iôe ∫ɪ©à°SÓd »Øµj ɇ πbC’G ≈∏Y áYÉ°S 1,5 ádB’G πq¨°T 1 á«ë∏dG Öjò°ûJ óટG ô©°ûdG ádGRE’ ¿PC’G ±ôW ∫ƒM áeƒ©æH ádB’G ¢SCGQ ∑ôq ∑ôM q 2 .(13 º°SQ) ¿PC’G πNGO ¤G ádB’G ¢SCGQ πNOCG ºK ,¿PC’G êQÉN 21 ≥ë∏ŸG §°ûŸÉH ∂«ØdÉ°S hG ∂«HQÉ°T hG ∂à«◊ §«°û“≈∏Y ¢UôMG .Öjò°ûàdÉH AóÑdG πÑb ób ¬fG å«M ¿PE’G πNGO .º°S 0,5 øe ÌcCG ¤G ádB’G ¢SCGQ πNóJ ’ ¿PC’G á∏ÑW Ö≤K hG ìôL ¤G …ODƒj .áªYÉfh áØ«ØN äÉcôëH πH áYô°ùH Üò°ûŸG ∑ô– ’ .ÉÑfÉL ádB’G ™°V 7 2 22 ÚÑLÉ◊G ô©°T ¢üb 1 :»FÉHô¡µdG QÉ«àdG øY ádB’G π°üa AÉæKG Öjò°ûà∏d ÖLÉ◊G Ò°ü≤J hG ójóëàd ô©°ûdG Öjò¡J ádBG ∫ɪ©à°SÉH í°üæj ’ ¬∏ªcÉH , ájQÉ£ÑdG ádGREG ó©H á«fÉK »FÉHô¡µdG QÉ«àdÉj ádB’G π°UƒJ ’ 23 .»FÉHô¡µdG QÉ«àdG øY Üò°ûŸG π°üaG 1 22 äÉeƒ∏©ŸGh áeóÿG ádBG’G π¨°T 1 ÉgOôØà Iô©°T πc ÖLÉ◊G ô©°T ¢ü≤d ádB’G ¢SCGQ Ωóîà°SG 2 .(14 º°SQ) ≥ë∏ŸG §°ûŸÉH Öjò°ûàdG Üò°ûŸG §Ñ°†H (2D) äGQGóà°SE’G ™ÑàJ Ωɶf ) áfôŸG •É°ûe’G Ωƒ≤J ádƒ¡°ùH Öjò°ûàdG AÉæKG IQhÉæŸÉH Ωƒ≤j ¬fG . ¬LƒdG äGQGóà°SG Ö°ùM hG øbòdÉc á°UÉN ájÉæY Ö∏£àJ ≈àdG øcÉeC’G Öjò°ûJ ÉeG .áeÉJ .á©FGQ èFÉàf »£©jh ádƒ¡°ùH ºàj ¬fEÉa áÑbôdG á≤£æe 13 24 24 √ÉŒG ‘ ÖLÉ◊G ∫ƒW ≈∏Y É¡côMh ¿PC’G πØ°SCG óæYádB’G ™°V 3 .(15 º°SQ) ∞«ãµdG ô©°ûdG á≤£æe øe kGÒãc ádB’G ÜGÎbG øe QòMGh ¢TƒeôdG ¢üb ‘ ádB’G ∫ª©à°ùJ ’ .Úæ«©dGh ¢TƒeôdG ∞«¶æàdG ‘ §°ûŸG á≤∏M πNOG . §°ûŸG ™«ªéàd. πjóÑàdG •É°ûeG óMG áaÉ°VEG É¡à«ÑK 䃰U ™ª°ùJ ≈àM πØ°SC’G ¤G É¡©aOGh RÉ¡÷G QÉ°ûe ƒgh ܃∏£ŸG Öjò°ûàdG ∫ƒW ™°Vh √ÉŒÉH §Ñ°†dG §°ûe 1 .(4 º°SQ) º¡°ùH ¬«dG 14 hG ∫hÎÑdGh ∫ƒëµdÉc πFGƒ°ùdG hG §°ûµdG ô°UÉæY πª©à°ùJ ’ .ádB’G ∞«¶æàd ¿ƒà«°SC’G Öjò°ûàdG ´É°VhG ∫hóL 5 ɪ¡æe πµd Ò«¨æ∏d Ú∏HÉb Ú≤ë∏e Ú£°ûe ≈∏Y Üò°ûŸG …ƒàëj :.ô©°ûdG ∫ƒW å«M øe ´É°VhG 10 …G Öjò°ûà∏d ´É°VhG 15 4 AÉŸG ‘ ádB’G ôª¨J ’ á≤ë∏ŸG •É°ûeC’G É¡æe Öë°SG 2 .ô©°û∏d º∏e 9 ∫ƒW ≈∏Y ∫ƒ°üë∏d ( 5-1 ™°VƒdG ) Ò¨°üdG §°ûŸG º∏e 17-10 ∫ƒW ≈∏Y ∫ƒ°üë∏d ( 5-1 ™°VƒdG ) ÒѵdG §°ûŸG .ô©°û∏d á£≤fh ™£≤dG äGôØ°T ÚH áaÉ°ùe πbG πãÁ »≤ÑàŸG ô©°ûdG ∫ƒW ¿G .(5 º°SQ) Iô°ûÑ∏d §°ûŸG á°ùeÓe , QÉ«àdG øY ádƒ°üØeh πª©dG øY ÉeÉ“ áØbƒàe ádB’G ¿G øe ócCÉJ 1 É¡Ø«¶æàH AóÑdG πÑb »FÉHô¡µdG , , IQÉjR ≈Lôj πcÉ°ûe ájG ∂à¡LGh hG äÉeƒ∏©e ájG ¤G âéæMG GPEG ∫É°üJ’G hG www,philips.com :âfÎfE’G ≈∏Y ¢ùÑ«∏«a ™bƒe ∞JÉ¡dG ΩÉbQG óéà°S) ∂jód ¢ùÑ«∏«a iód øFÉHõdÉH ájÉæ©dG õcôà ájÉæ©∏d õcôe OƒLh ΩóY ∫ÉM ‘h( á«ŸÉ©dG ¢ùÑ«∏«a ádÉØc≈∏Y º°ù≤H hG ∂jód ¢ùÑ«∏«a π«cƒH π°üJG ¬«a âfG …òdG ó∏ÑdG ‘ øFÉHõdÉH .BVá«°üî°ûdG ájÉæ©dGh á«dõæŸG Iõ¡LÓd ¢ùÑ«∏«a áeóN .(16 º°SQ) ∞∏ÿG ¤G É¡©aóH ¢ü≤dG IóMh íàaG 3 5 23