1
User manual
Manuel d’utilisation
Gebruikershandleiding
Användar-handbok
| Benutzerhandbuch
| Manuale per l'utent
PhotoFrame™
| Manual del usuario
| Manual do usuário
7FF1
Classic
7FF1CME
7FF1CWO
Modern
7FF1M4
7FF1CMI
• Packing list
• Initial setup
Getting started
• Specification
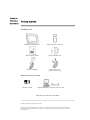
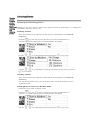
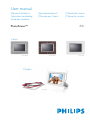
Packing List
Digital PhotoFrame™
PhotoFrame™ Stand
Quick start guide
User manual CD
Power adaptor
USB Cable to PC
(male A type plug)
What else you'll need
Power outlet
Digital Photos, memory card or PC
RETURN TO TOP OF THE PAGE
©2005 Koninklijke Philips Electronics NV
All rights reserved. Reproduction, copying, use, modification, hiring, renting, public performance,
transmission and/or broadcasting in whole or in part is prohibited without written consent of Philips
Electronics NV
• Packing list
Getting started
• Initial setup
• Specification
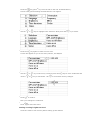
Initial setup
Philips digital PhotoFrame™ can be placed either vertically or horizontally to
fit the photos on display. Its internal rechargeable battery provides you the
freedom to pass it around and show photos without the power cord. Or, you
can place it somewhere in the room for constant PhotoFrame™ by connecting
it to the main.
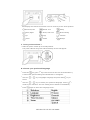
A. Removing the protective bag/film on parts
B. Attaching the PhotoFrame™ stand
• Place head of stand into socket
• Rotate clockwise until stand locks in-place
C. Connecting to a power source
• Connect the supplied power cable from PhotoFrame™ to a power outlet .
The internal battery will start charging and the battery LED turn orange.
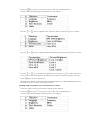
Locate control keys
• Use your PhotoFrame™ by pressing the control keys in the back.
• LCD display also shows the function icon for each key at the same position.
Previous/Left
Switch view
Setup
Next/ Right
Show/ Hide icon
Photo setting
Up
Copy
Confirm
Down
Delete
Escape
C. Turning on PhotoFrame™
• Slide the power switch up to the ON position.
The power LED will be green and the Startup screen will appear.
D. Choose your preferred language
•
•
•
•
Press the
key (the 3rd key from the left on the rear of PhotoFrame™)
A menu with general settings for PhotoFrame™ will appear.
Use the
select.
or
key to highlight Language and press the
key to
Use the
or
key to choose your preferred language. Press
to
confirm your selection. The new setting will be effective immediately.
Press
again to leave the Language menu.
RETURN TO TOP OF THE PAGE
•Packing list
Getting started
•Initial setup
•Specification Specification
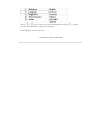
Picture/Display
- Effective display area: 137 x 91 mm (5.4" x 3.6"), 6.5" diagonal
- Vertical dot pitch: 0.1905 mm
- Horizontal dot pitch: 0.1905 mm
- Resolution: 720 x 480 pixels
- Brightness: 200 nits
- Viewing angle (CR>5): Horizontal (-85°~85°), Vertical (-85°~85°)
- Backlight Half-Life time: 20,000 hours
Connectivity
reader: Built-in Secure digital (SD), Multimedia card (MMC), Memory stick
- Card
(MS, MS Pro), Compact flash (CF) type I only.
Convenience
Photo format supported: Up to 12M pixels, JPEG photos following EXIF and DCF
standards
Memory size: 50 photos or more
Placement supported: Landscape, Portrait
Control buttons: 6 buttons
Display mode Automatic slideshow, Full-Screen browse, Thumbnail browse
Setup menu:
Photo menu:
OSD languages: English, French, German, Italian, Spanish, Simplified Chinese,
Russian, Japanese
Plug & Play compatibility: Windows 2000/XP or later, Mac OS X or later, Linux
Accessories
accessories: AC power adaptor (AC 100~240V 50/60 Hz 0.36A-->DC 5V
- Included
2.5A), USB cables, Quick start guide
- User manual: Yes (in CD-ROM)
Power
- Power LED indicator Green (power on), Off (power off)
- Battery LED indicator Orange (charging), Off (not charging)
- Power mode supported Battery powered, AC powered
RETURN TO TOP OF THE PAGE
• Viewing
Enjoying photos
photos
• Copying
photos
• Viewing
Viewing Photos
photo
slideshows When there is no memory card in PhotoFrame™, it displays photos stored in local memory.
• Deleting
When a memory card is inserted to PhotoFrame™, it will display photos from most recently
and
connected media in a "Last-in, First-display" order.
Rotating
photos
You can choose from three PhotoFrame™ viewing modes. Press
( the 1st key
from the left on the rear of PhotoFrame™) to toggle among the three viewing
modes; use
to view the previous photo and
to view the next photo. (
are the first two keys from the right on the rear of PhotoFrame™. )
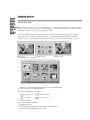
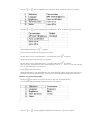
THUMBNAIL-List of photos.
A
Each icon represents the function of the corresponding
key in the rear of PhotoFrame™.
B Source of photos on screen
Memory stick
Compact flash
SD, MMC
PhotoFrame™
C Current Photo
D Current Photo number
E
Slideshow icon
(If shown, this photo will be shown in slideshow.)
F Current photo number, same as D
and
G Total photo count
H Resolution of current photo (in pixels).
I
Date current photo was taken
J
Source of displayed photos.
SLIDESHOW- Automatic, Rotating display of photos.
BROWSE—Manual viewing of photos one-by-one. (Displays size and date)
Each icon represents the function of the corresponding key in the rear of PhotoFrame™.
A
Each icon represents the function of the corresponding
key in the rear of PhotoFrame™.
B Source of photos on screen
Memory stick
Compact flash
SD, MMC
PhotoFrame™
C Current Photo number
D Total photo count
E Resolution of current photo (in pixels)
F Date current photo was taken
Viewing photos on PhotoFrame™
•
Remove any memory card from PhotoFrame™.
Photos stored in the PhotoFrame™ will appear.
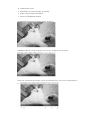
Viewing digital camera photos from a memory card
•
Insert the memory card into the slot in the frame:
•
For Compact Flash card, firmly slide card in the larger slot end first and face DOWN.
•
For SD, MMC, or Memory Stick card, slide card in the smaller slot end first and face UP
until it locks in-place.
After a few seconds photos on the memory card will display.
How to remove a memory card:
•
To remove Compact Flash card, pull out the card slowly.
•
To remove SD, MMC, or Memory Stick card, push the card again to unlock and then pull
out the card.
RETURN TO TOP OF THE PAGE
• Viewing
Enjoying photos
photos
• Copying
photos
• Viewing
Copying Photos
photo
slideshows You can copy photos stored on a memory card, or PC to PhotoFrame™. PhotoFrame™ will
• Deleting
then internally store a resized copy of the original photo. This resized copy will remain
and
inside PhotoFrame™ until you delete it from PhotoFrame™.
Rotating
photos
PhotoFrame™'s internal memory will store 50 or more resized photos. Please see the
Deleting and Rotating Photos section to learn how to delete photos stored in
PhotoFrame™.
Copying from a memory card
You may copy photos one by one in Browse mode or several photos at once in Thumbnail
Mode
Copying photo one by one in Browse mode
• Change view mode to Browse.
• Insert the memory card into PhotoFrame™.
Photos from memory card will appear.
•
•
With the photo for copy shown on screen, press the
key (the 4th key from the left
on the rear of PhotoFrame™). Four different orientations of the selected photo will
appear.
Use the
or
key to select the desired photo orientation and then press the
key.
Do not remove the memory card before the copy screen disappears upon completion.
If a warning message shows up indicating no free space for more photos, you may need
to remove some already stored photos first before copying more photos.
• After the copy screen disappears upon completion, a resized copy of the photo is stored
inside PhotoFrame™.
• You may move to other photos and continue this process until all the photos you want
are copied to Photos Frame.
Copy several photos at once in Thumbnail mode
• Change view mode to Thumbnail.
• Insert the memory card into PhotoFrame™.
Photos from memory card will appear.
•
Highlight the photo for copy in Thumbnail mode and press the
key (the 4th key from
the left on the rear of PhotoFrame™).
A multi-photo copy screen with small photos from current thumbnail screen will appear.
•
Use the
or
key to move,
to add photos to copy list,
from copy list, and then press the
to remove photos
to confirm the copy list.
Photos on the copy list are shown with a small copy icon
.
Do not remove the memory card before the copy screen disappears upon completion.
If a warning message shows up indicating no free space for more photos, you may need
to remove some already stored photos first before copying more photos.
• You may move to other Thumbnail pages and continue this process until all the photos
you want are copied to PhotoFrame™.
copying PC Photos to PhotoFrame™
•
For copying photos from a PC to the PhotoFrame™ , install the
Auto Run software PhotoFrame™ manager
Philips Auto Run Program for PhotoFrame™ is a windows based
application for user to manage photos between Philips
PhotoFrame™ and PC. It provides easy-to-use user interface for
user to browse and preview the photos in both PC directories and
PhotoFrame™ albums, and for user to perform operations, such as
copying, moving and deleting photo(s).
•
For installation and more detail about the application, please
follow the instructions in the PC software user manual located on
the CD
RETURN TO TOP OF THE PAGE
•Viewing
Enjoying photos
photos
•Copying
photos
•Viewing
photo
slideshows
•Deleting
and
Rotating
photos
Viewing Photo Slideshows
When you set the PhotoFrame™ view mode to Slideshow, it will automatically rotate the
PhotoFrame™ed on screen. You may handpick the photos for slideshow and choose
slideshow frequency – for example, how long a photo remains on screen – transition
effect – how next photo replaces current one on screen – and sequential or random
PhotoFrame™. You may also select to show all slideshow photos in either vertical or
horizontal orientation to match how you place the PhotoFrame™.
Picking photos for slideshow
Note: This function only applies to photos stored on PhotoFrame™'s internal memory.
• Change view mode to Browse or Thumbnail.
•
Press the
key (the 4th key from the left on the rear of PhotoFrame™).
A menu with specific settings for the selected photo will appear.
•
Press the
key to select Show in slideshow setting and use the
decide if you want to display this photo in the Slideshow mode.
or
Default setting is Yes for Show in slideshow.
•
Press the
to confirm.
Now your selected setting is confirmed.
•
Press
to leave this menu.
Choosing slideshow frequency
Note: This function applies to photos stored on all media.
•
Press the
key (the 3rd key from the left on the rear of PhotoFrame™).
A menu with general settings for PhotoFrame™ will appear.
key to
•
Press the
key to select Slideshow settings and use the
the Frequency item. Next press the
•
Use the
or
or
key to move to
key again to select Frequency settings.
key to highlight the interval a photo remains on screen and press
to confirm.
• Now your selected setting is confirmed.
•
Press
to leave this menu.
Choosing transition effects
Note: This function applies
•
Press the
to photos stored on all media.
key (the 3rd key from the left on the rear of PhotoFrame™).
A menu with general settings for PhotoFrame™ will appear.
•
Press the
key to select Slideshow settings and use the
the Effect item. Press the
or
key again to select Effect settings.
key to move to
•
Use the
Press
or
key to highlight the way one photo replaces the next on screen.
to confirm your selection.
Now your selected setting is confirmed.
Press
to leave this menu.
Choosing photo order
Note: This function applies
•
to photos stored on all media.
key (the 3rd key from the left on the rear of PhotoFrame™).
Press the
• A menu with general settings for PhotoFrame™ will appear.
•
Press the
key to select Slideshow settings and use the
the Order item. Next press the
•
Use the
or
or
key to move to
key again to select Order settings.
key to highlight your preference and press
to confirm.
Now your selected setting is confirmed.
•
Press
to leave this menu.
Indicating PhotoFrame™ placement orientation
•
Press the
key (the 3rd key from the left on the rear of PhotoFrame™).
A menu with general settings for PhotoFrame™ will appear.
•
•
Press
key to select Slideshow settings; press
key again to select Orientation.
Use the
or
key to highlight how you want to place PhotoFrame™. Press
confirm your selection.
Now your selected setting is confirmed.
•
Press
to leave this menu.
Selecting correct photo orientation for Slideshow
Note: This function only applies to photos stored on PhotoFrame™'s
internal
memory.
• Change the view mode to Browse or Thumbnail.
•
key (the 4th key from the left on the rear of PhotoFrame™).
Press the
A menu with specific settings for the selected photo will appear.
•
Use the
or
key to highlight Rotate. Next, press the
to select.
to
•
•
Use the
or
key to move the highlight among different rotation angles until the
thumbnail image on the left shows the desired orientation for the selected photo.
Press
to confirm.
Now your selected settings are confirmed.
•
Press
to leave this menu.
RETURN TO TOP OF THE PAGE
•Viewing
Enjoying photos
photos
•Copying
photos
•Viewing
Deleting and Rotating photos
photo
slideshows Sometimes you may want to delete some photos stored on PhotoFrame™ or change the
•Deleting
orientation of photos. Here is how:
and
Rotating a photo
Rotating
photos
Note: This function only applies to photos stored on PhotoFrame™'s internal
memory.
•
•
•
Press the
key (the 4th key from the left on the rear of PhotoFrame™).
A menu with specific settings for the selected photo will appear.
Use the
or
key to highlight Rotate and press the
key to select.
Use the
or
key to highlight the desired orientation for this photo; press the
key to confirm.
Deleting a photo
Note: This function only applies to photos stored on PhotoFrame™'s
internal
memory.
You may delete photos one by one in Browse mode or several photos at once in
Thumbnail mode.
Delete photo one by one in Browse mode
• Change the view mode to Browse mode.
•
•
Press the
key (the 4th key from the left on the rear of PhotoFrame™).
A menu with specific settings for the selected photo will appear.
Use the
or
key to highlight Delete and press the
key to select.
•
Use the
or
key to highlight Delete Photo; Press
to confirm.
• When you delete a photo, PhotoFrame™ will show status and return to Brose mode after
completion.
Delete several photos at once in Thumbnail mode
• Change view mode to Thumbnail.
•
•
Highlight the photo for delete in Thumbnail mode and press the
key (the 2rd key
from the left on the rear of PhotoFrame™).
A multi-photo delete screen with small photos from current thumbnail screen will appear.
Use the
or
key to move,
from delete list, and then press the
to add phtos to delete list,
to remove photos
key to confirm the delete list.
Photos on the delete list are shown with a small delete icon
.
• After the delete screen disappears upon completion, all the photos on the delete list are
deleted from PhotoFrame™.
• You may move to other Thumbnail pages and continue this process to delete all the
photos you want to delete from PhotoFrame™.
RETURN TO TOP OF THE PAGE
•Selecting
brightness,
language and
set time
functions
•Checking
PhotoFrame™
status
•Taking care
of your
PhotoFrame™
Optimizing PhotoFrame™
Selecting brightness, language and set time functions
Use this section to select PhotoFrame™ brightness levels and on-screen information displa
language. You may also enter your local time and then set a different brightness level fo
the evening hours from 6:00PM~6:00AM. In addition, you can set your daily automat
turn-off and turn-on time for PhotoFrame™!
Setting a general brightness level
•
Press the
key (the 3rd key from the left on the rear of PhotoFrame™).
A menu with general settings for PhotoFrame™ will appear.
•
Use the
or
key to highlight Brightness. Next press the
key to select.
A brightness bar with scales and current value will appear.
•
Use the
the menu.
or
key to modify the brightness level and press
Now your selected settings is confirmed.
•
Press
to leave this menu.
Setting your local time
•
to confirm and exit
Press the
key (the 3th key from the left on the rear of PhotoFrame™).
A menu with general settings for PhotoFrame™ will appear.
•
•
Use the
or
Press the
key to highlight Time functions. Next press the
key to select.
key again to select Current Time.
A clock will appear for you to set Hours, Minute, and AM/PM.
•
•
Use the
or
key to set Hours; next then press the
use the
or
key to set Minute. Use
Press
key to move to Minutes and
to move back for any changes.
to confirm.
Now your settings are confirmed.
•
Press
to leave this menu.
Setting evening brightness level
Local time must be set correctly before setting up this feature
•
Press the
key (the 3rd key from the left on the rear of PhotoFrame™).
A menu with general settings for PhotoFrame™ will appear.
•
Use the
or
key to highlight Time functions. Next, press the
Use the
or
key to highlight 6PM-6AM Brightness and press the
key to select.
•
•
•
key to select.
Use the
or
key to modify the brightness level and press
to confirm and leave.
If you choose Current Brightness, brightness will remain the same during the evening.
Press
again to leave this menu.
All brightness change during 6PM-6AM (through Brightness or 6PM-6AM Brightness) will
be effective for the 12-hour evening time frame.
Setting daily automatic turn-off and turn-on time
• Local time must be set correctly before setting up this feature.
•
Press the
key (the 3rd key from the left on the rear of PhotoFrame™).
A menu with general settings for PhotoFrame™ will appear.
•
•
•
•
•
•
•
•
Use the
or
key to highlight Time functions. Next, press the
Use the
or
key to highlight Auto on/off timer. Next, press the
Select Enabled and press
key to select.
key to select.
to confirm.
Move to Auto on at and press
key to select.
Set the time to turn on PhotoFrame™ everyday and press
Move to Auto off and press
to confirm.
key to select.
Set the time to turn off PhotoFrame™ everyday and Press
to confirm.
Now you have completed the auto on/off setup for your PhotoFrame™. It will turn off and
turn on automatically at preset time.
Press
to leave this menu.
Digital PhotoFrame™ will automatically turn off its display exactly at the Auto-off time, If
the time has already passed today, it will go into Auto-off status at that time tomorrow.
Choose on-screen language
•
Press the
key (the 3rd key from the left on the rear of PhotoFrame™).
A menu with general settings for PhotoFrame™ will appear.
•
Use the
or
key to highlight Language and press the
key to select.
•
Use the
or
key to choose your preferred language and press
The new selected setting is effective immediately.
•
Press
again to leave this menu.
RETURN TO TOP OF THE PAGE
to confirm.
•Selecting
brightness,
language and
set time
functions
•Checking
PhotoFrame™
status
•Taking care
of your
PhotoFrame™
Optimizing PhotoFrame™
Checking PhotoFrame™ status
You may check the status of your PhotoFrame™— whether the system is ON, if the batte
is charging, how many more photos can be stored, how much battery power remains, whic
media are currently connected, or the PhotoFrame™ software version.
From the LED light indicator in the back, you can determine whether the system is ON or
the battery is charging:
Power LED
Green: System ON
Off: System OFF
Battery LED
Orange: Battery is charging
Off: Battery is not charging
Below is an easy way to look up other information.
•
Press the
key (the 3rd key from the left on the rear of PhotoFrame™).
A menu with general settings for PhotoFrame™ will appear.
•
Use the
or
key to highlight Status.
Current PhotoFrame™ status will appear on the right column.
Free space
(pic): XX (Estimates of how many additional photos can be stored
PhotoFrame™)
Power: DC (when main is supplying power)
XX% (estimates of battery power remaining,
when internal battery is supplying power.)
Connected media: Connected media: (Lists all memory cards actively connected
to PhotoFrame™)
Firmware: (PhotoFrame™ software version)
•
Press
again to leave this menu.
RETURN TO TOP OF THE PAGE
Optimizing PhotoFrame™
•Selecting
brightness,
language and
set time
Taking care of your PhotoFrame™
functions
•Checking
PhotoFrame™ 1) Do not drop
status
PhotoFrame™ is a complicated electronic device and cannot withstand shock from drops
•Taking care
of your
2) Do not expose to moisture
PhotoFrame™
PhotoFrame™ is neither moisture proof nor moisture resistant. Exposing it to moisture o
liquid spills of any kind will very likely damage your PhotoFrame™.
3) Do not hit or scratch
The LCD panel of PhotoFrame™ is made of glass and therefore is sensitive to abnormal
force or hardware with sharp edges.
4) Screen cleaning
Please use only dry soft cloth to clean your screen.
5) Battery charging
For first time use, please fully charge your PhotoFrame™ (Battery LED will be off when
battery is fully charged). This process may take up to 3 hours or more. PhotoFrame™
starts fully recharging its internal battery only when the battery level is below certain
value. This is designed to extend your PhotoFrame™ battery life by reducing unnecessar
battery charging.
6)
Keep the stand clear from cables
Make sure the stand of your PhotoFrame™ is clear from cables as
cables could pull the stand out of PhotoFrame™ to the floor.
7) Temperature and humidity limitations
Operating temperature: 0° ~ 45° (Celsius) / 32° ~ 113° (Fahrenheit)
Humidity: 20% ~ 80%
RETURN TO TOP OF THE PAGE
Frequently asked questions
1)
Q: Is the LCD screen touch-enabled?
A: The LCD screen is not touch-enabled. Please use the keys in the back to control
PhotoFrame™.
2)
Q: Can I switch between different slideshows photos by using different memory cards?
A: Yes. When you connect your memory card to PhotoFrame™, it will slideshow photos
stored on that specific card.
3)
Q: How can I quick-charge my PhotoFrame™?
A: Charge it with the system in OFF status. PhotoFrame™ will be
> 85% charged in 2
hours when system is OFF and in 5 hours when system is ON.
4)
Q: Will the LCD screen be damaged if I keep showing the same photo for a long time?
A: No. PhotoFrame™ can display the same photo continuously for 1,000 hours
without any damage to the LCD screen.
5)
Q:Can I use PhotoFrame™ to delete photos on memory card?
A: No, it does not support operations to delete photos on external devices such as a
memory card.
6)
Q: Can I print photos from PhotoFrame™?
A: No, it does not support direct photo printing.
7)
Q: After copying photos, how can I check if the photos are already stored inside?
A: The photos are copied after the screen confirms with "photo copied" message. You
may then remove the card to view internal photos.
8)
Q: How does PhotoFrame™ show high-resolution 4:3 digital photos on its 3:2
screen?
A: To ensure high picture integrity, PhotoFrame™ shrinks the photos at original aspect
ratio and trims excessive portions before displaying these photos.
9)
Q: Can I use PhotoFrame™ during its Auto-off periods?
A: Yes. Press any control key to bring the system back to ON status.
10) Q: Can I change 6PM-6AM Brightness to other time frames, such as 7PM-11PM
Brightness?
A: No. It cannot be changed.
11) Q: Can I increase the memory size to store more pictures on my DPD?
A: No. The internal memory of DPD is fixed and cannot be expanded. However, you
could switch between different photos by using different memory cards on DPD. Please
note that photo rotation and slideshow orientation features are not supported for
photos stored on memory cards because DPD only reads such photos but cannot
change them.
12) Q:
Why doesn't my PhotoFrame™ show some of my photos?
A: Digital cameras take photos and store them in JPEG format according to camera
industry standards. PhotoFrame™ is designed to show photos following the same
industry standards. Some images, such as web images, scanned images, or photos in
RAW format from professional cameras, are not stored according to camera industry
standards and therefore cannot be correctly displayed on PhotoFrame™. Please use PC
applications to convert such images into standard JPEG format for PhotoFrame™.
13) My PhotoFrame™ is ON but the system does not respond anymore!
First please make sure the system is properly powered. Then please use a pin to trigger
the Reset button located at the lower-left corner on the back to restore the system.
14) Q: Why doesn't my PhotoFrame™ go into Auto-off status after I set it?
A: First, please make sure you set Current Time, Auto-off at, and Auto-on at correctly.
PhotoFrame™ will automatically turn off its display exactly at the Auto-off time. If the
time has already passed for the day, it will start entering Auto-off status at the
specified time from the next day.
15) Q: Why doesn't my PhotoFrame™ follow my 6PM-6AM Brightness setting in the
evening?
A: First, please make sure you set Current Time correctly. If you modify the Brightness
setting during 6PM~6AM, it will temporarily follow that new setting for the evening and
return to the original 6PM-6AM Brightness setting from the next evening.
16) Q: I'm trying to upload pictures from my PC directly to the PhotoFrame™ using the USB
connection, but I cannot get it working. What can I do?
A: Connect PhotoFrame™ to PC and put photos directly under the root directory of the
PhotoFrame™ drive. Disconnect the USB cable. After a few seconds, all photos in the
root directory will be automatically added to PhotoFrame™ and the directory will be
emptied. Please note that this operation does not apply to photos in sub-directories.
RETURN TO TOP OF THE PAGE
•Troubleshooting
your
PhotoFrame™
•Keeping your
PhotoFrame™
up to date
Troubleshooting
Troubleshooting your PhotoFrame™
Please see below for various situations and recommended actions.
Situations
Recommended actions
Warning message:
"Low battery"
Recharge PhotoFrame™ or turn off PhotoFrame™ befo
it can be recharged again. If the PhotoFrame™'s intern
battery level drops completely to zero, the "Current tim
setting may be lost.
Warning message: "No free
space to store more photos"
It means your PhotoFrame™ is fully loaded with photo
If such message shows up when your PhotoFrame™
holds less than 40 photos, please use USB cable to
connect PhotoFrame™ to PC and use PC to check if the
are abnormal files taking up the local memory of
PhotoFrame™. Normal files inside PhotoFrame™ are
usually less than 250KB in size.
Warning message: "No photo
on internal memory"
It means there is no photo in your PhotoFrame™. If su
message shows up after you load photos onto
PhotoFrame™ from PC, please make sure to the
instructions in "Copying photos" section are followed
properly.
Warning message: "No photo
on external memory"
It means there is no photo in your memory card. If suc
message shows up after you load photos onto memory
cards from PC, please make sure to the instructions in
"Viewing PC photos from a memory card" section are
followed properly.
Screen freezes and does not
respond to control anymore
Use a pin to trigger the RESET button through the hole
the lower-left corner on PhotoFrame™'s back (next to
Serial Number and Model Name sticker).
Part of photo is cropped on
PhotoFrame™
Adjust your photo to 3:2 aspect ratio. Many digital
cameras take photos in 4:3 aspect ratio but
PhotoFrame™ displays photos on 3:2 aspect ratio scre
Consequently, some upper and bottom parts of a typic
4:3 photo will not be displayed on PhotoFrame™'s
screen.
Keeping your PhotoFrame™ up to date
At times Philips will provide Software to keep your PhotoFrame™ up to date. Please regis
yourself to www.philips.com/register or visit www.p4c.philips.com for latest support new
RETURN TO TOP OF THE PAGE
•International
Service and Warranty
Warranty
•For
European
Countries
•USA
Your Philips Warranty
Thank you for purchasing this Philips product.
All Philips products are designed and manufactured to high standards and deliver highquality performance, ease of use and ease of installation. Should you encounter any
difficulties while installing or using this product, please check our website
www.philips.com/support before you contact the Philips helpdesk.
What is covered?
This warranty applies within Andorra, Austria, Belgium, Cyprus, Czech Republic, Denmark,
France, Finland, Germany, Greece, Hungary, Ireland, Italy, Liechtenstein, Luxembourg,
Monaco, the Netherlands, Norway, Portugal, Poland, Russia, Slovakia, Slovenia, Sweden,
Switzerland, Spain, Turkey and the United Kingdom and only for products originally
designed, manufactured, approved and/or authorized for usage within these countries. This
international Philips guarantee complements the existing national guarantee obligations in
the country of purchase and does not affect your statutory rights as a customer.
Warranty coverage begins as from the day you buy your product.
12 months
Andorra, Austria, Belgium, Cyprus, Czech Republic, Denmark,
France, Finland, Greece, Hungary, Ireland, Italy, Liechtenstein,
Luxembourg, Monaco, the Netherlands, Norway, Portugal, Poland,
Russia, Slovakia, Slovenia, Sweden, Switzerland, Spain, United
Kingdom
24 months
Germany, Turkey
If the Philips Helpdesk concludes with you that the product is defective, contact the Philips
dealer where you bought the product. In the event you require service whilst in another
country, or your dealer no longer exists or no longer sells Philips products, contact our
helpdesk for support to solve the problem.
What is exclude?
The Philips warranty applies provided the product is handled properly for its
intended use, in accordance with its operating instructions and upon presentation
of the original invoice or cash receipt, indicating the date of purchase, dealer's
name and model and production number of the product.
The Philips warranty may not apply if:
z
the documents have been altered in any way or made illegible;
z
the model or production number on the product has been altered, deleted, removed
or made illegible;
z
repairs or product modifications and alterations have been executed by unauthorized
service organizations or persons;
z
damage is caused by accidents including but not limited to lightning, water or fire,
physical damage (e.g. broken display, visible scratches) caused by heavy impact or
z
else;
z
Defects caused by abuse or misuse of the product;
z
This warranty does not cover accessories belonging to the product.
z
Product requires modification or adaptation to enable it to comply with local or
national technical standards, which apply in countries for which the product was not
originally designed, manufactured, approved and/or authorized. Therefore always
check whether a product can be used in a specific country.
z
Note that for products that are not originally designed, manufactured, approved
and/or authorized for usage within the country of use the Philips global warranty
terms apply.
Contact
In order to avoid unnecessary inconvenience, we advise you to read the operating
instructions carefully or go to the www.philips.com/support website for additional support
before contacting the Philips helpdesk.
To solve your problem quickly, please prepare the following details before contacting the
Philips helpdesk:
z
Philips type number
z
Philips serial number
z
PC environment Processor:
z
{
286/386/486/Pentium Pro/Internal memory
{
Operating system and version (Windows, DOS, OS/2, MAC)
Type and brand of Memory card used (Model, brand and memory size of memory
card)
Having the following information available will also help speed up the process:
z
Your proof of purchase indicating: date of purchase, dealer name, model and product
serial number.
z
The full address from which the faulty product has to be collected and the swap
model should be delivered.
Philips' customer help desks are located worldwide. Click here to access the Philips Contact
Information.
Or you can reach us via:
Website: http://www.philips.com/support
WESTERN EUROPE
Country
Telephone number
Tariff
Austria
0820 901115
€ 0.20
Belgium
070 253 010
€ 0.17
Cyprus
800 92256
Free of Charge
Denmark
3525 8761
Local call tariff
Finland
09 2290 1908
Local call tariff
France
08 9165 0006
€ 0.23
Germany
0180 5 007 532
€ 0.12
Greece
00800 3122 1223
Local call tariff
Ireland
01 601 1161
Local call tariff
Italy
199 404 042
€ 0.25
Luxembourg
26 84 30 00
Local call tariff
The Netherlands
0900 0400 063
€ 0.20
Norway
2270 8250
Local call tariff
Portugal
2 1359 1440
Local call tariff
Spain
902 888 785
€ 0.15
Sweden
08 632 0016
Local call tariff
Switzerland
02 2310 2116
Local call tariff
United Kingdom
0906 1010 017
£0.15
RETURN TO TOP OF THE PAGE
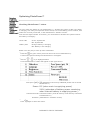
Consumer Information Centers
Antilles •Argentina •Australia • Bangladesh• Brasil •Chile •China •
Colombia •Belarus •Bulgaria • Croatia • Czech Republic •Estonia • Dubai • Hong Kong •
Hungary • India • Indonesia • Korea • Latvia • Lithuania • Malaysia • Mexico • Morocco •
New Zealand • Pakistan • Paraguay • Peru • Philippines • Poland • Romania • Russia •
Serbia & Montenegro • Singapore • Slovakia • Slovenia • South Africa • Taiwan •
Thailand • Turkey • Ukraine • Uruguay • Venezuela
Eastern Europe
BELARUS
Technical Center of JV IBA
M. Bogdanovich str. 155
BY - 220040 Minsk
Tel: +375 17 217 33 86
BULGARIA
LAN Service
140, Mimi Balkanska Str.
Office center Translog
1540 Sofia, Bulgaria
Tel: +359 2 960 2360
www.lan-service.bg
CZECH REPUBLIC
Xpectrum
Lužná 591/4
CZ - 160 00 Praha 6 Tel: 800 100 697
Email:[email protected]
www.xpectrum.cz
CROATIA
Renoprom d.o.o.
Mlinska 5, Strmec
HR - 41430 Samobor
Tel: +385 1 333 0974
ESTONIA
FUJITSU SERVICES OU
Akadeemia tee 21G
EE-12618 Tallinn
Tel: +372 6519900
www.ee.invia.fujitsu.com
HUNGARY
Serware Szerviz
Vizimolnár u. 2-4
HU - 1031 Budapest
Tel: +36 1 2426331
Email: [email protected]
www.serware.hu
LATVIA
ServiceNet LV
Jelgavas iela 36
LV - 1055 Riga,
Tel: +371 7460399
Email: [email protected]
LITHUANIA
ServiceNet LT
Gaiziunu G. 3
LT - 3009 KAUNAS
Tel: +370 7400088
Email: [email protected]
www.servicenet.lt
ROMANIA
Blue Ridge Int'l Computers SRL
115, Mihai Eminescu St., Sector 2
RO - 020074 Bucharest
Tel: +40 21 2101969
SERBIA & MONTENEGRO
Tehnicom Service d.o.o.
Bulevar Vojvode Misica 37B
YU - 11000 Belgrade
Tel: +381 11 3060 886
SLOVAKIA
Datalan Servisne Stredisko
Puchovska 8
SK - 831 06 Bratislava
Tel: +421 2 49207155
Email: [email protected]
SLOVENIA
PC HAND
Brezovce 10
SI - 1236 Trzin
Tel: +386 1 530 08 24
Email: [email protected]
POLAND
Zolter
ul.Zytnia 1
PL - 05-500 Piaseczno
Tel: +48 22 7501766
Email: [email protected]
www.zolter.com.pl
RUSSIA
Tel: +7 095 961-1111
Tel: 8-800-200-0880
Website: www.philips.ru
TURKEY
Türk Philips Ticaret A.S.
Yukari Dudullu Org.San.Bolgesi
2.Cadde No:22
34776-Umraniye/Istanbul
Tel: (0800)-261 33 02
UKRAINE
Comel
Shevchenko street 32
UA - 49030 Dnepropetrovsk
Tel: +380 562320045
www.csp-comel.com
Latin America
ANTILLES
Philips Antillana N.V.
Kaminda A.J.E. Kusters 4
Zeelandia, P.O. box 3523-3051
Willemstad, Curacao
Phone: (09)-4612799
Fax : (09)-4612772
ARGENTINA
Philips Antillana N.V.
Vedia 3892 Capital Federal
CP: 1430 Buenos Aires
Phone/Fax: (011)-4544 2047
BRASIL
Philips da Amazônia Ind. Elet. Ltda.
Rua Verbo Divino, 1400-São Paulo-SP
CEP-04719-002
Phones: 11 21210203 -São Paulo & 0800-701-0203-Other Regions without São Paulo City
CHILE
Philips Chilena S.A.
Avenida Santa Maria 0760
P.O. box 2687Santiago de Chile
Phone: (02)-730 2000
Fax : (02)-777 6730
COLOMBIA
Industrias Philips de Colombia
S.A.-Division de Servicio
CARRERA 15 Nr. 104-33
Bogota, Colombia
Phone:(01)-8000 111001 (toll free)
Fax : (01)-619-4300/619-4104
MEXICO
Consumer Information Centre
Norte 45 No.669
Col. Industrial Vallejo
C.P.02300, -Mexico, D.F.
Phone: (05)-3687788 / 9180050462
Fax : (05)-7284272
PARAGUAY
Av. Rca. Argentina 1780 c/Alfredo Seiferheld
P.O. Box 605
Phone: (595 21) 664 333
Fax: (595 21) 664 336
Customer Desk:
Phone: 009 800 54 1 0004
PERU
Philips Peruana S.A.
Customer Desk
Comandante Espinar 719
Casilla 1841
Limab18
Phone: (01)-2136200
Fax : (01)-2136276
URUGUAY
Rambla O'Higgins 5303 Montevideo
Uruguay
Phone: (598) 619 66 66
Fax: (598) 619 77 77
Customer Desk:
Phone: 0004054176
VENEZUELA
Industrias Venezolanas Philips S.A.
Apartado Postal 1167 Caracas 1010-A
Phone: (02) 2377575
Fax : (02) 2376420
Pacific
AUSTRALIA
Philips Consumer Electronics
Consumer Care Center
Level 1, 65 Epping Rd
North Ryde NSW 2113
Phone: 1300 363 391
Fax : +61 2 9947 0063
NEW ZEALAND
Philips New Zealand Ltd.
Consumer Help Desk
2 Wagener Place, Mt.Albert
P.O. box 1041
Auckland
Phone: 0800 477 999 (toll free)
Fax : 0800 288 588
Asia
BANGLADESH
Philips Service Centre
100 Kazi Nazrul Islam
Avenue Kawran Bazar C/A
Dhaka-1215
Phone: (02)-812909
Fax : (02)-813062
CHINA
SHANGHAI
Rm 1007, Hongyun Building, No. 501 Wuning road,
200063 Shanghai P.R. China
Phone: 4008 800 008
Fax: 21-52710058
HONG KONG
Philips Electronics Hong Kong Limited
Consumer Service
Unit A, 10/F. Park Sun Building
103-107 Wo Yi Hop Road
Kwai Chung, N.T.
Hong Kong
Phone: (852)26199663
Fax: (852)24815847
INDIA
Phone: 91-20-712 2048 ext: 2765
Fax: 91-20-712 1558
BOMBAY
Philips India
Customer Relation Centre
Bandbox House
254-D Dr. A Besant Road, Worli
Bombay 400 025
CALCUTTA
Customer Relation Centre
7 justice Chandra Madhab Road
Calcutta 700 020
MADRAS
Customer Relation Centre
3, Haddows Road
Madras 600 006
NEW DELHI
Customer Relation Centre
68, Shivaji Marg
New Dehli 110 015
INDONESIA
Philips Group of Companies in Indonesia
Consumer Information Centre
Jl.Buncit Raya Kav. 99-100
12510 Jakarta
Phone: (021)-7940040 ext: 2100
Fax : (021)-794 7511 / 794 7539
KOREA
Philips Korea Ltd.
Philips House
C.P.O. box 3680
260-199, Itaewon-Dong.
Yongsan-Ku, Seoul 140-202
Phone: 080 600 6600 (toll free)
Fax : (02) 709 1210
MALAYSIA
After Market Solutions Sdn Bhd,
Philips Authorised Service Center,
Lot 6, Jalan 225, Section 51A,
46100 Petaling Jaya,
Selangor Darul Ehsan,
Malaysia.
Phone: (603)-7954 9691/7956 3695
Fax: (603)-7954 8504
Customer Careline: 1800-880-180
PAKISTAN
Philips Consumer Service
Mubarak manzil,
39, Garden Road, Saddar,
Karachi-74400
Tel: (9221) 2737411-16
Fax: (9221) 2721167
E-mail: [email protected]
Website: www.philips.com.pk
PHILIPPINES
PHILIPS ELECTRONICS & LIGHTING, INC.
Consumer Electronics
48F PBCOM tower
6795 Ayala Avenue cor VA Rufino St.
Salcedo Village
1227 Makati City, PHILS
Phone: (02)-888 0572, Domestic Toll Free: 1-800-10-PHILIPS or 1-800-10-744 5477
Fax: (02)-888 0571
SINGAPORE
Accord Customer Care Solutions Ltd
Authorized Philips Service Center
Consumer Service
620A Lorong 1 Toa Rayoh
Singapore 319762
Tel: +65 6882 3999
Fax: +65 6250 8037
TAIWAN
Philips Taiwan Ltd.
Consumer Information Centre
13F, No. 3-1 Yuan Qu St., Nan Gang Dist.,
Taipei 115, Taiwan
Phone: 0800-231-099
Fax : (02)-3789-2641
THAILAND
Philips Electronics (Thailand) Ltd.
26-28th floor, Thai Summit Tower
1768 New Petchburi Road
Khwaeng Bangkapi, Khet Huaykhwang
Bangkok10320 Thailand
Tel: (66)2-6528652
E-mail: cic [email protected]
Africa
MOROCCO
Philips Electronique Maroc
304,BD Mohamed V
Casablanca
Phone: (02)-302992
Fax : (02)-303446
SOUTH AFRICA
PHILIPS SA (PTY) LTD
Customer Care Center
195 Main Road
Martindale, Johannesburg
P.O. box 58088
Newville 2114
Telephone: +27 (0) 11 471 5194
Fax: +27 (0) 11 471 5123
E-mail: [email protected]
Middle East
DUBAI
Philips Middle East B.V.
Consumer Information Centre
P.O.Box 7785
DUBAI
Phone: (04)-335 3666
Fax : (04)-335 3999
RETURN TO TOP OF THE PAGE
Philips Pixel Defect Policy
Philips strives to deliver the highest quality products. We use some of the industry's most
advanced manufacturing processes and practice stringent quality control. However, pixel or
sub pixel defects on the TFT LCD panels used in flat panel monitors are sometimes
unavoidable. No manufacturer can guarantee that all panels will be free from pixel defects,
but Philips guarantees that any monitor with an unacceptable number of defects will be
repaired or replaced under warranty. This notice explains the different types of pixel defects
and defines acceptable defect levels for each type. In order to qualify for repair or
replacement under warranty, the number of pixel defects on a TFT LCD panel must exceed
these acceptable levels.
This policy is valid worldwide.
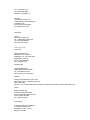
Pixels and Sub pixels
A pixel, or picture element, is composed of three sub pixels in the primary colors of red,
green and blue. Many pixels together form an image. When all sub pixels of a pixel are lit,
the three colored sub pixels together appear as a single white pixel. When all are dark, the
three colored sub pixels together appear as a single black pixel. Other combinations of lit
and dark sub pixels appear as single pixels of other colors.
Types of Pixel Defects
Pixel and sub pixel defects appear on the screen in different ways. There are two categories
of pixel defects and several types of sub pixel defects within each category.
Bright Dot Defects Bright dot defects appear as pixels or sub pixels that are always lit or
'on'. That is, a bright dot is a sub-pixel that stands out on the screen when the monitor
displays a dark pattern. There are the types of bright dot defects:
One lit red, green or blue
sub pixel
Two adjacent lit sub pixels:
- Red + Blue = Purple
Three adjacent lit sub
pixels (one white pixel)
- Red + Green = Yellow
- Green + Blue = Cyan (Light Blue)
A red or blue bright dot must be more than 50 percent brighter than neighboring
dots while a green bright dot is 30 percent brighter than neighboring dots.
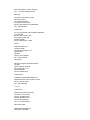
Black Dot Defects Black dot defects appear as pixels or sub pixels that are always dark or
'off'. That is, a dark dot is a sub-pixel that stands out on the screen when the monitor
displays a light pattern. These are the types of black dot defects:
One dark sub pixel
Two or three adjacent dark sub pixels
Proximity of Pixel Defects
Because pixel and sub pixels defects of the same type that are near to one another may be
more noticeable, Philips also specifies tolerances for the proximity of pixel defects.
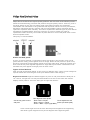
BRIGHT DOT DEFECTS
ACCEPTABLE LEVEL
MODEL
7FF1 series
1 lit subpixel
2
2 adjacent lit subpixels
1
3 adjacent lit subpixels (one white pixel)
0
Total bright dot defects of all types
2
BLACK DOT DEFECTS
ACCEPTABLE LEVEL
MODEL
7FF1 series
1 dark subpixel
3
2 adjacent dark subpixels
1
3 adjacent dark subpixels
0
Total black dot defects of all types
3
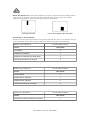
TOTAL DOT DEFECTS
ACCEPTABLE LEVEL
MODEL
7FF1 series
Total bright or black dot defects of all types
RETURN TO TOP OF THE PAGE
4
Regulatory
Recycling Information for Customers • Banned Substance Declaration • CE Declaration
Confirmity • FCC Declaration of Conformity • Federal Communications Commission (FCC)
Notice (U.S. Only) • Declaration of Conformity for Products Marked with FCC Logo, United
States Only • Commission Federale de la Communication (FCC Declaration) • EN 55022
Compliance (Czech Republic Only) • VCCI Class 2 Notice (Japan Only) • Polish Center for
Testing and Certification Notice• North Europe Information (Nordic Countries) • BSMI Notice
(Taiwan Only) • Philips End-of-Life Disposal • Waste Electronics and Electrical Equipment
(WEEE)
Recycling Information for Customers
Philips establishes technically and economically viable objectives to optimize the environmental
performance of the organization's product, service and activities.
From the planning, design and production stages, Philips emphasizes the important of making
products that can easily be recycled. At Philips, end-of-life management primarily entails
participation in national take-back initiatives and recycling programs whenever possible,
preferably in cooperation with competitors.
There is currently a system of recycling up and running in the European countries, such as The
Netherlands, Belgium, Norway, Sweden and Denmark.
In U.S.A., Philips Consumer Electronics North America has contributed funds for the Electronic
Industries Alliance (EIA) Electronics Recycling Project and state recycling initiatives for end-oflife electronics products from household sources. In addition, the Northeast Recycling Council
(NERC) - a multi-state non-profit organization focused on promoting recycling market
development - plans to implement a recycling program.
In Asia Pacific, Taiwan, the products can be taken back by Environment Protection
Administration (EPA) to follow the IT product recycling management process, detail can be
found in web site www.epa.gov.tw
For help and service, please read the section of Service and Warranty or the following team of
Environmental specialist can help.
Mr. Job Chiu - Environment manager
Philips Electronics Industries (Taiwan) Ltd, Monitor Business Unit
E-mail: [email protected]
Tel: +886 (0) 3 454 9839
Mr. Maarten ten Houten - Senior Environmental Consultant
Philips Consumer Electronics
E-mail: [email protected]
Tel: +31 (0) 40 27 33402
Ms. Delmer F. Teglas
Philips Electronics North America
E-mail: [email protected]
Tel: +1 865 521 4322
RETURN TO TOP OF THE PAGE
Banned Substance Declaration
This product comply with RoHs and Philips BSD (AR17-G04-5010-010) requirements
CE Declaration of Conformity
z
Philips Consumer Electronics declare under our responsibility that the product is in
conformity with the following standards
- EN60950:2000 (Safety requirement of Information Technology Equipment)
- EN55022:1998 (Radio Disturbance requirement of Information Technology Equipment)
- EN55024:1998 (Immunity requirement of Information Technology Equipment)
- EN61000-3-2:2000 (Limits for Harmonic Current Emission)
- EN61000-3-3:1995 (Limitation of Voltage Fluctuation and Flicker)
following provisions of directives applicable
- 73/23/EEC (Low Voltage Directive)
- 89/336/EEC (EMC Directive)
- 93/68/EEC (Amendment of EMC and Low Voltage Directive)
and is produced by a manufacturing organization on ISO9000 level.
RETURN TO TOP OF THE PAGE
Federal Communications Commission (FCC) Notice (U.S. Only)
This equipment has been tested and found to comply with the limits for a Class B
digital device, pursuant to Part 15 of the FCC Rules. These limits are designed to
provide reasonable protection against harmful interference in a residential
installation. This equipment generates, uses and can radiate radio frequency
energy and, if not installed and used in accordance with the instructions, may
cause harmful interference to radio communications. However, there is no
guarantee that interference will not occur in a particular installation. If this
equipment does cause harmful interference to radio or television reception, which
can be determined by turning the equipment off and on, the user is encouraged to
try to correct the interference by one or more of the following measures:
z
z
z
z
Reorient or relocate the receiving antenna.
Increase the separation between the equipment and receiver.
Connect the equipment into an outlet on a circuit different from that to which the receiver
is connected.
Consult the dealer or an experienced radio/TV technician for help.
Changes or modifications not expressly approved by the party responsible for
compliance could void the user's authority to operate the equipment.
Connections to this device must be made with shielded cables with metallic RFI/EMI connector
hoods to maintain compliance with FCC Rules and Regulations.
To prevent damage which may result in fire or shock hazard, do not expose this appliance to
rain or excessive moisture.
THIS CLASS B DIGITAL APPARATUS MEETS ALL REQUIREMENTS OF THE CANADIAN
INTERFERENCE-CAUSING EQUIPMENT REGULATIONS.
RETURN TO TOP OF THE PAGE
FCC Declaration of Conformity
Model Number: 7FF1
Trade Name: Philips
Responsible Party: Philips Consumer Electronics North America
P.O. Box 671539
Marietta, GA 30006-0026
1-888-PHILIPS (744-5477)
Declaration of Conformity for Products Marked with FCC Logo,
United States Only
This device complies with Part 15 of the FCC Rules. Operation is subject to the following two
conditions: (1) this device may not cause harmful interference, and (2) this device must accept
any interference received, including interference that may cause undesired operation.
Commission Federale de la Communication (FCC Declaration)
Cet équipement a été testé et déclaré conforme auxlimites des appareils
numériques de class B,aux termes de l'article 15 Des règles de la FCC. Ces
limites sont conçues de façon à fourir une protection raisonnable contre les
interférences nuisibles dans le cadre d'une installation résidentielle. CET appareil
produit, utilise et peut émettre des hyperfréquences qui, si l'appareil n'est pas
installé et utilisé selon les consignes données, peuvent causer des interférences
nuisibles aux communications radio. Cependant, rien ne peut garantir l'absence
d'interférences dans le cadre d'une installation particulière. Si cet appareil est la
cause d'interférences nuisibles pour la réception des signaux de radio ou de
télévision, ce qui peut être décelé en fermant l'équipement, puis en le remettant
en fonction, l'utilisateur pourrait essayer de corriger la situation en prenant les
mesures suivantes:
z
z
z
z
Réorienter ou déplacer l'antenne de réception.
Augmenter la distance entre l'équipement et le récepteur.
Brancher l'équipement sur un autre circuit que celui utilisé par le récepteur.
Demander l'aide du marchand ou d'un technicien chevronné en radio/télévision.
Toutes modifications n'ayant pas reçu l'approbation des services compétents en
matière de conformité est susceptible d'interdire à l'utilisateur l'usage du présent
équipement.
Les raccordements à cet appareil doivent être réalisés avec des câbles blindés à protections
métalliques pour les connecteurs RFI/EMI afin de maintenir la conformité avec les Règlements
et la Législation du FCC.
CET APPAREIL NUMERIQUE DE LA CLASSE B RESPECTE TOUTES LES EXIGENCES DU
REGLEMENT SUR LE MATERIEL BROUILLEUR DU CANADA.
RETURN TO TOP OF THE PAGE
EN 55022 Compliance (Czech Republic Only)
RETURN TO TOP OF THE PAGE
VCCI Notice (Japan Only)
This is a Class B product based on the standard of the Voluntary Control Council for
Interference (VCCI) for Information technology equipment. If this equipment is used near a radio
or television receiver in a domestic environment, it may cause radio Interference. Install and use
the equipment according to the instruction manual.
Class B ITE
RETURN TO TOP OF THE PAGE
Polish Center for Testing and Certification Notice
The equipment should draw power from a socket with an attached protection circuit (a threeprong socket). All equipment that works together (computer, monitor, printer, and so on) should
have the same power supply source.
The phasing conductor of the room's electrical installation should have a reserve short-circuit
protection device in the form of a fuse with a nominal value no larger than 16 amperes (A).
To completely switch off the equipment, the power supply cable must be removed from the
power supply socket, which should be located near the equipment and easily accessible.
A protection mark "B" confirms that the equipment is in compliance with the protection usage
requirements of standards PN-93/T-42107 and PN-89/E-06251.
RETURN TO TOP OF THE PAGE
North Europe Information (Nordic Countries)
Placering/Ventilation
VARNING:
FÖRSÄKRA DIG OM ATT HUVUDBRYTARE OCH UTTAG
LÄTÅTKOMLIGA, NÄR DU STÄLLER DIN UTRUSTNING PÅPLATS.
ÄR
Placering/Ventilation
ADVARSEL:
SØRG VED PLACERINGEN FOR, AT NETLEDNINGENS STIK OG
STIKKONTAKT ER NEMT TILGÆNGELIGE.
Paikka/Ilmankierto
VAROITUS:
SIJOITA LAITE SITEN, ETTÄ VERKKOJOHTO VOIDAAN TARVITTAESSA
HELPOSTI IRROTTAA PISTORASIASTA.
Plassering/Ventilasjon
ADVARSEL:
NÅR DETTE UTSTYRET PLASSERES, MÅ DU PASSE
KONTAKTENE FOR STØMTILFØRSEL ER LETTE Å NÅ.
PÅ
AT
RETURN TO TOP OF THE PAGE
BSMI Notice (Taiwan Only)
RETURN TO TOP OF THE PAGE
End-of-Life Disposal
Your new product contains materials that can be recycled and reused. Specialized companies
can recycle your product to increase the amount of reusable materials and to minimize the
amount to be disposed of.
Please find out about the local regulations on how to dispose of your old monitor from your local
Philips dealer.
(For customers in Canada and U.S.A.)
Dispose of in accordance to local-state and federal regulations.
For additional information on recycling contact www.eia.org (Consumer Education Initiative)
RETURN TO TOP OF THE PAGE
Waste Electronics and Electrical Equipment (WEEE)
This product is labelled with this symbol in accordance with European
Directive 2002/96/EG to indicate that it must not be disposed of with
your other household waste. Please check your local city office or
waste disposal service for the return and recycling of this product.
RETURN TO TOP OF THE PAGE
Specifications are subject to change without notice.
Trademarks are the property of Koninklijke Philips Electronics N.V.
or their respective owners
2006 © Koninklijke Philips Electronics N.V. All rights reserved.
www.philips.com