1
SON3t:
L_.:
3-758-850-22 (1)
/
f
Trin itron _Color TV
Operating
Instructions
KV-13M10
KV-MT1300
KV-14R10
KV-1460R
K V-20M 10
KV-20SIO
KV-20S 11
KV-MT2000
KV-ST2050
KV-21R10
KV-21RS 10
KV-2180R
KV-2190R5
©1994 by Sony Corporation
CAUTION
To prevent
fire
or shock
hazard,
do not expose
the unit to rain or
moisture.
Ix)NOT OPEN
C&UTION
:
TO REDUCE
DO NOT
NO
REFER
THE
REMOVE
RISK
COVER
UEER,SERVICEABLE
SERVICING
TO QUALIFIED
Note on Caption Vision (USA
and Canadian models only)
'
OF
ELECTRIC
(OR
SHOCK,
BACK).
PARTS
SERVICE
This television receiver provides display
of television closed captioning in
accordance with § 15.119 of the FCC rules.
INSIDE,
PERSONNEL.
This symbol is intended
to alert the user to the
presence of uninsulated
"dangerous voltage"
within the product's
enclosure that may be of
sufficient magnitude to
constitute a risk of
Safety
When using TV games, computers, and
similar products with your TV, keep the
brightness and contrast functions at low
settings. If a fixed (non-moving) pattern is
left on the screen for long periods of time
at a high brightness or contrast setting,
the image can be permanently
imprinted
onto the screen. These types of imprints
are not covered by your warranty because
they are the result of misuse.
Note
to CATV system
installer
This reminder is provided to call the
CATV system installer's attention to
Article 820 - 40 of the NEC that provides
guidelines for proper grounding and, in
particular specifies that the cable ground
shall be connected to the grounding
system of the building, as close to the
point of cable entry as practical.
electric shock to persons.
Owner's
This symbol is intended
to alert the user to the
presence of important
operating and
maintenance
(servicing)
instructions in the
literature accompanying
the appliance.
The model and serial numbers are located
at the rear of the TV. Record these
precautions
• Operate the TV only on 120 V AC, 60 Hz.
• One blade of the plug is wider than the
other for safety purposes and will fit
into the power outlet only one way. If
you are unable to insert the plug fully
into the outlet, contact your dealer.
• To prevent electric shock, do not use
this polarized AC plug with an
extension cord, receptacle or other
outlet unless the blades can be fully
inserted to prevent blade exposure.
For details concerning safety precautions,
see the attaching leaflet "IMPORTANT
SAFEGUARDS."
Record
numbers in the spaces provided below.
Refer to them whenever you call upon
your Sony dealer regarding this product.
Model No.
Serial No.
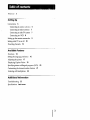
Welcome!
Setting
5
Up
Connections
6
Connecting
to outdoor
Connecting
to indoor antenna
antenna
6
7
7
Connecting to cable TV system
Connecting
to a VCR
8
Setting up the remote commander
Setting cable TV on or off
Presetting
channels
Available
10
12
Features
Functions
14
Setting the language
Adjusting
9
preference
the picture
16
17
Displaying
Caption Vision
Specifying
stereo or bilingual programs
Customizing
the channel number buttons
Listening with headphones
Additional
Troubleshooting
Specifications
19
Information
23
back cover
22
(MTS)
21
20
4
Thank you tol put'cla,a_ing the Sony [rinitron
Color IV. Before
operating
the TV, please read this manual thoroughly
and retain
future reference.
it for
The instructions in this manual are for the models listed on the front
cover. Before you start reading, check your model number by looking at
the rear of your TV. The KV-2190RS is the model used for illustration
purposes. Any differences in operation are clearly indicated in the text,
for example, "KV-2190RS only."
Here are some of the features you will enjoy with your TV:
• A 181-channel
• On-screen
settings.
frequency synthesis
tuner that is cable compatible.
menus that let you set the picture
• A sleep timer that automatically
selected.
quality, sound, and other
turns off the TV after the time you
• An Audio/Video
input jack to connect your VCR to the TV
(KV-13M10/14R10/20M10/20S10/20S11/21R10/21RS10
only).
• A dual language feature that lets you choose the menu language
either in English or Spanish (KV-14RlO/1460R!21RlO/21RSlO/2180R/
2190RS only).
_F Setttng
Up
Select one ot the three way_ to connect the TV to the antenna
and/or
cable system. It is recommended
to connect an outdoor
antenna
or a
cable TV system for better picture quality.
Connecting
to outdoor
antenna
Connect the antenna cable to the VHF-UHF antenna terminal. If the
antenna cable cannot be connected directly to the jack, follow one of the
diagrams below, depending on the type of cable you have.
Notes
• Do not use tools to attach the cable to the VHF/UHF
terminal. Doing so may
damage the terminal.
• Most VHF/UHF
combination
antennas have a signal splitter. Remove the splitter
before attaching the appropriate connector.
• If the U/V mixer is used, snow and noise may appear in the picture when viewing
cable 'IV channels over 37.
[]
(Rear of TV)
• VHF only
or
• VHF/UHF
/UH_I
B
75-ohm
To attach
an F-type
[]
coaxial
cable
an F-type connector, see "Attaching
connector to the antenna cable."
(Rear of TV)
Antenna connector (supplied
except for KV-MT2000/ST2050)
• VHF only
or
• UHF only
or
• VHF/UHF
Loosen
connect
300-ohm
twin
lead cable
the leads, then
tighten.
75-ohm
• VHF
and
• UHF
(Rear of TV)
4
_;;'_
_
EAC-66 UV mixner
300-ohm
6
coaxial cable
twin
lead cable
Attaching
an F-type
connector
F-type connector
10 mm
_-_
_\_ '(3181n')
7mm in. _ e
(1/4
• Antenna cabl
Connecting
to indoor
to the antenna
cable
_
_._
.J_ 3 mm (1/8 in.)
_
r_€_
_--'_(J
_ll_oo
_
\'_
antenna
• Except for KV-MT2OOOIST2050
Use the supplied dipole antenna and antenna connector. To attach the
antenna connector, see "Connecting to outdoor antenna I_1."After
you've turned on the TV, adjust the antenna for best reception.
(supplied)
VHF/UHF
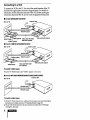
Connecting
to cable
TV system
If your cable company requires you to connect a cable box, follow
example m. If not, follow example I'/!.
[]
Cable box
(Rear of TV)
Incoming
[]
(Rear of TV)
__
Incoming
cable
cable
Connecting
to a VCR
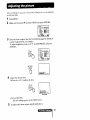
To connect the VCR to the TV, first check the model number of the TV
and select the appropriate connection diagram below. For details on
connection, see the instruction manual of the VCR. Before making the
connection, disconnect the AC power cords of equipment being used.
•
For KV-20S10120S11121RS10
(Rear of TV)
Antenna cable
_.
VHF/UHF input
4F/UHF outp_
T
•
For KV-13M10/14R10/20M10121R10
(Rear of TV)
Antenna cable
)EO (yellow)
AUDIO
To watch
video
Video and audio outputs
Video cable VMC-720M
(not supplied)
(black)
tapes
Press the TV/VIDEO button until "VIDEO" appears on the screen.
•
For KV-MT130011460RIMT2000/ST205012180R/2190RS
(Rear of TV)
To watch
Antenna cable
video
tapes
1 On the TV: Preset channel 3 or 4, whichever is not used in your area, following
instructions
for adding channels in "Presetting
channels" (page 13).
2 On the VCR: Set the channel to the same channel as chosen above. Then begin
viewing
the video tape.
the
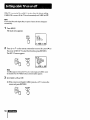
lnstall
two size AA batteries
(supplied)
as shown.
Notes
• Match the + and - on the batteries to the diagram
inside the battery compartment.
• If you do not use the remote commander
for an extended period of time, remove
the batteries to avoid possible damage from battery leakage.
• Do not handle the remote commander roughly. Do not drop it, step on it or let it
get wet.
• Do not place the remote commander
in direct sunlight,
near a heater, or where the
humidity
is high.
Instructions in this manual are based on the remote commander. You
can also use the controls on the TV if they have the same name as tho_e
on the remote commander.
(KV-14R10/1460R/21R10/21R$!O/2180RI2190RS
only)
If you prefer your menus in Spanish, see page 16 for instructions.
If the TV is conneded
CABLE ON is correct.
to a cable 'IV syMem, then
If the TV is not connected,
the factory setting
set CABLE to OFF.
Note
If more than 90 seconds
automatically.
1
elapse
after you press
a button,
the menu
disappears
Press MENU.
The main menu appears.
MENU
• VIDEO
MTS:MAIN
(_
I
SET UP
CC/TEXT
[use ,r_n
2
OFF
Exitl_
Press Z_+ or V- on the remote commander to move the cursor (I_) on
the screen to SET UP. To select that function, press RETURN.
The SET UP menu appears.
[SET
|
_(RL) _
RETURN
UP
}
I
CH ERASEIADD
I CHGUIDE
I
Il • AUTO
CABLE PROGRAM
:ON
/
_MENU
rUse
€{_"_-]
I|I
Exitl'_]J
Note
If CABLE appears in black, the TV is set to video input
be selected. Press TV/VIDEO
so that a channel number
3
and CABLE
appears.
cannot
Set CABLE to ON or OFF.
(1) If the cursor is not beside CABLE, press A+ or _7- to move the
cursor and press RETURN.
10
(2) Press !x+ or V-, to select ON or OFF.
(3)PressRETURN.
RETURN
SET UP
• CABLE:OFF
AUTO PROGRAM
CH ERASE/ADD
CH GUIDE
_MENU
Use
4
Press MENU to return to the original screen.
MENU
O_
Exit_
TV channels can be preset easily: first stoic all the receivable channels
automatically,
following the procedure below. Next, erase unwanted
channels or add additional channels. Preset channels during the day
rather than late at night, when some channels may not be broadcasting.
1
Press MENU.
2
Press/_+
or V- on the remote commander
to move the cursor (I,) on
the screen to SET UP and press RETURN.
The SET UP menu appears.
ISET
_((RL_
RETURN
UP
|
|
CH ERASE/ADD
|
CH GUIDE
II| • CABLE:ON
AUTO
PROGRAM
_MENU
I
I
III
Note
If AUTO PROGRAM appears in black, the TV is set to video input and AUTO
PROGRAM cannot be selected. Press TV/VIDEO so that a channel number
appears.
3
Select AUTO PROGRAM.
(1) Press !x+ or V- to move the cursor (1_) to AUTO PROGRAM.
SET UP
CABLE:OFF
• AUTO PROGRAM
CH ERASE/ADD
CH GUIDE
_MENU
Use
)
I
I
I
I
[
€i'_--------I Exiti-_TJ
(2) Press RETURN.
RETURN
AUTO
PROGRAM
"AUTO PROGRAM" appears on the screen and the TV starts scanning
and presetting channels automatically. When all the receivable channels
are stored, "AUTO PROGRAM" disappears and the lowest numbered
channel is displayed.
Erasing
or adding
channels
1
Press MENU.
2
Press/_+
3
Press Zk+ or _7- to select CH ERASE/ADD
4
To erase an unwanted channel:
(1) Press CH +/- to select the channel you want to erase.
(2) Make sure the cursor (I_) is beside ERASE.
or V- to select SET UP and press RETURN.
and press RETURN.
Channel
I
/
to be erased
CH ERASE/ADD
I_ERASE
I
(_
- I
ADD
/Select
/
the
/
channell
(3) Press RETURN.
The indication "-" appears beside the channel number, showing
that the channel is erased from the preset memory.
To add a channel that you want:
(1) Press 0-9 buttons to select the channel you want to add and press
ENTER.
(2) Press/X+ or V- to select ADD.
Channel
to be added
CH ERASE/ADD
(3) Press RETURN.
The indication "+" appears beside the channel number,
that the channel is added to the preset memory.
5
To erase and/or add other channels, repeat step 4.
6
When finished, press MENU.
Note
If you erase or add a VHF or UHF channel, the cable TV channel
number is also erased or added, and vice versa.
showing
with the same
__PJ
13
_d'Available
Features
Note
If "VIDEO"
apj__c,u a u_t the a¢lccn,
l_uca_ 1 V/VIDEO
so that a _.hannel
number
appears.
Selecting
a channel
directly
Press the 0-9 buttons to select a channel. Or press ENTER after entering
the channel for immediate selection.
@®@
®®
®
To scan through
channels
Press CH +/- until the channel
you want appears.
OH
Switching
quickly
between
two
channels
Press JUMP.
The channel you watched previously appears.
switches back to the previous channel.
Pressing JUMP again
JUMP
Adjusting
the
volume
Press VOL +/- to adjust the volume.
I
VOLUME
llIMIlllt_-_'.
..........
Muting
the
sound
Press MUTING.
"MUTING"
appears on the screen.
MUTING
To restore the sound, press MUTING again, or press VOL +.
Displaying
on-screen
information
Use this feature to check your channels and MTS mode.
Press DISPLAY.
DISPLAY
To cancel the display, press DISPLAY again.
Setting
the
Sleep
Timer
The TV stays on for the length of time specified and then shuts off
automatically.
Press SLEEP repeatedly until the time (minutes) wanted appears. Each
time you press SLEEP, the time changes as follows: 30 ,_ 60 ,_ 90 ,_ OFF.
SLEEP
To cancel the Sleep Timer, press SLEEP repeatedly
appears, or turn the TV off.
until "SLEEP OFF"
Note
If DISPLAY or MUTING is pressed with Caption Vision selected,
muting display will disappear after a few seconds.
-_ .....
the channel
"
or
I 15
•
For models
2190RS
KV.14R10/1460R/21R10/21RS10/2180R/
If Spanish is preferred
1
to English, the menu language can be changed.
Press MENU.
2
Press A+ or V- to move the cursor (_') to ENGLISH and press
RETURN.
I
_}{(
Li_
R)
I_
RETURN
IVlTS:MA I N
SETUPI SH
i V,OEO
ENGL
I,
rUse
3
_.['_
_1
Exil
Press A+ or V- to select ESPAI_IOLand press RETURN.
R)
RETURN
I
VIDEO
I
MTS :IvlA I N
)" ESPANOL
lusa_€_
4
Press MENU to return to the normal screen.
MENU
16
s..rl_
When watching TV programs,
to suit your taste.
tile quality of the picture
can be adjusted
1
Press MENU.
2
Make sure the cursor (1_) is beside VIDEO and press RETURN.
v I DEO
]
• P I CTURE lill,li[lllllltlllUlllllll..../
HUE
.............
I ............./
COLOR
II#llllllllll_
............
/
BRIGHT
SHARP
MENU
III_HIIIHIHI
..............
/
IIIm111111_
.............
/
_/
Use 0_]
3
ExitlME_lJ
Select the item to adjust. See chart on following page for details on
results of adjustments. For example:
To adjust brightness, press A+ or _7- to select BRIGHT and press
RETURN.
VID£O
]
P I CTURE Imllllllllllllllltlllil,.,,
I
HUE
...........I ................
]
COLOR
• BRIGHT
SHARP
_MENU
us_ _
mHIlUlIIII
................
I
mU_ ................
|
|HIIlUlI_It
................
|
_|
Exit_L_lJ
RETURN
BRIGHTNESS
iifltl_l[lllli{llffli{l_tl
................................
4
Adjust the selected item:
(1) Press Zx+ or V- to adjust the item.
BRIGHTNESS
lllllHllllllllllnllllnUlllllUnlllllllUl
....................
(2) Press RETURN.
The new setting appears
5
in the VIDEO menu.
To adjust other items, repeat steps 3 and 4 above.
r- v,_.1ii_/,"Jt_ Ia'K_'I_!u:#:
17
Description
of adjustable
items
Adjustment
Item
Press ZI+ to
Press V- to
PICTURE
Increase picture contrast
for vivid color
Decrease picture contrast
for soft color
HUE
Make skin tones become
greenish
Make skin tones become
purplish
COLOR
Increase color intensity
Decrease color intensity
BRIGHT
Brighten the picture
Darken the picture
SHARP
Sharpen the picture
Soften the picture
To restore
the
factory
settings
Press RESET while the VIDEO menu is displayed.
except PICTURE are restored to factory settings.
All the settings
•
USA and
Canadian
models
only
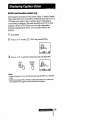
Some programs are broadcast with Caption Vision. To display Caption
Vision, select either CC1, CC2, TEXT1, or TEXT2 from the menu. CC1 or
CC2 shows you a caption, that is a printed version of the dialog or
sound effects of a program. (The mode should be set to CC1 for most
programs.) TEXT1 or TEXT2 shows you text, that is information
presented using half of the screen. It is not usually related to the
program.
1
Press MENU.
2
Press A+ or V- to select _/TEXT
and press RETURN.
|
SET UP
!I MTS:MAIN
I
_.C]/TEXT
: OFF
[U,e Or_
3
Exi,_--I
Press A+ or V- to select the caption type and press RETURN.
I
M'rS:M__N
RETuR. Iv0Eo
1_
II > cL_-q/TEXT:
SET UP TEXT2
/
1
/I
(use_r_-_ Exidi_lJ
Notes
• Captions disappear for a few seconds when you press the DISPLAY or MUTING
button.
• Captions may appear with a white box or other errors instead of a certain word.
Poor reception of TV programs can also cause errors in captions.
19
[] For models
KV-20S
10120S 11/ST2050121RS
1012190RS
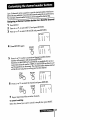
The Multichannel TV Sound (MTS) feature allows you to enjoy stereo
sound (MAIN) or Second Audio Programs (SAP) at your choice. The
initial setting is stereo sound (MAIN).
1
Press MENU.
2
Make sure the cursor (I_) is beside MTS and press RETURN.
[v00
1
•
SET UP
MTS :MA IN
CC/TEXT
Use
3
:OFF
_'_
Exit_---_
Press/_+ or _7- to select MAIN, SAP, or MONO and press
RETURN.
R)
RETURN
[
VIDEO
l • MTS : SAP
CC/TEXT:OFF
MTS mode
Sound source
MAIN
Listen to stereo sound.
SAP
Listen to bilingual programs.
The sound of non-SAP programs will be muted when SAP
is selected.
MONO
Reduce noise during stereo broadcasts.
Up to 12 channels can be assigned to a specific channel number. This feature
allows the easy selection of your favorite channels using the on-screen menu.
For example, channel number button 2 can be assigned to channel 124.
Assigning
a channel
number
button
1
Press
MENU.
_1
Press
A+ or V- to select
SET UP and press
3
Press
A+ or V- to select
CH GUIDE
to a favorite
RETURN,
and press
RETURN.
2
5
8
0
4
5
channel
3
6
g
E
_'5-"
Press RETURN again.
Press Z_+ or _7- to select a customized
channel number (chosen
number
will appear in red) and press RETURN.
Numbers
0-9 and DISPLAY and ENTER are available
for use as a
customized
channel number.
DISPLAY and ENTER are shown as D
and E respectively
on the screen. The channel number button
will be the one you press to call up your favorite channel.
6
Press A+ or V- to select the channel and press RETURN.
7
Repeat steps 5 and 6 to set other channels.
To cancel
selected
a setting
Select the channel you want to cancel in step 5, then press RESET.
21
Using
1
the
customized
channel
number
buttons
Press CH GUIDE.
The CHANNEL GUIDE menu appears showing channel number
buttons and the corresponding channels.
2
Press a channel number button, DISPLAY or ENTER on the
commander to select the channel you want.
To cancel the CHANNEL GUIDE menu
Press CH GUIDE while the CHANNEL
•
GUIDE menu is displayed.
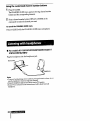
For models KV-13M10/14R10/20M10120S10/20S11/
21R10/21RS10/21M10
Plug the headphones
into the headphones
jack.
ront ! eadhones
Notes
• To prevent
hearing damage due to sudden or prolonged
excessive volume,
raise the headphones
volume too high while listening.
• Using the headphones
jack will turnoff the sound to TV speakers.
• If your TVis a monauralTV, the monauralsound will be heard from both
headphones.
do not
(_Additional
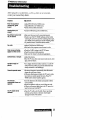
Information
After trying the remedies
below a_ld the ELoblem
contact your nearest Sony dealer.
is not corrected,
Problem
Adjustment
Poor or no picture
(screen lit), good
sound
• Adjust-PICTURE in the VIDEO menu.
• Adjust BRIGHT in the VIDEO menu.
• Check antenna/cable connections.
Good picture,
sound.
• Check the MTS setting in the AUDIO menu.
no
No picture (screen not
lit), no sound
nocolor
• Make sure the power cord is connected securely.
• Check to see if the TV/VIDEO setting is correct: when
watching TV, set to TV, and when watching video tapes,
set to VIDEO or the channel you use for watching video.
• Try another channel. It could be station trouble.
• Adjust COLOR in the VIDEO menu.
• Black and white programs cannot be seen in color.
Only snow and noise
appear on the screen
• Check the CABLE setting in the SET UP menu.
• Check the antenna/cable connection.
• Make sure the channel is broadcasting
programs.
Dotted
lines or stripes
• Adjust the antenna.
• Move the TV away from noise sources such as cars, neon
signs, and hair-dryers.
Double
ghosts
images
• Use a highly directional outdoor antenna or a cable TV
cable (when the problem is caused by reflections from
nearby mountains or tall buildings).
Cannot operate
The remote
commander
operate
Or
menu
k
does not
The TV needs to be
cleaned.
• The menu disappears automatically when 90 seconds
elapse after you press a button.
• If the menu items appear in black, the TV is set to video
input and you cannot operate the menu. Press TV/
VIDEO until a channel number appears.
• Insert the batteries
in the remote commander
with the
correct polarity.
• Replace the batteries with new ones if they are weak.
• If there is a fluorescent light close to the TV, move it at
least 34 feet away from the TV.
• Clean the TV with a soft dry cloth. Never
use strong
solvents
such as thinner
or benzine,
which
might
damage
the finish
of the cabinet.
r:_r.m,.,,_.,im,.,,,,_,,.,,-
[ 23
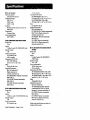
• For all models
4 W in standby
Dimensions (W/H/D)
KV-20MlO!21R10:522
x 475 x
471.2 mm ( 20 5/8 x 18 3/4 x 18 s/8 in.)
KV-MT2000/2180R:
526 x 488 x
477.5 mm ( 20 3/4 x 19 1/4 x 18 7/8 in.)
Mass
Television system
American TV standard
Channel coverage
VHF: 2-13
UHF: 14-69
CA'IN: 1-125
Antenna
75-ohm external antenna terminal
VHF/UHF
Picture tube
Trinitron ®tube
for
Power requirements
120 V, 60 Hz
• KV-13MlOlMT1300114R10/1460R
Screensize
13 in.
21.7 kg (47 lb 14 oz)
Supplied accessories
Size AA batteries (2)
KV-20M10/21R10:
Remote commander
RM-Y116 (1), Dipole antenna (1),
Antenna connector (1)
KV-MT2000: Remote commander
RM-Y123 (1)
KV-2180R: Remote commander
RM-Y123 (1), Dipole antenna
Antenna connector (1)
(1),
Inputs
I video, I audio (KV-13M10/14R10
Speaker output
1W
only)
Power consumption
75 W when in use
Inputs
1 video, 2 audio (KV-20S10/20S11/
21RS10 only)
Speaker output
2W+2W
4 W in standby
Dimensions (W/H/D)
372 x 339 × 408 mm
(14 s/4 x 13 3/8 x 16 1/8 in.)
Mass
10.3 kg (22 lb 12 oz)
Supplied accessories
Size AA batteries (2)
Dipole antenna (1)
Antenna connector (1)
KV-13M10/14R10:
Remote commander
RM-Y116 (1)
KV-MT1300: Remote commander
RM-Y123 (1)
KV-1460R: Remote commander
RM-Y123 (1)
• KV-20M10/MT2000121R1012180R
Screen size
20 in.
Inputs
I video, 1 audio (KV-20M10/21R10
Speaker output
2W
Power consumption
97 W when in use
Sony Corporation
Printed in U.S.A.
• KV-20S10120S11/ST2050121RSlOI
2190RS
Screen size
20 in.
Power consumption
100 W when in use
4 W in standby
Dimensions (W/H/D)
KV-20SlO!20S11/21RS10:522
x 475 x
471.2 mm (20 s/8 x 18 3/4 x 18 s/8 in.)
KV-ST2050!2190RS:
526 x 488 x 477.5
ram (20 3/4 x 191/4 x 18 7/8 in.)
Mass
21.8 kg (48 lb 10 oz)
Supplied accessories
Size AA batteries (2)
KV-20S10/20S11/21RS10:
Remote
commander RM-Y116 (1), Dipole
antenna (1), Antenna connector (1)
KV-ST2050: Remote commander
only)
RM-Y123 (1)
KV-2190RS: Remote commander
RM-Y123 (1), Dipole antenna (1),
Antenna connector (1)
Design and specifications
change without notice.
are subject to