1
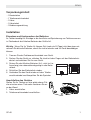
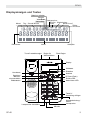
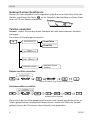
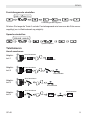
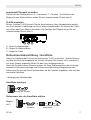
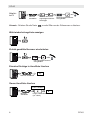
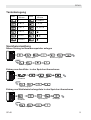
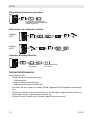
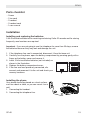
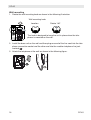
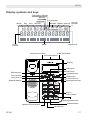
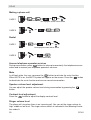
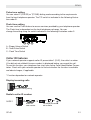
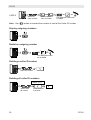
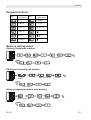
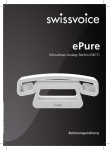
CP-40
Analogue telephone
Bedienungsanleitung
User manual
CP-40
Willkommen bei Swissvoice
Ihr CP-40 ist ein schnurgebundenes Telefon zum Anschluss an das analoge Telefonnetz.
Nehmen Sie sich etwas Zeit, um diese Bedienungsanleitung aufmerksam zu lesen und
um die umfangreichen Funktionen Ihres CP-40 kennen und nutzen zu lernen.
Inhalt
Verpackungsinhalt . . . . . . . . . . . . . . . . . . . . . . . . . . . . . . . . . . . . . . . . . . . . . . . . . . . . .1
Installation . . . . . . . . . . . . . . . . . . . . . . . . . . . . . . . . . . . . . . . . . . . . . . . . . . . . . . . . . . .1
Displayanzeigen und Tasten . . . . . . . . . . . . . . . . . . . . . . . . . . . . . . . . . . . . . . . . . . . . .3
Gebrauch eines Kopfhörers . . . . . . . . . . . . . . . . . . . . . . . . . . . . . . . . . . . . . . . . . . . . . .4
Telefon einstellen . . . . . . . . . . . . . . . . . . . . . . . . . . . . . . . . . . . . . . . . . . . . . . . . . . . . . .4
Telefonieren . . . . . . . . . . . . . . . . . . . . . . . . . . . . . . . . . . . . . . . . . . . . . . . . . . . . . . . . . .5
Rufnummernübermittlung / Anrufliste . . . . . . . . . . . . . . . . . . . . . . . . . . . . . . . . . . . . . .7
Tastenbelegung . . . . . . . . . . . . . . . . . . . . . . . . . . . . . . . . . . . . . . . . . . . . . . . . . . . . . . .9
Speicherverwaltung . . . . . . . . . . . . . . . . . . . . . . . . . . . . . . . . . . . . . . . . . . . . . . . . . . . .9
Sicherheitshinweise . . . . . . . . . . . . . . . . . . . . . . . . . . . . . . . . . . . . . . . . . . . . . . . . . . .10
Anhang . . . . . . . . . . . . . . . . . . . . . . . . . . . . . . . . . . . . . . . . . . . . . . . . . . . . . . . . . . . . .11
CP-40
CP-40
Verpackungsinhalt
- 1 Basisstation
- 1 Telefonanschlusskabel
- 1 Hörer
- 1 Hörerkabel
- 1 Bedienungsanleitung
Installation
Einsetzen und Austauschen der Batterien
Ihr Telefon benötigt für Einträge in die Anrufliste und Speicherung von Telefonnummern
im Telefonbuch drei Alkaline-Batterien der Größe AA.
Wichtig : Wenn Sie Ihr Telefon für längere Zeit (mehr als 30 Tage) nicht benutzen entnehmen Sie bitte die Batterien, damit sie nicht auslaufen und Ihr Gerät beschädigen
können.
1. Trennen Sie das Telefonanschlusskabel vom Gerät.
2. Drehen Sie das Gerät um, drücken Sie leicht mit dem Finger auf den Batteriefachdeckel und schieben Sie ihn vom Gerät.
3. Setzen Sie drei Alkaline-Batterien (AA - nicht im Lieferumfang) wie nebenstehend gezeigt in das Batte+ A A riefach.
- A A +
4. Schließen Sie das Batteriefach wieder.
+ A A 5. Verbinden Sie das Gerät wieder mit dem Telefonanschlusskabel und überprüfen Sie die Speicher.
Anschließen des Gerätes
Stellen Sie Ihr Telefon auf eine glatte ebene Fläche wie etwa einen Tisch oder montieren Sie es
an der Wand.
1. Hörer anschließen.
2. Telefonanschlusskabel anschließen.
CP-40
1
CP-40
Wandmontage
1. Drehen Sie die Hörerhalterung für Wandmontage wie nachstehend gezeigt:
Hörerhalterung für Wandmontage
Grundeinstellung
180°drehen
Die Hörerhalterung ist notwendig um den Hörer bei Wandmontage (vertikal) zu halten.
2. Befestigen Sie die Wandhalterung an der Wand und verbinden Sie das eine Ende
des Telefonanschlusskabels mit der Telefonanschlussdose und das andere Ende
mit der Telefonanschlussbuchse des Gerätes (Kennzeichnung
).
3. Befestigen Sie das Telefon an der Wandhalterung wie dargestellt.
2
CP-40
CP-40
Displayanzeigen und Tasten
Batterien entladen
Morgen
Voice Box
Nachmittag
Monat
Tag Stunde Minute
M
Lautsprecher
Mikrofon Wiederholung
stumm
Neuer Anruf
Zähler
Anrufliste
D
Rufnummer
Anklopfen
Name
Tonruf-Lautstärkeregler
Regler für
Wahlverfahren
Flash-Regler
Display
Wähltaste
Einstellen
Löschtaste
Kontrast
Speichern
Mikrofon
stummschalten
Blättertasten
R-Taste (Flash)
Ein/Aus-LED
Nachrichten-LED
Taste 0 /
Leerschlag einfügen
Wahlwiederholung /
Pause
Lautsprecher
Lautsprecher-Lautstärke
Mikrofon
CP-40
3
CP-40
Gebrauch eines Kopfhörers
Stecken Sie Ihren Kopfhörer (nicht mitgeliefert) in die Buchse auf der linken Seite des
Gerätes und drücken Sie Taste
um Ihr Gespräch über Kopfhörer zu führen (Kopfhörer mit 2.5 mm Stecker erforderlich).
Telefon einstellen
Hinweis : Ändern Sie vor dem ersten Gebrauch die unten beschriebenen Werkseinstellungen.
Sie müssen 4 Einstellungen vornehmen:
DATUM/ZEIT
Format Datum
Format Zeit
AMTSKENNZIFFER
CODE FERNLEIT‘G
SPRACHE WÄHLEN
gewünschte Sprache
auswählen
Datum und Zeit einstellen
DATUM/ZEIT
Geben Sie Monat, Tag, Stunde und Minute ein
Amtskennziffer einstellen
AMTSKENNZIFFER
Amtskennziffer eingeben
Wenn eine in der Anrufliste gespeicherte Nummer eine Vorwahl enthält die mit der im
Telefon gespeicherten Amtskennzahl übereinstimmt, werden die Ziffern der Vorwahl
gelöscht und nur die Rufnummer (ohne Vorwahl) wird gespeichert.
4
CP-40
CP-40
Fernleitungscode einstellen
CODE FERNLEIT‘G
Fernleitungscode eingeben
Drücken Sie lange die Taste 0 und der Fernleitungscode wird vorne an die Rufnummer
angefügt (nur in Wahlvorbereitung möglich).
Sprache einstellen
SPRACHE WÄHLEN
Sprache wählen
Telefonieren
Anruf annehmen
Anruf annehmen
Möglichkeit 1
Anruf beenden
Rufton
Anruf annehmen
Möglichkeit 2
Anruf beenden
Rufton
Anruf annehmen
Möglichkeit 3
Anruf beenden
Rufton
Anruf annehmen
Möglichkeit 4
Anruf beenden
Rufton
CP-40
5
CP-40
Rufnummer wählen
Möglichkeit 1
oder
Nummer eingeben
Möglichkeit 2
oder
Die angezeigte Nummer wird gewählt
oder
Rufnummer wählen
Wahlwiederholung
Möglichkeit 1
oder
oder
Die angezeigte Rufnummer wird gewählt
Möglichkeit 2
oder
Die letzte gewählte Nummer
wird wiederholt
Netzwerkdienste des Netzbetreibers anwählen
Drücken Sie während des Gesprächs die Taste
. Das Gespräch wird unterbrochen
und Sie gelangen zu den Netzwerkdiensten Ihres Netzbetreibers.
Mikrofon stummschalten (Mute)
Soll Ihr Gesprächspartner nicht mithören, können Sie das Mikrofon vorübergehend
stummschalten. Während des Gesprächs Taste
drücken.
Taste
erneut drücken, um das Mikrofon wieder einzuschalten.
Lautsprecher-Lautstärke einstellen
Sie können während eines Gespräches die Lautsprecher-Lautstärke einstellen, indem
Sie Taste
drücken.
Kontrast einstellen
Drücken Sie die Taste
um den Displaykontrast einzustellen.
Tonruf-Lautstärke einstellen
Sie können die Tonruf-Lautstärke in 3 Stufen einstellen (leise, mittel, laut). Die Postition
des Tonruf-Lautstärkereglers sehen Sie auf untenstehender Skizze unter A.
6
CP-40
CP-40
Impulswahl/Tonwahl einstellen
Sie können das Wahlverfahren: P = Impulswahl, T = Tonwahl. Die Postition des
Reglers für das Wahlverfahren sehen Sie auf untenstehender Skizze unter B.
FLASH einstellen
Mit der Funktion FLASH können Sie die Netzfunktionen Ihres Netzbetreibers anwählen. Die Flashzeit ist abhängig von Ihrem lokalen Netzbetreiber. Sie können die Flashzeit mittels des Flash-Reglers einstellen. Die Postition des Reglers sehen Sie auf
untenstehender Skizze unter C.
C
B
A
A - Tonruf-Lautstärkeregler
B - Regler für Wahlverfahren
C - Regler für Flash
Rufnummernübermittlung / Anrufliste
Sofern Ihr Netzbetreiber Rufnummernerkennung* (CLIP) unterstützt, wird die Rufnummer des Anrufers (vorausgesetzt der Anrufer hat seine Rufnummer nicht unterdrückt)
auf Ihrem Display angezeigt, bevor Sie den Anruf entgegennehmen.
Damit die Funktion nutzen können, müssen für Ihren Telefonanschluss die Leistungsmerkmale Rufnummernanzeige und Rufnummernübermittlung freigeschaltet sein.
Informieren Sie sich bei Ihrem Netzbetreiber, ob die Funktion angeboten wird und über
eventuelle Gebühren.
* abhängig vom Netzbetreiber.
Anrufliste anzeigen
Anzeige der Anrufliste
Rufnummer aus der Anrufliste wählen
Möglichkeit 1
oder
Nummer
auswählen
CP-40
oder
Die angezeigte Nummer
wird gewählt
7
CP-40
Möglichkeit 2
oder
Nummer
auswählen
Ziffer vor der
angezeigten Nummer
hinzufügen
Hinweis : Drücken Sie die Taste
oder
Die angezeigte Nummer
wird gewählt
um die Ziffer vor der Rufnummer zu löschen.
Wahlwiederholungsliste anzeigen
Zuletzt gewählte Nummer wiederholen
oder
oder
Die angezeigte Nummer
wird gewählt
Einzelne Einträge in Anrufliste löschen
Nummer auswählen
Ganze Anrufliste löschen
ALLES LÖSCHEN?
Nummer
auswählen
8
Langer Tastendruck
(ca. 3 Sek.)
CP-40
CP-40
Tastenbelegung
Taste
Zugeordnete
Zeichen
Taste
Zugeordnete
Zeichen
1
PQRS7
ABC2
TUV8
DEF3
W XY Z 9
GHI4
JKL5
MNO6
Speicherverwaltung
Neuen Eintrag im Nummernspeicher anlegen
Speicherplatz
Nummer eingeben
Namen eingeben
Eintrag aus Anrufliste in den Speicher übernehmen
Nummer
auswählen
Speicherplatz
Bestätigen
Namen eingeben
Eintrag aus Wahlwiederholungsliste in den Speicher übernehmen
Nummer
auswählen
Speicherplatz
Bestätigen
Namen eingeben
CP-40
9
CP-40
Gespeicherte Nummern ansehen
Gewünschten Speicherplatz
auswählen, Name und Nummer
werden angezeigt
Rufnummer aus Speicher wählen
Möglichkeit 1
oder
oder
Speicherplatz auswählen
Möglichkeit 2
oder
Speicherplatz
Speicher-Einträge löschen
Speicherplatz
auswählen
Langer Tastendruck
(ca. 3 Sek.)
Sicherheitshinweise
Bitte beachten Sie:
• Stellen Sie das Gerät entfernt von:
– Wärmequellen,
– direkter Sonneneinstrahlung,
– anderen elektrischen Geräten auf.
• Schützen Sie das Gerät vor Nässe, Staub, aggressiven Flüssigkeiten und Dämpfen.
• Schliessen Sie die Anschluss-Schnüre nur an den dafür vorgesehenen Dosen an.
• Schliessen Sie nur zugelassenes Zubehör an.
• Stellen Sie das Telefon nicht in Bädern oder Duschräumen auf.
10
CP-40
CP-40
Anhang
Pflege
Ihr Telefon ist ein Produkt, das in Design und Ausführung hohen Ansprüchen genügt.
Es sollte daher mit Sorgfalt behandelt werden.
Zum Reinigen des Telefons wischen Sie das Gerät mit einem Antistatiktuch oder einem
etwas angefeuchteten weichen Ledertuch ab, anschließend mit einem trockenen Tuch.
Entsorgungshinweis (Umweltschutz)
Am Ende der Lebensdauer des Produkts darf das Gerät nicht im normalen
Hausmüll entsorgt werden. Bringen Sie es zu einer Sammelstelle zur Aufbereitung elektrischer und elektronischer Geräte. Das Symbol am Produkt, in
der Bedienungsanleitung und/oder Verpackung zeigt dies an.
Einige der Materialien des Produkts können wiederverwendet werden, wenn Sie das
Gerät in einer Aufbereitungsstelle abgeben. Mit der Wiederverwertung einiger Teile
oder Rohmaterialien aus gebrauchten Produkten leisten Sie einen wichtigen Beitrag
zum Umweltschutz.
Wenden Sie sich bitte an Ihre örtlichen Behörden, wenn Sie weitere Informationen
über Sammelstellen in Ihrer Umgebung benötigen.
Batterien-/Akku-Entsorgung
Für alle verbrauchten Batterien und Akkus besteht eine gesetzliche Rückgabepflicht;
sie dürfen nicht über den Hausmüll entsorgt werden. Entsorgen Sie die Batterien/
Akkus entsprechend den behördlichen Auflagen. Führen Sie sie der Wiederverwertung
zu. Die Batterien/Akkus werden recycelt, da sie z. B. Nickel - Cadmium (Ni - Cd), Blei
(Pb), Cadmium (Cd) oder QuecksiIber (Hg) enthalten können.
Die Batterien/Akkus sind mit Symbolen und ihrem Inhaltsstoff gekennzeichnet,
z. B.:
CP-40
11
CP-40
Garantiebestimmungen
Auf Ihr Gerät wird Garantie ab Kaufdatum im Rahmen der gesetzlichen Bestimmungen
des Landes, in dem Sie Ihr Gerät gekauft haben, gewährt.
Zum Nachweis des Kaufdatums bewahren Sie bitte den Kaufbeleg oder die durch die
Verkaufsstelle komplett ausgefüllte Garantiekarte auf. Innerhalb der Garantiezeit
werden unentgeltlich alle Mängel, die auf Material- und Herstellungsfehlern beruhen,
beseitigt. Die Garantieleistung erfolgt durch Reparatur oder Austausch des defekten
Gerätes nach Wahl des Lieferanten.
Von der Garantie ausgenommen sind Verbrauchsmaterialien, Mängel, die den Wert oder
Gebrauch des Gerätes nur unerheblich beeinträchtigen, sowie Schäden, die auf
unsachgemässen Gebrauch, auf Verschleiss oder auf Eingriffe durch Dritte, zurückzuführen sind. Eventuelle Folgeschäden, hervorgerufen durch die Nutzung, den Ausfall
oder Mängel des Produktes, insbesondere jede Haftung für Vermögensschäden sind von
dieser Garantie ausgeschlossen.
Im Garantiefall wenden Sie sich bitte an die Verkaufsstelle, bei der Sie das Telefon
gekauft haben.
Zulassung und Konformität
Dieses schnurgebundene Analog-Telefon entspricht den grundlegenden
Anforderungen der R&TTE Richtlinie 1999/5/EG über Funkanlagen und Telekommunikationsendeinrichtungen und ist geeignet zum Anschluss und Betrieb in
demjenigen Land, in welchem das Gerät verkauft wurde.
Die Konformitätserklärung ist auf folgender Webseite abrufbar:
www.swissvoice.net.
Die Konformität des Telefons mit der obgenannten Richtlinie wird durch das
CE-Zeichen bestätigt.
12
CP-40
CP-40
CP-40
13
CP-40
Welcome to Swissvoice
Your CP-40 is a corded telephone designed for connection to an analog telephone network.
Please read these operating instructions carefully to familiarise yourself with and take
full advantage of the benefits of your new CP-40.
Contents
Parts checklist . . . . . . . . . . . . . . . . . . . . . . . . . . . . . . . . . . . . . . . . . . . . . . . . . . . . . . .15
Installation . . . . . . . . . . . . . . . . . . . . . . . . . . . . . . . . . . . . . . . . . . . . . . . . . . . . . . . . . .15
Display symbols and keys . . . . . . . . . . . . . . . . . . . . . . . . . . . . . . . . . . . . . . . . . . . . . .17
Headset function . . . . . . . . . . . . . . . . . . . . . . . . . . . . . . . . . . . . . . . . . . . . . . . . . . . . .18
Telephone configuration . . . . . . . . . . . . . . . . . . . . . . . . . . . . . . . . . . . . . . . . . . . . . . .18
Phone operation . . . . . . . . . . . . . . . . . . . . . . . . . . . . . . . . . . . . . . . . . . . . . . . . . . . . .19
Caller ID features . . . . . . . . . . . . . . . . . . . . . . . . . . . . . . . . . . . . . . . . . . . . . . . . . . . . .21
Keypad functions . . . . . . . . . . . . . . . . . . . . . . . . . . . . . . . . . . . . . . . . . . . . . . . . . . . . .23
Memory management . . . . . . . . . . . . . . . . . . . . . . . . . . . . . . . . . . . . . . . . . . . . . . . . .23
Safety instructions . . . . . . . . . . . . . . . . . . . . . . . . . . . . . . . . . . . . . . . . . . . . . . . . . . . .24
Appendix . . . . . . . . . . . . . . . . . . . . . . . . . . . . . . . . . . . . . . . . . . . . . . . . . . . . . . . . . . .25
14
CP-40
CP-40
Parts checklist
- 1 base
- 1 line cord
- 1 handset
- 1 handset cord
- 1 user manual
Installation
Installing and replacing the batteries
3 AA-Size alkaline batteries for receiving and storing Caller ID records and for storing
frequently used numbers are required.
Important : If you are not going to use the telephone for more than 30 days, remove
the batteries because they may leak and damage the unit.
1. If the telephone line cord is connected, disconnect it from the base unit.
2. Carefully turn the phone, open the battery compartment by pressing gently with a
finger on the battery cover and remove it.
3. Insert 3 AA-size alkaline batteries (not included) as
shown in the illustration.
+ A A 4. Replace the battery compartment cover.
- A A +
5. If the line cord was previously connected, dis+ A A connect and reconnect it to the unit and check your
memory locations.
Installing the phone
Your phone should be placed on a level surface,
such as a desk or table, or you can mount it on a
wall.
1. Connecting the handset.
2. Connecting the telephone line.
CP-40
15
CP-40
Wall mounting
1. Rotate the wall mounting knob as shown in the following illustration:
Wall mounting knob
Location
Rotate 180°
The knob is designed to keep the unit in place when the telephone is mounted on the wall.
2. Install the base unit on the wall and then plug one end of the line cord into the telephone connection socket and the other end into the modular telephone line jack
marked
.
3. Attach the telephone at the wall as shown in the following figure.
16
CP-40
CP-40
Display symbols and keys
Low battery indicator
Morning
Voice mail
Afternoon
Month
Day
M
Hour
Minutes
Loudspeaker
Call-log
Mute Mic Repeat New call Number
D
Phone
number
Call waiting
Name
Ring Volume Switch
Flash Time Switch
Tone/Pulse Switch
Display
Dial button
Set but t on
Delete button
Contrast button
St o r e but t on
Mu t e but t on
Flash button
In use indic at or
M essage indic at or
Right/left buttons
Key 0 /
Insert a space
Redial/pause button
Speaker button
Speake r Volume button
Microphone
CP-40
17
CP-40
Headset function
Plug your headset (not provided) into the headset jack on the left side of the base and
press key
to establish the phone conversation over the headset (headset with 2.5
mm plug required).
Telephone configuration
Note : Immediately change the following factory settings.
There are 4 options to set:
DATE/TIME
Date format
Time format
LOCAL AREA CODE
LONG DIST CODE
SELECT LANGUAGE
select desired language
Setting date/time
DATE/TIME
Enter Month, Day, Hour and Minute
Setting the local area code
LONG AREA CODE
Enter your area code
When a number is stored in the caller ID list and the first digits of the number match
with the area code set in the telephone, the area code digits are deleted and only the
rest of the number is stored.
18
CP-40
CP-40
Setting the long distance code
LONG DIST CODE
Enter your long distance code
Press and hold button "0" to insert the long distance code in front of the telephone
number (only possible in pre-dialing mode).
Setting the language
SELECT LANGUAGE
Select language
Phone operation
Receiving a phone call
Answer call
CASE 1
End call
Ringing
Answer call
CASE 2
End call
Ringing
Answer call
CASE 3
End call
Ringing
Answer call
End call
CASE 4
Ringing
CP-40
19
CP-40
Making a phone call
CASE 1
OR
Dial number
OR
The displayed number will be dialed
OR
CASE 2
Dial number
Redial
OR
CASE 1
OR
The displayed number will be dialed
OR
CASE 2
Last number redial
Access telephone operator services
During conversation, press
button to interrupt momentarily the telephone conversation and to access your telephone operator's services.
Mute
In off-hook state, the user can press the
button to activate the mute function.
When MUTE is on, the MUTE symbol will appear on the screen. Press the
button
to deactivate the mute function and resume normal conversation.
Speaker volume level adjustment
You can adjust the speaker volume level during conversation by pressing the
button.
Contrast level adjustment
Press the
button to adjust the display contrast level.
Ringer volume level
The phone will ring when there is an incoming call. You can set the ringer volume to
high, middle or low level. The ringer volume switch is indicated in the following illustration under A.
20
CP-40
CP-40
Pulse tone setting
You can select P (PULSE) or T(TONE) dialing mode according to the requirements
from the local telephone operator. The T/P switch is indicated in the following illustration under B.
Flash time setting
You can use the Flash feature to access services provided by your telephone operator.
The Flash time is dependent on the local telephone exchange. You can
change the setting using the switch indicated in the following illustration under C.
C
B
A
A - Ringer Volume Switch
B - Tone/Pulse Switch
C - Flash Time Switch
Caller ID features
If your network operator supports caller ID presentation* (CLIP), the caller’s number
(if he did not not withheld his own number) is displayed before you accept the call.
To use this function, your telephone line must have active Caller Identification Presentation. Check with your network operator to find out whether the function is available
and about charges, if applicable.
* Function dependent on network operator.
Display incoming calls
Display incoming call log
Redial a caller ID number
OR
CASE 1
Select the
caller number
CP-40
OR
The displayed number
will be dialed
21
CP-40
CASE 2
Note : Use
OR
Add number in
front of number
Select the
caller number
OR
The displayed number will
be dialed
button to truncate the number in front of the Caller ID number.
Display outgoing numbers
Redial an outgoing number
OR
OR
The displayed number
will be dialed
Deleting a caller ID number
Select the number
Deleting all caller ID numbers
ERASE ALL?
Select caller
ID number
22
Press and hold
3 seconds
CP-40
CP-40
Keypad functions
Key
Assigned
characters
Key
Assigned
characters
1
PQRS7
ABC2
TUV8
DEF3
W XY Z 9
GHI4
JKL5
MNO6
Memory management
Storing a telephone number
Memoy location
Dial number
Enter name
Storing an incoming call number
Select the
number
Memory location
Confirm
Enter name
Storing outgoing numbers into memory
Select the number
Memory location
Confirm
Enter name
CP-40
23
CP-40
Check content of memory location
Select memory location,
number and name are displayed.
Dialing a memory location
OR
CASE 1
OR
Select memory location
OR
CASE 2
Memory location
Deleting a memory location
Select memory
location
Press and hold
3 seconds
Safety instructions
Please observe the following instructions:
• Place the phone at the appropriate distance:
– from sources of heat,
– from direct sunlight,
– from other electrical appliances.
• Protect your phone from damp, dust, aggressive liquids and steam.
• Connect the cables only using the sockets provided.
• Connect only approved accessories.
• To clean the phone, use only a slightly damp cloth.
• Do not use your phone in damp rooms (for example, in the bath).
24
CP-40
CP-40
Appendix
Care
Your telephone is a sophisticated product in terms of design and construction, and
should therefore be handled with care.
To clean the telephone, wipe first with an antistatic cloth or a damp, soft leather cloth
and then dry using a dry cloth.
Recycling (environmental protection)
At the end of the product's life cycle, the telephone must not be disposed of in
normal domestic waste. Please take it to a collection point for processing electrical and electronic equipment: see symbol on the product, in the user manual
and/or packaging.
Some materials used in this product can be recycled if you take it to a recycling depot.
By recycling parts or raw materials from used products you will be making an important
contribution to environmental protection. Please contact your local authority if you
require information about collection points in your neighbourhood.
Disposing of the batteries
By law, all used batteries and accumulators must be recycled and not disposed of in
domestic waste. Please dispose of them according to the official regulations. Take
them to a recycling depot. The batteries/accumulators will be recycled since they may,
for example, contain nickel cadmium (Ni - Cd), lead (Pb), cadmium (Cd) or mercury
(Hg). The batteries and accumulators are labelled with symbols and information on
their contents,
e.g.:
CP-40
25
CP-40
Warranty conditions
Your telephone is subject to a guarantee from the date of purchase in accordance with
the legal provisions of the country in which the telephone was purchased. As evidence
of the date of purchase, please keep the receipt or the warranty card completed by the
retailer. All defects attributable to material and manufacturing faults will be corrected
free of charge within the warranty period, either by repairing or replacing the defective
equipment.
The warranty does not cover expendable materials, defects which affect the value or
use of the equipment only insignificantly, and damage caused by incorrect use, ordinary wear and tear, or manipulation by third parties.
This warranty does not cover consequential damage caused by the use, failure or
defectiveness of the product. In particular, no liability whatsoever is accepted for
damage to property and pecuniary loss.
To claim under this warranty, please contact the retailer where you purchased your
telephone.
Approval and conformity
This corded analog telephone complies with the basic requirements contained in the
R&TTE Directive 1999/5/EC on radio equipment and telecommunications terminal
equipment and is suitable for connection and operation in the member state indicated
on the base station and/or packaging.
The declaration of conformity may be viewed at: www.swissvoice.net.
The CE symbol confirms the conformity of the telephone with the above
directive.
26
CP-40
Warranty Certificate
Warranty Certificate
Garantieschein, Bon de garantie, Certificato di garanzia,
Garantiebewijs, Takuutodistus, Garantibevis, Garantisedel,
Garantibevis, Certificado de Garantía, Talão de garantia
device type:
(Gerätetyp, type d’appareil, tipo di apparecchio, toesteltype, laitetyyppi, maskintype,
apparattyp, apparattype, modelo del aparato, modelo do aparelho):
serial number:
(Seriennummer, numéro de série, numero di serie, serienummer, sarjanumero,
serienummer, serienummer, serienummer, número de serie, número de série):
dealer’s stamp:
(Händlerstempel, sceau du vendeur, timbro del rivenditore, stempel van de dealer,
kauppiaan leima, forhandlerens stempel, försäljarens stämpel, forhandlerstempel,
sello del comerciante. carimbo do vendedor):
dealer’s signature: (Unterschrift des Händlers, signature du vendeur, firma del rivenditore,
handtekening van de dealer, kauppiaan allekirjoitus, forhandlerens underskrift,
försäljarens underskrift, forhandlers underskrift, firma del comerciante,
assinatura do vendedor):
date of purchase: (Kaufdatum, date d’achat, data d’acquisto, datum van aankoop, ostopäiväys,
kjøpsdato, datum för köpet, salgsdato, fecha de adquisición, data de compra):
Internet:
www.swissvoice.net
© Swissvoice SA 2010
20405718xx_ba_a0
SV 20405718