1
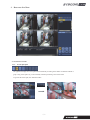
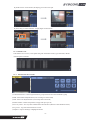
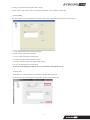
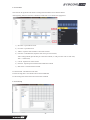
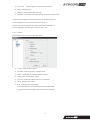
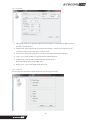
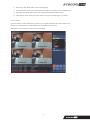
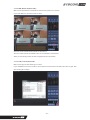
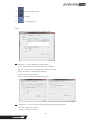
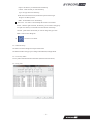
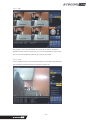
NetClient software user manual 1-1. General information Net Client is an application which provides users not only viewing and controling remote DVRs, but also receiving realtime event data or alarm signals with LAN, WAN environment. Net Client enables users who care about security to manage full information from all the wire-connected DVRs. All security administrators can control all situations even in emergency with easy operation in their PC. 1-2 Main features of Net Client program is as follows, - Real time monitoring multi DVRs at the same time (Up to 64ch) - Various screen mode supported. (1, 4, 9, 16, 25, 36, 49, 64 screen & sequence mode) - Remote playback/backup & local playback (backup file view) - Remote controlling DVR setting value / PTZ camera control System requirements for PC - Operating system : Windows XP / Vista / Windows7 - CPU : Dual core or Higher - Ram : At least 1GB (2GB or higher memory recommended) - VGA : 128MB graphic memory or More Program Installation 1-2-1 Find Net Client installing program, and execute it. 1-2-2 After installation, the Net Client icon will be created on the desktop. 1-3 . Log In When the application is started, Login window will be shown. Input ID and password. Initial ID and password are admin and admin (These ID and password are separate from ID and password of DVR) -2- 2. How to use Net Client 2-1 ICONS in Live mode 2-1-1. Screen split option The appilcation displays the screen split mode automatically according to the number of channels of DVR or group. Using screen split icon, you can manually select the split among 1/4/9/16/2/36/64ch To get into full screen split, click maximize button -3- By double click on certain channel, the display goes to full screen split By mouse drag on certain channel in 1ch split, digital zoom functions. 2-1-2. Realtime event In the bottom of Live screen, events update along with information of time, type, DVR name, channel And description in realtime. 2-1-3. MAIN ICONS in Live mode 1) Connect/Disconnect : Connect registerd DVR or group/ Disconnect the connected DVR or group 2) RPB : Enter Remote Playback Mode (view recordings on remote DVR) 3) LPB : Enter Local Playback Mode (view backup data in PS format) 4) Remote SETUP : Remote setup Mode (CGI page will open up in IE) 5) Two-way Audio : Two-way audio communication thru NetClient. (Between remote DVR site and PC) 6) Log viewer : Logs from selected DVR are viewed. 7) Snapshot : Capture still image of highlighted channel -4- 8) Config : Set up NetClient and register DVR or Group 9) Audio Volum : Adjust audio volume coming from remote DVR. Only workable in 1ch full split. 2-1-3-1. Config To register DVR and set up configuration of Netclient, please click Config Icon, the below windows will be pop up. 1) User : Add or delete Users who use this program 2) DVR : Add or delete Dvrs to DVR list 3) Group : Add or delete DVR to DVR group 4) Camera : Configure OSD related with cameras. 5) System : configure program and upgrade DVR remotely 6) Event : function related event can be setup. To save the values changed in windows, the save Icon should be clicked before closed. 2-1-3-1-1. User The default user is admin which can’t be deleted and changed without password Please input the user name and password in the blank, and then click the add ICON, -5- 2-1-3-1-2. DVR New DVR can be registered in this menu or existing DVR information can be edited or deleted. After registering DVR, the DVR info is indicated in DVR LIST in Live mode as the right picture 1) Site Name : input DVR site name. 2) Dvr Name : input DVR name 3) Address : input the same IP address or host name of DVR. 4) Port name : in HD SDI DVR, Input the same Client port value of DVR, And in analogue DVR, Input the first port value name of DVR ( ex. The port value of dvr is 7690~7694, 7690 is written here) 5) User ID : Input the user name of DVR 6) Password : input the password related with USER name of DVR 7) Max camera : Select the channel of DVR. To add new DVR : Fill Banks and click ADD To delete existing DVR : select DVR in the list and click DELETE To edit existing DVR :select DVR in the list and click CHANGE 2-1-3-1-3 Group -6- 1) Clear Array : Clear all registered cameras in screen division 2) ADD : add DVR Group 3) DELETE : delete selected registered Group 4) CHANGE : Add or delete the cameras already registered of selected Group To make the list to display from more than one DVR, please make Group List. 1) Please Drag DVR or the camera to the right screen division. 2) Please Click add Icon and write down group name and then click OK icon. 3) After adding group, click Save Icon to return to main screen. 2-1-3-1-4. Camera Check the OSD items if you want to show them in live 1) Cell no : Camera number is shown 2) Site Name : DVR Name written in DVR is shown. 3) Address : DVR address related with cameras is shown 4) Camera name : camera name is shown 5) Time : the present time of DVR is shown on each channel. 6) Frame : the frame rate is shown 7) Rate : the display rate can be selected. Screen Rate allows live screen to display full screen without blank. Orignal screen show the original video stream size sent from DVR. -7- 2-1-3-1-5. system 1) SW Upgrade : DVR can be upgrade through this function remotely. File format must be TAR.GZ which is provided by the manufacturer. 2) Sequence time : Select sequence time by second. If current screen is 1ch split, then it will show by 1ch according to sequence time. If 4ch split, it will show by 4ch. 3) Auto connect : when program starts, the Live mode of selected dvr is automatically displayed 4) Login : you can select whether or not program starts with ID and password 5) Program mode : when the mark is checked, the other window pop up to Run playback mode when you select RPB, LPB. 6) Display mode : you can select display mode and UI size. 2-1-3-1-6. Event You can select the event output in NetClient and event types that trigger the output -8- 1) Event Popup: The channel where event occurs will popup 2) Alarm Beep: When event occurs, beep sound will be made in case speaker device is equipped in PC. 3) High Light: The channel where event occurs will generate high light around its frame. 4) Vloss, Motion, Sensor, Alarm out, System: Select event types that would trigger event output. 2-1-3-2. Connect To connect DVR, First select DVR name you want to see Live mode with Mouse and click CONNECT icon. (caution : the selected point is not SITE NAME, but DVR NAME below site name) With connect success message, it shows live of selected DVR. -9- 2-1-3-2. RBP (Remote Playback mode) RBP is used to playback the recorded data of DVR or back up them to PC remotely. If you Click RBP Icon, the below window is shown. Select date on the calendar and hour/minute in time bar first. The color of date and time shows RED if there are recorded data in selected DVR. When you click the Play button, the data is displayed from the selected time. 2-1-3-3. LBP (Local Playback mode) RBP is used to play the data backed up in Local PC. If you click RBP Icon, the below window is shown and then click the file Icon located in the bottom of right. Then open a backup file to display. - 10 - Water mark: Click water mark icon to check whether or not PS file has been modifie or edited. The basic window and function between RBP and LBP are similar except a few functions. 1) : Play Button 2) : Pause 3) 4) , : Step back ward, step forward in pause. , : Fast Forward, Back forward, this key is used together with To play faster or slower. The value exits from -5 to +5. 5) 6) . : playback speed, these function are used just for forward play : Adjust brightness of recorded image. (Adjusting brightness of image in Netclient not camera) 7) : Adjust contrast of recorded image (Adjusting contrast of image in Netclient not camera) 8) : Adjust Sharpness of recorded image (Adjusting sharpness of image in Netclient not camera) 9) : Adjust Softness of recorded image (Adjusting softness of image in Netclient not camera) 10) : Select black.white of recorded image - 11 - 11) : Go back to default values 12) : Snapshot 13) : Go to backup menu Backup When the Disc Icon is clicked, the below window pops up. file backup : it is used to backup file generated in DVR. (1 file is generated with 10 minutes or with max size of 700MB) Start time : select the date and click BACKUP LIST to show file lists. Output : the directory in which the data is backed up Type : file type when it is backed up Progress : show the progress during making backup file Part Backup : it is used to back up the files selecting specific starting and ending time. Start time : starting time of backup End time : ending time of backup - 12 - Output : the directory in which the data is backed up Camera : select cameras you want to back up Type : file type when it is backed up Both can be selected one time, but the back up time will be longer. Progress : the back up status. Make : Click MAKE icon to start backup PS to AVU : it is used to convert backup file form PS to AVI format. PS file : Click the right side of bar, the directory you save data in will pop up. AVI path : the directory in which the converted AVI file is backed up Cameras : please select the cameras you want to change file type to AVI. Make : Order to start change file. 14) : Go back to Live mode 2-1-3-4. Remote set up The function is used to change the setup of remote DVR. The different window will pop up according to HD SDI DVR, Analogue DVR. 2-1-3-5. Tow way Audio Two-way audio communication thru NetClient. (Between DVR site and PC) 2-1-3-6. Log view - 13 - 2-1-3-7. PTZ Only support in 1ch screen split. Pan/tilt camera must be connected to the channel. With direction keys and zoom in/out icons, you can control pan/tilt/zoom of the camera. You can call SCAN & PRESET which was previously saved in DVR. 2-1-3-8. Color Color configuration doesn’t work in HD SDI DVR due to the attribute of HD SDI DVR. Only workable for analog DVR. Select one channel to adjust color. - 14 -