1
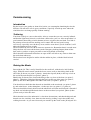
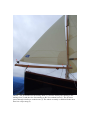
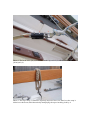
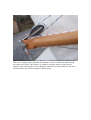
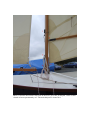
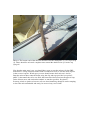
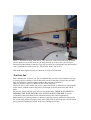
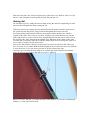
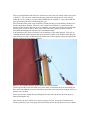
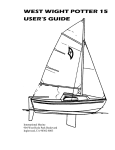
BayRaider
Owners Manual
SwallowBoats Ltd, Gwbert Rd, Cardigan, Wales, SA43 1PN
Contents
Contents ....................................................................................................................................2
Introduction...............................................................................................................................3
Specification .............................................................................................................................3
Safety Information....................................................................................................................4
The RCD Design Category..................................................................................................4
Loading .................................................................................................................................4
Safety Equipment .................................................................................................................4
Air Buoyancy........................................................................................................................4
Self Draining Cockpit ..........................................................................................................5
Water Ballast ........................................................................................................................5
Self Righting, Side Decks, and Asymmetric Capsize Buoyancy,.....................................5
Capsize Recovery.................................................................................................................6
Re-boarding ..........................................................................................................................7
The Ketch Rig.......................................................................................................................7
Commissioning.........................................................................................................................8
Introduction...........................................................................................................................8
Trailering ..............................................................................................................................8
Raising the Masts .................................................................................................................8
The First Sail ..................................................................................................................... 15
Raising Sail........................................................................................................................ 16
Rigging and Using the Spinnaker..................................................................................... 18
Sailing ................................................................................................................................ 18
Reefing............................................................................................................................... 19
Using the outboard ............................................................................................................ 19
Towing, Anchoring, Mooring........................................................................................... 19
Recovery ............................................................................................................................ 20
Maintenance........................................................................................................................... 20
Warranty................................................................................................................................. 22
Introduction
Congratulations on the purchase of your new Swallow Boats BayRaider. We are
confident that you will have many hours of fun from this boat.
Please take the time to read this owners manual through completely before taking your
boat out for the first time. Although she has been designed with safety in mind, the single
most important safety factor is the weather. Choose the weather for your maiden outings
with care and don’t be pressurised by others urging you to launch.
Please keep this manual in a safe place and hand it on to a new owner if you decide to sell
the boat.
Specification
Your boat has a Hull Identification Number which is a 14 digit number required by
European law. The HIN for your boat is engraved on a timber pad in the outboard well
and within one of the seat lockers. It is also written on the Declaration of Conformity,
which should be included with this manual.
Dimensions:
Hull Length
Waterline Length:
Beam:
Draft:
Weight (empty Boat):
Sail Area:
6.05m
5.60m
2.05m
1.40m (board up). 0.25m (board down)
330kg (Epoxy Ply)
425kg (Glass fibre Reinforced Epoxy)
430kg (Glass fibre Reinforced Polyester)
280kg (Carbon fibre Reinforced Epoxy)
17 square metres
Safety Information
Your new boat has some innovative design features that make her a safer boat than most
open craft of her type. Despite these features, we urge caution in her use at all times,
especially if the boat is new to the user, remember weather conditions are never
predictable.
The RCD Design Category
Your boat has a Recreational Craft Directive category of C - INSHORE. This means she
is theoretically capable of handling winds up to force 6 and significant wave heights of
up to 2 metres. To quote from the RCD:
“INSHORE: Designed for voyages in coastal waters, large bays, estuaries, lakes and
rivers where conditions up to, and including, wind force 6 and significant wave heights
up to, and including, 2 m may be experienced.”
The RCD attempts to classify boats like this but the judgement of the owner must be the
most important factor.
Loading
She is intended for up to four adults. She can be safely sailed alone, though in these
circumstances we recommend the use of the water ballast.
She should carry no more than 300kg load, in addition to the water ballast, which also
weighs 300kg.
Safety Equipment
Before sailing you should always carry the following safety equipment as a minimum:
• Lifejackets or buoyancy aids
• Bucket for bailing
• Oars
You might also consider carrying some means of contacting someone ashore, and some
signally flares to attract attention.
In addition, you should tell people where you are going and what time you expect to
arrive.
Air Buoyancy
If swamped your boat depends on sealed air chambers which are accessible through
plastic twist hatches, for ventilation. It is essential that these hatches are shut when
underway. Air chambers that let water pour into them will not work as buoyancy!
The main mast is a sealed hollow section that is designed to help prevent the boat from
fully inverting in the case of a capsize. It is important that the mast and hull air chambers
are not punctured or drilled into as this will cause water to leak. If you have any doubts,
please contact us.
Self Draining Cockpit
The BayRaider has a cockpit floor that, under normal loading conditions, is above the
external water level. This means that if flooded, it is possible to empty the cockpit fast by
opening the hatch in the outboard well bulkhead and letting the water run out. The sump
area just forward of the outboard well bulkhead is designed to catch and drain (via the
bailer) most of the spray and water that inevitably is a part of open boat sailing.
Water Ballast
The water ballast is an integral part of the BayRaider. It works by admitting 300kg of
water into a central chamber under the floor, thus substantially increasing the boats
stability, particularly at high angles of heel. The downside is the huge increase in weight
which slows the boat down, especially at higher speeds.
The water is admitted through a forward facing self bailer or bung, accessible under the
main floor hatch aft of the centreboard case. Open this underway and you will see the
water pouring in. A little disconcerting but the water will not come up over the top of the
floor, unless the boat is heavily loaded.
It usually takes between 5 and 10 minutes to fill. She will completely fill under her own
weight when floating level, due to the 75mm of foam on the underside of the floor. Leave
the hatch off, or loose when filling to allow air to escape. The cockpit floor has a slight
slope aft to drain water into the sump. Ensure any crew sit well forward during filling to
make sure the tank is completely full at the front end.
When the tank is only half full, beware of the free surface effect and the resulting slight
reduction in stability that can occur due to water sloshing port to starboard. In practice we
have not noticed any problems in this regard, as the water is constrained between the seat
sides, so only has limited room to move, but it pays to be cautious.
You can empty the tanks when moving at more than about 4.5 knots through the water,
by opening the two forward bailers, on either side of the centreboard case. These are
located under the small hatches set into the floor. It normally takes about 10 minutes of
steady sailing to empty the tanks.
Self Righting, Side Decks, and Asymmetric Capsize Buoyancy,
If you capsize when the ballast tank is empty, the boat will lie on her side with the rig on
the water. In normal conditions she will not turn over completely. If she does, due
perhaps to wave action, or crew members hanging onto the sides of the up turned hull,
then she can be recovered single handed if necessary, thanks to her unique Asymmetric
Capsize Buoyancy (ACB).
Side decks are very important to create a boat that is self righting from 90 degrees, but
unfortunately, they hinder recovery of a vessel that has fully inverted. The BayRaider
mast is a hollow sealed unit, aiding recovery, but without ACB, the boat is still too stable
in the inverted state for one man to be able to right alone.
ACB allows one side deck tank to flood, thus destroying buoyancy on one side. A baffle
on the port side under the foredeck (EPOXY PLY BOAT ONLY) protects the tank from
flooding in the 90 degree knockdown case, but when fully inverted, the tank entrance is
exposed and water pours in. On GRP, GRE and CRE boats, the inlet for this water is the
wooden lined hole on the port side next to the mizzen. Once the boat has been righted,
the majority of the water pours back the way it came in, landing in the floor well (or
Outboard well - GRP boats), from where it can flow out the outboard well. The
remaining amount floods into the floor well via a small drain hole into the port side seat
locker. You can feel for this with your hand in the locker, reaching outward and upward
(epoxy ply only).
If your boat is capsized with the water tanks full, she will of course self right. It is
unlikely she will ever get as far as a full invert in this state as her angle of vanishing
stability is an impressive 120 degrees, but if she does she can be recovered in the same
way as if the ballast tank were empty.
Capsize Recovery
We have only capsized the BayRaider deliberately for tests. You can see the video of this
on our website, but we would also strongly recommend that you capsize her yourself.
Pick a nice day off a beach and get your friends and family to stand on one side deck.
Without a rope from the opposite chainplate they are unlikely to achieve a capsize. With
the ballast tanks full we found that one of us had to climb the mast in order to maintain
the downward force necessary for a 90 degree invert. If you can, try her with the tanks
empty first, so that you can see how easy she is to right from a knockdown, single
handed. All you need to do is put some of your weight onto the centreboard. Watch out
for the boat righting on top of you, so try and only grab the tip of the board.
She should right well before you need to stand on the board.
If this works well, you might like to test her with the tanks full to check that she self
rights from a knockdown.
In practice a capsize is unlikely to occur on a fine day with many people around to help
you, in shallow water. Worse case scenario is that you have no water ballast and are
sailing alone, with enough wave action and deep enough water for her to fully invert. If
this happens, we recommend the following:
Swim underneath the boat and make sure the main sheet and jib sheet are released. The
mizzen should be left as it helps keep the righted boat head to wind.
Climb on top of the inverted boat. The bilge runners should help you here, which together
with the keel strip should provide grip to board. Reach through the Centreboard slot and
pull the board vertical. There is a notch on the bottom corner to get your fingers round
and pull. If you have a crew member they could help by pulling the board down from
underneath, but it should not be necessary.
Any spare crew member should help by climbing on top of the upturned boat, but again,
we have done this test alone, so they should not be necessary.
After about 2 minutes, the boat will be taking on a significant heel to one side. Use your
weight on the centreboard to lever the boat up slowly. The sails will slow the progress but
once they are almost clear of the water kneel out on the centreboard as far as you can to
bring the boat fully upright.
Re-boarding
Getting back on board can be difficult and it is advisable to practice this when swimming
alongside the boat. The BayRaider has sufficient stability to make reboarding over the
side easily possible without re capsizing the boat, unless the main sheet is cleated in and
the wind is against.
However, we have recently designed a step in the back of the rudder blade to further help
re boarding. It should be fairly obvious how it works, but again, it is worth a try next time
you are anchored off a beach somewhere.
It is possible to haul yourself in over the side, but tired and wet you may not find this
possible. Rigging up a rope loop is a reasonable method, but it needs to be long enough
only to drop just below the chine (the hard angle in the hull). If it is much lower than this
your foot will slip under the boat as you try and push. Much shorter and you will not be
able to get your foot to reach it. It is a good idea to keep this line permanently tied around
the mizzen bits (the supports for the mizzen mast – a strong point) so that it is ready for
use over the side when needed.
The Ketch Rig
Another safety feature on this boat is the ketch rig. In strong winds it allows the boat to
be well balanced with the mainsail completely dropped. If you find yourself caught out in
a sudden squall then dropping the main is often a good idea. It is fast and easy to do, and
creates a boat that is extremely safe.
Commissioning
Introduction
Rig the boat in your garden or front drive before you contemplate launching her for the
first time. Do not raise sails in gusty conditions, especially in built up areas where the
wind direction can change quickly without warning.
Trailering
Your boat is likely to come on her trailer. Always ensure the tyres are correctly inflated,
and that the light board electrics work when connected to your car. Also ensure there is a
good amount (about 30kg or half a human) of nose weight on the tow hitch. Too little is
the primary reason for trailers snaking out of control. Do not load your boat up
excessively, especially not with heavy items, and be aware that if you do load her, it will
affect the amount of nose weight.
The boat should be tied on with at least two separate ties. Remember that it is much more
likely the boat will come off the front (under emergency braking/impact) than off the
back, unless you have a super powerful car and enjoy harsh accelerating.
Check that the ballast tank self bailers are open as this will allow any water to drain onto
the road when underway.
The boat has been designed to trailer with the rudder in place, with the blade hoisted
vertical.
Raising the Masts
Start with the jib. This is easily identified as the small sail, with the wire luff (leading
edge). With the mast lowered, attach the lower corner (tack) to the furling drum at the
end of the jib boom (see point 5, photo1). Attach the top end (head) to the top swivel on
the end of the main halyard (see point 2, photo 2).
Shackle the jib boom to the stem head fitting at the very bow of the boat (see point 3,
photo3). Thread the jib halyard through the block on the top of the mast (see point 2,
photo 4) and down through the non return clam cleat (see point 1, photo 5).
You should next check that the shrouds are shackled to the mast head (see point 3, photo
4), and at their base, to the chainplates, via the rope ties (see point 1,2,3, photo 6).
The mast should be already bolted onto the tabernacle and if the main halyard is threaded
up (hook end aft) through the dumb sheave at the mast head (see point 4, photo 4) then
you are ready to raise the mast.
Check that the base of the tabernacle is clear from obstructions, and that the halyards and
shrouds are also similarly clear, then raise the mast by picking it up in the middle and
walking forwards. As you move forward you can take up the slack on the jib halyard. It is
handy to have the jib sheets threaded through the boom and cleated off, to ensure the
back end of the boom does not fall overboard when raising.
Once you have the mast vertical lean on it while tightening the jib halyard. Pull this as
hard as you can, then cleat off. If the winds not too heavy, you can unfurlthe jib now, on
the trailer to test the luff tensions. When you unfurl the jib the back end of the jib boom
should be pulled up and cleated off with the clew line (see point 3, photo 1). The action
of raising the jib boom at the aft end, lowers the front end, so pulling much more tension
into the jib luff. Furl the jib away again before attempting to launch the boat.
A note about the furling line. The line should be 6.5m long. Even with the sail fully
furled most of it should be left on the drum, ready to be used when furling the jib in high
wind conditions.
Photo1 - The jib shackled to the furling drum (5). Note the furling line running to the
furling cleat (1) and the clew line running to the clew outhaul cleat (3). The jib sheet
passes through a bullseye on the boom (2). The whole assembly is shackled to the stem
head via a rope strop (4).
Photo 2. The head of the jib (1) is shackled to the top swivel (2) which is shackled to the
jib halyard (4).
Photo 3. The rope strop (1) should be regularly inspected for wear. Note how the strop is
folded over the boom, thus theoretically multiplying the ropes breaking load by 4.
Photo 4 Mast head - lowered. The jib halyard (2) is threaded through the head block (1).
This boat is equipped for a spinnaker, the halyard of which would be threaded through
the empty lower block. The shrouds (3) should be regularly checked, especially for
tightness. The main halyard (4) goes through a dumb sheave at the mast head. The mast
remains hollow and sealed for lightness and buoyancy.
Photo 5. Note the non-return clam cleat on the mast (1) for the jib halyard, which is then
cleated off more permanently at 3. The main halyard is cleated at 4.
Photo 6. The bottom end of the shrouds shackled onto the chainplates (1) via a rope strop
(2). There should be at least 4 complete turns around the shackle/wire eye before any
tying off.
Now that the main mast is up, you should have room to step the mizzen. On the GRP
boats there is a large stainless washer with a bit taken out of it, to lock the mast in place
in the event of capsize. Wood epoxy owners should ensure their mizzen is tied in.
Snap the mizzen sheets onto the boom using the clip and rope provided (see point 2,
photo 7) then unroll the sail to set. Stick the front end of the boom into the prussic loop
on the mizzen mast, and tension the outhaul as much as possible. See photo 7.
In strong winds we prefer to have no sails set when launching, though it can be tempting
to leave the mizzen unfurled and ready, be aware of any cross winds.
Photo 7: The mizzen setup, with sail set. once unrolled, sit the front end of the jib boom
into the prussic loop on the mast (4), pushing the loop up as far as the sail will allow.
Then tension the outhaul as much as you can, best done by sweating the rope between the
cleat (3) and the end of the boom (1). The mizzen sheets clip on at 2.
With both masts up but no sails set, the boat is ready to be launched.
The First Sail
Pick a fine day for your first sail. We recommend that you don’t invite hoards of people
to a fancy launch ceremony, at least not until you have sailed her yourself first and had
time to familiarise yourself with her without the pressure of onlookers.
Don’t be afraid to cancel if conditions look a little marginal.
When you arrive at the launch site, remove the trailer board (it should stow alongside the
trailer wheel, without need for full removal) and take of all ties apart from the winch
hitch.
Reverse the trailer until the tyres are wet, but not the hubs. THERE IS NO NEED TO
IMMERSE THE TRAILER HUBS TO LAUNCH OR RECOVER HER. If you do
accidentally, then wash them down with fresh water at the earliest opportunity.
Rather than rig a separate painter, we prefer to push the boat off while still connected to
the winch strap (ratchet released). Once started she picks up speed quickly, which should
be regulated by holding the winch strap from running out too fast.
Due to her fat stern, she will pick up buoyancy and float in very shallow water. Un-clip
the bow, and bring the boat alongside the jetty. Re park the car.
Raising Sail
We normally begin by setting the mizzen, then raising the mainsail (depending on wind
direction and strength) then lastly setting the jib.
Unfurl the mizzen by rotating the mast until fully unrolled, then attach the front end of
the sprit boom into the prussic loop provided and tighten the mizzen out haul.
Lower the rudder blade into the water by releasing the rudder up haul line which is
cleated on the tiller. This will give you basic steerage way but ensure that you pull the
blade right down as soon as you are deep enough and cleat into the auto release cleat on
the opposite side of the tiller from the uphaul cleat. When the boat is hard on the wind
you will find it extremely difficult to pull the rudder blade down. Luff up into wind for a
few seconds to make your job much easier.
Next comes the mainsail, though you may prefer to motor out and raise this when you
have sea room. If you cannot hold the boat roughly head to wind it becomes very difficult
to raise the main, so it is not always possible to do this when at the jetty.
Assuming you can, then the first thing to do is attach the main halyard to the topmast
using the spliced snap hook in the end (see point 1 , photo 8)
Photo 8. Feed the halyard (1) around the back of the topmast (2), into the sawn-through
bullseye (3), and clip back on itself.
Next you should attach the mast jaws to the mast, above the non return clam cleat (point
1, photo 5). You can also connect up the rope parrel bead strops here to save doing it
when the sail is set (these are just visible behind the jib on photo 1 - they clip round the
mast by inserting the bead end through the eye).
The front end of the main boom should be slotted into the gooseneck fitting at the mast
and the mainsheet checked. Check it is not cleated off, and that it is connected to the
boom near the aft end. The last job is to attach the car at the lower front corner (the tack)
into the track on the backface of the mast. Slot it into the topmast position so that it
doesnt hinder bringing the topmast up to maximum height.
You should now be ready to hoist the sail by hauling on the main halyard. Tell crew to
watch their heads as the topmast and boom are lifted off the deck. Pull the main halyard
up as hard as possible, so that the block on the front of the topmast is hard up against the
aft face of the mast (see point 1 photo 9)
Photo 9. The topmast hard up against the back of the mainmast.
Cleat it off on the lower leat at the base of the mast. Tension the tack car and check you
have sufficient outhaul tension on the boom (generally more tension in stronger winds, so
that the sail is flatter).
Lastly you need to unfurl the jib, pulling the aft end of the jib boom up in the process,
thus tensioning the rig.
Now check you know which way you are going to sail off. Lower the Centreboard as
much as possible to get some grip. Go forward and ensure the jib sheets are loose, unfurl
the jib by releasing the small furling line and pulling on the thicker clew line until the
clew of the jib is right up against the aft end of the jib boom.
Tips:
• Not many boats have a rudder that be can be completely lifted out of the water.
Double check you have released it before you set sail!
• To help keep her head to wind when rigging her, sheet in the mizzen tight to the
centreline as soon as you have unfurled it.
Rigging and Using the Spinnaker
The Asymmetric Spinnaker is a powerful light weather sail that should be used with
caution until you have mastered it.
It is essential in all but the lightest conditions to have a crew member to help hoist and set
it. It is also advisable to test rig the spinnaker on dry land first because it is much easier to
sort out tangles here. Remember that the Asymmetric Spinnaker is nothing more than a
large, free flying ulta baggy jib. it is hoisted on a seperate halyard and attached to the
front end of the bowsprit by hooking it onto the bobstay.
The important thing to remember about a spinnaker is that it is best set and struck when
pointing downwind. This is blows it all away from the boat which keeps it free of snags.
The spinnaker sets on a retractable bowsprit that cleats under the foredeck.
Start with the bowsprit retracted. Hook on the bobstay to the tack (the corner with the
sailmaker label near it) then attach the halyard to the head. This is done by pinching the
rope, about 6 inches in from the end with the bead on it, and pushing the pinched end
through the eye in the sail. This forms a loop. Push the bead through the loop and pull the
whole lot tight. Check that the sheets are going round the furled forestay, round the
outside of the shrouds and into the strop blocks. These are blocks spliced onto a loop.
This loop can be pinched and threaded through under the oarlocks each side and tucked
inside itself. You are now ready to hoist.
Extend the bowsprit by pulling the rope out and cleating under the foredeck. This will
draw the spinnaked out of its bag. Once cleated off, raise the sail as fast as possible by
pulling on the halyard. Cleat off with the spinnaker luff still curved. Follow the exact
opposite procedure to drop. Test your spinnaker in light weather first.
Sailing
Here are some basic guidelines to sailing your boat. This is not intended as a lesson on
sailing. If you are inexperienced then we recommend you go out with someone else who
is, or take appropriate lessons.
The ketch rig is best sailed with the jib out the most, the main in a little more and the
mizzen in the tightest. If you have the jib boom rigged then the whole rig is self tacking
which makes long beats to windward up narrow estuaries a lot easier – the sheets can all
be set and left. It is easy to forget about the mizzen, and although it can be sheeted in
hard a lot of the time, it is always worth easing it as you bear away.
The feel of the helm can be altered with the set of the jib and the mizzen. If you are
sailing across very shallow water in strong winds, the rudder will have to be up and so
will not have as much grip on the water. The gusts will tend to head the boat round into
wind. You can mitigate this somewhat by sailing with the mizzen slackened.
You can also use the mizzen to back the stern of the boat round. Pull it all the way hard to
windward and the boat will turn about very quickly, like backing the jib. Experiment with
it when you have sea room.
Reefing
The quickest and easiest way to reduce sail in a hurry is by dropping the main altogether.
Let the jib go, pull the mizzen in tight (so she points into wind) and then drop the main
into the bottom of the boat.
Reefing is straightforward but it should first be tried in calm water or on dry land.
To reef the sail:
Release the jib and haul the mizzen into midships to sit her head to wind.
Release the main halyard and lower the sail and yard into the cockpit.
The yard has two pennants tied to it, above the position of the main halyard. For the first
reef position, tie the pennant ends together in a reef knot, with the halyard lying inside the
enclosed loop. This effectively means the halyard attachment position is now further up
the yard, so the sail when raised will be lower.
Re attach the outhaul to the new, higher cringle position, and do the same for the tack
(the lower leading corner of the sail).
If possible, roll away the bottom of the sail and tie into place with the reefing pennants
provided. Do not try to tie the sail to the boom, as in some reefing systems.
Raise the sail as per normal, tension the outhaul and sail on.
It sounds easy but it is extremely important to practice reefing so that you know what to
do if you have to.
Using the outboard
We recommend a small short shaft. 2HP is plenty and 4HP is maximum. Anything more
than this probably won’t fit in the confines of the engine well and will weigh your stern
down, barely driving you any faster.
Smaller engines do not have reverse, but the engine can be fully rotated in place to
compensate. When manoeuvring in tight spaces, let go of the tiller (it can be flipped up
out the way) and use the outboard tiller, or use both tillers together.
Towing, Anchoring, Mooring
If you need to take a tow, the easiest place is to bring the line in over the fairleads in the
bow and round one of the mooring cleats. It should not be cleated off, but held by hand in
case it needs instant release.
An anchor can be stored on the floor, up forward underneath the GRP seat piece. We
recommend something about 6kg in weight, with plenty of chain and polyester (stretchy)
rope. Moor by the bow, bringing the line up through one of the fairleads and onto a cleat.
Mooring can be done in the same way. Again use a suitable high stretch rope to minimise
shock loading on the boat. We recommend you leave the sump bailer open to shed rain
water when on a mooring. The ballast tank bailers we normally leave shut, though they
do leak slowly, so expect water to fill the ballast tanks in time if on a permanently wet
mooring.
Recovery
Recovering your boat can be done single handed, though in strong cross winds it is easier
to have help.
Here is our way of doing it single handed:
Sail the boat to the jetty and land on the upwind side of it. The effects of cross wind are
likely to be stronger than the effects of an opposing cross tide when recovering her.
Lower the masts, especially if there is a strong cross wind (Mizzen out first, then main
lowered).
Pull the boat up as close to the jetty as you can, without obstructing it.
Get the car and trailer and reverse down the jetty. At no point during the procedure
should you unhitch the trailer from the car, or the boat and all is likely to roll into the
water. Only reverse far enough to get the tyres wet.
Unroll the trailer winch strap fully. Then engage the ratchet and make sure you know
which way to turn to start winding in under ratchet. Ideally, the boat should be close
enough to you to keep one end of the winch strap in one hand while you push the boat off
with the other.
Bring the bow of the boat round to the end of the trailer, letting the wind/tide bring the
stern round. Timing is important, do not wait for the boat to line up with the trailer before
snapping the winch hook on, but connect it as soon as you can, and pull the bow of the
boat up onto the back of the trailer if you can too. Walk forward to the winch, holding the
tension in the strap to try to minimise the stern being swept sideways. Wind the winch as
quick as you can to bring the boat up.
If you have the water tanks full then it makes things easier if you undo the central access
hatch and the small central outboard well hatch before recovery. A good deal of the
waterballast water will then drain out the outboard well as the bow is lifted, making your
job easier.
Ensure all the bailers in the boat are open once too so that the boat drains her water on the
road.
Maintenance
Your boat requires a little care to keep her looking good. In the most part this is about
maintaining the bright work (finished wood) which will always deteriorate in sunlight.
Please give us a call to find out exactly how your woodwork was treated, and for our
latest opinions on the effectiveness of new treatments.
All the timber used is durable, with the exception of the Douglas fir used in the spars. If
there is one area to concentrate on it should be these, but we have neglected a lot of our
spars over the years and have never had a failure. As long as they are not sitting in any
pools of rainwater they will be fine.
The rest of the timber should be treated if you prefer the look, but can be left to go sun
bleached with no ill effects to the boat.
The paintwork can be touched up if needed with the appropriate paints, again, give us a
call. The underlying epoxy should keep out the water so it is about aesthetics, and please
call us for advice.
It is a good idea to keep a small quantity of araldite or other epoxy handy for any odd
jobs. The Plywood used to build your boat is by and large 6mm thick, which is not really
deep enough to hold a screw. Therefore if you want to add any fittings or modify your
boat, the best way is to glue a pad of timber to the area in question, after first scraping or
sanding off any paint.
If you have a spray hood, the transparent film in the windows it attacked by ultra violet,
so when folding it down, push the film inwards so that the canvas protects it by lying
over it.
Warranty
1. This warranty is given in addition to all rights given by statute or
otherwise.
2. Swallowboats warrants all parts of the basic hull to be free from defects in materials
and workmanship under normal use and circumstances, and the exercise of prudent
seamanship, for a period of two years from the date
of commissioning by the original owner. The owner must exercise
routine maintenance and care.
3. This warranty does not apply to defects in surface coatings caused by
weathering or normal use and wear.
4. This warranty does not apply if the boat has been altered, modified, or
repaired without prior written approval of Swallowboats. Any
changes to the hull structure, deck structure, rig or foils without the
written approval of Swallowboats boats will void this warranty.
5. The use of the boat for commercial purposes shall void this warranty.
6. Warranty claims for materials or equipment not manufactured by Swallowboats can be
made directly to the relevant manufacturer. Swallowboats warrants that these parts were
installed correctly and according to the instructions provided by the manufacturer.
7. Warranty claims shall be made to Swallowboats as soon as
practicable and, in any event, within 28 days upon discovery of a
defect. No repairs under warranty are to be undertaken without written
approval of Swallowboats.
8. Upon approval of a warranty claim, Swallowboats may, at its
expense, repair or replace the component. In all cases, the
replacement will be equal in value to the original component.
9. Due to the continuing evolution of the marine market, Swallowboats reserves the right
to change the design, material, or construction of its products without incurring any
obligation to incorporate such changes in products already built or in use.