1
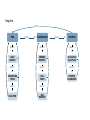
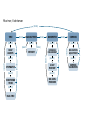
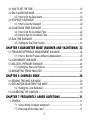
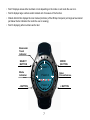
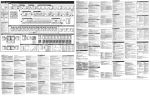
EN | FR | DE | ES | IT | NL | FI | SV M A R I N E R | R E G AT TA | YA C H T S M A N INSTRUCTION MANUAL www.suunto.com Regatta [MODE] [MODE] > CHRONOGRAPH > COMPASS [SELECT] [SELECT] [SELECT] [SELECT] SAIL TIMER [SELECT] [SELECT] > > DUAL TIME SAIL MEMORY [SELECT] > > > COUNTDOWN TIMER [SELECT] DECLINATION ADJUSTMENT [MODE] > CHRONO MEMORY [SELECT] > DAILY ALARMS [MODE] > [SELECT] [SELECT] [MODE] COMPASS CALIBRATION [MODE] TIME Mariner, Yachtsman > SAILING TIMER [SELECT] [MODE] 4 DAY MEMORY [SELECT] [SELECT] > > > [SELECT] DECLINATION ADJUSTMENT > [SELECT] > > SEA LEVEL PRESSURE > DUAL TIME COMPASS [SELECT] DIFFERENCE MEASUREMENT COUNTDOWN TIMER [SELECT] > [SELECT] [MODE] MEMORY [SELECT] [MODE] > > > [SELECT] DAILY ALARMS [SELECT] > BAROMETER [SELECT] [SELECT] STOPWATCH [MODE] COMPASS CALIBRATION [MODE] [MODE] [MODE] TIME [SELECT] [MODE] 1. 2. 3. 4. 5. 6. 7. 8. 9. 10. 11. 12. 13. 14. 15. 16. 17. 18. 19. 20. 21. 22. 23. 24. 25. 26. 27. 28. 29. 30. 31. 32. 33. 34. 35. 36. 37. 38. 39. 40. Customer SERVICE Contacts Suunto USA Phone Suunto Canada Phone Web Site Suunto Europe Phone Fax Web Site Suunto Oy Phone Fax Web Site 1 (800) 543-9124 1 (800) 776-7770 www.suuntousa.com +33 3 90 20 74 30 +33 3 90 20 74 40 www.suuntoeurope.com +358 9 875 870 +358 9 8758 7301 www.suunto.com Congratulations, your newly purchased Wristop Computer is designed to provide years of enjoyment in whatever outdoor activities you engage. Along with this product you will find a Warranty card, this Users Guide, and a full service support team to give you the results you need anytime, anywhere, quickly and professionally. We wish you many unforgettable moments with your new Wristop Computer! 1 EN TABLE OF CONTENTS CHAPTER 1 INTRODUCTION .......................................................... 5 1.1 KEY FUNCTIONS (MODES) ......................................................................................... 5 1.1.1 Backlight Features ........................................................................................... 5 1.1.2 Water Resistance ............................................................................................ 5 1.2 BUTTON FUNCTIONS ................................................................................................... 5 1.2.1 The [Mode] Button ........................................................................................... 5 1.2.2 The [+] Button .................................................................................................. 6 1.2.3 The [-] Button ................................................................................................... 6 1.2.4 The [Select] Button .......................................................................................... 6 1.3 LCD DISPLAY ................................................................................................................. 6 1.4 MEASUREMENTS AND UNITS .................................................................................... 8 1.4.1 Selecting the Units of Measurement .............................................................. 8 1.5 PRESSURE SENSOR CALIBRATION .......................................................................... 9 1.6 CARE AND MAINTENANCE .......................................................................................... 9 1.6.1 Battery Replacement ....................................................................................... 9 CHAPTER 2 SAILING TIMER MODE (MARINER ANDYACHTSMAN) 11 2.1 SAILING TIMER MEMORY SUB MODE ..................................................................... 12 CHAPTER 3 CHRONOGRAPH MODE (REGATTA) .......................... 13 3.1 3.2 3.3 3.4 HOW TO USE THE CHRONOGRAPH ........................................................................ 13 HOW TO VIEW THE CHRONOGRAPH MEMORY .................................................... 14 SAIL TIMER FUNCTION .............................................................................................. 15 SAIL TIMER MEMORY FUNCTION ............................................................................ 16 CHAPTER 4 TIME MODE ............................................................... 17 2 4.1 HOW TO SET THE TIME ............................................................................................. 18 4.2 DAILY ALARM SUB MODE .......................................................................................... 19 4.2.1 How to Set the Daily Alarms .......................................................................... 19 4.3 STOPWATCH SUB MODE .......................................................................................... 20 4.3.1 How to Use the Stopwatch ............................................................................ 20 4.4 COUNTDOWN TIMER SUB MODE ............................................................................ 21 4.4.1 How to Set the Countdown Timer ................................................................. 22 4.4.2 How to Start the Countdown Timer ............................................................... 22 4.5 DUAL TIME SUB MODE .............................................................................................. 22 4.5.1 Setting the Dual Time Function ..................................................................... 23 CHAPTER 5 BAROMETER MODE (MARINER AND YACHTSMAN) 23 5.1 PRESSURE DIFFERENCE MEASUREMENT SUB MODE ....................................... 24 5.1.1 How to Start the Pressure Difference Measurement .................................... 25 5.2 4-DAY MEMORY SUB MODE ...................................................................................... 25 5.3 SEA LEVEL PRESSURE SUB MODE ......................................................................... 26 5.3.1 Setting the Sea Level Pressure .................................................................... 26 5.4 BAROMETRIC TREND INDICATOR ........................................................................... 27 CHAPTER 6 COMPASS MODE ....................................................... 28 6.1 BEARING TRACKING SUB MODE ............................................................................. 29 6.2 DECLINATION ADJUSTMENT SUB MODE ............................................................... 29 6.2.1 Setting the Local Declination ......................................................................... 30 6.3 CALIBRATING THE COMPASS .................................................................................. 30 CHAPTER 7 FREQUENTLY ASKED QUESTIONS .......................... 31 7.1 GENERAL ..................................................................................................................... 31 7.1.1 Is the Wristop Computer waterproof? ........................................................... 31 7.1.2 How long will the battery last? ....................................................................... 31 3 7.1.3 What do the segments on the circumference mean? ................................... 31 7.1.4 Why do the segments on the circumference go to the left (counterclockwise)? ....................................................................................... 32 7.1.5 Why is there a symbol above the mode indicator bar and what does it mean? ......................................................................................................... 32 7.2 TIME .............................................................................................................................. 32 7.2.1 Why do the segments on the circumference increase and decrease when I am in the Time mode? ....................................................................... 32 7.2.2 What is the longest time I can set in the timer? ............................................ 33 7.3 BAROMETER ............................................................................................................... 33 7.3.1 What is the little box on the top left of the display? ...................................... 33 7.3.2 Does the Wristop Computer show future trends in weather conditions? ..... 33 7.3.3 What does absolute pressure and relative pressure mean? ................... 33 7.3.4 Is the Wristop Computer temperature compensated? .................................. 33 7.4 COMPASS .................................................................................................................... 34 7.4.1 What is the purpose of the rotating outer bezel? .......................................... 34 7.4.2 Where do I find the correct declination for my area so I can set my Wristop Computer? .................................................................................. 34 8. ABBREVIATIONS ...................................................................... 34 9. SPARE PARTS AVAILABLE ....................................................... 34 10. COPYRIGHT AND TRADEMARK NOTICE ................................ 35 11. CE COMPLIANCE ..................................................................... 35 12. LIMITS OF LIABILITY AND ISO 9001 COMPLIANCE .............. 35 4 CHAPTER 1 INTRODUCTION 1.1 MAIN FUNCTIONS (MODES) The Mariner/Yachtsman features the following functions: sailing timer, barometer, compass and watch. These are identified as sail mode [SAIL], barometer mode [BARO], compass mode [COMP] and time mode [TIME] in this manual and also on the display of the instrument. The Regatta features the following functions: compass, chronograph and watch. These are identified as compass mode [COMP]. chronograph mode [CHR] and time mode [TIME]. 1.1.1 Backlight Features The Wristop Computer has an electroluminescent backlight. This is initiated by pressing and holding the [Mode] button in for 2 seconds. The backlight will remain on for 5 seconds. Pressing the [Mode] button during this time will restart the 5 second period, continuing the backlight feature. 1.1.2 Water Resistance The Wristop Computer is waterproof to a depth of 30m/100ft. Note: The Wristop Computer models are not dive instruments. Buttons should not be operated (put to use) while under water. 1.2 BUTTON FUNCTIONS Four buttons are used to operate the Wristop Computer: [Mode], [+] (ON/OFF), [-] (Fast Bearing), and [Select]. 1.2.1 The [Mode] Button Is located on the top right of the Wristop Computer. In the main mode level, pressing the [Mode] button allows the user to select or move from one mode or function to the next (TIME, SAIL, BARO, COMP). In the sub mode level, pressing the [Mode] button returns the user to the main mode level. In the setup process, pressing the [Mode] button accepts the changes or preferences. Pressing the button again will return the user to the main mode level. 5 Pressing the button for 2 seconds activates the backlight feature. 1.2.2 The [+] Button Is located on the bottom right of the Wristop Computer. In the setup process, pressing the [+] button changes or scrolls the value upward. In the timing functions, this button can act as a start/stop (or On/Off) button. 1.2.3 The [-] Button Is located on the bottom left of the Wristop Computer. In the setup process, pressing the [-] button changes or scrolls the value downward. This button is also known as the Fast Bearing button. Pressing the [-] button in any of the main modes (except in Sailing Timer) will quickly display the compass mode, showing either the normal compass or bearing tracking feature (depending on what display has been chosen in the compass mode). 1.2.4 The [Select] Button Is located on the top left of the Wristop Computer. In the main mode level, pressing the [Select] button allows the user to enter into the sub modes of the particular function or return to the main mode the user is in. In the main mode or sub mode, pressing and holding the [Select] button in for more than 2 seconds allows the user to enter the setup process. In the setup process, the [Select] button allows the user to move between settable units or values and determine preferences. 1.3 LCD DISPLAY The display is designed to offer maximum clarity and simplicity to the user. The display is divided into several regions or areas. The Outer Circumference encompasses the outer boundary of the LCD display. A Barometric Trend Indicator provides a quick reference for forecasting weather conditions. 6 Field 1 displays values either numbers or text depending on the mode or sub mode the user is in. Field 2 displays large numbers and/or related unit of measure of the function. A Mode Indictor Bar displays the main modes (functions) of the Wristop Computer (a triangle arrow located just below the bar indicates the mode the user is viewing). Field 3 displaying either numbers and/or text. %DURPHWHU 7UHQG ,QGLFDWRU 02'( %87721 6(/(&7 %87721 Field 1 0RGH ,QGLFDWRU %87721 Field 2 Field 3 7 2XWHU &LUFXPIHUHQFH %87721 1.4 MEASUREMENTS AND UNITS The Wristop Computer supplies two units of measure: metric or imperial. Metric Unit of Measure °C Imperial Unit of Measure °F mbar inHg m ft 1.4.1 Selecting the Units of Measurement To change the unit of measure displayed: 1. Check the mode indicator. If the mode arrow is not on TIME, PRESS the [Mode] button until the arrow is directly below TIME on the Mode Indicator Bar. 2. PRESS the [Mode] and [Select] buttons simultaneously and hold in for 3 seconds. Field 1 will display SET momentarily and then display UNI (Fig. 1). WARNING: If the user presses the [Select] button (and does not hold for 2 seconds) while in the UNI setting mode, the user will be in the Pressure Sensor Calibration. Refer to the next section for details. 3. PRESS the [Select] button and hold in for 2 seconds. Located to the right in Field 2, mbar or inHg will begin to flash. 4. PRESS the [+] button to toggle between mbar and inHg. 5. At the unit of measure desired, PRESS the [Select] button to move to the next unit. Located at the top right in Field 1, °C or °F will begin to flash. 6.PRESS the [+] button to toggle between °C and °F. 7. At the unit of measure desired, PRESS the [Select] button to move to the next unit. Located to the right in Field 2, m or ft will begin to flash. 8. PRESS the [+] button to toggle between m and ft 9. At the unit of measure desired, PRESS the [Mode] button to accept the changes. PRESS the [Mode] button again to return to the main time mode. 8 Note: If the user does not press any button for 1 minute in the setup mode, the display will automatically exit setup. Selecting the units of measurement is complete. 1.5 PRESSURE SENSOR CALIBRATION WARNING: This is a FACTORY CALIBRATION SETTING. Do not enter this mode. If you enter this mode in error, exit immediately by pressing the [MODE] button to return to the UNI setting mode. Normally there is no need to alter the calibration. If the Pressure Setting Calibration has been altered, you can return the factory setting. Proceed as follows: In the calibration setting mode, scroll the barometric pressure value up or down until text dEF appears. This is the factory setting. Then exit by pressing [MODE]. 1.6 CARE AND MAINTENANCE Perform only the detailed processes discussed in this manual. Do not perform any other service to the Wristop Computer or attempt to open the case or remove the buttons or the bezel. Protect your Wristop Computer from shocks, extreme heat and prolonged exposure to direct sunlight. If not in use, your Wristop Computer should be stored in a clean, dry environment at room temperature. The Wristop Computer can be wiped clean with a lightly moistened (warm water) cloth. Applying a mild soap to the area can clean stubborn stains or marks. Avoid exposing the Wristop Computer to strong chemicals like gasoline, cleaning solvents, acetone, alcohol, adhesives, and paint, as they will damage the units seals, case and finish. Never attempt to take the Wristop Computer apart or service it yourself. Make sure the area around the sensors (backside of the instrument) is kept free of dirt and sand. Never insert any objects into the sensor openings of the Wristop Computer. 1.6.1 Battery Replacement The Wristop Computer operates on a three-volt lithium cell Type: CR 2430. The maximum life expectancy is approximately 12-18 months. 9 A low battery-warning indicator is activated when 5-15 percent of the battery capacity is still available. When this occurs we recommend replacement of the battery. Extreme cold weather will activate the low battery-warning indicator. Though the indicator is activated, the battery may not need to be replaced due to this condition. In temperatures above 10°C (50°F) and the low battery warning indicator is activated, the battery will need to be replaced. Note: Heavy use of the electroluminescent backlight, and compass will significantly reduce the life of the battery. To replace the battery: 1. turn the Wristop Computer to view the backside; 2. insert a coin in the coin slot located on the battery compartment cover; 3. turn the coin counterclockwise to the open position marked on the back of the case; 4. remove the battery compartment cover; 5. remove the old cell from the battery compartment and ensure the O-ring and all surfaces are clean and dry. Do not stretch the O-ring. 6. place the new cell into the battery compartment (negative side down, positive side up); 7. ensure the O-ring is in place to keep the Wristop Computer waterproof and place the battery compartment cover back onto the backside of the Wristop Computer; 8. insert a coin back into the coin slot; and 9. turn the coin clockwise to the close position marked on the back of the case. Note: Battery replacement should be performed with extreme care so as to ensure the Wristop Computer continues to remain waterproof. It is the operators responsibility to take due care to ensure the Wristop Computer remains waterproof. After every battery replacement, it is necessary to calibrate the magnetic sensor. Details on performing this process are found in Calibrating the Compass section of this manual. 10 CHAPTER 2 SAILING TIMER MODE (MARINER AND YACHTSMAN) To view Sailing Timer: Check the Mode Indicator Bar. If the mode arrow is not on SAIL, PRESS the [Mode] button until the arrow is directly below SAIL on the bar. In the Sail mode (Fig. 2.): Field 1 the selected time to be counted down in minutes, maximum 120 minutes; Field 2 the time to be counted down in minutes and seconds; and Field 3 the current time and the text log book to the left of the current time. To set the count down, PRESS the [-] button, the selection will begin with 120 minutes. It is adjustable in 10minute increments, from 120 to 60 minutes, in 5-minute increments, from 60 to 15 minutes, and from 15 minutes to 0 by the minute. Continue pressing the [-] button until the desired minute is achieved. The selected time is stored in Field 1. To begin the count down, PRESS the [+] button. During the count down the timer will activate audible signals. Interval Audible signal Every full minute Short double beep Every 10 seconds during the last minute Short double beep Every second during the last ten seconds Short single beep At the completion of the count down Long single beep When the time to count down has been reached, a stopwatch will automatically start running (Fig. 3). The range of the stopwatch is 120: 00,00. Field 1 displays the seconds and tenths of seconds of the event; Field 2 displays the hours and minutes of the event; and Field 3 displays the current time and the text logbook to the left of the current time. 11 During this activity when the stopwatch is running, the [-] button can be used to store up to 50 split times (way point times) to be viewed after the race has been completed. The split time (way point time) will be displayed for 10 seconds after pushing the [-] button. The stopwatch is stopped by pressing the [+] button twice within two seconds. This will eliminate accidental stops of the stopwatch. The finish time is also stored in the memory. After the stopwatch has been stopped, the [-] button returns the user to the countdown display. PRESS the [Mode] button once to return to the Sailing Timer main mode. 2.1 SAILING TIMER MEMORY SUB MODE In the Sail mode, PRESS the [Select] button once. In the first display (Fig. 4): Field 1 shows the year of race; Field 2 shows the starting time of the race; and Field 3 shows starting date of race and the text log book and memory to the left. PRESS the [+] button to view the second display. In the second display (Fig. 5): Field 1 shows the seconds and tenths of seconds of the timed event; Field 2 shows the hours and minutes of the event; and Field 3 shows the text dUr (dUr = duration). PRESS the [+] button to display the stored split times (way point times) (Fig. 6): Field 1 shows the seconds and tenths of seconds of the split time; Field 2 shows the hours and minutes of the split time; and Field 3 shows the actual time when the split time was taken. If you stop to view this display the date as well as the year of the split moment will start alternating with the time. PRESS the [+] and [-] buttons to scroll through the split times. PRESS the [Select] button to exit and return to the main mode. 12 Note: Only one race can be stored in the memory. As soon as the count down function is restarted, the information from the previous race will be erased from the memory. CHAPTER 3 CHRONOGRAPH MODE (REGATTA) The chronograph mode is able to: measure and store 1-99 split and lap times for up to 99 runs; and obtain a maximum range of one run (timing event) up to 23 hours 59 minutes and 59.9 seconds. Upon exceeding this range the Regatta will activate an audible sound to indicate the maximum range has been reached and the timing process has stopped. To view Chronograph mode: Check the Mode Indicator Bar. If the mode arrow is not on CHR, PRESS the [Mode] button until the arrow is directly below CHR on the bar. In the Chronograph mode (Fig. 7): Field 1 displays the seconds and tenths of seconds of the timer. Field 2 displays the timer showing the hours and minutes. Field 3 displays the current time and to the right the text Stopwatch. Note: If the stopwatch function is on and the user is in another mode other than the main chronograph mode, the text Stopwatch flashes to remind the user this function is activated. 3.1 HOW TO USE THE CHRONOGRAPH In the chronograph mode: 1. PRESS the [+] button to start the stopwatch. 2. PRESS the [-] button to store the lap time and split time in memory. Lap and split times are displayed as follows: In Field 1 the lap time is shown for the latest lap shown in Field 3 L # (# = lap number) (Fig. 8). The lap time is displayed for five seconds before the measured split time is displayed. 13 The split time is indicated by the abbreviation SPL (SPL = split) in Field 3 displaying for five seconds before it returns to showing the running time (Fig. 9). Note: The user can continuously press the [-] button during this activity and can record and display new lap and split times up to 99 times. 3. PRESS the [+] button to stop the stopwatch. 4. PRESS the [-] button to reset the stopwatch to zero once the stopwatch has stopped. Note: If the user decides to go to a different mode while utilizing the chronograph feature, the chronograph/ stopwatch will continue to run in the background. The timing of another event cannot start until the stopwatch has been zeroed after the first timing. The zeroing is done by pushing the [-] button. 3.2 HOW TO VIEW THE CHRONOGRAPH MEMORY In the Chronograph mode, PRESS the [Select] button once. This sub mode features three screens. These screens automatically rotate displaying a summary of information of the most recent completed timed event in intervals of 4 seconds. In the first display (Fig. 10): Field 1 displays the year; Field 2 displays the event number CH #; and Field 3 displays date of the timed event The user can PRESS the [-] button to scroll down to view previous timed events captured and then PRESS [+] button to scroll up to the most recent completed timed event. The second display shows duration of run/timing event on the bottom row (Fig. 11): Field 1 displays the seconds and tenths of seconds of the timed event; Field 2 displays the total time of the event in hours and minutes; and Field 3 displays the text dUr (dUr = duration). The third display shows the total number of laps stored into memory (Fig. 12): 14 Field 2 displays the total number of laps stored; and Field 3 displays the text LAP. Viewing the timed events individual lap and split times 1. PRESS and hold the [Select] button for 2 seconds (Fig. 13): Field 2 displays the event number CH # the user will be viewing; and Field 3 displays the text bEG (begin). 2. PRESS the [+] button to view the lap and split time which is in chronological order beginning with lap1. Field 1 displays the seconds and tenths of seconds of the lap or split time; Field 2 displays the hours and minutes of the lap or split time; and Field 3 displays the text L # or SPL (SPL = split time). The lap time will be viewed first the split time will follow automatically. 3. PRESS the [+] button to continue viewing the reminder of lap and split times recorded. When the last lap and split times have been viewed, the display will show in Field 2 CH #; and in Field 3 the text End (indicating the end of this activity). 4. PRESS the [Mode] button once to exit and return to the chronograph memory sub mode. 3.3 SAIL TIMER FUNCTION In the Chronograph mode, PRESS the [Select] button two times. The display shows in (Fig. 14): Field 1 the selected time to be counted down in minutes, maximum 10 minutes; Field 2 the time to be counted down in minutes and seconds; and Field 3 the current time and the text logbook to the left of the current time. To set the count down, PRESS the [-] button, the selection will begin with 10 minutes. Continue pressing the [-] button until the desired minute is achieved. The selected time is stored in Field 1. To begin the count down, PRESS the [+] button. During the count down the timer will activate audible signals. 15 Interval Audible signal Every full minute Short double beep Every 10 seconds during the last minute Short double beep Every second during the last ten seconds Short single beep At the completion of the count down Long single beep When the time to count down has been reached, a stopwatch will automatically start running (Fig. 15). The range of the stopwatch is 119:59,59. Field 1 displays the seconds and tenths of seconds of the event; Field 2 displays the hours and minutes of the event; and Field 3 displays the current time and the text logbook to the left of the current time. During this activity when the stopwatch is running, the [-] button can be used to store up to 50 split times (waypoints) to be viewed after the race has been completed. The split time (waypoint time) will be displayed for 10 seconds after pushing the [-] button. The stopwatch is stopped by pressing the [+] button twice within two seconds. This will eliminate accidental stops of the stopwatch. The finish time is also stored in the memory. After the stopwatch has been stopped, the [-] button returns the user to the countdown display. PRESS the [Mode] button once to return to the chronograph main mode. 3.4 SAIL TIMER MEMORY FUNCTION In the Chronograph mode, PRESS the [Select] button three times. In the first display (Fig. 16): Field 1 shows the year of race; Field 2 shows the starting time of the race; and Field 3 shows starting date of race (month and day) and the text logbook and memory to the left. PRESS the [+] button to view the second display. 16 In the second display (Fig. 17): Field 1 shows the seconds and tenths of seconds of the timed event; Field 2 shows the hours and minutes of the event; and Field 3 shows the text dUr (dUr = duration). PRESS the [+] button to display the stored split times (waypoint times) (Fig. 18): Field 1 shows the seconds and tenths of seconds of the split time; Field 2 shows the hours and minutes of the split time; and Field 3 shows the starting time of the race. If you stop to view this display, start date of the race as well as the year will start alternating with the start time on the bottom row. PRESS the [+] and [-] buttons to scroll through the split times. PRESS the [Select] button to exit and return to the main mode. Note: Only one race can be stored in the memory. As soon as the count down function is restarted, the information from the previous race will be erased from the memory. CHAPTER 4 TIME MODE The Time mode provides the user with: an adjustable 24/12 hour clock display; a calendar pre-programmed to the year 2089; three daily alarms; stopwatch; countdown timer; and a dual time operation. To view and use the Time mode function: Check the Mode Indicator arrow. If the mode arrow is not on TIME, PRESS the [Mode] button until the arrow is directly below TIME. 17 In the TIME mode (Fig. 19): Field 1 displays the day of the week. Field 2 displays the current time. Field 3 displays the date (month/day if the 12-hour clock has been chosen; day/month if the 24-hour clock has been chosen). The Outer Circumference graphically displays time in seconds. The TIME mode and all sub modes can be adjusted through the set up program of the Wristop Computer. 4.1 HOW TO SET THE TIME To set the Time: 1. PRESS the [Select] button and hold in for 2 seconds. Located in Field 3, the seconds will begin to flash (Fig. 20). 2. PRESS the [+] button to scroll the seconds upward or PRESS the [-] button to reset the seconds to zero. 3. At the seconds desired, PRESS the [Select] button to move to the next setting. Located on right of Field 2, the minutes will begin to flash. 4. PRESS the [+] button to scroll the minutes upward or PRESS the [-] button to scroll the minutes downward. 5. At the minutes desired, PRESS the [Select] button to move to the next setting. Located in the center of Field 2, the hour will begin to flash. 6. PRESS the [+] button to scroll the hour upward or PRESS the [-] button to scroll the hour downward. 7. At the hour desired, PRESS the [Select] button to move to the next setting. Located in Field 1, the 24 or 12 hour clock setting will begin to flash. 8. PRESS either the [+] or the [-] button to toggle between the 24hr and 12hr. Note: if the 12 hour clock is chosen either AM/PM will appear below the hour in Field 2. 9. At the clock setting desired, PRESS the [Select] button to move to the next setting. Located in the center of Field 2, the year will begin to flash (Fig. 21). 10. PRESS the [+] button to scroll the year upward or PRESS the [-] button to scroll the year downward. 18 11. At the year desired, PRESS the [Select] button to move to the next setting. Located in the center of Field 3, the month represented by a number will begin to flash. 12. PRESS the [+] button to scroll the month upward or PRESS the [-] button to scroll the month downward. 13. At the month desired, PRESS the [Select] button to move to the next setting. Located to the right of Field 3, the day will begin to flash. 14. PRESS the [+] button to scroll the day upward or PRESS the [-] button to scroll the date downward. Note: Once the user has determined the year, month and day, the Wristop Computer will supply the day of the week in Field 1. Note: If the 12-hour clock is chosen, the date will be displayed as month/day. If the 24-hour clock is chosen, the date will be displayed day/month. 15.At the desired day, PRESS the [Mode] button to accept the changes and return to the main mode. Note: If the user does not press any button for 1 minute in the setup mode, the display will automatically exit setup. Setting the time is now complete. 4.2 DAILY ALARM SUB MODE The Wristop Computer allows the user to select and enter settings for up to three alarms. In the TIME mode, PRESS the [Select] button once to enter this sub mode. In the Daily Alarm sub mode (Fig. 22): Field 1 displays ON or OFF (the activation status of a particular alarm), Field 2 displays the time of a particular alarm, and Field 3 displays the alarm (1, 2, or 3) the user is viewing. Pressing the [+] or the [-] button will toggle between the alarms 1, 2, or 3 to view the settings for each alarm. 4.2.1 How to Set the Daily Alarms 1. PRESS the [+] or the [-] button to select the desired alarm to be set (1, 2, or 3). 19 2. PRESS the [Select] button and hold in for 2 seconds. Located in Field 1, the ON or OFF will begin to flash. 3. PRESS either the [+] or the [-] button to toggle between ON and OFF. 4. At the setting desired, PRESS the [Select] button to move to the next setting. Located in the center of Field 2, the hour will begin to flash. 5. PRESS the [+] button to scroll the hour upward or PRESS the [-] button to scroll the hour downward. 6. At the hour desired, PRESS the [Select] button to move to the next setting. Located on the right of Field 2, the minutes will begin to flash. 7. PRESS the [+] button to scroll the minutes upward or PRESS the [-] button to scroll the minutes downward. 8. At the minutes desired, PRESS the [Mode] button to accept the changes and exit the setup program. A small bell will appear at the bottom left side in Field 2 to signify an alarm has been activated. The Alarm setup is complete. To activate up to three alarms, please repeat steps 1-8 for the selected alarm (1, 2, or 3). 4.3 STOPWATCH SUB MODE The Wristop Computer stopwatch sub mode can provide split time measurement and two finish times up to 24 hours. In the TIME mode, PRESS the [Select] button twice to enter this sub mode. In the Stopwatch sub mode (Fig. 23): Field 1 displays the seconds and tenths of a second, Field 2 displays the current time, and Field 3 displays hours and minutes and to the far right stopwatch. 4.3.1 How to Use the Stopwatch There are three timing modes the user can employ: an elapsed time measurement; a split time measurement; and a two finish time measurement. 20 In the elapsed time mode: 1. PRESS the [+] button to start, stop, and restart the stopwatch. 2. PRESS the [-] button to reset the stopwatch to zero once the stopwatch has stopped. In the split time mode: 1. PRESS the [+] button to start the stopwatch. 2. PRESS the [-] button once to stop the stopwatch and to display a split time. 3. PRESS the [-] button a second time to release the split time display and resume the stopwatch. 4. PRESS the [+] button to stop the stopwatch. 5. PRESS the [-] button to reset the stopwatch to zero once the stopwatch has stopped. In the two finish time mode: 1. PRESS the [+] button to start the stopwatch. 2. PRESS the [-] button once to stop the stopwatch to display the finish time of the first person. 3. PRESS the [+] button to stop the stopwatch. 4. PRESS the [-] button a second time to release and display the finish time of the second person. 5. PRESS the [-] button to clear and to reset the stopwatch. Note: When the stopwatch sub mode is activated, the stopwatch will continue and remain in the background if the user is in other modes or sub modes. The user can identify the stopwatch is still activated by the flashing text stopwatch in Field 3. 4.4 COUNTDOWN TIMER SUB MODE In the TIME mode, PRESS the [Select] button three times to enter this sub mode. In the countdown timer sub mode (Fig. 24): Field 1 displays the seconds, Field 2 displays the current time, and Field 3 displays the hour and minutes and to the bottom far right the text timer. 21 4.4.1 How to Set the Countdown Timer 1. PRESS the [Select] button and hold in for 2 seconds. Located in Field 1, the seconds will begin to flash. 2. PRESS the [+] button to scroll the seconds upward or PRESS the [-] button to scroll the seconds downward. 3. At the seconds desired, PRESS the [Select] button to move to the next setting. Located on right of Field 3, the minutes will begin to flash. 4. PRESS the [+] button to scroll the minutes upward or PRESS the [-] button to scroll the minutes downward. 5. At the minutes desired, PRESS the [Select] button to move to the next setting. Located in the center of Field 3, the hour will begin to flash. 6. PRESS the [+] button to scroll the hour upward or PRESS the [-] button to scroll the hour downward. 7. At the hour desired, PRESS the [Mode] button to accept the changes and exit the set up program. The countdown timer setup is complete. 4.4.2 How to Start the Countdown Timer To start the countdown timer: 1. PRESS the [+] button to start, stop, and restart the timer. 2. PRESS the [-] button to reset the timer to zero once the timer has stopped. Note: When the countdown timer is activated, the countdown timer will continue and remain in the background if the user is in other modes or sub modes. The user can identify the countdown timer still activated by the flashing text timer in Field 3. 4.5 DUAL TIME SUB MODE In the TIME mode, PRESS the [Select] button four times to enter this sub mode. In the dual time sub mode (Fig. 25): 22 Field 1 displays dUA indicating dual time, Field 2 displays the current time, and Field 3 displays the dual time (e.g. your home time). The user can display the seconds while in this sub mode by pressing the [+] button, in Field 3 the seconds will appear for 10 seconds. Afterwards the display returns to showing the dual time. 4.5.1 Setting the Dual Time Function In the dual time sub mode: 1. PRESS the [Select] button and hold in for 2 seconds. Located in Field 3, the hours will begin to flash. 2. PRESS the [+] button to scroll the hours upward or PRESS the [-] button to scroll the hours downward. 3. At the hour desired, PRESS the [Select] button to move to the next setting. Located in Field 3 to the right of the hour value, the minutes will begin to flash. 4. PRESS the [+] button to scroll the minutes upward or PRESS the [-] button to scroll the minutes downward. 5. At the minutes desired, PRESS the [Mode] button to accept the changes and exit the setup program. The dual time setup is complete. The dual time stays the same, even though the time in the main time mode is adjusted. For example, if you set the dual time to show your home time, your home time will always be displayed in this sub mode even though you travel to a different time zone and adjust the time in the main time mode. Note: The dual time sub mode is completely independent and does not effect the alarms or the memory functions. These are dependent on the current local time. CHAPTER 5 BAROMETER MODE (MARINER AND YACHTSMAN) The Barometer mode provides the user with: an adjustable unit of measure mbar or inHg; mbar range 300 to 1 100 mbar, inHg range 8.90 to 32.40; a resolution of 1 mbar or 0.05 inHg; 23 a one hour interval measuring to estimate barometric trend; · a difference measurement function; an automatic 4-day memory of atmospheric pressure for the last 6 hours in 1-hour intervals, thereafter, in 6hour intervals; temperature compensation (temperature does not effect the pressure within the specified temperature range) a temperature range -20° to 60°C or -5° to 140°F; and a temperature resolution of 1° C or F. Note: Body heat will effect temperature when the Wristop Computer is worn on the wrist. To achieve an accurate reading remove the Wristop Computer from the wrist and allow at least 15 minutes before reading the temperature. If youve been in the barometer mode for more than 15 minutes with no rate of vertical movement, you should allow 1 hour for the Wristop Computer to adjust the temperature. To acquire a quicker up-date of the temperature, press the [Mode] button 4 times to re-enter the mode. To view and use the Barometer mode: Check the Mode Indicator Bar. If the mode arrow is not on BARO, PRESS the [Mode] button until the arrow is directly below BARO on the bar. In the Barometer mode (Fig. 26): Field 1 displays the current temperature. Field 2 displays the current absolute atmospheric pressure. Field 3 displays the current time. The Outer Circumference graphically displays the atmospheric pressure over 100 millibars or 1 inHg where one complete circle is equivalent to 100 mbar/1 inHg, depending on the unit of measure chosen. Note: The absolute pressure is the actual pressure in any location at any given time. Where as, sea level pressure is the corresponding pressure at sea level. 5.1 PRESSURE DIFFERENCE MEASUREMENT SUB MODE In the Barometer mode, PRESS the [Select] button once to enter this sub mode. 24 In the Pressure Difference Measurement sub mode (Fig. 27): Field 1 displays the change in temperature. Field 2 displays the change in atmospheric pressure. Field 3 displays the current time; to the left of the time is the text differ. The Outer Circumference graphically displays the change in pressure where one full circle equals 100 mbars or 1 inHg. This sub mode does continue in the background and allows the user to move to other modes and at the users convenience can return to this sub mode to show the current reading. 5.1.1 How to Start the Pressure Difference Measurement 1. PRESS the [Select] button and hold in for 2 seconds. Located in Field 1 is the text SET; located in Field 2, zero will begin to flash (Fig. 28). 2. PRESS the [Mode] button to accept the flashing zero and start the difference measurement. If the user does not desire to begin the difference measurement, PRESS either the [+] or the [-] button to toggle to the current barometric pressure reading, then PRESS the [Mode] button to exit the setup program. Note: If the user does not press any button for 1 minute in the setup mode, the display will automatically exit setup. 5.2 4-DAY MEMORY SUB MODE In the Barometer mode, PRESS the [Select] button twice to enter this sub mode. This sub mode allows the user to follow changes in pressure that will assist forecasting changes in weather condition (i.e. storms). In the 4-day memory sub mode (Fig. 29): Field 1 displays the day of the week the user is in; Field 2 displays the atmospheric pressure; and Field 3 displays the time and to the left the text memory. The Outer Circumference graphically displays the atmospheric pressure where one full circle equals 100 mbars or 1 inHg. 25 To view the information compiled in the 4-day memory: PRESS the [-] button to scroll back down in increments of one hour for the first six hours, after that increments are 6 hours. PRESS the [+] button to scroll back up. Note: Replacing the battery will not erase this information. 5.3 SEA LEVEL PRESSURE SUB MODE Sea level pressure is pressure relative to sea level where as the pressure read in the main barometric display is absolute pressure in the current location. In the Barometer mode, PRESS the [Select] button three times to enter this sub mode. In the sea level pressure sub mode (Fig. 30): Field 1 displays the text SEA; Field 2 displays the current sea level pressure; and Field 3 displays the current time. 5.3.1 Setting the Sea Level Pressure To set the sea level pressure you have two choices either give the current sea level pressure or give the exact altitude of the location (e.g. lake). 1. PRESS the [Select] button and hold in for 2 seconds. Located in Field 2, the current sea level pressure will begin to flash. 2. PRESS the [+] button to scroll the pressure upward or PRESS the [-] button to scroll the pressure downward. 3. At the desired pressure, PRESS the [Mode] button to accept the changes and return to the main mode or if you want use altitude to set the sea level pressure, PRESS the [Select] button. Located in the field 2 the current reference altitude will begin to flash. 4. PRESS the [+] button to scroll the altitude upward or PRESS the [-] button to scroll the altitude downward. 26 5. At the desired value, PRESS the [Mode] button to accept the changes and return to the main mode. Note: Information on the current sea level pressure can be obtained through newspapers, local news and radio weather reports, the local airport facility or through the Internet under local weather. Information on the altitude can be found by utilizing a topographical map identifying the current location with the associated altitude marked. If the user does not press any button for 1 minute in the setup mode, the display will automatically exit setup. 5.4 BAROMETRIC TREND INDICATOR Located on the top left corner of the LCD display resides the Barometric Trend Indicator. This feature is always displayed in all main modes providing the user a continual quick reference to analyze upcoming weather conditions. The Barometric trend is comprised of two lines forming an arrow. Each line represents a 3-hour period. The right line represents the last 3 hours. The left line represents 3 hours prior to the last 3 hours. The line can indicate 9 different patterns in the barometric trend. Situation 6-3 hours ago Situation last 3 hours Dropped heavy (>2 mbars/3hours) Dropping heavy (>2 mbars/3hours) Dropped heavy (>2 mbars/3hours) Remaining stable Dropped heavy (>2 mbars/3hours) Rising heavy (>2 mbars/3hours) Remained stable Dropping heavy (>2 mbars/3hours) Remained stable Remaining stable Remained stable Rising heavy (>2 mbars/3hours) Risen heavy (>2 mbars/3hours) Rising heavy (>2 mbars/3hours) Risen heavy (>2 mbars/3hours) Remaining stable Risen heavy (>2 mbars/3hours) Dropping heavy (>2 mbars/3hours) Note: If the user remains at the same elevation, the barometric trend indicator can work as a weather forecasting tool. 27 CHAPTER 6 COMPASS MODE The compass mode provides the user with: a cardinal or half cardinal point abbreviation; bearing degrees; a North-South arrow; a bearing track mode showing desired direction and actual bearing; a rotating bezel; a resolution of 1° for the bearing, ±5° for North-South direction; and a declination correction feature. To view and use the Compass mode: Check the Mode Indicator Bar. If the mode arrow is not on COMP, PRESS the [Mode] button until the arrow is directly below COMP on the bar. In the COMPASS mode (Fig. 31): Field 1 displays the cardinal or half-cardinal point. Field 2 displays the bearing in degrees. Field 3 displays the current time. The Outer Circumference graphically displays the North-South arrow where one-lit segment shows North and three-lit segments show South. The compass display is active for 45 seconds at a time. After this, the compass enters sleep mode and an ---° indicator appears in the field 2. Reactivate the compass by pressing the [-] button. The Mariner provides a bubble level for the user to achieve a precise reading within ±3 degrees. The user centers the liquid bubble to ensure the Wristop Computer position is level and takes a reading. Note: Compass readings should be performed away from objects possessing sources of magnetism. Avoid buildings, large metal objects, power lines, loudspeakers, electric motors etc. Always take bearings in the open air, not inside tents, caves, or other shelters. 28 6.1 BEARING TRACKING SUB MODE The user can select to change from the cardinal point mode to the bearing track mode and utilize the bearing lock feature in this mode for tracking purposes (Fig. 32). In the compass main mode: 1. PRESS the [Select] button and hold in for 2 seconds. Located in Field 1, OFF will begin to flash and the field 2 shows the text bEA (bearing) (Fig. 33). 2. PRESS either the [+] or the [-] button to change the setting between OFF and ON. 3. At the selection desired, PRESS the [Select] button to move to the next setting. Located in Field 2, the actual bearing in degrees will begin to flash (Fig. 34). 4. Turn the Wristop Computer to the desired direction. Lock the bearing displayed by pressing the [-] button. 5. Adjust the locked bearing, if necessary by pressing the [Select] button and then adjusting the value with the [+] and [-] buttons. 6. At the desired bearing to track, PRESS the [Mode] button to accept the changes and exit the setup program. Note: If the user does not press any button for 1 minute in the setup mode, the display will automatically exit setup. 6.2 DECLINATION ADJUSTMENT SUB MODE The Wristop Computer allows the user to compensate the difference between true north and magnetic north. This process is accomplished by adjusting the declination, resulting in the user obtaining correct compass readings. In the Compass mode, PRESS the [Select] button once to enter this sub mode. In the Declination Adjustment sub mode (Fig. 35): Field 1 displays the declination direction OFF where OFF = no declination; W = West; E = East. Field 2 displays declination in degrees. Field 3 displays the text dEC. 29 6.2.1 Setting the Local Declination 1. PRESS the [Select] button and hold in for 2 seconds. Located in Field 1, OFF will begin to flash. 2. PRESS either the [+] or the [-] button to change the declination direction in Field 1. 3. At the direction desired, PRESS the [Select] button to move to the next setting. Located in Field 2, the degrees will begin to flash. 4. PRESS the [+] button to scroll the degrees upward or PRESS the [-] button to scroll the degrees downward. 5. At the degrees desired, PRESS the [Mode] button to accept the changes and exit the setup program. Note: If the user does not press any button for 1 minute in the setup mode, the display will automatically exit setup. Local Declination is now set. 6.3 CALIBRATING THE COMPASS A compass calibration should be done when the Wristop Computer is subject to close proximity of magnetic sources, extreme cold weather, every time the battery is replaced or suspected that other environmental conditions have effected the compass readings. Note: We also recommend calibrating the compass before using the compass the first time and every time leaving for a hike where the compass will be used. To begin the calibration: 1. PRESS the [Select] button twice when in the main compass mode. Field 1 displays the text CMP. Field 3 displays the text CAL (Fig. 36). 2. PRESS the [Select] button and hold in for 2 seconds. Located in Field 2, the text PUSH will begin to flash (Fig. 37). 3. PRESS the [-] button to start calibration. 4. In Field 2, 360° appears and the Outer Circumference displays all segments lit (Fig. 38). When this occurs, hold the Wristop Computer level and start to slowly turn the device around a full circle in a level position. The 30 direction of turning does not matter. The lit segments will be turned off as the turning proceeds. When the first full circle is completed, the instrument will inform the user within one minute of whether the calibration was successful displaying the text dOnE in Field 2 (Fig. 39) or if the process needs to be repeated displaying PUSH and - in Field 2. Note: The user may need to perform the rotating of the compass more than twice around for the calibration to be completed. Note: If the text FAIL appears in Field 2 (Fig. 40), the battery should be removed and put back in before trying to proceed with the calibration process. The removal of the battery will reset the unit. 5. Once the calibration is successful, PRESS the [Mode] button to accept the process and exit the calibration mode. Note: It is important to hold the Wristop Computer level during the calibration process to ensure accuracy. The compass calibration is complete. CHAPTER 7 FREQUENTLY ASKED QUESTIONS 7.1 GENERAL 7.1.1 Is the Wristop Computer waterproof? Yes, it is waterproof to a depth of 30 meters (100 ft). Rain and other normal exposure to water will not effect its operation. You can swim wearing your Wristop Computer. However, the Wristop Computer is NOT a diving device. 7.1.2 How long will the battery last? All users employ the product in different ways. Battery life depends mainly on how much the backlight and the compass are used. The low-battery warning symbol appears on the display when 5 to 15 percent of battery capacity remains. This should give the user plenty of time to safely change the battery. 7.1.3 What do the segments on the circumference mean? In the Barometer mode, one full circle equals 100 mbar or 1 inHg, and the segments indicate the pressure over 31 a full hundred mbar or over a full inHg. When using the difference measurement function of the barometer, the segments indicate the change in atmospheric pressure either to the right if the pressure has risen or to the left if the pressure has dropped. In the main Compass mode, the segments indicate the North, i.e. the one segment indicates North and the three segments point South. If you have set the compass to track a certain bearing, the segments on the circumference indicate the difference between the direction in which you want to go and your actual bearing. 7.1.4 Why do the segments on the circumference go to the left (counterclockwise)? Normally, they always go to the right (clockwise) from the 12-noon position. You are in the difference measurement mode and your unit is showing a decreasing value. In normal mode, the segment display increases clockwise, but if you are in a mode that shows you differences, all decreasing values go counterclockwise from the center position, and all increasing values go clockwise. So, it is minus to the left (counterclockwise), and plus to the right (clockwise). 7.1.5 Why is there a symbol above the Mode Indicator Bar and what does it mean? The symbol indicates that one, two, or three daily alarms are activated. 7.2 TIME 7.2.1 Why do the segments on the circumference increase and decrease when I am in the Time mode? The main function of the segments is related to the Compass mode, where a division into 36 segments is necessary due to the 360-degree scale of a compass. In the Time mode, the segments show the advancement of seconds. Because the number of seconds differs from the number of degrees, it is impossible for the segments to be consecutively lit up; they now light up or extinguish, thereby marking the passing of every second. 32 7.2.2 What is the longest time I can set in the timer? The maximum range of the countdown timer is 23 hours 59 minutes and 59 seconds. 7.3 BAROMETER 7.3.1 What is the little box on the top left of the display? It is the barometric trend indicator that shows the general direction of weather changes. The display is based on barometer measurements for the last 6 hours. 7.3.2 Does the Wristop Computer show future trends in weather conditions? No, the Wristop Computer continually accumulates data on barometric pressure existent within a 3 to 6 hour window and displays general barometric trends in weather based on the accumulated data. 7.3.3 What does absolute pressure and relative pressure mean? Absolute pressure is the actual pressure in any location at any given time. Relative pressure on the other hand equals the corresponding pressure at sea level for a certain altitude that you are at. For example, if you are at an altitude of 1,000 m/3,300 ft the absolute pressure normally is around 900 mbar/26.60 inHg. The relative pressure at sea level would then be around 1,013 mbar/29.90 inHg. 7.3.4 Is the Wristop Computer temperature compensated? Yes, the Wristop Computer is temperature compensated, which means that for the temperature range specified (-5 to +140°F/-20 to +60°C), the instrument will show accurate pressure. Within this range, the temperature has no effect on the atmospheric pressure reading. Temperature compensation does not, however, mean that the temperature reading isnt at all effected by body heat. Body heat will affect the temperature reading, and to get the correct temperature reading of the environment remember to take the Wristop Computer off your wrist and wait about 15 minutes for it to stabilize and show the correct temperature of the surroundings. 33 7.4 COMPASS 7.4.1 What is the purpose of the rotating outer bezel? The purpose of the rotating bezel is that people can use the instrument as a regular base plate compass if they want to, and use the bezel to e.g. indicate North when in the bearing tracking mode or leaving the compass display for another mode. 7.4.2 Where do I find the correct declination for my area so I can set my Wristop Computer? Local declination, either E or W, is usually marked on maps with either one-degree or half-degree accuracy. 8. ABBREVIATIONS dEF - default factory setting of pressure sensor, corresponds to standard (1013 mbar or 29,90 inHg) air pressure at sea level dUR dUA SPL CMP bEA CAL dEC SNR - sensor (used in pressure sensor calibration) bEG - begin - 9. SPARE PARTS AVAILABLE Battery Replacement Kit (including battery, battery lid and o-ring) Watch Straps in plastic (Regatta/Mariner) or leather (Yachtsman) Extension strap in plastic Bezel (Available only in Suunto Oy during maintenance) 34 duration dual time split time compass bearing calibration declination Suunto Oy provides moderate-priced Wristop Computer service to its customers. Batteries are usually available in sport and watch shops etc. 10. COPYRIGHT AND TRADEMARK NOTICE This publication and its contents are proprietary to Suunto Oy and are intended solely for the use of its clients to obtain knowledge and key information regarding the operation of Wristop Computer. Its contents shall not be used or distributed for any other purpose and/or otherwise communicated, disclosed or reproduced without the prior written consent of Suunto Oy. Suunto, Wristop Computer, Mariner, Regatta, Yachtsman and their logos are all registered or unregistered trademarks of Suunto Oy. All rights are reserved. While we have taken great care to ensure that information contained in this documentation is both comprehensive and accurate, no warranty of accuracy is expressed or implied. 11. CE COMPLIANCE All Suunto Wristop Computers conform with the required European Union EMC directives 89/336/TEC. 12. LIMITS OF LIABILITY AND ISO 9001 COMPLIANCE If this product should fail due to defects in materials or workmanship, Suunto Oy will, at its sole option, repair or replace it with new or rebuilt parts, free of charge, for two (2) years from the date of its purchase. This warranty is extended only to the original purchaser and only covers failures due to defects in materials and workmanship that occur during normal use while in the period of the warranty. It does not cover damage or failures resulting in accident, misuse, neglect, mishandling, alteration or modifications of the product, or any failure caused by operation of the product outside the scope of its published specifications, or any causes not covered by this warranty. There are no express warranties except as listed above. The client can exercise the right to repair under the warranty by contacting our Customer Service department to obtain a repair authorization. 35 Suunto Oy, Suunto Europe and Suunto USA/Canada shall in no event be liable for any incidental or consequential damages arising from the use of or inability to use the product. Suunto Oy does not assume any responsibility for losses or claims by third parties that may arise through the use of this device. Suuntos Quality Assurance System is certified by Det Norske Veritas to be ISO 9001 compliant in all Suunto Oys operations (Quality Certificate No. 96-HEL-AQ-220). 36