1
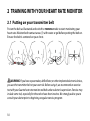
en
QUICK GUIDE
1
2
1 Getting started . . . . . . . . . . . . . . . . . . . . . . . . . . . . . . . . . . . . . . . . . . . . . . . . . . . . . . . . . . . . . . . . . . . . . . . . . 3
1.1 Basic settings . . . . . . . . . . . . . . . . . . . . . . . . . . . . . . . . . . . . . . . . . . . . . . . . . . . . . . . . . . . . . . . 3
1.2 Setting activity class . . . . . . . . . . . . . . . . . . . . . . . . . . . . . . . . . . . . . . . . . . . . . . . . . . . . . . . . 4
1.3 Menu navigation . . . . . . . . . . . . . . . . . . . . . . . . . . . . . . . . . . . . . . . . . . . . . . . . . . . . . . . . . . . 6
1.4 Modes and views . . . . . . . . . . . . . . . . . . . . . . . . . . . . . . . . . . . . . . . . . . . . . . . . . . . . . . . . . . . 7
1.5 Button lock . . . . . . . . . . . . . . . . . . . . . . . . . . . . . . . . . . . . . . . . . . . . . . . . . . . . . . . . . . . . . . . . . . 8
1.6 Installing Training Manager . . . . . . . . . . . . . . . . . . . . . . . . . . . . . . . . . . . . . . . . . . . . . . . . 9
2 Training with your heart rate monitor . . . . . . . . . . . . . . . . . . . . . . . . . . . . . . . . . . . . . . . . . . . . . . . 10
2.1 Putting on your transmitter belt . . . . . . . . . . . . . . . . . . . . . . . . . . . . . . . . . . . . . . . . . . 10
2.2 Starting a training session . . . . . . . . . . . . . . . . . . . . . . . . . . . . . . . . . . . . . . . . . . . . . . . . 11
2.3 Analyzing your training data . . . . . . . . . . . . . . . . . . . . . . . . . . . . . . . . . . . . . . . . . . . . . 12
2
1 GETTING STARTED
en
1.1 Basic settings
Press any button to activate your Suunto t6c. You will be prompted to set your PERSONAL
settings: your physical characteristics and activity class. The device suggests a default
fitness METS level, but if you know your real fitness METS, you should use that value.
NOTE: The maximum performance capacity measured in a laboratory test is sometimes
given as ml oxygen/kg/min (VO2 max). If you want to compare the maximum performance
capacity calculated by the program in METs to your measured VO2 max, use the relation 1
MET = 3.5 ml/min/kg.
1.
2.
3.
4.
Change the values with the [Lap +] and [Light -] buttons.
Accept the settings and move to the next setting with the [Mode] button.
Return to the preceding setting by pressing the [View Back] button.
After setting the fitness METS level, continue to UNITS and GENERAL settings, or
quick exit to TIME mode by pressing the [Start Stop] button.
3
NOTE: All the PERSONAL settings can be fine tuned later.
1.2 Setting activity class
The activity class (ACT CLASS) is a rating of your current activity level. Use the following
classifications to help you determine your activity class.
Activity class 1
If you do not participate regularly in recreational sports or heavy physical activity, use
1.
Activity classes 2 and 3
If you participate regularly in recreational sports or do physical work, and your weekly
exercise is:
● less than 1 hour, use 2.
● more than 1 hour, use 3.
Activity classes 4-7
If you participate regularly in sports or other physical activity, and you engage weekly
in heavy exercise:
● under 30 minutes, use 4.
● 30-60 minutes, use 5.
4
● 1-3 hours, use 6.
● over 3 hours, use 7.
en
Activity classes 7.5 - 10
If you train on a regular basis or participate in competitive sports, and your weekly
exercise is:
● 5-7 hours, use 7.5.
● 7-9 hours, use 8.
● 9-11 hours, use 8.5.
● 11-13 hours, use 9.
● 13-15 hours, use 9.5.
● over 15 hours, use 10.
You can update your Activity Class with the Training Manager software.
NOTE: If you train without your Suunto t6c, Training Manager software may ask to
decrease your ACT CLASS, even though you have trained at the described level. We recommend
you always train with your Suunto heart rate monitor to ensure it understands and guides
you correctly.
5
1.3 Menu navigation
Access the settings menu by keeping [Mode] pressed.
Scroll through the menus and sub menus with [Lap +] and
[Light -].
Enter a menu and a sub menu, or accept a setting value
with [Mode].
Return to the previous menu with [View Back].
At any time you can exit by pressing [Start Stop].
6
1.4 Modes and views
en
Modes
There are two modes: TIME and TRAINING. Switch between modes with [Mode]. The
indicators on the left-hand side of the screen show which mode is enabled.
TRAINING mode has two displays, DISPLAY 1 and DISPLAY 2.
You can customize each TRAINING display. In the settings menu, go to DISPLAYS. Enter
DISPLAY 1 or DISPLAY 2 and then enter ROW 1, ROW 2 or VIEWS to select the information
you want to display.
7
Views
Each mode has different views containing supplementary information, such as the
altitude in TIME mode or calories in TRAINING mode. Go to DISPLAYS settings to define
which views are shown in the TRAINING mode displays. Change views in TIME and
TRAINING modes with [View Back].
20
1.5 Button lock
You can lock and unlock the buttons in both TIME and TRAINING mode by keeping [Light
-] pressed.
8
When the buttons are locked, you can still change views and turn on the backlight. We
recommend you lock the buttons, for example, after you have started a training session
or are storing the device in a travel bag.
1.6 Installing Training Manager
To analyze the training data saved in your device's memory, you need to install the
Suunto Training Manager software. The installation package includes the software
application and USB drivers. For instructions on how to install the drivers, see the Suunto
Training Manager online Help after you have installed the software.
To install the Suunto Training Manager application:
1. Insert the Suunto Training Manager CD-ROM into the drive.
2. Wait for the installation to begin and follow the installation instructions.
NOTE: If the installation does not automatically start, go to the CD-drive using your
file manager and double-click on setup.exe.
NOTE: You can always download the latest version of Suunto Training Manager from
www.suunto.com. Please check for updates regularly as new features are continuously
developed.
9
en
2 TRAINING WITH YOUR HEART RATE MONITOR
2.1 Putting on your transmitter belt
Put on the belt as illustrated and switch to TRAINING mode to start monitoring your
heart rate. Moisten both contact areas (1) with water or gel before putting the belt on.
Ensure the belt is centered on your chest.
1
2
3
4
WARNING: If you have a pacemaker, defibrillator, or other implanted electronic device,
you use the transmitter belt at your own risk. Before using it, we recommend an exercise
test with your Suunto heat rate monitor and belt under a doctor’s supervision. Exercise may
include some risk, especially for those who have been inactive. We strongly advise you to
consult your doctor prior to beginning a regular exercise program.
10
2.2 Starting a training session
en
When you enter TRAINING mode, your Suunto t6c automatically searches for signals
from a transmitter belt. Once found, your heart rate is displayed on the screen. The
training session itself starts when you start the log recorder and ends when you stop
it.
Using log recorder
By default, the log recorder (CHRONO) is displayed on the top row of the DISPLAY 1. You
can personalize the TRAINING mode displays in the DISPLAYS settings.
To use the log recorder:
1. In TRAINING mode, start the log recorder with [Start Stop]. While the log recorder
is running, you can add training laps with [Lap +].
2. Stop the log recorder with [Start Stop].
3. Continue with another timed session (lap) with [Start Stop].
To reset the timer and view the last log summary, keep [Lap +] pressed.
NOTE: The log recorder must be stopped before you can reset it.
11
2.3 Analyzing your training data
Viewing the logbook
While the log recorder is running, your Suunto t6c collects various data about the
sessions, depending on your personalized settings. This data is saved in your device’s
memory.
NOTE: You have to stop the log recorder before you can access the data in the logbook.
To view the totals of your last training sessions in logbook:
1. In TRAINING mode, keep the [Lap +] button pressed to view the summary of the
previous recorded log.
2. Press the [Lap +] button to scroll through the details.
Using Training Manager
You can transfer your training logs from the Suunto t6c memory to Suunto Training
Manager and analyze them in more detail. Suunto Training Manager measures up to
seven body parameters from your training session: heart rate, EPOC, Training effect,
ventilation volume, respiratory rate, oxygen consumption, and energy consumption.
12
To transfer training data from Suunto t6c to Training Manager:
1. Connect your Suunto t6c to the USB port of your computer using the supplied
data cable.
2. Transfer the log files to Suunto Training Manager according to the instructions
given in the Suunto Training Manager online Help.
13
en
SUUNTO CUSTOMER SERVICE
SERVICE CLIENT SUUNTO, SUUNTO KUNDENDIENST, SERVICIO AL
CLIENTE DE SUUNTO, ASSISTENZA CLIENTI SUUNTO, SUUNTO
KLANTENSERVICE, SUUNNON ASIAKASPALVELU, SUUNTOS KUNDTJÄNST,
SERVIÇO AO CLIENTE DA SUUNTO, SUUNTO 客户服务, SUUNTO 客戶服務
www
Global helpdesk
Suunto USA
Suunto Canada
Suunto website
+358 2 284 11 60
+1 (800) 543-9124
+ 1 (800) 776-7770
www.suunto.com
en
www.suunto.com
Copyright © Suunto Oy 2/2008.
All rights reserved.