1
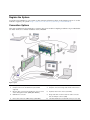
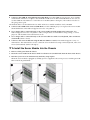
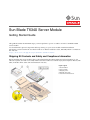
Sun Blade T6340 Server Module
Getting Started Guide
This guide describes the minimum steps you must perform to power on and boot Oracle’s Sun Blade T6340
server module.
You should install optional components before powering on your server module. Detailed installation
information can be found in the Sun Blade T6340 Server Module Installation Guide, 820-3900, which is available at
this web site:
http://docs.sun.com/app/docs/prod/blade.t6340?l=en#hic
Shipping Kit Contents and Safety and Compliance Information
Before installing the server module, refer to the printed safety document Important Safety Information for Sun
Hardware Systems, 821-1590 or 816-7190, and the Sun Blade T6340 Server Module Safety and Compliance Manual, 8203903 (Available online at the Sun documentation web site.)
Figure Legend:
1. Documentation
2. Server module
3. Shipping carton
4. Antistatic wrist strap
5. Customer information sheet
Register the System
Locate the serial number for your system on the customer information sheet on the shipping carton. Go to this
website to register your system: http://www.sun.com/service/warranty/index.xml#reg
Connection Options
This section summarizes five methods to connect to the server module. Complete procedures are provided in the
Sun Blade T6340 Server Module Installation Guide, 820-3900.
Figure Legend
1
Server (local or remote)
6
Computer connected to CMM RJ-45 serial connector
2
Computer connected to RJ-45 Ethernet (remote KVM
supported)
7
Computer connected to dongle cable RJ-45 serial connector
3
Ethernet cable connected to RJ-45 Ethernet connector on the
chassis management module (CMM) (NET MGMT 0)
8
Keyboard, video monitor, mouse (local KVM)
4
CMM with two connectors
9
Dongle cable with one RJ-45 serial, two USB 2 connectors
and one HD15-pin connector (VGA)
5
RJ-45 cable connected to CMM serial port (SER MGT)
10
Sun Blade T6340 server module with service processor (SP)
■
Connect to the CMM SP Using Ethernet Port NET MGT 0. Use the CMM service processor proxy and the
command line interface to navigate to the Sun Blade T6340 server module SP ILOM firmware. You can also
use the CMM SP web interface to control the server module (Items 1 through 3). This method is described in
this getting started guide.
The methods below are described in the Sun Blade T6340 Server Module Installation Guide, 820-3900.
■
Connect to the CMM serial connector (SER MGT). Use the CMM SP proxy to navigate to the server module
SP ILOM firmware. This method supports CLI access only (Item 6).
■
Use a dongle cable to connect directly to the server module SP with an RJ45 serial connection. This
method supports CLI access only (Items 7 and 9). Dongle cables are intended for setup, testing, or service
purposes and should be removed when not in use.
■
Use a dongle cable to connect directly to the server module host with a local keyboard, video and mouse
(local KVM). (Items 8 and 9).
■
Connect to the server module SP using the Ethernet (DHCP or static). This method supports a CLI, or a
web interface. The web interface can also control the server module host using a remote keyboard, video and
mouse (remote KVM). (Items 1 through 3).
▼ To Install the Server Module Into the Chassis
1. Remove a filler panel from the chassis.
2. Insert the server module in the chassis until it is about 1.5 cm (one-half inch) from the front of the chassis.
3. Push the ejector levers in simultaneously until they snap in place.
When the server module is plugged in, standby power is supplied to the service processor and the green OK
LED on the front panel blinks.
Caution – For proper cooling, ensure that all chassis slots are filled with a server module, or filler
panel.
Connecting Through the Chassis CMM Ethernet Port
You can connect to the CMM through the RJ-45 NET MGT 0 Ethernet port. Before you can use the Ethernet
connection, you must know the IP address for the CMM.
▼ To Log Into the CMM Using SSH
ILOM supports SSH access to the CLI over the Ethernet.
1. Log into the CMM with the SSH client.
In the example below, replace 10.3.212.24 with the IP address of your CMM.
2. Type your password when prompted.
Note – The default user name is root, and the default password is changeme.
For example:
$ ssh [email protected]
Password:
Sun(TM) Integrated Lights Out Manager
Version 2.0.4.0
Copyright 2008 Sun Microsystems, Inc. All rights reserved.
Warning: password is set to factory default.
You are now connected to the CMM ILOM software CLI.
▼ To Log Into the Service Module SP Using the CLI
1. Navigate to the server module SP by typing this ILOM command:
-> cd /CH/BLn/SP/cli
Where n is an integer (0 - 11) that identifies the target server module.
2. Type the start command.
3. Type y to continue or n to cancel.
After you enter y, the ILOM software running on the server module SP prompts for the password specific to
that server module SP.
Note – The CMM ILOM logs on to the server module ILOM using the user name that is in the user target
under /CH/BLn/SP/cli (where n is the server module number).
4. Type the password when prompted.
The default password is changeme.
The following display shows an example of the procedure above.
-> start
Are you sure you want to start /CH/BL2/SP/cli (y/n)? y
start: Connecting to /CH/BL2/SP/cli as user root
start: Change the “user” property to connect as a different user
Password: changeme
Waiting for daemons to initialize...
Daemons ready
Sun(TM) Integrated Lights Out Manager
Version 2.0.4.0
Copyright 2008 Sun Microsystems, Inc. All rights reserved.
Use is subject to license terms.
Warning: password is set to factory default.
->
You are now connected to the server module service processor.
▼ To Power On the Host
1. Type the start /SYS command and type y.
-> start /SYS
Are you sure you want to start /SYS (y/n)? y
Starting /SYS
2. Type the start /SP/console command and type y.
-> start /SP/console
Are you sure you want to start /SP/console (y/n)? y
Serial console started. To stop, type #.
0:0:0>POST enabling CMP 0 threads: ffffffff.ffffffff
0:0:0>POST enabling CMP 1 threads: ffffffff.ffffffff
...
After you issue the start command, the CPU and memory controllers initialize, and the OpenBoot™ PROM
(OBP) firmware initializes. The system may take several minutes to complete POST diagnostics and boot. If a
boot device installed with the Solaris OS is accessible locally, that device will be booted. Otherwise, the system
will use the boot net command to seek a boot device on the network. For more information about system
configuration and installing the Solaris OS, see the Sun Blade T6340 Server Module Installation Guide, 820-3900.
Firmware Upgrades
For instructions on upgrading the firmware on your server module, refer to Integrated Lights Out Manger
(ILOM) documentation.
Documentation for This Product
Find the documentation for Oracle’s Sun Blade T6340 server module at this URL:
http://docs.sun.com/app/docs/prod/blade.t6340?l=en#hic
For translated documentation, select your language at this website: http://docs.sun.com.
Task
Document Type, Part Number or URL
Review known issues, workarounds and new
information
Sun Blade T6340 Server Module Product Notes, 820-3901
Connect server to network, configure software
Sun Blade T6340 Server Module Installation Guide, 820-3900
Set remote access. View system status and
event logs.
Sun Integrated Lights Out Manager 2.0 Supplement for Sun Blade T6340 Server
Modules, 820-3904
Diagnose and troubleshoot the server module.
Remove and replace components.
Sun Blade T6340 Server Module Service Manual, 820-3902
Review safety information.
Sun Blade T6340 Server Module Safety and Compliance Manual, 820-3903
Important Safety Information for Sun Hardware Systems, 821-1590 or 816-7190
Chassis specific hardware and ILOM
information
http://docs.sun.com/app/docs/prod/blade.srvr#hic
Sun Contact Information
Topic
URL
Patches and firmware
updates
http://www.sun.com/support/
Technical support
http://www.sun.com/service/contacting/
Submitting comments
http://www.sun.com/hwdocs/feedback
Please include the title and part number of your document with your feedback:
Sun Blade T6340 Server Module Getting Started Guide, 820-3899
Copyright © 2008, 2010, Oracle and/or its affiliates. All rights reserved.
Part No. 820-3899-11, Rev. A
April 2010