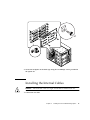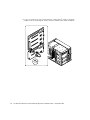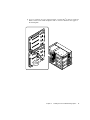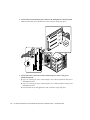
1
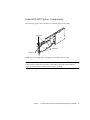
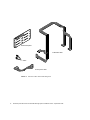
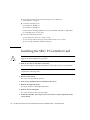
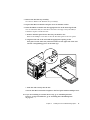
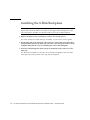
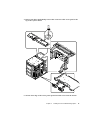
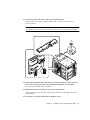
Sun Enterprise™ 450 Server
Internal RAID Storage Option
Installation Guide
Sun Microsystems, Inc.
901 San Antonio Road
Palo Alto, CA 94303-4900 U.S.A.
650-960-1300
Part No. 805-6765-11
September 2000, Revision A
Send comments about this document to: [email protected]
Copyright 2000 Sun Microsystems, Inc., 901 San Antonio Road, Palo Alto, CA 94303-4900 U.S.A. All rights reserved.
This product or document is distributed under licenses restricting its use, copying, distribution, and decompilation. No part of this product or
document may be reproduced in any form by any means without prior written authorization of Sun and its licensors, if any. Third-party
software, including font technology, is copyrighted and licensed from Sun suppliers.
Parts of the product may be derived from Berkeley BSD systems, licensed from the University of California. UNIX is a registered trademark in
the U.S. and other countries, exclusively licensed through X/Open Company, Ltd.
Sun, Sun Microsystems, the Sun logo, AnswerBook2, docs.sun.com, Sun Enterprise, Sun Enterprise SyMON, Sun StorEdge SRC/P Intelligent
SCSI RAID Controller, Solstice DiskSuite, OpenBoot, SunVTS, OpenWindows, and Solaris are trademarks, registered trademarks, or service
marks of Sun Microsystems, Inc. in the U.S. and other countries. All SPARC trademarks are used under license and are trademarks or registered
trademarks of SPARC International, Inc. in the U.S. and other countries. Products bearing SPARC trademarks are based upon an architecture
developed by Sun Microsystems, Inc.
The OPEN LOOK and Sun™ Graphical User Interface was developed by Sun Microsystems, Inc. for its users and licensees. Sun acknowledges
the pioneering efforts of Xerox in researching and developing the concept of visual or graphical user interfaces for the computer industry. Sun
holds a non-exclusive license from Xerox to the Xerox Graphical User Interface, which license also covers Sun’s licensees who implement OPEN
LOOK GUIs and otherwise comply with Sun’s written license agreements.
Federal Acquisitions: Commercial Software—Government Users Subject to Standard License Terms and Conditions.
DOCUMENTATION IS PROVIDED “AS IS” AND ALL EXPRESS OR IMPLIED CONDITIONS, REPRESENTATIONS AND WARRANTIES,
INCLUDING ANY IMPLIED WARRANTY OF MERCHANTABILITY, FITNESS FOR A PARTICULAR PURPOSE OR NONINFRINGEMENT, ARE DISCLAIMED, EXCEPT TO THE EXTENT THAT SUCH DISCLAIMERS ARE HELD TO BE LEGALLY INVALID.
Copyright 2000 Sun Microsystems, Inc., 901 San Antonio Road, Palo Alto, CA 94303-4900 Etats-Unis. Tous droits réservés.
Ce produit ou document est distribué avec des licences qui en restreignent l’utilisation, la copie, la distribution, et la décompilation. Aucune
partie de ce produit ou document ne peut être reproduite sous aucune forme, par quelque moyen que ce soit, sans l’autorisation préalable et
écrite de Sun et de ses bailleurs de licence, s’il y en a. Le logiciel détenu par des tiers, et qui comprend la technologie relative aux polices de
caractères, est protégé par un copyright et licencié par des fournisseurs de Sun.
Des parties de ce produit pourront être dérivées des systèmes Berkeley BSD licenciés par l’Université de Californie. UNIX est une marque
déposée aux Etats-Unis et dans d’autres pays et licenciée exclusivement par X/Open Company, Ltd.
Sun, Sun Microsystems, le logo Sun, AnswerBook2, docs.sun.com, Sun Enterprise, Sun Enterprise SyMON, Sun StorEdge SRC/P Intelligent
SCSI RAID Controller, Solstice DiskSuite, OpenBoot, SunVTS, OpenWindows, et Solaris sont des marques de fabrique ou des marques
déposées, ou marques de service, de Sun Microsystems, Inc. aux Etats-Unis et dans d’autres pays. Toutes les marques SPARC sont utilisées sous
licence et sont des marques de fabrique ou des marques déposées de SPARC International, Inc. aux Etats-Unis et dans d’autres pays. Les
produits portant les marques SPARC sont basés sur une architecture développée par Sun Microsystems, Inc.
L’interface d’utilisation graphique OPEN LOOK et Sun™ a été développée par Sun Microsystems, Inc. pour ses utilisateurs et licenciés. Sun
reconnaît les efforts de pionniers de Xerox pour la recherche et le développement du concept des interfaces d’utilisation visuelle ou graphique
pour l’industrie de l’informatique. Sun détient une licence non exclusive de Xerox sur l’interface d’utilisation graphique Xerox, cette licence
couvrant également les licenciés de Sun qui mettent en place l’interface d’utilisation graphique OPEN LOOK et qui en outre se conforment aux
licences écrites de Sun.
LA DOCUMENTATION EST FOURNIE “EN L’ETAT” ET TOUTES AUTRES CONDITIONS, DECLARATIONS ET GARANTIES
EXPRESSES OU TACITES SONT FORMELLEMENT EXCLUES, DANS LA MESURE AUTORISEE PAR LA LOI APPLICABLE, Y COMPRIS
NOTAMMENT TOUTE GARANTIE IMPLICITE RELATIVE A LA QUALITE MARCHANDE, A L’APTITUDE A UNE UTILISATION
PARTICULIERE OU A L’ABSENCE DE CONTREFAÇON.
Please
Recycle
iii
iv
Contents
1.
Sun Enterprise 450 Server Internal RAID Storage Option Installation
About the SRC/P Controller
Kit Contents
1
4
Host System Requirements
General Information
7
7
First-Time Installation Information
2.
10
Installing the Internal RAID Storage Option
Before You Begin
11
11
Installing the SRC/P Controller Card
Installing the 8-Disk Backplane
Installing the Internal Cables
Installing External Devices
Reassembling the System
12
14
15
22
23
Reconfiguring and Rebooting the System
3.
1
24
Upgrading an Internal 8-Bay Storage Expansion Option to an Internal RAID
Storage Option 27
Upgrading an 8-Bay Storage Expansion Option
Functional Description
27
29
v
vi
Sun Enterprise 450 Server Internal RAID Storage Option Installation Guide • September 2000
Preface
This guide describes how to install a Sun Enterprise™ 450 internal RAID storage
option into a Sun Enterprise 450 server. It includes instructions for installing a Sun
StorEdge SRC/P Intelligent SCSI RAID Controller™ card into a Sun Enterprise 450
server and connecting internal and external devices to the card.
These instructions are designed for an experienced workgroup server administrator
Using UNIX Commands
This document may not contain information on basic UNIX® commands and
procedures such as shutting down the system, booting the system, and configuring
devices.
See one or more of the following for this information:
■
Solaris Handbook for Sun Peripherals
■
AnswerBook2™ online documentation for the Solaris™ operating environment
■
Other software documentation that you received with your system
vii
Typographic Conventions
Typeface
Meaning
Examples
AaBbCc123
The names of commands, files,
and directories; on-screen
computer output
Edit your.login file.
Use ls -a to list all files.
% You have mail.
AaBbCc123
What you type, when
contrasted with on-screen
computer output
% su
Password:
AaBbCc123
Book titles, new words or
terms, words to be emphasized
Read Chapter 6 in the User’s Guide.
These are called class options.
You must be superuser to do this.
Command-line variable;
replace with a real name or
value
To delete a file, type rm filename.
Shell Prompts
Shell
Prompt
C shell
machine_name%
C shell superuser
machine_name#
Bourne shell and Korn shell
$
Bourne shell and Korn shell superuser
#
viii Sun Enterprise 450 Server Internal RAID Storage Option Installation Guide • September 2000
Related Documentation
The following documents contain topics that relate to information in this guide.
TABLE P-1
Related Documentation
Title
Part Number
Ultra Enterprise 450 Server Owner’s Guide
805-0429
Sun StorEdge SRC/P Intelligent SCSI RAID Controller
User’s Guide
806-4148
Sun StorEdge MultiPack Installation
805-3953
Sun StorEdge MultiPack Storage Guide
805-3955
Sun StorEdge MultiPack User’s Guide
805-3954
Accessing Sun Documentation Online
The docs.sun.comsm web site enables you to access a select group of Sun technical
documentation on the Web. You can browse the docs.sun.com archive or search
for a specific book title or subject at:
http://docs.sun.com
Ordering Sun Documentation
Fatbrain.com, an Internet professional bookstore, stocks select product
documentation from Sun Microsystems, Inc.
For a list of documents and how to order them, visit the Sun Documentation Center
on Fatbrain.com at:
http://www.fatbrain.com/documentation/sun
Preface
ix
Sun Welcomes Your Comments
Sun is interested in improving its documentation and welcomes your comments and
suggestions. You can email your comments to Sun at:
[email protected]
Please include the part number (805-6765-11) of your document in the subject line of
your email.
x
Sun Enterprise 450 Server Internal RAID Storage Option Installation Guide • September 2000
CHAPTER
1
Sun Enterprise 450 Server Internal
RAID Storage Option Installation
The Sun Enterprise 450 internal RAID storage option consists of a Sun StorEdge
SRC/P Intelligent SCSI RAID Controller, an 8-disk backplane, and the internal cables
necessary to connect the SRC/P Controller to the 8-disk backplane.
This guide describes how to:
■
Install the internal RAID storage option into a Sun Enterprise 450 server
■
Upgrade an 8-bay storage expansion option to an internal RAID storage option
After you have completed the procedures in this guide, see the Sun StorEdge SRC/P
Intelligent SCSI RAID Controller User’s Guide for information about software
installation and array configuration.
See “First-Time Installation Information” on page 10 for a list of the tasks required to
completely install the SRC/P Controller.
About the SRC/P Controller
The SRC/P Controller is a host-based, three-channel UltraSCSI RAID controller card
with a 64-bit PCI system interface and a dedicated processor.
The idea of RAID (redundant array of independent disks) is to combine multiple
disk drives into an array of drives that provides better performance and more data
protection than a single large drive. The server sees the array as a single logical
storage unit.
The SRC/P Controller improves performance over software-based RAID because it
off-loads RAID processing from the server CPU to the processor on the SRC/P
Controller card.
1
Fault tolerance for data protection is provided by different types of RAID
architecture. RAID levels 1, 5, 1+0, and 5+0 provide disk fault tolerance methods to
protect data from being lost in the event of a hardware failure. Each RAID level
offers different trade-offs in fault tolerance features and performance. In addition,
RAID 0 offers no fault tolerance, but it does provide high I/O performance.
For additional data protection, hot spare drives are supported. Should an active
drive fail, the hot spare drive assigned to the array replaces it and the data is
automatically redirected to the hot spare drive.
The SRC/P Storage Manager, which is a graphical user interface (GUI), and a
command-line management interface are included for RAID configuration,
diagnostics, and event reporting. The SRC/P Controller automatically determines a
RAID level and stripe size for your array based on your requirements for capacity,
security, and performance. You can also manually select a specific RAID level
through the GUI.
The SRC/P Controller uses read-ahead caching to reduce disk access time and
improve performance. The controller automatically tallies I/O operations in cache
RAM for analysis of storage subsystem I/O loading. You can view these numbers
through the SRC/P Storage Manager. The controller analyzes these statistics to
optimize the array architecture, cache, and stripe size for your system. You can tune
and set cache parameters through the SRC/P Storage Manager.
The SRC/P Controller provides three independent single-ended channels with three
high-density 68-pin external SCSI connectors that are Fast/Wide and Ultra/Wide
capable and three 68-pin internal SCSI connectors that are Ultra/Wide capable. Each
channel supports either internal disk drives (where applicable) or external storage
devices, but not both.
Each SRC/P Controller supports 36 disk drives per card. The SRC/P Controller
supports disk hot plugging so that you can replace drives while the system is
operational. For information about hot plug disk replacement, see the Sun StorEdge
Multipack Storage Guide for external devices; for internal disk drives see the product
notes or owner’s guide for your server.
ECC (error checking and correcting) memory detects and corrects data errors in the
entire data path through the controller cache and other controller hardware. With
ECC you generate redundant information that you can use to detect and correct
errors in stored or transmitted data.
If you are using a software RAID package such as Veritas or Solstice DiskSuite™,
along with the SRC/P Controller, the software RAID package will recognize the
logical devices created using the SRC/P Controller.
Onboard temperature and voltage sensors pass critical hardware management data
to the SRC/P Storage Manager information windows for logging and for notifying
you. GUI windows also display status conditions with status flags on the drive or
array icons.
2
Sun Enterprise 450 Server Internal RAID Storage Option Installation Guide • September 2000
The onboard battery backup module supports the cache. It protects data not yet
written to the drives from being lost when the power is lost. Using the SRC/P
Storage Manager, you can view the battery charge status, the date of initial
calibration, and the date of the last maintenance calibration.
Features
All SRC/P Controllers include the following features:
■
PCI Local Bus Rev. 2.1 compliant; 12.28-inch (31.19 cm) long card; 64-bit PCI bus;
33-MHz clock speed
■
High-performance RISC processor
■
Universal dual voltage signaling (3.3V and 5V)
■
Three external and three internal 68-pin SCSI connectors that are Fast/Wide and
Ultra/Wide capable and that can support external, single-ended UltraSCSI disks
■
SCSI data transfer rates of up to 40-Mbytes/sec peak throughput per channel at a
20-MHz bus clock rate
■
One 64-Mbyte onboard ECC write-cache memory module
■
Replaceable battery module that provides a backup time of 48 hours for
64-Mbyte cache
■
Support for RAID levels 0, 1, 5, 1+0, and 5+0
■
Support for hot spares, hot-plug disks, and transparent drive rebuild
■
Tunable cache parameters
■
Self-test capability
■
Controller firmware that resides onboard in flash PROM and that can be
upgraded without replacing any hardware chips
■
Graphical and command-line management interface
Chapter 1
Sun Enterprise 450 Server Internal RAID Storage Option Installation
3
Kit Contents
Your system may be configured-to-order with a RAID storage option already
installed at the factory, or you may order one of the option kits listed below. Check
that you’ve received all of the parts you ordered. Contact Sun Microsystems or your
distributor/reseller if you are missing anything.
TABLE 1-1
4
Option Kit Contents
Option Kit and Related Options
Description
Sun Enterprise 450 Server Internal
RAID Storage Option Kit
The option kit includes the following parts:
• SRC/P Controller
• 8-disk backplane
• 8-slot SCSI data cable
• 8-slot SCSI power cable
• I2C cable
• Electrostatic discharge strap
• SRC/P Controller CD
External SCSI data cable option
2m cable for use with external storage devices
Sun Enterprise 450 Server Internal RAID Storage Option Installation Guide • September 2000
Internal RAID Option Components
The following figures show the SRC/P Controller and internal cables.
Channel 0
A
B
Channel 2
C
Channel 1
FIGURE 1-1
Sun StorEdge SRC/P Intelligent SCSI RAID Controller Card
Note – The internal connectors for Channel 0, Channel 1, and Channel 2 correspond
to the external connectors A,B, and C on the SRC/P Controller. Each channel
supports either internal or external devices (but not both).
Chapter 1
Sun Enterprise 450 Server Internal RAID Storage Option Installation
5
8-Disk backplane
8-Slot data cable
I2C cable
8-Slot power cable
FIGURE 1-2
6
Internal Cables and 8-Disk Backplane
Sun Enterprise 450 Server Internal RAID Storage Option Installation Guide • September 2000
Host System Requirements
Before installing the SRC/P Controller, make sure that the Sun Enterprise 450 host
server meets the following hardware and software requirements.
TABLE 1-2
System Requirements
Component
Description
Software
The operating environments supported are Solaris 2.6, Solaris 7 and
later compatible operating environments.
Host system
Sun Enterprise 450 server.
Maximum SRC/P
Controller cards
Six cards.
PCI slot selection
The SRC/P Controller requires a 64-bit PCI slot. On a Sun
Enterprise 450 server use PCI slots 1 through 7 only.
Power requirements
Two power supply units must be installed in the server.
General Information
The next table provides hardware configuration information. See Appendix A for
specification information.
Chapter 1
Sun Enterprise 450 Server Internal RAID Storage Option Installation
7
TABLE 1-3
General Information
Component
Description
Target devices
Internal Disk Drives
Each internal channel supports four internal disk drives.
One SRC/P Controller card can support 12 internal disk
drives. Two 8-disk storage options are required to support
the maximum internal disk drives.
External Devices
Each card has three external connectors that can be used to support
up to 36 external devices. For each external storage device you need
a 2m cable (ordered separately).
The controller can support the following external drives if internal
disks are not connected to that internal channel:
• Sun StorEdge MultiPack-6
• Sun StorEdge MultiPack-12
SCSI IDs and
termination
Internal Disk Devices
The SCSI target address (SCSI ID) of each disk drive is determined
by the slot location where the drive is connected to the 8-disk
backplane. The backplane also provides the SCSI termination for
each drive. Do not use jumpers on the drive to select a specific SCSI
ID.
Target address (SCSI ID) 7 is reserved for the SRC/P Controller.
External Devices
Your hardware configuration determines the number and
distribution of SCSI addresses available. For the Sun StorEdge
MultiPack devices, SCSI IDs are hardcoded. You do not need to set
jumpers. You can view SCSI IDs through the GUI for the SRC/P
Controller.
PCI slot selection
The SRC/P Controller requires a 64-bit PCI slot. You may install the
SRC/P Controller in slots 1 through 7 only. For maximum
performance, configure the system, if possible, with no more than
one card on each PCI bus.
If you are installing two 8-disk storage options, install the SRC/P
Controller for the upper 8-disk backplane into a PCI slot located
above the card used for the lower 8-disk backplane.
DC power
8
The DC power requirement is 5V +5% at 3.5 amps.
Sun Enterprise 450 Server Internal RAID Storage Option Installation Guide • September 2000
External Cabling Guidelines
Use the following cabling guidelines to ensure proper device termination:
■
A 2m cable is required for each external device (Sun part number 3832A).
■
A maximum of 12 disks (one 6-drive or one 12-drive MultiPack) is supported per
external port for up to 36 disk drives per SRC/P Controller.
■
The SCSI bus must be correctly terminated. Most Sun devices use
autotermination. See the documentation supplied with the device.
■
Non-Sun devices are not supported.
Installation Scenarios
The Sun Enterprise 450 server internal RAID storage option can support up to 16
internal disk drives (two option kits) and 36 external disk drives (additional cables
required).
TABLE 1-4 below lists installation scenarios for a new Sun Enterprise 450 server.
If you are upgrading an 8-bay storage expansion option to an internal RAID storage
option, see “Upgrading an 8-Bay Storage Expansion Option” on page 27.
TABLE 1-4
Disk Drive Installation Scenarios for a Sun Enterprise 450 Server
Number of Disk Drives
Internal RAID Option Required
First eight internal disk drives
One Sun Enterprise 450 Server
Internal RAID Storage Option Kit
Last eight internal disk drives
One additional Sun Enterprise 450
Server Internal RAID Storage
Option Kit
Eight internal disk drives and
external storage
One Sun Enterprise 450 Server
Internal RAID Storage Option Kit
Two 2m cables (ordered
separately)
Two external storage devices
Sun StorEdge SRC/P Intelligent
SCSI RAID Controller Kit
Two 2m cables (ordered
separately)
Three external storage devices
Sun StorEdge SRC/P Intelligent
SCSI RAID Controller Kit
One additional 2m cable
Chapter 1
Sun Enterprise 450 Server Internal RAID Storage Option Installation
9
First-Time Installation Information
Installing the Sun Enterprise 450 Server Internal RAID Storage option is one step in
the SRC/P Controller installation process. You need to complete all of the steps in
TABLE 1-5 to fully install your storage option.
TABLE 1-5
10
First-Time Installation Steps
Task
For Information, See...
1
Review the features of the SRC/P
Controller and read the general
information.
This chapter.
2
Verify that you have received all
of the parts you have ordered.
“Kit Contents” on page 4 of this guide.
3
Back up the data on the disks,
if necessary.
AnswerBook2 online documentation for the Solaris
software environment.
4
Install the SRC/P Controller card
into the server.
• “Installing the SRC/P Controller Card” on
page 12 of this guide; or
• “Upgrading an 8-Bay Storage Expansion Option”
on page 27 if you are upgrading from an 8-bay
storage option.
5
Install the software and configure
RAID arrays.
The installation document included with the
SRC/P Controller software and the Sun StorEdge
SRC/P Intelligent SCSI RAID Controller User’s Guide.
6
Restore data to disks, if necessary.
AnswerBook2 online documentation for the Solaris
software environment.
Sun Enterprise 450 Server Internal RAID Storage Option Installation Guide • September 2000
CHAPTER
2
Installing the Internal RAID Storage
Option
This chapter describes how to install the internal RAID storage option into a
new Sun Enterprise 450 server. To upgrade a Sun Enterprise 450 server that has
a SRC/P Controller already installed, see Chapter 3.
To install the internal RAID storage option, you will need to complete the following
tasks:
■
Prepare the Sun Enterprise 450 server
■
Install the SRC/P Controller card
■
Install the 8-disk backplane
■
Install the internal SCSI cables
■
Connect any external devices
■
Reassemble the system
■
Reconfigure and reboot the system
■
Verify the installation
Before You Begin
Caution – Persons who access this equipment must observe all safety precautions
described in Appendix C of the Sun StorEdge SRC/P Intelligent SCSI RAID
Controller User’s Guide.
11
■
Verify that you have received all of the parts you ordered; see
“Kit Contents” on page 4.
■
Locate the following tools:
■
■
Screwdriver, Phillips #1
■
Screwdriver, Phillips #2
■
Electrostatic discharge (ESD) mat, Sun part number 250-1088, or equivalent
■
Grounding wrist or foot strap
Locate the following manuals:
■
Ultra Enterprise 450 Server Owner’s Guide
■
Sun StorEdge SRC/P Intelligent SCSI RAID Controller User’s Guide
■
Sun StorEdge MultiPack Installation Manual
Installing the SRC/P Controller Card
Caution – You need two power supplies in the Sun Enterprise 450 server to
support the internal RAID storage option.
1. Back up any data on the disks, if necessary.
See the AnswerBook online documentation for the Solaris software environment.
Note – You will need to refer to the Ultra Enterprise 450 Server Owner’s Guide to
complete the following tasks.
2. Power off the system.
See “How to Power Off the System.”
3. Turn off any peripheral devices attached to the server.
4. Remove the right side panel.
See “How to Remove the Right Side Panel.”
5. Remove the left side panel.
See “How to Remove the Left Side Panel.”
6. Attach the antistatic wrist strap to your wrist and to a metal component on the
server chassis.
12
Sun Enterprise 450 Server Internal RAID Storage Option Installation Guide • September 2000
7. Remove the disk fan tray assembly.
See “How to Remove the Disk Fan Tray Assembly.”
8. Unpack the SRC/P Controller and place it on an antistatic surface.
9. Insert the SRC/P Controller into the appropriate slot on the main logic board.
You can install the SRC/P Controller in PCI slots 1 through 7 only. The SRC/P
Controller requires a 64-bit PCI slot.
a. Remove the filler panel for the PCI slot you intend to use.
Remove the Phillips screw that secures the PCI filler panel to the rear panel.
b. Align the left side of the card with the appropriate opening on the
back panel. At the same time, insert the bracket on the right side of the card
into the corresponding groove on the CPU cage.
c. Push the card securely into the slot.
d. Secure the SRC/P Controller faceplate to the back panel with the Phillips screw.
10. If you are installing an external device only, go to “Installing External
Devices” on page 22. Otherwise, go to “Installing the 8-Disk Backplane”
on page 14.
Chapter 2
Installing the Internal RAID Storage Option
13
Installing the 8-Disk Backplane
Note – If you are installing two Sun Enterprise 450 Server Internal RAID Storage
Option Kits, install the SRC/P Controller for the upper 8-disk backplane in a PCI
slot located above the SRC/P Controller used for the lower 8-disk backplane.
1. Remove the disk fan tray assembly, if you have not already done so.
See “How to Remove a Disk Fan Tray Assembly” in your server owner’s guide.
2. On the right side of the enclosure, remove the two screws that secure the 8-disk
backplane filler panel to the disk cage, and remove the filler panel. Remove both
backplane filler panels if you are installing the lower 8-disk backplane.
3. Insert the 8-disk backplane down into the 12 mounting hooks at the rear of the
disk cage.
Use the lowest available set of hooks; do not mount a backplane at the top of the
disk cage if the center portion of the cage has no backplane.
14
Sun Enterprise 450 Server Internal RAID Storage Option Installation Guide • September 2000
4. Secure the backplane to the disk cage using the two Phillips screws provided in
the option kit.
Installing the Internal Cables
Caution – UltraSCSI data cables are fragile and should be handled with care.
1. Connect the I2C cable.
Chapter 2
Installing the Internal RAID Storage Option
15
■
16
If you are installing the lower 8-disk backplane, connect the I2C cable to connector
P0500 on the 4-slot backplane and to connector P0600 on the 8-disk backplane.
Sun Enterprise 450 Server Internal RAID Storage Option Installation Guide • September 2000
■
If you are installing the upper 8-disk backplane, connect the I2C cable to connector
P0601 on the lower 8-disk backplane and to connector P0600 on the upper 8disk backplane.
Chapter 2
Installing the Internal RAID Storage Option
17
2. Connect the 8-slot UltraSCSI power cable to the backplane at connector J0101.
Make sure that the tab on the bottom of the connector snaps into place.
3. Connect the other end of the 8-disk UltraSCSI power cable to the power
distribution board.
■
If you are installing the lower 8-disk backplane, use connector J0304 on the power
distribution board.
■
If you are installing the upper 8-disk backplane, use connector J0303 on the power
distribution board.
Be sure that the tab on the right side of the connector snaps into place.
18
Sun Enterprise 450 Server Internal RAID Storage Option Installation Guide • September 2000
4. Remove the three small Phillips screws that secure the cable access panel to the
top of the system chassis.
5. Tilt the front edge of the access panel upward and lift it free from the chassis.
Chapter 2
Installing the Internal RAID Storage Option
19
6. Insert the 8-disk UltraSCSI data cable into the cable access port on the top of the
system chassis.
Position the cable in the access port with connectors P1-A and P1-B toward the left
side of the enclosure (where the main logic board is located). If you are installing the
upper 8-disk backplane, you must position the cable between the two existing data
cables in the access port.
7. On the left side of the enclosure, carefully route the cable so that it rests on top of
the shelf located directly above the top CPU module.
Take care to avoid damaging the cable on any sharp sheet metal edges.
8. On the left side of the enclosure, connect the two cable connectors to the SRC/P
Controller.
Note – Channel 0 is for the 4-slot data cable. Use channels 1 and 2.
See “Internal RAID Option Components” on page 5 to view the location of the
channels.
If necessary, remove the brackets from the ends of each connector.
Note – If you are installing two storage option kits, the 8-slot UltraSCSI data cable
on the outside (on top in the access port) must connect to the SRC/P Controller in
the lower slot.
9. If the 8-slot UltraSCSI data cable has excess slack, carefully fold the cable and
secure the fold using the cable clip attached to the CPU card cage.
Do not crease the cable when you fold it.
20
Sun Enterprise 450 Server Internal RAID Storage Option Installation Guide • September 2000
10. Connect the other end of the cable to the 8-disk backplane.
Connect P2-B to the upper connector, J0402, and connect P2-A to the lower
connector, J0102.
Note – If you are installing two expansion option kits, the UltraSCSI data cable on
the outside (on top in the access port) must connect to the lower 8-disk backplane.
11. If the 8-disk UltraSCSI data cable has excess slack, carefully fold the cable and
secure the fold using the cable clip attached to the disk fan tray assembly.
Do not crease the cable when you fold it.
12. Replace the cable access panel on top of the system chassis.
Align the three tabs on the edge of the panel with the corresponding slots in the
system chassis.
13. Secure the access panel with the three Phillips screws.
Chapter 2
Installing the Internal RAID Storage Option
21
14. Fill in information on the four labels at the ends of the 8-disk UltraSCSI data
cable.
This identification is important when replacing a cable, backplane, or PCI card,
particularly when two Sun Enterprise 450 server internal RAID options are installed.
a. On the left side of the system, fill in the two labels on the 8-disk UltraSCSI
data cable for the appropriate connectors.
Fill in the number of the PCI slot used and check the box to indicate either the
upper backplane or lower backplane.
b. On the right side of the system, fill in the two labels on the 8-disk UltraSCSI
data cable for the appropriate connectors.
Check the box to indicate either the upper backplane or lower backplane.
Installing External Devices
You need an UltraSCSI 2m cable for each external storage device that you connect to
the SRC/P Controller.
1. If necessary, power off the server.
See “How to Power Off the System” in your server owner’s guide for instructions.
2. Turn off any peripheral devices attached to the server.
3. Connect any external storage devices to the SRC/P Controller.
Use the external 2m cables supplied with the SRC/P Controller. The cable
connectors are keyed so that they can only connect one way. See “Internal RAID
Option Components” on page 5 to view the location of the channels.
Note – Do not connect external SCSI devices to a SCSI channel that is used to
support internal disk drives.
Note – External ports A and B are close together and will not accommodate
non-Sun external 2m cables.
22
Sun Enterprise 450 Server Internal RAID Storage Option Installation Guide • September 2000
■
If you are connecting an external storage device to the upper port A on the SRC/P
Controller, insert the connector with the flat side facing down.
■
If you are connecting an external storage device to either port B or port C on the SRC/P
Controller, insert the connector with the flat side facing up.
Reassembling the System
Note – After reassembling the system, be sure to perform the steps in the next
section,“Reconfiguring and Rebooting the System” on page 24 to reconfigure and
reboot your system so that it can use the SRC/P Controller.
Chapter 2
Installing the Internal RAID Storage Option
23
Complete these tasks to reassemble the system. Refer to the Ultra Enterprise 450
Server Owner’s Guide for the information to complete each task.
■
“How to Install the Disk Fan Tray Assembly”
■
“How to Install the Left Side Panel”
■
“How to Install the Right Side Panel”
To install disk drives for the new backplane(s), complete this task:
■
“How to Install a Disk Drive” in the Ultra Enterprise 450 Server Owner’s Guide
Reconfiguring and Rebooting the System
Before the system can properly recognize the new SRC/P Controller, you must
verify that the card is installed correctly, reconfigure the system, and reboot the
system.
1. Power on the system.
See “How to Power On the System” in the Ultra Enterprise 450 Server Owner’s Guide.
2. When the system banner is displayed on the monitor, immediately enter the
Stop-a sequence on the Sun keyboard.
If you are using an alphanumeric terminal instead of a monitor, press the Break key
on the terminal’s keyboard.
3. Use the show-devs command to verify that the SRC/P Controller is included in
the list of system devices. When the ok prompt is displayed, enter the following
command:
ok show-devs
scsis identifies the SRC/P Controller. The listing should include a line similar
to the following:
/pci@4,4000/pci@4/scsis@4/scsi@0
If the SRC/P Controller is not listed, check that the card is properly seated. Reinstall
the card if necessary.
24
Sun Enterprise 450 Server Internal RAID Storage Option Installation Guide • September 2000
4. Enter the following command to perform a reconfiguration boot:
ok boot -r
This command rebuilds the device trees for the system, incorporating any newly
installed options so that they can be recognized by the system. After the
reconfiguration boot has successfully completed, the system prompt should be
displayed.
What Next
■
If this is the first SRC/P Controller that you installed in your server, the next step is to
install the software necessary to run the SRC/P Controller. See the installation
document supplied with the controller software.
■
If you have already installed the software for a different SRC/P Controller, you are
ready to configure drive arrays. See “How to Create an Array” in the Sun
StorEdge SRC/P Intelligent SCSI RAID Controller User’s Guide.
Note – When you install a new SRC/P Controller, the controller will automatically
initiate the initial calibration cycle for the battery. The calibration cycle requires
approximately 24 hours to complete. During the calibration cycle, the SRC/P
Controller cache is operating in Write-through mode and should not be used for
performance testing. When the process is completed, the battery module will be
ready to provide backup protection and the controller will automatically switch to
Write-back mode. See the Sun StorEdge SRC/P Intelligent SCSI RAID Controller User’s
Guide for more information.
Chapter 2
Installing the Internal RAID Storage Option
25
26
Sun Enterprise 450 Server Internal RAID Storage Option Installation Guide • September 2000
CHAPTER
3
Upgrading an Internal 8-Bay
Storage Expansion Option to an
Internal RAID Storage Option
This chapter describes how to upgrade an installed 8-bay storage expansion option
to an internal RAID storage option.
Upgrading an 8-Bay Storage Expansion
Option
Perform the following steps to upgrade an 8-bay storage expansion option to an
internal RAID storage option.
1. If there are two UltraSCSI controller cards installed in the system, and you are
using the SRC/P Controller to support an 8-disk storage option, you need to
remove one of the UltraSCSI controller cards.
a. Disconnect the two 8-disk UltraSCSI data cable connectors from the front of
the UltraSCSI controller PCI card you are removing.
The cables are labeled P1-A and P1-B. Take note of where each connector attaches
to the PCI card.
b. Disconnect all external cables from the faceplate of the PCI card.
c. Remove the Phillips screw that secures the faceplate of the PCI card to the back
panel of the system.
d. Pull the UltraSCSI PCI card all the way out of the slot.
Hold the PCI card by the edges.
27
2. Install the SRC/P Controller.
See “Installing the SRC/P Controller Card” on page 12.
3. If necessary remove the existing 8-slot UltraSCSI backplane and install the new
8-disk backplane.
To remove the 8-slot UltraSCSI backplane, see “How to Remove an 8-slot UltraSCSI
Backplane” in the Ultra Enterprise 450 Server Owner’s Guide.
To install the 8-disk backplane, see “Installing the 8-Disk Backplane” on page 14.
4. If necessary, install the internal SCSI data cables.
See “Installing the Internal Cables” on page 15.
5. Connect any external devices.
See “Installing External Devices” on page 22.
6. Reassemble the system.
See “Reassembling the System” on page 23.
7. Reconfigure and reboot the system.
See “Reconfiguring and Rebooting the System” on page 24.
What Next
■
If this is the first SRC/P Controller that you installed in your server, the next step is to
install the software necessary to run the SRC/P Controller. See the Sun StorEdge
SRC/P Intelligent SCSI RAID Controller User’s Guide and the documentation
supplied with your controller software.
■
If you have already installed the software for a different SRC/P Controller, you are
ready to configure drive arrays. See “How to Create an Array” in the Sun
StorEdge SRC/P Intelligent SCSI RAID Controller User’s Guide.
Note – When you install a new SRC/P Controller, the controller will automatically
initiate the initial calibration cycle for the battery. The calibration cycle requires
approximately 24 hours to complete. During the calibration cycle, the SRC/P
Controller cache is operating in Write-through mode and should not be used for
performance testing. When the process is completed, the battery module will be
ready to provide backup protection and the controller will automatically switch to
Write-back mode. See the Sun StorEdge SRC/P Intelligent SCSI RAID Controller User’s
Guide for more information.
28
Sun Enterprise 450 Server Internal RAID Storage Option Installation Guide • September 2000
APPENDIX
A
Specifications
This appendix provides a functional description and a reference for physical,
performance, electrical, and environmental specifications.
Functional Description
TABLE A-1
Functional Description
Component
Description
Processor
High-performance RISC processor
Firmware
Operational firmware is stored in flash memory and can be updated
using host utilities without requiring component replacements
PCI
PCI Version 2.1 compliant, 64-bit, 33-MHz PCI bus; up to
264-Mbytes/sec transfer rate; Universal PCI compliant
SCSI
Clock Rate: 20 MHz
Three internal 68-pin connectors
Three external 68-pin VHDCI connectors
Support of ANSI X3.131:1994, SCSI-2 specification
Support of ANSI X3.277:1996, FAST-20 specification
UltraSCSI synchronous wide (16-bit) data transfers up to
40 Mbytes/sec
UltraSCSI synchronous narrow (8-bit) data transfers up to
20 Mbytes/sec
UltraSCSI low-voltage differential or single-ended bus operation
29
TABLE A-1
Functional Description (Continued)
Component
Description
Memory
64-Mbyte DIMM
DIMMs to be installed in the controller must conform to the
following specifications:
Speed: 60-ns EDO
Size: 64 Mbytes
Width: 32 bit
Configuration: 72 pin, small-outline
Voltage 3.3V
Battery
Type: Nickel Metal Hydride
Capacity: 3800 mAH
Backup time: 48 hours (with 64-Mbyte cache installed);
65 hours (with 16-Mbyte cache installed)
Charge time: 3 hours
Operating Temp: 10 oC to 40 oC
DC power
requirements
Measurement: 5V +/-5%; 3.3V +/-0.3V
Voltage: 5V + 5%
Ripple and noise: 50-mv peak-to-peak max
Current: 3.27A typical (3 channel configuration)
Voltage: 3.3V + 5%
Ripple and noise: 50-mv peak-to-peak max
Physical Dimensions
TABLE A-2
Physical Dimensions
Dimension
Measurement
Length of SRC/P Controller with expansion card and
battery backup unit
12.28 in (31.19 cm)
Width of SRC/P Controller card
4.2 in (10.67 cm)
Length of basic SRC/P Controller card
(measurement does not include length of expansion
card and battery backup unit)
10.25 in (26.03 cm)
Component height (not including PCB):
Primary component side
Back side
30
0.570 in (14.48 mm)
0.105 in (2.67 mm)
Sun Enterprise 450 Server Internal RAID Storage Option Installation Guide • September 2000
TABLE A-2
Physical Dimensions (Continued)
Dimension
Measurement
Length of expansion card (daughter card)
5.575 in (141.6 mm)
Width of expansion card
3.46 in (81.3 mm)
Length of battery module
4.475 in (113.7 mm)
Width of battery module
3.875 in (98.4 mm)
Performance Specifications
TABLE A-3
Performance Specifications
Feature
Specification
PCI clock
16–33 MHz
PCI data burst transfer rate
132 Mbytes/sec (32-bit PCI)
264 Mbytes/sec (64-bit PCI)
SCSI synchronous transfer rate
40 Mbytes/sec (Ultra)
SCSI asynchronous transfer rate
Device dependent
SCSI transfer size
64K blocks
PCI data address lines
64-bit PCI (63-0)
PCI modes
32-bit/64-bit PCI
Capacitance per PCI signal line
10 pf (maximum)
SCSI interface
16-bit single-ended SCSI
SCSI bus parity
Yes
SCSI 8-bit devices
No
SCSI 16-bit devices
Yes
Appendix A
Specifications
31
Environmental Specifications
TABLE A-4
Environmental Specifications
Condition
32
Operating Specification
o
o
Storage Specification
Temperature
10 C to 40 C
0 oC to 40 oC
Relative humidity
10%–90% (non-condensing)
10%–90% (non-condensing)
Altitude
3000 meters (10,000 feet)
Sun Enterprise 450 Server Internal RAID Storage Option Installation Guide • September 2000