1
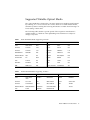
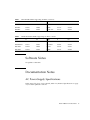
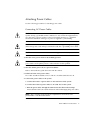
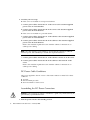
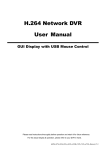
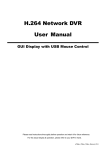
Netra™ 1290 Server Product Notes
Sun Microsystems, Inc.
www.sun.com
Part No. 819-4375-12
February 2008, Revision A
Submit comments about this document at: http://www.sun.com/hwdocs/feedback
Copyright 2008 Sun Microsystems, Inc., 4150 Network Circle, Santa Clara, California 95054, U.S.A. All rights reserved.
Sun Microsystems, Inc. has intellectual property rights relating to technology that is described in this document. In particular, and without
limitation, these intellectual property rights may include one or more of the U.S. patents listed at http://www.sun.com/patents and one or
more additional patents or pending patent applications in the U.S. and in other countries.
This document and the product to which it pertains are distributed under licenses restricting their use, copying, distribution, and
decompilation. No part of the product or of this document may be reproduced in any form by any means without prior written authorization of
Sun and its licensors, if any.
Third-party software, including font technology, is copyrighted and licensed from Sun suppliers.
Parts of the product may be derived from Berkeley BSD systems, licensed from the University of California. UNIX is a registered trademark in
the U.S. and in other countries, exclusively licensed through X/Open Company, Ltd.
Sun, Sun Microsystems, the Sun logo, Java, AnswerBook2, docs.sun.com, Netra, and Solaris are trademarks or registered trademarks of Sun
Microsystems, Inc. in the U.S. and in other countries.
All SPARC trademarks are used under license and are trademarks or registered trademarks of SPARC International, Inc. in the U.S. and in other
countries. Products bearing SPARC trademarks are based upon an architecture developed by Sun Microsystems, Inc.
The OPEN LOOK and Sun™ Graphical User Interface was developed by Sun Microsystems, Inc. for its users and licensees. Sun acknowledges
the pioneering efforts of Xerox in researching and developing the concept of visual or graphical user interfaces for the computer industry. Sun
holds a non-exclusive license from Xerox to the Xerox Graphical User Interface, which license also covers Sun’s licensees who implement OPEN
LOOK GUIs and otherwise comply with Sun’s written license agreements.
U.S. Government Rights—Commercial use. Government users are subject to the Sun Microsystems, Inc. standard license agreement and
applicable provisions of the FAR and its supplements.
DOCUMENTATION IS PROVIDED "AS IS" AND ALL EXPRESS OR IMPLIED CONDITIONS, REPRESENTATIONS AND WARRANTIES, INCLUDING
ANY IMPLIED WARRANTY OF MERCHANTABILITY, FITNESS FOR A PARTICULAR PURPOSE OR NON-INFRINGEMENT, ARE DISCLAIMED,
EXCEPT TO THE EXTENT THAT SUCH DISCLAIMERS ARE HELD TO BE LEGALLY INVALID.
Copyright 2008 Sun Microsystems, Inc., 4150 Network Circle, Santa Clara, Californie 95054, États-Unis. Tous droits réservés.
Sun Microsystems, Inc. possède les droits de propriété intellectuels relatifs à la technologie décrite dans ce document. En particulier, et sans
limitation, ces droits de propriété intellectuels peuvent inclure un ou plusieurs des brevets américains listés sur le site
http://www.sun.com/patents, un ou les plusieurs brevets supplémentaires ainsi que les demandes de brevet en attente aux les États-Unis et
dans d’autres pays.
Ce document et le produit auquel il se rapporte sont protégés par un copyright et distribués sous licences, celles-ci en restreignent l’utilisation,
la copie, la distribution, et la décompilation. Aucune partie de ce produit ou document ne peut être reproduite sous aucune forme, par quelque
moyen que ce soit, sans l’autorisation préalable et écrite de Sun et de ses bailleurs de licence, s’il y en a.
Tout logiciel tiers, sa technologie relative aux polices de caractères, comprise, est protégé par un copyright et licencié par des fournisseurs de
Sun.
Des parties de ce produit peuvent dériver des systèmes Berkeley BSD licenciés par l’Université de Californie. UNIX est une marque déposée
aux États-Unis et dans d’autres pays, licenciée exclusivement par X/Open Company, Ltd.
Sun, Sun Microsystems, le logo Sun, Java, AnswerBook2, docs.sun.com, Netra, et Solaris sont des marques de fabrique ou des marques
déposées de Sun Microsystems, Inc. aux États-Unis et dans d’autres pays.
Toutes les marques SPARC sont utilisées sous licence et sont des marques de fabrique ou des marques déposées de SPARC International, Inc.
aux États-Unis et dans d’autres pays. Les produits portant les marques SPARC sont basés sur une architecture développée par Sun
Microsystems, Inc.
L’interface utilisateur graphique OPEN LOOK et Sun™ a été développée par Sun Microsystems, Inc. pour ses utilisateurs et licenciés. Sun
reconnaît les efforts de pionniers de Xerox dans la recherche et le développement du concept des interfaces utilisateur visuelles ou graphiques
pour l’industrie informatique. Sun détient une license non exclusive de Xerox sur l’interface utilisateur graphique Xerox, cette licence couvrant
également les licenciés de Sun implémentant les interfaces utilisateur graphiques OPEN LOOK et se conforment en outre aux licences écrites de
Sun.
LA DOCUMENTATION EST FOURNIE "EN L’ÉTAT" ET TOUTES AUTRES CONDITIONS, DÉCLARATIONS ET GARANTIES EXPRESSES
OU TACITES SONT FORMELLEMENT EXCLUES DANS LA LIMITE DE LA LOI APPLICABLE, Y COMPRIS NOTAMMENT TOUTE
GARANTIE IMPLICITE RELATIVE À LA QUALITÉ MARCHANDE, À L’APTITUDE À UNE UTILISATION PARTICULIÈRE OU À
L’ABSENCE DE CONTREFAÇON.
Please
Recycle
Netra 1290 Server Product Notes
The Netra 1290 Server Product Notes provide last-minute information that corrects or
compliments the Netra™ 1290 server documentation.
Topics discussed fall into these three catagories:
■
“Hardware Notes” on page 2 – Changes to the server hardware or supported
peripherals.
■
“Software Notes” on page 5 – Changes to the installed software and includes
patches and workarounds.
■
“Documentation Notes” on page 5 – Changes to the documentation or new and
updated information.
These product notes might change over time, so refer to them often for the latest
information about your Netra 1290 server.
Note – Sun™ is not responsible for the availability of third-party web sites
mentioned in this document. Sun does not endorse and is not responsible or liable
for any content, advertising, products, or other materials that are available on or
through such sites or resources. Sun will not be responsible or liable for any actual
or alleged damage or loss caused by or in connection with the use of or reliance on
any such content, goods, or services that are available on or through such sites or
resources.
1
Hardware Notes
Initial Power Connection Time Constraint
Although somewhat similar, the Netra 1290 server does not behave the same at
initial power connection as the Netra 1280 server. In particular, you must apply
power to any two of the four Netra 1290 input power connections within 2 seconds.
Otherwise, the system controller might fail to start. To fulfill this time constraint,
follow these guidelines:
■
If not installed, install circuit breakers or quick connectors in the power path from
source power to the server power inputs for -48 VDC input systems.
■
Ensure that circuit breakers are off, quick connectors are disconnected, or AC
power cords are unplugged. Energize the circuit breakers, connect the quick
connectors, or plug in the AC power cords for two or more of the power inputs
within a 2-second interval.
Note – The 2-second time constraint applies only to the initial power connection to
an unenergized Netra 1290 server. There are no time constraints for power
application to the third and fourth input power connections, or for replacement of a
power supply in an operating system.
Shipping Kit Contents
The shipping kit might contain different items than those described on the packing
list. For example, to promote eco-responsibility, the kit might no longer contain the
RJ-45 Ethernet cable, the antistatic wriststrap, or other ancillary items. Alternatively,
serial adapters, fasteners, or other items not listed on the packing list might be
included to enhance the customer experience. Contact Sun Microsystems, Inc. to
purchase the items you need. These ancillary items also might be available at
computer supply stores.
2
Netra 1290 Server Product Notes • February 2008
Supported Writable Optical Media
The optical media drive shipped in your Netra 1290 server might be manufactured
by Samsung. As a service to users who wish to burn CD or DVD writable media,
Sun Microsystems is making the following information available from Samsung’s inhouse testing of their drive.
The following tables list the top write speeds of the respective manufacturer’s
writable media as of the date of this publishing. This information is subject to
change at any time.
TABLE 1
DVD+R Writable Media Supporting 16x Burn
Maker
MID
MT ID
Maker
MID
MT ID
CMC
CMC MAG
M01
MKM
MCC
004
DAXON
DAXON
AZ3
MUST
MUST
006
DAXON
DAXON
CY3
PHILIPS
PHILIPS
C16
INFOMEDIA
INFOME
R30
Prodisc
PRODISC
R05
INFOSCIENCE
IS03
001
RICOH
RICOHJPN
R03
LEADDATA
LD
M04
RITEK
RITEK
P16
LGE
LGEP16
001
SONY
SONY
D21
MAXELL
MAXELL
003
TDK
TDK
003
MBI
MBIPG101
R05
TAIYO YUDEN
YUDEN000
T03
TABLE 2
DVD-R Writable Media Supporting 16x Burn
Maker
MID
Maker
MID
Maker
MID
CMC
CMC MAG.
AM3
MAXELL
MXLRG04
RITEK
RITEKF1
DAXON
Daxon016
MBI
MBI 01RG40
SONY
SONY16D1
DAXON
DAXON016S
MKM
MCC03RG20
TDK
TTH02
INFOSCIENCE
INFOSMART03
OPTODISC
OPTODISCR016
TY
TYG03
LGE
LGE16
PRODISC
PRODISCS05
Netra 1290 Server Product Notes
3
TABLE 3
DVD+RW Rewritable Media Supporting 8x Burn
Maker
MID
MT ID
Maker
MID
MT ID
MKM
MKM
A03
RITEK
RITEK
008
Ricoh
RICOHJPN
W21
TABLE 4
DVD-RW Rewritable Media Supporting 6x Burn
Maker
MID
Maker
MID
Maker
MID
CMC
CMCW04
MKM
MCC
01RW6X01
RITEK
RITEKW06
JVC
JVC1Victord7
TDK
TDK701saku
TABLE 5
DVD+R Dual-Layer Writable Media Supporting 8x Burn
Maker
MID
MT ID
Maker
MID
MT ID
MKM
MKM
003
Ricoh
RICOHJPN
D01
TABLE 6
TABLE 7
DVD-R Dual-Layer Writable Media Supporting 4x Burn
Maker
MID
MKM
MKM_01
CD-R Writable Media Supporting 48x Burn
Maker
LI
LO
Maker
LI
LO
BEALL
972116
795974
Mitsubishi
973423
795973
CMC
972666
795971
MPO
970006
795974
CSI
972426
795974
NANYA
971537
795974
DAXON
972267
795974
NSD
972535
795971
FORNET
972607
795971
PRODISC
973219
795971
FUJI
972645
795973
PRODISC
973219
795972
GIGA
972812
795974
PRODISC
973219
795973
4
Netra 1290 Server Product Notes • February 2008
TABLE 7
CD-R Writable Media Supporting 48x Burn (Continued)
Maker
LI
LO
Maker
LI
LO
LEAD DATA
972656
795974
PRODISC
973219
795974
MAXELL
972529
743000
RITEK
971517
795970
MAXELL
972529
795974
Wealth Fair
971817
795974
TABLE 8
CD-RW Rewritable Media Supporting 16x Burn or Faster
Maker
LI
LO
Maker
LI
LO
Daxon
972260
744150
Mitsubishi
973425
744300
INFOEMDIA
972531
795973
Mitsubishi
973425
795974
Mitsubishi
973424
744300
Prodisc
973212
795973
Mitsubishi
973424
795974
RITEK
972712
744100
Software Notes
No updates at this time.
Documentation Notes
AC Power Supply Specifications
In the Netra 1290 Server Service Manual, Table A-3, Electrical Specifications on page
A-3, has been updated as follows:
Netra 1290 Server Product Notes
5
TABLE A-3
Electrical Specifications
Electrical Element
DC Version Requirement
AC Version Requirement
Voltage
-48 VDC, -60 VDC nominal
200 VAC to 240 VAC single phase, 4763 Hz
Current (per power supply)
41 A maximum per input at -48 VDC
9A maximum per input at 200 VAC
Current (total)
99.5 A maximum total for all inputs
at -40VDC
20A maximum total for all inputs at
180 VAC
Power*
3980 Watts
3750 Watts
* Total input power is approximately equally divided among the operating power supplies.
AC Power Supply Type
In the Netra 1290 Server Administration Guide, Code Example 5-10 on page 83,
identifies the power supplies as a type A166. This is incorrect. The power supplies
are type A209 and should be identified as such. For example:
CODE EXAMPLE 5-10
Slot
---SSC1
/N0/SCC
/N0/BP
/N0/SIB
/N0/SPDB
/N0/PS0
/N0/PS1
/N0/PS2
/N0/PS3
/N0/FT0
/N0/RP0
/N0/RP2
/N0/SB0
/N0/SB2
/N0/SB4
/N0/IB6
/N0/MB
6
Pwr
--On
On
On
On
On
On
On
On
On
On
On
On
-
showboards Command Output – Disabled and Degraded Components
Component Type
-------------System Controller V2
System Config Card
Baseplane
Indicator Board
System Power Distribution Bd.
A209 Power Supply
A209 Power Supply
A209 Power Supply
A209 Power Supply
Fan Tray
Repeater Board
Repeater Board
CPU Board
CPU Board V3
CPU Board
PCI+ I/O Board
Media Bay
Netra 1290 Server Product Notes • February 2008
State
----Main
Assigned
Assigned
Assigned
Assigned
Auto Speed
Assigned
Assigned
Active
Assigned
Active
Active
Assigned
Status
-----Passed
OK
Passed
Passed
Passed
OK
OK
OK
OK
Passed
OK
OK
Passed
Passed
Passed
Passed
Passed
Attaching Power Cables
Use the following procedures for attaching power cables.
Connecting AC Power Cables
Caution – The AC version of the Netra 1290 server is designed to work with power
systems having a grounded neutral conductor. Do not connect the equipment into
any other type of power system. Contact your facilities manager or a qualified
electrician to determine what type of power is supplied to your building.
Caution – The AC version of the Netra 1290 server is shipped with grounding type
(three-wire) power cords. Always connect the cords into a grounded power outlet.
Caution – The socket outlets must be near the equipment and easily accessible.
1. Turn the server power switch to the Standby position.
Caution – The On/Standby power switch does not isolate the equipment. The AC
power cables are the primary means of disconnection for this product.
2. Turn the cabinet power off (in a powered cabinet).
Refer to the installation guide that came with the cabinet.
3. Label both ends of the power cables.
Two cables should be labeled Source A and two should be labeled Source B.
4. Connect the power cables to the system.
a. Connect the Source A power cables to AC0 and AC1 on the system.
b. Connect the Source B power cables to AC2 and AC3 on the system.
c. Run the power cables through the CMA and secure them with tie-wraps.
Ensure that the CMA can extend and retract without dislodging the power cables.
Note – Step 3 and Step 4 will already be completed for servers that come
preinstalled in a Sun Rack 900 cabinet.
Netra 1290 Server Product Notes
7
5. Consider your next steps:
■
If the server is mounted in an unpowered cabinet:
a. Connect power cables from Source A on the server to the customer-supplied
power source A circuit breakers.
b. Connect power cables from Source B on the server to the customer-supplied
power source B circuit breakers.
■
If the server is mounted in a powered cabinet:
a. Connect power cables from Source A on the cabinet to the customer-supplied
power source A circuit breakers.
b. Connect power cables from Source B on the cabinet to the customer-supplied
power source B circuit breakers.
Refer to the installation guide that came with the cabinet for instructions on
cabinet power cabling.
Note – It is the installer’s responsibility to ensure that the cabinet has sufficient
electrical power and redundancy to handle the required installation.
c. Connect power cables from Source A on the cabinet to Source A on the server.
d. Connect power cables from Source B on the cabinet to the Source B on the
server.
Refer to the installation guide that came with the cabinet for instructions on
cabinet power cabling.
DC Power Cable Conditions
The power supplied to the DC version of the Netra 1290 server must follow these
conditions:
■
■
■
-48 VDC
50A maximum per cable
99.5A maximum for entire server
Assembling the DC Power Connectors
Caution – The following procedure is intended as a guide only and should only be
performed by a qualified electrician.
1. Turn the power switch to the Standby position.
8
Netra 1290 Server Product Notes • February 2008
Caution – The On/Standby power switch does not isolate the equipment. The
circuit breakers are the primary means of disconnection for this product.
2. Remove the plastic covers from the DC inlet box (FIGURE 1).
Each cover is retained by a Phillips screw.
Source B+
white
(neutral/return)
Source Bblack
(hot/input)
Source B+
white
(neutral/return)
Source Bblack
(hot/input)
Electrical
grounding studs
Plastic cover
retaining screw
Plastic cover
FIGURE 1
DC Inlet Box With Source B Plastic Cover Removed and Connectors Exposed
3. Assemble the ground connection.
a. Crimp the two-hole ground lug onto the ground cable.
The shipping kit contains lugs for crimping customer-supplied cables. Use a
crimping tool or approved equivalent to secure the lugs onto the cables.
b. Use two M5 nuts and washers to fit the lug to the electrical grounding studs
between the two plastic covers.
Use the M5 nut driver provided.
4. Assemble the power cable ends.
Netra 1290 Server Product Notes
9
a. Crimp the single-hole lugs onto the input and return cables.
b. Slide the lugs through the plastic cover.
See (FIGURE 1).
c. Use M5 nuts and washers to secure the lugs to the respective source terminals.
Use the M5 nut driver provided.
5. Ensure that:
■
The cables are oriented correctly with respect to the labeling on the connection
studs.
■
The correct polarity of feed is connected to each stud on the rear of the system.
■
A ground strap for each feed pair is connected to the electrical groundstuds.
6. Secure the plastic covers with the Phillips screws.
Connecting the DC Power Cables
Caution – The following procedure is intended as a guide only and should only be
performed by a qualified electrician.
1. Connect the ground cable to a suitable ground point.
10
Netra 1290 Server Product Notes • February 2008
2. Connect the remaining power cables to the customer-supplied circuit breakers.
DC0 and DC1 are connected to one power source. DC2 and DC3 are connected to the
other power source (FIGURE 2).
White (neutral/return)
+
Circuit breaker
Source B
-
Black (hot/input)
White (neutral/return)
+
Circuit breaker
-
Black (hot/input)
DC3 (B +)
DC3 (B -)
DC2 (B +)
DC2 (B -)
Netra 1290
ground
Green
DC1 (A +)
+
Circuit breaker
-
White (neutral/return)
Black (hot/input)
Source A
+
Circuit breaker
-
White (neutral/return)
Black (hot/input)
FIGURE 2
DC1 (A -)
DC0 (A +)
DC0 (A -)
Netra 1290 Power Feed Connectors
Verifying the DC Connections Prior to Applying Initial Power
Caution – The following procedure is intended as a guide only and should only be
performed by a qualified electrician.
Caution – Ensure that the cabling is correct prior to switching system power on for
the first time. Incorrect cabling could cause injury to personnel or damage to
equipment.
1. Verify that the ground input wires (green) connect to system ground.
2. Verify that the hot input wires (black) connect to negative terminal lugs.
3. Verify that the neutral-return input wires (white) connect to positive terminal
lugs.
4. Connect a digital volt meter to each branch in turn and verify that:
■
DVM black probe to server ground and red probe to + (positive) terminals
indicates 0 VDC.
Netra 1290 Server Product Notes
11
■
12
DVM black probe to server ground and red probe - (negative) terminals indicates
-48 VDC.
Netra 1290 Server Product Notes • February 2008