1
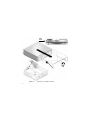
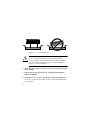
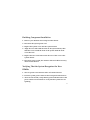
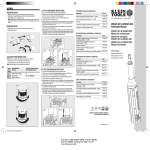
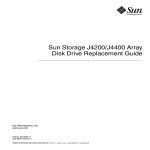
Sun Blade™ 100 DIMM
Installation Guide
Copyright 2001 Sun Microsystems, Inc., 901 San Antonio Road, Palo Alto, CA 94303-4900 U.S.A. All
rights reserved.
This product or document is distributed under licenses restricting its use, copying, distribution, and
decompilation. No part of this product or document may be reproduced in any form by any means
without prior written authorization of Sun and its licensors, if any. Third-party software, including
font technology, is copyrighted and licensed from Sun suppliers.
Parts of the product may be derived from Berkeley BSD systems, licensed from the University of
California. UNIX is a registered trademark in the U.S. and other countries, exclusively licensed
through X/Open Company, Ltd.
Sun, Sun Microsystems, the Sun logo, docs.sun.com, Sun Blade, and Solaris are trademarks,
registered trademarks, or service marks of Sun Microsystems, Inc. in the U.S. and other countries. All
SPARC trademarks are used under license and are trademarks or registered trademarks of SPARC
International, Inc. in the U.S. and other countries. Products bearing SPARC trademarks are based
upon an architecture developed by Sun Microsystems, Inc.
The OPEN LOOK and Sun™ Graphical User Interface was developed by Sun Microsystems, Inc. for
its users and licensees. Sun acknowledges the pioneering efforts of Xerox in researching and
developing the concept of visual or graphical user interfaces for the computer industry. Sun holds a
non-exclusive license from Xerox to the Xerox Graphical User Interface, which license also covers
Sun’s licensees who implement OPEN LOOK GUIs and otherwise comply with Sun’s written license
agreements.
Federal Acquisitions: Commercial Software—Government Users Subject to Standard License Terms
and Conditions.
DOCUMENTATION IS PROVIDED “AS IS” AND ALL EXPRESS OR IMPLIED CONDITIONS,
REPRESENTATIONS AND WARRANTIES, INCLUDING ANY IMPLIED WARRANTY OF
MERCHANTABILITY, FITNESS FOR A PARTICULAR PURPOSE OR NON-INFRINGEMENT, ARE
DISCLAIMED, EXCEPT TO THE EXTENT THAT SUCH DISCLAIMERS ARE HELD TO BE
LEGALLY INVALID.
Please
Recycle
Installing DIMMs in the
Sun Blade 100 System
Verifying the Current DIMM Configuration
Before you start to install additional DIMMs, reboot your system and
check the banner screen on your monitor to verify the amount of
memory already installed in your system. The banner screen is
displayed at the top of your monitor screen before the system begins
to reboot (Figure 1-1).
Sun Blade 100, Keyboard Present
OpenBoot 4.x, 128 MB memory installed, Serial #54528.
Ethernet address 8:0:20:1a:b3:c8, Host ID: 7200d500.
Figure 1-1
Banner Screen Example
1
Preparing for Installation
To prepare for installation of optional components, you must power
off the system, remove the cover, and attach an antistatic wrist strap.
Powering Off the System
1. Exit from any applications that are running.
2. Choose one of the two power-off methods, orderly or immediate:
■ To perform an orderly power-off:
a. Press the power switch and immediately release it
(Figure 1-2).
The system shutdown menu is displayed.
b. Select Shutdown.
■
!
2
The system performs internal shutdown procedures.
To perform an immediate power-off, press and hold the power
switch for four seconds before releasing it.
Caution – The immediate power-off method does not
perform an orderly shutdown of the operating system and
data might be lost.
3. Verify that the power-indicator LED on the power switch turns
off.
4. Turn off power to the monitor and to all external devices.
3
Power
switch
Figure 1-2
4
Preparing for DIMM Installation
Removing the System Cover
1. Disconnect from the system any cables that are attached to
external devices, such as the monitor, keyboard, and mouse.
Caution – Pressing the power switch does not remove all
power from the system; a small voltage remains in the
power supply. To remove all power from the system, you
must disconnect the system power cord.
2. Disconnect the system power cord to ensure all power is removed
from the system.
3. At the system back panel, remove the two screws that secure the
cover.
4. Slide the cover back to the end of the system chassis and lift the
cover off (Figure 1-2).
5
Attaching an Antistatic Wrist Strap
!
Caution – Always wear an antistatic wrist strap when
handling internal components to equalize all electrical
potentials within the system.
1. Unwrap the first two folds of the wrist strap and wrap the
adhesive side firmly against your wrist.
2. Peel the liner from the copper foil at the opposite end of the
wrist strap.
3. Attach the copper foil end of the wrist strap to the system chassis
to provide a ground for electrostatic discharge (Figure 1-2).
Installing the DIMMs
Note – For maximum performance, the DIMMs in the
Sun BladeTM 100 system have been specifically designed for it. Do not
use DIMMs from a different system to upgrade or replace the DIMMs
in this system. Verify with your Sun sales or service representative that
the DIMMs you order have been certified by Sun for the Sun Blade 100
system.
6
When installing additional DIMMs, first fill the connector closest to
the motherboard edge, then fill toward the CPU (Figure 1-3).
1. Power off the system, remove the cover, and attach an antistatic
wrist strap as described in “Preparing for Installation” on page 2.
!
Caution – Hold DIMMs only by their edges to avoid
damaging them (Figure 1-4).
2. Push apart the ejection levers at each end of an empty DIMM
connector on the motherboard (Figure 1-5).
7
4
Figure 1-3
8
DIMM Installation Order
3
2
1
3. Unpack the DIMM, holding it only by the edges (Figure 1-4).
Figure 1-4
Unpacking the DIMM
4. Position the DIMM in the connector, ensuring that the alignment
notches on the bottom of the DIMM are aligned with the
connector alignment keys (Figure 1-5).
5. Press firmly on both DIMM top corners at the same time until the
DIMM is fully seated.
9
Figure 1-5
!
Correct DIMM Insertion
Caution – Seating the DIMM into a slot unevenly can cause
short circuits that damage the system. Ensure that all
contacts engage at the same time. Do not rock the DIMM
into place. You should hear a “click” when the DIMM is
properly seated. See Figure 1-5.
6. Verify that the ejection levers close over the notches on both ends
of the DIMM.
7. Repeat steps 3 through 6 until you are finished installing the
additional DIMMs.
8. Complete the next section, “Finishing Component Installation.”
Be sure to verify that the system recognizes the new DIMMs that
you installed.
10
Finishing Component Installation
1. Remove your antistatic wrist strap from the chassis.
2. Reconnect the system power cord.
3. Replace the system cover onto the system chassis.
4. Align the cover tabs with the slots on the system chassis, then
slide the cover toward the front of the system until the front
cover tabs lock.
5. Replace the two screws that secure the rear of the cover to the
system chassis.
6. Reconnect to the system, the monitor cable and cables from any
other external devices.
Verifying That the System Recognizes the New
DIMMs
1. Turn on power to the monitor and to all external devices.
2. Press the system power switch on the front panel and release it.
3. After several seconds, verify that the power-indicator LED on the
power switch is lit and listen to verify that the system fans are
spinning.
11
4. The power-indicator LED on the power switch illuminates after
the system begins the internal booting process.
5. Check the banner screen on your monitor to verify that the
system recognizes the additional memory.
6. The banner screen is displayed on the monitor a few seconds
after you power on the system (Figure 1-1 on page 1).
7. If you experience problems during power on, see the
“Troubleshooting” section of the Sun Blade 100 Getting Started
Guide, 806-3415.
12
Copyright 2001 Sun Microsystems, Inc., 901 San Antonio Road, Palo Alto, CA 94303-4900 Etats-Unis.
Tous droits réservés.
Ce produit ou document est distribué avec des licences qui en restreignent l’utilisation, la copie, la
distribution, et la décompilation. Aucune partie de ce produit ou document ne peut être reproduite
sous aucune forme, par quelque moyen que ce soit, sans l’autorisation préalable et écrite de Sun et de
ses bailleurs de licence, s’il y en a. Le logiciel détenu par des tiers, et qui comprend la technologie
relative aux polices de caractères, est protégé par un copyright et licencié par des fournisseurs de
Sun.
Des parties de ce produit pourront être dérivées des systèmes Berkeley BSD licenciés par l’Université
de Californie. UNIX est une marque déposée aux Etats-Unis et dans d’autres pays et licenciée
exclusivement par X/Open Company, Ltd.
Sun, Sun Microsystems, le logo Sun, docs.sun.com, Sun Blade, et Solaris sont des marques de
fabrique ou des marques déposées, ou marques de service, de Sun Microsystems, Inc. aux Etats-Unis
et dans d’autres pays. Toutes les marques SPARC sont utilisées sous licence et sont des marques de
fabrique ou des marques déposées de SPARC International, Inc. aux Etats-Unis et dans d’autres
pays. Les produits portant les marques SPARC sont basés sur une architecture développée par Sun
Microsystems, Inc.
L’interface d’utilisation graphique OPEN LOOK et Sun™ a été développée par Sun Microsystems,
Inc. pour ses utilisateurs et licenciés. Sun reconnaît les efforts de pionniers de Xerox pour la
recherche et le développement du concept des interfaces d’utilisation visuelle ou graphique pour
l’industrie de l’informatique. Sun détient une licence non exclusive de Xerox sur l’interface
d’utilisation graphique Xerox, cette licence couvrant également les licenciés de Sun qui mettent en
place l’interface d’utilisation graphique OPEN LOOK et qui en outre se conforment aux licences
écrites de Sun.
LA DOCUMENTATION EST FOURNIE “EN L’ETAT” ET TOUTES AUTRES CONDITIONS,
DECLARATIONS ET GARANTIES EXPRESSES OU TACITES SONT FORMELLEMENT EXCLUES,
DANS LA MESURE AUTORISEE PAR LA LOI APPLICABLE, Y COMPRIS NOTAMMENT TOUTE
GARANTIE IMPLICITE RELATIVE A LA QUALITE MARCHANDE, A L’APTITUDE A UNE
UTILISATION PARTICULIERE OU A L’ABSENCE DE CONTREFAÇON.
Sun Microsystems, Inc.
901 San Antonio Road
Palo Alto, CA 94303-4900 USA
650 960-1300
Fax 650 969-9131
Part Number 806-7837-10
February 2001, Revision A