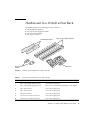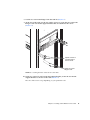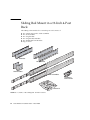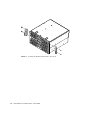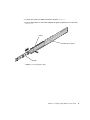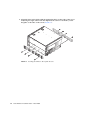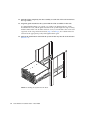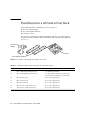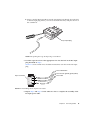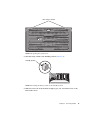
1
Netra™ 440 Server Installation
Guide
Sun Microsystems, Inc.
www.sun.com
Part No. 817-3882-12
March 2006, Revision A
Submit comments about this document at: http://www.sun.com/hwdocs/feedback
Copyright 2006 Sun Microsystems, Inc., 4150 Network Circle, Santa Clara, California 95054, U.S.A. All rights reserved.
Sun Microsystems, Inc. has intellectual property rights relating to technology that is described in this document. In particular, and without
limitation, these intellectual property rights may include one or more of the U.S. patents listed at http://www.sun.com/patents and one or
more additional patents or pending patent applications in the U.S. and in other countries.
This document and the product to which it pertains are distributed under licenses restricting their use, copying, distribution, and
decompilation. No part of the product or of this document may be reproduced in any form by any means without prior written authorization of
Sun and its licensors, if any.
Third-party software, including font technology, is copyrighted and licensed from Sun suppliers.
Parts of the product may be derived from Berkeley BSD systems, licensed from the University of California. UNIX is a registered trademark in
the U.S. and in other countries, exclusively licensed through X/Open Company, Ltd.
Sun, Sun Microsystems, the Sun logo, AnswerBook2, Java, docs.sun.com, VIS, Sun StorEdge, Solstice DiskSuite, Java, SunVTS, Netra, and
Solaris are trademarks or registered trademarks of Sun Microsystems, Inc. in the U.S. and in other countries.
All SPARC trademarks are used under license and are trademarks or registered trademarks of SPARC International, Inc. in the U.S. and in other
countries. Products bearing SPARC trademarks are based upon an architecture developed by Sun Microsystems, Inc.
The OPEN LOOK and Sun™ Graphical User Interface was developed by Sun Microsystems, Inc. for its users and licensees. Sun acknowledges
the pioneering efforts of Xerox in researching and developing the concept of visual or graphical user interfaces for the computer industry. Sun
holds a non-exclusive license from Xerox to the Xerox Graphical User Interface, which license also covers Sun’s licensees who implement OPEN
LOOK GUIs and otherwise comply with Sun’s written license agreements.
U.S. Government Rights—Commercial use. Government users are subject to the Sun Microsystems, Inc. standard license agreement and
applicable provisions of the FAR and its supplements.
DOCUMENTATION IS PROVIDED "AS IS" AND ALL EXPRESS OR IMPLIED CONDITIONS, REPRESENTATIONS AND WARRANTIES,
INCLUDING ANY IMPLIED WARRANTY OF MERCHANTABILITY, FITNESS FOR A PARTICULAR PURPOSE OR NON-INFRINGEMENT,
ARE DISCLAIMED, EXCEPT TO THE EXTENT THAT SUCH DISCLAIMERS ARE HELD TO BE LEGALLY INVALID.
Copyright 2006 Sun Microsystems, Inc., 4150 Network Circle, Santa Clara, Californie 95054, Etats-Unis. Tous droits réservés.
Sun Microsystems, Inc. a les droits de propriété intellectuels relatants à la technologie qui est décrit dans ce document. En particulier, et sans la
limitation, ces droits de propriété intellectuels peuvent inclure un ou plus des brevets américains énumérés à http://www.sun.com/patents et
un ou les brevets plus supplémentaires ou les applications de brevet en attente dans les Etats-Unis et dans les autres pays.
Ce produit ou document est protégé par un copyright et distribué avec des licences qui en restreignent l’utilisation, la copie, la distribution, et la
décompilation. Aucune partie de ce produit ou document ne peut être reproduite sous aucune forme, par quelque moyen que ce soit, sans
l’autorisation préalable et écrite de Sun et de ses bailleurs de licence, s’il y en a.
Le logiciel détenu par des tiers, et qui comprend la technologie relative aux polices de caractères, est protégé par un copyright et licencié par des
fournisseurs de Sun.
Des parties de ce produit pourront être dérivées des systèmes Berkeley BSD licenciés par l’Université de Californie. UNIX est une marque
déposée aux Etats-Unis et dans d’autres pays et licenciée exclusivement par X/Open Company, Ltd.
Sun, Sun Microsystems, le logo Sun, AnswerBook2, Java, docs.sun.com, VIS, Sun StorEdge, Solstice DiskSuite, Java, SunVTS, Netra, et Solaris
sont des marques de fabrique ou des marques déposées de Sun Microsystems, Inc. aux Etats-Unis et dans d’autres pays.
Toutes les marques SPARC sont utilisées sous licence et sont des marques de fabrique ou des marques déposées de SPARC International, Inc.
aux Etats-Unis et dans d’autres pays. Les produits portant les marques SPARC sont basés sur une architecture développée par Sun
Microsystems, Inc.
L’interface d’utilisation graphique OPEN LOOK et Sun™ a été développée par Sun Microsystems, Inc. pour ses utilisateurs et licenciés. Sun
reconnaît les efforts de pionniers de Xerox pour la recherche et le développement du concept des interfaces d’utilisation visuelle ou graphique
pour l’industrie de l’informatique. Sun détient une license non exclusive de Xerox sur l’interface d’utilisation graphique Xerox, cette licence
couvrant également les licenciées de Sun qui mettent en place l’interface d ’utilisation graphique OPEN LOOK et qui en outre se conforment
aux licences écrites de Sun.
LA DOCUMENTATION EST FOURNIE "EN L’ÉTAT" ET TOUTES AUTRES CONDITIONS, DECLARATIONS ET GARANTIES EXPRESSES
OU TACITES SONT FORMELLEMENT EXCLUES, DANS LA MESURE AUTORISEE PAR LA LOI APPLICABLE, Y COMPRIS NOTAMMENT
TOUTE GARANTIE IMPLICITE RELATIVE A LA QUALITE MARCHANDE, A L’APTITUDE A UNE UTILISATION PARTICULIERE OU A
L’ABSENCE DE CONTREFAÇON.
Please
Recycle
Contents
Preface
1.
xiii
Preparing for Installation
Shipping Kit
1
1
Verifying All Parts
2
Installation Site Requirements
Physical Dimensions
3
3
Environmental Requirements
4
AC Operating Power Limits and Ranges
DC Power Source Requirements
4
5
DC Supply and Ground Conductor Requirements
Recommended Operating Environment
Ambient Temperature
7
8
Acoustic Noise Emissions
8
Calculating Heat Dissipation
NEBS Level 3 Compliance
9
9
Sun Advanced Lights Out Manager
Sun Install Check Tool
7
7
Ambient Relative Humidity
Airflow Considerations
6
9
10
iii
Sun Remote Services Net Connect Support
2.
Installation Overview
Installation Overview
13
13
Installing Optional Components
3.
15
Installing a Netra 440 Server Into a Rack
Rackmounting Options
11
17
18
Hardmount in a 19-Inch 4-Post Rack
19
Sliding Rail Mount in a 19-Inch 4-Post Rack
Installing the Long Bracket Extenders
4.
Hardmount in a 600 mm 4-Post Rack
36
Hardmount in a 23-Inch 2-Post Rack
42
Hardmount in a 19-Inch 2-Post Rack
45
Connecting Cables
24
33
49
Connecting the Chassis Grounding Cable (DC Version)
Connecting All Other Cables
Alarm Port
52
53
Serial Port (TTYB)
USB Ports (USB0-3)
54
55
Ethernet Ports (NET0 and NET1)
SCSI Port
56
57
ALOM Serial Management Port (TTYA)
RJ-45 to DB-9 Adapter Crossovers
59
60
RJ-45 to DB-25 Adapter Crossovers
ALOM Network Management Port
60
61
Assembling and Connecting the DC Input Power Cable
iv
51
▼
Assembling the DC Input Power Cable
▼
Installing the Strain Relief Housings
Netra 440 Server Installation Guide • March 2006
66
62
62
▼
Connecting the DC Input Power Cable to the Server
Connecting the AC Power Cables
5.
68
71
Setting Up a System Console Device
75
Accessing the System Console Through a Terminal Server
Connecting the Server to a Terminal Server
76
76
Accessing the System Console Through a Terminal Server
78
Accessing the System Console Through an Alphanumeric Terminal
Accessing the System Console Through a TIP Connection
6.
Powering On and Configuring the Server
Powering On the Server
80
83
83
Setting the Rotary Switch
84
Powering On From the Keyboard
85
Powering On Using the On/Standby Button
86
Powering Off the System Using the On/Standby Button
Configuring the Server
79
86
87
Software Configuration Worksheet
88
Configuring With the Server Details Registered as a Name Server
91
Configuring Without the Server Details Registered as a Name Server
Configuring a Standalone Server for the First Time
Clearing Your Configuration and Starting Again
92
93
Accessing Advanced Lights Out Manager (ALOM) Software
Displaying the ALOM Prompt
Displaying the Console Prompt
93
93
94
Taking Console Write Capability Away From Another User
A.
Installing the DVD Drive
B.
Netra 440 Server LEDs
91
94
95
97
Contents
v
Enclosure Status LEDs
Alarm LEDs
97
98
Hard Drive LEDs
101
Fan Tray LEDs (0-2)
101
Power Supply LEDs
102
Ethernet Connection LEDs
102
Network Management Port LED
C.
Selecting a Boot Device
D.
Managing Network Interfaces
Network Interfaces
103
105
107
107
Redundant Network Interfaces
108
Attaching a Twisted-Pair Ethernet Cable
108
Configuring the Primary Network Interface
For Additional Information
110
Configuring Additional Network Interfaces
Initiating a Reconfiguration Boot
Index
vi
117
Netra 440 Server Installation Guide • March 2006
109
114
111
Figures
FIGURE 1-1
Netra 440 Server Ship Kit Contents
2
FIGURE 3-1
Contents of the Hardmount 19-Inch 4-Post Kit
FIGURE 3-2
Securing the Hardmount Brackets to the Server
FIGURE 3-3
Attaching the Rear Mount Support Brackets
21
FIGURE 3-4
Securing the Front of the Server to the Rack
22
FIGURE 3-5
Securing the Rear of the Server to the Rack
23
FIGURE 3-6
Contents of the Sliding Rail 19-Inch 4-Post Kit
24
FIGURE 3-7
Securing the Hardmount Bracket to the Server
26
FIGURE 3-8
Dismantling the Slide
FIGURE 3-9
Securing the Glides to the System Chassis
FIGURE 3-10
Securing the Short Brackets to the Front of the Rack
FIGURE 3-11
Securing the Long Brackets to the Rear of the Rack
FIGURE 3-12
Securing the Slide to the Brackets
FIGURE 3-13
Sliding the System Into the Rack
FIGURE 3-14
Securing the Front of the System to the Rack
FIGURE 3-15
Installing Extender and Slide Assembly on Long Bracket
FIGURE 3-16
Securing the Long Brackets Extenders and Slide Assembly to Rack
FIGURE 3-17
Contents of the Hardmount 600 mm 4-Post Kit
FIGURE 3-18
Securing the Hardmount Brackets to the Server
FIGURE 3-19
Attaching the Rear Mount Support Brackets
19
20
27
28
29
30
31
32
33
34
35
36
37
38
vii
FIGURE 3-20
Attaching the 600 mm Front Adjuster Brackets to the Front Hardmount Brackets
FIGURE 3-21
Attaching the 600 mm Front Adjuster Brackets to the Rack
FIGURE 3-22
Securing the Rear Mount Flange
FIGURE 3-23
Contents of the Hardmount 23-Inch 2-Post Kit
FIGURE 3-24
Securing the Side Brackets to the Side of the Server
FIGURE 3-25
Securing the Front of the Server to the Rack
FIGURE 3-26
Contents of the Hardmount 19-Inch 4-Post Kit
FIGURE 3-27
Securing the Side Brackets to the Side of the Server
FIGURE 3-28
Installing and Securing the Server in the 2-Post Rack
FIGURE 4-1
Back Panel Features (DC Version)
49
FIGURE 4-2
Back Panel Features (AC Version)
50
FIGURE 4-3
Alarm Port
FIGURE 4-4
Serial Port Pin Numbering
FIGURE 4-5
USB Connector Pin Numbering
FIGURE 4-6
Ethernet Connector Pin Numbering
FIGURE 4-7
SCSI Port Pin Numbering
FIGURE 4-8
Serial Management Port Pin Numbering
FIGURE 4-9
Network Management Port Pin Numbering
FIGURE 4-10
DC Connection Parts
FIGURE 4-11
Stripping the Insulation From the Wire
FIGURE 4-12
Opening the Input Plug Cage Clamp Using the Cage Clamp Operating Lever
FIGURE 4-13
Opening the Cage Clamp Using a Screwdriver
FIGURE 4-14
Assembling the DC Input Power Cable
FIGURE 4-15
Inserting the Bottom Portion of the Strain Relief Housing
FIGURE 4-16
Routing the Wires out of the Bottom Portion of the Strain Relief Housing
FIGURE 4-17
Securing the Wires to the Strain Relief Housing
FIGURE 4-18
Assembling the Strain Relief Housing
FIGURE 4-19
Opening the System Door
FIGURE 4-20
Turning the Rotary Switch to the Standby Position
FIGURE 4-21
Connecting the DC Input Power Cable to the DC Connectors
viii
40
41
42
43
44
45
46
47
53
54
55
56
57
59
61
63
64
65
65
66
67
68
69
Netra 440 Server Installation Guide • March 2006
69
70
67
64
39
FIGURE 4-22
Disconnecting the DC Input Power Cable From the DC Connector
70
FIGURE 4-23
Opening the System Door
FIGURE 4-24
Turning the Rotary Switch to the Standby Position
FIGURE 4-25
Connecting the AC Power Cords to the AC Connectors
FIGURE 5-1
Patch Panel Connection Between a Terminal Server and a Netra 440 Server
FIGURE 6-1
Opening the System Door
FIGURE 6-2
Rotary Switch Positions
FIGURE A-1
Removing the DVD Slot Cover
FIGURE A-2
Installing the DVD drive.
72
72
73
77
84
85
96
96
Figures
ix
x
Netra 440 Server Installation Guide • March 2006
Tables
TABLE 1-1
Physical Specifications, Netra 440 Server
3
TABLE 1-2
Netra 440 Server Operating and Storage Specifications
TABLE 1-3
AC Operating Power Limits and Ranges for Each Power Supply in the Netra 440 Server
4
TABLE 1-5
DC Operating Power Limits and Ranges for Each Power Supply in the Netra 440 Server
5
TABLE 1-6
DC Operating Power Limits and Ranges for the Netra 440 Server
5
TABLE 1-4
AC Operating Power Limits and Ranges for the Netra 440 Server
5
TABLE 1-7
ALOM Component Monitoring
TABLE 3-1
Optional Rackmount Kits
TABLE 3-2
19-inch 4-Post Rackmount Screw Kit Contents
TABLE 3-3
Sliding Rail 19-inch 4-Post Rackmount Screw Kit Contents
25
TABLE 3-4
Hardmount 600 mm 4-Post Rackmount Screw Kit Contents
36
TABLE 3-5
Hardmount 23-Inch 2-Post Rackmount Screw Kit Contents
42
TABLE 3-6
19-inch 2-Post Rackmount Screw Kit Contents
TABLE 4-1
Netra 440 Server Ports 50
TABLE 4-2
Alarm Port Signals
TABLE 4-3
Serial Port Connector Signals
TABLE 4-4
USB Ports Pin Numbering
TABLE 4-5
Ethernet Connection Transfer Rates
TABLE 4-6
Ethernet Connector Pin Signals
TABLE 4-7
OpenBoot PROM Devalias and Device Path Data for the Ethernet Ports
4
10
18
19
45
53
54
55
56
56
56
xi
TABLE 4-8
SCSI Port Pin Signals 57
TABLE 4-9
Serial Management Port Pin Signals
TABLE 4-10
RJ-45 to DB-9 Adapter Crossovers
TABLE 4-11
RJ-45 to DB-25 Adapter Crossovers
TABLE 4-12
Network Management Port Pin Signals
TABLE 5-1
Pin Crossovers for Connecting to a Typical Terminal Server
TABLE 6-1
Netra 440 Software Configuration Worksheet
TABLE B-1
Enclosure Status LEDs
TABLE B-2
Alarm Indicators and Dry Contact Alarm States
TABLE B-3
Hard Drive LEDs
TABLE B-4
Fan Tray LEDs
TABLE B-5
Power Supply LEDs
TABLE B-6
Ethernet LEDs
TABLE B-7
Network Management Port LED
xii
59
60
60
61
88
98
101
101
102
102
Netra 440 Server Installation Guide • March 2006
103
99
77
Preface
The Netra 440 Server Installation Guide provides instructions, some background
information, and reference material to help you install a new Netra™ 440 server.
Instructions in most of the document assume that a system administrator who is
experienced with the Solaris™ Operating System (Solaris OS) is performing the
installation. However, you do not need Solaris OS experience to follow instructions
in Chapter 3, which detail the installation of the Netra 440 server into a rack.
How This Book Is Organized
This guide is organized into three chapters and three appendixes.
Chapter 1 illustrates the contents of the Netra 440 server ship kit and provides
guidelines for planning the installation.
Chapter 2 provides an installation overview for the Netra 440 server.
Chapter 3 provides instructions for installing the Netra 440 server into a rack.
Chapter 4 provides instructions for cabling the Netra 440 server.
Chapter 5 provides instructions for connecting a system console device to the Netra
440 server.
Chapter 6 provides instructions for powering on the server and for installing
additional software.
Appendix A provides instructions for installing a DVD-ROM drive into the Netra
440 server.
Appendix B includes information on the system LEDs.
Appendix C provides instructions for selecting a boot device.
xiii
Appendix D provides instructions for managing network interfaces.
Using UNIX Commands
This document might not contain information on basic UNIX® commands and
procedures such as shutting down the system, booting the system, and configuring
devices. See the following for this information:
■
Software documentation that you received with your system
■
Solaris™ operating environment documentation, which is at
http://docs.sun.com
Shell Prompts
xiv
Shell
Prompt
C shell
machine-name%
C shell superuser
machine-name#
Bourne shell and Korn shell
$
Bourne shell and Korn shell superuser
#
Netra 440 Server Installation Guide • March 2006
Typographic Conventions
Typeface*
Meaning
Examples
AaBbCc123
The names of commands, files,
and directories; on-screen
computer output
Edit your.login file.
Use ls -a to list all files.
% You have mail.
AaBbCc123
What you type, when contrasted
with on-screen computer output
% su
Password:
AaBbCc123
Book titles, new words or terms,
words to be emphasized.
Replace command-line variables
with real names or values.
Read Chapter 6 in the User’s Guide.
These are called class options.
You must be superuser to do this.
To delete a file, type rm filename.
* The settings on your browser might differ from these settings.
Related Documentation
Application
Title
Part Number
Late-breaking product
information
Netra 440 Server Product Note
817-3885-xx
Product description
Netra 440 Server Product Overview
817-3881-xx
Administration
Netra 440 Server System Administration
Guide
817-3884-xx
Parts installation and
removal
Netra 440 Server Service Manual
817-3883-xx
Diagnostics and
troubleshooting
Netra 440 Server Diagnostics and
Troubleshooting Guide
817-3886-xx
Advanced Lights Out
Manager (ALOM) system
controller
Sun Advanced Lights Out Manager User’s
Guide for the Netra 440 Server
817-5481-xx
Preface
xv
Accessing Sun Documentation
You can view, print, or purchase a broad selection of Sun documentation, including
localized versions, at:
http://www.sun.com/documentation
Third-Party Web Sites
Sun is not responsible for the availability of third-party web sites mentioned in this
document. Sun does not endorse and is not responsible or liable for any content,
advertising, products, or other materials that are available on or through such sites
or resources. Sun will not be responsible or liable for any actual or alleged damage
or loss caused by or in connection with the use of or reliance on any such content,
goods, or services that are available on or through such sites or resources.
Contacting Sun Technical Support
If you have technical questions about this product that are not answered in this
document, go to:
http://www.sun.com/service/contacting
Sun Welcomes Your Comments
Sun is interested in improving its documentation and welcomes your comments and
suggestions. You can submit your comments by going to:
http://www.sun.com/hwdocs/feedback
Please include the title and part number of your document with your feedback:
Netra 440 Server Installation Guide, part number 817-3882-12
xvi Netra 440 Server Installation Guide • March 2006
CHAPTER
1
Preparing for Installation
This chapter includes a description of the components of the Netra 440 server and a
set of questions that the system administrator must answer before installing the
server software.
This chapter contains the following sections:
■
■
■
■
■
■
“Shipping Kit” on page 1
“Verifying All Parts” on page 2
“Installation Site Requirements” on page 3
“Sun Advanced Lights Out Manager” on page 9
“Sun Install Check Tool” on page 10
“Sun Remote Services Net Connect Support” on page 11
Shipping Kit
Standard components of Netra 440 servers are installed at the factory. However, if
you ordered options such as a PCI card and monitor, these are shipped to you
separately.
Check that you have received everything you ordered.
Note – Inspect the shipping carton for evidence of physical damage. If a shipping
carton is damaged, request that the carrier’s agent be present when the carton is
opened. Keep all contents and packing material for the agent’s inspection.
1
Verifying All Parts
Verify that you have received all the parts of your system. See the illustration below
to identify most of the parts shipped with the system.
Netra 440 server
Antistatic
wrist strap
RJ-45 to
DB-9 adapter
RJ-45 to DB-25
adapter
RJ-45 serial
console cable
M5 nut kit
FIGURE 1-1
Rackmount kit
DC connectors
(DC server only)
Netra 440 Server Ship Kit Contents
Note – The DC connector assembly kit is for the DC-powered server only. If you
have an AC-powered server, please dispose of this DC connector kit.
2
Netra 440 Server Installation Guide • March 2006
Installation Site Requirements
This section provides the specifications and site requirements you may need when
planning the installation of the Netra 440 server. For safety and compliance
information, refer to the Netra 440 Safety and Compliance Manual (817-6225-xx) and
the Important Safety Information for Sun Hardware Systems document (816-7190-xx)
that came with your system.
Physical Dimensions
TABLE 1-1
Physical Specifications, Netra 440 Server
Measure
U.S.
Metric
Width
17.32 inches
440.0 mm
Depth
19.5 inches
495 mm
Height
8.75 inches (5 rack units)
222 mm
Weight (without PCI cards and rack mounts)
79.4 lbs
36 kg
Weight (fully configured with 19-inch
4-post hardmount rack option)
81.6 lbs
37 kg
Chapter 1
Preparing for Installation
3
Environmental Requirements
You can operate and store the Netra 440 server safely in the conditions detailed in
TABLE 1-2.
TABLE 1-2
Netra 440 Server Operating and Storage Specifications
Specification
Operating
Storage
Ambient
temperature
5˚C (41˚F) to 40˚C (104˚F)
Short term*:
-5˚C (23˚F) to 55˚C (131˚F)
-40˚C (-40˚F) to 70˚C (158˚F)
Relative
humidity
5% to 85% relative humidity,
noncondensing
Short term*: 5% to 90% relative humidity,
noncondensing, but not to exceed
0.024 kg water/kg dry air
(0.053 lbs. water/2.205 lb. dry air)
Up to 93% relative humidity noncondensing,
38˚C (100.4˚F) max wet bulb
Altitude
Up to 3000 m (9842.4 ft.)
Up to 12000 m (39369.6 ft.)
* Short term (no more than 96 hours) temperature and humidity limits apply to servers with altitudes up to 1800 m (5905.44 ft.).
AC Operating Power Limits and Ranges
The information in this section applies to the AC version of the Netra 440 server.
TABLE 1-3 gives AC power source requirements for each power supply in the Netra
440 server, and TABLE 1-4 gives AC power source requirements for the Netra 440
server as a whole.
TABLE 1-3
4
AC Operating Power Limits and Ranges for Each Power Supply in the Netra
440 Server
Description
Limit or Range
Operating input voltage range
90 - 264 VAC
Operating frequency range
47 - 63 Hz
Maximum operating input current
5.5 A @ 90 VAC
Maximum operating input power
500 W
Netra 440 Server Installation Guide • March 2006
TABLE 1-4
AC Operating Power Limits and Ranges for the Netra 440 Server
Description
Limit or Range
Operating input voltage range
90 - 264 VAC
Operating frequency range
47 - 63 Hz
Maximum operating input current
11 A @ 90 VAC
Maximum operating input power
1000 W
Note – The figures for the maximum operating current are provided to help you
specify the fusing and cabling you need to deliver power to your equipment.
However, these figures represent worst-case scenarios.
DC Power Source Requirements
The information in this section applies to the DC version of the Netra 440 server.
TABLE 1-5 gives DC power source requirements for each power supply in the Netra
440 server, and TABLE 1-6 gives DC power source requirements for the Netra 440
server as a whole.
TABLE 1-5
DC Operating Power Limits and Ranges for Each Power Supply in the Netra
440 Server
Description
Limit or Range
Operating input voltage range
-40 VDC to -75 VDC
Maximum operating input current
11.5 A
Maximum operating input power
450 W
TABLE 1-6
DC Operating Power Limits and Ranges for the Netra 440 Server
Description
Limit or Range
Operating input voltage range
-40 VDC to -75 VDC
Maximum operating input current
23 A
Maximum operating input power
900 W
■
Reliably connected to protected earth ground
■
May be supplied by one or two power sources, isolated from each other
Chapter 1
Preparing for Installation
5
■
Capable of providing up to 500 W of continuous power per power supply
■
Limited to TNV-2 as defined by UL 60950 and IEC 60950
Note – The DC version of the Netra 440 server must be installed in a restricted-access
location. According to the intent of the National Electrical Code, a restricted-access
location is an area intended for qualified or trained personnel only and has access
controlled by a locking mechanism, such as a key lock or an access card system.
DC Supply and Ground Conductor Requirements
■
Suitable conductor material: Use copper conductors only
■
Power supply connections through the input connector: 12 AWG (between the
Netra 440 server and the source). There are three conductors:
■
■
■
-48V (negative terminal)
Chassis ground connection
-48V Return (positive terminal)
■
System ground conductor: 12 AWG (to be connected to the chassis)
■
Cable insulation rating: Minimum of 75°C (167°F), low smoke fume (LSF), flame
retardant
■
Only one of the following cable types:
■
■
■
UL style 1028 or other UL 1581(VW-1) compliant equivalent
IEEE 383 compliant
IEEE 1202-1991 compliant
■
Branch circuit cable insulation color: According to applicable National Electrical
Codes
■
Grounding cable insulation color: Green/yellow
Overcurrent Protection Requirements
■
Overcurrent protection devices must be provided as part of each equipment rack.
■
Circuit breakers must be located between the DC power source and the Netra 440
server. Use one 20 A, double-pole, fast trip DC-rated circuit breaker for each
power supply unit.
Note – Overcurrent protection devices must meet applicable national and local
electrical safety codes, and must be approved for the intended application.
6
Netra 440 Server Installation Guide • March 2006
Recommended Operating Environment
Your environmental control system must provide intake air for the server which
complies with the limits specified in “Environmental Requirements” on page 4.
To avoid overheating, do not direct warmed air:
■
■
Toward the front air intake of the server
Toward the server access panels
Note – When you receive your system, place it in the environment in which you
will install it. Leave it in its shipping crate at its final destination for 24 hours. This
resting period prevents thermal shock and condensation.
The system has been tested to meet all functional requirements when operating in
the operating environmental limits presented in “Environmental Requirements” on
page 4. Operating computer equipment in extremes of temperature or humidity
increases the failure rate of hardware components. To minimize the chance of
component failure, use the server within the optimal temperature and humidity
ranges.
Ambient Temperature
An ambient temperature range of 21˚C (69.8˚F) to 23˚C (73.4˚F) is optimal for system
reliability. At 22˚C (71.6˚F) it is easy to maintain safe relative humidity levels.
Operating in this temperature range provides a buffer if the environmental support
systems fail.
Ambient Relative Humidity
Ambient relative humidity levels between 45% and 50% are the most suitable for
data processing operations in order to:
■
■
■
Prevent corrosion
Provide an operating time buffer in the event of environmental control system
failure
Help avoid failures caused by the intermittent interference from static discharges
that occur when relative humidity is too low
Electrostatic discharge (ESD) is easily generated and less easily dissipated in areas
where the relative humidity is below 35%, and becomes critical when levels drop
below 30%.
Chapter 1
Preparing for Installation
7
Airflow Considerations
■
Ensure unobstructed airflow through the chassis.
■
Inlet air enters at the front of the server and exits from the back.
■
Ventilation openings such as cabinet doors, for both the inlet and exhaust of the
server should provide a minimum open area of 215 cm2 (33.325 in2) each. This
equates to a 60% open area perforation pattern across the front and rear area of
the server (445 mm x 81 mm; 17.5 in x 3.2 in). The impact of other open area
characteristics that are more restrictive should be evaluated by the user.
■
Front and rear clearance of the server should allow a minimum of 5 mm (.2 in) at
the front of the system and 80 mm (3.1 in) at the rear of the server when mounted.
These clearance values are based on the above inlet and exhaust impedance
(available open area) and assume a uniform distribution of the open area across
the inlet and exhaust areas. Clearance values greater than these are recommended
for improved cooling performance.
Note – The combination of inlet and exhaust restrictions such as cabinet doors and
the spacing of the server from the doors can affect the cooling performance of the
system and should be evaluated by the user. The server placement is particularly
important for high temperature NEBS environments where the server inlet ambient
temperature is 55˚C (131˚F).
■
Care should be taken to prevent recirculation of exhaust air within a rack or
cabinet.
■
Cables should be managed to minimize interfering with the server exhaust vent.
■
Air temperature rise through the system is approximately 15˚C (59˚F).
Acoustic Noise Emissions
The acoustic noise emissions on a Netra 440 server are as follows:
■
Operating acoustic noise is 7.0 B (LWAd (1B=10dB))
■
Idling acoustic noise is 7.0 B (LWAd (1B=10dB))
Declared noise emissions are in accordance with ISO 9296 standards.
8
Netra 440 Server Installation Guide • March 2006
Calculating Heat Dissipation
To calculate the heat generated by a server so that you can estimate the heat your
cooling system must dissipate, convert the figure for the system’s power
requirement from Watts to BTU/hr. A general formula for doing this is to multiply
the power requirement figure in Watts by 3.412.
NEBS Level 3 Compliance
Telcordia certified that the DC-powered version of the Netra 440 server meets NEBS
Level 3 requirements per SR-3580, including the appropriate sections of GR-63CORE (Network Equipment-Building System Requirements: Physical Protection) and GR1089-CORE (Electromagnetic Compatibility and Electrical Safety – Generic Criteria for
Network Telecommunications Equipment).
Sun Advanced Lights Out Manager
The Netra 440 server ships with the Sun Advanced Lights Out Manager (ALOM)
software preinstalled. By default, the system console is directed to ALOM and is
configured to show server console information on startup.
ALOM enables you to monitor and control your server over either a serial
connection (using the SERIAL MGT port), or Ethernet connection (using the NET
MGT port). See Chapter 4 for the location of these and other ports. For information
about configuring an ALOM Ethernet connection, refer to the Sun Advanced Lights
Out Manager User Guide for the Netra 440 Server (817-5481-xx).
Note – The ALOM serial port, labelled SERIAL MGT, is for server management
only. If you need a general purpose serial port, use the standard TTYB serial port.
See Chapter 4 for the location of these serial ports.
ALOM can be configured to send e-mail notifications of hardware failures and other
events related to the server or to ALOM.
The ALOM circuitry uses standby power from the server, which means:
■
ALOM is active as soon as the server is connected to a power source, and remains
active until power is removed by unplugging the power cables.
■
ALOM continues to be effective even when the operating system is offline and
when the server is in Standby mode.
Chapter 1
Preparing for Installation
9
TABLE 1-7 lists the components monitored by ALOM and describes the information
provided for each component.
TABLE 1-7
ALOM Component Monitoring
Component Monitored
What ALOM Reveals
Disk drives
Whether each slot has a drive present, and whether it
reports OK status
Fans
Whether a fan is present, fan speed and whether the fans
report OK status
CPUs
Whether a CPU is present, the temperature measured at the
CPU, and any thermal warning or failure conditions
Power supplies
Whether each bay has a power supply present, and
whether it reports OK status
System enclosure
temperature
System ambient temperature, as well as any enclosure
thermal warning or failure conditions
Circuit breakers and voltages
Whether circuit breakers have been tripped, and whether
correct voltages are reported
Server front panel
System rotary switch position and status of LEDs
Alarm port
Status of the alarm port
Sun Install Check Tool
The Netra 440 server supports the Sun Install Check tool, which can confirm that
your server has been installed successfully. The Install Check software is designed to
check the initial server installation and tests your server for:
■
■
■
■
Minimum required Solaris OS level
Presence of key critical patches
Proper firmware levels
Unsupported hardware components
If potential issues are identified, the software generates a report that provides
specific instructions to remedy the issues.
You can download the Sun Net Connect software and documentation at:
http://www.sun.com/software/installcheck/
10
Netra 440 Server Installation Guide • March 2006
Sun Remote Services Net Connect
Support
The Netra 440 server supports the SunSM Remote Services (SRS) Net Connect
monitoring services. The SRS Net Connect web services give you the ability to selfmonitor systems, create performance and trend reports, and receive automatic
notifications so you can act more quickly when a system event occurs and manage
potential issues before they become problems.
For more information about SRS Net Connect, including how to sign up and
download the documentation, refer to the SRS Net Connect web site at:
http://www.sun.com/service/support/srs/netconnect/
Note – The Net Connect Installation Guide contains installation instructions specific to
the Netra 440 server. This guide can be downloaded after signing up for the service.
Chapter 1
Preparing for Installation
11
12
Netra 440 Server Installation Guide • March 2006
CHAPTER
2
Installation Overview
This chapter lists the steps in a typical Netra 440 server installation and contains the
procedures that must be performed before installing the server in a rack.
This chapter contains these topics:
■
■
“Installation Overview” on page 13
“Installing Optional Components” on page 15
Installation Overview
Each step in this task list refers you to the relevant section of the documentation for
more information. Complete each step in the order listed.
1. Verify that you have received all of the components that ship with your server.
See FIGURE 1-1 for the ship kit contents.
2. Install any optional components shipped with your system.
If you have purchased optional components such as additional memory, install
them prior to mounting the server in a rack. See “Installing Optional
Components” on page 15 for more information.
3. Mount the server into a rack or cabinet.
See Chapter 3 for rackmount installation instructions.
4. Connect the chassis grounding cable.
See “Connecting the Chassis Grounding Cable (DC Version)” on page 51.
5. Connect the serial, network, and all other data cables to the server.
See “Connecting All Other Cables” on page 52.
13
6. Assemble and connect the input power cables to the server.
See “Assembling and Connecting the DC Input Power Cable” on page 62 for
complete instructions.
7. Set up a terminal or console for installing your server.
See Chapter 5 for complete instructions.
8. Gather configuration information for your system.
See the “Configuring the Server” on page 87.
9. (Optional) Set any desired OpenBoot™ PROM configuration options.
You can control several aspects of system behavior through OpenBoot PROM
commands and configuration variables. Refer to the OpenBoot 4.x Command
Reference Manual (816-1177-xx) and the Netra 440 Server System Administration
Guide (817-3884-xx) for OpenBoot command information.
10. Confirm that the Ethernet connection is attached to the server.
11. Check whether the rotary switch is in the Normal position.
See “Setting the Rotary Switch” on page 84.
12. Power on the server by either pressing the On/Standby button on the front panel
or from a keyboard using the ALOM software.
See “Powering On the Server” on page 83.
13. Configure the server software.
The Solaris operating system is preinstalled on the server. When you power on,
you are automatically guided through the Solaris operating system configuration
procedure. See “Configuring the Server” on page 87 for more information.
14. Install any required patch or patches to the server.
Refer to the Netra 440 Server Release Notes (817-3885-xx) for a list of the required
patches.
15. Load additional software from the Solaris media kit (optional).
The Solaris media kit (sold separately) includes several CDs containing software
to help you operate, configure, and administer your server. See the
documentation provided with the media kit for a complete listing of included
software and detailed installation instructions.
14
Netra 440 Server Installation Guide • March 2006
Installing Optional Components
The standard components of the Netra 440 server are installed at the factory.
However, if you ordered options such as additional memory or a PCI card, these will
be shipped separately. If possible, install these components prior to installing the
server in a rack.
■
If you ordered a DVD drive, go to Appendix A for installation instructions.
■
If you ordered any other options that are not factory-installed, see the Netra 440
Server Service Manual (817-3883-xx) for installation instructions.
Note – All internal components except hard drives must be installed by qualified
service technicians only.
Caution – To protect electronic components from electrostatic damage, which can
permanently disable the system or require repair by Sun service technicians, place
components on an antistatic surface, such as a Sun antistatic discharge mat, an
antistatic bag, or a disposable antistatic mat. Also, always wear an antistatic wrist
strap connected to a metal surface on the chassis when you work on system
components.
Note – The optional component list might be updated at any time. Refer to the Sun
StoreSM web site (http://store.sun.com) for the most current list of Netra 440
server supported components.
Chapter 2
Installation Overview
15
16
Netra 440 Server Installation Guide • March 2006
CHAPTER
3
Installing a Netra 440 Server Into a
Rack
This chapter provides instructions for installing the Netra 440 server into a rack, and
contains the following sections:
■
■
■
■
■
■
“Rackmounting Options” on page 18
“Hardmount in a 19-Inch 4-Post Rack” on page 19
“Sliding Rail Mount in a 19-Inch 4-Post Rack” on page 24
“Hardmount in a 600 mm 4-Post Rack” on page 36
“Hardmount in a 23-Inch 2-Post Rack” on page 42
“Hardmount in a 19-Inch 2-Post Rack” on page 45
Caution – The server is heavy. Two people are required to lift and mount the
system into a rack enclosure when using the procedures in this chapter.
Before starting any of the following rackmounting procedures, identify a helper to
assist you in installing the server. Verify that your helper can safely lift and carry
42 lbs. (19 kg), which is approximately half the weight of a fully-equipped server.
Caution – When completing a two-person procedure, always communicate your
intentions clearly before, during, and after each step to minimize confusion.
17
Rackmounting Options
The Netra 440 server ships with a 19-inch, 4-post hardmount rack kit (see
“Hardmount in a 19-Inch 4-Post Rack” on page 19 for installation instructions).
TABLE 3-1 lists the four additional rackmount kit options that can be ordered from
Sun. This chapter provides installation instructions for all of these rackmount kit
options.
TABLE 3-1
Optional Rackmount Kits
Order Number
Mounting Kit
Installation Instructions
X8100A
19-inch 4-post slide mount kit
“Sliding Rail Mount in a 19-Inch 4-Post Rack” on page 24
X7905A
600 mm x 600 mm rackmount kit
“Hardmount in a 600 mm 4-Post Rack” on page 36
X7903A
23-inch 2-post rackmount kit
“Hardmount in a 23-Inch 2-Post Rack” on page 42
18
Netra 440 Server Installation Guide • March 2006
Hardmount in a 19-Inch 4-Post Rack
The hardmount kit for a 19-inch 4-post rack consists of:
■
■
■
■
Two
Two
Two
Two
hardmount brackets
rear mount support brackets
rear mount flanges
bags of screws
Rear mount support brackets
Hardmount brackets
Rear mount
flanges
Screws
FIGURE 3-1
Contents of the Hardmount 19-Inch 4-Post Kit
TABLE 3-2
19-inch 4-Post Rackmount Screw Kit Contents
Number
Description
Where Used
8
M5 x 8 mm Phillips flathead screws
8 for hardmount brackets
6
M5 x 8 mm Phillips panhead screws
4-6 for rear mount brackets (depending on rack depth)
12
M5 x 12 mm screws
12 for rack, if appropriate
12
M6 x 12 mm screws
12 for rack, if appropriate
12
M6 square clip nuts
12 for rack, if appropriate
12
10-32 x 0.5 in. combo head screws
12 for rack, if appropriate
12
12-24 x 0.5 in. combo head screws
12 for rack, if appropriate
Chapter 3
Installing a Netra 440 Server Into a Rack
19
1. Get the front hardmount brackets from the rack kit (FIGURE 3-1).
2. Using eight of the supplied M5 × 8 mm flathead Phillips screws (four screws for
each bracket), secure the front hardmount brackets to the sides of the server
(FIGURE 3-2).
FIGURE 3-2
20
Securing the Hardmount Brackets to the Server
Netra 440 Server Installation Guide • March 2006
3. Measure the depth of the rack.
4. Get the two rear mount support brackets from the rack kit (FIGURE 3-1).
5. Install the rear mount support brackets at the rear of the server, extending the rear
mount support brackets to the measured depth of the rack (FIGURE 3-3).
Use two to three of the supplied M5 × 8 mm panhead Phillips screws for each
bracket, depending on the rack depth. If your rack is especially deep, you may only
be able to secure the rear mount support brackets using only two screws per side.
FIGURE 3-3
Attaching the Rear Mount Support Brackets
Chapter 3
Installing a Netra 440 Server Into a Rack
21
6. Lift the server to the desired location in the rack.
7. Using four screws per side, secure the front hardmount brackets attached to the
sides of the server to the front of the rack (FIGURE 3-4).
The size of the screws varies, depending on your particular rack.
FIGURE 3-4
22
Securing the Front of the Server to the Rack
Netra 440 Server Installation Guide • March 2006
8. Get the two rear mount flanges from the rack kit (FIGURE 3-1).
9. At the rear of the rack, use the two captive screws to secure the two rear mount
flanges to the rear mount support brackets that are attached to the server
(FIGURE 3-5).
Captive screws to
secure flange to
rear of server
Screws to secure
flange to rack
FIGURE 3-5
Securing the Rear of the Server to the Rack
10. Using two screws for each rear mount support bracket, secure the rear mount
support brackets to the rear of the rack (FIGURE 3-5).
The size of the screws vary, depending on your particular rack.
Chapter 3
Installing a Netra 440 Server Into a Rack
23
Sliding Rail Mount in a 19-Inch 4-Post
Rack
The sliding rail mount kit for a 19-inch 4-post rack consists of:
■
■
■
■
■
■
Two 19-inch 4-post Telco slide assemblies
Two short brackets
Two long brackets
Two long bracket extenders
Two hardmount front brackets
Bag of screws
Extenders
Long brackets
Short brackets
Slide assemblies
Hardmount
front brackets
Screw kit
FIGURE 3-6
24
Contents of the Sliding Rail 19-Inch 4-Post Kit
Netra 440 Server Installation Guide • March 2006
TABLE 3-3
Sliding Rail 19-inch 4-Post Rackmount Screw Kit Contents
Number
Description
Where Used
4
M5 x 8 mm Phillips flathead screws
4 for hardmount front brackets
8
Shoulder screws
8 for glides
10
M6 brass collar screws
4 for short brackets, 4 for long brackets, 2 extra
8
M5 panhead screws
8 for slides
12
M5 x 12 mm screws
20 for rack, if appropriate
12
M6 x 12 mm screws
12 for rack, if appropriate
12
M6 square clip nuts
12 for rack, if appropriate
12
10-32 x 0.5 in. combo head screws
12 for rack, if appropriate
12
12-24 x 0.5 in. combo head screws
12 for rack, if appropriate
Note – The front-to-back rail spacing must be at least 755.7 mm (29.75 inches) and
not more than 755.7 mm (29.75 inches) from the outside face of the front rail to the
outside face of the back rail. If the spacing exceeds the maximum measurement,
install the rail extenders as described in “Installing the Long Bracket Extenders” on
page 33.
1. Get the hardmount brackets and M5 × 8 mm flathead Phillips screws from the rack
kit (FIGURE 3-6).
2. Using four of the supplied M5 × 8 mm flathead Phillips screws (two screws for
each bracket), secure the hardmount brackets to the sides of the server (FIGURE 3-7).
Note that the hardmount brackets are attached to the top portion of the server, with
the brackets oriented so that the handles are at the lower part of the brackets.
Chapter 3
Installing a Netra 440 Server Into a Rack
25
FIGURE 3-7
26
Securing the Hardmount Bracket to the Server
Netra 440 Server Installation Guide • March 2006
3. Get the Telco slide assemblies from the rack kit (FIGURE 3-6).
4. Press in the button on each slide and pull the glide completely out of the slide
(FIGURE 3-8).
Button
Slide (in two parts)
Glide
FIGURE 3-8
Dismantling the Slide
Chapter 3
Installing a Netra 440 Server Into a Rack
27
5. Align the holes in the glides with the appropriate holes on the sides of the server
and, using the eight screws from the ship kit (four screws for each side), secure
the glides to the sides of the server (FIGURE 3-9).
FIGURE 3-9
28
Securing the Glides to the System Chassis
Netra 440 Server Installation Guide • March 2006
6. Get the short brackets and long brackets from the rackmount kit (FIGURE 3-6).
7. Lift each short bracket to the desired position at the front of the rack and attach a
short bracket to each of the front rack uprights (FIGURE 3-10).
Use two of the brass M6 collar screws and M6 cage nuts (if required) to secure each
bracket.
FIGURE 3-10
Securing the Short Brackets to the Front of the Rack
Chapter 3
Installing a Netra 440 Server Into a Rack
29
8. Lift each long bracket to the desired position at the rear of the rack and attach a
long bracket to each of the rear rack uprights (FIGURE 3-11).
To secure each bracket, use two of the brass M6 collar screws and M6 cage nuts (if
required), exactly as you did for the front rack uprights in the previous step.
Note – If the dimension is greater than 755.7 mm, attach the rail extenders to the
long brackets as described in “Installing the Long Bracket Extenders” on page 33
FIGURE 3-11
30
Securing the Long Brackets to the Rear of the Rack
Netra 440 Server Installation Guide • March 2006
9. Extend a slide to line up the access holes with the front screw holes.
10. Using the M5 panhead screws (four for the short bracket and four for the long
bracket), secure the slide onto the short and long brackets at the front and rear of
the rack (FIGURE 3-12).
Long bracket
Short bracket
Slide
FIGURE 3-12
Securing the Slide to the Brackets
11. Repeat Step 9 and Step 10 for the slide on the other side of the rack.
Chapter 3
Installing a Netra 440 Server Into a Rack
31
12. Push the slides completely into the assembly on each side of the rack and release
the stop catches.
13. Align the glides attached to the system with the slide assemblies in the rack.
You might find that there is too much or too little room between the two slides
mounted in the rack, and the glides attached to the system might not align correctly
with the slides in the rack. If either situation occurs, loosen the M6 collar screws and
cage nuts on the long and short brackets (Step 7 and Step 8), move them inward or
outward to the appropriate points, then tighten them again.
14. Push in the slide buttons and slide the system all the way into the rack enclosure
(FIGURE 3-13).
FIGURE 3-13
32
Sliding the System Into the Rack
Netra 440 Server Installation Guide • March 2006
15. Using one screw per side, secure the front of the hardmount brackets that are
attached to the sides of the server to the front of the rack (FIGURE 3-14).
The size of the screws varies, depending on your particular rack.
FIGURE 3-14
Securing the Front of the System to the Rack
Installing the Long Bracket Extenders
Use this procedure to attach the long bracket extenders to the long brackets and slide
assemblies. See FIGURE 3-15 for mounting details when using this procedure.
Note – If the long brackets are already attached to the slide assembly, you might
have to remove the long brackets and reinstall them using this procedure.
1. Locate the long bracket extenders.
The extenders are shorter than the long brackets and do not have clips nuts attached.
Chapter 3
Installing a Netra 440 Server Into a Rack
33
2. Place an extender and slide assembly inside a long bracket.
3. Install two M5 panhead screws through the rear set of holes in the slide assembly
and into the front clip nuts in the center slots of the long bracket and tighten.
4. Install the two M5 panhead screws through one of the front set of holes in the
slide assembly and into the matching clip nuts in the long bracket and tighten.
5. Install two M5 panhead screw through the front slots of the bracket extender and
into the rear clip nuts in the center slots of the long bracket and hand tighten.
6. Install the two M5 panhead screws through the center slot of the bracket extender
and into the matching clip nuts on the long bracket and hand tighten.
Long bracket
Slide assembly
Extender
Front
Rear
FIGURE 3-15
Installing Extender and Slide Assembly on Long Bracket
7. Secure the extender brackets and slide assemblies in the rack as shown in
FIGURE 3-11.
Adjust the rails to the proper length, tighten the screws on the extenders, and install
four M6 collar screws (two in front bracket and two in the rear bracket) for each
sliding rail assembly.
34
Netra 440 Server Installation Guide • March 2006
FIGURE 3-16
Securing the Long Brackets Extenders and Slide Assembly to Rack
Chapter 3
Installing a Netra 440 Server Into a Rack
35
Hardmount in a 600 mm 4-Post Rack
The hardmount kit for a 600 mm 4-post rack consists of:
■
■
■
Two rear mount flanges
Two front adjuster brackets
One bag of screws
You will also need the two hardmount brackets and two rear mount support
brackets from the standard rackmount kit that came with the Netra 440 server
(FIGURE 3-1).
Rear mount
flanges
Screws
Front adjuster brackets
FIGURE 3-17
Contents of the Hardmount 600 mm 4-Post Kit
TABLE 3-4
Hardmount 600 mm 4-Post Rackmount Screw Kit Contents
Number
Description
Where Used
8
M5 x 8 mm Phillips flathead screws
8 for hardmount brackets
14
M5 x 8 mm Phillips panhead screws
8 for front adjuster brackets and 4-6 for rear
mount brackets (depending on rack depth)
12
M5 x 12 mm screws
12 for rack, if appropriate
12
M6 x 12 mm screws
12 for rack, if appropriate
12
M6 square clip nuts
12 for rack, if appropriate
12
10-32 x 0.5 in. combo head screws
12 for rack, if appropriate
12
12-24 x 0.5 in. combo head screws
12 for rack, if appropriate
36
Netra 440 Server Installation Guide • March 2006
1. Get the two front hardmount brackets from the standard rack kit (FIGURE 3-1).
These front hardmount brackets came as part of the standard Netra 440 server ship
kit, not as part of the 600 mm four-post rackmount ship kit.
2. Using eight of the supplied M5 × 8 mm flathead Phillips screws (four screws for
each bracket), secure the front hardmount brackets to the sides of the server
(FIGURE 3-18).
FIGURE 3-18
Securing the Hardmount Brackets to the Server
Chapter 3
Installing a Netra 440 Server Into a Rack
37
3. Measure the depth of the rack.
4. Get the two rear mount support brackets from the standard rack kit (FIGURE 3-1).
These rear mount support brackets came as part of the standard Netra 440 server
ship kit, not as part of the 600 mm four-post rackmount ship kit.
5. Install the rear mount support brackets at the rear of the server, extending the rear
mount support brackets to the measured depth of the rack (FIGURE 3-19).
Use two to three of the supplied M4 × 8 mm panhead Phillips screws for each
bracket, depending on the rack depth. If your rack is especially deep, you may only
be able to secure the rear mount support brackets using only two screws per side.
FIGURE 3-19
38
Attaching the Rear Mount Support Brackets
Netra 440 Server Installation Guide • March 2006
6. Get the 600 mm front adjuster brackets from the rack kit (FIGURE 3-17).
7. Using eight of the supplied M5 × 8 mm panhead Phillips screws (four screws for
each adjuster bracket), attach the 600 mm front adjuster brackets to the front
hardmount brackets (FIGURE 3-20).
FIGURE 3-20
Attaching the 600 mm Front Adjuster Brackets to the Front Hardmount
Brackets
Chapter 3
Installing a Netra 440 Server Into a Rack
39
8. Lift the server to the desired location in the rack.
9. Using four screws per side, secure the 600 mm front adjuster brackets to the front
of the rack (FIGURE 3-21).
The size of the screws varies, depending on your particular rack.
FIGURE 3-21
40
Attaching the 600 mm Front Adjuster Brackets to the Rack
Netra 440 Server Installation Guide • March 2006
10. Get the two rear mount flanges from the rack kit (FIGURE 3-17).
11. At the rear of the rack, use the captive screws to secure the two rear mount flanges
to the rear mount support brackets that are attached to the server (FIGURE 3-22).
Captive screws to
secure flange to
rear of server
Screws to secure
flange to rack
FIGURE 3-22
Securing the Rear Mount Flange
12. Using two screws for each rear mount support bracket, secure the rear mount
support brackets to the rear of the rack (FIGURE 3-22).
The size of the screws vary, depending on your particular rack.
Chapter 3
Installing a Netra 440 Server Into a Rack
41
Hardmount in a 23-Inch 2-Post Rack
The hardmount kit for a 23-inch 2-post rack consists of:
■
■
Two side brackets
Bag of screws
Screws
Side brackets
FIGURE 3-23
TABLE 3-5
Contents of the Hardmount 23-Inch 2-Post Kit
Hardmount 23-Inch 2-Post Rackmount Screw Kit Contents
Number
Description
Where Used
8
M5 x 8 mm Phillips panhead screws
8 for side brackets
12
M5 x 12 mm screws
12 for rack, if appropriate
12
M6 x 12 mm screws
12 for rack, if appropriate
12
M6 square clip nuts
12 for rack, if appropriate
12
10-32 x 0.5 in. combo head screws
12 for rack, if appropriate
12
12-24 x 0.5 in. combo head screws
12 for rack, if appropriate
42
Netra 440 Server Installation Guide • March 2006
1. Get the side brackets from the rack kit (FIGURE 3-23).
2. Using eight of the M5 × 8 mm panhead Phillips screws (four for each side
bracket), secure the side brackets to the sides of the server (FIGURE 3-24).
Note that the wide, flat side of the brackets are facing the rear of the server for this
rackmount option, not the front.
FIGURE 3-24
Securing the Side Brackets to the Side of the Server
Chapter 3
Installing a Netra 440 Server Into a Rack
43
3. Lift the server to the desired location in the rack.
4. Using four screws per side, secure the front hardmount brackets attached to the
sides of the server to the front of the rack (FIGURE 3-25).
The size of the screws varies, depending on your particular rack.
FIGURE 3-25
44
Securing the Front of the Server to the Rack
Netra 440 Server Installation Guide • March 2006
Hardmount in a 19-Inch 2-Post Rack
The hardmount kit for a 19-inch 2-post rack consists of:
■
■
■
■
Two
Two
Two
Two
hardmount brackets
bags of screws
rear mount support brackets (not used in this option)
rear mount flanges (not used in this option)
Rear mount support brackets
(not used in this option)
Hardmount brackets
Rear mount flanges
(not used in this option)
Screws
FIGURE 3-26
Contents of the Hardmount 19-Inch 4-Post Kit
TABLE 3-6
19-inch 2-Post Rackmount Screw Kit Contents
Number
Description
Where Used
8
M5 x 8 mm Phillips flathead screws
8 for hardmount brackets
6
M5 x 8 mm Phillips panhead screws
6 for rear mount brackets (not used in this option)
12
M5 x 12 mm screws
12 for rack, if appropriate
12
M6 x 12 mm screws
12 for rack, if appropriate
Chapter 3
Installing a Netra 440 Server Into a Rack
45
TABLE 3-6
19-inch 2-Post Rackmount Screw Kit Contents (Continued)
Number
Description
Where Used
12
M6 square clip nuts
12 for rack, if appropriate
12
10-32 x 0.5 in. combo head screws
12 for rack, if appropriate
12
12-24 x 0.5 in. combo head screws
12 for rack, if appropriate
1. Get the side brackets from the rack kit (FIGURE 3-26).
2. Using eight of the M5 × 8 mm panhead Phillips screws (four for each side
bracket), secure the side brackets to the sides of the server (FIGURE 3-27).
Note that the wide, flat side of the brackets are facing the rear of the server for this
rackmount option, not the front.
FIGURE 3-27
46
Securing the Side Brackets to the Side of the Server
Netra 440 Server Installation Guide • March 2006
3. Lift the server into the rack.
4. Using four screws for each bracket, secure the front of the server to the front of
the rack (FIGURE 3-28).
The size of the screws varies, depending on your rack.
FIGURE 3-28
Installing and Securing the Server in the 2-Post Rack
Chapter 3
Installing a Netra 440 Server Into a Rack
47
48
Netra 440 Server Installation Guide • March 2006
CHAPTER
4
Connecting Cables
FIGURE 4-1 shows the DC version of the Netra 440 server back panel and identifies
the DC power supply connectors and I/O ports. FIGURE 4-2 shows the AC version of
the Netra 440 server back panel and identifies the AC power supply connectors and
I/O ports.
USB ports
(USB0-3)
Serial port (TTYB)
Ethernet ports
(NET0, NET1)
Serial management port
SCSI port
Network management port
Alarm port
DC connector
Power supply 3
DC connector
Power supply 2
FIGURE 4-1
DC ground studs
DC connector
Power supply 1
DC connector
Power supply 0
Back Panel Features (DC Version)
49
USB ports
(USB0-3)
Serial port (TTYB)
Ethernet ports
(NET0, NET1)
Serial management port
SCSI port
Network management port
Alarm port
AC connector
Power supply 3
AC connector
Power supply 1
AC connector
Power supply 2
50
AC connector
Power supply 0
FIGURE 4-2
Back Panel Features (AC Version)
TABLE 4-1
Netra 440 Server Ports
Port
Information
Alarm port
In a telecommunications environment, use this port to
connect to the central office alarming system. See the
Netra 440 Server Product Overview for more information.
Serial port (TTYB)
This port provides standard serial functionality. Note that
the system controller serial management port is not a
standard serial port. See the Netra 440 Server Product
Overview for more information.
USB ports
See the Netra 440 Server Product Overview for information
about devices you can connect to these ports.
Ethernet ports
You use these ports to connect to your Ethernet network.
The left port is NET0, and the right port is NET1.
External SCSI port
See the Netra 440 Server Product Overview for information
about the devices you can connect to this port.
Netra 440 Server Installation Guide • March 2006
TABLE 4-1
Netra 440 Server Ports (Continued)
Port
Information
Serial management port
(SERIAL MGT)
Use this, the default port, to attach the system console
device.
Network management port
(NET MGT)
Use this port to access ALOM features by way of the
network.
DC connectors (DC version)
DC power input cables connect to each DC connector. Do not
connect the cord to a DC connector at this point. See
“Assembling and Connecting the DC Input Power Cable” on
page 62.
AC connectors (AC version)
AC power cables connect to each AC connector. Do not
connect the power cable to an AC connector at this point.
See “Connecting the AC Power Cables” on page 71.
Connecting the Chassis Grounding
Cable (DC Version)
Before installing any other cable, you should first attach the chassis ground cable to
the server’s chassis grounding studs. Refer to Chapter 1 for the site requirements for
this section.
1. Obtain a chassis grounding cable from your site and two M5 nuts with lock
washers from the ship kit.
2. Go to the back of the server and locate the two DC ground studs (see FIGURE 4-1).
3. Position and align the chassis grounding cable against the two ground studs at the
rear of the chassis.
4. Tighten the two M5 nuts to secure the grounding cable to the two studs.
5. Secure the other end of the grounding cable to the earth ground in the building.
You can secure the grounding cable to a proper grounding point on the rack, as long
as the rack is properly grounded to the earth ground in the building.
Caution – An electrical hazard is present if energized units are not properly
grounded.
Chapter 4
Connecting Cables
51
Connecting All Other Cables
When connecting the remaining cables to the ports at the rear of the Netra 440
server, keep the following points in mind:
■
Although access to the ALOM through the network management port is secure,
access through the serial management port is not secure. Therefore, avoid
connecting a serial modem to the serial management port.
■
The ALOM serial management port (labeled SERIAL MGT) and network
management port (labeled NET MGT) are present in the Solaris OS device tree as
/dev/ttya, and in the OpenBoot configuration variables as ttya. However, the
serial management port does not function as a standard serial connection. If you
want to attach a standard serial device to the system (such as a printer), you need
to use the DB-9 port labeled “TTYB” on the system back panel, which
corresponds to /dev/ttyb in the Solaris OS device tree, and as ttyb in the
OpenBoot configuration variables. See the Netra 440 Server Product Overview for
more information.
■
The 10BASE-T network management port on the ALOM is reserved for use with
the ALOM and the system console. The network management port does not
support connections to 100 Mbps or Gigabit networks. If your configuration
requires a high-speed Ethernet port, use one of the Gigabit Ethernet ports instead.
■
USB ports support hot-plugging. You can connect and disconnect the USB cable
and peripheral devices while the system is running, without affecting system
operations. However, you can only perform USB hot-plug operations while the
operating system is running.
■
USB hot-plug operations are not supported when the system ok prompt is
displayed or before the system has completed booting.
■
You can connect up to 126 devices to each of the two USB controllers, for a total of
252 USB devices per system.
See FIGURE 4-1 for the locations of these ports. The following sections give the
pinouts for each of these connectors.
■
■
■
■
■
■
■
52
“Alarm Port” on page 53
“Serial Port (TTYB)” on page 54
“USB Ports (USB0-3)” on page 55
“Ethernet Ports (NET0 and NET1)” on page 56
“SCSI Port” on page 57
“ALOM Serial Management Port (TTYA)” on page 59
“ALOM Network Management Port” on page 61
Netra 440 Server Installation Guide • March 2006
Alarm Port
The alarm port uses a standard DB-15 connector. In a telecommunications
environment, use this port to connect to the central office alarming system.
FIGURE 4-3 shows the pin numbering of the alarm port, TABLE 4-2 and describes the
pin signals.
1
9
8
15
FIGURE 4-3
Alarm Port
TABLE 4-2
Alarm Port Signals
Pin
Signal Description
Pin
Signal Description
1
RESERVED
9
ALARM1_NC
2
RESERVED
10
ALARM1_COM
3
NC
11
ALARM2_NO
4
NC
12
ALARM2_NC
5
ALARM0_NC*
13
ALARM2_COM
6
ALARM0_NO1
14
ALARM3_NO
7
ALARM0_COM1
15
ALARM3_COM
8
ALARM1_NO
CHASSIS
FRAME GND
* The ALOM software sets the ALARM0 (critical) relay and the associated (critical) LED for the following
conditions:
• When the system is in Standby mode.
• When the server is powered on and the operating system has not booted or has failed.
Chapter 4
Connecting Cables
53
Serial Port (TTYB)
The serial port connector (TTYB) uses a DB-9 connector. Use this port for general
purpose serial data transfers.
1
6
54
5
9
FIGURE 4-4
Serial Port Pin Numbering
TABLE 4-3
Serial Port Connector Signals
Pin
Signal Description
Pin
Signal Description
1
Data Carrier Detect
6
Data Set Ready
2
Receive Data
7
Request to Send
3
Transmit Data
8
Clear to Send
4
Data Terminal Ready
9
Ring Indicate
5
Ground
Netra 440 Server Installation Guide • March 2006
USB Ports (USB0-3)
Four Universal Serial Bus (USB) ports are located on the motherboard in a doublestacked layout. The ports can be accessed from the back panel.
USB2
1
2
3
4
1
2
1
2
4
USB3
3
4
USB1
B
B
USB0
3
3
4
1
A
A
FIGURE 4-5
USB Connector Pin Numbering
TABLE 4-4
USB Ports Pin Numbering
2
Pin
Signal Description
Pin
Signal Description
A1
+5 V (fused)
B1
+5 V (fused)
A2
USB0/1-
B2
USB2/3-
A3
USB0/1+
B3
USB2/3+
A4
Ground
B4
Ground
Chapter 4
Connecting Cables
55
Ethernet Ports (NET0 and NET1)
The Netra 440 server has two RJ-45 Gigabit Ethernet connectors (NET0, NET1). The
Ethernet interfaces operate at 10 Mbps, 100 Mbps, and 1000 Mbps. The transfer rates
for the Ethernet ports are given in TABLE 4-5.
TABLE 4-5
Ethernet Connection Transfer Rates
Connection Type
IEEE Terminology
Transfer Rate
Ethernet
10BASE-T
10 Mbit/s
Fast Ethernet
100BASE-TX
100 Mbits/s
Gigabit Ethernet
1000BASE-T
1000 Mbit/s
12345678
FIGURE 4-6
Ethernet Connector Pin Numbering
TABLE 4-6
Ethernet Connector Pin Signals
Pin
Signal Description
Pin
Signal Description
1
Transmit/Receive Data 0 +
5
Transmit/Receive Data 2 –
2
Transmit/Receive Data 0 –
6
Transmit/Receive Data 1 –
3
Transmit/Receive Data 1 +
7
Transmit/Receive Data 3 +
4
Transmit/Receive Data 2 +
8
Transmit/Receive Data 3 –
TABLE 4-7
Ethernet Port
56
OpenBoot PROM Devalias and Device Path Data for the Ethernet Ports
OpenBoot PROM Devalias
Device Path
0
net0
/pci@1c,600000/network@2
1
net1
/pci@1f,700000/network@1
Netra 440 Server Installation Guide • March 2006
SCSI Port
The SCSI serial data connector is located on the motherboard and can be accessed
from the back panel.
34
1
68
FIGURE 4-7
SCSI Port Pin Numbering
TABLE 4-8
SCSI Port Pin Signals
35
Pin
Signal Description
Pin
Signal Description
1
Data12 +
35
Data12 –
2
Data13 +
36
Data13 –
3
Data14 +
37
Data14 –
4
Data15 +
38
Data15 –
5
Parity1 +
39
Parity1 –
6
Data0 +
40
Data0 –
7
Data1 +
41
Data1 –
8
Data2 +
42
Data2 –
9
Data3 +
43
Data3 –
10
Data4 +
44
Data4 –
11
Data5 +
45
Data5 –
12
Data6 +
46
Data6 –
13
Data7 +
47
Data7 –
14
Parity0 +
48
Parity0 –
15
Ground
49
Ground
16
DIFF_SENSE
50
Ground
17
TERM_PWR
51
TERM_PWR
18
TERM_PWR
52
TERM_PWR
19
(N/C)
53
(N/C)
Chapter 4
Connecting Cables
57
TABLE 4-8
58
SCSI Port Pin Signals (Continued)
Pin
Signal Description
Pin
Signal Description
20
Ground
54
Ground
21
ATN +
55
ATN –
22
Ground
56
Ground
23
BSY +
57
BSY –
24
ACK +
58
ACK –
25
RST +
59
RST –
26
MSG +
60
MSG –
27
SEL +
61
SEL –
28
CD +
62
CD –
29
REQ +
63
REQ –
30
I/O +
64
I/O –
31
Data8 +
65
Data8 –
32
Data9 +
66
Data9 –
33
Data10 +
67
Data10 –
34
Data11 +
68
Data11 –
Netra 440 Server Installation Guide • March 2006
ALOM Serial Management Port (TTYA)
The serial management connector (labeled SERIAL MGT) is an RJ-45 connector
located on the ALOM system controller card and can be accessed from the back
panel. This port is the default connection to the system, and you should use this port
only for server management.
1
8
FIGURE 4-8
Serial Management Port Pin Numbering
TABLE 4-9
Serial Management Port Pin Signals
Pin
Signal Description
Pin
Signal Description
1
Request to Send
5
Ground
2
Data Terminal Ready
6
Receive Data
3
Transmit Data
7
Data Set Ready
4
Ground
8
Clear to Send
If you need to connect to the SERIAL MGT port using a cable with either a DB-9 or
a DB-25 connector, use a supplied adapter to perform the crossovers given for each
connector. The supplied RJ-45 to DB-9 and RJ-45 to DB-25 adapters are wired as
described in TABLE 4-10 and TABLE 4-11.
Chapter 4
Connecting Cables
59
RJ-45 to DB-9 Adapter Crossovers
TABLE 4-10
RJ-45 to DB-9 Adapter Crossovers
Serial Port (RJ-45 Connector)
DB-9 Adapter
Pin
Signal Description
Pin
Signal Description
1
RTS
8
CTS
2
DTR
6
DSR
3
TXD
2
RXD
4
Signal Ground
5
Signal Ground
5
Signal Ground
5
Signal Ground
6
RXD
3
TXD
7
DSR
4
DTR
8
CTS
7
RTS
RJ-45 to DB-25 Adapter Crossovers
TABLE 4-11
60
RJ-45 to DB-25 Adapter Crossovers
Serial Port (RJ-45 Connector)
DB-25 Adapter
Pin
Signal Description
Pin
Signal Description
1
RTS
5
CTS
2
DTR
6
DSR
3
TXD
3
RXD
4
Signal Ground
7
Signal Ground
5
Signal Ground
7
Signal Ground
6
RXD
2
TXD
7
DSR
20
DTR
8
CTS
4
RTS
Netra 440 Server Installation Guide • March 2006
ALOM Network Management Port
The network management connector (labeled NET MGT) is an RJ-45 connector
located on the ALOM system controller card and can be accessed from the back
panel. This port needs to be configured prior to use. For information on configuring
this port for managing the server with ALOM, see the Advanced Lights Out Manager
User Guide for the Netra 440 Server (817-5481-xx)
1
NET MGT
8
FIGURE 4-9
Network Management Port Pin Numbering
TABLE 4-12
Network Management Port Pin Signals
Pin
Signal Description
Pin
Signal Description
1
Transmit Data +
5
Common Mode Termination
2
Transmit Data –
6
Receive Data –
3
Receive Data +
7
Common Mode Termination
4
Common Mode Termination
8
Common Mode Termination
Chapter 4
Connecting Cables
61
Assembling and Connecting the DC
Input Power Cable
Note – This section describes how to connect DC power input cables to a DCpowered Netra 440 server. For AC-powered server instructions, see “Connecting the
AC Power Cables” on page 71.
Caution – Verify that your site meets the source site requirements given in “DC
Power Source Requirements” on page 5 before proceeding with these instructions.
The basic system configuration comes with four power supplies installed. The
system will continue to operate even if a single power supply fails (known as a 3+1
configuration) or if two power supplies fail (known as a 2+2 configuration). A 2+2
configuration is possible because any two power supplies will satisfy the entire load
of a fully-configured system.
▼
Assembling the DC Input Power Cable
Note – If you have already assembled the DC input power cables, skip to
“Connecting the DC Input Power Cable to the Server” on page 68.
1. Identify the parts that you will use to assemble the DC input power cable
(FIGURE 4-10).
The following DC connection parts are provided in this kit so that you can assemble
one or more DC power input cables. These cables are used to connect the -48V DC
input source(s) to the power supply units in the following components:
■
■
■
■
62
DC input plugs
Strain relief housings
Cage clamp operating lever
Tie wraps
Netra 440 Server Installation Guide • March 2006
Cage clamp operating lever
DC input plug
Strain relief housing
FIGURE 4-10
DC Connection Parts
2. Turn off power from the DC power source through the circuit breakers.
Caution – Do not proceed with these instructions until you have turned off the
power from the DC power source through the circuit breakers.
3. Get a DC input plug from the ship kit.
4. Locate the three wires coming from the DC power source that will be used in the
connection to your unit:
■
■
■
-48V (negative terminal)
Chassis ground
-48V Return (positive terminal)
Chapter 4
Connecting Cables
63
5. Strip 8 mm (5/16 inches) of insulation from each of the wires coming from the DC
power source.
Do not strip more than 8 mm (5/16 inches) from each wire. Doing so will leave
uninsulated wire exposed from the DC connector after the assembly is complete.
8 mm (5/16 in.)
FIGURE 4-11
Stripping the Insulation From the Wire
6. Open the cage clamp for a section of the DC input plug.
Perform one of the following actions:
■
Insert the tip of the cage clamp operating lever into the rectangular hole directly
above the hole in the DC input plug where you want to insert the first wire, and
press down on the cage clamp operating lever.
Top of input plug
FIGURE 4-12
64
Opening the Input Plug Cage Clamp Using the Cage Clamp Operating Lever
Netra 440 Server Installation Guide • March 2006
■
Insert a small slotted screwdriver into the rectangular hole directly above the hole
in the DC input plug where you want to insert the first wire, and press down on
the screwdriver.
Top of input plug
FIGURE 4-13
Opening the Cage Clamp Using a Screwdriver
7. Feed the exposed section of the appropriate wire into the hole in the DC input
plug described in Step 6.
FIGURE 4-14 shows which wires should be inserted into each hole in the DC input
plug.
From -48V Return
From -48V
1
2
3
From chassis ground (green/yellow)
Top of connector
FIGURE 4-14
Assembling the DC Input Power Cable
8. Repeat Step 6 and Step 7 for the other two wires to complete the assembly of the
DC input power cable.
Chapter 4
Connecting Cables
65
9. Repeat Step 4 through Step 8 to create as many DC input power cables as you need
for your unit.
You need one DC input power cable for every power supply that you have in the
Netra 440 server chassis.
If you need to remove a wire from the DC input plug, insert the cage clamp
operating lever or a small screwdriver into the slot directly above the wire and press
down (FIGURE 4-12 and FIGURE 4-13), then pull the wire from the DC input plug.
▼
Installing the Strain Relief Housings
1. Take the DC input plug and insert the bottom portion of the strain relief housing
into the notch on the DC input plug until it snaps into place.
Make sure the strain relief housing snaps into place on the DC input plug. You
cannot complete the assembly correctly if the strain relief housing is not snapped
into place.
FIGURE 4-15
66
Inserting the Bottom Portion of the Strain Relief Housing
Netra 440 Server Installation Guide • March 2006
2. Route the three wires coming from the DC power source through the opening at
the end of the bottom portion of the strain relief housing.
FIGURE 4-16
Routing the Wires out of the Bottom Portion of the Strain Relief Housing
3. Insert the tie wrap into the bottom portion of the strain relief housing.
FIGURE 4-17
Securing the Wires to the Strain Relief Housing
4. Loop the tie wrap over the wires and back out of the strain relief housing.
Tighten the tie wrap to secure the wires to the strain relief housing (FIGURE 4-17).
Chapter 4
Connecting Cables
67
5. Lower the top portion of the strain relief housing so that the three prongs on the
top portion insert into the openings in the DC input plug.
Push the top and bottom portions of the strain relief housing together until they
snap into place.
FIGURE 4-18
Assembling the Strain Relief Housing
▼
Connecting the DC Input Power Cable to the
Server
Caution – An energy hazard is present when energized units are not properly
grounded.
1. Open the front system door.
Press in on the door release latches and lower the system door.
68
Netra 440 Server Installation Guide • March 2006
Door release latches
FIGURE 4-19
Opening the System Door
2. Turn the rotary switch to the Standby position (FIGURE 4-20).
Standby position
SCC
FIGURE 4-20
Turning the Rotary Switch to the Standby Position
3. Slide the server out of the rack far enough to give you convenient access to the
back of the server.
Chapter 4
Connecting Cables
69
4. Connect the DC input power cables to the DC connector on each power supply.
Good practice is to connect each power supply to a separate DC circuit, which
enables the system to remain operational if one of the DC circuits fails. Consult your
local electrical codes for any additional requirements.
FIGURE 4-21
Connecting the DC Input Power Cable to the DC Connectors
5. Turn on the circuit breakers to provide power to the servers.
If you want to disconnect the DC input power cable from the DC connector at some
point in the future, turn the circuit breakers off, then squeeze the two tabs on the
sides of the DC input power cable and gently disconnect the DC input power cable
from the DC power supply.
Caution – Do not attempt to disconnect the DC input power cable from the DC
connector until you have turned off the power from the DC power source through
the circuit breakers.
FIGURE 4-22
70
Disconnecting the DC Input Power Cable From the DC Connector
Netra 440 Server Installation Guide • March 2006
Connecting the AC Power Cables
Note – This section describes how to connect AC power cords to an AC-powered
Netra 440 server. For DC-powered server instructions, see “Assembling and
Connecting the DC Input Power Cable” on page 62.
The basic system configuration comes with four power supplies installed. The
system will continue to operate even if a single power supply fails (known as a 3+1
configuration) or if two power supplies fail (known as a 2+2 configuration). A 2+2
configuration is possible because any two power supplies will satisfy the entire load
of a fully-configured system. Additionally, to ensure true AC line input redundancy
for the server, you should use two separate AC power sources, and you should
connect the power cables from any two AC power supplies in the server to each AC
power source. You can also connect an uninterruptible power supply (UPS) between
each AC power source and the server to increase the availability of the server.
Note – The Netra 440 server uses nominal input voltages from 100 VAC to 240 VAC.
Sun products are designed to work with power systems having a grounded neutral
conductor. To reduce the risk of electrical shock, do not plug Sun products into
another type of power source. Contact your facilities manager or a qualified
electrician if you are unsure what type of power is supplied to your building.
1. Open the front system door.
Press in on the door release latches and lower the system door.
Chapter 4
Connecting Cables
71
Door release latches
FIGURE 4-23
Opening the System Door
2. Turn the rotary switch to the Standby position (FIGURE 4-24).
Standby position
SCC
FIGURE 4-24
Turning the Rotary Switch to the Standby Position
3. Get the supplied AC power cords from the server’s shipment kit.
4. Slide the server out of the rack far enough to give you convenient access to the
back of the server.
72
Netra 440 Server Installation Guide • March 2006
5. Connect one end of each AC power cord into the AC connectors located at the rear
of the server.
See FIGURE 4-25 for the location of the AC connectors.
AC connectors
FIGURE 4-25
Connecting the AC Power Cords to the AC Connectors
6. Connect the other ends of the power cords into AC wall outlets.
To ensure true AC line input redundancy for the server, you should use two separate
AC power sources, and you should connect the power cables from any two AC
power supplies in the server to each AC power source.
Chapter 4
Connecting Cables
73
74
Netra 440 Server Installation Guide • March 2006
CHAPTER
5
Setting Up a System Console Device
This chapter provides information on connecting a system console device to the
server. To install the Solaris OS and any application software, you must set up a
terminal or other device to access the system console. You can either:
■
■
■
Connect the system to a terminal server
Use an alphanumeric (ASCII) terminal
Establish a TIP connection from another server
Regardless of the method you choose, for initial power-on you must connect the
device to the serial management port (SERIAL MGT) on the ALOM system
controller card. All of the procedures in the following sections assume that you are
setting up a system console device by using the default configuration. After initial
power-on, you may use the NET MGT port if you choose. See the Netra 440 Server
System Administration Guide (817-3884-xx) for details.
See the appropriate section for the connection method that you want to use:
■
■
■
“Accessing the System Console Through a Terminal Server” on page 76
“Accessing the System Console Through an Alphanumeric Terminal” on page 79
“Accessing the System Console Through a TIP Connection” on page 80
75
Accessing the System Console Through a
Terminal Server
Connecting the Server to a Terminal Server
The serial management port on the Netra 440 server is a data terminal equipment
(DTE) port. The pinouts for the serial management port correspond with the pinouts
for the RJ-45 ports on the serial interface breakout cable supplied by Cisco for use
with the Cisco AS2511-RJ terminal server. If you use a terminal server made by
another manufacturer, check that the serial port pinouts of the Netra 440 server
match those of the terminal server you plan to use.
If the pinouts for the server serial ports correspond with the pinouts for the RJ-45
ports on the terminal server, you have two connection options:
■
Connect a serial interface breakout cable directly to the Netra 440 server. See the
Netra 440 Server System Administration Guide (817-3884-xx) for details.
■
Connect a serial interface breakout cable to a patch panel and use the straightthrough patch cable (supplied by Sun) to connect the patch panel to the server.
The following illustration shows how to connect a patch cable between a terminal
server, patch panel, and the serial management port (SERIAL MGT) on the Netra 440
server.
76
Netra 440 Server Installation Guide • March 2006
Terminal server
Straight-through cable
Patch panel
Patch cable to serial management port
Netra 440
server
FIGURE 5-1
Patch Panel Connection Between a Terminal Server and a Netra 440 Server
If the pinouts for the serial management port do not correspond with the pinouts for
the RJ-45 ports on the terminal server, you need to make a crossover cable that takes
each pin on the Netra 440 server serial management port to the corresponding pin in
the terminal server’s serial port.
TABLE 5-1 shows the crossovers that the cable must perform.
TABLE 5-1
Pin Crossovers for Connecting to a Typical Terminal Server
Netra 440 Serial Management Port
(RJ-45 Connector) Pin
Terminal Server Serial Port Pin
Pin 1 (RTS)
Pin 1 (CTS)
Pin 2 (DTR)
Pin 2 (DSR)
Pin 3 (TXD)
Pin 3 (RXD)
Pin 4 (Signal Ground)
Pin 4 (Signal Ground)
Pin 5 (Signal Ground)
Pin 5 (Signal Ground)
Chapter 5
Setting Up a System Console Device
77
TABLE 5-1
Pin Crossovers for Connecting to a Typical Terminal Server (Continued)
Netra 440 Serial Management Port
(RJ-45 Connector) Pin
Terminal Server Serial Port Pin
Pin 6 (RXD)
Pin 6 (TXD)
Pin 7 (DSR /DCD)
Pin 7 (DTR)
Pin 8 (CTS)
Pin 8 (RTS)
Accessing the System Console Through a
Terminal Server
● Open a terminal session on the connecting device, and type:
% telnet IP-address-of-terminal-server port-number
For example, for a Netra 440 server connected to port 10000 on a terminal server
whose IP address is 192.20.30.10, you would type:
% telnet 192.20.30.10 10000
Note – At this point, all system information is delivered to you by way of the
ALOM system controller card and its software. ALOM is the default method for
communicating with the Netra 440 server. For detailed information about using
ALOM, consult the Advanced Lights Out Manager User’s Guide for the Netra 440 Server
(817-5481-xx) and the Netra 440 Server System Administration Guide (817-3884-xx),
which includes information about reconfiguration options.
78
Netra 440 Server Installation Guide • March 2006
Accessing the System Console Through
an Alphanumeric Terminal
The following procedure assumes that you are accessing the system console device
by connecting an alphanumeric terminal to the serial management port (SERIAL
MGT) of the Netra 440 server.
For detailed information about system console options, see the Netra 440 Server
System Administration Guide (817-3884-xx).
1. Turn off power to the alphanumeric terminal.
2. Attach one end of the serial cable to the alphanumeric terminal’s serial port.
Use an RJ-45 null modem serial cable or an adapter that is appropriate for your
device. If you are using a laptop system or a terminal with a DB-9 connector, use an
appropriate RJ-45/DB-9 adapter. Connect this cable or adapter to the terminal’s
serial port connector.
3. Attach the serial cable’s RJ-45 connector to the server’s serial management port
(SERIAL MGT) on the ALOM system controller card.
See Chapter 4 for more information about the various ports.
4. Connect the alphanumeric terminal’s AC power cord to an AC connector and turn
it on.
5. Set the terminal to receive:
■
■
■
■
■
9600 baud
8 bits
No parity
1 stop bit
No handshake protocol
See the documentation accompanying your terminal for information about how to
configure it.
Note – At this point, all system information is delivered to you by way of the
ALOM system controller card and its software. ALOM is the default method for
communicating with the Netra 440 server. For detailed information about using
ALOM, refer to the Advanced Lights Out Manager User’s Guide for the Netra 440 Server
(817-5481-xx) and the Netra 440 Server System Administration Guide (817-3884-xx),
which includes information about reconfiguration options.
Chapter 5
Setting Up a System Console Device
79
Accessing the System Console Through a
TIP Connection
The following procedure assumes that you are setting up a system console device for
the Netra 440 server by connecting the serial port of another Sun system to the serial
management port (SERIAL MGT) of the Netra 440 server.
For detailed information about system console options, refer to the Netra 440 Server
System Administration Guide (817-3884-xx).
1. Ensure that the Sun system to which you are establishing the TIP connection is
powered on and active.
2. Connect the RJ-45 serial cable and RJ45/DB25 adapter.
Use the cable and adapter to connect the other Sun system’s ttyb serial port to the
Netra 440 server’s serial management port (SERIAL MGT). Pinouts, part numbers,
and other details about the serial cable and adapter are provided in the Netra 440
Server Service Manual.
3. Ensure that the /etc/remote file on the Sun system contains an entry for
hardwire.
Most releases of Solaris OS software shipped since 1992 contain an /etc/remote
file with the appropriate hardwire entry. However, if the Sun system is running an
older version of Solaris OS software, or if the /etc/remote file has been modified,
you might need to edit it. See the Netra 440 Server System Administration Guide (8173884-xx) for details.
4. In a terminal window on the other Sun system, type:
hostname% tip hardwire
The other Sun system responds by displaying:
connected
The terminal window is now a TIP window directed to the Netra 440 server through
the other Sun system’s TTYB port. This connection is established and maintained
even when the Netra 440 server is completely powered off or just starting up.
80
Netra 440 Server Installation Guide • March 2006
Note – Use a terminal tool, not a console tool. Some TIP commands might not work
properly in a console tool window.
Note – At this point, all system information is delivered to you by way of the
ALOM system controller card and its software. ALOM is the default method for
communicating with the Netra 440 server. For detailed information about using
ALOM, refer to the Advanced Lights Out Manager User’s Guide for the Netra 440 Server
(817-5481-xx) and the Netra 440 Server System Administration Guide (817-3884-xx),
which includes information about reconfiguration options.
Chapter 5
Setting Up a System Console Device
81
82
Netra 440 Server Installation Guide • March 2006
CHAPTER
6
Powering On and Configuring the
Server
This chapter describes how to power on and configure the server to suit your
application. It contains these sections:
■
■
■
■
“Powering On the Server” on page 83
“Powering Off the System Using the On/Standby Button” on page 86
“Configuring the Server” on page 87
“Accessing Advanced Lights Out Manager (ALOM) Software” on page 93
Powering On the Server
To power on the server, you can use either the On/Standby button located behind
the front bezel, or you can use the keyboard. If you power on from the keyboard,
you can see system output as the server powers on.
Caution – Never move the system when the system power is on. Movement can
cause catastrophic hard drive failure. Always power off the system before moving it.
83
Setting the Rotary Switch
Before you begin powering on the server, make sure that the rotary switch is in the
normal position. This position allows the On/Standby button to control the power
state of the server. For more information on the operation of the rotary switch, refer
to the Netra 440 Server Product Overview (817-3881-xx).
1. Open the front system door.
Press in on the door release latches and lower the system door.
Door release latches
FIGURE 6-1
Opening the System Door
2. Ensure that the rotary switch is set to the normal position.
If the switch is not in the normal position (|), set it now.
84
Netra 440 Server Installation Guide • March 2006
Standby
Rotary switch
Normal
Locked
SCC
Diagnostics
On/Standby button
FIGURE 6-2
Rotary Switch Positions
3. Close the bezel.
Powering On From the Keyboard
1. Connect the server to the power supply.
The server automatically goes into Standby power mode when it is connected to a
power source. See Chapter 4 for instructions on connecting the power cables.
2. Set up a connection to the SERIAL MGT port.
For details, see Chapter 4.
When you switch to the ALOM prompt after initial power-on, you will be logged in
as the admin user and prompted to set a password. You must set this password in
order to execute certain commands.
3. If you are prompted to do so, set a password for the admin user.
The password must contain:
■
■
■
At least two alphabetic characters
At least one numeric or one special character
Between six and eight characters
Once the password is set, the admin user has full permissions and can execute all
ALOM command-line interface (CLI) commands.
Chapter 6
Powering On and Configuring the Server
85
4. Turn on power to any peripherals and external storage devices you have connected
to the server.
Read the documentation supplied with the devices for specific instructions.
5. At the console sc> prompt, type the following command to power on the server:
sc> poweron
Powering On Using the On/Standby Button
1. Connect the server to the power supply.
The server automatically goes into Standby power mode when it is connected to a
power source. See Chapter 4 for instructions on connecting the power cables.
2. Turn on power to any peripherals and external storage devices you have connected
to the server.
Read the documentation supplied with the devices for specific instructions.
3. Set the rotary switch on the front bezel to the Normal (|) position.
See FIGURE 6-2 for more information.
4. Press the On/Standby button.
5. Turn the rotary switch to the Locked position.
This prevents anyone from accidentally powering off the system.
Powering Off the System Using the
On/Standby Button
Caution – Applications running on the Solaris operating system can be adversely
affected by a poorly executed system shutdown. Make sure you have gracefully shut
down any applications before powering off the system.
1. Notify users that the system will be powered down.
2. Back up the system files and data, if necessary.
86
Netra 440 Server Installation Guide • March 2006
3. Ensure that the rotary switch is in the Normal or Diagnostics position.
See FIGURE 6-2 for more information.
4. Press and release the On/Standby button on the front bezel.
The system begins an orderly software system shutdown.
Note – Pressing and releasing the On/Standby button initiates an orderly software
shutdown. Pressing and holding the switch for four seconds causes an immediate
hardware shutdown. Whenever possible, you should initiate an orderly shutdown.
Forcing an immediate hardware shutdown can corrupt the disk drive and cause loss
of data.
5. Wait for the front panel green System Activity indicator to go out.
See “Enclosure Status LEDs” on page 97 for a description of this indicator.
Configuring the Server
The Netra 440 server comes preinstalled with the Solaris 8 OS.
Note – Solaris 9 is also supported on the Netra 440 server; however, you must order
Solaris 9 separately. See the www.sun.com website for more details. You may also
have to install separate packages and patches after you’ve installed Solaris 9. Refer
to the Netra 440 Server Release Notes (817-3885-xx) for more details.
When you power on the server for the first time, you are automatically taken
through a configuration procedure. This procedure consists of a number of
questions, and the answers you give determine how the server is configured.
Complete the software installation worksheet and choose the configuration that best
suits your requirements from the list below. Then follow the instructions in the
appropriate section to configure your server.
■
“Software Configuration Worksheet” on page 88
■
“Configuring With the Server Details Registered as a Name Server” on page 91
■
“Configuring Without the Server Details Registered as a Name Server” on page 91
■
“Configuring a Standalone Server for the First Time” on page 92
■
“Clearing Your Configuration and Starting Again” on page 93
Chapter 6
Powering On and Configuring the Server
87
Software Configuration Worksheet
Use the following worksheet to gather the information that you need to configure
software on the Netra 440 server. You do not need to gather all of the information
that is requested on the worksheet. You only need to collect the information that
applies to your system.
TABLE 6-1
Netra 440 Software Configuration Worksheet
Information Needed to
Install
Description/Example
Your Answers
Network
Is the system connected to a network?
Yes/No
DHCP
Can the system use Dynamic Host configuration Protocol
(DHCP) to configure its network interfaces?
Yes/No
Host Name
Host name that you choose for the system.
IP Address
If you are not using DHCP, supply the IP address for the
system.
Example: 129.200.9.1
Subnet
If you are not using DHCP, is the system part of a subnet?
If yes, what is the netmask of the subnet?
Example: 255.255.0.0
Yes/No
IPv6
Do you want to enable IPv6 on this machine?
Yes/No
Kerberos
Do you want to configure Kerberos security on this
machine?
If yes, gather this information:
Default Realm:
Administration Server:
First KDC:
(Optional) Additional KDCs:
Yes/No
Name Service
Which name service should this system use?
NIS+/NIS/DNS/LDAP/
None
Domain Name
If the system uses a name service, supply the name of the
domain in which the system resides.
NIS+ and NIS
Do you want to specify a name server or let the installation
program find one?
If you want to specify a name server, provide the following
information.
Server’s host name:
Server’s IP address:
88
Netra 440 Server Installation Guide • March 2006
Specify One/Find One
TABLE 6-1
Netra 440 Software Configuration Worksheet (Continued)
Information Needed to
Install
Description/Example
Your Answers
DNS
Provide IP addresses for the DNS server. You must enter at
least one IP address, but you can enter up to three
addresses.
Server’s IP Address(es):
You can enter a list of domains to search when a DNS query
is made.
Search Domain:
Search Domain:
Search Domain:
LDAP
Provide the following information about your LDAP
profile.
Profile Name:
Profile Server:
IP Address:
Default Router
Do you want to specify a default IP router (gateway) or let
the Solaris Web Start installation program find one?
If you want to specify a default router, provide the
following information.
Router IP address:
Specify one/Find one
Time Zone
How do you want to specify your default time zone?
Geographic region
Offset from GMT
Time zone file
Locales
For which geographic regions do you want to install
support?
Power Management
Do you want to use Power Management?
Yes/No
Proxy Server
Configuration
(Only available in
the Solaris Web
Start program)
Do you have a direct connection to the Internet or do you
need to use a proxy server to gain access to the Internet?
If you use a proxy server, provide the following
information.
Host:
Port:
Direct Connection/Proxy
Server
Automatic reboot
or CD/DVD
ejection
Reboot automatically after software installation?
Eject CD/DVD automatically after software installation?
Yes/No
Yes/No
Chapter 6
Powering On and Configuring the Server
89
TABLE 6-1
Netra 440 Software Configuration Worksheet (Continued)
Information Needed to
Install
Description/Example
Your Answers
Software Group
Which Solaris Group do you want to install?
Entire Plus OEM
Entire
Developer
End User
Core
Custom Package
Selection
Do you want to add or remove software packages from the
Solaris Software Group that you install?
Note - When you select which packages to add or remove,
you need to know about software dependencies and how
Solaris software is packaged.
64-bit
Do you want to install support for 64-bit applications?
Select Disks
On which disks do you want to install the Solaris software?
Example: c0t0d0
Preserver Data
Do you want to preserve any data that exists on the disks
where you are installing the Solaris software?
Yes/No
Auto-layout File
Systems
Do you want the installation program to lay out file
systems on your disks automatically?
If yes, which file systems should be used for auto-layout?
Example:/,/opt,/var
If no, you must provide file system configuration
information.
Yes/No
Mount Remote File
Systems
(only available in
the Solaris
suninstall
program)
Does this system need to access software on another file
system?
If yes, provide the following information about the remote
file system.
Server:
IP Address:
Remote File System:
Local Mount Point:
Yes/No
90
Netra 440 Server Installation Guide • March 2006
Yes/No
Configuring With the Server Details Registered as
a Name Server
Note – Follow the instructions in this section only if you have a name server
installed on your network. For instructions on using a name server to automate the
process of configuring the Solaris operating system on multiple servers, refer to the
Solaris Advanced Installation Guide that comes with the Solaris software.
During the boot process, you are prompted for certain information. The information
you provide determines the configuration of the server.
1. Specify the type of terminal you are using to communicate with the server.
2. Specify whether you need IPv6 enabled, and then follow the instructions on the
screen.
3. Specify whether you want to enable the Kerberos Security mechanism, and then
follow the instructions on the screen.
4. When prompted, give a password (if any) for users logging in as superuser.
Configuring Without the Server Details Registered
as a Name Server
Follow the instructions in this section if you do not have a name server configured
on your network.
Tip – Read these instructions through before you follow them, to see what
information the system prompts you for when you start it for the first time.
During booting you are prompted for certain information. The information you
provide determines the configuration of the server.
1. Specify the type of terminal you are using to communicate with the server.
2. When asked if you want the server to be networked, answer Yes.
3. Specify whether the IP address is to be configured by DHCP.
If you plan to configure the IP address manually, specify an IP address when
prompted.
4. Specify which of the Ethernet ports you intend to use as the primary Ethernet
connection.
Chapter 6
Powering On and Configuring the Server
91
5. Specify a host name for the server.
6. If prompted, specify the IP address for the system.
The system prompts you for this address if you declined to use DHCP in Step 3. It
also asks you whether the server is to be part of a subnet. If you answer yes, the
system prompts you to provide the netmask of the subnet.
7. Specify whether you need IPv6 enabled, and then follow the instructions on the
screen.
8. Specify whether you want to enable the Kerberos Security mechanism, and then
follow the instructions on the screen.
9. Specify the name service you want the server to use.
10. Specify the name of the domain of which the server will be a part.
11. Specify whether you want the system to search the network for a name server or
whether you want it to use a particular name server.
12. If you chose to use a particular name server, specify the host name and IP address
of the name server.
13. At the name server prompt, create entries in the network administration files for
the system you are setting up.
14. At the system you are setting up, follow the prompts to provide time and date
information.
15. When prompted, give a password (if any) for users logging in as superuser.
Configuring a Standalone Server for the First
Time
1. Specify the type of terminal you are using to communicate with the server.
2. When prompted to indicate whether you want the server to be networked, specify
No.
3. Specify a host name for the server.
4. Confirm the information you have given.
5. Specify the date and time information.
6. When prompted, give a password (if any) for users logging in as superuser.
92
Netra 440 Server Installation Guide • March 2006
Clearing Your Configuration and Starting Again
If you want to start the power on process again, as if from a previously unused
server, you must clear the configuration of the server.
1. At the Solaris prompt, type:
# sys-unconfig
2. When prompted to confirm that you want to create a “blank” server, type y.
3. When the OpenBoot prompt appears, type:
ok> boot
4. Follow the instructions in one of the following sections:
■
■
■
“Configuring With the Server Details Registered as a Name Server” on page 91
“Configuring Without the Server Details Registered as a Name Server” on page 91
“Configuring a Standalone Server for the First Time” on page 92
Accessing Advanced Lights Out
Manager (ALOM) Software
For detailed ALOM instructions and configuration information, refer to the Sun
Advanced Lights Out Manager User Guide For the Netra 440 Server (817-5481-xx).
The ALOM software is preinstalled on the server and is ready to run as soon as
power is supplied to the server. However, you need to perform some basic
configuration steps to customize the ALOM software to suit your application.
Displaying the ALOM Prompt
1. At the command prompt, type the default keystroke sequence (#.) to display the
ALOM prompt:
# #.
Chapter 6
Powering On and Configuring the Server
93
Note – When you switch to the ALOM prompt after initial power-on, you are
logged in as the admin user and prompted to set a password. You must set this
password in order to execute certain commands.
2. If you are prompted to do so, set a password for the admin user.
The password must contain:
■
■
■
At least two alphabetic characters
At least one numeric or one special character
Between six and eight characters
Once the password is set, the user has full permissions and can execute all ALOM
command-line interface (CLI) commands.
Displaying the Console Prompt
● At the ALOM prompt, type:
sc> console
More than one ALOM user can be connected to the server console stream at a time,
but only one user is permitted to type input characters to the console.
If another user is logged on and has write capability, you will see the message below
after issuing the console command:
sc> Console session already in use. [view mode]
Taking Console Write Capability Away From
Another User
● At the ALOM prompt, type:
sc> console -f
94
Netra 440 Server Installation Guide • March 2006
APPENDIX
A
Installing the DVD Drive
Both DVD-ROM drives and DVD-RW drives are supported in the Netra 440 server
(both are referred to as the DVD drive in this document). The DVD drive is not a
hot-swappable component; you must power down the server before you can remove
or install a DVD drive into the system. The DVD drive does not come standard with
the Netra 440 server, so you must order it separately. Following are the part numbers
for the DVD drives:
■
■
DVD-ROM drive—X7423A
DVD-RW drive—X7424A
Consult your authorized Sun sales representative or service provider to order a DVD
drive.
You may also need to install additional software and patches for the DVD-RW drive.
Refer to the Netra 440 Server Release Notes (817-3885-xx) for more information.
1. Power off the system, if it is not already powered off.
See “Powering Off the System Using the On/Standby Button” on page 86.
2. Attach the antistatic wrist strap.
3. Open the system door.
4. Remove the DVD slot cover, if one is installed.
Pull down on the top of the DVD slot cover, then lift it up and away from the empty
DVD slot (FIGURE A-1). Store the DVD slot cover in a safe place.
95
FIGURE A-1
Removing the DVD Slot Cover
5. Slide the DVD drive into the system until the two DVD drive locking tabs click
into place (FIGURE A-2).
SCC
FIGURE A-2
Installing the DVD drive.
6. Close the system door.
7. Power on the system and perform a configuration reboot.
See “Powering On the Server” on page 83.
96
Netra 440 Server Installation Guide • March 2006
APPENDIX
B
Netra 440 Server LEDs
This appendix gives information on the Netra 440 server LEDs. All of the
information in this appendix is related directly to instructions in this guide.
■
■
■
■
■
■
■
“Enclosure Status LEDs” on page 97
“Alarm LEDs” on page 98
“Hard Drive LEDs” on page 101
“Fan Tray LEDs (0-2)” on page 101
“Power Supply LEDs” on page 102
“Ethernet Connection LEDs” on page 102
“Network Management Port LED” on page 103
Enclosure Status LEDs
As you install your Netra 440 server, be aware of several enclosure status LED
indicators on both the front and back panels. These indicators provide general
enclosure status, alert you to system problems, and help you to determine the
location of system faults.
At the top left of the server front are three general enclosure status LEDs. Two of
these LEDs, the system Service Required LED and the System Activity LED, provide a
snapshot of the overall enclosure status. One LED, the Locator LED, helps you to
locate a specific system quickly, even though it might be one of many systems in a
room. The Locator LED is lit by command from the administrator. For instructions,
refer to the Netra 440 Server Diagnostics and Troubleshooting Guide (817-3886-xx).
Other LEDs located on the front of the server work in conjunction with specific fault
LED icons. For example, a power supply fault illuminates the associated power
supply Service Required LED and the system Service Required LED. Since all front
panel status LEDs are powered by the server’s 5-volt standby power source, fault
97
LEDs remain lit for any fault condition that results in a system shutdown. Locator,
Service Required, and System Activity LEDs are also found at the upper-left corner
of the back panel.
The enclosure status LEDs operate as described in the following table.
TABLE B-1
Enclosure Status LEDs
Name
Icon
Description
Locator
This white LED is lit by Solaris OS command, by Sun Management Center
software, or by Sun Remote System Control software, to locate a system.
See the Netra 440 Server System Administration Guide for more information
Service Required
This amber LED lights when system hardware or software has detected a
system fault. This LED lights for any faults or failures detected in the
following areas:
• Motherboard
• CPU/memory module
• DIMM
• Hard drive
• Fan trays
• Power supply
In addition to the system Service Required LED, other fault LEDs might
also be lit, depending on the nature of the fault. If the system Service
Required LED is lit, check the status of other fault LEDs on the front panel
to determine the nature of the fault. See the Netra 440 Server Diagnostics and
Troubleshooting Guide for more information.
System Active
This green LED lights when the ALOM detects that Solaris OS is running.
Alarm LEDs
The alarm LEDs are located at the front of the system, along the left side of the front
cover.
The dry contact alarm card has four LED status indicators that are supported by
ALOM. Information about the alarm indicators and dry contact alarm states is
provided in TABLE B-2. For more information about alarm indicators, refer to the Sun
Advanced Lights Out Manager Software User’s Guide for the Netra 440 Server (817-5481xx). For more information about an API to control the alarm indicators, refer to the
Netra 440 Server System Administration Guide (817-3884-xx).
98
Netra 440 Server Installation Guide • March 2006
TABLE B-2
Indicator
and Relay
Labels
Critical
(Alarm0)
Alarm Indicators and Dry Contact Alarm States
Indicator
Color
Application or
Server State
Red
Server state
(Power
on/off and
Solaris OS
functional/
not
functional)
Application
state
Major
(Alarm1)
Red
Application
state
Condition or Action
System
Indicator
State
Alarm
Indicator
State
Relay
NCd
State
Relay
NO\
State
No power input.
Off
Off
Closed
Open
Default
state
System power off.
Off
On
Closed
Open
Input
power
connected
System power
turns on; Solaris
OS not fully
loaded.
Off
On
Closed
Open
Transient
state
Solaris OS
successfully
loaded.
On
Off
Open
Closed
Normal
operating
state
Watchdog
timeout.
Off
On
Closed
Open
Transient
state;
reboot
Solaris OS
Solaris OS
shutdown
initiated by user.*
Off
On
Closed
Open
Transient
state
Lost input power.
Off
Off
Closed
Open
Default
state
System power
shutdown
initiated by user.
Off
On
Closed
Open
Transient
state
User sets Critical
alarm on.\
—
On
Closed
Open
Critical
fault
detected
User sets Critical
alarm off.\
—
Off
Open
Closed
Critical
fault
cleared
User sets Major
alarm on.\
—
On
Open
Closed
Major
fault
detected
User sets Major
alarm off.\
—
Off
Closed
Open
Major
fault
cleared
Appendix B
Comments
Netra 440 Server LEDs
99
TABLE B-2
Indicator
and Relay
Labels
Minor
(Alarm2)
User
(Alarm3)
Alarm Indicators and Dry Contact Alarm States (Continued)
System
Indicator
State
Alarm
Indicator
State
Relay
NCd
State
Relay
NO\
State
User sets Minor
alarm on.\
—
On
Open
Closed
Minor
fault
detected
User sets Minor
alarm off.\
—
Off
Closed
Open
Minor
fault
cleared
User sets User
alarm on.\
—
On
Open
Closed
User fault
detected
User sets User
alarm off.\
—
Off
Closed
Open
User fault
cleared
Indicator
Color
Application or
Server State
Condition or Action
Amber
Application
state
Amber
Application
state
Comments
* The user can shut down the system using commands such as init0 and init6. This does not include the system power shutdown.
\ Based on a determination of the fault conditions, the user can turn the alarm on using the Solaris platform alarm API or ALOM CLI.
For more information about the alarm API, see the Netra 440 Server System Administration Guide and for more information about ALOM
CLI, see the Sun Advanced Lights Out Manager Software User’s Guide for the Netra 440 Server.
d NC state is the normally closed state. This state represents the default mode of the relay contacts in the normally closed state.
\ NO state is the normally open state. This state represents the default mode of the relay contacts in the normally open state.
In all cases when the user sets an alarm, a message is displayed on the console. For
example, when the critical alarm is set, the following message is displayed on the
console:
SC Alert: CRITICAL ALARM is set
Note that in some instances when the critical alarm is set, the associated alarm
indicator is not lit.
100
Netra 440 Server Installation Guide • March 2006
Hard Drive LEDs
The hard drive LEDs are located at the front of the system, behind the front cover,
directly above each hard drive.
The following table describes the hard drive LEDs.
TABLE B-3
Hard Drive LEDs
Name
Icon
Description
OK-to-Remove
This blue LED lights when the hard drive has been taken offline and is safe
to remove from the system.
Service Required
Reserved for future use.
Activity
This green LED lights when the system is powered on and a disk is present
in the monitored drive slot. This LED flashes slowly during the hard drive
hot-swap procedure. It flashes rapidly when the disk is spinning up or
down, or during read/write activity.
Fan Tray LEDs (0-2)
The fan tray LEDs are located behind the front cover, directly above each fan tray.
Note that these LEDs give information only for fan trays 0-2; they do not give
information on fan tray 3, located inside the system.
The following table describes the fan tray LEDs.
TABLE B-4
Fan Tray LEDs
Name
Description
Service Required
This amber LED lights when there is a fault detected with
the fan tray. Note that the Service Required LEDs on the
front and back panels also light when this occurs.
Activity
This green LED lights when the fan tray is on and
operating normally.
Appendix B
Netra 440 Server LEDs
101
Power Supply LEDs
The power supply LEDs are located at the rear of the system on each power supply.
The following table describes the power supply LEDs.
TABLE B-5
Power Supply LEDs
Name
Icon
Description
OK-toRemove
This blue LED lights when it is safe to remove the power
supply from the system. This LED is controlled by the
software only.
Service
Required
This amber LED lights when the power supply’s internal
circuitry detects a fault. Note that the Service Required LEDs
on the front and back panels also light when this occurs.
Power OK
This green LED lights when the power supply is in standby
mode or when it is on and outputting regulated power within
specified limits.
Ethernet Connection LEDs
A set of Ethernet LEDs is located on each Ethernet port. The Ethernet LEDs operate
as described in TABLE B-6.
TABLE B-6
102
Ethernet LEDs
Name
Description
Link/Activity
This green LED lights when a link is established at the particular port with
its link partner, and blinks to indicate activity.
Speed
This amber LED lights when a Gigabit Ethernet connection is established,
and is off when a 10/100-Mbps Ethernet connection is established.
Netra 440 Server Installation Guide • March 2006
Network Management Port LED
The network management port has a Link LED that operates as described in
TABLE B-7.
TABLE B-7
Network Management Port LED
Name
Description
Link
This green LED is lit when an Ethernet connection is present.
Appendix B
Netra 440 Server LEDs
103
104
Netra 440 Server Installation Guide • March 2006
APPENDIX
C
Selecting a Boot Device
The boot device is specified by the setting of an OpenBoot configuration variable
called boot-device. The default setting of this variable is disk net. Because of
this setting, the firmware first attempts to boot from the system hard drive, and if
that fails, from the on-board NET0 Gigabit Ethernet interface.
This procedure assumes that you are familiar with the OpenBoot firmware and that
you know how to enter the OpenBoot environment. For more information, see the
Netra 440 Server System Administration Guide (817-3884-xx).
Note – The serial management port on the ALOM card is preconfigured as the
default system console port. For more information, see the Netra 440 Server Product
Overview (817-3881-xx).
If you want to boot from a network, you must connect the network interface to the
network. See Chapter 4.
● At the ok prompt, type:
ok setenv boot-device device-specifier
Where the device-specifier is one of the following:
■
■
■
■
■
■
■
■
cdrom – Specifies the DVD drive
disk – Specifies the system boot disk (internal disk 0 by default)
disk0 – Specifies internal drive 0
disk1 – Specifies internal drive 1
disk2 – Specifies internal drive 2
disk3 – Specifies internal drive 3
net, net0, net1– Specifies the network interfaces
full path name – Specifies the device or network interface by its full path name
105
Note – The Solaris OS modifies the boot-device variable to its full path name, not
the alias name. If you choose a nondefault boot-device variable, the Solaris OS
specifies the full device path of the boot device.
Note – You can specify the name of the program to be booted as well as the way the
boot program operates. For more information, refer to the OpenBoot 4.x Command
Reference Manual in the OpenBoot Collection AnswerBook for your specific Solaris OS
release.
If you want to specify a network interface other than an onboard Ethernet interface
as the default boot device, you can determine the full path name of each interface by
typing:
ok show-devs
The show-devs command lists the system devices and displays the full path name
of each PCI device.
106
Netra 440 Server Installation Guide • March 2006
APPENDIX
D
Managing Network Interfaces
This appendix describes how to manage network interfaces. This appendix contains
the following sections:
■
■
■
■
■
“Network Interfaces” on page 107
“Redundant Network Interfaces” on page 108
“Attaching a Twisted-Pair Ethernet Cable” on page 108
“Configuring the Primary Network Interface” on page 109
“Configuring Additional Network Interfaces” on page 111
Network Interfaces
The Netra 440 server provides two on-board Sun Gigabit Ethernet interfaces, which
reside on the system motherboard and conform to the IEEE 802.3z Ethernet
standard. The Ethernet interfaces operate at 10 Mbps, 100 Mbps, and 1000 Mbps.
Two back panel ports with RJ-45 connectors provide access to the on-board Ethernet
interfaces. Each interface is configured with a unique Media Access Control (MAC)
address. Each connector features two LEDs, as described in the Netra 440 Server
Product Overview (817-3881-xx). Additional Ethernet interfaces or connections to
other network types are available by installing the appropriate PCI interface cards.
The system’s onboard interfaces can be configured for redundancy, or an additional
network interface card can serve as a redundant network interface for one of the
system’s on-board interfaces. If the active network interface becomes unavailable,
the system can automatically switch to the redundant interface to maintain
availability. This capability is known as automatic failover and must be configured at
the Solaris OS level. In addition, this configuration provides outbound data load
balancing for increased performance. For additional details, see “Redundant
Network Interfaces” on page 108.
107
The Ethernet driver is installed automatically during the Solaris OS installation
procedure.
For instructions on configuring the system network interfaces, see:
■
■
“Configuring the Primary Network Interface” on page 109
“Configuring Additional Network Interfaces” on page 111
Redundant Network Interfaces
You can configure your system with redundant network interfaces to provide a
highly available network connection. Such a configuration relies on special Solaris
OS features to detect a failed or failing network interface and automatically switch
all network traffic over to the redundant interface. This capability is known as
automatic failover.
To set up redundant network interfaces, you can enable automatic failover between
the two similar interfaces using the IP Network Multipathing feature of the Solaris
OS. For additional details, refer to the Netra 440 Server System Administration Manual
(817-3884-xx). You can also install a pair of identical PCI network interface cards, or
add a single card that provides an interface identical to one of the two on-board
Ethernet interfaces.
To ensure maximum redundancy, each onboard Ethernet interface resides on a
different PCI bus. To help further maximize system availability, ensure that any
additional network interfaces added for redundancy also reside on separate PCI
buses, which are supported by separate PCI bridges. For additional details, refer to
the Netra 440 Server Product Overview (817-3881-xx).
Attaching a Twisted-Pair Ethernet Cable
1. Locate the RJ-45 twisted-pair Ethernet (TPE) connector for the appropriate
Ethernet interface—the left connector (net0) or the right connector (net1).
For a PCI Ethernet adapter card, see the documentation supplied with the card.
2. Connect a Category-5 unshielded twisted-pair (UTP) cable to the appropriate
RJ-45 connector on the system back panel.
You should hear the connector tab click into place. The UTP cable length must not
exceed 100 meters (328 feet).
108
Netra 440 Server Installation Guide • March 2006
3. Connect the other end of the cable to the RJ-45 outlet of the appropriate network
device.
You should hear the connector tab click into place.
Consult your network documentation if you need more information about how to
connect to your network.
If you are adding an additional network interface to the system, you need to
configure that interface. See “Configuring Additional Network Interfaces” on
page 111.
Configuring the Primary Network
Interface
For background information, see “Network Interfaces” on page 107.
If you are using a PCI network interface card, see the documentation supplied with
the card.
1. Choose a network port, using the following table as a guide.
Ethernet Port
PCI Bus/Clock Rate
OpenBoot PROM
devalias
Device Path
1
PCI 2B/66 MHz
net1
/pci@1f,700000/network@1
0
PCI 1A/66 MHz
net0
/pci@1c,600000/network@2
2. Attach an Ethernet cable to the port you chose.
See “Attaching a Twisted-Pair Ethernet Cable” on page 108.
3. Choose a network host name for the system and make a note of it.
You need to furnish the name in a later step.
The host name must be unique within the network. It can consist only of
alphanumeric characters and the dash (-). Do not use a dot in the host name. Do not
begin the name with a number or a special character. The name must not be longer
than 30 characters.
4. Determine the unique Internet Protocol (IP) address of the network interface and
make a note of it.
You need to furnish the address in a later step.
An IP address must be assigned by the network administrator. Each network device
or interface must have a unique IP address.
Appendix D
Managing Network Interfaces
109
During installation of the Solaris OS, the software automatically detects the system’s
on-board network interfaces and any installed PCI network interface cards for which
native Solaris device drivers exist. The operating environment then asks you to
select one of the interfaces as the primary network interface and prompts you for its
host name and IP address. You can configure only one network interface during
installation of the operating system. You must configure any additional interfaces
separately, after the operating system is installed. For more information, see
“Configuring Additional Network Interfaces” on page 111.
For Additional Information
After completing this procedure, the primary network interface is ready for
operation. However, in order for other network devices to communicate with the
system, you must enter the system’s IP address and host name into the namespace
on the network name server. For information about setting up a network name
service, see the Solaris Naming Configuration Guide for your specific Solaris OS
release.
The device driver for the system’s on-board Sun Gigabit Ethernet interfaces is
automatically installed with the Solaris OS release. For information about operating
characteristics and configuration parameters for this driver, refer to the Platform
Notes: The Sun GigaSwift Ethernet Device Driver.
This document is available on the Solaris on Sun Hardware AnswerBook, which is
provided on the Solaris Supplement CD for your specific Solaris OS release.
If you want to set up an additional network interface, you must configure it
separately, after installing the operating environment. See “Configuring Additional
Network Interfaces” on page 111.
Note – The Netra 440 server conforms to the Ethernet 10/100BASE-T standard,
which states that the Ethernet 10BASE-T link integrity test function should always
be enabled on both the host system and the Ethernet hub. If you have problems
establishing a connection between this system and your hub, verify that the Ethernet
hub also has the link test function enabled. Consult the manual provided with your
hub for more information about the link integrity test function.
110
Netra 440 Server Installation Guide • March 2006
Configuring Additional Network
Interfaces
Perform the following tasks to prepare an additional network interface:
■
If you are setting up a redundant network interface, see “Redundant Network
Interfaces” on page 108.
■
If you need to install a PCI network interface card, follow the installation
instructions in the Netra 440 Server Service Manual (817-3883-xx).
■
Attach an Ethernet cable to the appropriate port on the system back panel. See
“Attaching a Twisted-Pair Ethernet Cable” on page 108. If you are using a PCI
network interface card, see the documentation supplied with the card.
Note – All internal devices, except hard drives, must be installed by qualified
service personnel only. Installation procedures for these components are covered in
the Netra 440 Server Service Manual (817-3883-xx).
1. Choose a network host name for each new interface.
You need to furnish the name in a later step.
The host name must be unique within the network. It can consist only of
alphanumeric characters and the dash (-). Do not use a dot in the host name. Do not
begin the name with a number or a special character. The name must not be longer
than 30 characters.
Usually an interface host name is based on the system host name. For example, if the
system is assigned the host name sunrise, the added network interface could be
named sunrise-1. For more information, see the installation instructions
accompanying the Solaris OS.
2. Determine the Internet Protocol (IP) address for each new interface.
You need to furnish the IP address in a later step.
An IP address must be assigned by your network administrator. Each interface on a
network must have a unique IP address.
3. Boot the operating system, if it is not already running.
Be sure to perform a reconfiguration boot if you just added a new PCI network
interface card. See “Initiating a Reconfiguration Boot” on page 114.
4. Log in to the system as superuser.
5. Create an appropriate /etc/hostname file for each new network interface.
Appendix D
Managing Network Interfaces
111
The name of the file you create should be of the form /etc/hostname.typenum,
where type is the network interface type identifier (some common types are ce, le,
hme, eri, and ge) and num is the device instance number of the interface according
to the order in which it was installed in the system.
For example, the file names for the system’s Gigabit Ethernet interfaces are
/etc/hostname.ce0 and /etc/hostname.ce1 If you add a PCI Fast Ethernet
adapter card as a third interface, its file name should be /etc/hostname.eri0. At
least one of these files—the primary network interface—should exist already, having
been created automatically during the Solaris OS installation process.
Note – The documentation accompanying the network interface card should
identify its type. Alternatively, you can enter the show-devs command from the ok
prompt to obtain a list of all installed devices.
6. Edit the /etc/hostname file(s) created in Step 5 to add the host name(s)
determined in Step 1.
Following is an example of the /etc/hostname files required for a system called
sunrise, which has two on-board Sun Gigabit Ethernet interfaces (ce0 and ce1)
and a PCI Fast Ethernet adapter card (eri2). A network connected to the on-board
ce0 and ce1 interfaces would recognize the system as sunrise and sunrise-1,
while networks connected to the PCI-based eri0 interface would recognize the
system as sunrise-2.
sunrise #
sunrise
sunrise #
sunrise-1
sunrise #
sunrise-2
cat /etc/hostname.ce0
cat /etc/hostname.ce1
cat /etc/hostname.eri0
7. Create an entry in the /etc/hosts file for each active network interface.
An entry consists of the IP address and the host name for each interface.
112
Netra 440 Server Installation Guide • March 2006
The following example shows an /etc/hosts file with entries for the three network
interfaces used as examples in this procedure.
sunrise # cat /etc/hosts
#
# Internet host table
#
127.0.0.1
localhost
129.144.10.57 sunrise loghost
129.144.14.26 sunrise-1
129.144.11.83 sunrise-2
8. Manually configure and enable each new interface using the ifconfig command.
For example, for the interface eri0, type:
# ifconfig eri0 inet ip-address netmask ip-netmask broadcast +
For more information, see the ifconfig(1M) man page.
After completing this procedure, any new network interfaces are ready for
operation. However, in order for other network devices to communicate with the
system through the new interface, the IP address and host name for each new
interface must be entered into the namespace on the network name server. For
information about setting up a network name service, consult the Solaris Naming
Configuration Guide for your specific Solaris release.
The ce device driver for each of the system’s on-board Sun Gigabit Ethernet
interfaces is automatically configured during Solaris installation. For information
about operating characteristics and configuration parameters for these drivers, refer
to the Platform Notes: The Sun GigaSwift Ethernet Device Driver.
This document is available on the Solaris on Sun Hardware AnswerBook, which is
provided on the Solaris Supplement CD for your specific Solaris release.
Note – The Netra 440 server conforms to the Ethernet 10/100BASE-T standard,
which states that the Ethernet 10BASE-T link integrity test function should always
be enabled on both the host system and the Ethernet hub. If you have problems
establishing a connection between this system and your Ethernet hub, verify that the
hub also has the link test function enabled. Consult the manual provided with your
hub for more information about the link integrity test function.
Appendix D
Managing Network Interfaces
113
Initiating a Reconfiguration Boot
After installing any new internal option or external storage device, you must
perform a reconfiguration boot so that the operating system is able to recognize the
newly installed device(s). In addition, if you remove any device and do not install a
replacement device prior to rebooting the system, you must perform a
reconfiguration boot in order for the operating system to recognize the configuration
change. This requirement also applies to any component that is connected to the
system I2C bus to ensure proper environmental monitoring.
This requirement does not apply to any component that is:
■
Installed or removed as part of a hot-swap operation
■
Installed or removed before the operating system is installed
■
Installed as an identical replacement for a component that is already recognized
by the operating system
To issue software commands, you need to set up an alphanumeric terminal
connection, a local graphics monitor connection, ALOM connection, or a TIP
connection to the Netra 440 server. See Chapter 5 for more information about
connecting the Netra 440 server to a terminal or similar device.
Caution – Before you power on the system, ensure that the system doors and all
panels are properly installed.
This procedure assumes that you are accessing the system console using the serial
management or network management port.
1. Turn on power to any external peripherals and storage devices.
Read the documentation supplied with the device for specific instructions.
2. Turn on power to the alphanumeric terminal or local graphics monitor, or log in to
the ALOM.
3. Turn the rotary switch to the Diagnostics position.
Use the Diagnostics position to run power-on self-test (POST) and OpenBoot
Diagnostics tests to verify that the system functions correctly with the new part(s)
you just installed. See “Setting the Rotary Switch” on page 84 for information about
rotary switch settings.
4. Press the On/Standby button to power on the system.
114
Netra 440 Server Installation Guide • March 2006
5. If you are logged in to the sc> prompt, switch to the ok prompt. Type:
sc> console
6. When the system banner is displayed on the system console, immediately abort
the boot process to access the system ok prompt.
The system banner contains the Ethernet address and host ID. To abort the boot
process, use one of the following methods:
■
■
■
Hold down the Stop (or L1) key and press A on your keyboard.
Press the Break key on the terminal keyboard.
Type the break command from the sc> prompt.
7. At the ok prompt, type the following commands:
ok setenv auto-boot? false
ok reset-all
You must set the auto-boot? variable to false and issue the reset-all
command to ensure that the system correctly initiates upon reboot. If you do not
issue these commands, the system may fail to initialize, because the boot process
was aborted in Step 6.
8. At the ok prompt, type the following command:
ok setenv auto-boot? true
You must set the auto-boot? variable back to true so that the system boots
automatically after a system reset.
9. At the ok prompt, type the following command:
ok boot -r
The boot -r command rebuilds the device tree for the system, incorporating any
newly installed options so that the operating system recognizes them.
Appendix D
Managing Network Interfaces
115
Note – The system can take anywhere from 30 seconds to 20 minutes before the
system banner appears. This time depends on the system configuration (number of
CPUs, memory modules, PCI cards) and the level of POST and OpenBoot
Diagnostics tests being performed. For more information about OpenBoot
configuration variables, refer to the Netra 440 Server System Administration Guide
(817-3884-xx).
10. Turn the rotary switch to the Locked position.
This prevents anyone from accidentally powering off the system. See “Setting the
Rotary Switch” on page 84 for information about rotary switch settings.
11. Close the system door.
The system front panel LED indicators provide power-on status information. For
information about the system LEDs, refer to “Enclosure Status LEDs” on page 97.
If the system encounters a problem during startup, and the rotary switch is in the
Normal position, try restarting the system in diagnostics mode to determine the
source of the problem. Turn the rotary switch to the Diagnostics position and power
cycle the system. See “Powering On the Server” on page 83 for more information.
For information about system diagnostics and troubleshooting, see the Netra 440
Server Diagnostics and Troubleshooting Guide (817-3886-xx).
116
Netra 440 Server Installation Guide • March 2006
Index
Symbols
/etc/hostname file, 111
/etc/hosts file, 112
Numerics
19-inch 2-post hardmount
installing, 45
screw kit, 45
19-inch 4-post hardmount
installing, 19
screw kit, 19
19-inch 4-post slide mount
installing, 24
part number, 18
screw kit, 25
23-inch 2-post hardmount
installing, 42
part number, 18
screw kit, 42
600 mm 4-post hardmount
installing, 36
part number, 18
screw kit, 36
accessing, 93
console prompt, 94
overview, 9
ports, 9
prompt, 93
remote power-off, 114
airflow requirements, 8
alarm board
alarm indicators, 99
alarm states, 99
alarm indicators, 99
critical, 99
major, 99
minor, 100
user, 100
alarm ports, 53
alarm states, dry contact, 99
ALOM
See Advanced Lights Out Manager
ALOM network management port, 61
configuration rules, 52
ALOM serial management port (TTYA), 59
alphanumeric terminal
remote power-off, 114
A
AC power
connectors
location, 73
acoustic noise emissions, 8
Active (enclosure status LED), 98
Activity (hard drive LED), 101
Advanced Lights Out Manager
B
back panel
enclosure status LEDs, table, 98
features, 49, 50
ports
locating, 49, 50
baud rate, 79
117
boot-device (OpenBoot configuration
variable), 105
boxes shipped to you, 2
C
checklist of parts, 2
Cisco L2511 Terminal Server, connecting, 76
clearance, airflow, 8
clearing system configuration, 93
compliance, NEBS, 9
configuring
server
as standalone, 92
with details not registered, 91
with details registered, 91
software, 87
clearing, 93
cooling (heat dissipation), 9
critical, alarm indicator, 99
D
DC ground studs
connecting grounding cable, 51
location, 51
DC input power cable
assembling, 62
connecting, 68
DC power requirements
overcurrent protection, 6
device trees, rebuilding, 115
DVD slot cover
removing, 95
DVD-ROM
installing, 95
part number, 95
DVD-RW
installing, 95
part number, 95
E
enclosure status LEDs
Active, 98
Locator, 98
Service Required, 98
table, 98
environmental specifications, 4
118
Netra 440 Server Installation Guide • March 2006
Ethernet
cable, attaching, 108
configuring interface, 109
interfaces, 107
link integrity test, 110, 113
using multiple interfaces, 110
Ethernet ports, 56
about, 107
configuring redundant interfaces, 108
F
Fault LED
described, 97
front panel
enclosure status LEDs, table, 98
H
hard drives
LEDs, 101
Activity, 101
OK-to-Remove, 101
Service Required, 101
heat dissipation, 9
I
ifconfig (Solaris command), 113
Install Check Tool, 10
installation overview, 13
installation site requirements, 3
installing
optional components, 15
server into rack, 17 to 47
19-inch 2-post hardmount, 45
19-inch 4-post hardmount, 19
19-inch 4-post slide mount, 24
23-inch 2-post hardmount, 42
600 mm 4-post hardmount, 36
L
LEDs
Active (enclosure status LED), 98
Activity (hard drive LED), 101
enclosure status, table, 98
Ethernet LEDs, 102
Fault, described, 97
Locator (enclosure status LED), 98
Locator, described, 97
network management port LED, 103
OK-to-Remove (hard drive LED), 101
power supply, described, 101
Service Required (enclosure status LED), 98
Service Required (hard drive LED), 101
lights out manager
See Advanced Lights Out Manager, 9
link integrity test, 110, 113
local graphics monitor
remote power-off, 114
Locator LED
described, 97
M
major, alarm indicator, 99
minor, alarm indicator, 100
moving the system, precautions, 83
N
NEBS compliance, 9
Net Connect monitoring services, 11
network
name server, 113
primary interface, 110
network interfaces
about, 107
configuring additional, 111
redundant, 108
normally closed (NC), relay state, 100
normally open (NO), relay state, 100
O
OK-to-Remove (hard drive LED), 101
On/Standby button, 84, 86
OpenBoot commands
show-devs, 106, 112
OpenBoot configuration variables
boot-device, 105
OpenBoot firmware
selecting a boot device, 105
optional components
installing, 15
overcurrent protection, 6
circuit breakers, 6
P
parity, 79
parts
checklist of, 2
password, admin user, 85, 94
PCI cards
device names, 106
physical specifications, 3
ports
alarm, 53
ALOM network management, 61
ALOM serial management (TTYA), 59
Ethernet, 56
SCSI, 57
serial, 54
USB, 55
power specifications, 5
power supplies
LEDs, described, 101
powering off, 86
powering on, 83 to 86
from keyboard, 85
using On/Standby button, 86
R
rackmount kits
part numbers
19-inch 4-post slide mount, 18
23-inch 2-post hardmount, 18
600 mm 4-post hardmount, 18
reconfiguration boot, 114
redundant network interfaces, 108
relay state
normally closed (NC), 100
normally open (NO), 100
RJ-45 twisted-pair Ethernet (TPE) connector, 108
rotary switch
location, 84
locked position, 86
normal position, 84
setting, 84
S
SCSI port, 57
serial port, 54
connecting to, 79
Index
119
Service Required (enclosure status LED), 98
Service Required (hard drive LED), 101
shipping (what you should receive), 2
show-devs (OpenBoot command), 106, 112
software configuration, 87
worksheet, 88
Solaris commands
ifconfig, 113
Solaris media kit, contents of, 14
specifications
environmental, 4
physical, 3
power, 5
SRS Net Connect, 11
standby power, 5
storage environment, 4
Sun Install Check Tool, 10
Sun Store web site, 15
system console
accessing via tip connection, 80
sys-unconfig command, using, 93
T
tip connection, 80
U
USB ports, 55
user, alarm indicator, 100
V
ventilation requirements, 8
120
Netra 440 Server Installation Guide • March 2006