1
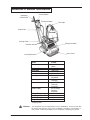
Electronic Service
Manuals
This electronic document is provided as a service to our customers.
We do not create the contents of the information contained in this document. Should you have detailed questions pertaining to the information
contained in this document, you may contact Michco, or the manufacturer which provided the original information in this electronic deliverable. Michco’s only part in this electronic deliverable was the electronic
assembly process. By providing this manual on line we are not guaranteeing parts availability.
You may contact Michco through the following methods:
Phone (517) 484-9312 or (800) 331-3339
2011 N. High St. -- Lansing, Michigan -- 48906
Fax: (517) 484-9836
Email: [email protected]
Web site: www.Michco.Com
Parts Web site: www.FloorMachineParts.Com
Order Parts on Line at:
www.FloorMachineParts.Com
Directly to Parts & Service:
By Email: [email protected]
By Fax: (517) 702-2041
By Voice: Use numbers above.
Serving the Cleaning Industry Since 1922
Notice: All copyrighted material remains property of original owners, all trademarks are property of respective owners.
Manuals are subject to Manufacturer’s reproduction limitations. Originals or reproductions were provided by manufacturers
through a request. We make no warranty as to the correctness of information provided in this document and you assume
all risk. By placing these manuals on line we are not declaring our corporation to be an manufacturer authorized dealer or
provider, please check our web site for authorized manufacturers we represent.
Operator's
Manual
EZ-8
Sander
READ THIS BOOK
This book has important information for the use and safe operation of this machine. Failure to read
this book prior to operating or attempting any service or maintenance procedure to your Clarke
American Sanders machine could result in injury to you or to other personnel; damage to the machine
or to other property could occur as well. You must have training in the operation of this machine
before using it. If operator(s) cannot read this manual, have it explained fully before attempting to
operate this machine.
Si Ud. o sus operadores no pueden leer el Inglés, se hagan explicar este manual completamente
antes de tratar el manejo o servicio de esta máquina.
All directions given in this book are as seen from the operator’s position at the rear of the machine.
Form No. 70214A
7/03
Printed in the U.S.A.
Contents of this Book
Operator Safety Instructions .........................................................3
Introduction and Machine Specifications ....................................... 5
How to Transport the Machine ...................................................... 6
Machine Set-Up ........................................................................... 7
How to Operate the Machine ........................................................ 7
Sanding Cuts and Sandpaper .................................................... 9
Sander Adjustment Procedures .................................................. 10
Routine Maintenance .................................................................. 11
Troubleshooting ......................................................................... 12
Section II Parts and Service Manual
Assembly Drawing #1 ................................................................ 14
Assembly Parts List #1 .............................................................. 15
Assembly Drawing #2 ................................................................ 16
Assembly Parts List #2 .............................................................. 17
Wiring Diagram .......................................................................... 18
Page
2
Sunbelt EZ - 8 Sander Operator's Manual
OPERATOR SAFETY INSTRUCTIONS
WARNING
AVERTISSEMENT
ADVERTENCIA
DANGER means:
Severe bodily injury or death can occur to you or other personnel if the
DANGER statements found on this machine or in this Owner's Manual are
ignored or are not adhered to. Read and observe all DANGER statements
found in this Owner's Manual and on your machine.
WARNING means:
Injury can occur to you or to other personnel if the WARNING statements
found on your machine or in this Owner's Manual are ignored or are not
adhered to. Read and observe all WARNING statements found in this Owner's
Manual and on your machine.
CAUTION means:
Damage can occur to the machine or to other property if the CAUTION statements found on your machine or in this Owner's Manual are ignored or are not
adhered to. Read and observe all CAUTION statements found in this Owner's
Manual and on your machine.
DANGER:
Failure to read the Owner's Manual prior to operating or attempting any service or maintenance procedure to your Clarke American Sanders machine could result in injury to you or
to other personnel; damage to the machine or to other property could occur as well. You
must have training in the operation of this machine before using it. If your operator(s)
cannot read English, have this manual explained fully before attempting to operate
this machine.
DANGER:
Sanding/finishing wood floors can create an environment that can be a fire hazard or
explosive. Do not operate this machine around solvents, thinners, alcohol, fuel, floor
finishes, wood dust or any other flammable materials. Vapors and wood dust generated by
sanding or finishing wood flooring can create an explosive environment. Cigarette lighters,
pilot lights, electrical sparks and all other sources of ignition should be extinguished or
avoided. Keep work area well ventilated.
DANGER:
Hitting a nail while sanding can cause sparks and create an explosion or fire. Always use
a hammer and punch to countersink all nails before sanding floors.
DANGER:
Spontaneous combustion or an explosion can occur when working with sanding dust. The
sanding dust can ignite and cause injury or damage. Never over fill dust bag or leave
machine unattended with dust in bag. Empty the sanding dust in a metal container clear of
any combustible materials. Do not empty into fire.
DANGER:
Operating a machine that is not completely or fully assembled could result in injury or
property damage. Do not operate this machine until it is completely assembled. Keep
all fasteners tight. Keep adjustments according to machine specifications.
DANGER:
Moving parts of this machine can cause severe injury. Keep hands, feet and loose clothing
away from all moving parts of the sander. Disconnect machine from power source before
accessing the sanding drum, drive belts, or fan chamber. Do not operate unless drum cover,
belt guard, and dust pipe are in place. Never leave machine unattended while motor is running
or connected to power source.
Sunbelt EZ - 8 Sander Operator's Manual
Page
3
Page
DANGER:
Electrocution or injury could occur if the power cord encounters the sanding drum. Keep the
cord clear of the sanding drum. Always lift the power cord over the machine.
DANGER:
Electrocution or severe injury could occur if machine is connected to an electrical system that
is not properly grounded. Do not remove or disable grounding pin.
DANGER:
Electrocution could occur if maintenance or repairs are performed on a machine that has not
been disconnected from the power source. Always unplug machine before servicing.
WARNING:
Sanding dust can be airborne and can be breathed in while operating a sander. Always wear
a dust mask while operating sanding equipment.
WARNING:
Injury to the eyes and/or body can occur if protective clothing and/or equipment is not worn
while sanding.
Always wear safety goggles, protective clothing, and a dust mask while
performing any sanding operation.
CAUTION:
Maintenance and repairs performed by unauthorized personnel could result in damage or
injury. Maintenance and repairs performed by unauthorized personnel will void your warranty.
Servicing of this unit must always be referred to an authorized Clarke American Sanders
distributor.
CAUTION:
Use of this machine to move other objects or to climb on could result in injury or damage. Do
not use this machine as a step or furniture. Do not ride on this machine.
CAUTION:
The machine is heavy. Use the proper lifting technique when transporting the machine. Get
help to lift the machine.
CAUTION:
Serious damage to the floor can occur if the machine is left running in one spot while the
sanding drum is in contact with the floor. To avoid damage to the floor, feather cut in at a normal
sanding rate. Do not dwell while lowering or raising the sanding drum. Always sand at a
constant rate.
4
Sunbelt EZ - 8 Sander Operator's Manual
Introduction & Machine Specifications
Control Switch
Operating
Control Lever
Transport Handle
Dust Pipe
Control Link
Locking Collar
Transport Handle
Handle Latch
Drum Cover
Level Adjustment
Model
Abrasive Size
Abrasive Rate
Drum Rate
Dust Control Rate
Drum Pressure
Leveling Controls
Operating Controls
Motor
Power Cable
Voltage/Frequency
Amperage
Dimensions (in)*
Weight (lbs)*
07058S
8 in x 19 in
sleeve
2830 ft/min
1800 RPM
76 CFM
25 lbs
Externally
Adjustable
Lever
Operated
1½ HPTEFC
Thermally
Protected
40' 12 Gauge
Abrasive
Resistant
115 / 60
12
21½x16x35½"
125
*Shipping Value
CAUTION:
Your equipment may be inappropriate on some installations. Always consult with
the flooring manufacturer on the proper installation, preparation, and finishing of
their product. Determine suitability of your equipment in preparing the product.
Sunbelt EZ - 8 Sander Operator's Manual
Page
5
How to Transport the Machine
Transporting the Machine With Limited
Cargo Area:
To transport the machine, follow this procedure:
1. Lower sanding drum with control lever. See figure
#1.
2. Slide collar up beyond overlap of control link;
remove pin from notch. See figure #2.
3. Twist and remove handle pigtail from motor cord.
See figure #3.
Figure # 1
4. Release handle latch and remove handle from
chassis. See figure # 2.
5. Remove dust pipe from chassis.
6. Lift chassis with transport handles and place in
cargo area. See figure # 4 A and B.
WARNING: Machine is heavy (95 lbs.). To
avoid injury or damage grasp
transport handles firmly; use
proper lifting technique.
Figure # 2
7. Secure chassis to prevent movement in cargo area.
Place handle and dust pipe in cargo area.
A
B
Figure # 4
Page
6
Figure # 3
Sunbelt EZ - 8 Sander Operator's Manual
Machine Set-up
To set up the machine follow this procedure:
1. Familiarize yourself with the machine. Read all
danger, warning, and caution statements as well
as the Operator's Manual. If operator is unable
to read, have the manual explained
before operating.
2. Install handle and fasten latch. Insert control link
into notch and slide collar to pin. See figure # 5.
3. Raise sanding drum with control lever. See
figure # 6.
Figure # 5
4. Install dust tube. Tie dust bag over bell opening
of dust tube.
5. Connect the handle pigtail to the motor cord.
Align ground pin, insert and twist.
To install abrasive on sanding drum, slide abrasive
over drum, center abrasive, and close drum cover.
Figure # 6
Figure # 7
Sunbelt EZ - 8 Sander Operator's Manual
Page
7
How to Operate the Machine
To operate the machine follow this procedure:
1. Set any exposed nails with a hammer and punch
to avoid encounter with sanding drum. Connect
the machine to an appropriate grounded and
fused circuit (power supply). Press the selector
switch to the start (S) position. Once started,
allow switch to return to run (R) position.
1
2
3
4
CAUTION: To prevent damage to the surface,
make sure the machine is always
moving when the sanding drum is
in contact with the floor.
2. Work right to left. For each forward pass, move
the machine 4" over the pass you have just
finished. Retrace your reverse path without
overlapping. See figure # 8.
3. Feather-cut in by easing the sanding drum down
onto the surface with the control lever while the
sander is in motion.
Figure 8
4. When sanding drum is fully engaged with the
surface, release control lever and adjust your
pace for adequate stock removal. Keep sander
in motion while the sanding drum is engaged with
the surface or dwell marks will occur.
5. Move the machine in the direction of the grain in
the wood whenever possible. Sand the surface
at a constant pace.
6. Gradually feather-cut out at the termination point
(the end of your pass) by easing the sanding
drum up with the control lever. Stagger the
termination points for a better blend when
edging. See figure # 8.
7. When replacing abrasive, emptying contents of
dust bag, or when sanding operation is com pleted, press selector switch to off (O) position.
Disconnect the machine from the power supply.
8. Empty dust bag whenever it is 1/3 full. Never
leave a dust bag unattended with sanding dust in
it. Sanding dust can spontaneously ignite and
cause a fire or explosion. Empty dust into a
metal container clear of any combustible material.
Page
8
Sunbelt EZ - 8 Sander Operator's Manual
Sanding Cuts and Sandpaper
Initial Cut
The purpose of the initial cut is to remove old finish and gross imperfections on the floor surface. A coarse
abrasive should be used. If the surface is severely damaged by deep scratches, pre-existing dwell marks,
uneven planks, etc., it may be necessary to sand across or diagonally to the grain to restore evenness to the
surface. If these conditions are not present, the initial cut should be done in the direction of the grain.
If glazing, loading, or burning takes place immediately into an initial cut, select a coarser abrasive. If this
should occur during an initial cut, the abrasive has dulled and must be replaced.
Final Cuts
The purpose of a finishing cut is to remove the scratches produced during the initial cut. Use a fine (60 - 80
grit) grain abrasive.
If the surface remains rough after a finishing cut, it may be necessary to use an even finer grain of abrasive (80
- 100 grit). Care should be taken in selecting the grit size of the abrasive. A very fine grain will close the
pores on a wood floor making admission of a stain difficult.
If glazing or burning should occur immediately into a finishing cut, increase pace. If it should occur during a
finishing cut, the abrasive has dulled and must be replaced.
Grain
Use
8x 19 Sleeve
Cloth Back
Part No./Cnt.
8 x 18 55/64 Sleeve
Paper Back
Part No./Cnt.
24 grit
For removing gross imperfections and restore
evenness to old flooring. To remove build-up of
paints and varnishes.
945930/10
945416/10
40 grit
For the first sanding of new flooring (maple, oak).
For removing minor imperfections and finishes
from old flooring.
945933/10
945418/10
60 grit
For clean-up from initial cut 36 grit.
945935/10
945420/10
80 grit
For final sanding of certain hardwoods. For
clean-up of initial cuts (50 grit).
945936/10
945421/10
100 grit
For final sanding of certain hardwoods and
conifers where a smooth surface is desired.
945937/10
945422/10
Sunbelt EZ - 8 Sander Operator's Manual
Page
9
Sander Adjustment Procedures
DANGER:
Electrocution could occur if maintenance and repairs are performed
on a unit that is not properly disconnected from the power source.
Disconnect the power supply before attempting any maintenance
or service.
DANGER:
Moving parts of this machine can
cause serious injury and/or damage. Keep hands, feet and loose
clothing away from all moving parts
of the sander.
The following information provides details on how to
adjust different features/controls of the sander.
Figure # 9
Dust Shoe
To adjust the dust shoe follow this procedure:
1. Disconnect machine from power supply.
2. Loosen the four screws fastening the dust shoe to
the chassis.
3. Adjust the dust shoe towards the drum to improve
recovery of fine particles.
4. Adjust the dust shoe away from the drum to
improve recovery of coarse particles.
5. Align the dust shoe with the drum and tighten
screws. See figure # 9.
Leveling
To adjust the machine leveling follow this procedure:
1. Locate the leveling screw. See figure # 10.
2. Tighten the screw (compress the leveling spring)
to sand heavier on drive belt side of sanding drum.
Figure # 10
3. Loosen the leveling screw (relax the leveling
spring) to sand heavier on the side opposite the
drive belts.
Page
10
Sunbelt EZ - 8 Sander Operator's Manual
Routine Maintenance
The following items need to be periodically inspected
and maintained to keep your sander in good working
condition.
Sanding Chamber
Periodically blow out the sanding chamber to prevent
large accumulations of debris which could interfere
with the performance of the dust recovery system.
Wheels
Periodically remove the debris from the truck and
caster wheels. Debris can cause waves on a sanded
surface.
Dust Bag
Remove the dust bag from the machine and shake it
thoroughly to remove the sanding dust from the dust
bag. Turn the dust bag inside out and machine wash
in cold water to prevent pore blockage and loss of
dust recovery.
Drive Belt
Periodically check the drive belts for broken cogs or
frayed edges. Frayed edges may indicate poor
tracking. Realign effected belt.
Bearings
Periodically check the bearings for wear or damage
according to the following schedule.
Arbor shaft
Motor shaft
Relubricate every 150
hrs. w/.10 oz. of a NLGI
grade 2, -300F to 2500F,
58-75 SUS at 2100 F,
grease lubricant.
after 1st 5000 hrs.
Fan shaft
After first 1500 hrs.
Sunbelt EZ - 8 Sander Operator's Manual
Page
11
Troubleshooting
Problem
Drive belts jump teeth or squeak.
Cause
Action
Damaged belt.
Replace belt.
Insufficient tension.
Tension drive belt.
Poor belt tracking.
Align Pulley.
Squealing, growling or grinding
noise coming from machine.
Damage and/or worn bearing.
Remove drive belts, rotate arbor
motor and fan shafts to locate
dragging or rough bearing.
Contact an authorized Clarke
American Sanders dealer.
Dust pick-up is poor.
Dust bag is over 1/3 full.
Dust bag is dirty.
Dust shoe is improperly adjusted.
Dust chute is obstructed.
Empty contents of bag.
Shake debris from bag and wash.
Readjust dust shoe.
Remove dust shoe and clear throat.
Motor will not start.
Defective motor starter.
Contact an authorized Clarke
American Sanders dealer.
Contact an authorized Clarke
American Sanders dealer.
Contact an authorized Clarke
American Sanders dealer.
Check connections.
Remove power. Depress reset
button on motor
Contact an authorized Clarke
American Sanders dealer.
Defective start capacitor.
Defective start switch.
Poor connections.
Motor overload tripped.
Defective motor.
Motor runs sluggishly.
Motor overload trips/repeatedly
trips
No power.
Check power supply and connections.
Low voltage from excessive length,
undersized extension cord, or poor
connection.
Locate power source nearer to work
site. Check connections.
Defective run capacitor.
Contact an authorized Clarke
American Sanders dealer.
Defective motor.
Contact an authorized Clarke
American Sanders dealer.
Low voltage from excessive length,
undersized extension cord, or poor
connection.
Remove power, allow motor to cool.
Depress reset button on motor.
Locate power source nearer to
worksite. Check connections.
Contact an authorized Clarke
American Sanders dealer.
Excessive load.
Contact an authorized Clarke
American Sanders dealer
Contact an authorized Clarke
American Sanders dealer.
Contact an authorized Clarke
American Sanders dealer.
Contact an authorized Clarke
American Sanders dealer.
Contact an authorized Clarke
American Sanders dealer.
Defective start switch.
Defective motor starter.
Defective motor.
Defective capacitor.
Uneven cut.
Leveling out of adjustment.
Readjust leveling.
Burning or glazing.
Dull abrasive.
Too fine of an abrasive.
Replace abrasive.
Use a coarser abrasive.
Waves on sanded surface.
Debris on wheels.
Flat spot on tire(s).
Remove and clean wheels.
Replace tires.
Page
12
Sunbelt EZ - 8 Sander Operator's Manual
EZ-8
Sander
Section II
Parts and Service Manual
(70214A)
Sunbelt EZ - 8 Sander Operator's Manual
Page
13
EZ-8 Sander
Assembly Drawing #1 10/01
57
58
56
1
55 52
51
2
4
5
53
6
41
40
8
50
42
43
39
7
44
37
48
38
49
47
30
9
10
11 12
45
23
22
54
25
19 12
46
36
35
16
15
18
14
11
13
17
34
28
33
32
21
23
26
29
31
7
14
20
4
32
Page
27
25
24
Sunbelt EZ - 8 Sander Operator's Manual
EZ-8 Sander
Assembly Drawing #1 11/01
Ref. #
1
2
4
5
6
7
8
9
10
11
12
13
14
15
16
17
18
19
20
21
22
23
24
25
26
27
28
Part No.
41949A
912169
962831
170686
61089A
80027A
50917A
50916A
22122C
902567
915561
920196
66159A
167312
962798
67457A
980681
877307
65005A
60166A
980648
59945A
86113A
920365
80501A
81211A
962689
Description
Cord, Motor
Plug L5-15P
Screw Set 10-32 x 5/16
Nut Conduit ½
Pulley, Fan/Drum
Screw 5/16 -18x1 Sq. Neck
Belt, Fan
Belt, Drum
Cover, Fan
Bearing
Key, Hardened
Nut ½-13 Jam
Pulley, Fan
Ring, Retaining
Screw 10-24 x 1/2
Shaft, Fan
Washer, Bowed
Ring, Retaining
Impeller
Axle, Truck
Spacer
Wheel
Screw ½-13 x 2
Nut 1/2 - 13 Nylock
Key 3/16 x 1¼
Nut, Flanged 5/16 -18
Screw Set ¼-28 x ¼
Qty
1
1
3
1
1
6
1
1
1
2
2
1
1
1
3
1
1
1
1
1
3
2
1
2
1
2
4
Ref. #
29
30
31
32
33
34
35
36
37
38
39
40
41
42
43
44
45
46
47
48
49
50
51
52
53
54
55
56
57
58
Part No.
66161A
86114A
915082
51178A
81211A
67459A
60434A
85835A
920196
980645
60435A
920110
65707A
58698A
58699A
80026A
920284
68015A
69031A
82504A
25903C
81208A
44642A
170637
915580
57423A
77234A
40545A
52465A
51095A
Description
Pulley, Drum
Screw ½-13 x 2½
Key 3/16 x 3/16 x ¾
Bearing, Arbor
Nut, Flanged 5/16 -18
Shaft, Arbor Clamp
Arm, Truck Level
Screw ¼-20x 2½
Nut, ½-13 Jam
Washer 3/8 SAE
Arm, Truck, Lift
Nut 5/16 -18 ESNA
Link Adjust
Spring, Truck Leveling 1
Spring, Drum, Pressure
Bolt, Shoulder 3/8 x ½
Nut ¼ ESNA
Stud
Spacer, Shim
Pin, Clevis 5/16 x ¾
Frame, Main
Nut Flanged 5/16-24
Motor, 1.5Hp 115V/60Hz
Relief, Strain
Key 3/16 x 1½
Ring, Retaining
Label, Lifting Warning
Fan
Cover, Fan
Capacitor Cover
Qty
1
1
1
2
4
1
1
1
1
2
1
1
1
1
1
1
2
1
1
1
2
1
1
1
1
1
1
1
1
Motor Parts Not Illustrated
Motor 44642A
Part No.
41306A
41307A
47409A
47391A
Sunbelt EZ - 8 Sander Operator's Manual
Description
Capacitor Run
Capacitor Start
Starter Switch
Thermal Switch
Qty
1
1
1
1
Page
15
EZ-8 Sander
Assembly Drawing #2 10/01
31
32
26
25
27
28
34 35
33
30
1
63
36
40
26
39 38
29
37
41
67
2
46
42
24
43
66
57
3
44
50
45 47
23
56
49
48
61
51
22
52
62
60
59
55
53
54
64 21
65
20
19
4
10
5
18
7
17
16
11
6
15
14
13
12
8
9
58
Page
16
Sunbelt EZ - 8 Sander Operator's Manual
EZ-8 Sander
Assembly Parts List #2 10/01
Ref. #
1
2
3
4
5
6
7
8
9
10
11
12
13
14
15
16
17
18
19
20
21
22
23
24
25
26
27
28
29
30
31
32
33
Part No.
69106C
69107A
50951A
68285A
23807C
962988
52125A
67612A
962826
67468A
80012A
65310A
920365
59960A
81307A
920284
29405A
51194A
962170
66948A
31223A
22123C
64469A
61659A
65706A
960952
34609A
65618A
980022
920110
980645
63928A
34610A
Description
Tube, Handle
Tube, Dust
Bag, Dust
Support Tube
Guard, Belt
Screw ¼-20 x 1¼
Caster Asm. Complete
Shoe, Dust
Screw 10-24 x 3/8
Shaft, Caster
Bolt, Shoulder 5/16 x 1½
Key, Washer
Nut 1/2 - 13 Nylock
Wheel Caster
Nut, 7/16 -14 Jam
Nut, ¼-20 ESNA
Yoke, Caster
Bearing, Caster
Screw Set 10-24 x ¼
Retainer, Bumper
Bumper, Front
Cover, Front
Handle, Front
Collar
Link, Control
Bolt, Shoulder 3/8 x 3/8
Grip, Lever
Lever, control
Washer, Wave
Nut 5/16 -18 ESNA
Washer 3/8 SAE
Guard, Switch
Grip, Handle
Qty
1
1
1
1
1
2
1
1
4
1
1
1
3
1
1
1
1
2
1
1
1
1
1
1
1
2
1
1
1
1
2
1
2
Ref. #
34
35
36
37
38
39
40
41
42
43
44
45
46
47
48
49
50
51
52
53
54
55
56
57
58
59
60
61
62
63
64
65
66
67
Part No.
930093
97100A
74052A
42183A
911248
41807A
47387A
24525C
81210A
980675
962677
962826
962109
337504
911461
41948A
51523A
962094
170892
920196
980648
55711A
920296
69098A
22603A
70215A
81217A
60906A
962162
77299A
85381A
85517A
980603
70175A
Description
Rivet 1/8
Trim, Vinyl, Black
Plate Safety
Cord Set, Power 115V
Plug 5-15P
Contactor
Switch, Control
Housing Control
Nut, Fixture 3/8 PT
Washer
Screw 10-24 x 3/4
Screw 10-24 x 3/8
Screw 10-24 x 5/8
Relief, Strain
Adapter L5-15R
Cord, Interconnect
Relief, Strain
Screw ¼-20 x 3/8
Washer, ¼ Lock
Nut, ½-13 Jam
Washer ½
Latch
Nut #10 ESNA
Wear, Strip
Drum Expansion
Label
Nut, ¼-20 x .218H Nylk.
Block, Wear
Screw, ¼-20 x ½ Ft.
Label, Caution
Screw, 10-24 x 3/4 PN-SB
Screw, 10-24 x ½ PN-SB
Washer, #10 Lock Ext. Th.
Tag, Warning
Qty
2
Ref
1
1
1
1
1
1
1
1
6
1
2
1
1
1
1
2
2
1
1
1
2
1
1
1
2
2
2
1
2
8
1
1
Accessories Available:
70401A- Package of two disposable paper dust collection bags
837304- Bag retainer for 70401A
Sunbelt EZ - 8 Sander Operator's Manual
Page
17
EZ-8 Sander
Wiring Diagram 8/00
Page
18
Sunbelt EZ - 8 Sander Operator's Manual
Sunbelt EZ - 8 Sander Operator's Manual
Page
19
Clarke® American Sanders U. S. Warranty
This Clarke American Sanders Industrial/Commercial Product is warranted to be free from defects in
materials and workmanship under normal use and service for a period of one year from the date of purchase,
when operated and maintained in accordance with Clarke American Sanders' Maintenance and Operations
Instructions.
This warranty is extended only to the original purchaser for use of the product. It does not cover normal
wear parts such as electrical cable or V-belts.
If difficulty develops with the product, you should:
(a). Contact the nearest authorized Clarke American Sanders repair location or contact Nilfisk-Advance Inc.,
for the nearest authorized Clarke American Sanders repair location. Only these locations are authorized to
make repairs to the product under this warranty.
(b). Return the product to the nearest Clarke American Sanders repair location. Transportation charges to
and from the repair location must be prepaid by the purchaser.
(c). Clarke American Sanders will repair the product and or replace any defective parts without charge within
a reasonable time after receipt of the product.
Clarke American Sanders' liability under this warranty is limited to repair of the product and/or replacement
of parts and is given to purchaser in lieu of all other remedies, including INCIDENTAL AND CONSEQUENTIAL
DAMAGES.
THERE ARE NO EXPRESS WARRANTIES OTHER THAN THOSE SPECIFIED HEREIN. THERE ARE NO
WARRANTIES WHICH EXTEND BEYOND THE DESCRIPTION OF THE FACE HEREOF. NO WARRANTIES,
INCLUDING BUT NOT LIMITED TO WARRANTY OF MECHANTABILITY, SHALL BE IMPLIED. A warranty
registration card is provided with your Clarke American Sanders product. Return the card to assist Clarke
American Sanders in providing the performance you expect from your new floor machine.
Clarke American Sanders reserves the right to make
changes or improvements to its machine without notice.
Always use genuine Clarke American Sanders Parts for repair.
Division of