1
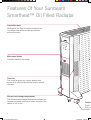
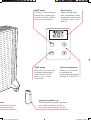
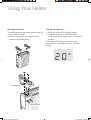
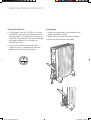
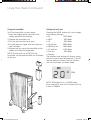
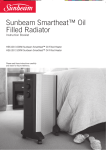
Sunbeam Smartheat™ Oil
Filled Radiator
Instruction Booklet
HE6150TF 1500W Sunbeam Smartheat™ Oil Filled Radiator With 500W Turbo Fan
Please read these instructions carefully
and retain for future reference.
Contents
Sunbeam’s Safety Precautions
Safety Precautions For Your Heater
Sunbeam’s Total Safety System
Features Of Your Sunbeam Smartheat™
Oil Filled Radiator
Using Your Heater
Troubleshooting Guide
Care And Cleaning
1
2
3
4
6
12
12
Sunbeam’s Safety Precautions
•
•
•
•
•
•
•
•
Sunbeam are very safety conscious when
• Do not use an appliance for any purpose other
designing and manufacturing consumer prodthan its intended use.
ucts, but it is essential that the product user
• Do not place an appliance on or near a hot gas
also exercise care when using an electrical
flame, electric element or on a heated oven. Do
appliance. Listed below are precautions which
not place on top of any other appliance.
are essential for the safe use of an electrical
• Do not let the power cord of an appliance hang
appliance:
over the edge of a table or bench top or touch
Read carefully and save all the instructions
any hot surface.
provided with an appliance.
• For safety reasons and to avoid maintenance
Always turn the power off at the power outlet
by unskilled persons, some appliances are
before you insert or remove a plug. Remove by
‘sealed’ using tamperproof screws. Such
grasping the plug - do not pull on the cord.
appliances should always be returned to the
nearest Sunbeam Appointed Service Centre for
Turn the power off and remove the plug when
adjustment or repair if required.
the appliance is not in use and before cleaning.
• Do not operate any electrical appliance with a
Do not use your appliance with an extension
damaged cord or after the appliance has been
cord unless this cord has been checked and
dropped or damaged in any manner. If damage
tested by a qualified technician or service
is suspected, return the appliance to the
person.
nearest Sunbeam Appointed Service Centre for
Always use your appliance from a power
examination, repair or adjustment.
outlet of the voltage (A.C. only) marked on the
• For additional protection, Sunbeam recommend
appliance.
the use of a residual current device (RCD)
Close supervision is necessary when your
with a tripping current not exceeding 30mA in
appliance is being used near children or infirm
the electrical circuit supplying power to your
persons.
appliances.
Never leave an appliance unattended while in
• Do not immerse the appliance in water or any
use.
other liquid.
Young children should be supervised to ensure
that they do not play with the appliance.
If you have any concerns regarding the performance and use of your appliance,
please visit www.sunbeam.com.au or contact the Sunbeam Consumer Service Line.
Ensure the above safety precautions are understood.
1
Safety Precautions For
Your Heater
• This heater becomes hot during use. To avoid
burns, do not let bare skin touch hot surfaces.
If provided, use handles when moving this
heater. Keep combustible materials such as
furniture, pillows, bedding, papers, clothes and
curtains at least 3 feet (90cm) away from the
front of the heater and keep them away from
the sides and rear.
• Extreme caution is necessary when any heater
is used by or near children or invalids and
whenever the heater is left unattended.
• Always unplug the heater when not in use.
• Do not use outdoors.
• Do not run the cord of the heater under
carpeting. Do not cover the cord with throw
rugs, runners or other floor coverings. Arrange
the cord away from traffic areas where it will
not be tripped over.
• Do not locate the heater immediately below a
socket outlet.
• Do not use this heater in the immediate
surrounds of a bath, shower, laundry area or
swimming pool.
• Do not insert or allow foreign objects to enter
any ventilation or exhaust openings as this may
cause electric shock or fire, or damage to the
heater.
• To prevent a possible fire, do not block air
intakes or exhaust in any manner. Do not use
on soft surfaces, such as beds, where opening
may become blocked.
• A heater has hot and arcing or sparking parts
inside. Do not use it in areas where petrol,
paint or flammable liquids are used or stored.
• In order to avoid overheating, do not cover the
heater.
• This heater is only to be used with the castors
fitted and in good condition.
• Your Sunbeam Smartheat™ heater is filled
with a precise quantity of special oil. Repairs
requiring opening of the oil container are only
to be made by Sunbeam or its service agents
who should be contacted if there is an oil leak.
• When scrapping the heater at the end of its
useful life, follow local regulations concerning
the disposal of oil.
Important Instructions - Retain For
Future Use
If you have any concerns regarding the performance and use of your appliance,
please visit www.sunbeam.com.au or contact the Sunbeam Consumer Service Line.
Ensure the above safety precautions are understood.
2
Sunbeam’s Total Safety System
Adjustable electronic thermostat
Thermal back-up fuse
Your Sunbeam Smartheat™ oil filled radiator
features an adjustable electronic thermostat
which detects the temperature in the
vicinity of the heater and switches the heating
element off when a preset temperature is
reached.
In addition to this automatic cut-off, your
heater contains a thermal back-up fuse to
provide additional back-up protection. If the
heater is in an overheat situation, the back-up
fuse will open, stopping the power flow to the
heating element and fan. This fuse cannot be
reset, so in the event that the back-up fuse is
activated, the heater will need to be replaced.
Safety auto shutoff
If the appliance overheats for any reason,
a switch automatically activates to turn the
heater off. For added safety, you must remove
the plug from the wall and wait till the heater
cools down before the heater can be switched
back on.
3
Features Of Your Sunbeam
Smartheat™ Oil Filled Radiator
Convection vents
Vents guide the flow of heated convection air
to provide more effective heat distribution
around the room.
Main power button
Provides power to the heater.
Turbo fan
The turbo fan gives you instant warmth and
assists with distributing the heat evenly around
the room.
Discreet cord storage compartment
The discreet cord storage compartment allows you
to keep the power cord out of harms way when the
heater is not in use.
4
Castors
Provid
from ro
astors
rovide easier mobility
om room to room.
MODE button
Digital display
There are 3 heat settings to
choose from, allowing you
to select the most comfortable room temperature.
Shows heating mode,
room temperature, preset
temperature, and number
of hours to Auto On and
Auto Off.
C
H
FAN
MODE
TIMER
TIMER button
Thermostat adjustment
Allow you to start and stop
the heater automatically.
Select from 0.5 to 24
hours in ½ or 1 hour
increments.
Allows you to increase
or decrease the
thermostat temperature
between 5°C and 35°C.
Integrated humidifier cup
The removable humidifier cup allows
you to add moisture to the air to
ensure that the air doesn’t dry out.
5
Using Your Heater
Attaching the castors
Turning the heater on
1.Carefully position the heater upside down on
a soft cloth or carpet.
2.Use the 4 wing nuts provided to fix the
castors to the heater base.
1.Place the heater on a flat level surface.
2.Insert the plug into a 230/240V power
outlet and turn the power switch to the on (I)
position.
The heater will display the current room
temperature. The heater is now in standby
mode.
C
Locating Tabs
Locating Guides
6
Using Your Heater (continued)
Turning the heater off
Cord storage
• If the heater is set to HI, MED or LO, press
the MODE button until the heater returns to
standby mode. The display will continue to
show the temperature in the room, although
the heater element will no longer be
heating the room.
• If you will not be using the heater for a
length of time, it is advisable to press the
power switch to the off (O) position.
1.Open the hinged door on the bottom of the
heater, below the controls.
2.Wrap the cord around the retaining hooks.
3.Close the door to store neatly away.
7
Using Your Heater (continued)
Using the humidifier
Setting the heat level
To fill the humidifier cup with water:
1.Open the hinged door on the side of the
heater opposite to the controls.
2.Remove the humidifier cup.
3.Pull the top from the cup to open.
4.Fill with water no higher than the maximum
level indicated.
5.Replace the top, return the humidifier to the
heater, and close the hinged door.
NOTE: Ensure that you do NOT fill the
humidifier cup beyond the MAX line indicated
on the cup.
Pressing the MODE button will cycle through
the following settings:
• HI
1500 Watts
• MED
900 Watts
• LO
600 Watts
• HI with fan
2000 Watts
• MED with fan
1400 Watts
• LO with fan
1100 Watts
• Fan only
500 Watts
• Standby
The selected heat setting will display, along
with the current room temperature. If one of
the fan modes is chosen, the fan indicator
will also illuminate, as shown below.
MED
MAX
C
FAN
NOTE: Although this is a 1500W heater,
when used on HI with fan the heater will use
a total of 2000W.
8
Using Your Heater (continued)
Setting the thermostat
Whichever heating level is chosen, the
thermostat temperature is initially preset to
23°C, ideal for indoor comfort
1.Use the MODE button to select any heating
level.
2.Use the and keys to choose any
thermostat setting between 5°C and 35°C.
• Press the key once. The display will
show 23°C.
• Each time the key is pressed, the
thermostat temperature increases by 1°C.
Similarly, each time the key is pressed,
the thermostat temperature decreases by
1°C.
• If you press continuously on one of the
or keys, the thermostat temperature
changes more rapidly.
• As you increase the thermostat temperature beyond 35°C, the temperature display
cycles back to 5°C. Similarly, reducing
the thermostat temperature below 5°C will
cause the temperature display to cycle
back to 35°C.
HI
4.Press the MODE button to lock the settings
in place. Alternatively, if you do nothing, the
settings will automatically lock in after about
5 seconds. The display will revert to showing
the heat setting and current temperature in
the room.
HI
C
NOTE: If the room temperature is warmer
than the preset temperature, the heating
element will soon switch itself off, although
the display will still be as shown. When the
room temperature drops below your preset
temperature, the thermostat will automatically
switch the heating element back on.
To alter the preset temperature: You can
alter the preset temperature at any time by
pressing the and buttons.
C
9
Using Your Heater (continued)
Setting Auto Off
To help conserve energy, you can programme
the heater to automatically switch itself off
after a preset number of hours. You can select
from 30 minutes (0.5 hours) to 24 hours.
1.Select any heating level.
2.Press the TIMER button. The clock
and
hour H symbols will now appear.
HI
4.The setting will automatically lock in after
about 5 seconds. The display will now revert
to showing the heating mode and room
temperature. The clock symbol will remain
to indicate that the Auto Off function is
now active.
HI
C
H
3.Press the TIMER button to set the number
of hours before you want the heater to switch
itself off (up to a maximum of 24).
• Each press of the TIMER button will
increase the time before Auto Off by 30
minute intervals, up to 10 hours, then by
1 hour intervals up to 24 hours.
• If you press continuously on the TIMER
button, the time changes more rapidly.
• As you increase the time beyond 24
hours, the display cycles back to 0.0.
HI
H
10
To check the remaining time
To check for how long before the heater will
switch off, press the TIMER button.
To cancel Auto Off
Press the TIMER button till the hour display
cycles back to 0.0 hours.
This will cancel Auto Off, and the display will
revert to showing the heating mode and room
temperature.
NOTE: you can change the heat setting
and thermostat settings while the Auto Off
function is active.
Using Your Heater (continued)
Setting Auto On
To cancel the Auto On function
You can programme the heater to automatically switch itself on after a preset number
of hours. For example, you could set the
heater in the morning to switch itself on an
hour before you expect to arrive home in the
evening.
1.Ensure the heater is in standby mode. To do
this, keep pressing the MODE button until
the display shows only the room temperature.
2.Press the TIMER button. The clock
and
hour H symbols will now appear.
Follow the directions as for Auto Off to set the
hour display to 0.0 hours.
This will cancel the Auto On function, and the
heater will revert to Standby mode.
Altering the heat setting and thermostat
Once the time has elapsed and the heater has
switched on, the heat setting and thermostat
can be changed as described earlier.
H
3.Use the TIMER button to set the number of
hours before you want the heater to switch
itself on in exactly the same way as for the
Auto Off procedure.
H
After the preset number of hours, the heater
will automatically switch itself on to HI, with
the thermostat set to 23°C for maximum
comfort.
11
Troubleshooting Guide
If your heater fails to operate check the
following:
• Make sure the electrical outlet or circuit
breaker is working, and the thermostat is set
to an appropriately high setting.
• Check for obstructions. If you find an
obstruction, turn the heater off and follow
the reset instructions in this section.
Resetting the safety auto shutoff
1.Remove any blockage from the heater vents.
2.Switch the heater off by pressing the main
power button.
3.Unplug the heater and wait 5-10 minutes for
the heater to cool down.
4.Once the heater has cooled down, plug the
heater into the power outlet and operate
normally.
Care and Cleaning
Ensure that the heater is switched off and
disconnected from the power outlet before
cleaning.
Carefully wipe the exterior of the heater with
a soft damp cloth and dry thoroughly with a
dry cloth.
Over time, dust may accumulate on the vents.
This dust can be removed by wiping with a
damp cloth, or by using the brush attachment
to your vacuum cleaner.
12
Store the heater in a cool dry place when
not in use. Store the heater in its carton
if possible, to prevent scratching and dust
accumulation.
2 Year Replacement Guarantee
We are so confident of the quality of our product, should this
appliance develop any malfunction within 2 years of purchase
(3 Months commercial use) due to faulty materials
or manufacture, we will replace it for you absolutely free.
Should you experience any difficulties with
your appliance, please phone our customer
service line for advice on 1300 881 861
in Australia, or 0800 786 232 in New
Zealand.
Your Sunbeam 2 Year Replacement
Guarantee naturally does not cover misuse
or negligent handling, and excludes
breakables such as glass or ceramic items,
and normal wear and tear.
Similarly, your 2 Year Replacement
Guarantee does not cover damage to
household surfaces as a result of water
or other substances leaking from your
appliance, nor does it cover freight costs.
Should your appliance require repair
or service after the guarantee period,
contact your nearest service centre.
For a complete list of Sunbeam’s
authorised service centres visit or call:
Australia
www.sunbeam.com.au
1300 881 861
New Zealand
www.sunbeam.co.nz
0800 786 232
In Australia, this guarantee is additional
to the conditions and guarantees which
are mandatory as implied under the Trade
Practices Act 1974 and State and Territory
legislation.
13
Consumer Hotline
In Australia
Visit www.sunbeam.com.au
Or call 1300 881 861
In New Zealand
Visit www.sunbeam.co.nz
Or call 0800 786 232
is a registered Trademark of Sunbeam.
Made in China.
Due to minor changes in design or otherwise,
the product may differ from the one shown in this leaflet.
© Copyright Sunbeam Corporation Limited 2008.
ABN 45 000 006 771
Sunbeam Corporation is a division of GUD Holdings Ltd.
1108