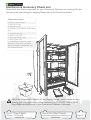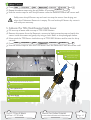
1
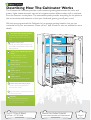
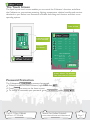
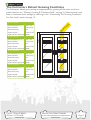
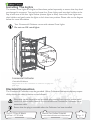
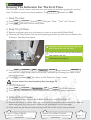
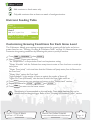
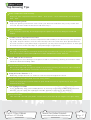
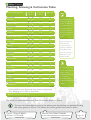
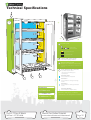
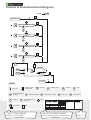
The Commercial Cultivator User Manual Version 3.0
Call Us 7 Days A Week
Watch Our Online Tutorials
Toll Free 1.877.352.0490
www.urbancultivator.net/videomanual
Page 1
Please read the information inside this Instruction Booklet carefully and keep it
as a reference manual.
These symbols are used to highlight important information:
Warnings!
Information and best practices.
Environmental information.
If you are unclear about any aspect of information within please contact Urban Cultivator using [email protected] or by calling our toll free number at +1 877 352 0490 available seven days a week.
Call Us 7 Days A Week
Watch Our Online Tutorials
Toll Free 1.877.352.0490
www.urbancultivator.net/videomanual
Page 2
Contents
Safety Precautions4
Child Safety4
Safety Precautions In Daily Use4
Disposal5
Password Protection 18215
Describing How The Cultivator Works6
The Touch Screen7
Password Protection7
The Cultivators Default Growing Conditions8
Growing And Cultivation Cycles9
Unpacking The Cultivator10
Hardware & Accessory Check List10
Installation Instructions11
Your Room Environment11
Installing The Lights12
Electrical Connection12
Running The Cultivator For The First Time13
1. Setup The Clock13
2. Setup The pH Doser13
3. Fill The Reservoir13
4. Calibrate The pH Sensor13
5. Calibrate The TDS (Total Dissolved Solids) Sensor14
Planting Your Herbs And Microgreens15
Mixing Nutrients15
Nutrient Feeding Table16
Customising Growing Conditions For Each Grow Level16
Top Ten Growing Tips17
Planting, Growing & Cultivation Table18
Maintenance19
Cleaning The Grow Trays19
Cleaning The Reservoir19
Technical Specifications20
Process & Instrumentation Diagram21
Frequently Asked Questions22
Service And Spare Parts24
Customer Care24
Standard Guarantee Conditions24
Call Us 7 Days A Week
Watch Our Online Tutorials
Toll Free 1.877.352.0490
www.urbancultivator.net/videomanual
Page 3
Safety Precautions
Urban Cultivator cares about your plants and safety. We want you to be familiar with the following safety instructions.
It is important that this instruction manual remain with the Commercial Cultivator appliance
so that new owners can also learn about the product and relevant safety precautions.
You must carefully read through this instruction manual before installing and using the Commercial Cultivator.
If you are unclear about any aspect of information within please contact Urban Cultivator using [email protected] or telephone our toll free number +1 877 352 0490 available
seven days a week.
Child Safety
This appliance is designed to be operated by adults.
The water from your Commercial Cultivator is not for drinking.
Keep your Seeds, Nutrients and Growing Mediums in a safe, dry storage area.
The Cultivator’s Control Panel has a Child Safety Lock. Refer to the Control Panel
Table for more information.
Safety Precautions In Daily Use
Contaminated items and/ or garbage must not be present in the Commercial Cultivator.
Keep the door closed when not working with the Cultivator.
Do not remove the grow trays when the machine is watering. Refer to the Control Panel
table for instructions on controlling the watering & lighting schedules.
Only use products that have been designed to be used with the Commercial Cultivator.
Do not sit or stand on the open door or grow trays.
Always unplug the power cord from the outlet and disconnect the water mains when the
Cultivator is not in use. The pH sensor should also be placed back into its case.
The Commercial Cultivator should be serviced by a licensed professional.
Use genuine spare parts and supplies that have been provided by Urban Cultivator.
Any attempts to fix the Commercial Cultivator without an authorised professional can
be dangerous.
Do not place any items on top of the Commercial Cultivator.
Be careful when removing the Grow Tray’s that can weight up to 100 pounds when fully
loaded with soil, plants and water. The Cultivator has two slide out safety mechanisms.
Call Us 7 Days A Week
Watch Our Online Tutorials
Toll Free 1.877.352.0490
www.urbancultivator.net/videomanual
Page 4
Whenever you take a Grow Tray out be careful of standing water. It can take up to ten
minutes for the Grow Tray to drain after a watering cycle.
he Cultivator may tip dangerously forward when removing fully loaded Grow Trays
T
from the top two levels. The Reservoir should be full with water to avoid this potential
tipping hazard. Please secure the Cultivator using the strap and fixing provided. Refer to
the Installation Instructions.
Dispensing of this product correctly helps the environment.
Password Protection 1821
The Cultivators
is password protected.
When prompted to Enter Password, type 1821 then
.
S
t
a
t
u
s
Press
to return to the home screen.
To change or customize your password, go to 7. Set Password under
Call Us 7 Days A Week
Watch Our Online Tutorials
Toll Free 1.877.352.0490
www.urbancultivator.net/videomanual
Page 5
Describing How The Cultivator Works
The Commercial Cultivator provides a self-contained growing environment for herbs and
greens. Lights imitate the sun’s rays and an irrigation system delivers water and/ or nutrients
from the reservoir to the plants. The automated system provides everything for the plants at
the correct times and measures so that your herbs and greens grow all year round.
We have pre-programmed the Cultivator for an average growing situation, but you can
customize to fit your environment. Please call us 7 days a week or visit our website for more
details.
1
Ful l S pe c t r um Li ghti ng Sy s te m
C u s t o m i s a b l e L i ght i ng S chedul es,
4
R e m o v a b l e L i g ht s A bove E ach Grow
Tr a y.
2
1
3
4.1
Grow Level 1
Digital Feedin g System
W i t h p H C o n t ro l A nd N ut r ient Monit or ing,
95 Litre Reservoir, 3/8” NPT Female Connection To City
3
Water In & Drain Out.
Grow Level 2
Gr ow Le v e ls & Re mov a bl e Gr ow
3
Tr a y s
F o u r G r o w F lat s P er S hel f
3
S i x t e e n G r o w Fl at s I n Tot al
Grow Level 3
Gr ow Le v e l 1
M o s t S u i t a b l e For I ncubat i on
Gr ow Le v e l 2
M o s t S u i t a b l e For Young To Teenage
Plants
3
Gr ow Le v e l 3
M o s t S u i t a b l e For Teenage To Mat ure
Grow Level 1
Plants
Gr ow Le v e l 4
M o s t S u i t a b l e For Mat ure P l ant s
4
Centre Parting O ut Sw inging D oors
2
L e f t D o o r W i t h Sealing Gas k et A nd
5
R e c e s s e d P u l l Handle.
4.1
R i g h t D o o r W i t h The Sealing Gas k et A nd
R e c e s s e d P u l l Handle.
5
Mobi l i t y
F o u r H e a v y D u ty C ast or W heel s
Tw o Lockable S w ivel Castors At The Front
Tw o In-Line C astors At The Rear
Call Us 7 Days A Week
Watch Our Online Tutorials
Toll Free 1.877.352.0490
www.urbancultivator.net/videomanual
Page 6
The Touch Screen
The liquid crystal touch screen enables you to control the Cultivator’s functions and allows
the Cultivator to communicate watering, lighting, temperature, relative humidity and nutrient
data back to you. Below is an illustration and table describing each function and their corresponding options.
Ti m e & Date
1
2
3
4
17:22:51
03/08/13
Li qui d C r y s ta l
Touc h Sc r e e n
Sna p I n/
Out C ov e r
LEVEL
S TA G E
TEMP
̊C
RH
set
act
%
1
SEED
10
21
40
2
VEG 1
10
22
36
3
VEG 2
10
21
42
4
VEG 3
10
AMB
21
42
21
47
MAIN RESERVOIR
Water Level (%)
67
Water pH
6.0
W a t e r Te m p ( ̊ C )
18
TDS (ppm)
19
MENU
Pr e s s “Me nu” To A c c e ss
The C ul ti v a tor s Func ti ons
Password Protection
The Cultivators
is password protected.
When prompted to Enter Password, type 1821 then
.
S
t
a
t
u
s
Press
to return to the home screen.
To change or customize your password, go to 7. Set Password under
Call Us 7 Days A Week
Watch Our Online Tutorials
Toll Free 1.877.352.0490
www.urbancultivator.net/videomanual
Page 7
The Cultivators Default Growing Conditions
The Cultivators default grow settings are appropriate for growing all the herbs and microgreens listed on our “Planting, Growing & Cultivation Table” on page 21. Advanced users may
want to customise these settings by referring to the “Customising The Growing Conditions
For Each Level” section on page 19.
G r ow Level 1
Set Temperature (C°) (F°)
24C° 75F°
Water Schedule
Water Time (mins)
Light Schedule
1 Per 4 Days
10
18 On/ 6 Off
Lights On Time (All Levels)
08:00
G r ow Level 2
Set Temperature (C°) (F°)
22C° 72F°
1
Water Schedule
Water Time (mins)
Light Schedule
Lights On Time (All Levels)
1 Per 3 Days
10
18 On/ 6 Off
08:00
G r ow Level 3
Set Temperature (C°) (F°)
Water Schedule
Water Time (mins)
Light Schedule
Lights On Time (All Levels)
2
20C° 68F°
1 Per 3 Days
10
18 On/ 6 Off
08:00
G r ow Level 4
Set Temperature (C°) (F°)
Water Schedule
Water Time (mins)
Light Schedule
18C° 64F°
1 Per 2 Days
10
18 On/ 6 Off
Lights On Time (All Levels)
08:00
ow
r
G
els
v
Le
3
4
Call Us 7 Days A Week
Watch Our Online Tutorials
Toll Free 1.877.352.0490
www.urbancultivator.net/videomanual
Page 8
Growing And Cultivation Cycles
The Cultivator is designed to operate warmer on the top grow level (Grow Level 1) & cooler
on the bottom (Grow Level 4). Germinating is recommended on the top levels where the
plants can benefit from warmer temperatures. There is more vertical space to grow taller
plants on the lower grow shelves than on the upper grow shelves.
Once plants develop they can be moved down as they get bigger and flourish under cooler
conditions.
Incubation
Warmer
Sm aller
v er tical
grow ing
s pace.
Grow Level 1 Mo s t S uitab le For Incubation
Grow Level 2 Mo s t S uitab le For Young To Teenage P lants
Grow Level 3 M ost S uitab le For Teenage To M a ture Plants
Cultivation
Cooler
Lar ger
ver t i cal
growi ng
space.
Grow Level 4 M ost Suitab le For M ature Plants
Call Us 7 Days A Week
Watch Our Online Tutorials
Toll Free 1.877.352.0490
www.urbancultivator.net/videomanual
Page 9
Hardware & Accessory Check List
Please check that all the components for your Commercial Cultivator are accounted for and
that none have been damaged in shipping. Please refer to the Checklist provided.
Compon e nt Na m e s
1 . To u c h S c re e n Cont rol
2 . G row Tray ’s ( x4 )
3 . R e s e r vo i r Cover
4 . Lo c k a b l e Ca stor Wheel s ( Front Onl y )
(x2)
5 . S p l a s h Pl ate s ( x3 )
6 . G row I n s e r t s ( x1 6 )
7 . H u mi d i t y D o m es ( x1 6 )
8 . G row L i g ht s ( x1 6 )
9 . Co n s u ma b le' s ( opt ional seed s,
n u t r i e nt s, s t i c k y st r ips, pH d ow n
b o t t l e, p H B u ffer # 4 , pH Bu ffer # 7 ) .
1 0 . S a fe t y Wa l l St rap
1
5
10
2
9
3
6
7
4
Check the Commercial Cultivator for any shipping damage. Never connect or start
growing with a damaged machine. Please contact us at +1 877 352 0490 or e mail
[email protected] if your Commercial Cultivator is damaged.
Call Us 7 Days A Week
Watch Our Online Tutorials
Toll Free 1.877.352.0490
www.urbancultivator.net/videomanual
Page 10
Installation Instructions
All plumbing and electrical work should be done by a certified professional. To successfully
install the Cultivator you need to;
Positioned the Cultivator on level ground so that the water inside flows evenly and lock the
front two castor wheel brakes so the unit doesn’t move when the doors and grow trays
are operated.
Leave at least 3’ 0” at the front of the Cultivator for the doors, trays and yourself.
Allow a 12” ventilation gap from the top of the Cultivator to the ceiling.
Connect the city water supply and city drain to the 3/8” NPT female fittings at the back
left of the Cultivator. See the photograph below. Neither connection can be more than 10’
away and 4’ up from ground level.
The 120/240v electrical outlet should be within 6 feet away from the Cultivator.
Pipes which have not been in regular use should be cleaned with running water
before connecting the Commercial Cultivator.
Make sure that the water inlet hose is not twisted, crushed, entangled or leaking in
any way. Do not use connection hoses that have been used previously by other
appliances.
Attach your Cultivator to the wall to ensure no tipping.
City Fill Connection
3/8" NPT female fitting
City Drain Connection
3/8" NPT female fitting
Your Room Environment
The Commercial Cultivator has been designed to work inside a well ventilated commercial
space. Ideally the ambient room temperature should be 68 to 72 degrees Fahrenheit (20 to 22
degrees Celsius), and relative humidity between 40% to 80%.
Call Us 7 Days A Week
Watch Our Online Tutorials
Toll Free 1.877.352.0490
www.urbancultivator.net/videomanual
Page 11
Installing The Lights
The sixteen Grow Lights are fragile and have been packed separately to ensure that they don’t
get damaged in transport. You need to locate four Grow Lights each into their holders at the
top of each one of the four Light Shelves (sixteen lights in total). Insert the Grow Lights into
their holders and gently twist the lights to lock them into position. Please refer to the diagram
below for more information
Your Commercial Cultivator comes with sixteen Grow Lights.
Do not use UV rated lights
x16
1
Commercial Cultivator
1. Twist & Pull To Release
Tu r n c l o c k wi s e o r a n t i c l o c k wi s e t o re l e a s e o r e n g a g e t h e
g ro w l i g h t .
Electrical Connection
The Commercial Cultivator must be grounded. Urban Cultivator does not accept any responsibilty should this safety measure not be followed.
Electricity can be dangerous and an unsafe plug inserted into a power socket could
result in a serious safety hazard. Do not connect the Commercial Cultivator via an
extension cable.
Ensure that the plug is accessible after the Cultivator has been installed.
Call Us 7 Days A Week
Watch Our Online Tutorials
Toll Free 1.877.352.0490
www.urbancultivator.net/videomanual
Page 12
Running The Cultivator For The First Time
The Cultivator’s clock, sensors and reservoir need to be set up before growing for the first
time. To follow is a point to point procedure. The 1.Se tup Menu Password is 1821.
1. Setup The Clock
Press
Press
MENU
MENU
,
, then 1.Clock . Set your “Date”, “Time” and “Format”.
and return to the setup menu.
1.Se tup Menu
2. Setup The pH Doser
Remove the lower grow tray and reservoir cover to access the pH Bottle Shelf.
Place the pH Down bottle into the shelf replacing its bottle cap with the one fixed to the
Cultivator. See the photo below.
1
pH Dow n Bottl e . Re m ov e the Cap and
pl a c e the bottl e i nto the hol e.
2 I ns e rt the tube i nto the pH D own Bot t le
1
2
a nd ti ghte n the c a p.
3 Cultivators pH Dosing Line
3
Press MENU , 1.Se tup Menu , NEXT ,
, PH Pump then hold down PRIME PUMP
until you see a single drop come out from the Cultivators pH Dosing Line. Refer to the
photograph above.
Press Back and then MENU to return to the “Reservoir Setup” screen.
Ensure water lines are hooked up first (see page 13)
3. Fill The Reservoir
Press MENU , 1.Se tup Menu ,
, 1.Fill and AC CEP T to fill the reservoir.
Once full, the Cultivators on board computer will maintain a constant water level.
4. Calibrate The pH Sensor
Fill one cup of water, one cup of pH Buffer #4 and one cup of pH Buffer #7.
Remove the sensor from the Reservoir, twist open its protective cap and swish it inside the
water and gently dry using a cloth. Refer to the photograph on the next page.
Now swish the pH Sensor inside the cup of pH #4 and let rest for thirty seconds.
Call Us 7 Days A Week
Watch Our Online Tutorials
Toll Free 1.877.352.0490
www.urbancultivator.net/videomanual
Page 13
Press MENU , 1.Se tup Menu , NEXT ,
, Sensor Cal , 1. pH 4 Cal
and Y .
Repeat the above steps using the pH Buffer #7 pressing 2. pH 7 Cal and Y .
Use the suction cups to stick the pH sensor onto the Reservoir’s back left corner wall.
Safely store the pH Sensor cap and use it to stop the sensor from drying out
when the Cultivators Reservoir is empty. Do not let the pH Sensor dry out as it
will void your warranty.
5. Calibrate The TDS (Total Dissolved Solids) Sensor
Fill one cup of water and one cup of TDS 1000 Solution.
Remove the sensor from the Reservoir, remove its black protective cap and swish the
sensor inside the water and gently dry using a cloth. Refer to the photograph below.
Now swish the TDS Sensor inside the cup of TDS 1000 Solution and let rest for thirty
seconds.
Press MENU , 1.Se tup Menu , NEXT ,
, Sensor Cal , 3. TDS Cal
and Y .
Use the suction cups to stick the TDS Sensor onto the Reservoir’s back left corner wall.
1
3
1
2
6
p H S e nso r & t wist- o ff cap
2
T D S S e ns or w ith
re mova b le cap.
7
4
5
1
pH Sensor
2 TD S ( Tot a l D i s s o l ve d S o l i d s ) S e n s o r
3 Wate r Le ve l S e n s o r
4 Filter & Water Pump
5 Wate r M ove r Ai r Pu m p
6 Water Fill Line
7 Air I nt a k e L i n e
Call Us 7 Days A Week
Watch Our Online Tutorials
Toll Free 1.877.352.0490
www.urbancultivator.net/videomanual
Page 14
Planting Your Herbs And Microgreens
The Cultivators default grow settings are appropriate for growing all the herbs and microgreens listed on our Planting, Growing & Cultivation Table on page 21. Advanced users may
want to customise these settings by referring to the “Customising The Growing Conditions
For Each Level” section.
Mix approximately 5-10 parts soil to one part water (depending on the moisture in your
soil) stirring until the lumps are gone.
Fill the Grow Inserts 1/2 to 3/4 full and level the soil without patting it down.
Sprinkle your seeds onto the top soil with an even amount of space between the seeds.
Refer to the Planting, Growing And Cultivation table for detailed information or watch our
online tutorials at www.urbancultivator.net/videomanual.
Place the planted Grow Inserts into the Grow Tray and run a Manual Water. Press MENU ,
1.Se tup Menu
, type in your password then
. Press
,
and
.
Use the Humidity Domes with the air vents closed for two days.
Close the Cultivator’s door.
After two days remove the Humidity Domes and wipe away the condensed water. If there
is an established growth open the Humidity Dome’s air vents and put them back onto the
Grow Trays for one more day before removing the Domes for the remainder of the plants
growing life.
When using humidity domes, lift the lid daily to ensure a fresh air exchange
Use the Humidity Domes and their adjustable air vents for germinating seeds. The
domes increases temperature and humidity levels inside to help germinate the seeds.
Incubate new plants in the top Grow Tray and grow larger plants from the Bottom
Grow Tray.
Mixing Nutrients
Remove the Lower Grow Tray and Reservoir Cover.
Add the correct amount of Nutrients into the 90 litre capacity Reservoir. Refer to the Nutrient Feeding Table on page 18 for more information.
Insert the Reservoir Cover and Lower Grow Tray back into position. The Cultivator will
automatically mix the nutrients and draw the water along with the added nutrients from
the Reservoir during its next scheduled water cycle.
Add your chosen Grow Nutrients into the Reservoir. Make sure to follow the directions on the back of your chosen product. The Commercial Cultivator holds 90
litres of water inside its Reservoir.
Call Us 7 Days A Week
Watch Our Online Tutorials
Toll Free 1.877.352.0490
www.urbancultivator.net/videomanual
Page 15
Add nutrients to fresh water only.
Only add nutrients after at least one week of seed germination.
Nutrient Feeding Table
We ek 1
Don’ t add nutrien ts
Week 2
Add 2 cc’ s per litre
160cc’s
We ek 3 A n d On goin g
Add 4 cc’ s per litre
3 8 0 cc ’s
Customising Growing Conditions For Each Grow Level
The Cultivators default grow settings are appropriate for growing all the herbs and microgreens listed on our “Planting, Growing & Cultivation Table” on page 21. Advanced users can
customise the growing conditions by following this point to point procedure.
Press MENU , 1.Se tup Menu , then 2.Levels .
Select 1. Level 1 . Input your desired;
“Set Temperature” is the particular Grow Level temperature setting.
“Water Schedule” tells the Cultivator how many times to water a Grow Level over a certain period of time.
“Water Time (mins)” is the total time that the Cultivator will pump water from its Reservoir to
the Grow Level.
“Water Now” waters the Grow Level.
“Light Schedule” is the number of hours on against the number of hours off.
“Lights On Time (All Levels)” sets the time at which the Grow Lights switch on.
Press Back once to set your settings and return to the “Select Level” section.
Repeat the above for 2.Level 2 , 3.Level 3 and 4. Level 4 .
Press MENU to return to the home screen.
Germinating is recommended on the top levels. Once plants develop they can be
moved down as they get bigger. Refer to the “Growing & Cultivation Cycles” section.
Call Us 7 Days A Week
Watch Our Online Tutorials
Toll Free 1.877.352.0490
www.urbancultivator.net/videomanual
Page 16
Top Growing Tips
R o o m T e m pe r a t u r e A n d H u m i d it y
K e e p y o ur r o o m t e m p e r a t u r e b e t w e e n 6 0 ¼ F - 7 8 ¼ F (1 5 ¼ C - 2 5 ¼ C a n d h u m id ity le v e ls bet ween
4 0% - 7 0%.
Ke e p E v e r y t h in g C l e a n
K e e p y o ur g r o w i n g e n v i r o n m e n t c l e an . C le a n y o u r R e s e rv o ir a n d G ro w T ra y s e v e ry mo nt h and
r i n s e o ut t h e fi l t e r i n s i d e t h e Re s e r v o ir a n d G ro w T ra y 's .
D o n ’ t Ov e rw a t e r
D o n' t o v e r w a t e r e s p e c i a l l y a t t h e b e g in n in g o f th e p la n ts life a s it m a y b rin g o n mo u ld and
mildew.
H u m i d i t y D o m e s H e l p G e r m in a t e P lants
U s e t he H u m i d i t y D o m e s t o i n c r e a s e te mp e ra tu re a n d h u mid ity in th e G ro w T ra y s w h e n germ inat i ng s e e d s . Ke e p t h e D o m e s o n f o r t h e firs t tw o d a y s a fte r th e s e e d s h a v e b e e n p la n te d wit h t he
a i r v e nt s c l o s e d . A s y o u r p l a n t s b e g in to g e rm in a te y o u ma y w a n t to k e e p th e D o me s on wit h open
a i r v e nt s f o r o n e o r t w o m o r e d a y s as y o u r p la n ts b e g in to g e rm in a te .
U s e P r o p e r so il o r p a d s.
W e hi g hl y r e c o m m e n d t h e s o i l b r a n ds S u n s h in e # 4 o r P re mie re H P . Y o u c a n u s e o th e r mediums,
s u c h a s o ur S u r e t o G r o w w h i t e p a d s b u t w e h a v e fo u n d b e tte r re s u lts w ith s o il.
Don’t Add Too Much Nutrients
O v e r f e e d i ng c a n c a u s e d a m a g e t o t he p la n ts lis te d in o u r P la n tin g , G ro w in g & C u ltiv a tion Table.
Follow the Nutrient Feeding Table.
R e s t a r t A ft e r F o u r t e e n W e e k s
M o s t o f t h e h e r b s a n d m i c r o g r e e n s l is te d in o u r P la n tin g , G ro w in g & C u ltiv a tio n T a b le should be
r e - s o w n a n d r e p l a n t e d a f t e r a m a x i m u m o f fo u rte e n w e e k s .
Ke e p p H L e ve l s B e t w e e n 5 - 7
B a l a n c i n g y o u r p H l e v e l a t 5 i s s m a r t a s it w ill in c re a s e th ro u g h o u t th e w e e k .
S o w S e e d s A L i t t le H e a vy A n d T h in Ou t Y oung P l an ts
P l u c k o ut yo u n g p l a n t s t o a l l o w o t h e rs to g ro w a n d fill o u t. T h is is a g re a t w a y to e n jo y your
C ul t i v a t o r E v e r y D a y
Use Hydrogen Peroxide
I f y o u a c c i d e n t a l l y k e e p y o u r h u m i d ity d o me s o n to o lo n g o r o v e rw a te r a n d d e v e lo p u nwant ed
b a c t e r i a , y o u c a n s p r a y w i t h H y d r o ge n P e ro x id e a n d w a te r (3 0 % H P – 1 G a l w a te r).
L o v e Y o u r P la n t s
T a k e t i m e a n d c a r e w i t h y o u r p l a n t s . L o o k a t th e m , p ic k th e m u p (fo r w e ig h t. If its lig ht , wat er).
Call Us 7 Days A Week
Watch Our Online Tutorials
Toll Free 1.877.352.0490
www.urbancultivator.net/videomanual
Page 17
Planting, Growing & Cultivation Table
Her bs & M i crogre e ns
Amaranth
Arugula
Basi l
B ean Ten d r i ls
Cham omi le
Chi ves
Choi S um
Cilantro
Dill
Lem on Balm S ee d s
Lettuces
M arjoram
M int
M i zuna
M us t ard G reens
N as t ur ti um
Oregan o
Pac Ch oi
Pars ley
Pea Tend r i ls
R os em ar y
S age
Shi so
Shun gi ko
S or rel
Spear mi nt
Spi n ach
Thym e
Tar ragon
Tat soi
Watercres s
Wheatgrass
S e e d s*
Cu l t ivate
I de a l p H
1 8 to 1 1 6
1 8 to 1 1 6
1 8 to 1 1 6
2-8
1-6
10
1-4
2-10
1-10
2-8
2-8
2-10
2-12
1-5
2-12
2-8
1-8
1-6
2-12
2-12
2-10
2-10
1-4
2-12
2-12
12-8
1-8
2-10
2-10
2-12
2-12
2-12
1-6
2-10
1-7
6
6.5
6.5
6.5
6.5
7
5.5
7.5
6
6.5
6.5
7
6.5
6
7
7
5.5
6.5
6.5
6.5
7
6
6
6
7
6.5
7
6.5
6.5
6.5
6.5
6.5
(Cups)
1 to 1 1 2
1 8 to 1 1 6
1 8 to 1 4
1 8 to 1 1 6
1 4 to 1 8
1 8 to 1 1 6
1 8 to 1 1 6
1 4 to 1 1 6
1 1 6 to 1 3 2
1 1 6 to 1 3 2
1 8 to 1 1 6
1 8 to 1 1 6
1 2 to
1
1 1 6 to 1 3 2
1 8 to 1 1 6
1 8 to 1 1 6
1 1 2 to 2
1 1 6 to 1 3 2
1 1 6 to 1 3 2
1 8 to 1 1 6
1 8 to 1 1 6
1 1 6 to 1 3 2
1 1 6 to 1 3 2
1 2 to 1 1 2
1 1 6 to 1 3 2
1 1 6 to 1 3 2
1 8 to 1 1 6
1 4 to 1 8
1 to 1 1
2
( We e k s )
Th e Cu l t ivato r ’s
de fa u l t Lig ht in g
Cyc l e a n d Wate r in g S c h e du l e a re
a p p ro p r iate fo r
grow in g a l l t h e
h e r b s a n d m ic ro gre e n s l is te d
h e re.
As yo u b e co m e m o re
exp e r ie nce d yo u’ l l
wa nt to b e gin
c us to m is ing yo ur
grow ing co ndit io ns
us ing t he Co nt ro l
Pa ne l to co nt ro l t he
Cul t ivato r ’s a uto m ate d fe at ure s.
I f yo u r s e e d is n’t
o n t h e c u l t ivat io n
t a b l e, c h e c k
Ur b a n Cu l t i v a t o r. n e t
o r c a l l yo u r
fr ie n dl y U r b a n
Cu l t ivato r R e p fo r
a dv ice.
*Per Flat
Fi ll th e G row I nse r t s ( fl at s) half way to t h re e - qu a r te r s fu l l
wi t h Planti n g S oi l or Su re To Grow Pa ds.
Water once e ve r y fou r d ays.
Keep li ghts on for e i g hte e n hou rs an d o ff fo r s ix .
The above is a recommendation only. Flats can be sown heavier or thinner.
You can sow heavy then thin out as the plants grow by plucking out patches allowing
the other greens to fill out. This allows you to use greens from start to finish.
Call Us 7 Days A Week
Watch Our Online Tutorials
Toll Free 1.877.352.0490
www.urbancultivator.net/videomanual
Page 18
Maintenance
Cleaning The Grow Trays
Clean your grow trays between each harvest however you should immediately clean mould or
unwanted organic matter.
Do not use any chemically damaging or unhealthy cleaning products such as bleach.
Using chemical cleaning products may be toxic and could potentially erode the Grow
Trays. You can use 30% Hydrogen Peroxide to clean the reservoir and water lines (1
tsp per gallon)
You should rinse out the filter in the reservoir on a monthly basis.
Cleaning The Reservoir
Remove the bottom Grow Tray and Reservoir Lid.
Press MENU , 1.Se tup Menu , enter passcode, 3. Main Water , 4. Drain and AC CEPT .
The Cultivator will start to drain the Reservoir so you can wipe it clean. This can take up
to 30 minutes.
Add your preferred cleaning agent (h2o2) into the Reservoir following the guidelines on the
rear of the agents packaging. The Commercial Cultivator holds 90 litres of water.
Once Clean, press MENU , 1.Se tup Menu , 3. Main Water , 1.Fill
and AC CEPT .
Once the Reservoir has re-filled press MENU , 1.Se tup Menu , 2.Levels , 1. Level 1 and
Water Now
so that the cleaning agent flows through the Cultivators piping system.
Repeat the process for each Grow Tray; 2.Level 2 , 3.Level 3 and 4. Level 4 .
Once the levels and reservoir are cleaned, press 3. Recycle then AC CEPT to remove the
cleaning agent.
If you wipe clean the Reservoir do not knock the pumps, mis-align the Pipes and in
particular the Sensors.
We recommend using a non-chlorine bleach purchased from a reputable environmentally conscience company. Please follow the quantity guidelines on its packaging.
Draining the reservoir sends water down and out from the Drain Hose. Water from
your Commercial Cultivator is not for drinking and biological residues may still be
present and could be harmful.
Call Us 7 Days A Week
Watch Our Online Tutorials
Toll Free 1.877.352.0490
www.urbancultivator.net/videomanual
Page 19
Technical Specifications
2
1
(c)
(a)
1
(b)
Ai r Fl ow Syste m
Arrows Show The
Direction Of Air Flow
Ducting Located On This Side
Fan’s Located On This Side
4
2
Fu l l Spe c tr u m Li g hti n g Sys te m
Automated Lighting S chedul e s
3
D i gi ta l Fe e d i n g Syste m
With pH Control And Nutr ie nt M onitor ing,
95 Litre Reservoir, 3/8 NPT Fittings To City Water In and
Drain Out.
3
4
G row C h a m be r s & Sl i de O u t S he l ve s
Four Grow Flats Per Shelf
Sixteen Flats Of Herb And Microgreens
Total Volume 40cf
Grow Level 1 (Top)
M ost Suitable For I ncubat ion
Grow Level 2
M ost Suitable For Young To Te e na ge
Plants
Dimensions
(a) 750mm or 29
(b) 1550mm or 61”
Grow Level 3
M ost Suitable For Teenag e To M at ure
Plants
1
2
”
Grow Level 4 (Bottom)
M ost Suitable For M ature Pl a nt s
MAX Draw 0 .3 kWh pe r day. 1 0 A B reaker
7 5 % RH Bas ed On An Averag e R ate O f 120C FM.
(c) 2007mm or 79”
Call Us 7 Days A Week
Watch Our Online Tutorials
Toll Free 1.877.352.0490
www.urbancultivator.net/videomanual
Page 20
Process & Instrumentation Diagram
TE
AMBIENT
RH
TIP
MUNICIPAL DRAIN
LEVEL 1
TIC
RH
LEVEL 2
TIC
RH
LEVEL 3
TIC
RH
LEVEL 4
TIC
RH
PP
pH SOLUTION
FIL
RESERVOIR
FLT PS
AIR
PMP
PMP
TDS pH
TIP
CIT Y WATER
LEGEND
TIP
NORMALLY CLOSED
SOLENOID VALVE
TIE IN POINT
TIC
TEMPERATURE INDICATOR
& CONTROL
pH
pH SENSOR
TE
TEMPERATURE ELEMENT
TOTAL DISSOLVED SOLIDS
MONITORING
TDS
RH
PERISTALTIC PUMP
PP
AXIAL FAN
RELATIVE HUMIDIT Y SENSOR
LIGHTS
PHONE +1-877-352-0490
ADDRESS: UNIT 311 - 13060 80TH AVENUE SURREY, BC,
CANADA V3W 3B2, CANADA.
SHV
SHUTTLE VALVE
FIL
FILTER
AP
FLT
AIR PUMP
FLOAT SWITCH
PS
DRAWN
ART
UNLESS OTHERWISE SPECIFIED
CHECKED
DM
DIMENSIONS ARE IN MM
TOLERANCE: N/A
MATERIAL: VARIABLE
FINISH: VARIABLE
DRAWING SCALE: N/A
DO NOT SCALE
ENGINEER
MANU
COMP. NUMBER
COMP. NUMBER
Q.A.
COMPONENT
KITCHEN CULTIVATOR
FILE
KC_SCHEMATIC.AI
DRAWING
PROCESS & INSTRUMENTATION DGM
VERSION
#002
QTY
QTY
Call Us 7 Days A Week
Watch Our Online Tutorials
Toll Free 1.877.352.0490
www.urbancultivator.net/videomanual
PMP
PUMP
PRESSURE SENSOR
PROPRIETOR & CONFIDENTIAL
THE INFORMATION CONTAINED
WITHIN THIS DRAWING IS THE SOLE
PROPERTY OF URBAN CULTIVATOR.
ANY REPRODUCTION IN PART OR
WITHOUT THE WRITTEN PERMISSION
OF URBAN CULTIVATOR IS PROHIBITED.
Page 21
Frequently Asked Questions
What is the password for the child lock screen?
KC – Enter and the Down Arrow key simultaneously for 3 seconds.
CC - 1821 or your own personal 4 digit password.
How often should I do maintenance on my KC or CC?
In either the KC or CC you should wet/dry shop vacuum or wipe down reservoir and levels
every 6-8 weeks. Ensure to check filters and pumps (show pics) for seed and soil build up.
Is my Cultivator pre-.programmed?
Yes, it comes pre-programmed for an average growing environment and an average for all
plants needs. To set it to your environment or specific plant’s needs check the manual, call our
support line or check uc.net
When and should I use plant nutrients?
Most plants that you grow in here have a short lifespan and don’t need much nutrients. Anything with a 7-10 day life cycle you don’t need nutrients unless you are harvesting re-growth.
You can feed anything after week 2. 20 cc’s for week 2 in KC and 190 cc’s for week 2 in the
CC. 40 cc’s each week after week 3 in KC and 380 cc’s each week after week 3 in CC.
How many flats will I get out of one of my seed containers?
You will get 3-6 flats out of every Urban Cultivator seed containers. You can plant heavy and
thin out young plants and use as you go or plant more flats thinner and let them grow out before you harvest. Try using the shaker to sow seeds evenly.
How much soil should I put in my flats?
You should fill each flat ½ to ¾ with our recommended potting soil (Sunshine #4 and Premiere HP). ½ full for shorter life cycle (1-2 weeks) plants such as; Pea Tendrils, Wheat Grass,
Sunflower, Broccoli, etc. Fill your flat ¾ full when planting longer life cycle (2-14 weeks) plants
such as; Classic Herbs (basil, oregano, etc), Arugula, Beet Tops, etc.
Do I mix in my seeds or cover them with dirt?
We have found great results by covering the newly sown seeds with a light dusting of soil that’s
been shifted through a regular strainer. The finer soil spreads nicely and makes a protective
blanket during germination. Sow your seeds over the dirt, then give them a good spray of water from a spray bottle, next cover with the sifted dirt and then another light spraying of water
just to moisten the top blanket. Be careful not to spray too much or too close and wash off
the thin dirt blanket.
Call Us 7 Days A Week
Watch Our Online Tutorials
Toll Free 1.877.352.0490
www.urbancultivator.net/videomanual
Page 22
Frequently Asked Questions (cont’d)
What do I do if my water mover isn’t working in my UC Commercial?
Check the water mover by insuring the level of water is above the outtake of the water mover
then clean any debris/seeds out of the intake strainer and insure the pump is on
and vibrating. If there is still no movement of water and air bubbles, pull off the small clear air
intake line and unscrew the out take fitting. Clean out any debris/seeds inside the fitting and
re-screw back onto the pump and re-insert the clear tube.
What do I do if my air stone isn’t aerating in the UC Residential?
Insure that air pump is in on by going through your menu options. Take your bottom grow
tray out and insure there is more then 50% of water inside. Pull air stone up and out of the
reservoir and release it from the clip. Insure the air stone is still intact. Replace if it is broken.
Does my water reservoir keep itself filled?
Yes, if you received your Cultivator with City Hook-up capabilities and have it plumbed in,
then it is pre-programmed to exchange the water in the reservoir once a week.
What do I do if my reservoir won’t exchange?
Remove connections on main water pipe and ensure there is no blockage. Return fitting on.
Open large blue pump by unscrewing and check to see filter isn’t blocked with seeds or dirt.
What do I do if my level won’t water?
You can wait a few minutes (3-10) as some times the prime needs to auto adjust. If you don’t
want to wait or if it still isn’t watering, pull the clear hosing that connects to the black fitting,
by pushing the release on the circular black fitting. Take the clear hose and place it under the
water and fill the line the best you can, then place clear hose back into the black circular fitting
and it will lock in.
What should my lighting schedule be?
We have pre-programmed our lighting schedules for most herbs, micro greens, lettuces, etc,
which is 18 hours light and 6 hours dark. If you wish to grow cherry tomato’s or peppers or
other plants that require a fruiting schedule, you can easily change your light schedule to 12
hours on and 12 hours off.
How often should I change my bulbs?
For maximum plant growth, we recommend you change your bulbs every 6 months.
Call Us 7 Days A Week
Watch Our Online Tutorials
Toll Free 1.877.352.0490
www.urbancultivator.net/videomanual
Page 23
Service And Spare Parts
Please call our toll free number +1 877 352 0490 or e mail [email protected] if you
think there is a problem with your Commercial Cultivator.
Customer Care
In the event that your Commercial Cultivator requires service, or you wish to purchase plant
supplies and spare parts please call us toll free on +1 877 352 0490 or e mail [email protected].
Please provide the following information when you are calling to arrange for an engineer or
return of goods:
Your name, address, zip number or postal code.
Your contact telephone number and best time to be reached.
Clear and concise details of the problem.
The purchase date and name of the sales representative who sold you the Commercial Cultivator.
Standard Guarantee Conditions
Urban Cultivator Limited guarantee that if within 36 months of the date of purchase this Commercial Cultivator appliance or any part thereof is proved to be defective due to faulty workmanship or materials, we will, at our option repair or replace the same FREE OF CHARGE for
labour, materials or carriage on condition that:
The Commercial Cultivator has been correctly installed and used only on the electricity
supply stated on the rating plate.
The Commercial Cultivator has been used in accordance to the manufacturer’s
instructions.
The Commercial Cultivator has not been tampered with by any person not authorised
by us.
All service work under this guarantee must be authorised by Urban Cultivator.
Any appliance or defective component shall become the property of Urban Cultivator.
This guarantee is in addition to your statutory and other legal rights.
Call Us 7 Days A Week
Watch Our Online Tutorials
Toll Free 1.877.352.0490
www.urbancultivator.net/videomanual
Page 24