1
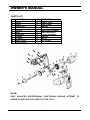
3/8’’ ELECTRIC DRILL Topic Page General Safety Rules 2 Tool Use and Care 3 Technical Specification 4 Drill 5 Maintenance 7 Limited Warranty 9 WARNING! READ AND UNDERSTAND ALL SAFETY PRECAUTIONS IN THIS MANUAL BEFORE OPERATING. FAILURE TO COMPLY WITH INSTRUCTIONS IN THIS MANUAL COULD RESULT IN PERSONAL INJURY, PROPERTY DAMAGE, AND/ OR VOIDING OF YOUR WARRANTY. ALL POWER AMERICA WILL NOT BE LIABLE FOR ANY DAMAGE BECAUSE OF FAILURE TO FOLLOW THESE INSTRUCTIONS. 1 OWNER’S MANUAL GENERAL SAFETY RULES WARNING! Read and understand all instructions. Failure to follow all instruction listed below, may result in electrical shock, fire and/or serious personal injury. SAVE THESE INSTRUCTIONS WELL Work Area 1. Keep your work area clean and well lit, Cluttered benches and dark areas invite accidents. 2. Do not operate power tools in explosive atmospheres, such as in the presences of flammable liquids, gases, or dust. Power tools create sparks, which may ignite the dust or fumes. 3. Keep bystanders, children and visitors away while operating a power tool. Distractions can cause you to loose control. Electrical Safety 4. Double insulated tools are equipped with a polarized plug (one blade is wider than the other). This plug will fit in a polarized outlet only one way. If the plug does not fit fully in the outlet, reverse the plug. If it still does not fit, contact a qualified electrician to install a polarized outlet. Do not change the plug in any way. Double insulation eliminates the need for the three wire grounded power cord and grounded power supply system. 5. Avoid body contact with grounded surfaces such as pipes, radiators, ranges, and refrigerator. There is an increased risk of electrical shock if your body is grounded. 6. Don't expose power tools to rain or wet conditions. Water entering a power tool will increase the risk of electrical shock. 7. Do not abuse the cord. Never use the cord to carry the tools or pull the plug from the outlet. Keep cord away from heat, oil, sharp edges or moving parts. 8. When operating a power tool outside, use an outdoor extension cord marked "W-A" or "W". These cords are rated for outdoor use and reduce the risk of electrical shock. Personal Safety 9. Stay alert, watch what you are doing and use common sense when operating a power tool. Do not use tool while tired or under the influence of drugs, alcohol or medication. A moment of inattention while operating power tools may result in serious personal injury. 2 3/8’’ ELECTRIC DRILL 10. Dress properly. Do not wear loose clothing or jewelry. Contain long hair. Keep your hair, clothing and gloves away from moving parts. Loose clothes, jewelry or long hair can be caught in moving parts. 11..Avoid accidental starting. Be sure switch is off before plugging in. Carrying tools with your finger on the switch or plugging in tools that have the switch on invites accidents. 12.Remove adjusting keys or switches before turning the tool on. A wrench or a key that is left attached to a rotating part of the tool may result in personal injury. 13.Do not overreach. Keep proper footing and balance at all times. Proper footing and balance enables better control of the tool in unexpected situations. 14.Use safety equipment. Always wear eye protection. Dust mask, non-skid safety shoes, hardhat or hearing protection must be used for appropriate conditions. Tool Use and Care 15.Use clamps or other practical way to secure and support the work piece to a stable platform. Holding the work by hand or against your body is unstable and may to loss of control. 16.Do not force tool. Use the correct tool for your application. The correct tool will do the job better and safer at the rate for which it is designed. 17.Do not use tool if switch does not turn on or off. Any tool that cannot be controlled with the switch is dangerous and must be replaced. 18.Disconnect the plug from the power source before making any adjustment, changing accessories or storing the tool. Such preventative safety measures reduce the risk of starting the tool accidentally. 19.Store idle tools out of reach of children and other untrained persons. Tools are dangerous in the hands of untrained users. 20.Maintain tools with care. Keep cutting tools sharp and clean. Properly maintained tools, with sharp edges are less likely to bind and are easier to control. 21.Check for misalignment or binding of moving parts, breakage of parts and any other condition that affect the tools operation. If damaged, have the tool serviced before using. Poorly maintained tools cause many accidents. SPECIFIC SAFETY RULES Hold tool by insulated gripping surfaces when performing an operation where the Drill may contact hidden wiring. Contact with a "live" wire will also make exposed metal parts of the tool "live" and shock the operator. 3 OWNER’S MANUAL TECHNICAL SPECIFICATIONS Technical Specifications Drill Model# Input Voltage Input Power No Load Speed Chuck Capacity Power Cord Double Insulated 120V~60Hz 4.2 Amp 0 - 3000 RPM 3/8" (10mm) 18AWG Yes SERVICE NOTE: ONLY QUALIFIED PROFESSIONAL ELECTRICANS SHOULD ATTEMPT TO REPAIR OR REPLACE ANY PARTS TO THIS TOOL. Tool service, mechanical and/or electrical is to be performed only by qualified repair personnel. Service performed by unqualified personnel may result in a risk of injury. When servicing a tool, use only identical replacement parts. Use of unauthorized parts or failure to follow maintenance instructions may create a risk of electrical shock or injury. OPERATION WARNING! Never touch the drill bit or other tool while it is moving. Do not touch the drill bit after operation, it will be very hot. If the drill bit jams in the work piece or if the drill stalls, stop immediately. Remove the bit from the work piece and correct the reason for stall before continuing. Turn the tool off immediately and do not operate, if tool speed drops abnormally low, begins to make abnormal noise, vibrations, or if the motor housing produces smoke or burning odor. SYMBOLS The following symbols are used for the tool: V ..................... Volts Amp................. Amperes ~......................Alternating Current .................... Double Insulted HZ ................... Hertz RPM ................ Revolutions Per Minute 4 3/8’’ ELECTRIC DRILL Extension Cords 1. Make sure your extension cord is in good condition. When using an extension cord, be sure to use one heavy enough to carry the current your product will draw. An undersized cord will cause a drop in line voltage resulting in loss of power and overheating. Table 1 shows the Correct size to use depending on cord length and nameplate Ampere rating. If in doubt, use the next heaver gage. The smaller the gage number is, the heavier the cord is. 2. Outdoors Use Extension Cords. When tool is used outdoors, use only extension cords intended for use outdoors and so marked. 3.Use only UL listed extension cords. Inspect extension cord before use and never use damaged or altered extension cords. Follow extension cord manufacturer safety instruction Minimum Recommended Extension Cord Gauge (AWG) Chart (Table 1) TABLE 1 RECOMMENDED MINIMUM WIRE GAUGE FOR EXTENSION CORDS* (120 VOLT) NAMEPLATE AMPERES EXTENSION CORD LENGTH (At Full Load) 25FEET 50FEET 75FEET 100 FEET 150 FEET FEET FEETFE 18 FEET 0-2.0 18 18 18 16 2.1-3.4 18 18 18 16 14 ET 3.5-5.0 18 18 16 14 12 5.1-7.0 18 16 14 12 12 7.1-12.0 16 14 12 10 . 12.1-16.0 14 12 10 16.1-20.0 12 10 *Based on limiting the line voltage drop to five volts at 150% of the rated amperes. DANGER: Failure to connect this tool to a properly grounded outlet can result in DAMAGE, FIRE, ELECTRIC SHOCK or FATAL INJURY. Consult a qualified electrician if you are in doubt as to weather the outlet is properly grounded. Do not modify the plug provided with the product - if it will not fit the outlet; have a proper outlet installed by a qualified electrician. Do not use any type of adapter with this product. FUNCTIONAL DESCRIPTION (Fig.1) 1. 2. 3. 4. 5. Grip Variable Speed Trigger Lock On Button Forward/Reverse Lever Keyless Chuck Figure 1 5 OWNER’S MANUAL Figure 1 Variable Speed Trigger (Fig. 2) 1. To start the drill, pull the trigger (1). Rotational speed will increase as the trigger is depressed. To stop, release the trigger. 2 . For continuous operation, pull the trigger (1) and depress the lock-on button (2). The drill will continue to run until the trigger is pulled fully and then released. Caution: Figure 2 Do not move the forward and reverse lever while drill is in use, damage to tool could result. Allow tool to come to a complete stop before changing direction. 1. On / Off Switch 2. Lock-on button 3. Forward / Reverse Lever •Always check tool rotation direction before drilling. 3. Use the forward and reverse lever (3) to select direction. Push it to the "left" position for clockwise rotation and "right" position for counter clockwise rotation. Installing / Changing Bits (Fig.3) WARNING :RISK OF PERSONAL INJURY. ALWAYS DISCONNECT TOOL FROM POWER SOURCE BEFORE MAKING ANY ADJUSTMENT, INSTALLING OR CHANGING DRILL BITS. 1. Rotate ring (1) counter clockwise to open chuck fully. 2. Insert drill bit into chuck as far as it will go. 3. Rotate ring (1) clockwise to tighten chuck fully 4. Drill is ready for use. Figure 3 WARNING: Let the drill operate for one minute without load before beginning to drill. Caution: Always use clamps to secure the work piece when drilling. Maximum torque often occurs at the point the bit breaks through the work piece. Grasp the tool firmly and proceed slowly as this occurs. Drilling/driving 1. Drilling in different materials: Wood - Hold the drill firmly and place the point of the bit in the center of the desired hole location. Depress the trigger to start drilling. Metal - Use a punch to mark hole position. Place the point of the bit in the center of punch mark. Depress the trigger to start drilling. Use cutting oil in most metals to 6 3/8’’ ELECTRIC DRILL improve drilling action and prolong bit life. See cutting oil and/or drill bit manufacturer recommendation for use. Plastic - Use high-speed steel drill bits and refer to wood drilling. Note: A jammed bit often is freed by placing the drill in reverse and slowly backing out of the work piece. 2. When driving screws, use suitable bits for the size and type of screw being used. Drill a pilot hole in most application to avoid splitting material. Use lower speeds for better control and to avoid stripping the screw head. WARNING: Dust and debris created during drilling, grinding or sanding on some materials may contain chemicals known to the State of California to cause cancer or birth defects or other reproductive harm. To reduce exposure to these chemicals, always use approved safety equipment, work in a well-ventilated area and wear dusk mask that filters out microscopic particles CHUCK REMOVAL 1. Open the chuck jaws fully. 2. Remove the retaining screw in the bottom of the chuck by turning clockwise. 3.Turn the chuck counterclockwise to remove from the drive shaft. 4.Reverse steps 1 - 3 to install new chuck. MAINTENANCE Caution: Tools service must be performed only by qualified repair personal. Service or maintenance performed by unqualified personnel could result in a risk of injury. 1. Clean the tool housing, motor vents and blade after each use. 2. Keep the grip dry, clean and free from oil and grease. 3. Store the tool on a safe and dry place, out of reach of children. 4. Do not use cleaning agents or solvents that could attach the plastic parts of the tool 5.The brushes should be checked periodically, and replaced when they become worn. Replacement should only be performed by a qualified technician 7 OWNER’S MANUAL PARTS LIST NO. 01 02 03 04 05 06 07 08 09 10 11 DESCRIPTION SCREW CHUCK DRIVE SHAFT BEARING WASHER GEAR STEEL BALL WASHER OIL BEAR RIGHT COVER CORD SLEEVE NO. 12 13 14 15 16 17 18 19 20 21 DESCRIPTION POWER CORD CORD CLAMP BEARING COOL FAN ARMATURE ASSEMBLY BRUSH ASSEMBLY STATOR ASSEMBLY BEARING SWITCH LEFT COVER NOTE: ONLY QUALIFIED PROFESSIONAL ELECTRICANS SHOULD ATTEMPT TO REPAIR OR REPLACE ANY PARTS TO THIS TOOL! 8 3/8’’ ELECTRIC DRILL Limited Warranty All-Power America warrants to the original purchaser who uses the product in a consumer application (personal, residential or household usage) that all products covered under this Warranty are free from defects in material and workmanship for one year from the date of purchase. All products covered by this limited Warranty which are used in commercial applications (i.e. income producing) are warranted to be free of defects in material and workmanship for 90 days from the date of original purchase. Products covered under this Warranty include air compressors, air tools, service parts, pressure washers and generators. All-Power America will repair or replace at All-Power America's sole option, products or components which have failed within the warranty period. Service will be scheduled according to the normal work flow and business hours at the service center location, and the availability of replacement parts. All decisions of All-Power America with regard to this limited warranty shall be final. This warranty gives you specific legal rights, and you may also have other rights which vary from state to state. RESPONSIBILITY OF ORIGINAL PURCHASER (Initial User): To process a warranty claim on this product, DO NOT return item to the retailer. The product must be evaluated by an Authorized Warranty Service Center. For the location of the nearest Authorized Warranty Service Center contact the retailer or place of purchase. Retain original cash register sales receipt as proof of purchase for warranty work. Use reasonable care in the operation and maintenance of the product as described in the Owner’s Manual(s). Deliver or ship the product to the nearest Authorized Warranty Service Center. Freight costs, if any, must be paid by the purchaser. Air compressors with 60 and 80 gallon tanks will be inspected at the site of installation. Contact the nearest Authorized Warranty Service Center that provides on-site service calls for service call arrangements. If the purchaser does not receive satisfactory results from the Authorized Warranty Service Center, the purchaser should contact All-Power America. 9 OWNER’S MANUAL Limited Warranty(cant’d) THIS WARRANTY DOES NOT COVER: Merchandise sold as reconditioned, used as rental equipment, or floor or display models. Merchandise that has become damaged or inoperative because of ordinary wear, misuse, cold, heat, rain, excessive humidity, freeze damage, use of improper chemicals, negligence, accident, failure to operate the product in accordance with the instructions provided in the Owner’s Manual(s) supplied with the product, improper maintenance, the use of accessories or attachments not recommended by All-Power America, or unauthorized repair or alterations. Repair and transportation costs of merchandise determined not to be defective. Costs associated with assembly, required oil, adjustments or other installation and start-up costs. Expendable parts or accessories supplied with the product which are expected to become inoperative or unusable after a reasonable period of use. Merchandise sold by All-Power America which has been manufactured by and identified as the product of another company, such as gasoline engines. The product manufacturer's Warranty, if any, will apply. ANY INCIDENTAL, INDIRECT OR CONSEQUENTIAL LOSS, DAMAGE, OR EXPENSE THAT MAY RESULT FROM ANY DEFECTS, FAILURE OR MALFUNCTION OF THE PRODUCT IS NOT COVERED BY THIS WARRANTY. Some states do not allow the exclusion, so it may not apply to you. IMPLIED WARRANTIES, INCLUDING THOSE OF MERCHANTABILITY OR FITNESS FOR A PARTICULAR PURPOSE, ARE LIMITED TO ONE YEAR FROM THE DATE OF ORIGINAL PURCHASE. Some states do not allow limitations on how long an implied warranty lasts, so the above limitations may not apply. All-Power America Inc. 730 S.Epperson Drive City Of Industry,CA91748 www.allpoweramerica.com All rights reserve 10