1
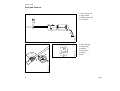
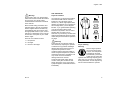
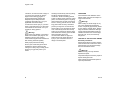
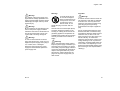
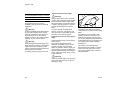
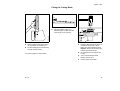
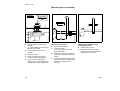
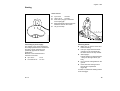
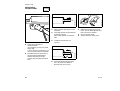
STIHL EC7D.
Instruction Manual
Owner's Manual
Assembling
Safety Precautions
Operating Instructions
Mainten~nce
a
english / USA
Contents
Parts and Controls ............................ 2
IMPORTANT SAFETY
INSTRUCTIONS ............................... 4
SAFETY PRECAUTIONS ................. 6
Working Techniques ....................... 15
Fitting the Cutting Blade ................. 17
Mounting the Loop Handle ............. 18
Starting ........................................... 19
Lubricating Flexible Shaft ............... 20
Gearbox Lubrication ....................... 21
Replacing the Depth Wheel ............ 21
Replacing the Skirt ......................... 21
Replacing the Cutting Blade ........... 22
Storing the Machine ........................ 22
Key to Symbols .............................. 23
Maintenance and Repairs ............... 23
Specifications ................................. 24
Special Accessories ....................... 24
This manual contains warnings,
operating and safety precautions for the
STIHL EC 70 edger.
Pay special attention to the safety
precautions outlined on pages 4 to 14.
Allow only persons who understand this
manual to operate your edger.
To receive maximum performance and
satisfaction from your STIHL edger, it is
important that you read and understand
the maintenance and safety precautions
before using your edger.
Contact your STIHL dealer or the STIHL
distributor for your area if you do not
understand any of the instructions in this
manual.
!Warning!
Because a edger is a high-speed cutting
tool some special safety precautions
must be observed to reduce the risk of
personal injury.
Careless or improper use may cause
serious or even fatal injury.
Make sure your unit is equipped with the
proper deflector and handle for the type
of cutting attachment being used.
Always wear proper eye protection.
STIHL's philosophy is to continually
improve all of its products. As a result,
engineering changes and improvements are made from time to time. If the
operating characteristics or the appearance of your edger differs from those
described in this manual, please contact
your STIHL dealer for information and
assistance.
Printed on clorine-free paper
© 1999 Andreas Stihl AG & Co., Waiblingen
0458 387 3021. M0,5. M9. PM. Printed in USA
EC 70
STIHl
1
english / USA
Parts and Controls
1= Power supply cord
2= Trigger switch
3= Starting lockout lever
4= Loop handle
4
3
2
387BA005 KN
1
5= Strain relief flap
6= Cutting blade
7= Deflector
7
387BA006 KN
5
8
8= Depth wheel
9= Wingnut
10= Skirt
9
10
387BA007 KN
6
2
EC 70
english / USA
Definitions
1 = Power supply cord.
Supplies electric to current motor.
2 = Trigger switch.
To switch the machine "on" and "off"
3 = Starting lockout lever.
Must be depressed before the
trigger switch can be activated.
4 = Loop handle.
9= Wingnut.
Must be loosened to rotate the
deflector to adjust the depth of cut.
10= Skirt.
The skirt is designed to reduce the
risk from foreign objects flung
backwards toward the operator by
the cutting tool.
For easy control of machine during
cutting work.
5 = Strain relief flap.
Supports extension cord and
reduces the likelihood of
disconnection of extension cord
receptacles and trimmer plug.
6 = Cutting blade.
Metal cutting blade for cutting grass,
weeds and soft green plants.
7 = Deflector.
The deflector is designed to reduce
the risk of injury from foreign objects
flung backwards toward the
operator by the cutting tool and from
contact with the cutting tool.
8 = Depth wheel.
Deflector-mounted depth wheel
rolls on ground and keeps edger´s
cutting blade at present height for
required depth of cut.
EC 70
3
english / USA
IMPORTANT SAFETY
INSTRUCTIONS
!Warning!
To reduce the risk of serious or fatal
injury form electrocution, thrown objects
and blade contact, follow basic
precautions, including the following:
1 = Avoid Dangerous Environment Don't use appliance in damp or wet
locations.
2 = Don't Use In Rain.
3 = Keep Children Away -All visitors
should be kept at a distance from
work area.
4 = Dress Properly - Do not wear loose
clothing or jewelry. They can be
caught in moving parts. Use of
rubber gloves and substantial
footwear is recommended when
working outdoors.
5 = Use Safety Glasses - Always use
face or dust mask if operation is
dusty.
6 = Use Right Appliance - Do not use
appliance for any job except that for
which it is intended.
4
7 = Ground Foult Circuit interupter
(GFCI) protection should be
provided on the circuit(s) or outlet(s)
to be used for the gardening
appliance. Receptacles are a
available having built-in GFCI
protection and may be used for this
measure of safety.
8 = Warning To reduce the risk of
electric shock, use only with an
extension cord intended for outdoor
use, such as an extension cord of
cord type
Minimum wire gage for extension cords
for 120 Volt appliances using 0 - 6 amps
Cord length (ft)
25 50 100 150
Wire size (AWG) 18 16 16 14
Appropriate extension cords are
available in special stores for electrical
equipment or form your STIHL dealer.
SW-A, SOW-A, STW-A, STOW-A,
SJW-A, SJOW-A, SJTW-A, or
SJTOW-A.
9 = Cord Sets - Make sure your cord set
is in good condition. When using an
extension cord set, be sure to use
one heavy enough to carry the
current your product will draw. An
undersized extension cord set will
cause a drop in line voltage
resulting in loss of power and
overheating. Table below shows the
correct size to use depending on
cord length and nameplate ampere
rating. If in doubt, use the next
heavier gage. The smaller the gage
number, the heavier the cord.
EC 70
english / USA
3
10= Avoid Unintentional Starting - Don´t
carry plugged-in appliance with
finger on switch. Be sure switch is
off when plugging in.
17= Store Idle Appliance indoors - When
not in use, appliances should be
stored indoors in dry, high or lockedup place - out of reach of children.
11= Don´t Abuse Cord - Never carry
appliance by cord or yank it to
disconnect from receptacle. Keep
cord from heat, oil, and sharp
edges.
18= Maintain appliance with care - keep
cutting edge sharp and clean for
best performance and to reduce the
risk of injury. Follow instructions for
lubricating and changing
accessories. Inspect appliance cord
periodically, and if damaged, have it
repaired by an authorized service
facility. Inspect extension cords
periodically and replace if damaged.
Keep hands dry, clean and free from
oil and grease.
2
1
349BA014 KN
12= Don´t grasp the exposed cutting
blades or cutting edges when
picking up or holding the appliance.
To reduce the risk of disconnection of
appliance cord form the extension cord
set during operating:
:
Insert unit's plug (1) into extension
cord coupling (2).
:
Swing the flap (3) outward and push
extension cord into the recess.
:
Let go of the flap.
EC 70
13= Don´t Force Appliance - It will do the
job better and with less likelihood of
a risk of injury at the rate for which it
was designed.
14= Don´t Overreach - Keep proper
footing and balance at all times.
15= Stay Alert - Watch what you are
doing. Use common sense. Do not
operate appliance when you are
tired.
16= Disconnect Appliance - Disconnect
the appliance from the power supply
when not in use, before servicing,
when changing accessories such as
blades, and the like.
5
english / USA
SAFETY PRECAUTIONS
SAVE THESE INSTRUCTIONS!
19= Check damaged parts - before
further use of the appliance, a guard
or other part that is damaged should
be carefully checked to determine
that it will operate properly and
perform its intended function. Check
for alignment of moving parts,
binding of moving parts, breakage
of parts, mounting, and any other
condition that may affect its
operation. A guard or other part that
is damaged should be properly
repaired or replaced by an
authorized service center unless
indicated elsewhere in this manual..
Replacement Parts
When servicing use only identical
replacement parts. Replace damaged
cords or have them repaired by
authorized STIHL Servicing dealer only.
To reduce the risk of electric shock, this
equipment has a polarized plug (one
blade is wider than the other). This plug
will fit in a polarized outlet one way. If the
plug does not fit fully in the outlet,
reverse the plug. If it still does not fit,
contact a qualified electrician to install
the proper outlet. Do not change the
plug in any way.
Warning!
Because your edger is a
high-speed, fast-cutting
electric power tool,
special safety precautions
must be observed to
reduce the risk of fire,
electric shock and personal injury.
It is important that you
read, fully understand and
observe the following
safety precautions and
warnings. Save this
owner's manual and read
the safety instructions periodically. Be
thoroughly familiar with the controls and
the proper use of the equipment. Know
how to stop the unit and disengage the
controls quickly.
Careless or improper use of any electric
edger may cause serious or fatal injury.
have your STIHL dealer show you how
to operate your electric edger. Observe
all applicable local safety regulations,
standard and ordinances.
!Warning!
The use of any electric edger may be
hazardous. If the rotating cutting tool
comes in contact with your body, it will
cut you. When it comes in contact with
solid foreign objects such as rocks or
bits of metal, it may fling them directly or
by ricochet in the direction of bystanders
or the operator.
Striking such objects could damage the
cutting attachment and may cause
blades to crack, chip or break.
Thrown objects or damaged blades may
result in serious or fatal injury to the
operator or bystanders.
!Warning!
Minors should never be allowed to use
an electric edger. Bystanders, especially
children and animals should not be
allowed in the area where an electric
edger is in use
Never let the electric edger run
unattended.
SAVE THESE
INSTRUCTIONS
6
EC 70
english / USA
Do not lend or rent your electric edger
without the owner's manual. Be sure that
anyone using your electric edger
understands the information contained
in this manual.
Most of these safety precautions and
warnings apply to the use of all STIHL
electric edgers. Different models may
have different parts and controls. See
the appropriate section of your owner's
manual for a description of the controls
and function of the parts of your model
electric edger.
Safe use of an electric involves
1 = the operator
2 = the edger
3 = the use of the edger.
THE OPERATOR!
Physical Condition
You must be in good physical condition
and mental health and not under the
influence of any substance (drugs,
alcohol, etc.) which might impair vision,
dexterity or judgment. Do not operate an
electric edger when you are fatigued.
Be alert - if you get tired while operating
your electric edger, take a break.
Tiredness may result in loss of control.
Working with any edger can be
strenuous. If you have any condition that
might be aggravated by strenuous work,
check with your doctor before operation
an edger.
!Warning!
Prolonged use of an electric edger (or
other machines) exposing the operator
to vibrations may produce whitefinger
disease (Raynaud's phenomenon) or
carpal tunnel syndrome. These
conditions reduce the hand's ability to
feel and regulate temperature, produce
numbness and burning sensations and
may cause nerve and circulation
damage and tissue necrosis.
Continual and regular users should
monitor closely the condition of their
hands and fingers. If any of the above
symptoms appear, seek medical advice
immediately.
EC 70
000BA017 KN
!Warning!
Proper Clothing
Warning!
Electric edger operation
can cause serious injury
to eyes, ears and person.
The deflector and skirt
provided with your electric
edger may not protect the
operator from all foreign objects (gravel,
glass, wire, etc.) thrown by the rotating
cutting attachment. Thrown objects may
also ricochet and strike the operator.
7
english / USA
Therefore, to reduce the risk of injury to
your eyes never operate an electric
edger unless wearing goggles or
properly fitted safety glasses with
adequate top and side protection
complying with ANSI Z 87.1 (or your
applicable national standard).
To reduce the risk of injury to your face
STIHL recommends that you also wear
a face shield or face screen over your
goggles or safety glasses.
!Warning!
Edger noise may damage your hearing.
Wear sound barriers (ear plugs or ear
mufflers) to protect your hearing.
Continual and regular users should have
their hearing checked regularly.
Wear proper protective clothing.
Protect your hands with gloves when
handling the electric edger and the
cutting tool. Heavy-duty, nonslip gloves
improve your grip and protect your
hands.
Clothing must be sturdy and snug-fitting,
but allow complete freedom of
movement. Avoid loose-fitting jackets,
scarfs, neckties, jewelry, flared or cuffed
pants, unconfined long hair or anything
that could become caught on branches,
brush or moving parts of the unit. Wear
long pants made of heavy material to
protect your legs. Do not wear shorts.
Good footing is very important in edger
work. Wear sturdy boots with nonslip
soles. Do not operate an electric edger
when barefoot or wearing open sandals.
Steel-toed safety boots are
recommended. Wear an approved
safety hard hat to reduce the risk of
injury to your head when there is a
danger of head injuries.
THE EDGER
For illustrations and definitions of the
electric edger parts see the chapter on
"Parts and Controls"!
!Warning!
Never modify an electric edger in any
way. Only attachments supplied by
STIHL or expressly approved by STIHL
for use with the specific STIHL electric
edger model are authorized. Although
certain unauthorized attachments are
useable with the STIHL electric edger,
their use may, in fact, be extremely
dangerous.
THE USE OF THE ELECTRIC EDGER
Electrical precautions
Special precautions for electric edgers
must be observed to reduce the risk of
personal injury and property damage
from fire and electric shock.
!Warning!
When servicing, use only identical
replacement parts.
Only authorized personnel may repair or
replace damaged cords.
Never attempt unauthorized repairs or
open the powerhead.
8
EC 70
english / USA
!Warning!
The voltage of the power supply must
agree with the voltage specified an the
edger's machine label. Improper voltage
will damage the edger and may cause
personal injury.
!Warning!
Be sure switch is off when plugging the
unit into the power supply in order to
reduce the risk of fire or electrical shock
from arcing and the risk of injury from
contact with a revolving cutting tool.
!Warning!
In order to reduce the risk of serious
injury from electrocution, never use your
edger if the power supply cord or plug is
cut, cracked, worn or damaged.
Disconnect the plug from the power
supply and have a dealer replace the
power supply cord.
EC 70
Warning!
Cord Sets
To avoid electric shock,
do not use the edger in
damp or wet locations. Do
not expose or use in rain.
To reduce the risk of
electric shock, do not
handle the plug or the unit with wet
hands.
!Warning!
Ground Foult Circuit interrupter (GFCI)
protection should be provided on the
circuit(s) or outlet(s) to be used for the
gardening appliance. Receptacles are
available having built-in GFCI protection
and may be used for this measure of
safety.
!Warning!
When using the electric edger, always
keep the power supply cord behind you
and away from the cutting tool. Always
ensure that your power supply cord does
not become entangled with obstacles or
objects. Damaged cables may cause
electrocution. Always disconnect the
plug from the power supply when you
take a break.
To reduce the risk of electric shock use
only extension cords that are intended
for outdoor use. Use only three-wire
extension cords that have three-prong
grounding plugs and grounding
receptacles that accept the appliance
plug.
Do not use damaged extension cords.
Examine extension cord before using
and replace if damaged. Wehn using an
extension cord, be sure to use one
heavy enough to carry the current your
trimmer will dray. An undersized
extension cord will cause a drop in line
voltage resulting in loss of power and
overheating. Following table shows the
correct size to use depending on cord
length and machine label ampere rating
(for cord set type see chapter entitled
"Starting").
9
english / USA
Appropriate extension cords are
available in special stores for electrical
equipment.
!Warning!
To reduce the likelihood of disconnection
and the risk of electric shock, always
retain the extension cord by means of
the retaining device on the trimmer
handle as shown in the chapter entitled
"Starting" in your owner's manual.
!Warning!
Avoid damage to the power supply cord.
Keep cord away from heat, oil and sharp
edges. Never carry trimmer by power
cable or yank power cable to disconnect
the plug from the wall outlet.
To unplug, grasp the plug not the cord.
Transporting the electric edger
!Warning!
Always switch off the motor and make
sure the cutting attachment has stopped
before putting an electric edger down.
When transporting your electric edger in
a vehicle, properly secure it to prevent
turnover and damage to the electric
edger.
To reduce the risk of unintentional
starting, never carry a plugged in unit
with your finger on the switch. Be sure
the switch is off when plugged in.
Preparation for the use of the electric
edger
Adjust hand grip to suit your size before
stating work.
The machine should be properly
balanced as specified in your owner's
manual for proper control and less
fatigue in operation. Always check your
electric edger for proper condition and
operation before starting, particularly the
power supply cord, plug, switch, cutting
tool and deflector.
002BA118 KN
Minimum wire size for extension cords
for 120 Volt appliances using 6-10 amps
Cord length (ft)
50 100
150
Wire size (AWG)
16 14
12
An arrow on the deflector shows the
correct direction of rotation of the cutting
blade.
The deflector can be rotated to suit
working conditions. The arrow on the
deflector must always face away from
you, so that cuttings and other dedris will
be diverted away from the machine and
your position (see chapter "Working
Techniques").
The cutting tool must be properly
tightened and safe operating condition.
Inspect for loose parts (nuts, screws,
etc.) and for cracked, bent, warped or
damaged blades.
!Warning!
Inspect the power supply cord and plug
before and after each use for signs of
damage or aging.
10
EC 70
english / USA
!Warning!
002BA056 KN
15m (50ft)
!Warning!
Your electric edger is a one-person
machine. Once switched on, it may fling
foreign objects for a great distance. To
reduce the risk of eye and other injury
insure that bystanders are at least 50
feet (15 m) away. Stop the motor and
cutting tool immediately if you are
approached. Operate your electric
edger without assistance.
Working Conditions
!Warning!
Never attempt to use an electric edger in
locations where there is a potential for
explosive or flammable atmospheres.
Operate the electric edger under good
visibility and daylight conditions only.
Work carefully.
Special care must be taken in slippery
conditions and in difficult, over-grown
terrain. Watch for hidden obstacles such
as tree stumps, roots and ditches to
avoid stumbling.
Stay alert for uneven side
walks, holes in terrain or
other similar conditions
when using your electric
edger. Always push
slowly over rough ground.
Do not abuse your electric edger.
EC 70
Before cutting, inspect and clear the
area of stones, glass, pieces of metal,
trash or other solid objects. The cutting
attachment could throw objects of this
kind and cause personal injury. Do not
use electric edger on gravel surfaces.
!Warning!
When using your electric edger, avoid
cutting close to fences, sides of
buildings, tree trunks, stones or other
such objects that could cause the
electric edger to kick out or could cause
damage to the blade. In addition, be
alert to an increased risk of ricochets in
such situations.
Operating Instructions
Always hold the edger firmly with both
hands. Wrap your fingers tightly around
the handles, keeping the handles
cradled between your thumb and
forefinger. Keep your hands in this
position to have your electric edger
under control at all times.
Make sure the handles and grip of the
electric edger are in good condition and
free of moisture, pitch, oil or grease.
11
english / USA
!Warning!
!Warning!
!Warning!
Never attempt to operate any electric
edger with one hand. Loss of control of
the electric edger resulting in serious or
fatal injury may result.
In order to reduce risk of eye injury
always wear proper eye protection and
operate product from position where
guards or deflector blocks the line of
sight to the cutting tool.
If the electric edger strikes a foreign
object, follow these steps: switch off the
motor and disconnect the plug, inspect
for damage and repair any damage
before operating the product.
Do not overreach. Keep proper footing
and balance at all times.
If the cutting tool or deflector becomes
clogged or stuck, always switch off the
motor and disconnect the plug and make
sure the cutting tool has stopped, before
cleaning. Grass, weeds, etc. should be
cleaned off the cutting tool at regular
intervals.
!Warning!
Do not use the electric edger for any job
except that for which it is intended. Use
only for edging in grass, weeds and soft
green plants.
!Warning!
Never divert discharge of material
toward bystanders nor allow anyone
near the area of operation. Use care in
directing discharge to avoid glass
enclosure, automobiles, and the like.
To reduce the risk
of injury from
thrown objects and
blade contact,
never operate any
edger without a properly mounted
deflector. Keep the skirt on the deflector
adjusted properly at all times (see
chapter on mounting the cutting tool of
your owner's manual). Keep guards in
place and in working order.
12
!Warning!
Keep hands and feet away from cutting
area.
!Warning!
This electric edger is normally to be
used at ground level with the cutting
attachment perpendicular to the ground.
Use of an electric edger above ground
level or with the cutting attachment
parallel to the ground may increase the
risk of injury, since the cutting
attachment is more fully exposed and
the edger may be more difficult to
control. Never use your electric edger as
a hedge trimmer.
!Warning!
During cutting, check the tightness and
the condition of the cutting tool at regular
intervals. If the behavior of the tool
changes, switch off the motor
immediately, hold the electric edger very
firmly and brake the cutting tool to a
standstill by pressing it against the
ground. Unplug the unit and check the
nut securing the tool for tightness and
the cutting tool for cracks and damage.
EC 70
english / USA
If the electric edger vibrates abnormally,
immediately stop the engine and check
for the cause. Vibration is generally a
warning of trouble.
!Warning!
Replace cracked, bent, warped,
damaged, excessively worn of dull
cutting tools immediately. Such tools
may shatter at high speed and cause
serious or fatal injury.
!Warning!
A loose blade may cause the blade to
vibrate, crack, break or come off the
electric edger, which may result in
serious or fatal injury. Make sure that the
blade is properly tightened. Use the
wrench supplied or one of sufficient
length to obtain the proper torque. If the
blade loosens after being properly
tightened, stop work immediately. The
retaining nut may be worn or damaged
and should be replaced. Never use
unauthorized parts to secure the blade.
Failure to use the proper parts may
cause the blade to fly off and seriously
injure the operator or bystanders. If the
blade continues to loosen, see your
STIHL dealer. Do not attach any blade to
a unit without proper installation of all
required parts. Never use an electric
edger with a loose blade.
EC 70
!Warning!
MAINTENANCE; REPAIR AND
STORING
Never touch a rotating cutting tool with
your hand or any part of your body.
Use only identical STIHL replacement
parts for maintenance and repair. Use of
parts manufactured by others may
cause serious or fatal injury.
The tool continues to rotate for a short
period after the throttle trigger is
released (flywheel effect).
Switch off the motor and unplug the unit
whenever you leave the operating
position.
Follow the maintenance and repair
instructions in the appropriate section of
your owner's manual.
!Warning!
Always disconnect the plug from the
power supply and make sure that the
cutting tool is stopped before doing any
maintenance or repair work or cleaning
the electric edger. Do not attempt any
maintenance or repair work not
described in your owner's manual. Have
such work performed at your STIHL
service shop only.
Only authorized personnel may replace
the power supply cord. A damaged
power supply cord must be replaced by
a identical STIHL replacement part.
13
english / USA
Check cooling air inlets about every ten
hours of operation and clean if
necessary. Do not use any strong
detergents on the plastic housing or
handle. They can be attacked by certain
house-hold cleaners containing
aromatic oils such as pine or lemon, or
by solvents such as kerosene. Do not
spray water at the trimmer, moisture can
cause an electric shock hazard. Wipe
the unit with a cloth.
Never repair damaged cutting
attachments by welding, straightening or
modifying the shape. This may cause
parts of the cutting tool to come off and
result in serious or fatal injuries.
Check condition of cutting tool at regular
short intervals. If behavior of tool
changes, check it immediately for
tightness or any signs of cracks in
particular. Replace damaged or dull
cutting tools immediately, even if they
have only superficial cracks.
Tighten all nuts, bolts and screws after
each use.
Store electric edger indoors in a dry, high
or locked location and out of reach of
children.
SAVE THESE
INSTRUCIONS!
14
EC 70
english / USA
Working Techniques
241BA000 KN
1
Preparations
If the soil is very dry, spray it with water
before you start work: this softens the
soil a little and also reduces the amount
of dust created. Slightly damp green
plants are easier to cut.
:
Inspect the work area and clear
away any obstacles (stones, gravel,
glass, etc.) to reduce the risk of
injury from thrown objects.
:
Plan the best route for edging, i.e.
starting point, changes in direction,
etc. Always hold and operate your
edger on the right-hand side of the
body.
EC 70
Adjusting the depth of cut
:
2
Shut off the engine and wait for the
cutting blade to come to a complete
standstill.
:
Loosen wingnut (1)
counterclockwise
:
Adjust wheel (2):
Upwards
to increase depth of cut (A).
Downwards
to reduce depth of cut (A).
3
B
241BA002 KN
Your elektro edger is designed to
produce sharp contoured borders
around lawns and flower beds. It will cut
almost all types of grass, weeds and soft
green plants.
A
241BA001 KN
2
Adjust correctly
The depth of cut varies, depending
on unevenness of the ground, your
height and the way you hold the
edger.
:
Use the following procedure:
Adjust the wheel (2) so that the
cutting blade (3) just touches the
ground or breaks the surface of the
soil by no more than 5 mm (0,2“) (B)
in the normal working position.
15
241BA003 KN
english / USA
:
Standing in the normal working
position, check the depth of cut
again and correct it if necessary.
241BA004 KN
Tighten wingnut clockwise.
350BA022 KN
:
90°
! Do not adjust the deflector!
The deflector has been set by the
manufacturer so that the arrow on the
deflector and the open side point away
from the operator. This ensures that
cuttings and other debris will be directed
away from the machine and operator.
16
Edging
:
Switch on the edger - then start the
cut.
:
Hold and guide the unit so that the
blade is vertical.
:
Cut steadily so that the motor speed
remains constant – do not use force.
:
Cut at a normal walking pace.
:
Do not push the blade into the
ground!
EC 70
english / USA
Fitting the Cutting Blade
1
387BA003 KN
5
1
6
Place the elektro edger on a
suitable support so that the blade
mounting (1) faces upwards.
4
3
241BA007 KN
2
241BA005 KN
:
:
Always walk forwards when cutting,
do not pull the unit towards you.
:
Cut at a steady pace to avoid having
to make several passes.
1 = Gunning sight for cutting blade.
EC 70
:
Insert the Allen wrench (2) as far as
possible in the bore (3) – push
lightly and rotate it back and forth
together with the thrust washer (4)
until the drive shaft blocks.
:
Fit combination wrench (5) on the
nut (6).
:
Turn nut clockwise (left-hand
thread) and remove it.
:
Remove the thrust washer
17
english / USA
Mounting the Loop Handle
7
1
10
6
50 mm
4
(2")
7
9
2
Position blade (7) on the thrust
plate (8).
! Collar (arrow) must project into
the hole in the blade!
:
Fit thrust washer (4) on drive
shaft (9).
:
Block drive shaft.
:
Screw nut (6) onto drive shaft
counterclockwise and tighten it.
:
! Fit a new nut if the spring
washer (10) on the nut (6) loses its
resilience after a prolonged period!
18
A
Mounting loop handle
:
Fit the loop handle (1)
:
on the drive tube 30 cm (12“) (A) forward of the
control handle (2)
387BA002 KN
3
241BA008 KN
:
4
387BA001 KN
8
:
Position the clamp (3) against the
drive tube and slide it into the loop
handle.
:
Fit square nut (4) in the loop handle,
insert the clamp screw (5) from the
other side and tighten down
securely.
Adjusting loop handle to most
comfortable position:
:
Release clamp screw.
:
Slide the loop handle along the
drive tube to the required position retighten the clamp screw.
EC 70
english / USA
Starting
120 V version:
3
:
up to 100 ft
16 AWG
:
100 to 150 ft
14 AWG
:
Insert unit´s plug (1) in extension
cord coupling (2).
:
Swing the flap (3) outward and push
extension cord into the recess.
:
Let go of the flap.
1
2
1
387BA004 KN
349BA014 KN
2
Connecting to power supply
Switching On/Off
The voltage of your power supply and
the voltage specified on the unit must be
the same. Use an extension cord
specifically approved for outdoor
applications.
Minimum cross sectional area of
extension cord wires:
:
Make sure you have a secure and
balanced footing.
:
Hold your edger with both hands one hand on the control handle the other hand on the loop handle..
:
Stand upright hold the edger in a relaxed position
- always on the right side of your
body.
:
Do not rest the cutting blade on the
ground.
:
Press down the starting lockout
lever (1) and squeeze the
trigger (2).
:
up to 25 m:
1 mm²
:
more than 25 m:
1.5 mm²
To switch off, release the starting lockout
lever and trigger.
EC 70
19
english / USA
1
:
Check film of lubricant at
regular intervals once weekly if you use your power
edger daily
or every 25 hours of operation if you
use your power edger occasionally.
:
Mark the end of the gear head on
the drive tube (see illustration).
Release the clamp screw (1).
Pull the gear head (2) off the drive
tube.
:
Pull the flexible shaft (3) out of the
drive tube.
:
Coat shaft with STIHL gear lubricant
for hedge trimmers*.
Never pump grease into the drive
tube.
:
20
:
Slide the drive tube into the gear
head - turn the blade (4) back and
forth until mark is reached.
:
Line up the gear head.
:
Tighten down the clamp screw.
If shaft has turned blue, fit a
new one.
3
A
:
4
357BA053 KN
350BA026 KN
2
394BA001 KN
3
002BA087 KN
Lubricating
Flexible Shaft
Push shaft (3) into the drive tube turn it to and fro until distance
A is less than 20 mm (3/4").
EC 70
english / USA
Replacing the Skirt
1
2
2
Have worn depth wheel replaced by
your STIHL dealer.
241BA018 KN
1
:
Check grease level regularly, about
every 25 hours of operation.
:
Unscrew the filler plug (1).
If no grease can be seen on the
inside of the filler plug,
screw the tube (2) of STIHL gear
lubricant for brushcutters * into the
filler hole.
:
Squeeze 5 – 10 g (0,01 – 0,02 lb)
grease into the gear housing.
! Do not completely fill the gear
housing with grease.
:
Refit and tighten the filler plug.
1
4
241BA010 KN
2
3
The end of the thread on screw (1) is
caulked to ensure that the wingnut (2)
does not work loose and be lost.
241BA009 KN
Replacing the Depth Wheel
Removing the skirt
:
Release and remove screw (1)
along with washer (2).
:
Pull the skirt (3) off the lug (4) and
out of the deflector
A very high torque has to be applied to
remove the wingnut from the screw. If
the parts are then reassembled, the
captive function is no longer
guaranteed. In such a case the screw
and wingnut should be replaced by your
STIHL dealer.
5
241BA015 KN
Gearbox
Lubrication
3
Position of skirt
:
Position the skirt (3) correctly in
relation to depth wheel (5):
If wheel is on left, the skirt must
project to the right.
* See "Special Accessories".
EC 70
21
english / USA
Replacing the Cutting Blade
Storing the Machine
For periods of three months or more:
1
4
241BA017 KN
3
Fitting the skirt
:
Push the skirt (3) into the slot in the
deflector until it can be engaged on
the lug (4).
:
Fit the washer on the screw.
:
Insert screw and tighten it down
firmly.
22
C
B
241BA019 KN
A
:
Remove, clean and inspect the
cutting blade.
:
Thoroughly clean the machine,
paying special attention to the
cooling air inlets.
:
Store the machine in a dry and safe
place, out of the reach of children
and other unauthorized users.
Never attempt to repair a bent, warped
or cracked blade by straightening or
welding – it may shatter at high speed
and cause serious or fatal injury.
Replace such a blade with an original
STIHL cutting blade, part number
4133 713 4101 (marking 33/01).
:
Replace the blade (1) when length
(A) is no longer sufficient to obtain
the required depth of cut (C) and
maintain an adequate ground
clearance (B).
:
To avoid out-of-balance: check
cutting blade on STIHL balancer
5910 850 2600.
:
Do not resharpen the blade.
EC 70
english / USA
Key to Symbols
Maintenance and Repairs
This instruction manual refers to models
with different scopes of supply. Parts or
features not included in all models and
their resultant applications are marked
thus *. Parts not included in the standard
scope of supply, marked *, are available
as special accessories from your STIHL
dealer.
The user of this unit should carry out
only the maintenance operations
described in this manual. Other repair
work may be performed only by an
authorized STIHL dealer.
Scope of supply / equipment
STIHL maintains a continuous program
of updating its equipment and tools to
the very latest standards. For this
reason we may modify the design,
engineering and appearance of our
products periodically.
Warranty claims following repairs
can be accepted only if the repair has
been performed by an authorized
STIHL dealer using original STIHL
replacement parts.
Original STlHL parts can be identified by
the STIHL part number, the STIHl
logo and the STlHL parts symbol (.
The symbol may appear alone on small
parts.
Therefore, we cannot be responsible for
changes, modifications or improvements not covered in this manual.
EC 70
23
english / USA
Specifications
Special Accessories
Motor
Cutting blade
200 mm
Skirt
Rating:
Rated current:
Voltage:
Frequency:
Rated speed with
blade fitted:
No-load idle
speedwith blade
fitted
Fuse:
660 W
5.5 A
120 V
60 Hz
7,100 rpm
12,000 rpm
15 A
4133 713 4101
4133 716 3200
Depth wheel
Diameter
127 mm (5.0 in),
width 32 mm
(1.26 in)
4133 712 1000
Safety Goggles
Allen wrench
Weight
with blade:
5.0 kg (11 lbs)
STIHL gear lubricant for hedge trimmers
Bystander sound level
80g/3oz tube
225g/8oz tube
(at 50 ft)
STIHL gear lubricant for brushcutters
69.5 dB(A)
80g/3oz tube
225g/8oz tube
Dimensions
Overall length of
edger
24
0781 120 1109
0781 120 1110
0781 120 1117
0781 120 1118
1830 mm (72 in)
EC 70
englisch I english