1
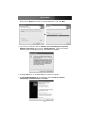
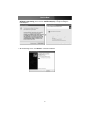
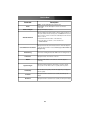
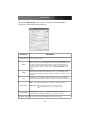
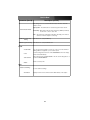
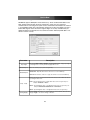
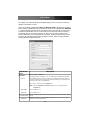
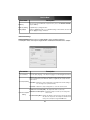
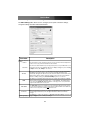
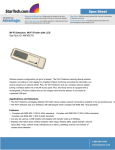
WiFi Detector
WiFi Access Point / Detector with LCD
WIFIDETG
Instruction Manual
Actual product may vary from photo
FCC Compliance Statement
This equipment has been tested and found to comply with the limits for a Class B digital
device, pursuant to part 15 of the FCC Rules. These limits are designed to provide
reasonable protection against harmful interference in a residential installation. This
equipment generates, uses and can radiate radio frequency energy and, if not installed
and used in accordance with the instructions, may cause harmful interference to radio
communications. However, there is no guarantee that interference will not occur in a
particular installation. If this equipment does cause harmful interference to radio or
television reception, which can be determined by turning the equipment off and on, the
user is encouraged to try to correct the interference by one or more of the following
measures:
• Reorient or relocate the receiving antenna.
• Increase the separation between the equipment and receiver.
• Connect the equipment into an outlet on a circuit different from that to which the
receiver is connected.
• Consult the dealer or an experienced radio/TV technician for help.
Use of Trademarks, Registered Trademarks, and
other Protected Names and Symbols
This manual may make reference to trademarks, registered trademarks, and other
protected names and/or symbols of third-party companies not related in any way to
StarTech.com. Where they occur these references are for illustrative purposes only and
do not represent an endorsement of a product or service by StarTech.com, or an
endorsement of the product(s) to which this manual applies by the third-party company in
question. Regardless of any direct acknowledgement elsewhere in the body of this
document, StarTech.com hereby acknowledges that all trademarks, registered
trademarks, service marks, and other protected names and/or symbols contained in this
manual and related documents are the property of their respective holders.
Instruction Manual
Table of Contents
Introduction . . . . . . . . . . . . . . . . . . . . . . . . . . . . . . . . . . . . . . . . . . . . . . . . . . . . .1
Features . . . . . . . . . . . . . . . . . . . . . . . . . . . . . . . . . . . . . . . . . . . . . . . . . . . . . . . .1
Before You Begin . . . . . . . . . . . . . . . . . . . . . . . . . . . . . . . . . . . . . . . . . . . . . . . . .1
System Requirements . . . . . . . . . . . . . . . . . . . . . . . . . . . . . . . . . . . . .1
Contents . . . . . . . . . . . . . . . . . . . . . . . . . . . . . . . . . . . . . . . . . . . . . . . .1
Installation and usage . . . . . . . . . . . . . . . . . . . . . . . . . . . . . . . . . . . . . . . . . . . .2
Charging the Wi-Fi adapter . . . . . . . . . . . . . . . . . . . . . . . . . . . . . . . . .2
Using the Wi-Fi detecter . . . . . . . . . . . . . . . . . . . . . . . . . . . . . . . . . . . .3
Driver and Utility installation . . . . . . . . . . . . . . . . . . . . . . . . . . . . . . . . .5
Using the Configuration Utility . . . . . . . . . . . . . . . . . . . . . . . . . . . . . . .8
Wireless connection status . . . . . . . . . . . . . . . . . . . . . . . . . . .9
General Connection Setting . . . . . . . . . . . . . . . . . . . . . . . . .11
WEP and WPA Encryption . . . . . . . . . . . . . . . . . . . . . . . . . .13
WPA Setting . . . . . . . . . . . . . . . . . . . . . . . . . . . . . . . . . . . . . .14
Advanced Settings . . . . . . . . . . . . . . . . . . . . . . . . . . . . . . . .15
Software Access Point mode . . . . . . . . . . . . . . . . . . . . . . . .16
Access Point general connection settings . . . . . . . . . . . . . . .17
MAC Address Filter . . . . . . . . . . . . . . . . . . . . . . . . . . . . . . . .19
Specifications . . . . . . . . . . . . . . . . . . . . . . . . . . . . . . . . . . . . . . . . . . . . . . . . . .20
Technical Support . . . . . . . . . . . . . . . . . . . . . . . . . . . . . . . . . . . . . . . . . . . . . . .20
Warranty Information . . . . . . . . . . . . . . . . . . . . . . . . . . . . . . . . . . . . . . . . . . . .20
i
Instruction Manual
Introduction
Thank for purchasing a StarTech.com 802.11b/g WLAN USB adapter with Wi-Fi detector.
This convenient device acts as a wireless network adapter, and can turn a wireless
station into a WLAN access point. Plus, WIFIDETG allows you to instantly detect
wireless hotspots, and offers an LCM display for simplified hot spot monitoring, as well as
a rechargeable Li-Polymer battery that can be charged each time the detector is
connected to a powered USB port.
Features
• Compliant with IEEE 802.11b/g 2.4GHz standards
• Up to 54 Mbps data transfer
• Supports software access point function, converting a wireless station into an access
point
• Complies with IEEE 802.11d country roaming standards
• USB 2.0 compliant, backward compatible with USB rev. 1.1.
• Small footprint design offers the perfect addition to laptop or desktop PCs
Before You Begin
System Requirements
• A Pentium based computer, running Windows 98SE, ME, 2000, XP or 2003 Server
Contents
This package should contain:
• 1 x Wi-Fi Detector
• 1 x Instruction Manual
• 1 x Driver CD
1
Instruction Manual
Installation and use
Bottom View
Top View
On/Off
Back
Next
Seek/Lock
LCM Display
Charging the Wi-Fi detector
1. Remove the cap from the Wi-Fi detector and slide the power switch to the ON
position. Carefully insert the USB connector into an available USB port on your
computer. The following will appear on the display:
Battery strength Indicator
The Battery Strength indicator will be animated while the Wi-Fi detector is being
recharged.
The Link/Act icon will blink when the Wi-Fi detector is being used as a wireless USB
adapter to surf the Internet.
2. When the Wi-Fi detector is finished recharging, it will automatically stop charging the
battery. Once fully charged, you will see the Charge Finish message displayed, and
the battery strength indicator will stop blinking:
2
Instruction Manual
3. If you slide the power switch to the OFF position while recharging, the Wi-Fi detector
will stop recharging the battery, and you will see Stop charging displayed. The
battery strength indicator will stop blinking:
Using the Wi-Fi detector
1. Slide the power switch to the ON position. The Welcome Screen will appear as
follows:
2. After the Welcome Screen is displayed, the Wi-Fi detector will automatically enter
scanning mode to detect nearby Wi-Fi signals:
Unencrypted
Encrypted
In scanning mode, the display will indicate the total number of unencrypted and
encrypted Wi-Fi signals detected.
3
Instruction Manual
3. Once scanning mode is complete, the detector will enter its standard display mode.
The detector will automatically sort the signals according to signal strength, followed by
encrypted access points, according to signal strength:
2
3
4
5
1
6
7
8
1
Operating Channel - Indicates the current operating channel of the detected
Wi-Fi signal.
2
Access Points detected - The left digit indicates which detected Wi-Fi signal is
currently displayed, and the right digit indicates the total number of Wi-Fi signals
detected.
3
Encryption indicator - WEP for WEP encryption, WPA for WPA encryption and
WPA2 for WPA2 encryption. Open indicates that the detected signal is
unencrypted.
4
G indicates that the signal is an 802.11g wireless signal. B indicates that the
signal is an 802.11b wireless signal.
5
Signal Strength indicator - Signal Strength is measured in increments ranging
from 5 (full strength) to 1 (low strength).
6
IN indicates that the signal is an infrastructure mode signal, Ad indicates that the
signal is an Adhoc mode signal.
7
Battery indicator with 3 bars indicates battery power. When displaying as
empty, please recharge the detector.
8
SSID Indicator - Displays the SSID. If the SSID is too long to fit on the display,
it will scroll to indicate the complete SSID.
4
Instruction Manual
4. If you wish to detect a signal with a dedicated SSID, simply hold down the Scan button
for 4 seconds to enter Lock mode. When the detector is in Lock mode, an icon with a
capitalized L will appear in the upper middle corner of the display:
In Lock mode, the detector constantly refreshes the signal strength, so the user can
move around to find where the detected signal strength is at it’s peak. Hold down the
Scan button for 4 seconds again, to unlock from Lock mode.
Driver and Utility installation
Note: Please do not install the USB adapter into the computer prior to installing the
necessary software.
Note: If the Wireless PC Card driver and Utility were previously installed on the host
computer, please uninstall the original version prior to attempting to install a second time.
The following instructions depict installation on a Windows XP system. Please note that
installation procedures are similar for Windows 98SE, ME, 2000 and 2003 Server.
To install the USB adapter:
1. Insert the Installation CD into the CD/DVD-ROM drive. Browse to, and execute the
Setup program, to launch installation:
5
Instruction Manual
2. If you want to install the software to a location other than that specified by default,
please click on Browse and select an alternate destination. Then click Next.
3. If you receive a notification that the software you are installing has not passed
Windows Logo testing, please click on Continue Anyway. Please note that the
software has been thoroughly tested for compatibility and reliability:
4. Insert WIFIDETG into an available USB port on the host computer.
5. The Found New Hardware Wizard will display. Select Install the software
automatically (recommended) and click Next.
6
Instruction Manual
6. If you receive a notification that the software you are installing has not passed
Windows Logo testing, please click on Continue Anyway, to begin installing the
USB Adapter:
7. At the following screen, click Finish to conclude installation:
7
Instruction Manual
Using the Configuration Utility
To setup the USB adapter, double-click on the icon in the system tray:
By default, Windows XP utilizes the Windows Zero Configuration Tool to setup wireless
clients. If you wish to use the Wi-Fi Utility included with WIFIDETG, you can begin by
using one of two methods:
First method:
a. Double-click the
utility icon in the
system tray.
b. Click Yes to use
the USB adapter
utility.
Second method:
a. Double-click on
the connectivity
icon located in the
system tray*
*The Connectivity icon can also be
found in the Windows Control
Panel, under Network
Connections
b. Click Advanced.
c. Remove the
checkmark
located next to
Use Windows to
configure my
wireless network
settings.
8
Instruction Manual
The Configuration Utility allows you to configure the Wireless LAN USB adapter, and
monitor the link status during the communication process. The Utility can be opened by
double-clicking on the icon located in the system tray:
Or, to close the Configuration Utility, right-click on the icon and select Exit ZDWlan.
Please note: The adapter will run at lower performance when connected using USB 1.1.
As such, if you wish to connect to an 11g (up to 54Mbps) network, please ensure that
the adapter has been installed using a USB 2.0 port, for maximum performance.
The adapter will work in 11b mode when the network is set to Adhoc mode. If you wish
to enable 11g connectivity, please follow these steps:
1.
2.
3.
4.
5.
Go to Network Connections.
Right-click on the Wireless Network Connection and select Properties.
From the pop-up screen, click Configure.
Select Advanced (from the Properties screen).
Enable IBSS_G_Mode.
Wireless Connection Status
When the Configuration Utility is opened, the system will scan all channels to locate
the access points/stations within the accessible range of your adapter, automatically
connect to the wireless device with the highest signal strength, and provide all
information about the wireless connection:
For a description of each function, please refer to the chart on page 10.
9
Instruction Manual
Parameter
Mode
Network Adapter
Available Network
Description
Station – Set the USB adapter as a wireless client.
Access Point - Set the USB adapter to function as a wireless
access point.
Displays USB adapter properties.
Displays all SSIDs and signal strengths of wireless stations nearby. To resurvey the available wireless devices please click Refresh. There are two
ways to view the connections between the USB adapter and the wireless
stations on the list:
1. Double-click the wireless station on the list directly.
2. Select the station you intend to connect and then click
Connect this site.
Current Network Information
Displays information about the wireless network to which the adapter is
connecting. This information includes Channel, Type, SSID, TX Rate and
Encrypt settings.
More Setting
Set functions including disable/enable WEP and Power Saving Mode, etc.
Link Status
BSSID
Signal Strength
Link Quality
Displays the status of the wireless connection.
Displays the MAC Address of the network to which the adapter is
connecting
Displays the signal strength level. This indicator can help to find the
proper position of the wireless station, for quality network operation.
This bar indicates the quality of the link. The higher the percentage, the
better the quality.
TX Frame
Displays the number of data frames successfully transmitted by the
adapter
RX Frame
Displays the number of data frames successfully received by the adapter
10
Instruction Manual
General Connection Setting
By clicking on More Setting, users are able to configure how the USB adapter is
encrypted, as well as other advanced functions:
Parameter
Description
General connection Select the channel used for networking. The channel settings of the wireless stations within
setting channel a network should be identical.
Tx Rate
There are several options including: Auto/1/2/5.5/11/6/9/12/18/24/36/48/54Mbps. When
Auto is selected, the device will automatically choose the most suitable transmission rate.
The higher the data rate designated in the network, the shorter the distance allowed
between the adapter and wireless stations. When the adapter works in 11b mode, the
maximum data rate is 11Mbps, so that there are only “Auto/1/2/5.5/11Mbps” options
available.
SSID
The SSID (up to 32 printable ASCII characters) comprises the unique name identified in a
WLAN. This ID prevents the unintentional merging of two co-located WLANs.You may
specify an SSID for the adapter, allowing only the device with the same SSID to connect to
the adapter.
Any
If the Any check box is enabled, the adapter will survey and connect to an available
wireless station without verifying the channel consistency and SSID of the wireless station.
Ad-Hoc – Select this mode if there is no access point or router in the network.
Network Type
Change/Apply
Infrastructure – This mode requires the presence of an 802.11 Access
Point. All communication is done via the access point or
router.
Clicking Change will enable you to configure General Connection Setting. In the
meantime, this button will change to Apply for you to confirm your settings.
Encryption Setting Users may enable/disable WEP and WPA encryption within the network.
11
Instruction Manual
Parameter (Cont’d)
Description (Cont’d)
This setting needs to be consistent with the wireless networks to which the
adapter connects.
Open System – No authentication is needed among the wireless network.
Authentication Mode
Shared Key – Only wireless stations using a shared key (WEP Key identified)
are allowed to connect to each other.
Auto – Auto switches the authentication algorithm, depending on the wireless
networks to which the adapter is connecting.
WEP Encryption Key
Setting
WPA Encryption Setting
Click this button to setup the WEP key.
Click this button to setup the WPA function.
Profile
Profile Name
You can save network settings as a profile. To connect to the network without
making additional configuration, you can load the profile.
Load
Load the setting values from the file in the Profile Name list. The new settings
will be activated immediately.
Save Current
Input a file name and click Save Current to write the current setting values to a
profile in the Profile Name list.
Delete
Delete a selected profile.
Other
Advanced Setting...
Information
Accesses advanced settings.
Displays the driver version, firmware and the MAC Address of the adapter.
12
Instruction Manual
WEP and WPA Encryption
WIFIDETG supports WPA (Wi-Fi Protected Access), which combines IEEE 802.1x and
TKIP (Temporal Key Integrity Protocol) technologies. Client users are required to
authorize before accessing access point routers, and the data transmitted in the network
is encrypted/decrypted using a dynamically changed secret key. This adapter also has a
built-in AES engine, which ensures the highest degree of security and authenticity for
digital information and provides the most advanced solution defined by IEEE 802.11i for
wireless network security.
WEP Settings
Parameter
Description
Key Length
Choose from 64-bit, 128-bit or 256-bit to encrypt transmitted data. A larger key length will
provide higher level of security, but the throughput will be lower.
Default Key ID
Select one of the keys (1~4) as the encryption key.
Hexadecimal – Only A-F, a-f and 0-9 are allowed to be set as the WEP key.
Default Key ID
ASCII –Numerical values, characters or signs are allowed to be used as the WEP key.
The keys are used to encrypt data transmitted in the wireless network. Fill in the text box
by following the rules below.
Key1 ~ Key4
64-bit – Input 10-digit Hex values or 5-digit ASCII values as the encryption keys. For
example: 0123456aef or Guest.
128-bit – Input 26-digit Hex values or 13-digit ASCII values as the encryption keys. For
example: 01234567890123456789abcdef or administrator.
256-bit – Input 58-digit Hex values or 29-digit ASCII values as the encryption keys.
Change/Apply
Clicking Change will enable you to setup the WEP key. In the meantime, this button will
change to Apply, to be used for settings confirmation.
13
Instruction Manual
WPA Setting
The adapter can automatically detect the WPA setting of the access point to which the
adapter is intended to connect.
There are two kinds of WPA mode: WPA and WPA-PSK. WPA is designed for enterprise
which requires a RADIUS Server and Certificate Server for the authentication. WPA-PSK
is a special mode designed for home and small business users who do not have access
to network authentication servers. In this mode, the user manually enters the starting
password in their access point or gateway, as well as in each wireless station in the
network. WPA takes over automatically from that point, keeping unauthorized users that
don't have the matching password from joining the network, while encrypting the data
traveling between authorized devices.
Parameter
Connect
Information
Protocol
Description
Displays settings for WPA mode.
This adapter supports two kinds of protocol for authentication, including TLS and PEAP.
TLS and PEAP require a certificate provided by the Certificate Server. PEAP requires a
user name and password as well. To get the certificate and the personal user name and
password, please contact your administrator.
TLS – Select a certificate from the Certificate list.
PEAP – Input the User Name and Password and also select a certificate from the
Certificate list.
User Name
Used for PEAP protocol.
Password
Used for PEAP protocol.
Pre-shared Key
Certificate
Input 8 to 63 digits of ASCII format to be used as the password for authentication within the
network.
All available certificates for TLS or PEAP will display in the list. Please select a proper
certificate for wireless authentication.
14
Instruction Manual
Parameter
Description
WEP Key
If the access point uses WEP data encryption function, please clcik WEP KEY SETTING to
setup the WEP key.
WEP Key Setting
Setup WEP keys by clicking this button.
Change/Apply
Clicking on Change will enable you to adjust WPA settings. In the meantime, the button will
switch to Apply for settings confirmation.
Advanced Settings
Advanced Setting allows users to enable/disable country roaming and power
consumption mode, and setup the fragmentation and RTS/CTS threshold of the adapter.
Parameter
Description
User Interface
Select the display language of the utility. Two languages are enabled: English and Chinese.
IEEE 802.11d (Country Roaming) is a standard that enables wireless devices to work at
the proper transmission power and radio channel, as regulated by the country where the
user is located.
Country Roaming World Mode – Enable the country roaming function, the adapter will follow the settings of
the connecting access point automatically.
User Select – Disable the country roaming function, to select the current location.
Continuous Access Mode (CAM) – The adapter will remain in active mode.
Power Consumption
Setting
Maximum Power-Saving Mode – Enables the adapter to remain in power saving mode
when it is idle.
Fast Power-Saving Mode – Enables the adapter to remain in power saving mode when in
idle, but some components of the adapter are still alive. In this
mode, power consumption is larger than Max mode.
15
Instruction Manual
Parameter
Description
Fragmentation
Threshold
Select the display language of the utility. Two languages are enabled: English and Chinese.
IEEE 802.11d (Country Roaming) is a standard that enables wireless devices to work at
the proper transmission power and radio channel, as regulated by current location.
RTS / CTS
Threshold
World Mode – Enable the country roaming function, the adapter will automatically follow
the settings of the connected access point.
User Select – Disable the country roaming function to select the current location.
Software Access Point Mode
This adapter can be used as a wireless access point. The relative configurations of the
access point include Channel, SSID, MAC Address Filtering, WEP encryption and so
on, are described as follows:
Parameter
Description
Station – Set the USB adapter to act as a wireless client.
Mode
Access Point – Set the USB adapter to function as a wireless access point.
Network Adapter
Displays USB Adapter product information.
Connect Station List Displays all MAC Addresses of wireless adapters connected to the access point.
Current Network
Setting
More Setting
Displays the connection settings of the current network, including Channel, SSID, WEP
and TX Power Level.
Function settings include disable/enable WEP, MAC Address Filter and Bridge Adapter
TX Frame
Displays the number of data frames successfully transmitted by the access point.
RX Frame
Displays the number of data frames successfully received by the access point.
16
Instruction Manual
Access Point general connection settings
The More Setting button allows users to configure access point connection settings,
encryption settings and other advanced functions:
Parameter
General Connection
Settings
Channel
Basic Rate
Description
Select the number of radio channels used by the access point. The wireless adapters that
connect to the access point should share the same channel.
Select the basic data transmission speed supported by the access point. When the access
point works in 11b mode, the maximum data rate is 11Mbps, allowing two options including
1, 2 Mbps and 1, 2, 5.5, 11Mbps to be selected.
Tx Rate
There are several transmit options, including Auto/1/2/5.5/11/6/9/12/18/24/36/48/54Mbps.
When Auto is selected, the device will choose the most suitable transmission rate
automatically. The higher the data rate used, the shorter the distance allowed between the
adapter and the wireless stations. When the adapter works in 11b mode, the maximum
data rate is 11Mbps, leaving only Auto/1/2/5.5/11Mbps options to be selected.
SSID
The SSID (up to 32 printable ASCII characters) is the unique name identified in a WLAN,
which prevents the unintentional merging of two co-located WLANs. The default SSID of
the access point is WLAN_AP. Wireless adapters connecting to the access point should
set up the same SSID as the access point.
Hide SSID
If the Hide SSID check box is enabled, the access point will not appear in the site survey
list of any wireless adapters. It means only the wireless adapters with the same SSID can
connect to the access point, avoiding unauthorized access.
Tx Power
There are four levels to chose from, to configure the transmission power of the access
point. The higher transmission power, the larger transmission distance and wireless
coverage.
Change/Apply
Click Change to configure the parameters of General Connection Setting. The button will
change to Apply for you to confirm your settings.
17
Instruction Manual
Parameter
(Cont’d)
WEP
Setting
Description
(Cont’d)
Enable or disable the WEP encryption function. If the WEP function is enabled, only
wireless adapters with the same WEP key setting can connect to the access point.
Click Setting to configure the WEP key. Please refer to Section 6.3 for more description.
Open System – No authentication is needed for connecting to the access point.
Authentication
Mode
Shared Key – Only wireless adapters using a shared key (WEP Key identified) are
allowed to connect to the access point.
Fragment
This value defines the maximum packet size. Any packet size larger than the designated
value will be fragmented. If you have decreased this value and experience high packet
error rates, you can increase it again, but it will likely decrease overall network
performance. Select a setting within a range of 256 to 2346 bytes.
RTS / CTS
Minimum packet size required for an RTS/CTS (Request To Send/Clear to Send). For
packets smaller than this threshold, an RTS/CTS is not sent and the packet is transmitted
directly to the WLAN. Select a setting within a range of 0 to 2347 bytes.
Preamble
The preamble defines the length of the CRC block for communication among the wireless
networks. There are two modes including Long and Short. High network traffic areas
should use a shorter preamble.
This access point can protect against unauthorized users accessing the connection, using
MAC Address Filter MAC Address filtering.
Bridge Adapter
Wireless adapters connected to the access point can access the wired network through
the bridge adapter. You can select an Ethernet adapter in the list to bridge the connection
between wireless and wired networks.
18
Instruction Manual
MAC Address Filter
Parameter
Description
Disable – Disable the MAC Address filter function.
Filter Type
Accept – Only the wireless adapters with the MAC Address setup in the table can connect
to the access point.
Reject – The wireless adapters with the MAC Address setup in the table will be rejected to
connect to the access point.
Filter MAC Address
MAC Address is a unique identification for hardware devices in the network. It is a 12-digit
hexadecimal values. Up to fifty unique MAC Addresses can be setup in the table. Fill in the
MAC Addresses of wireless adapters you want to accept or reject access to the access
point in this table.
19
Instruction Manual
Specifications
Bus Type
USB 2.0
Connectors
USB Type A Male
Maximum Data Transfer Rate
54Mbps
Maximum Bandwidth
Operating Systems supported
Certifications (Regulatory and other)
2.4000~2.4835GHz
Windows 98SE/Me/2000/XP/2003 Server
FCC, CE, RoHS, WEEE
Operating Temperature
32~140°F(0~60°C)
Operating Humidity
Humidity: 0-85% (NonCondensing)
Dimensions
14 x 28.5 x 91mm (.55 x 1.12 x 3.58”)
Technical Support
StarTech.com’s lifetime technical support is an integral part of our commitment to provide
industry-leading solutions. If you ever need help with your product, visit
www.startech.com/support and access our comprehensive selection of online tools,
documentation, and downloads.
Warranty Information
This product is backed by a one-year warranty. In addition, StarTech.com warrants its
products against defects in materials and workmanship for the periods noted, following
the initial date of purchase. During this period, the products may be returned for repair, or
replacement with equivalent products at our discretion. The warranty covers parts and
labor costs only. StarTech.com does not warrant its products from defects or damages
arising from misuse, abuse, alteration, or normal wear and tear.
Limitation of Liability
In no event shall the liability of StarTech.com Ltd. and StarTech.com USA LLP (or their
officers, directors, employees or agents) for any damages (whether direct or indirect,
special, punitive, incidental, consequential, or otherwise), loss of profits, loss of business,
or any pecuniary loss, arising out of or related to the use of the product exceed the
actual price paid for the product. Some states do not allow the exclusion or limitation of
incidental or consequential damages. If such laws apply, the limitations or exclusions
contained in this statement may not apply to you.
20
About StarTech.com
StarTech.com is “The Professionals’ Source for Hard-to-Find Computer
Parts”. Since 1985, we have been providing IT professionals with the
quality products they need to complete their solutions. We offer an
unmatched selection of computer parts, cables, server management
solutions and A/V products and serve a worldwide market through our
locations in the United States, Canada, the United Kingdom and Taiwan.
Visit www.startech.com for complete information about all our products
and to access exclusive interactive tools such as the Parts Finder and the
KVM Reference Guide. StarTech.com makes it easy to complete almost
any IT solution. Find out for yourself why our products lead the industry in
performance, support, and value.
Revised: 19 January 2007 (Rev. A)