1
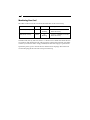
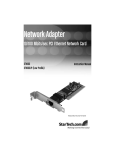
NETWORK ADAPTER
10/100 Mbits/sec PCI Ethernet Network
Card
ST100S
ST100SW
ST100SLP
Instruction Guide
* Actual product may vary from photo
The Professionals’ Source For Hard-to-Find Computer Parts
FCC COMPLIANCE STATEMENT
This equipment has been tested and found to comply with the limits for a Class B
digital device, pursuant to part 15 of the FCC Rules. These limits are designed to
provide reasonable protection against harmful interference in a residential installation.
This equipment generates, uses and can radiate radio frequency energy and, if not
installed and used in accordance with the instructions, may cause harmful interference
to radio communications. However, there is no guarantee that interference will not
occur in a particular installation. If this equipment does cause harmful interference to
radio or television reception, which can be determined by turning the equipment off
and on, the user is encouraged to try to correct the interference by one or more of the
following measures:
• Reorient or relocate the receiving antenna.
• Increase the separation between the equipment and receiver.
• Connect the equipment into an outlet on a circuit different from that to which the
receiver is connected.
• Consult the dealer or an experienced radio/TV technician for help.
1
Table of Contents
Introduction . . . . . . . . . . . . . . . . . . . . . . . . . . . . . . . . . . . . . . . . . . . . . . . . . . . . . . . . . . 2
Installation . . . . . . . . . . . . . . . . . . . . . . . . . . . . . . . . . . . . . . . . . . . . . . . . . . . . . . . . . . . 3
Connecting Your Card to Your Network . . . . . . . . . . . . . . . . . . . . . . . . . . . . . . . . . . 4
Installing the Drivers . . . . . . . . . . . . . . . . . . . . . . . . . . . . . . . . . . . . . . . . . . . . . . . . . . 5
Monitoring Your Card . . . . . . . . . . . . . . . . . . . . . . . . . . . . . . . . . . . . . . . . . . . . . . . . . . 6
Tips for Setting Up Your Network . . . . . . . . . . . . . . . . . . . . . . . . . . . . . . . . . . . . . . . 7
Technical Support . . . . . . . . . . . . . . . . . . . . . . . . . . . . . . . . . . . . . . . . . . . . . . . . . . . . . 9
Warranty Information . . . . . . . . . . . . . . . . . . . . . . . . . . . . . . . . . . . . . . . . . . . . . . . . . . 9
2
Introduction
Thank you for purchasing a StarTech.com10-100 Mbits/sec PCI Ethernet card. This
reliable, high speed network card lets you connect your computer to your Ethernet LAN
and experience super-fast transfer speeds of up to 100Mbits/sec. Full duplex support
means that the card can simultaneously transmit and receive information at these high
speeds. The card is a snap to install and set up and is fully Plug and Play compatible in a
wide range of operating environments.
Features
• Complies with 10BaseT Ethernet and 100BaseTX Fast Ethernet standards
• Capable of full- and half-duplex communications
• Complies with Plug and Play specifications
• Auto-negotiation function determines the optimal transmission rate
• Supports 32-bit PCI Bus Master for high performance and low processor utilization
• Backed by StarTech.com's lifetime warranty
Before You Begin
To ensure a quick and easy card installation, please read through this section carefully
before attempting to install the card.
System Requirements
• An IBM compatible notebook computer with a Pentium processor
• An open PCI slot
• One of the following operating environments: Windows XP/ME/2000/98/95,
Windows NT, Linux, NetWare 3.x/4.x, Lan Manager, TCP/IP software
• ST100SW ONLY: To take advantage of the Wake-On-Lan feature, your
motherboard must be equipped with ACPI/Wake-On-Lan capabilites. Consult your
motherboard user guide or contact the manufacturer for information.
WARNING! PCI cards, like all computer equipment, can be severely damaged by static
electricity. Be sure that you are properly grounded before opening your computer case or
touching your PCI card. StarTech.com recommends that you wear an anti-static strap
when installing any computer component. If an anti-static strap is unavailable, discharge
yourself of any static electricity build-up by touching a large grounded metal surface
(such as the computer case) for several seconds. Also be careful to handle the PCI card by
its edges and not the gold connectors.
3
Contents
This package should contain:
• 1 x PCI Ethernet Adapter card
• 1 x driver disk
Installation
This section will guide you through the installation of your card and the related
software. Please read through the instructions carefully and complete each step in the
order listed.
Installing the Card
1. Make sure that your system is unplugged and you are grounded.
2. Remove the cover of your system (see your computer's user manual for details, if
necessary) and gently turn your computer onto its side.
3. Locate an empty PCI slot (usually white in colour) and remove the metal plate that
covers the rear bracket. You may need a Phillips screwdriver to perform this step.
Hang on to the screw! You will need it to secure the card later.
4. Gently insert the card into the empty slot, making sure it is firmly seated.
5. Secure the card in place using the screw you removed in Step 3.
6. (ST100SW ONLY) Connect the Wake-On-LAN (WOL) connector to the WOL plug on
your motherboard. Consult your motherboard user guide for information, if
necessary.
7. Put the computer case back on.
4
Connecting Your Card to Your Network
Depending on how you are planning on using the card, the device you are connecting it
to and the type of cable you need may differ. To take advantage of the NIC’s 100
Mbits/sec capacity, it is recommended that you always use at least Category 5 Ethernet
cable. If you are unsure of the type of cable required for your device, consult your device
manufacturer.
NOTE: StarTech.com carries a wide range of Ethernet cables in various colors and
lengths. For more information on these products, as well as tips and ideas for setting up
and running your network, visit http://www.startech.com and click on the Networking
tab near the top of the screen.
• If you are connecting your computer directly to another computer, you need to use a
crossover cable.
• If you are connecting your computer to a hub or switch, you should use a straightthrough cable.
• If you are connecting your computer to the Internet via a DSL or cable modem, you
should use the cable recommended by the modem manufacturer.
Installing the Drivers
NOTE: Windows XP will automatically detect the new hardware and install the
necessary drivers without any user input.
The following are installation instructions for Windows OS only. If you are using Linux,
Netware, or any other supported environment, consult the driver installation instructions
available in text form on the driver disk.
The most recent drivers for your Ethernet adapter are available as a free download from
our website. Visit www.startech.com and click on the Downloads link for information.
Depending on your version of Windows and the configuration of your system, the
instructions that appear on your screen might not be identical to the instructions below.
Windows 2000/ME/98
1. Windows will automatically detect the new hardware. Click Next.
2. Choose “Driver from disk provided by hardware manufacturer”.
3. Insert the driver disk into your disk drive and specify the following path (where
“A:\” is the location of your driver disk):
• Windows 2000: A:\WIN2000
• Windows ME: A:\WINME
• Windows 98: A:\WIN98
4. You may be required to insert your Windows installation disk. Follow the remaining
prompts and reboot your computer when prompted.
5
Windows 95
1. Windows will automatically detect the new hardware. Click Next.
2. Select “Driver from disk provided by hardware manufacturer.”
3. Insert the driver disk into your disk drive and specify the following path (where
“A:\” is the location of your driver disk):
•A:\WIN95
Windows NT 4.0
1. From your Control Panel, double-click on the Network icon.
2. Choose Add Adapters and select “<Other> Requires disk from manufacturer.”
3. Insert the driver disk into your disk drive and specify the following path (where
“A:\” is the location of your driver disk):
• A:\WINNT4
4. The “Select line speed” dialog box will appear. The default is “Auto”, where the
adapter will auto-detect the line speed. You can choose to set the value to 10 (half- or
full-duplex) or 100 (half- or full-duplex) Mbps if you so choose.
5. The “Input Ethernet ID” dialog box will appear. This option is only required if you
have more than one Fast Ethernet adapter on the computer. Choose “Skip” if you
have only one adapter installed. If you are adding more than one Fast Ethernet
Adapters, consult the Msnt.txt file located in the Txt\Ms folder for additional
instructions.
6. The “Bus Location” dialog box will appear. If your machine contains more than one
hardware bus, please select the Bus Type and Bus Number where the network
adapter is installed.
7. Follow any additional on-screen prompts and reboot your computer to complete the
installation process.
6
Monitoring Your Card
The LEDs on the front of the card are the best indication of the card’s activity.
LED
Color
Status
Description
10M/Link/Activity
Yellow
On
Blinking
Card is in 10Mbits/sec mode
Network activity
100M/Link/Activity
Green
On
Blinking
Card is in 100Mbits/sec mode
Network activity
If neither Link/Activity LED is lit, there is a connection error. Make sure that all devices
are turned on and that the network cable is properly connected at both ends. Also make
sure that your network cables comply with EIA/TIA 568 and Category 5 specifications.
If problems persist, power down all devices and disconnect all plugs. Wait at least ten
seconds then plug the devices back in and power them up.
7
Tips for Setting Up Your Network
For information and help on setting up your network, please consult the manufacturer of
your operating system. The following is for tips and troubleshooting purposes only and
is intended for Microsoft users on a local area network.
Make sure your computers are configured properly
For your convenience, you should configure each of your computers so that they can
“see” each other and share devices and files. To do this, you have to make sure that the
following have been installed on your computers:
• Client for Microsoft Networks
• TCP/IP (Internet Protocol)
• File and Print Sharing
These clients, protocols, and services can be found in the following locations:
Windows XP
1. Click on Start, then click My Network Places.
2. Click View Network Connections in the Network Tasks box.
3. Right-click on Local Area Connection and choose Properties.
Windows 2000
1. Click on Start, then Settings, then Network and Dialup Connections.
2. Double-click Local Area Connections and click the Properties button.
Windows Me/98/95
1. Click on Start, then Settings, then Control Panel.
2. Double-click on Network.
NOTE: If you need to add any of the following components, check your Windows
documentation for details.
Make sure all your computers are on the same workgroup
To be able to communicate properly with each other, each computer must be located on
the same workgroup. Each computer within a workgroup must have a unique name. To
ensure compatiblility between each version of Windows, keep your computer names
under 13 characters long.To view, add, or edit your computer’s name, do the following:
8
Windows XP
1. Click Start and then Control Panel.
2. Double-click System then click on the computer name tab.
Windows 2000
1. Click on Start, then Settings, then Control Panel.
2. Double-click on System.
3. Click on the Network Identification tab.
Windows Me/98/95
1. Click Start, then Settings, then Control Panel.
2. Double-click Network, then click the Identification tab.
Make Sure Your Sharing is Set Up Properly
1. Go to your network dialog box using the procedure explained under “Make sure
your computers are configured properly.”
2. Click on File and Print Sharing.
3. Choose whether you want to install one, both, or neither of these options. Click OK.
4. Decide what files or folders you want to share. You can call up sharing options by
right-clicking on a file or folder and choose “Sharing” (Windows 2000/Me/98/95) or
“Sharing and Security” (Windows XP).
NOTE: If you are having any difficulties setting up or using your network, please
contact your operating system vendor.
9
Technical Support
The following technical resources are available for this StarTech.com product:
On-line help:
We are constantly adding new information to the Tech Support section of our web site. To
access this page, click the Tech Support link on our homepage, www.startech.com. In the
tech support section there are a number of options that can provide assistance with this
card.
Knowledge Base - This tool allows you to search for answers to common issues using
key words that describe the product and your issue.
FAQ - This tool provides quick answers to the top questions asked by our customers.
Downloads - This selection takes you to our driver download page where you can
find the latest drivers for this product.
Call StarTech.com tech support for help: 1-519-455-4931
Support hours: Monday to Friday 9:00AM to 5:00PM EST (except holidays)
Warranty Information
This product is backed by a one-year warranty. In addition StarTech.com warrants its
products against defects in materials and workmanship for the periods noted below,
following the initial date of purchase. During this period, the products may be
returned for repair, or replacement with equivalent products at our discretion. The
warranty covers parts and labor costs only. StarTech.com does not warrant its products
from defects or damages arising from misuse, abuse, alteration, or normal wear and
tear.
Limitation of Liability
In no event shall the liability to StarTech.com Ltd. (or its officers, directors, employees or
agents) for any damages (whether direct or indirect, special, punitive incidental,
consequential, or otherwise), loss of profits, loss of business, or any pecuniary loss,
arising out of related to the use of the product exceed the actual price paid for
the product.
Some states do not allow the exclusion or limitation of incidental or consequential
damages. If such laws apply, the limitations or exclusions contained in this statement
may not apply to you.
Revised: April 22, 2003