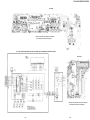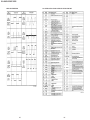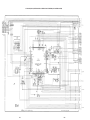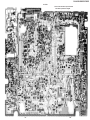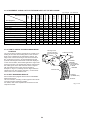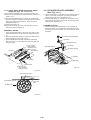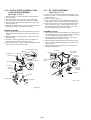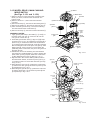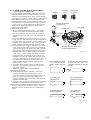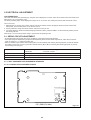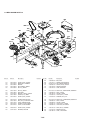
1
SLV-L45AR/L65HFAR/L75HFAR
RMT-V241/V242V
SERVICE MANUAL
Argentina Model
Ver 1.0 1998.07
Photo : SLV-L75HFAR
SPECIFICATIONS
Sistema
Formato
VHS PAL-N/NTSC estándar
Cobertura de canales
VHF 2 a 13
UHF 14 a 69
CATV A-8 a A-1, A a W,
W+1 a W+84
Antena
Terminal de antena de 75 ohmios para VHF/UHF
Entradas/salidas
LINE IN (SLV-L65HFAR)
LINE IN y LINE IN 2 (SLV-L45AR/L75HFAR)
VIDEO IN
Toma fonográfica (1) (SLV-L65HFAR)
Tomas fonográficas (1 por cada) (SLV-L45AR/L75HFAR)
Señal de entrada : 1 Vp-p, 75 ohmios,
desequilibrada, sincronización negativa
AUDIO IN
Tomas fonográficas (2, L/R) (SLV-L65HFAR)
Tomas fonográficas (1 por cada) (SLV-L45AR)
Tomas fonográficas (2 por cada, L/R) (SLV-L75HFAR)
Nivel de entrada : 327 m Vrms,
Impedancia de entrada : superior a
47 kiloohmios
LINE OUT
VIDEO OUT
Toma fonográfica (1)
Señal de Salida : 1 Vp-p, 75 ohmios,
desequilibrada, sincronización negativa
AUDIO OUT
Tomas fonográficas (2, L/R) (SLV-L65HFAR/L75HFAR)
Toma fonográfica (1) (SLV-L45AR)
Salida estándar : 327 m Vrms,
Impedancia de carga : 47 kiloohmios
Impedancia de salida : inferior a
10 kiloohmios
General
Requisitos de alimentación
220 a 240 V CA, 50Hz
Consumo de energía
18 W
Temperatura de funcionamiento
5˚C a 40˚C
Temperatura de almacenamiento
-20˚C a 60˚C
Dimensiones
Aprox. 360 x 97 x 298 mm (an /al / fn)
incluidas las piezas y controles
sobresalientes
Masa
Aprox. 3,7 kg
Accesorios suministrados
Control remoto (1)
Pilas tipo R6 (tamaño AA) (2)
Cable de antena (1)
Cable de audio / video (1)
(sólo el modelo SLV-L65HFAR/L75HFAR)
Cable de alimentación de CA (1)
Diseño y especificaciones sujetos a modificaciones sin previo aviso.
J VIDEO CASSETTE RECORDER
N-PAL NTSC
MICROFILM
SAFETY CHECK-OUT
After correcting the original service problem, perform the following
safety check before releasing the set to the customer :
1. Check the area of your repair for unsoldered or poorly-soldered connections. Check the entire board surface for solder splashes and bridges.
4. Look for parts which, though functioning, show obvious
signs of deterioration. Point them out to the customer and
recommend their replacement.
2. Check the interboard wiring to ensure that no wires are
“pinched” or contact high-wattage resistors.
5. Check the B+ voltage to see it is at the values specified.
3. Look for unauthorized replacement parts, particularly transistors, that were installed during a previous repair. Point
them out to the customer and recommend their replacement.
SAFETY-RELATED COMPONENT WARNING!!
COMPONENTS IDENTIFIED BY MARK ! OR DOTTED
LINE WITH MARK ! ON THE SCHEMATIC DIAGRAMS AND
IN THE PARTS LIST ARE CRITICAL TO SAFE OPERATION.
REPLACE THESE COMPONENTS WITH SONY PARTS
WHOSE PART NUMBERS APPEAR AS SHOWN IN THIS
MANUAL OR IN SUPPLEMENTS PUBLISHED BY SONY.
ATTENTION AU COMPOSANT AYANT RAPPORT
À LA SÈCURITÉ!
LES COMPOSANTS IDENTIFIÉS PAR UNE MARQUE ! SUR
LES DIAGRAMMES SCHÉMATIQUES ET LA LISTEDES
PIÉCES SONT CRITIQUES POUR LA SÉCURITÉ DE
FONCTIONNEMENT.
NE REMPLACER CES COMPOSANTS QUE PAR DES
PIÉCES SONY DONT LES
NUMÉROS SONT DONNÉS DANS CE MANUEL OUDANS
LES SUPPLÉMENTS PUBLIÉS PAR SONY.
–2–
TABLE OF CONTENTS
Section
______
Title
____
Page
____
Section
______
1. GENERAL
Paso 1 Conexiones ........................................................ 1-1
Paso 2 Configuración de la videograbadora .................. 1-2
Paso 3 Ajuste del reloj ................................................... 1-3
Selección del idioma ..................................................... 1-3
Instrucciones adicionales de sintonización ................... 1-3
Reproducción de cintas ................................................. 1-4
Grabación de programas de televisión .......................... 1-4
Grabación de programas de televisión con
temporizador ................................................................. 1-5
Grabación de programas de televisión mediante la
función VCR Plus + ...................................................... 1-6
Reproducción/búsqueda a distintas velocidades ........... 1-6
Grabación de programas de televisión con el
temporizador instantáneo .............................................. 1-6
Comprobación/cancelación de ajustes del
temporizador ................................................................. 1-7
Búsquedas con la función de índice .............................. 1-7
Grabación de programas estéreo y bilingües ................ 1-7
Edición con otra videograbadora .................................. 1-7
Ajuste de la imagen ....................................................... 1-8E
Indice visual .................................................................. 1-8E
Title
____
Page
____
Servo Circuit Waveforms .............................................. 4-15
IC 301 System Control & Tuning Control MPU Pin
Functions Table ............................................................. 4-16
CP-1 Board (SY-A) System Control & Servo
Circuit Diagram (SLV-L45AR) ..................................... 4-17
CP-1 Board (SY-A) System Control & Servo
Circuit Diagram (SLV-L65HFAR/L75HFAR) .............. 4-19
5. ADJUSTMENTS
1. Maintaining and Checking the Mechanism ............... 5-1
l -1. Regular Checks and Maintenance Items ............... 5-1
1-1-1. Regular Checks ................................................ 5-1
1-1-2. Cleaning ............................................................ 5-1
1-2 Service Tools ........................................................... 5-2
1-2-1. Service Tools ................................................... 5-2
1-2-2. Using the Relay Cable (J-6090-057-A) ............ 5-3
2. An Overview of the Mechanism ................................ 5-3
2-1. Names of the Main Parts ........................................ 5-3
2-1-1. Cassette Mechanism Assembly ........................ 5-3
2-1-2. Top View .......................................................... 5-4
2-1-3. Under Side ........................................................ 5-4
2-2. An Overview of the Mechanism Modes ................ 5-5
2-2-1. Mechanism Mode Switching Table .................. 5-5
2-2-2. Movement Check List for the Main Parts of the
Mechanism ........................................................ 5-6
2-2-3. How to Check the Mechanism
Mode Position ................................................... 5-6
2-2-4. Self-Diagnosis Display ..................................... 5-6
3. Disassembling the Main Parts of the Mechanism ..... 5-7
3-1. How to Make the Mechanism Move ...................... 5-7
3-1-1. How to Operate the Loading Motor Using
A DC Voltage Supply ....................................... 5-7
3-1-2. Operating the Loading Motor
by the Manual Method ...................................... 5-7
3-1-3. Making the Mechanism Move
Using the Manual Method ................................ 5-7
3-2. Mechanism Unit ..................................................... 5-8
3-3. Cassette Drive Mechanism .................................... 5-8
3-3-1. Cassette Mechanism Assembly ........................ 5-8
3-3-2. Cassette Drive Gear .......................................... 5-9
3-3-3. Door opener, Under Frame and Stand L ........... 5-9
3-3-4. Start Rack Gear and Front Rack Gear .............. 5-10
3-4. Cleaner Roller Assembly ....................................... 5-10
3-5. Cylinder (DRUM) .................................................. 5-11
3-5-1. Cylinder Motor (ROTOR and STATOR) ......... 5-11
3-5-2. Cylinder Assembly ........................................... 5-11
3-6. FE Head and ACE Head ........................................ 5-12
3-6-1. Audio R/P Head Assembly (ACE HEAD) ....... 5-12
3-6-2. Full Erase Head ................................................ 5-12
3-7. Capstan Motor ........................................................ 5-13
3-7-1. Capstan Motor .................................................. 5-13
3-7-2. Capstan Brake Assembly .................................. 5-13
3-8. Loading Motor Assembly and
Worm Gear Assembly ............................................ 5-14
3-9. Pinch Roller Pressure Mechanism ......................... 5-14
3-9-1. Pinch Roller Lever Assembly ........................... 5-14
3-9-2. Pinch Lift Cam and Pinch Cam Gear ............... 5-15
3-10. L Guide Lever Assembly and
Load Lever Assembly .......................................... 5-16
3-11. BT Lever Assembly ............................................. 5-16
3-12. Reel Drive Mechanism ........................................ 5-17
3-12-1. Reel Belt, Reel Pulley, Friction Gear
Assembly and Clutch Change Lever .............. 5-17
3-12-2. Clutch Mounting Assembly ............................ 5-17
2. DISASSEMBLY
1-1. Removal of Cabinet, Mechanism Unit and Main
Board ..................................................................... 2-1
Removing the Cabinet Parts .................................. 2-1
Removing the Mechanism Main Unit and the
CP-1 PWB Assembly ............................................. 2-1
l-2. Temporarily Setting Up and Connecting
CP-1 PWB Assembly ............................................. 2-3E
1-3. Installation of the Front Panel ................................ 2-3E
3. DIAGRAMS
Circuit Boards Location ................................................ 3-1
Mechanism Connection Diagram .................................. 3-2
Overall wiring Diagram (SLV-L45AR) ......................... 3-3
Overall wiring Diagram (SLV-L65HFAR/L75HFAR) ... 3-5
System Control & Servo Circuit Diagram
(SLV-L45AR) ................................................................ 3-7
System Control & Servo Circuit Diagram
(SLV-L65HFAR/L75HFAR) ......................................... 3-9
Audio & Video Circuit Diagram (SLV-L45AR) ........... 3-11
Video & Audio Circuit Diagram
(SLV-L65HFAR/L75HFAR) ......................................... 3-13
4. SCHEMATIC DIAGRAMS AND PRINTED
WIRING BOARDS
CP-1 Board (PW-A) Power Supply Circuit Diagram ... 4-1
CP-1 Board (VA-A) Video, Audio & Tuner
Circuit Diagram (SLV-L45AR) ..................................... 4-3
CP-1 Board (VA-A) Video, Audio & Tuner
Circuit Diagram (SLV-L65HFAR/L75HFAR) .............. 4-5
Video Circuit Waveforms .............................................. 4-7
VP-1 Board Video Pre-Amp circuit Diagram
(SLV-L45AR) ................................................................ 4-8
VP-1 Board Video Pre-Amp circuit Diagram
(SLV-L65HFAR/L75HFAR) ......................................... 4-9
A7101 Display (FLD) Grid/Anode Assignment
Drawing & Table ........................................................... 4-11
TM-1, 2 Boards Operation Key, Display & Timer
Circuit Diagram (SLV-L45AR) ..................................... 4-11
TM-1, 2 Boards Operation Key, Display & Timer
Circuit Diagram (SLV-L65HFAR/L75HFAR) .............. 4-13
–3–
Section
______
Title
____
Section
______
Page
____
3-12-3. S Soft Lever, Supply Reel Assembly
and S Reel Gear .............................................. 5-17
3-12-4. T Soft Brake Assembly, Take Up Reel
Assembly, T Reel Gear ................................... 5-18
3-13. Brakes .................................................................. 5-18
3-13-1. S Brake Assembly, T Brake
Assembly, T Brake ACT Slide ........................ 5-18
3-13-2. Brake Control Lever and Brake ACT Lever
Assembly ........................................................ 5-19
3-13-3. S Brake ACT Slide and BT Spring Lever
Assembly ........................................................ 5-19
3-14. Guides .................................................................. 5-20
3-14-1. Guide Roller Assembly ................................... 5-20
3-14-2. S and T Incline Mounting Assemblies ............ 5-20
3-15. Wheel Gear 2, Main Cam and Mode Switch ....... 5-21
3-16. Crescent Slide ...................................................... 5-22
3-17. S Load Gear, T Load Gear, S Load Lever
Assembly and T Load Lever Assembly ............... 5-23
3-18. Tape Sensors, Reel Sensor and EP SW Lever ..... 5-24
3-18-1. Tape Top Sensor and Tape End Sensor ........... 5-24
3-18-2. Reel Sensor ..................................................... 5-24
3-18-3. EP Switch Lever ............................................. 5-24
4. Mechanism Checks and Adjustments ........................ 5-25
4-1. Reel Table Torque Check ....................................... 5-25
4-2. Adjusting the BT Lever Assembly Position and
Checking the Back Tension Torque in Play Mode ..... 5-25
4-2-1. BT Lever Pole Position Adjustment ................. 5-25
4-2-2. Checking the Back Tension Torque
Play Mode ......................................................... 5-25
4-3. Tape Path Adjustment ............................................ 5-26
4-3-1. Adjustment Procedure ...................................... 5-26
4-3-2. Load Lever Assembly Height Adjustment ....... 5-26
4-3-3. Guide Roller Height Adjustment ...................... 5-27
4-3-4. Audio R/P Head (ACE HEAD) Height
Adjustment, Azimuth Adjustment and
Horizontal Position Adjustment ........................ 5-28
4-3-5. Checking After Adjustment .............................. 5-29E
Title
____
Page
____
2-4-3. RF AGC Adjustment ........................................ 6-10E
3. Test Points for Tape Path Adjustment ....................... 6-10E
7. EXPLODED VIEWS
7-1. Cabinet & Chassis Parts ......................................... 7-1
7-2. Mechanism Parts-1 ................................................ 7-2
7-3. Mechanism Parts-2 ................................................ 7-4E
8. ELECTRICAL PARTS LIST ................................. 8-1
Hardware List ................................................................ 8-9E
6. ELECTRICAL ADJUSTMENTS
Circuit Boards Location ................................................ 6-1
Self -Diagnosis Display ................................................. 6-2
1. Self-Diagnosis Contents and Mechanism Mode
Display ...................................................................... 6-2
2. Electrical Adjustment ................................................ 6-4
2-1. Servo Circuit Adjustment ....................................... 6-4
2-1-1. Test Equipment and Standards Required .......... 6-4
2-1-2. Location of Adjustment Points ......................... 6-4
2-1-3. Switching Position Adjustment ........................ 6-5
2-1-4. SP STIL V-LOCK Adjustment ......................... 6-5
2-2. Video Circuit Relay Jig .......................................... 6-6
2-2-1. Test Equipment and Standards Required .......... 6-6
2-3. MTS Decoder Circuit Adjustment
(SLV-L65HFAR/L75HFAR only) .......................... 6-7
2-3-1. Test Equipment and Standards Required .......... 6-7
2-3-2. Location of Adjustment Points ......................... 6-7
2-3-3. Stereo/SAP Filter Adjustment .......................... 6-8
2-3-4. Stereo VCO Adjustment ................................... 6-8
2-3-5. Input Level Adjustment .................................... 6-8
2-3-6. Separation Adjustment ...................................... 6-8
2-3-7. Audio Output Mode and Output Signal Check ... 6-9
2-4. IF Circuit Adjustment ............................................ 6-10E
2-4-1. Test Equipment and Standard Required ........... 6-10E
2-4-2. Location of Adjustment Point ........................... 6-10E
–4–
SLV-L45AR/L65HFAR/L75HFAR
SECTION 1
GENERAL
1-1
This section is extracted from SLVL75HFAR instruction manual.
1-2
1-3
1-4
1-5
1-6
1-7
1-8 E
SLV-L45AR/L65HFAR/L75HFAR
SECTION 2
DISASSEMBLY
1-1. REMOVAL OF CABINET, MECHANISM UNIT AND MAIN BOARD
1. Spread out the lock clamps (C) in the arrow direction
slightly and remove the TM-1 PWB as shown in Fig. 1-1-2.
2. Remove the screw 4 at the chassis.
3. Remove the red screw 5 in the chassis, the red screw
6, and remove the holder in this order. (SLV-L45AR)
Remove the screw 5 in the chassis, the screw 6, and
the holder in this order. (SLV-L65HFAR/L75HFAR)
4. Remove the two screws 7 and two screws 8 of the
mechanism unit. The two screws 8 of the cassette tray
can be removed easily by pushing the tray lock lever in
the arrow direction to remove the lock as shown in the
enlarge view A and by pushing the lid opener lever in
the arrow direction to remove the lock as shown in the
enlarge view B.
5. Lift up the whole mechanism unit and main board (CP-1
PWB assembly), and as shown in Fig. 1-1-3, push the
two lock clamps (D) of the chassis in the arrow direction
so that they can be removed from the chassis.
REMOVING THE CABINET PARTS (Fig. 1-1-1 )
1. Remove the cabinet and bottom cover by removing the
four screws 1 and four screws 2 .
2. Remove the front panel by removing the locks of the
clamps (A) using a screwdriver, etc. and slightly rotating
the bottom part in the direction of the arrow.
Notes: • Electrical adjustments for the this model can be
performed with only the cabinet removed.
• When replacing the bottom cover, do not tighten
the screws 2 too much. Excess tightness may
damage the screws taps on the chassis.
REMOVING THE MECHANISM MAIN UNIT AND
THE CP-1 PWB ASSEMBLY (Fig.1-1-2 and 1-1-3)
After removing the cabinet parts, remove the mechanism
unit and the CP-1 PWB assembly connected as follows.
1
Cabinet
1
1
1
Clamps(A)
Main Unit
Front Panel
Bottom Cover
2
2
2
2
2-1
Fig. 1-1-1
7
A
Terminal Board
5
6
Tray Lock Lever
8
8
4
Holder
7
Lid Opener Lever
(B)
TM-2 PWB
(C)
(C)
(B)
3
B
(C)
TM-2 PWB
(C)
(C)
SLV-L75HFAR
(C)
TM-2 PWB
Chassis
Cassette Tray
SLV-L65HFAR
SLV-L45AR
TM-1 PWB
Fig. 1-1-2
VP-1 PWB Assembly
Mechanism Main Unit
TM-2 PWB
CP-1 PWB Assembly
SLV-L45AR
SLV-L75HFAR
TM-1 PWB
Clamps(D)
SLV-L65HFAR
Chassis
Fig. 1-1-3
2-2
1-2. TEMPORARILY SETTING UP AND CONNECTING CP-1 PWB ASSEMBLY
The following is an example of how to place and connect the main board without a jig, when repairing the CP-1 PWB
assembly.
1. Place the mechanism unit and main board up side down
as a whole on a flat surface with foil side of the main
board facing up.
2. Operate the unit using the buttons on TM-1 PWB or the
remote control.
CP-1 PWB Assembly (Foil side)
Screws 9
Terminal Boord
Mechanism Main Unit
TM-1 PWB
Cassette Compartment
TM-2 PWB
Fig. 1-1-4
1-3. INSTALLATION OF THE FRONT PANEL
When installing the front panel to the chassis after repaires and adjustments.
1. Pressing down the door opener lever of the mechanism
main unit.
2. Set the cassette door to half-opened state as shown in
Fig. 1-1-5, and install the front panel to the chassis.
Note: Opened cassette door position does not install the
front panel to the chassis.
Jutted part of
Cassette Holder
Front Panel
Door Opener Lever
Cassette Door
(Position A)
Cassette Door
(Position B)
2-3 E
Fig. 1-1-5
SLV-L45AR/L65HFAR/L75HFAR
SECTION 3
DIAGRAMS
CIRCUIT BOARDS LOCATION
3 in 1 Tuner
(Tuner/IF/RF Conv.)
VP-1 PWB Assembly
CP-1 PWB Assembly
TM-2 PWB
TM-1 PWB
3-1
MECHANISM CONNECTION DIAGRAM
3-2
SLV-L45AR/L65HFAR/L75HFAR
OVERALL WIRING DIAGRAM (SLV-L45AR)
3-3
3-4
SLV-L45AR/L65HFAR/L75HFAR
OVERALL WIRING DIAGRAM (SLV-L65HFAR/L75HFAR)
3-5
3-6
SLV-L45AR/L65HFAR/L75HFAR
SYSTEM CONTROL & SERVO CIRCUIT DIAGRAM (SLV-L45AR)
3-7
3-8
SLV-L45AR/L65HFAR/L75HFAR
SYSTEM CONTROL & SERVO CIRCUIT DIAGRAM (SLV-L65HFAR/L75HFAR)
3-9
3-10
SLV-L45AR/L65HFAR/L75HFAR
AUDIO CIRCUIT DIAGRAM (SLV-L45AR)
VIDEO CIRCUIT DIAGRAM (SLV-L45AR)
3-11
3-12
SLV-L45AR/L65HFAR/L75HFAR
VIDEO CIRCUIT DIAGRAM (SLV-L65HFAR/L75HFAR)
AUDIO CIRCUIT DIAGRAM (SLV-L65HFAR/L75HFAR)
3-13
3-14E
SLV-L45AR/L65HFAR/L75HFAR
SECTION 4
SCHEMATIC DIAGRAMS AND PRINTED WIRING BOARDS
CP-1 BOARD (PW-A) POWER SUPPLY CIRCUIT DIAGRAM
4-1
4-2
SLV-L45AR/L65HFAR/L75HFAR
CP-1 BOARD (VA-A) VIDEO, AUDIO & TUNER CIRCUIT DIAGRAM (SLV-L45AR)
4-3
4-4
SLV-L45AR/L65HFAR/L75HFAR
CP-1 BOARD (VA-A) VIDEO, AUDIO & TUNER CIRCUIT DIAGRAM (SLV-L65HFAR/L75HFAR)
4-5
4-6
SLV-L45AR/L65HFAR/L75HFAR
VIDEO CIRCUIT WAVEFORMS
VP-1 BOARD VIDEO PRE-AMP CIRCUIT DIAGRAM (SLV-L45AR)
4-7
4-8
SLV-L45AR/L65HFAR/L75HFAR
VP-1 P.W.B.
r
There are few cases than the part isn't mounted
in this model is printed on this diagram.
VP-1 BOARD VIDEO PRE-AMP CIRCUIT DIAGRAM (SLV-L65HFAR/L75HFAR)
4-9
4-10
SLV-L45AR/L65HFAR/L75HFAR
A7101 DISPLAY (FLD) GRID / ANODE ASSIGNMENT DRAWING & TABLE
GRID & SEGMENT ASSIGNMENT
ANODE CONNECTION
TM-1, TM-2 BOARDS OPERATION KEY, DISPLAY & TIMER CIRCUIT DIAGRAM (SLV-L45AR)
4-11
4-12
SLV-L45AR/L65HFAR/L75HFAR
TM-1 P.W.B.
r
There are few cases than the part isn't mounted
in this model is printed on this diagram.
TM-1,TM-2 BOARDS OPERATION KEY, DISPLAY & TIMER CIRCUIT DIAGRAM (SLV-L65HFAR/L75HFAR)
TM-2 P.W.B.
r
4-13
There are few cases than the part isn't mounted
in this model is printed on this diagram.
4-14
SLV-L45AR/L65HFAR/L75HFAR
IC301 SYSTEM CONTROL & TUNING CONTROL MPU PIN FUNCTIONS TABLE
SERVO CIRCUIT WAVEFORMS
4-15
4-16
SLV-L45AR/L65HFAR/L75HFAR
CP-1 BOARD (SY-A) SYSTEM CONTROL & SERVO CIRCUIT DIAGRAM (SLV-L45AR)
4-17
4-18
CP-1 BOARD (SY-A) SYSTEM CONTROL & SERVO CIRCUIT DIAGRAM (SLV-L65HFAR/L75HFAR)
4-19
4-20
SLV-L45AR/L65HFAR/L75HFAR
CP-1 P.W.B.
r
4-21
There are few cases than the part isn't mounted
in this model is printed on this diagram.
4-22E
SLV-L45AR/L65HFAR/L75HFAR
SECTION 5
ADJUSTMENTS
1. MAINTAINING AND CHECKING THE MECHANISM
1-1. REGULAR CHECKS AND
MAINTENANCE ITEMS
NOTE: OIL AND GREASE
• Always use the specified brands of oil and grease. If you
use a grease with the wrong viscosity, for example, this
can lead to all sorts of problems. Be careful to keep the
oil and grease free of dust and foreign bodies.
• A “drop” of oil is the amount of oil remaining on the tip of
a rod with a diameter of 1.5mm after it is dipped in oil to
a depth of 1cm and then taken out.
To obtain full function and maximum performance from
the set, and to stop it getting dirty or scratched, we
recommend that you carry out the following maintenance
procedures and regular checks. The maintenance checks
described in the following section should also be carried
out without fail after carrying out any repairs to the set.
1-1-1. REGULAR CHECKS
Clean
Check
Oil
Hours of use (H)
Part maintained
Tape guide
ACE head, full erase head
Tape path
Cylinder (drum)
system
Cleaner roller assembly
Pinch roller
Reel table
Drive
Reel belt
system Relay gear, Pulley shaft, Gear shaft
Loading motor
Back tension
Perform- Brake system
ance
checks FWD, REW, PLAY torque,
REV torque
500
1000
( )
1500
( )
2000
( )
2500
( )
3000
( )
3500
( )
4000
( )
4500
( )
5000
( )
Remarks
The life of parts varies
enormously, depending
on the environment in
which the part is used.
Playback tension torque:
30 to 50g/cm
FWD: 600g/cm or over
REW: 600g/cm or over
PLAY (SP mode):
80 to I 40g/cm
REV: 120 to 220g/cm
1-1-2. CLEANING
1. Cylinder (Drum) (See Fig.1-1-1 )
Moisten a chamois with methyl alcohol and clean the video
head (including the Hi-Fi audio head) and the tape path
surface of the cylinder. Be sure to wipe horizontally in
relation to the video head. If you wipe vertically, or use
excessive force, you can damage the video head.
Cylinder
(Drum)
2. Tape Path System / Reel Drive System
Clean the pinch roller, the capstan shaft, the tape guides,
the FE head, the ACE head, the reel table, the pulley and
the reel belt with a soft cloth, or chamois, moistened with
methyl alcohol.
Tape path surface
Video head
Fig.1-1-1
5-1
1-2. SERVICE TOOLS
1-2-1. SERVICE TOOLS
NOTES ON ALIGNMENT TAPES
Select a PAL or NTSC alignment tape from the list below, according to the transmission system of the VCR you are
repairing.
PAL: For models with 625 scanning lines and a field frequency of 50Hz
NTSC: For models with 525 scanning lines and a field frequency of 60Hz
No.
Tool
Tool No.
1
2
3
4
5
Alignment tape NTSC (KRV51N2)
Alignment tape PAL (KRV-51P)
Alignment tape NTSC (KRV-52NE)
Alignment tape PAL (KRV-52PL)
Eccentric screw driver
8-192-605-32
8-192-605-36
8-192-605-41
8-192-605-46
J-6082-044-A
6
Nut box
J-6082-045-A
7
Torque dial gauge
H-7099-039-H
8
Torque dial gauge adaptor
H-7099-035-H
9
Cassette torque meter(VHJ-063S)
J-6082-011-A
10
Load lever assembly height adjustment tool
J-6090-055-A
11
Torque gauge screwdriver
J-6082-047-A
12
3 mm dia. bit for torque screwdriver
J-6082-048-A
13
14
15
Oil
Grease
Grease
7-661-018-18
7-662-010-04
J-6090-014-A
16
Relay cables
J-6090-057-A
8-192-605-32 (KRV-51N2)
8-192-605-36 (KRV-51P)
8-192-605-41 (KRV-52NE)
8-192-605-46 (KRV-52PL)
J-6082-044-A
Remarks
NTSC-NORMAL
PAL-NORMAL
Used to adjust the tape path
Used to adjust the tape path
Used to adjust the tape path
Used to adjust the height of the
lever load assembly
Used to measure reel winding
torque
Used to measure reel winding
torque
Used to measure back tension
torque
Used to adjust the height of the
load lever assembly
Used to adjust the tightening torque
of screws
Used to replace the bit of the torque
gauge screwdriver
Relay cables of mechanism and
CP-1 PWB assembly
H-7099-039-H
J-6082-045-A
H-7099-035-H
No. 5
No. 1–4
J-6082-011-A (VHT-063S)
No. 9
7-661-018-18 (NT-68)
No. 13
No. 6
J-6082-048-A
J-6082-047-A
J-6090-055-A
No. 10
7-662-010-04 (SGL-505)
No. 7, 8
No. 11
J-6090-014-A (EM-L30LG)
No. 14
No. 15
5-2
No. 12
J-6090-057-A
No. 16
Fig.1-2-1
1-2-2. Using the Relay Cable (J-6090-057-A)
The mechanism can be repaired without using the relay
cable (J-6090-057-A). As shown in Fig. 1-3-1, the relay
cable (J-6090-057-A) is a tool used for relay between the
CP-1 PWB assembly and mechanism unit.
When connecting it, take note of the pin number of the
connector.
VM-1 (VP-1) PWB
assembly
NOTE 1: Do not place the mechanism upright as shown
in Fig. 1-3-1 when inserting/ejecting the cassette.
NOTE 2: For NTSC models, be sure to connect the VM-1
PWB assembly and CP-1 PWB assembly.
Relay cable:
J-6090-057-A
CP-1 PWB assembly
Mechanism unit
Fig. 1-2-2
2. AN OVERVIEW OF THE MECHANISM
2-1. NAMES OF THE MAIN PARTS
2-1-1. CASSETTE MECHANISM ASSEMBLY
Stand L
Release lever
Lid opener spring
Tray lock
spring
Pinion gear
Under frame
Lock gear
Door opener
lever
Gear holder
Drive gear
Fig. 2-1-1
5-3
2-1-2. TOP VIEW
Capstan brake assembly
Cleaner roller assembly
Cleaner lever
Audio R/P head assembly
Cylinder (Drum)
(ACE head)
Capstan motor
Cylinder mounting
Pinch roller lever assembly
Guide roller assembly
Pinch lift cam
T incline mounting assembly
Pinch lift mounting
Front rack gear
Full erase head
Opener mounting
S incline mounting assembly
Pinch cam gear
Start rack gear
Guide roller assembly
Load lever assembly
Tape top sensor
Tape end sensor
BT lever assembly
Tape sensor LED
L guide act lever assembly
BT spring
Band brake assembly
Supply reel assembly
T soft brake assembly
S soft lever
EP switch
Take-up reel assembly
S brake
assembly
T brake assembly
S reel gear
T brake act slide
EP sw lever
T reel gear
Clutch mounting assembly
Fig. 2-1-2
2-1-3. UNDER SIDE
Reel belt
Cylinder earth
assembly
Capstan motor
Stator
Rotor
Harness mounting
T load gear
S load gear
Pinch cam gear
Crescent mounting
T load lever assembly
Mode switch (S8001)
S load lever assembly
Brake control lever
BT spring lever assembly
Main cam
Clutch change lever
MC-1 PWB assembly
Crescent slide
Wheel gear 2
Wheel gear 1
Brake act lever
assembly
Worm gear assembly
Reel pulley
S brake act slide
Loading motor assembly Friction gear assembly
Fig. 2-1-3
5-4
2-2. AN OVERVIEW OF THE MECHANISM MODES
2-2-1 . MECHANISM MODE SWITCHING TABLE
NOTE: The letters and figures enclosed in circles in the mechanism mode column are the codes on the crescent slide.
HEX
DATA
Mechanism mode
The principal mode-switching states of the mechanism
EJECT E
Distinguished by whether the
EP switch is ON or OFF.
Horizontal shift section.
Vertical shift section.
6
2
CASSETTE OUT
(EJECT)
IN REW
(SHORT REW)
IN REW R
0
INITIAL
(POWER OFF)
7
INITIAL 7
0
1
Cleaner roller assembly: ON
S/T mounting incline assembly
pressure begins.
S/T mounting incline assembly
pressure ends.
0
When loading is carried out starting at
the CASSETTE IN position
1
REVIEW
REVIEW 1
0
IDLER pos. 2
(Pinch roller OFF)
2
0
STILL/SLOW
STILL/SLOW 3
3
0
PLAY/STOP 5
5
REC PAUSE
REC
STOP
P LAY
CUE
0
4
0
BRAKE pos. 4
6
FF/REW 6
REW
APPEARANCE OF MODE SWITCH AND
RELATIONSHIP BETWEEN MODE POSITIONS
MODE SWITCH OUTPUT TABLE
HEX
DATA
0
1
2
3
4
5
6
7
1
5.0V
5.0V
2.5V
2.5V
3.4V
3.4V
2.0V
2.0V
SW DATA
X
Y
H
H
H
H
H
L
H
L
L
H
L
H
L
L
L
L
SW DATA 2
Z
H
5V
L
0V
H
5V
L
0V
H
5V
L
0V
H
5V
L
0V
FF
FF/REW
BRAKE
PLAY/STOP
STILL/SLOW
EJECT
CASSETTE IN
IN REW
INITIAL
IDLER
REVIEW
Fig. 2-2-1
5-5
2-2-2. MOVEMENT CHECK LIST FOR THE MAIN PARTS OF THE MECHANISM
Pinch roller lever assembly
UP
Clutch mounting assembly
PLAY
Load lever assembly
UNLO
Capstan brake assembly
OFF
S and T incline mounting assembly
Cleaner roller assembly
OFF
UP
OFF
OFF
ON
OFF
ON
OFF
OFF
ON
OFF
ON
OFF
OFF
OFF
OFF
ON
OFF
OFF
OFF
OFF
ON
ON
ON
OFF
OFF
ON
ON(W) ON(W)
ON
OFF
(W): Weakness
FF/REW
DOWN/
UP
BRAKE
UP
UP/
DOWN
PLAY/STOP
ON
OFF
ON
ON
OFF
OFF
STILL/SLOW
ON
OFF
ON
ON
OFF
OFF
IDLER
ON
OFF
OFF
ON
OFF
OFF
REV
(UNLOADING)
OFF
OFF
OFF
ON
OFF
OFF
(LOADING)
T brake assembly
S brake assembly
T soft brake assembly
S soft lever
BT lever assembly
BT spring
INITIAL
OFF
OFF
OFF
ON
OFF
OFF
Principal parts
(POWER OFF)
IN REW
Mechanism mode
EJECT
(S): Strength
ON/OFF
ON(S)
ON(S)
ON(S)
ON(W)
ON
ON
OFF
OFF
ON/OFF
OFF
OFF
ON
PLAY PLAY PLAY PLAY PLAY PLAY PLAY PLAY PLAY FF
UNLO UNLO LO
LO
LO
LO
LO
L
LO
LO
OFF OFF OFF OFF OFF OFF ON OFF OFF OFF
LO UNLO
OFF OFF (ON) (ON) OFF OFF OFF OFF OFF OFF
2-2-3. HOW TO CHECK THE MECHANISM MODE
POSITION
The edge of the
crescent mounting
is the reference-line
You can tell which mode the mechanism is currently in by
looking at the codes and marking-lines on the crescent
slide on the underside of the mechanism chassis. The
edge of the crescent mounting is used as the reference
line, as shown in Fig.2-2-2, and the marking-lines and
symbols indicating the mechanism modes are displayed
on the crescent slide, which slides against the edge of the
crescent mounting. The mechanism mode is read off from
the marking-line on the slide crescent which is aligned
with the reference-line on the crescent mounting.
Example: In Fig.2-2-2, marking-line 6 is aligned with the
reference-line on the crescent mounting , so the mechanism is seen to be in FF/REW mode.
Crescent mounting
6: FF/REW
4: BRAKE
5: PLAY/STOP
3: STILL/SLOW
2: IDLER
1: REVIEW
Crescent slide
7: INITIAL
(POWER OFF)
2-2-4. SELF-DIAGNOSIS DISPLAY
Some models are equipped with the SELF-DIAGNOSIS
DISPLAYS function.
Use it as a means of finding out the symptoms and cause
of the error before performing repairs.
For details, refer to the separate service manual for the
respective models.
E: EJECT
Fig. 2-2-2
5-6
3. DISASSEMBLING THE MAIN PARTS
OF THE MECHANISM
Left side
POINTS TO NOTE
• When fitting the parts of the mechanism, refer to the
‘‘Assembly Notes’’, and proceed in the reverse of disassembly order.
• Dis-assembly and assembly should be carried out in
EJECT mode unless a movement mode is explicitly
specified. EJECT mode is the state in which the cassette
tape has been ejected.
• Clamps are used to prevent parts coming loose. When
removing a clamp, be careful not to force it, as this can
result in damage.
Bottom side
Motor (+) wire
Motor (-) wire
Front side
Fig. 3-1-1
3-1. HOW TO MAKE THE MECHANISM
MOVE
3-1-2. OPERATING THE LOADING MOTOR BY THE
MANUAL METHOD (See Fig. 3-1-2)
In order to check a movement such as front loading, front
unloading, tape loading, tape unloading, raising/lowering
and pressing the pinch roller, you will need to operate the
loading motor. There are two methods of operating the
loading motor, and these are explained in sections 3-1-1
and 3-1-2. The above movements can also be performed
without operating the loading motor, by following the
method explained in section 3-1-3.
1) Refer to section 3-2 and install the mechanism unit.
2) Using your finger, turn the loading motor located at the
rear of the mechanism unit. For EJECT, turn the loading
motor in the direction of the arrow on the loading motor.
For PLAY or FF/REW, turn it in the opposite direction.
When rotating the loading motor in the EJECT direction
with a tape slacken, stop the rotation of the loading
motor before beginning front unloading.
Rotate the capstan motor with your hand, wind the
slacked part of the tape, and rotate the loading motor in
the EJECT direction again.
When carrying out front loading, release the lock by
pressing down the tray lock lever 8 and the lid opener
lever 9 of the cassette mechanism assembly (shown in
Fig. 3-2-2).
3-1-1. HOW TO OPERATE THE LOADING MOTOR
USING A DC VOLTAGE SUPPLY
(See Fig.3-1-1 )
1) Remove the power plug from the socket.
2) Remove the top cover, front cabinet assembly and
bottom cover.
3) Supply a DC voltage in the range 5V between the
MOTOR (+) wire and the MOTOR (–) wire on the CP-1
PWB assembly. To make the loading motor rotate in the
PLAY or FF/REW direction, the positive terminal should
be connected to the MOTOR (+) wire, and the negative
terminal to the MOTOR (–) wire. To make it rotate in the
EJECT direction, connect the positive terminal to the
MOTOR (–) wire, and the negative terminal to the
MOTOR (+) wire.
When rotating the loading motor in the E JECT direction with a tape slacken, stop the rotation of the loading
motor before beginning front unloading.
Rotate the capstan motor with your hand, wind the
slacked part of the tape, and rotate the loading motor in
the EJECT direction again.
NOTE 1: When carrying out front loading, release the
lock by pressing down the tray lock lever 8 and the
lid opener lever 9 of the cassette mechanism
assembly (shown in Fig. 3-2-2) in the direction of
the arrow.
NOTE 2: When the loading motor stops rotating, following
the completion of an operation such as tape loading
or front unloading, switch off the DC voltage supply.
The arrow which show the direction of EJECT
Loading motor
Fig. 3-1-2
3-1-3. MAKING THE MECHANISM MOVE USING
THE MANUAL METHOD
1) Refer to section 3-2 and remove the mechanism unit.
2) Refer to section 3-15 and remove the gear wheel 2.
3) If you turn the main cam anticlockwise, the mechanism
will switch to a mode such as PLAY or FF/REW. To
switch from FF/REW mode to EJECT mode, turn the
main cam clockwise.
5-7
3-2. MECHANISM UNIT
(See Figs. 3-2-1 and 3-2-2)
3-3.CASSETTE DRIVE MECHANISM
3-3-1 . CASSETTE MECHANISM ASSEMBLY
(See Figs.3-3-1 and 3-3-2)
1) Remove the top cover, bottom cover and front cabinet
assembly.
2) Unplug the flat cable 1 from the VM-1/VP-1 PWB
assembly on the cylinder (drum), and unplug the ACE
head connector 3.
3) Remove the screw 2, the two screws 4, then remove
the VM-1/VP-1 PWB assembly 5, lifting it upwards.
The shape of the VM-1/VP-1 PWB assembly and the
bracket varies according to the model.
4) Remove the four screws 6 and the two screws 0, then
lift up the mechanism unit. The tray 7 will stop you
removing the two screws 6 on the front, so release the
lock by pressing down the tray lock lever 8 and the lid
opener lever 9 shown in Fig. 3-2-2, then slide off the
tray 7. Move the tray by referring to section 3-1 and
turn the loading motor in the PLAY direction.
6 Screw
1) Put the VCR into EJECT mode.
2) Remove the two screws 1.
3) Lift up the back of the cassette mechanism assembly 2
slightly, and remove the two hooks 3 on the front.
ASSEMBLY NOTES:
1. The cassette mechanism assembly and the mechanism
chassis should both be fitted in EJECT mode.
2. Check that the two hooks 3 have snapped into the
mechanism chassis, and make sure that the two holes
4 in the cassette mechanism assembly are aligned
with the two dowels 5 on the mechanism chassis.
3. Make sure that the big tooth on the pinion gear of the
cassette mechanism assembly slots properly into the
deepest gap in the start rack gear, as shown in Fig. 3-32.
4. When fitting the two screws 1, use the torque gauge
screwdriver (J-6082-047-A). Give the screws a tightening torque of 5 kg/cm.
1 Flat cable
Bracket
6 Screw
1 Screws
2 Cassette mechanism assembly
6 Screw
1 Screws
4 Screw
7 Tray
2 Screw
3 Hook
VM-1 (VP-1)
PWB
assembly
5
Dowel
Mechanism
chassis
4 Hole
3 ACE head
connector
3 Hook
4 Hole
Fig.3-3-1
0 Screw
Fig.3-2-1
Ensure correct
interlocking
8 Tray lock
lever
Pinion gear
Ensure correct
interlocking
9 Lid opener
lever
Drive gear
Lock gear
Start rack gear
7 Tray
Fig. 3-3-2
Fig.3-2-2
5-8
3-3-3. DOOR OPENER, UNDER FRAME AND
STAND L (See Fig. 3-3-4)
3-3-2. CASSETTE DRIVE GEAR (See Fig. 3-3-3)
1) Refer to section 3-3-1 and remove the cassette mechanism assembly.
2) Remove clamps 1 and 2, then remove the gear holder
3.
3) Remove the clamp 1, then remove the pinion gear 4.
4) Remove the clamp 2, then remove the lockgear 5.
1) Remove the cassette mechanism assembly, referring to
section 3-1.
2) Remove the two clamps 1 and take out the under
frame 2, pulling it towards you.
3) Press down the tray lock lever 3 and the lid opener
lever 4, and loosen the tray 5, lifting it away from you.
In this state, press the clamp 6 and remove the door
opener lever 7.
4) Remove the two clamps 8 and take out the stand L 9.
Be careful not to exert too much force on the clamps 8,
as this could cause damage.
ASSEMBLY NOTES:
1. Put the tray in the EJECT mode position before fitting
any parts.
2. Apply grease (SGL-505) to the gear mounting shafts, all
the gear teeth, and the cam part of the drive gear 6.
3. Ensure that the drive gear, the lock gear and the pinion
gear interlock correctly, as shown in Fig. 3-3-2.
4. Make sure the clamps 1 and 2 snap in to the gear
holder 3.
ASSEMBLY NOTES:
Tray
Apply
grease
4 Pinion gear
(grease
the outer rim
1
Clamp of the teeth)
1. Apply grease (SGL-505) to the grooves !¡ on the stand
L, the inside of the hole !£ in the drive shaft !™. and the
mounting hole !¢ in the door opener lever of the stand
R.
2. Before fitting the stand L 9, be sure to move the tray
5 back as far as the EJECT mode position. Put the two
pins 0 on the tray 5 into the grooves !¡ on the stand
L. Put the drive shaft !™ into the hole !£.
3. Be suretofasten the two clamps 1 and theclamp 6 on
the stand R, and to fasten the two clamps 8 on the
stand L.
9 Stand L
2
Clamp
!¡ Grooves
6 Drive gear
5 Lock gear
(grease the outer rim
of the teeth)
3 Gear holder
!£ Hole
Fig.3-3-3
0
Pins
3 Tray
lock lever
1 Clamp
5 Tray
!™ Drive
shaft
4 Lid opener
lever
8
Clamps
6 Clamp
Stand R
7 Door opener
lever
2 Under frame
!¢ Hole
1 Clamp
Fig.3-3-4
5-9
3-3-4. START RACK GEAR AND FRONT RACK
GEAR (See Figs. 3-3-5 and 3-3-6)
3-4. CLEANER ROLLER ASSEMBLY
(See Fig. 3-4-1 )
1) Remove the mechanism unit, referring to section 3-2.
2) Remove the cassette mechanism assembly, referring to
section 3-3-1.
3) Remove the special screw 1. When you dothis, slide
the front rack gear assembly 2 towards the front until it
stops, then take it off the shaft 3. Take care not to
damage the shaft 3.
4) Remove the spring 4.
5) Remove the clamp 6 on the front rack gear 5, then
remove the start rack gear 7.
1) Remove the clamp 1 and take out the cleaner lever 2.
When you do this, be careful not to bend the plastic
springs A and B on the cleaner lever 2.
2) Remove the clamp 3, and take out the cleaner roller
assembly 4. Be careful not to touch the sponge on the
cleaner roller assembly 4.
ASSEMBLY NOTES:
1. When mounting the cleaner lever 2 on the shaft 5,
press the clamp 1 in the direction shown by the arrow,
and snap it into the mounting 6 on the audio R/P head
assembly.
ASSEMBLY NOTES:
1. Apply grease (SGL-505) to the front rack gear 5 and
all over the inside of the groove on the start rack gear
7.
2. Align the positioning mark 8 on the front rack gear 5
with the mark 0 on the main cam 9.
3. When installing the cassette mechanism assembly,
refer to section 3-3-1 and align the start rack gear with
the pinion gear.
6 Clamp
4 Cleaner roller assembly
3 Clamp
2 Cleaner lever
1 Clamp
5 Front rack gear
(apply grease to
3 inside of groove)
Shaft 2 Front rack
B Plastic spring
A Plastic spring
gear assembly
5 Shaft
4 Spring
6 Mounting
1 Special screw
7 Start rack gear
(apply grease to
inside of groove)
Fig.3-4-1
Fig.3-3-5
8 Positioning mark
0 Positioning mark
9 Main cam
5 Front rack
gear
Flg.3-3-6
5-10
3-5. CYLINDER (DRUM)
3-5-2. CYLINDER ASSEMBLY (See Fig. 3-5-2)
3-5-1. CYLINDER MOTOR (ROTOR AND STATOR)
(See Fig. 3-5-1)
1) Refer to sections 3-5-2, and remove the cylinder unit,
the rotor, and the stator.
2) Remove the three screws 1 and the cylinder assembly
2.
1) Refer to section 3-2 and remove the mechanism unit.
2) Remove the screw 1 and remove the cylindere arth
assembly 2 .
3) Remove the two screws 3, the rotor 4 and the spacer
8.
4) Remove the three screws 5 and the stator 6.
ASSEMBLY NOTES:
1.Be careful not to scratch or soil the top of the cylinder.
After fitting the cyiinder, clean the surface.
2.Align the cylinder assembly 2 with the two dowels 4 on
the mechanism chassis 3.
3.After fitting the cylinder assembly, do the tape path
adjustment as instructed in section 4-3 and do the
switching position adjustment of the servo circuit.
ASSEMBLY NOTES:
1. When fitting the rotor 4, align the long hole 9 -beside
the triangular mark on the rotor 4 - with the hole 0 in
the rotor disk.
2. When fitting the screws 3 and 5, use the torque
gauge screwdriver (J-6082-047-A). Give the screws a
tightening torque of 3 kg/cm.
3. Align the dowels !¡ on the cylinder earth assembly 2
with the holes !™ in the chassis.
4. After fitting the mechanism unit, do the switching
position adjustment of the servo circuit.
2 Cylinder
assembly
3 Screws
4 Rotor
9 Long hole (used for
alignment when fitting
the rotor)
4 Dowels
Triangular mark
3 Mechanism
chassis
5 Screws
6 Stator
1 Screws
Fig.3-5-2
1 Screws
8 Spacer
2 Cylinder
earth
assembly
!¡ Dowels
!™ Holes
0 Hole (Use for alignment
when fitting the rotor)
Fig. 3-5-1
5-11
3-6-2. FULL ERASE HEAD (See Fig.3-6-2)
3-6. FE HEAD AND ACE HEAD
1) Unplug the connector from the full erase head 1.
2) Remove the screw 2 and the full erase head 1.
3-6-1. AUDIO R/P HEAD ASSEMBLY (ACE HEAD)
(See Fig. 3-6-1 )
ASSEMBLY NOTE:
1) Unplug the connector from the audio R/P head assembly (ACE head).
2) Remove the two screws 1 and the audio R/P head
assembly (ACE head) 2.
1. After assembly, clean the full erase head 1.
2 Screw
ASSEMBLY NOTES:
1. Align the hole 3 on the audio R/P head assembly
(ACE head) with the pin 4 on the chassis unit.
2. After assembly, check that the clamp 5 on the cleaner
roller assembly has snapped into the mounting of the
audio R/P head assembly (ACE head) 2.
3. After assembly, clean the surface of the head with a
soft cloth or chamois.
4. After assembly, refer to section 4-3, and adjust the
head height, the azimuth and the tracking (X) position.
1 Full erase head
1 Screws
2 Audio R/P head assembly
(ACE head)
3 Hole
Fig. 3-6-2
5
Clamp
4 Pin
Fig. 3-6-1
5-12
3-7.CAPSTAN MOTOR
3-7-2. CAPSTAN BRAKE ASSEMBLY
(See Fig. 3-7-2)
3-7-1. CAPSTAN MOTOR (See Fig.3-7-1)
1) Remove the spring 1.
2) Remove the clamp 2, then remove the capstan brake
assembly 3.
1) Refer to section 3-2. then remove the mechanism unit.
2) Remove the two screws 2, then remove the harness
mounting 1.
3) Remove the reel belt 3.
4) Remove the three screws 5 and the capstan motor 6.
1 Spring
ASSEMBLY NOTES:
1. Check that connector 4 is inserted in the CP-1 PWB
assembly.
2. When fitting the thre screws 5, use the torque gauge
screwdriver (J-6082-047-A). Give the screws a tightening torque of 3.5 kg/cm.
3. After assembly, clean the capstan shaft with a soft cloth
or chamois.
3 Capstan brake
assembly
2 Clamp
5 Screws
6 Capstan
motor
Capstan shaft
Fig. 3-7-2
4
Connector
1 Harness
mounting
3 Reel belt
2 Screws
Fig. 3-7-1
5-13
3-8. LOADING MOTOR ASSEMBLY AND
WORM GEAR ASSEMBLY
(See Fig. 3-8-1 )
3-9. PINCH ROLLER PRESSURE
MECHANISM
3-9-1. PINCH ROLLER LEVER ASSEMBLY
(See Fig. 3-9-1)
1) Refer to section 3-2 and remove the mechanism unit.
2) Remove the soldering on the lead wires 2 of the
loading motor assembly from the MC-1 PWB assembly.
When you do this, be careful not to let the soldering iron
touch any other parts.
3) Press the clamp 3, and remove the loading motor
assembly 1 and the damper 4. Be careful not to exert
too much force on the clamp 3.
4) Remove the worm gear assembly 5. To maintain
performance, do not dis-assemble the worm gear
assembly 5.
1) Remove the clamp 1, then remove the pinch lift
mounting 2.
2) Remove the spring 3, then remove the pinch roller
lever assembly 4 off the pinch lift mounting 2. Before
you do this, align the Indentation 5 on the pinch roller
lever assembly 4 with the clamp 6 on the pinch lift
mounting 2.
ASSEMBLY NOTE:
1. Be careful to keep the surface of the pinch rollerf ree of
dust and dirt.
ASSEMBLY NOTES:
1. Apply grease (SGL-505) to the teeth of the worm gear
assembly.
2. Check that the clamps 3 and 6 are securing the
loading motor assembly.
3. Check the polarity of the lead wires 2 (the orange wire
is the positive terminal, and the gray wire is the negative terminal). After soldering the lead wires 2, adjust
them so that they do not touch the friction gear assembly.
4 Pinch roller lever
assembly
3 Spring
5 Worm gear assembly
5 Indentation
4 Damper
1 Loading motor assembly
Apply
grease
2 Pinch lift mounting
2 Lead wires
6 Clamp
6
Clamps
1 Clamp
Gray:
negative
Orange:
positive
3 Clamp
Fig. 3-8-1
Fig. 3-9-1
5-14
3-9-2. PINCH LIFT CAM AND PINCH CAM GEAR
(See Figs. 3-9-2 and 3-9-3)
!¡ Arrow on MC-1 PWB
assembly
1) Refer to section 3-2 and remove the mechanism unit.
When you do this, make sure the mechanism is in
EJECT mode.
2) Refer to section 3-9-1 and remove the pinch roller lever
assembly.
3) After removing the screw 1, undo the three clamps 2,
then remove the opener mounting 3.
4) Remove the clamp 4 and the pinch lift cam 5.
5) Remove the pinch cam gear 6.
0 Positioning marks
on mode switch
5 Pinch lift cam
!¢
Indentation
ASSEMBLY NOTES:
1. Apply grease (SGL-505) around the shaft 7, all over
the teeth B of the pinch cam gear 6, all over the teeth
of the pinch lift cam 5, all over the cam grooves A,
and all over the “V Part C” of the opener mounting 3.
Apply grease (EM-L30LG) to the outside of the shaft 8
and all over the top cam D of the pinch cam gear 6.
2. Check that the positioning mark 0 on the mode switch
9 is aligned with the arrow !¡ on the MC-1 PWB
assembly, as shown in Fig. 3-9-3. Then align the
triangular mark !™ on the pinch cam gear 6 with the
arrow !¡ on the MC-1 PWB assembly. After that, align
the round hole !£ on the pinch lift cam 5 with the
indentation !¢ on the pinch cam gear 6.
If you have carried out the above alignments and the
pinch roller will still not move up and down or perform
the pressing movement correctly, refer to section 3-15
and check the alignment of the gear wheels 1 and 2,
the main cam, and the mode switch.
C “ V “ part
!¡ Arrow
!™ Triangular mark
9 Mode switch
1 Screw
5 Pinch lift cam
6 Pinch cam gear
B
6 Pinch cam gear
Fig. 3-9-3
3 Opener
mounting
2 Clamps
!£ Round hole
A
D
8 Shaft
4 Clamp
7 Shaft
Fig. 3-9-2
5-15
3-10.L GUIDE LEVER ASSEMBLY AND
LOAD LEVER ASSEMBLY
(See Figs. 3-10-1 )
3-11. BT LEVER ASSEMBLY
(See Fig. 3-11-1 )
1) Refer to section 3-2 and remove the mechanism unit.
2) Refer to section 3-3-1 and remove the cassette mechanism assembly.
3) Remove the BT spring 1.
4) Remove the clamp 2 on the underside of the mechanism chassis, then remove the BT lever assembly 3.
5) Remove the clamp 5 on the band brake assembly 4.
Then, as shown in Fig. A, align the other end of the
band brake assembly with the protruding parts of the
BT lever assembly 3 before removing it.
1) Refer to section 3-3 and remove the cassette mechanism assembly.
2) Refer to sections 3-9-1 and 3-9-2, then remove the
pinch roller lever assembly and the opener mounting.
3) After removing the washer 4, remove the L guide act
lever assembly 5.
4) Remove the special nut 6, then remove the load lever
assembly 7 and the L guide lever spring 8.
ASSEMBLY NOTES:
ASSEMBLY NOTES:
1) Apply grease (SGL-505) to the toothed area A of the L
guide act lever assembly 5 and around the shafts 9
and 0.
2) Refer to section 4-3 and adjust the height of the load
lever assembly.
3) Hook the L guide lever spring 8 into the stopper !£
and load lever assembly 7 shown in Fig. A.
4) Put the pin !¡ of the L guide act lever assembly into the
cam groove !™ of the crescent slide.
1. When fitting the BT lever assembly 3, be careful not to
bend the stopper 6 or the S incline mounting assembly
7 out of shape by knocking it against them.
2. Hook the long hook of the BT spring 1 into the BT
Iever assembly 3, as shown in Fig. B.
3. After assembly. make sure that the mountings on both
ends of the band brake assembly 4 are positioned as
shown in Fig. C.
4. After assembly, refer to section 4-2-1, and make the
appropriate adjustment.
8 L guide lever spring
5 Clamp
Fig. A
7 Load lever
assembly
6 Special nut
!¡ Pin
4 Band brake
assembly
3 BT lever
assembly
8 L guide lever spring
4 Washer
5 L guide
act lever
assembly
Fig. A
Protruding
parts
7 Load lever assembly
Fig. B
Fig. C
A
7 S incline
mounting
assembly
1 BT spring
6 Stopper
0 Shaft
9 Shaft
2 Clamp
!™ Cam groove
!£ Stopper
Fig. 3-11-1
Fig.3-10-1
5-16
3-12.REEL DRIVE MECHANISM
1 Screws
Part A
3-12-1. REEL BELT, REEL PULLEY, FRICTION
GEAR ASSEMBLY AND CLUTCH CHANGE
LEVER (See Fig. 3-12-1)
1) Refer to section 3-2 and remove the mechanism unit.
2) Remove the reel belt 1 from the reel pulley 2.
3) Take off the washer 3 and remove the reel pulley 2.
4) Take off the washer 4 and remove the friction gear
assembly 5.
5) Remove the clutch change spring 6.
6) Remove the clamp 7 gripping the top of the mechanism chassis, then remove the clutch change lever 8.
3 Hole
3 Hole
2 Clutch
mounting
assembly
ASSEMBLY NOTES:
1. After cleaning the shafts 9 and 0, apply a drop of oil
(NT-68) to each.
2. Be careful not to get any grease on the reel belt 1.
4 Shaft
1 Reel belt
5 Shaft
Fig. 3-12-2
3 Washer
6 Clutch change
spring
3-12-3. S SOFT LEVER, SUPPLY REEL ASSEMBLY AND S REEL GEAR (See Fig. 3-12-3)
2 Reel pulley
1) Remove the S soft spring 1.
2) Remove the clamp 2, then remove the S soft lever 3.
3) Refer to section 3-12-2 and remove the clutch mounting
assembly.
4) Refer to section 3-11 and remove the band brake
assembly, then remove the supply reel assembly 4 and
the S reel gear 5.
8 Clutch change lever
4 Washer
7 Clamp
5 Friction gear
assembly
ASSEMBLY NOTES:
1. After cleaning the shafts 6 and 7, apply a drop of oil
(NT-68) to each.
2. After assembly, clean the side of the supply reel assembly 4.
9 Shaft
0 Shaft
3 S soft lever
2 Clamp
5 S reel
gear
1 S soft
spring
Fig. 3-12-1
4 Supply reel
assembly
3-12-2. CLUTCH MOUNTING ASSEMBLY
(See Fig.3-12-2)
1) Refer to section 3-3-1 and remove the cassette mechanism assembly.
2) Refer to section 3-12-1 and remove the reel pulley.
3) Remove the two screws 1, then remove the clutch
mounting assembly 2.
6 Shaft
ASSEMBLY NOTES:
1. Align the two holes 3 with the shafts 4 and 5. Be
careful not to press part A of the clutch mounting
assembly 2 against the band brake assembly.
2. After assembly, make sure that the clamp on the clutch
change lever has snapped into the chassis.
7 Shaft
Fig. 3-12-3
5-17
3-12-4. T SOFT BRAKE ASSEMBLY, TAKE UP
REEL ASSEMBLY, T REEL GEAR
(See Fig. 3-12-4)
3-13. BRAKES
3-13-1. S BRAKE ASSEMBLY, T BRAKE ASSEMBLY, T BRAKE ACT SLIDE (See Fig. 3-13-1)
1) Remove the T soft spring 1.
2) Remove the clamp 2, then remove the T soft brake
assembly 3.
3) Refer to section 3-12-2 and remove the clutch mounting
assembly.
4) Pressing the T brake assembly 4 in the direction of the
arrow, remove the take up reel assembly 5 and the T
reel gear 6.
1) Refer to section 3-3-1 and remove the cassette mechanism assembly.
2) Remove the two clamps 1, then remove the T brake
act slide 2. (Note: You can remove the S brake assembly 7 and the T brake assembly 5 without removing
the T brake act slide 2.)
3) Remove the brake spring 3.
4) Remove the two clamps 4 simultaneously, then remove
the T brake assembly 5.
5) Remove the clamp 6, then remove the S brake assembly 7.
ASSEMBLY NOTE:
1. After cleaning the shafts 7 and 8, apply a drop of oil
(NT-68) to each.
ASSEMBLY NOTES:
6 T reel gear
1. Apply grease (SGL-505) to the shafts 8 and 9.
2. When fitting the T brake act slide 2, align the mark 0
with the shaft !¡.
5 Take up reel
assembly
0 Mark 2 T brake act slide
3 T soft brake
assembly
3 Brake spring
4 T brake
assembly
2
Clamp
1 Clamp
1 Clamp
1 T soft
spring
5 T brake
assembly
7 S brake
assembly
7 Shaft
8 Shaft
6
Clamp
9 Shaft
!¡ Shaft
8 Shaft
4 Clamps
Fig.3-12-4
Fig. 3-13-1
5-18
3-13-3. S BRAKE ACT SLIDE AND BT SPRING
LEVER ASSEMBLY
(See Figs. 3-13-3 and 3-13-4)
3-13-2. BRAKE CONTROL LEVER AND BRAKE
ACT LEVER ASSEMBLY (See Fig. 3-13-2)
1) Refer to section 3-2 and remove the mechanism unit.
2) Refer to section 3-15 and remove the wheel gear 2.
3) Refer to sections 3-12-1, then remove the reel belt and
the reel pulley.
4) Remove the clamp 1, then remove the wheel gear 1
2.
5) Remove the clutch change spring 3.
6) Remove the clamps 4 and 5, then remove the brake
control lever 6. Remove the clamp 4 on the topside of
the mechanlsm chassis.
7) Remove the brake return spring 7.
8) Refer to section 3-8 and remove the worm gear assembly.
9) Remove the clamp 8 and clamp 5, then remove the
brake act lever assembly 9. To maintain the performance of the brake act lever assembly 9, do not
disassemble it.
1) Refer to section 3-16 and remove the crescent slide.
2) Refer to section 3-12-1 and remove the friction gear
assembly.
3) Slide the S brake act slide 1 in the direction of the
arrow A , then remove it.
4) Refer to section 3-11 and remove the BTspring.
5) Press the BTspring lever assembly 2 until it touches
the pin 3, then remove it.
ASSEMBLY NOTES:
1. Apply grease (SGL-505) to the shaft 4 shown in Fig. 313-3, and to the BT spring lever assembiy 2 and the S
brake act slide 1 shown in Fig. 3-13-4.
2. After mounting the BT spring lever assembly 2 on the
Shaft 4, hook the BT spring onto the clamp 5 and
press it until it touches the pin 6.
3. Make sure that the clamps 7, 8 and 9 have snapped
Into the S brake act slide 1. Align the arrow 0 on the
S brake act slide 1 with the arrow !¡ on the mechanism chassis.
ASSEMBLY NOTES:
1. Apply grease (SGL-505) to the shafts 0 and !¡, to the
teeth of the wheel gear 1 2. and to the pin !™ of the
brake control lever 6 .
2. Put the pin !£ of the brake control lever 6 into the cam
groove !¢ of the crescent slide.
3. Before fitting the wheel gear 1 2 , align the hole !∞ with
the hole !§ on the mechanism chassis.
4. Refer to section 3-15 and align the wheel gear 2.
!¡ Arrow on mechanism chassis
2 BT spring
lever
1 S brake act slide
assembly
!£ Pin
6 Brake control lever
9 Brake act
lever assembly
4 Clamp
!™ Pin
1 Clamp
!∞ Hole
A
3 Clutch change
spring
7 Clamp
7 Brake return
spring
9 Clamp
0 Arrow
5 Clamp
4 Shaft
6 Pin
8 Clamp
2 Wheel
gear 1
!¢ Cam
groove
5 Clamp
!¡ Shaft
8 Clamp
0 Shaft
3 Pin
Fig. 3-13-3
!§ Hole
Apply grease
1 S brake
act
slide
Fig. 3-13-2
Apply grease
2 BT spring
lever
assembly
Apply grease
Fig. 3-13-4
5-19
3-14-2. S AND T INCLINE MOUNTING
ASSEMBLIES (See Fig. 3-14-2)
3-14.GUIDES
1) Refer to section 3-2 and remove the mechanism unit.
2) Refer to section 3-4 and remove the cleaner lever.
3) Remove the four screws 5 and take off the two catcher
mountings 6.
4) Refer to section 3-1 and rotate the loading motor in the
PLAY direction until tape loading is completed.
5) Shift the S incline mounting assembly 1 slightly, in the
direction of the arrow A, then remove it from the S load
lever assembly 2.
6) Shift the T incline mounting assembly 3 slightly, in the
direction of the arrow B, then remove it from the T load
lever assembly 4.
3-14-1. GUIDE ROLLER ASSEMBLY
(See Fig. 3-14-1)
1) Unscrew the two screws 1. When you do this, be
careful not to damage the cylinder or the video head.
2) Remove the two guide roller assemblies 2 by unscrewing them anticlockwise.
ASSEMBLY NOTES:
1. Tighten the two screws 1 to a torque of 600 g/cm. After
tightening, apply a screw-locking glue.
2. After replacing the parts, be sure to clean the guide
roller and carry out tape path adjustment as described
in section 4-3.
2 Guide
roller
assembly
ASSEMBLY NOTES:
1. Apply grease (SGL-505) to the rail (top, underside and
sides) on the mechanism chassis.
2. When fitting the S and T incline mounting assemblies 1
and 3 into the rail, turn the loading motor manually in
the EJECT direction. When tape unloading begins,
watch out in case the S and T incline mounting assemblies 1 and 3 get caught in the rail.
3. Aline the dowels on the catcher mounting 6 with the
holes 7 in the mechanism chassis.
4. After repiacing the parts, clean the cylinder and the
roller guide, then adjust the tape path as described in
section 4-3.
1 Screw
1 S incline mounting
assembly
1 Screw
3 T incline
mounting
assembly
A
2 Guide
roller
assembly
B
Fig. 3-14-1
5 Screws
5 Screws
6 Catcher
mounting
2 S load lever
assembly
7
Holes
7 Holes
4 T load lever
assembly
Apply grease to the top,
underside and side of the rail.
Fig. 3-14-2
5-20
3-15. WHEEL GEAR 2, MAIN CAM AND
MODE SWITCH
(See Figs. 3-15-1 and 3-15-2)
3 Washer
6 Mode switch
1) Refer to section 3-2 and remove the mechanism unit.
When you do this, make sure the mechanism is in
EJECT mode.
2) Refer to section 3-7-1, then remove the harness
mounting.
3) Remove the clamp 1, then remove the wheel gear 2 2.
4) Remove the washer 3, then remove the main cam 4.
5) After unscrewing the screw 5, remove the soldering
from the terminal of the mode switch 6.
6) Remove the clamp 7, then remove the mode switch 6.
5 Screw
4 Main cam
7 Clamp
2 Wheel
gear 2
!¡ Pinch
cam
gear
ASSEMBLY NOTES:
!£ Front rack
gear
1. Apply grease (SGL-505) to the shafts 8, 9 and 0, to
the teeth of the main cam 4, and to the all over the
cam groove of main cam 4.
2. When fitting the modes witch 6, align it in AB order
as shown in Fig. 3-15-2. The alignment of the part B is
shown in Fig. A. Position the teeth of the mode switch
6 so that the sixth tooth space left of part A is aligned
with the triangular mark on the pinch cam gear !¡. After
aligning part B, refer to section 3-9-2 and check the
positioning of the mode switch, the pinch cam gear and
the pinch lift cam.
3. Beforehand, remove the soldering from the soldered
part of the MC-1 PWB assembly, in order to prevent the
mode switch 6 being warped. Solder the mode switch
6 after tightening the screw 5 (See Fig. 3-15-1 ) .
4. Align the hole in the crescent slide !™ with the hole in
the mechanism chassis, as shown at point G in Fig. 315-2 (refer to section 3-16 and see the holes 5 and 6
in Fig. 3-16-1).
5. When fitting the main cam 4, position the mode switch
6 and the front rack gear !£ as shown at points C and
D respectively in Fig. 3-15-2.
6. When fitting the gear wheel 2 2, position the main cam
4 and the wheel gear 1 !¢ as shown at points E and
F respectively in Fig. 3-15-2.
8 Shaft
9 Shaft
0 Shaft
!¢ Wheel
gear 1
!™ Crescent slide
Fig. 3-15-1
Fig. A
!¡ Pinch
cam
gear
Align at B
6 5
4
3
Marks on mode
switch 6
2
1
6
Mode
switch
A
C
B
!£ Front
rack
gear
D
Tooth tip on
main cam 4
2 Wheel gear 2
4 Main cam
!™ Crescent
slide
F
E
G
!¢ Wheel gear 1
Fig. 3-15-2
5-21
3-16.CRESCENT SLIDE
(See Figs. 3-16-1 and 3-16-2)
!¡ Screw
1) Refer to section 3-2 and remove the mechanism unit.
When you do this, make sure the mechanism is in
EJECT mode.
2) Refer to section 3-3-1 and remove the cassette mechanism assembly.
3) Refer to section 3-7-2 and remove the capstan brake
assembly.
4) Refer to section 3-12-4 and remove the T soft brake
assembly.
5) Refer to section 3-13-1 and remove the T brake act
slide.
6) Refer to section 3-12-1, then remove the reel belt and
the reel pulley.
7) Refer to section 3-15, then remove the wheel gear 2
and the main cam.
8) Refer to section 3-13-2, then remove the wheel gear 1
and the brake control lever.
9) Remove the two screws !¡, then remove the crescent
mounting !™.
10) Remove the clamps 1 and 2, then raise the right end
of the crescent slide 3 slightly. Slide the crescent slide
3 to the right until it comes away from the clamp 4,
then remove it.
!™ Crescent
mounting
3 Crescent slide
5 Hole
7 Hole
1 Clamp
2 Clamp
A
9 Hole
D 8 Pin
6 Hole
4 Clamp
0 Pin
Fig. 3-16-1
Apply grease to the areas shown in
• The places marked by dots should be greased
particularly generously.
ASSEMBLY NOTES:
1. Apply grease (SGL-505) to the points A, B, C and D
in Fig. 3-16-1, and to the crescent slide 3 shown in
Fig. 3-16-2.
2. Before fitting the crescent slide 3, refer to section 3-133 and align the arrow on the S brake act slide with the
arrow on the mechanism chassis. Then refer to Fig. 317-3 and check that the S load gear and the T load gear
have completed tape unloading.
3. When assembling the parts, raise the right side of the
crescent slide 3 slightly, and keeping it in this position,
slot the left side into the clamp 4, then align the hole
5 with the hole 6 in the mechanism chassis. When
you do this, check that the hole 7 is aligned with the
pin 8 on the BT spring lever assembly, and that the
hole 9 is aligned with the pin 0 on the S brake act
slide, before pressing the crescent slide 3 into place.
Check that the clamps 1, 2 and 4 are engaged.
4. After assembly, check that each leverand each brake is
working properly.
Grease the sides
Grease the teeth
Crescent
slide
Fig. 3-16-2
5-22
3-17. S LOAD GEAR, T LOAD GEAR,
S LOAD LEVER ASSEMBLY AND
T LOAD LEVER ASSEMBLY
(See Figs. 3-17-1. 3-17-2 and 3-17-3)
(T side)
1) Refer to section 3-16 and remove the crescent slide.
2) Refer to section 3-14-2 and remove the S and T incline
mounting assemblies.
3) Remove the clamp 1, then remove the components:
the S load gear 2, the S load spring 3 and the S load
lever assembly 4. When you do this, be careful not to
damage the clamp 1, which can be damaged easily.
Again, be careful when you disassemble the components, as the S load spring 3 will spring out.
4) Remove the following components: the T load gear 5,
the T load spring 6, and the T load lever assembly 7.
Be careful when you disassemble the components, as
the T load spring 6 will spring out.
Apply
grease here
Apply
grease inside
the hole
(S side)
Apply
grease here
Apply grease to the gears
Apply
grease
here
ASSEMBLY NOTES:
1. Apply grease (SGL-505) to the shafts 8, 9 and parts A
shown in Fig. 3-17-1. Then apply grease (SGL-505) to
the parts shown in Fig. 3-17-2.
2. When fitting the S load gear 2 and the T load gear 5
align them in the tape-loaded state, as shown in Fig. A in
Fig. 3-17-3. Again, after completing tape-unloading on
these gears, check that they are positioned as shown in
Fig. B in Fig. 3-17-3, then refer to section 3-14-2 and fit
the S and T incline mounting assemblies.
Apply grease inside
the hole
Apply
grease here
Fig. 3-17-2
Fig. A: When tape loading is complete
7 T load lever
assembly
6 T load
spring
T load gear
S load gear
3 S load spring
4 S load lever
assembly
1 Clamp
5 T load
gear
2 S load
gear
Fig. B: When tape unloading is complete
T load gear
S load gear
8 Shaft
9 Shaft
Parts A
(apply
grease here)
Fig. 3-17-3
Fig. 3-17-1
5-23
3-18.TAPE SENSORS, REEL SENSOR
AND EP SW LEVER
1 Photo diode
(reel sensor)
3-18-1 TAPE TOP SENSOR AND TAPE END
SENSOR (See Fig. 3-18-1)
Cut
Mounting shaft for
take up reel
assembly
1) Refer to section 3-2 and remove the mechanism unit.
2) Refer to section 3-3-1 and remove the cassette mechanism assembly.
3) Remove the soldering from the MC-1 PWB assembly,
then remove the photo diodes 1, 2 and the LED 3.
When removing the photo diode 2 on the tape top
sensor side, refer to section 3-15 and remove the main
cam.
ASSEMBLY NOTES:
1. Fit the photo diodes 1 and 2 so that their photoreceptors to face the LED 3, as shown in Fig. 3-18-1. Align
the cuts in the LED 3 and the holder 4.
Push the photo diodes 1, 2 and the LED 3 as far
down as they will go, so that they do not protrude above
the top of their holders.
2. Do the soldering quickly.
2 Protrusion
Fig. 3-18-2
Turn the photoreceptors to
face the LED 3
1 Photo
diode
(Tape end
sensor)
3-18-3. EP SWITCH LEVER (See Fig. 3-18-3)
1) Refer to section 3-3-1 and remove the cassette mechanism assembly.
2) Remove the EP switch spring 1.
3) Remove the clamp 2, then remove the EP switch lever
3.
2 Photo
diode
(Tape top
sensor)
ASSEMBLY NOTES:
3 LED
Align the cuts
Holders
Holders
4 Holder
1. Apply grease (SGL-505) to the protrusion 4 on the
back of the EP switch lever 3.
2. After fitting the cassette mechanism assembly. check
that in EJECT mode. the EP switch lever 3 does not
touch the EP switch 5 .
1 EP switch spring
3 EP switch lever
Front
Fig. 3-18-1
4 Protrusion on
back
(apply grease here)
3-18-2. REEL SENSOR (See Fig. 3-18-2)
2 Clamp
1) Refer to sections 3-12-2 and 3-12-4. then remove the
clutch mounting assembly, the T soft brake assembly
and the take up reel assembly.
2) Refer to section 3-13-2, then remove the wheel gear 2,
the wheel gear 1. and the brake control lever.
3) Remove the soldering from the MC-1 PWB assembly,
then remove the photo diode (reel sensor) 1.
ASSEMBLY NOTES:
5 EP switch
1. When assembling the parts, align the cut on the photo
diode (reel sensor) 1 with the protrusion on the
mechanism chassis 2.
2. Do the soldering quickly.
Fig. 3-18-3
5-24
4. MECHANISM CHECKS AND
ADJUSTMENTS
Dummy cassette
tape
Make holes with
roughly the same
diameter as the reel.
4-1. REEL TABLE TORQUE CHECK
1) With the power switch turned OFF, stick black vinyl tape
over the photo diodes of the tape sensors. Then turn
the power switch ON. Front loading will begin. Refer to
section 3-2 and Fig. 3-2-2. and release the locks of the
tray lock lever and the lid opener lever.
Stick black vinyl
tape over the tape
sensor holes.
NOTES:
1. The measurements must be taken without any incandescent light or daylight.
2. If the mechanism cannot be put into PLAY, FF or REW
mode by the method described in 1) above, make a
dummy cassette tape, as shown in Fig. 4-1-2. The dummy
cassette tape is made as follows: Unscrew the five screws
on the underside, remove the reels, leaf springs and other
parts on the supply and take up sides, make holes in the
upper surface as wide as the reel diameter, then assemble
the parts.
2) Put the mechanism into REW mode, wait at least 10 seconds, then measure the torque value of the reel table on
the supply side. It should be at least 600 g/cm. Take the
measurement with the torque dial gauge (H-7099-039-H/
H-7099-035-H) held in position in your hand (lock torque).
While taking the measurement, rotate the reel table (take
up reel assembly) on the take up side with your hand so
that the reel sensor does not respond.
3) After switching to FF mode, wait for at least 10 seconds
and then measure the torque value of the reel table on
the take up side. It should be at least 600g/cm (lock
torque).
4) After switching to PLAY mode, wait for at least 10
seconds and then measure the torque value of the reel
table on the take up side. It should be between 80 and
140g/cm (lock torque).
Fig. 4-1-2
4-2. ADJUSTING THE BT LEVER ASSEMBLY POSITION AND CHECKING THE
BACK TENSION TORQUE IN PLAY
MODE
4-2-1. BT LEVER POLE POSITION ADJUSTMENT
(See Fig. 4-2-1 )
1) Without loading a cassette tape, put the mechanism into
PLAY mode (turn the power switch OFF).
2) Adjust point A on the band brake assembly by rotating
it so that the tip of the BT lever assembly is aligned with
the line on the left side of the mechanism chassis.
3) Refer to section 4-2-2 and check that the back tension
torque is between 30 and 50g/cm.
Align the end of the BT lever
assembly with this line.
Torque dial gauge
(H-7099-039-H)
(H-7099-035-H)
Tension
pole
BT lever assembly
Reel table on
supply side
Point A
Reel table on
take up side
Fig. 4-2-1
4-2-2. CHECKING THE BACK TENSION TORQUE
PLAY MODE
1) Mount the cassette torque meter (VHT-063S) and
switch to PLAY mode.
2) Check that the back tension torque is between 30 and
50g/cm .
Fig. 4-1-1
5-25
4-3-2. LOAD LEVER ASSEMBLY HEIGHT
ADJUSTMENT (See Fig. 4-3-2)
4-3. TAPE PATH ADJUSTMENT
In normal circumstances, the tape path system does not
need to be adjusted. However, after removing or replacing
one of the parts shown in Fig. 4-3-1, you should check and
adjust the tape path. The adjustment of the tape path is
carried out while monitoring the envelope waveform of the
video head output, using an oscilloscope. To make sure
that the tape drawn off the reel runs freely and without
excessive tension along all the tape guides and cylinders
(drums), it is also important to check each tape guide by
eye.
1. Refer to sections 3-9-2, and remove the opener
mountIng .
2. Position the height adjustment tool (J-6090-055-A) 3
under the full surface of the protrusion 2 on the load
lever assembly 1, as shown in Fig. 4-3-2.
3. Using your firlgers, gently screw the adjustment nut 4
clockwise into the nut box (J-6082-045-A) 5 until the
protrusion 2 of the load lever assembly 1 touches the
height adjustment tool (J-6090-055-A) 3 and the screw
starts to feel tight. Next, loosen the adjustment nut 4
T guide roller
by 270° anticlockwise.
S guide roller
Audio R/P head assembly
4. Load a cassette tape (NTSC: T-160, PAL: E-240) and
(ACE head) Capstan shaft
switch to PLAY mode. Check that when you do this, no
Full erase
Loading guide
scratches appear on the upper or lower edges of the
head
Cylinder
tape. If scratches do appear, re-adjust the height.
(Drum)
S tape
T tape
guide
guide
Arrange the equipment so that the whole surface of the
projection on the load lever assembly is positioned over
BT post
Pinch roller
the height adjustment tool (J-6090-055-A) when seen from
0 tape guide
directly overhead.
S reel
T reel
5 Nut box
(J-6082-045-A)
Fig. 4-3-1
1 Load lever
assembly
4-3-1. ADJUSTMENT PROCEDURE
1. Select a PAL or NTSC alignment tape or blank cassette
tape, according to the transmission system of the VCR
you are repairing.
3 Height adjustment
tool (J-6090-055-A)
NTSC: For models with 525 scanning lines and a field
frequency of 60Hz
PAL:
For models with 625 scanning lnes and a field
frequency of 50Hz
2 Protrusion
2. Clean the tape guides, the cylinder(drum), the capstan
Shaft, the audio R/P head (ACE head) and the full
erase head.
3. Using an oscilloscope, adjust the height of the guide
roller and carry out horizontal position adjustment,
height adjustment and azimuth adjustment on the audio
R/P head (ACE head). When observing the envelope
waveform, bring the CH-1 probe into contact with the
envelope waveform test point, and bring the CH-2 probe
into contact with the switching pulse (SW P) test point.
While adjusting the tape path, set the trigger at the low
side of the switching pulse (SW P) in order to observe
the output waveform on the CH-1 side of the video
head.
NOTE:The contact point for the oscilloscope varies from
one model to another, so to find the correct point for your
model, refer to the figure entitled “Test point for tape path
adjustment” in the electrical circuit section of the service
manual.
4. When checking the tape path by eye, use a dental
mirror.
4 Adjustment nut
Fig. 4-3-2
5-26
4-3-3. GUIDE ROLLER HEIGHT ADJUSTMENT
(See Figs. 4-3-3 and 4-3-4)
Pressed
too far
Normal
1) Play the Alignment Tape (NTSC: KRV-52NE, PAL: KRV52PL) and check that the envelope waveform is at its
maximum at the tracking centre. Then, after loosening
the S guide roller and the T guide roller by rotating them
anticlockwise, tighten them in turn until the envelope
waveform becomes flat. If the envelope waveform is not
at its maximum at the tracking centre, refer to section 43-4 and carry out a rough adjustment of the horizontal
position of the audio R/P head (ACE head) before
adjusting the guide rollers.
2) Adjust the S guide roller.
1 Press the tracking button (Channel – ), and check
whether, when the envelope waveform has reached
50% of its maximum, the front half of the envelope
waveform is flat. If not, fine-tune the S guide roller as
follows.
a. If the front half of the envelope waveform is as shown
in Fig. 4-3-4 (a), this means that you have pressed the
S guide roller too far. Therefore, loosen it slightly, and
when it is in the state shown in Fig. 4-3-4 (b), tighten it
again, stopping when the envelope waveform is flat.
b. If the front half of the envelope waveform is as shown
in Fig. 4-3-4 (b), this means you have not pressed the
S guide roller far enough. Therefore, tighten it slightly,
stopping when the envelope waveform becomes flat.
c. If the front half of the envelope waveform is as shown
in Fig. 4-3-4 (c), it may happen that when you tighten
the S guide roller, the wrapper waveform does not
disappear, but sinks into the flat part, as shown in Fig.
4-3-4 (d). If this happens, the status shown in Fig. 4-34 (c) is normal, so loosen the S guide roller, then
tighten it again until the envelope waveform is as
shown in Fig. 4-3-4 (c).
2 Check that at the tracking centre, the output of the
front half of the envelope waveform is not less than
80% of the maximum.
3 Rotate the S guide roller 20° anticlockwise.
3) AdjusttheTguide roller.
1 press the tracking button (channel – ) and check
whether, when the envelope waveform is 50% of
maximum, the back half of the envelope waveform is
flat. If not, loosen the T guide roller slightly, then
tighten it gradually until the back half of the envelope
waveform becomes flat.
2 Check that the output for the back half of the envelope
waveform is at its maximum at the tracking centre.
4) Check that the envelope waveform does not fluctuate
when you switch from F-SEARCH to PLAY or from RSEARCH to PLAY. If it does fluctuate, repeat steps 3)
and 4).
Not pressed
far enough
Eccentric screwdriver
(J-6082-044-A)
S guide roller
T guide roller
Do not touch
the fixed
screw
The tape should not pass along
the cylinder lead surface
Fig. 4-3-3
If the envelope waveform
is at maximum at the
tracking centre, adjust to
flat.
In normal status, the waveform
will be flat even when the
envelope waveform is reduced
to 50%.
50%
100%
(a) S guide roller
pressed too far
(b) S guide roller not
pressed far enough
50%
50%
(d) S guide roller
pressed too far
(c) Normal status for
wrapper waveform
50%
50%
Fig. 4-3-4
5-27
(2) Horizontal position adjustment (See Fig. 4-3-6)
4-3-4. AUDIO R/P HEAD (ACE HEAD) HEIGHT
ADJUSTMENT, AZIMUTH ADJUSTMENT
AND HORIZONTAL POSITION ADJUSTMENT
(l) Azimuth adjustment (See Fig. 4-3-5)
1) Play the alignment tape (NTSC: KRV-52NE, PAL: KRV52PL).
2) Press the tracking buttons (channel + and channel – )
simultaneously and set the tracking to the centre.
3) Using an oscilloscope, observe the waveform of the
video head output.
4) Loosen the two fixed screws on the audio R/P head
(ACE head) by between 20° and 30° anticlockwise.
5) Using a slotted screwdriver, adjust the position of the
audio R/P head (ACE head). At the position where the
amplitude of the envelope waveform is at its maximum
at the tracking centre, tighten the fixed screw on the
audio R/P head (ACE head). When you do this, check
that the envelope waveform changes equally whether
the tracking is shifted by pressing the tracking button in
the plus or the minus direction.
6) Play the alignment tape (NTSC: KRV-52NE, PAL: KRV52PL) and check that the amplitude of the envelope
waveform is at its maximum at the tracking centre. If
not, repeat steps 1) to 6).
7) Refer to the electrical adjustments section of the service
manual, and adjust the switching position of the servo
circuit.
1) Play the alignment tape (NTSC: KRV-52NE, PAL: KRV52PL) and observe the waveform of the audio output,
using an oscilloscope.
2) Loosen the height adjustment screw in the counterclockwise direction and decrease the amplitude of the
audio output waveform. In this state, tighten the screw
in the clockwise direcion and maximize the amplitude.
Slightly tighten the screw further in the clockwise
direction and decrease the amplitude, and then loosen
it slowly in the counterclockwise direcion until the
amplitude starts to reach the maximum.
3) Set the amplitude of the audio output waveform to
maximum by rotating the azimuth adjustment screw.
4) Make sure that the tape edge is running between the
top of the audio head and the bottom of the control
head.
Gaps A and B should be roughly equal.
NOTE: Rotate the adjustment screw with a slotted screwdriver. Do not apply excessive force vertically. As the
height adjustment screw also adjusts tilt, rotate it slowly.
Do not rotate it excessively. And apart from the this screw,
and height adjustment screw, the screws is precisely
adjusted before shipment from the factory, and should not
be tampered with. Tampering with these screws can lead
to scratching of the tape and other problems.
Azimuth adjustment screw
NOTE:
1. When you press the tracking buttons (channel+ and
channel – ) simultaneously, the tracking is reset to the
tracking centre. When the tracking is at the tracking
centre, the message “T - : - “ will appear in place of the
clock display on the front panel. If you keep pressing the
channel– button the messages “T- : “ and “T - - : “ will
appear, while if you keep pressing the channel + button,
the messages “T : - ” and “T : - - “ will appear. Three
seconds after you stop pressing the tracking buttons, the
clock displav will re-appear.
2. The check described in paragraph 6) is not necessary
for models in which the only tape speed is SP mode.
Audio R/P head assembly
(ACE Head)
Height adjustment
screw
After resetting the tracking to the
tracking centre, set the envelope
waveform to maximum.
This screws is precisely
adjusted and should not be
tampered with.
Slotted
screwdriver
Scew
Audio head
Screw
A
A=B
Audio R/P head assembly
Tape
B
Fig. 4-3-6
Control head
Fig. 4-3-5
5-28
4-3-5. CHECKING AFTER ADJUSTMENT
1) Play the alignment tape (NTSC: KRV-52NE, PAL: KRV52PL) and check that the envelope waveform is
activated immediately and that there are no fluctuations
in the envelope waveform or the audio output waveform.
2) Load a cassette tape (NTSC:T-120, PAL: E-180) and
use it to record and replay. Check that the envelope
waveform is activated immediately and that there are
no fluctuations in the envelope waveform or the audio
output waveform. (When recording on the tape, input
1kHz to the audio input terminal. Use a scratch-free
cassette tape (NTSC: T-120, PAL: E-180).) Check that
at the tracking centre, the front half down and back half
down are not more than 20% of the value at the point
where the envelope waveform amplitude is at its
maximum.
3) Check that the envelope waveform is activated immediately when you switch from PLAY to R-SEARCH or
from R-SEARCH to PLAY. Check that there is no slack
in the tape next to the pinch roller.
4) Check that the envelope waveform is activated immediately when you switch to PLAY from FF, REW, FSEARCH, R-SEARCH or STOP mode. Check that there
is no slack in the tape next to the pinch roller.
5) Check that the tape is not curling or riding up on the
upper or lower flanges of the tape guides in PLAY, FF,
REW, F-SEARCH or R-SEARCH modes.
6) Check that in PLAY mode. the tape runs as shown in
Fig. 4-3-7.
7) Load a tape (NTSC:T-160, PAL: E-240) and play it
back. carry out the checks described in steps 3) to 5)
above.
S tape guide
No. 0 tape
guide
BT post
S guide
roller
Cylinder
(drum)
Audio R/P head assembly
(ACE head)
T guide roller
T tape guide
Loading guide
post
Pinch roller
Full erase
head
Capstan shaft
5-29 E
Fig. 4-3-7
SLV-L45AR/L65HFAR/L75HFAR
SECTION 6
ELECTRICAL ADJUSTMENTS
CIRCUIT BOARDS LOCATION
3 in 1 Tuner
(Tuner/IF/RF Conv.)
VP-1 PWB Assembly
CP-1 PWB Assembly
TM-2 PWB
TM-1 PWB
6-1
SELF-DIAGNOSIS DISPLAY
Mechanism Mode Display / Head Output Drop Warning Display / Cylinder Rotation Accumulated
Time Display
This unit displays the diagnosis contents of abnormalities and the mechanism, mode on its display panel in 2-digit numbers.
When the head playback output has dropped, the “ L” sign will be blinked. Some models (listed later) will also display the cylinder
rotation accumulated time.
These display shows the outline of the problems. Use it as a reference when servicing the unit.
1. Self-Diagnosis Contents and Mechanism Mode Display
• When the STOP button on the remote control is pressed for about 10 seconds continuously, the self- diagnosis number
will be displayed on the reception channel display of the display panel and number indicating the failed mechanism mode
(changed mode when being shifted) on the tape counter “seconds” display for 10 seconds each.
• During self-diagnosis display, displays other than the diagnosis number/mechanism mode number and the cylinder
accumulated rotation time display described later (some models only) will be turned off and when displays end, the
normal display will be returned automatically.
• Refer to “Self-Diagnosis Contents” for the self-diagnosis numbers and the “Mechanism Mode Display Contents” for the
mechanism mode numbers.
• When the “0” button on the remote control unit is pressed during display, and clearing the self-diagnosis display and
mechanism mode display.
Display panel
Self-Diagnosis number
(Reception channel display)
Mechanism mode number
(Tape counter “Seconds” display)
Self-Diagnosis Contents
No.
Problem
Main Possible Cause
Mechanism Operations and
State After Occurrence
00 There is no abnormality in the mechanism.
The cylinder motor does not rotate.
• The cylinder motor is faulty.
• The control of the cylinder motor is
faulty.
• The tape winds around the cylinder.
Shifts to the STOP mode.
The take-up reel does not rotate.
• The take-up reel is caught.
• The reel belt is faulty.
• The take-up torque has decreased.
Shifts to the STOP mode.
The capstan motor does not rotate.
• The capstan motor is faulty.
• The control of the capstan motor is
fauIty .
Shifts to the STOP mode.
The tape cannot be loaded with the
cassette inserted.
(But unloading can be performed.)
• Error in the operations of the tape
loading mechanism.
• Foreign particles in the tape
loading mechanism.
• The tape end sensor is faulty.
• The reel brake of the tape cassette
has not been released.
Unloads, shifts to the INITIAL mode,
and the power goes off.
• The tape guide is caught.
• The loading motor is faulty.
• The control of the loading motor is
faulty.
The power is forcibly turned off with
the mechanism at its current position.
01
02
03
04
Tape loading and unloading cannot
be performed with the cassette
05 inserted.
6-2
No.
Problem
Mechanism Operations and
State After Occurrence
Main Possible Cause
Front unloading cannot be performed • The cassette drive mechanism is
when ejecting the cassette.
faulty .
(Front loading can be performed.)
• The front door is caught.
Front loads and shifts to the STOP or
INITIAL mode.
• When the power switch is turned on
before eject operations: Shifts to the
STOP mode.
• When the power switch is turned off
before eject operations: Shifts to the
INITIAL mode and the power goes
off.
Front loading and front unloading
cannot be performed when ejecting
the cassette.
The power is forcibly turned off with
the mechanism at its current position.
06
07
• The tape cassette is caught in the
cassette drive mechanism.
• The main cam and front rack gear of
the front loading mechanism have
not engaged properly.
• The gears of the front loading drive
mechanism have not engaged
properly.
The mechanism becomes 1(REVIEW) • The mechanism mode switch
while moving from 2 (IDLER),
contact is faulty.
08 3 (STILL), 4 (BRAKE), and to
5 (STOP).
The power is forcibly turned off with
the mechanism at its current position.
The mechanism becomes 7 (INITIAL)
while moving from 1 (REVIEW),
09 2 (IDLER), 3(STILL), 4 (BRAKE),
and to 5 (STOP).
• The mechanism mode switch
contact is faulty.
Carries out tape take-up operations,
shifts to the INITIAL mode,
and the power goes off.
The capstan motor does not rotate
10 and cassette tape eject when
cassette tape insert.
• The capstan motor is faulty.
• The control of the capstan motor is
faulty.
Shifts to the STANDBY mode.
Protect cassette tape.
The cylinder motor does not rotate
11 and cassette tape eject when
cassette tape insert.
• The cylinder motor is faulty.
• The control of the cylinder motor is
faulty.
Shifts to the STANDBY mode.
Protect cassette tape.
Note: For details of mechanism operations corresponding to the mechanism positions of the self-diagnosis numbers 08
and 09 above, refer to the separate volume on the V95 Ι mechanism manual.
These manual reference numbers are shown in the cover.
Mechanism Mode Display Contents
Mode No.
00
01
02
03
04
05
06
07
Mechanism Mode
CASSETTE OUT
STANDBY
STOP
STILL
REC-PAUSE
AUDIO DUBBING – PAUSE
FRAME ADVANCE
SLOW
Mode No.
08
09
10
11
12
13
14
15
Mechanism Mode
PLAY
REC
AUDIO DUBBING
X2 SPEED PLAY
CUE
REVIEW
FAST FORWARD
REWIND
6-3
Mode No.
Mechanism Mode
16
17
18
19
VIDEO INSERT
VIDEO INSERT – PAUSE
AUDIO/VIDEO INSERT
REVERSE X2 SPEED PLAY
99
OTHERS
2. ELECTRICAL ADJUSTMENT
VCR PRESETTING
This VCR need three basic presetting by using the menus displayed on-screen. After all connection have been made, then
follow steps 1 to 3 to preset the VCR.
The three presetting steps will be displayed in sequence on TV screen. The setting are entered with the remote control.
Turn on the VCR
1. Adjusting the TV receiver to the video channel: The AUTO SETUP screen will appear. When the video channel has
been preset, press the OK button on the remote control.
2. Country selection: Using the numeric button, select the country of use.
3. Language selection: When the desired language has been select, press the MENU / TV button directly before prevent
auto tuning will start.
When steps 1 to 3 have been finish, ready to operate the all operating mode.
2-1. SERVO CIRCUIT ADJUSTMENT
• These adjustments should be done upon completion of the tape transport adjustments.
• If the tape transport adjustments (except the tilt adjustment) are done after these adjustments, follow the procedures
again in section 2-1-3, “switching position adj.”
• When a cassette tape is loaded, auto-tracking will be set immediately after starting the first playback. As this will daviate
the tracking center set, be sure to press the channel buttons (4) or ($) once directly after starting playback to prevent
auto-tracking from being set.
Oscilloscope
Vertical sensitivity
Bandwidth
: 5 mV/DIV, external trigger
: more than 10 MHz
Alignment Tape
Blank Tape
KRV-51P (8-192-605-36)
VHS-type cassette tape
: SP mode, monoscope. 400 Hz
Monitor TV
2-1-1. TEST EQUIPMENT AND STANDARDS REQUIRED
2-1-2. LOCATION OF ADJUSTMENT POINTS
TP101
SLV-L65HFAR/L75HFAR only
TP633
VR634
VR635
VR632
VR633
VR631
TP635
TP631
VR351
CP-1 PWB (Foil side)
6-4
Fig. 2-1-1
TP182
(ENV.)
TP183
(SW-P)
VP-1 PWB Assembly
Fig. 2-1-2
Note:
• Set the REC/PLAY SPEED button to indicator panel in
the SP mode.
• Self-recording means “Record any broadcasting or video
signal and playback the just-recorded portion.”
Start of play
back display
REC button
ON
2-1-3. SWITCHING POSITION ADJ.
Measuring Point
TP101
(VIDEO OUT)
TP183
(RF SW-P)
Measuring Equipment
Oscilloscope
PLAY (SP) mode
Alignment tape
(KRV-51P)
Adj. Location
Adj. Value
REC button
CHANNEL (4/$) button
PLAY button
6.5 H ± 0.5 H
1.
2.
3.
4.
5.
Within 2
secs.
Within 3
secs.
Adj. Condition
More
than
0.5
secs.
Adjusting
period
15 secs.
Fig. 2-1-3
T = 6.5H ± 0.5H
1H
At playback starts, press the REC button 3 times within
3 seconds after the playback picture comes out. However,
these 3-push must be done within 2 seconds, and last
push must be kept pressed for 0.5 seconds. (Fig. 2-1-3)
"P 0:00" is appeared in FLD, and it becomes the
adjustment mode. This indication value changes
automatically, and 6.5H adjustment is done. When this
value stops, adjustment value almost becomes 6.5H.
Observe the video output signal by the oscilloscope,
triggered by the fall down point of RF SW PULSE
(TP183), and confirm that a front edge of V-SYNC is
delayed for 6.5 H ± 0.5 H from the fall down point of RF
SW PULSE. (Fig. 2-1-4)
After the adjustment data is fixed (it should be within 15
seconds from the adjustment mode start), press the
PLAY button more than 1 second. Then the indication
changes to "P – : – ", it writes the data (delay quantity)
to theE2PROM. (If it passes through 15 seconds before
pushing the PLAY button, the intake of the data isn't
done, and it finishes the adjustment mode.)
If it is not in 6.5 H ± 0.5 at the time of the confirmation by
the above 3., make manual fine adjustment by pressing
the CHANNEL button, and do the operation of 4.
0.5H
Front edge of
vertical sync signal
RF. SW. PULSE
Fall
Fig. 2-1-4
2-1-4. SP STIL V-LOCK ADJ.
Measuring Point
Measuring Equipment
Picture of
monitor
Monoscope pattern
Self-recording
(SP mode)
STILL mode
Adj. Location
Adj. Value
CHANNEL (4) or ($) button
The minimum vertical shake
1.
2.
3.
6-5
Adj. Condition
Set the REC/PLAY SPEED button to the SP model.
Play back the own recorded portion of the tape and then
set the VCR in the STILL mode.
Press the CHANNEL (4) or ($) button so that the vertical
shake of picture becomes its minimum.
2-2. VIDEO CIRCUIT RELAY JIG
2-2-1 .TEST EQUIPMENT AND STANDARDS REQUIRED
Color Bar Signal Generator
PAL Color bar signal with 100% white level (EBU color bar signal)
Oscilloscope
Vertical sensitivity
Bandwidth
: 5 mV/DIV, external trigger
: more than 10 MHz
Oscilloscope Probe
Input capacity
: less than 25 pF (10:1)
less than 40 pF (1:1)
: DC ~ 40 MHz (10:1)
DC ~30 MHz (1:1)
Covering frequency
Digital Voltmeter
DC range
Alignment Tape
KRV-51P (8-192-605-36) : SP mode, color bar, 400 Hz
(Color bar signal waveform is described below. Refer to Fig. 2-2-1)
Relay Jig
J-6090-036-A
J-6090-019-A
: 7-wire flat cable for VP-1 PWB assembly (SLV-L45AR)
: 12-wire flat cable for VP-1 PWB assembly
(SLV-L65HFAR/L75HFAR)
75%
White
Yellow
Cyan
Green
Magenta
Red
Blue
ALIGNMENT TAPE COLOR BAR SIGNAL
VP-1 PWB Assembly
Relay Jig
J-6090-036-A
(SLV-L45AR)
J-6090-019-A
(SLV-L65HFAR/
L75HFAR)
100% White
0.7Vp-p
1Vp-p
0.3Vp-p
0.3Vp-p
V U
Burst signal
H. Sync signal
Flat Cable
Color bar signal waveform (KRV-51P)
V
U
100%
White
Cylinder
Assembly
Fig. 2-2-3
Blue
Red
Magenta
Green
Cyan
White
(75%)
Yellow
Fig. 2-2-1
Black
Color bar pattern (KRV-51P) on monitor TV
Fig. 2-2-2
RELAY JIG
Connect the flat cable end from the cylinder assembly to
the VP-1 PWB assembly using the relay jig to provide
simple repairing of the VP-1 PWB assembly, as shown in
Fig. 2-2-3. Further, when adjusting the VP-1 PWB assembly, be sure to make contact an end of shield case with
bracket of the VP-1 PWB assembly to maintain the shield
effect. If the VP-1 PWB assembly does not contact, there
is insufficient ground and no proper play back image can
be obtained.
6-6
SLV-L65HFAR/L75HFAR only
2-3. MTS DECODER CIRCUIT ADJUSTMENT
• If adjusting the MTS Decoder Circuit, special equipment
shown in section 2-2-1. is necessary.
• Improper adjustment will cause loss of performance of
stereo sound and bilingual sound detection.
• Prior to making these adjustments, the other adjustments
except the MTS Decoder should be completed.
2-3-1. TEST EQUIPMENT AND STANDARDS REQUIRED
TV Multichannel Sound Generator
LMS-238 (Prodused by Leader Electonics Corp.)
Oscilloscope
Standard Audio Signal Generator (SG)
Frequency Counter
Input frequency
: 20 Hz ~ 10MHz
DC Power Supply Unit
Voltage
: 0 ~ 15 V (DC)
Band Path Filter
200 Hz ~ 15 kHz
AC Voltmeter
DC Voltmeter
2-3-2. LOCATION OF ADJUSTMENT POINTS
TP101
TP633
VR634
VR635
VR632
VR633
VR631
TP635
TP631
VR351
CP-1 PWB (Foil side)
6-7
Fig. 2-3-1
SLV-L65HFAR/L75HFAR only
2-3-5. INPUT LEVEL ADJ.
Notes:
• Set the INPUT switch on the remote control to TUNER.
• Set the VIF/RF OUTPUT switch on the TV Multichannel
Sound Generator to CH-3 or CH-4. And LEVEL volume
control to push (locked the RF output level).
Measuring Point
Measuring Equipment
TP631
TV multichannel
sound generator
Standard audio
signal generator
AC voltmeter
2-3-3. STEREO/SAP FILTER ADJ.
Measuring Point
Measuring Equipment
TP633
Standard audio
Disconnected
signal generator (SG) Power cord of
Oscilloscope
VCR
Frequency counter
DC power supply unit
Adj. Location
Adj. Condition
Adj. Value
VR633 (ST.DBX FIL) Minimum level (Less than 10 mVp-p)
1. Temporary disconnect the power cord of the VCR to set
the power OFF.
2. Apply 5V(DC) to TP630 from the DC power supply unit.
3. Connect the standard audio signal generator and
frequency counter to TP631, and input 22.9 kHz ± 50
Hz, –10 ± 1 dBM sine wave.
4. After confirming TP633 output on the oscilloscope,
adjust VR633 (ST. DBX FIL) so that the output is
brought to its minimum level (less than 10 mVp-p).
Measuring Point
Measuring Equipment
TP635
TV multichannel
sound generator
DC voltmeter
Adj. Condition
E-E mode
Adj. Location
Adj. Value
VR635 (VCO)
–
1. Input the output signal of the TV multichannel sound
generator into the VCR ANT input terminal.
2. Set the TV multichannel sound generator as follows.
SAP switch : OFF, INT FREQ switch : 300 Hz,
STEREO switch : L + R, VIF/RF OUTPUT : CH-3 or CH-4.
3. Receive the signal of TV multichannel sound generator.
and confirm so that the “ L + R ” within the monitor TV
when PILOT switch to ON.
4. Set OFF the pilot switch of the TV multichannel sound
generator, then measure the DC output voltage of
TP635 and write the value down.
5. Set ON the pilot switch and confirm that “ ST ” within
the indicator panel lights. If not, adjust VR635 (VCO)
until “ ST ” lights.
6. Measure the output voltage of TP635, and adjust
VR635 (VCO) so that the output voltage agree with the
value (within ± 0.03 V) measured in step 3.
E-E mode
Adj. Location
Adj. Value
VR631 (INPUT LEVEL)
100 ± 5 mVrms
1. Input the output signal of the TV multichannel sound
generator into the VCR ANT input terminal.
2. Set the TV multichannel sound generator as follows.
SAP switch : OFF, EXT (MONO) switch : ON.
3. Input 300 ± 50 Hz sine wave into the EXT INPUT terminal
of the TV multichannel sound generator from the standard
audio signal generator.
4. Connect the AC voltmeter to the EXT INPUT terminal, and
adjust the output level of the standard audio signal
generator so that the input voltage becomes 343.7 ± 1
mVrms (terminated at 600Ω).
5. Adjust the VR631 (INPUT LEVEL) so that the AC voltmeter connected to TP631 becomes 100 ± 5mVrms.
2-3-6. SEPARATION ADJ.
Measuring Point
2-3-4. STEREO VCO ADJ.
Adj. Condition
Measuring Equipment
CH : 1
TV multichannel
AUDIO OUTPUT
sound generator
terminal (L)
Oscilloscope
CH : 2
Band path filter
AUDIO OUTPUT (200 Hz ~ 15kHz)
terminal (R)
Adj. Condition
E-E mode
Adj. Location
Adj. Value
VR632 (SEP. LOW)
VR634 (SEP. HIGHT)
Minimum level (less than
15mVp-p)
1. Input the output signal of the TV multichannel sound
generator into the VCR ANT input terminal.
2. Connect the oscilloscope to the AUDIO OUTPUT terminal
(L) and (R) of the VCR via the BPF.
3. Set the TV multichannel sound generator as follows.
SAP switch : OFF, PILOT switch : ON.
4. Receive the signal of TV multichannel sound generator,
and confirm so that the “ L + R ” within the monitor TV
when PILOT switch to ON.
5. Set the TV multichannel sound generator (STEREO switch :
Rch, INT FREQ switch : 3 kHz), and adjust VR632 (SEP.
LOW) so that the output of the AUDIO OUTPUT terminal
(L) is brought to its minimum level (less than 15 mVp-p)
during Rch modulation.
6. Set the TV multichannel sound generator (STEREO switch :
Lch, INT FREQ switch : 300 Hz), and adjust VR634 (SEP.
HIGH) so that the output of the AUDIO OUTPUT terminal
(R) is brought to its minimum level (less than 15 mVp-p)
during Lch modulation.
6-8
SLV-L65HFAR/L75HFAR only
7. Set the TV multichannel sound generator (STEREO switch :
Lch, INT FREQ switch : 3 kHz), and confirm that the
difference between the AUDIO OUTPUT terminal (L)
and (R) is more than 25 dB.
8. Set the TV multichannel sound generator (STEREO switch :
Rch, INT FREQ switch : 300 Hz), and confirm that the
difference between the AUDIO OUTPUT terminal (L)
and (R) is more than 20 dB. If not, repeat steps 5 to 8.
1. Input the output signal of the TV multichannel sound
generator into VCR ANT input terminal. Set the TV multichannel sound generator (INT FREQ switch : 300 Hz,
STEREO switch : L + R, SAP switch : ON, PILOT switch :
ON).
2. Receive the signal of TV multichannel sound generator,
and confirm so that the “ L + R ” within the monitor TV
when PILOT switch to ON.
3. Confirm “ ST ” and “ SAP ” within the VCR indicator panel
lights.
4. Confirm the waveform of the AUDIO OUTPUT terminal (L)
and (R) on the oscilloscope.
5. Set the TV multichannel sound generator as follows.
PILOT switch : ON, STEREO switch : Lch.
6. Press the VCR PROGRAM button to set ON-SCREEN
MENU, and select the VCR SETUP menu.
7. Confirm that the waveforms of the AUDIO OUTPUT terminal
(L) and (R) become “ No. 1 to 3 ” in the table below when
selecting the MTS mode on the next screen, “ MONO ” n
“ STEREO ” n “ SAP ” sequentially.
8. Set the TV multichannel sound generator (EXT terminal : no
input, EXT (MONO) switch : ON).
9. Confirm that the waveforms of the AUDIO OUTPUT terminal
(L) and (R) become “ No.4 ” in the table below when selecting
the VCR SETUP menu then setting the MTS mode to “ SAP ”.
Note : Measurement of steps 5 through 8, be sure to
connect the BPF between oscilloscope and AUDIO
OUTPUT terminals.
2-3-7. AUDIO OUTPUT MODE AND OUTPUT
SIGNAL CHECK
Measuring Point
Measuring Equipment
CH : 1
TV multichannel
AUDIO OUTPUT
sound generator
terminal (L)
Oscilloscope
CH : 2
AUDIO OUTPUT
terminal (R)
Adj. Condition
E-E mode
Adj. Location
Adj. Value
–
–
No.
Mode of VCR
(Indicator Panel)
AUDIO OUTPUT
Lch
1
STEREO
(“ ST ” indicator lights)
300Hz
sine
wave
approx.
240 mVp-p
300Hz
sine
wave
approx.
15 mVp-p
2
MONO
(NO indicators)
300Hz
sine
wave
approx.
120 mVp-p
300Hz
sine
wave
approx.
120 mVp-p
3
SAP
(“ SAP ” indicator lights)
300Hz
sine
wave
approx.
120 mVp-p
300Hz
sine
wave
approx.
180 mVp-p
4
SAP
(“ SAP ” indicator lights)
300Hz
sine
wave
approx.
180 mVp-p
–
6-9
AUDIO OUTPUT
Rch
2-4. IF CIRCUIT ADJUSTMENT
• In this model, the circuits of the TUNER, IF, and RF
converter have been made into one. Therefore, should
one circuit malfunction, the whole unit must be replaced.
• The adjustments for the IF (RF AGC) circuit of the 3 in 1
tuner are described below.
Note: The 3 in tuner dose not need any adjustments,
because precise adjustments were down before
shipment.
2-4-1. TEST EQUIPMENT AND STANDARD REQUIRED
Monitor TV
2-4-2. LOCATION OF ADJUSTMENT POINT
2-4-3. RF AGC ADJ.
Measuring Point
Measuring Equipment
Picture of
monitor TV
Rear Panel
Monitor TV
Adj. Location
3 in 1 Tuner
VR (RF AGC)
(on the 3 in 1 tuner)
CP-1 PWB
Assembly
VR RF AGC
3 in 1 Tuner
Fig. 2-4-1
Adj. Condition
E-E mode
Adj. Value
S/N is best point
1. Connect the monitor TV to the VHF/UHF antenna
output terminal.
2. Connect the VHF or UHF antenna to the VHF/UHF
antenna input terminal.
3. Receive the middle electrical field (70 dBµ ~90 dBµ) of
the VHF or UHF channel, and slowly turn the VR (RF
AGC) from the point where snow-noise is present to the
point where it just disappears from the monitor TV.
4. Confirm by monitor TV that there is no beat and
saturation (S/N is best point) when receiving any TV
channel.
3. TEST POINTS FOR TAPE PATH ADJUSTMENT
Test points TP182 (ENV) and TP183 (SW-P) for tape path adjustment are shown in figure below.
For adjustment, refer to the separate volume “ V95 Ι Mechanism Manual ” (MM531433) and “ V95 ΙΙ Mechanism Manual ” (MS531500).
TP183
(SW-P)
VP-1 PWB Assembly
6-10E
TP182
(ENV.)
Fig. 3-1
SLV-L45AR/L65HFAR/L75HFAR
SECTION 7
EXPLODED VIEWS
NOTE :
r -XX, -X mean standardized parts, so they may
have some difference from the original one.
r The construction parts of an assembled part are
indicated with a collation number in the remark
column.
r The parts marked with a ◊ are special parts for
Argentina and are supplied by SONY ARGENTINA.
r Items marked “ * ”are not stocked since they are
The CP-A board and CP-1 board
are identical.
seldom required for routine service. Some delay
should be anticipated when ordering these items.
r The mechanical parts with no reference number
in the exploded views are not supplied.
r Hardware (# mark) list and accessories and packing materials are given in the last of this parts
list.
7-1.CABINET & CHASSIS PARTS
25
28
9
27
#3
10
#2
26
8
7
#1
#1
4
9 #3
11
6
14
15
5
16
17
12
#3
#3
not supplied
18
20
14
13
21 19
3
23
22
24
4
2
Ref. No.
–––––––
* 1 ◊
* 1 ◊
* 1 ◊
2 ◊
3
Part No.
–––––––
A-6788-321-A
A-6788-328-A
A-6788-331-A
3-051-096-01
3-942-768-02
Description
––––––––––
CABINET ASSY, FRONT (L75HFAR)
CABINET ASSY, FRONT (L65HFAR)
CABINET ASSY, FRONT (L45AR)
BUTTON (BASE)
EMBLEM (NO.5), SONY
4
* 5
* 5
* 5
6
3-965-446-01
A-6794-549-A
A-6794-557-A
A-6794-564-A
1-693-424-11
SCREW, SPECIAL
CP-A BOARD, COMPLETE (L75HFAR)
CP-A BOARD, COMPLETE (L65HFAR)
CP-A BOARD, COMPLETE (L45AR)
TUNER (RF/TU/IF)
A-6794-554-A
A-6794-567-A
3-970-792-01
3-976-269-01
3-740-382-01
VP-1 BOARD, COMPLETE (L65HFAR,L75HFAR)
VP-1 BOARD, COMPLETE (L45AR)
BRACKET, TERMINAL (L45AR)
BRACKET, TERMINAL (L65HFAR,L75HFAR)
+BTS-B S 4X12
10
10
* 10
11
* 12
3-051-087-01
3-051-290-01
3-976-260-01
3-963-641-01
3-963-642-01
COVER, TOP (L75HFAR)
COVER, TOP (L45AR)
COVER, TOP (L65HFAR)
HOLDER (AC INLET)
TOP HOLDER COVER
* 13
14
* 15
* 15
* 15
3-963-620-01
3-942-661-01
◊ A-6794-547-A
◊ A-6794-561-A
◊ A-6794-569-A
*
*
*
*
7
7
8
8
9
16
16
◊
◊
◊
◊
◊
Remark
–––––––
#3
1
Ref. No.
–––––––
16
17
18
◊
Part No.
–––––––
3-974-743-01
3-947-433-01
3-051-089-01
Description
Remark
––––––––––
––––––
BUTTON 2P (POWER EJECT) (L65HFAR)
WINDOW
DOOR, CASSETTE (L75HFAR)
◊
◊
◊
◊
◊
3-051-287-01
3-051-292-01
A-6794-546-A
A-6794-560-A
A-6794-568-A
DOOR, CASSETTE (L65HFAR)
DOOR, CASSETTE (L45AR)
TM-1 BOARD, COMPLETE (L75HFAR)
TM-1 BOARD, COMPLETE (L65HFAR)
TM-1 BOARD, COMPLETE (L45AR)
18
18
* 19
* 19
* 19
COVER, BOTTOM
STAND, FELT
TM-2 BOARD, COMPLETE (L75HFAR)
TM-2 BOARD, COMPLETE (L65HFAR)
TM-2 BOARD, COMPLETE (L45AR)
◊ 3-051-090-01 BUTTON (2P) (L75HFAR)
◊ 3-051-293-01 BUTTON (POWER.EJECT) (L45AR)
20
21
21
21
22
3-960-936-01 SPRING
◊ 3-051-091-01 BUTTON (PAUSE) (L75HFAR)
◊ 3-051-294-01 BUTTON (PAUSE) (L45AR)
3-974-744-01 BUTTON (PAUSE) (L65HFAR)
◊ 3-051-092-01 BUTTON (REC) (L75HFAR)
22
22
23
23
23
◊ 3-051-295-01
3-974-745-01
◊ 3-051-095-01
◊ 3-051-298-01
◊ 3-974-749-01
24
24
24
25
26
◊ 3-051-094-01 BUTTON (PLAY.STOP) (L75HFAR)
◊ 3-974-748-01 BUTTON (PLAY.STOP) (L65HFAR)
◊ 3-051-297-01 BUTTON (PLAY.STOP) (L45AR)
3-709-128-01 COVER, BATTERY (L45AR,L65HFAR)
1-475-752-11 COMMANDER, STANDARD (RMT-V241)
(L75HFAR)
27
1-475-753-11 COMMANDER, STANDARD (RMT-V242)
(L45AR,L65HFAR)
3-709-395-01 COVER (V241) (L75HFAR)
28
7-1
BUTTON (REC) (L45AR)
BUTTON (REC) (L65HFAR)
BUTTON (FF.REW) (L75HFAR)
BUTTON (FF.REW) (L45AR)
BUTTON (FF.REW) (L65HFAR)
7-2.MECHANISM PARTS-1
62
77
63
72
61
75
64
62
71
not
supplied
65
67
78
79
107 105
88
102
103
#4
102
97
101 99
94
#4
110
95
#4
not supplied
58
123
122
#4
104
111 117
121
51
91 93
92
87
78
98
81
96
100
124
54
53
52
90
103
109
125
56
55
53
89
80
104
108
57
73
106
68
59
84
81
82
83
80
60
86
74
66
70
69
85
76
112
113
114
120
119
116
118
7-2
115
Ref. No.
–––––––
51
52
53
54
55
Part No.
–––––––
3-746-760-01
1-698-912-11
3-746-761-01
1-698-913-11
3-735-738-01
Description
––––––––––
SCREW (2.3X6), SPECIAL
MOTOR, ROTOR CYL DC 2W
SCREW (2.3X10), SPECIAL
MOTOR, STATOR CYL DC 2W
SPACER, MOTOR
56
56
57
57
58
59
3-966-785-01
3-976-272-01
3-966-786-01
3-976-273-01
A-8316-756-A
3-960-915-01
CYLINDER LWR (L45AR)
CYLINDER LWR (L65HFAR/L75HFAR)
CYLINDER UPR (L45AR)
CYLINDER UPR (L65HFAR/L75HFAR)
CLUTCH MOUNT BOARD, COMPLETE
LEVER, DOOR OPENER
60
* 61
62
63
* 64
3-960-954-01
3-960-952-01
3-960-939-01
3-965-758-01
A-6779-276-A
FRAME, UNDER
STAND (L)
SCREW (2.6X6), SPECIAL
PAD
MECHANICAL ASSY, CASSETTE
65
66
67
68
* 69
3-961-302-01
3-961-301-01
3-961-303-01
3-960-959-01
3-960-916-01
70
71
72
73
74
Ref. No.
–––––––
87
88
89
90
91
92
Part No.
–––––––
3-961-015-01
3-961-014-01
3-961-024-01
3-961-026-01
3-973-490-01
3-961-027-01
Description
––––––––––
SPRING, CAPSTAN BRAKE
BRAKE ASSY, CAPSTAN
LEVER ASSY, PINCH ROLLER
SPRING, PINCH ROLLER
MOUNT, LIFT PINCH
CAM, LIFT PINCH
93
94
95
96
97
3-961-030-01
3-961-029-01
3-961-028-01
3-961-045-01
3-961-044-01
SCREW (2.6X16), SPECIAL
OPENER MOUNT
GEAR, CAM PINCH
NUT (3X3), SPECIAL
SPRING, L GUIDE LEVER
98
99
* 100
101
102
3-966-764-01
3-964-886-01
3-970-884-01
3-740-367-01
3-960-951-01
LEVER ASSY, ROAD
LEVER (ASSY), ACT L GUIDE
MOUNT (ASSY), T INC LINE
WASHER, SLIT
SCREW (2.6X10), SPECIAL
LEVER, RELEASE
SPRING, LID OPENER
SPRING, LOCK TRAY
GEAR, LOCK
HOLDER, GEAR
103
104
105
106
107
3-970-880-01
1-810-691-11
3-960-927-01
3-961-002-01
3-961-003-01
CATCHER
PHOTO DIODE PN263L-NC
GEAR, S REEL
LEVER, S SOFT
SPRING, S SOFT
3-960-960-01
3-960-977-01
3-963-789-01
3-961-016-01
3-971-997-01
GEAR, PINION
SPRING, BT
BAND (ASSY), BRAKE
LEVER ASSY, BT
HEAD, FULL ERASE
108
109
110
111
112
3-961-023-01
3-961-022-01
1-810-690-11
1-801-326-11
3-961-305-01
SPRING, EP SWITCH
LEVER, EP SWITCH
LED LN59L
PHOTO COUPLER SG-105F
GEAR, FRONT RACK
75
76
77
78
79
3-960-984-01
3-977-067-01
A-6779-889-A
3-735-630-01
3-978-528-01
SCREW (2.6X10), SPECIAL
CLEANER (ASSY)
LEVER ASSY BOARD, COMPLETE
ROLLER ASSY, GUIDE
REEL (ASSY), SUPPLY
113
114
115
116
117
3-961-306-01
3-961-307-01
3-961-021-01
3-961-001-01
3-963-784-01
GEAR, START RACK
SPRING, FRONT RACK
SCREW (2.6X6), SPECIAL
SPRING, T SOFT
BRAKE (ASSY), SOFT
80
81
* 82
83
84
3-735-754-01
3-961-038-01
3-970-883-01
3-963-782-01
3-961-008-01
WASHER (DIA.3), ADJUSTMENT
SCREW (2X3), SPECIAL
MOUNT (ASSY), S INC LINE
REEL (ASSY), TAKE UP
SLIDE, T ACT BRAKE
118
119
120
121
122
3-191-422-01
3-948-603-01
3-960-926-01
3-960-928-01
3-963-786-01
SCREW (2.6X5.5), SPECIAL
WASHER, SPECIAL
PULLEY, REEL
GEAR, T REEL
BRAKE (ASSY), T
123
124
125
3-966-765-01 SPRING, BRAKE
3-963-785-01 BRAKE (ASSY), S
3-960-925-01 SCREW (2.6X4), SPECIAL
85
86
Remark
–––––––
3-966-763-01 SCREW (2.6X12)
A-6779-797-A HEAD ASSY, R/P ACE
7-3
Remark
––––––
7-3.MECHANISM PARTS-2
166
169
168
163
173
166
167
170
172
165
162
174
164
171
158
157
166
175
180
176
159
181
178
161
179
160
182
177
156
155
183
185
184
154
153
not supplied
152
186
151
Ref. No.
–––––––
Part No.
–––––––
Description
––––––––––
151
152
153
154
155
3-961-032-01
3-961-047-01
3-961-049-01
3-961-048-01
3-961-050-01
SCREW (2.6X6), SPECIAL
MOTOR ASSY, LOADING
DAMPER
GEAR (COMPL), WORM
GEAR (1), WHEEL
156
157
158
159
160
3-963-793-01
3-963-794-01
3-973-491-01
3-963-780-01
3-961-034-01
161
162
163
164
165
3-961-011-01
3-963-788-01
3-963-787-01
3-961-013-01
3-961-012-01
166
167
3-960-921-01 SCREW (2.6X6), SPECIAL
3-974-757-01 RETAINER, CAPSTAN
Remark
–––––––
Ref. No.
–––––––
168
169
* 170
171
172
* 173
Part No.
–––––––
3-960-929-01
1-763-142-11
A-6796-534-A
3-960-925-01
3-963-796-01
3-963-795-01
Description
––––––––––
BELT, REEL
MOTOR, CAPSTAN DC3W
MC-1 BOARD, COMPLETE
SCREW (2.6X4), SPECIAL
MOUNT, CRESCENT
SLIDE, CRESCENT
GEAR (2), WHEEL
CAM, MAIN
WASHER (3.6X0.5), SPECIAL
SWITCH (P-IT), MODE
SCREW (2.6X8), SPECIAL
174
175
176
177
178
A-6779-673-A
3-960-998-01
3-961-035-01
3-970-882-01
3-970-879-01
GEAR ASSY, T ROAD BOARD, COMPLETE
GEAR, T ROAD
SPRING, T ROAD
LEVER (ASSY), T ROAD
GROUND (ASSY), CYL
SPRING, BRAKE RETURN
BAR (ASSY), ACT BRAKE LEVER
LEVER, CONTROL BRAKE
SPRING, CLUTCH CHANGE
LEVER, CLUTCH CHANGE
179
180
181
182
183
A-6779-672-A
3-960-995-01
3-960-996-01
3-970-881-01
3-960-982-01
GEAR ASSY, S ROAD BOARD, COMPLETE
GEAR, S ROAD
SPRING, S ROAD
LEVER (ASSY), S ROAD
LEVER ASSY, BT SPRING
184
185
186
3-963-783-01 GEAR (ASSY), FRICTION
3-735-755-01 WASHER (DIA.2.6)
3-961-007-01 SLIDE, S ACT BRAKE
7-4 E
Remark
––––––
SLV-L45AR/L65HFAR/L75HFAR
SECTION 8
ELECTRICAL PARTS LIST
NOTE :
r Due to standardization, replacements in the
parts list may be different from the parts specified in the diagrams or the components used on
the set.
r -XX, -X mean standardized parts, so they may
have some difference from the original one.
r RESISTORS
All resistors are in ohms
METAL : Metal-film resistor
METAL OXIDE :Metal oxide-film resistor
F : nonflammable
r Items marked “ * ”are not stocked since they
are seldom required for routine service. Some
delay should be anticipated when ordering these
items.
Ref. No.
–––––––
*
◊
*
◊
*
◊
Part No.
–––––––
A-6794-549-A
A-6794-557-A
A-6794-564-A
CP-A
r SEMICONDUCTORS
In each case, u : µ , for example :
uA.... : µ A.... , uPA.... : µ PA....
uPB.... : µ PB.... , uPC.... : µ PC....
uPD.... : µ PD....
r CAPACITORS
uF : µ F
r COILS
uH : µ H
r The parts marked with a ◊ are special parts for
Argentina and are supplied by SONY ARGENTINA.
Description
Remark
––––––––––
–––––––
CP-A BOARD, COMPLETE (L75HFAR)
CP-A BOARD, COMPLETE (L65HFAR)
CP-A BOARD, COMPLETE (L45AR)
*********************
The components identified by mark !
or dotted line with mark ! are critical
for safety.
Replace only with part number specified.
When indicating parts by reference
number, please include the board.
The CP-A board and CP-1 board
are identical.
Ref. No.
–––––––
C1042
C1044
C1046
C1049
C1071
Part No.
–––––––
1-162-209-31
1-164-004-11
1-162-211-31
1-162-203-31
1-126-935-11
Description
––––––––––
CERAMIC
CERAMIC CHIP
CERAMIC
CERAMIC
ELECT
27PF
0.1uF
33PF
15PF
470uF
5%
10%
5%
5%
20%
Remark
––––––
50V
25V
50V
50V
6.3V
C1072
C1073
C1074
C1075
C1080
1-126-154-11
1-164-159-21
1-162-600-11
1-162-294-31
1-162-294-31
ELECT
CERAMIC
CERAMIC
CERAMIC
CERAMIC
47uF
0.1uF
0.0047uF
0.001uF
0.001uF
20%
20%
10%
10%
6.3V
50V
16V
50V
50V
C1101
C1102
C1103
C1104
C1105
1-126-301-11
1-126-154-11
1-164-004-11
1-102-129-00
1-102-129-00
ELECT
ELECT
CERAMIC CHIP
CERAMIC
CERAMIC
1uF
47uF
0.1uF
10000PF
10000PF
20%
20%
10%
10%
10%
50V
6.3V
25V
50V
50V
C1106
C1107
C1108
C1110
C1112
1-102-129-00
1-102-129-00
1-164-004-11
1-162-294-31
1-164-004-11
CERAMIC
CERAMIC
CERAMIC CHIP
CERAMIC
CERAMIC CHIP
10000PF
10000PF
0.1uF
0.001uF
0.1uF
10%
10%
10%
10%
10%
50V
50V
25V
50V
25V
C1113
C1114
C2001
C2002
C2003
1-162-209-11
1-164-004-11
1-124-257-00
1-163-009-11
1-102-129-00
CERAMIC
CERAMIC CHIP
ELECT
CERAMIC CHIP
CERAMIC
27PF
0.1uF
2.2uF
0.001uF
10000PF
10%
20%
10%
10%
25V
50V
50V
50V
C2004
C2005
C2006
C2007
C2008
1-111-241-11
1-124-259-11
1-164-004-11
1-124-259-11
1-164-004-11
ELECT
ELECT
CERAMIC CHIP
ELECT
CERAMIC CHIP
10uF
4.7uF
0.1uF
4.7uF
0.1uF
20%
20%
10%
20%
10%
16V
50V
25V
50V
25V
C2009
C2010
C2011
C2012
C2013
1-124-259-11
1-124-229-00
1-124-638-11
1-164-004-11
1-102-128-00
ELECT
ELECT
ELECT
CERAMIC CHIP
CERAMIC
4.7uF
33uF
22uF
0.1uF
0.0082uF
20%
20%
20%
10%
10%
50V
10V
10V
25V
50V
C2014
C2015
C2016
1-111-241-11 ELECT
1-102-128-21 CERAMIC
1-164-004-11 CERAMIC CHIP
10uF
20%
0.0082uF 10%
0.1uF
10%
C2017
1-162-294-31 CERAMIC
0.001uF
10%
C2018
1-164-004-11 CERAMIC CHIP
0.1uF
10%
C2021
C2022
1-164-087-11 CERAMIC
1-162-293-31 CERAMIC
0.0015uF 10%
820PF
10%
1-533-583-11 HOLDER, FUSE
< CAPACITOR >
C1001
C1002
C1003
C1004
C1005
1-126-301-11
1-111-241-11
1-126-154-11
1-164-004-11
1-126-154-11
ELECT
ELECT
ELECT
CERAMIC CHIP
ELECT
1uF
10uF
47uF
0.1uF
47uF
20%
20%
20%
10%
20%
50V
16V
6.3V
25V
6.3V
C1006
C1007
C1008
C1009
C1010
1-164-004-11
1-126-301-11
1-126-301-11
1-126-301-11
1-102-976-91
CERAMIC CHIP
ELECT
ELECT
ELECT
CERAMIC
0.1uF
1uF
1uF
1uF
180PF
10%
20%
20%
20%
5%
25V
50V
50V
50V
50V
C1011
C1012
C1013
C1014
C1015
1-162-288-31
1-162-219-31
1-124-638-11
1-102-129-00
1-162-211-31
CERAMIC
CERAMIC
ELECT
CERAMIC
CERAMIC
330PF
68PF
22uF
10000PF
33PF
10%
5%
20%
10%
5%
50V
50V
10V
50V
50V
C1016
C1017
C1018
C1019
C1021
1-102-129-00
1-163-063-00
1-130-490-11
1-126-301-11
1-161-059-00
CERAMIC
CERAMIC CHIP
MYLAR
ELECT
CERAMIC
10000PF
0.022uF
0.039uF
1uF
0.047uF
10%
10%
5%
20%
10%
50V
50V
50V
50V
50V
C1022
C1023
C1024
C1025
C1026
1-126-301-11
1-161-059-00
1-164-004-11
1-102-129-00
1-126-301-11
ELECT
CERAMIC
CERAMIC CHIP
CERAMIC
ELECT
1uF
0.047uF
0.1uF
10000PF
1uF
20%
10%
10%
10%
20%
50V
50V
25V
50V
50V
C1027
C1028
C1029
C1030
C1031
1-161-059-00
1-126-301-11
1-126-154-11
1-164-004-11
1-102-129-00
CERAMIC
ELECT
ELECT
CERAMIC CHIP
CERAMIC
0.047uF
1uF
47uF
0.1uF
10000PF
10%
20%
20%
10%
10%
50V
50V
6.3V
25V
50V
C1032
C1033
C1037
1-126-301-11 ELECT
1-126-301-11 ELECT
1-126-301-11 ELECT
1uF
1uF
1uF
C1040
C1041
1-111-241-11 ELECT
1-163-099-00 CERAMIC CHIP
10uF
18PF
20%
50V
20%
50V
20%
50V
(L45AR ,L75HFAR)
20%
16V
5%
50V
8-1
16V
50V
25V
(L45AR)
50V
25V
(L45AR)
50V
50V
CP-A
Ref. No.
–––––––
C2023
C2024
C2025
Part No.
–––––––
1-161-049-00
1-162-305-11
1-124-589-11
Description
––––––––––
CERAMIC
CERAMIC
ELECT
0.0068uF 10%
0.0068uF 20%
47uF
20%
C2026
C2030
C2031
C2048
C2072
C2201
1-130-973-00
1-126-154-11
1-164-004-11
1-124-589-11
1-163-009-11
1-126-301-11
FILM
ELECT
CERAMIC CHIP
ELECT
CERAMIC CHIP
ELECT
0.022uF
47uF
0.1uF
47uF
0.001uF
1uF
C2301
1-111-241-11 ELECT
C2302
1-111-241-11 ELECT
C2303
1-161-494-00 CERAMIC
C2304
1-161-494-00 CERAMIC
C2305
1-163-017-00 CERAMIC CHIP
C2306
1-163-017-00 CERAMIC CHIP
C2307
1-124-455-00 ELECT
C2308
1-124-455-00 ELECT
C2309
1-164-087-11 CERAMIC
C2310
1-164-087-11 CERAMIC
C2313
1-102-129-00 CERAMIC
C2318
1-161-327-00 CERAMIC
C2321
1-124-831-11 ELECT
C2323
1-124-455-00 ELECT
C2324
1-124-589-11 ELECT
C2325
1-161-494-00 CERAMIC
C2326
1-102-129-00 CERAMIC
C2327
1-124-589-11 ELECT
C2328
1-124-589-11 ELECT
C2331
1-102-129-00 CERAMIC
C2332
1-124-455-00 ELECT
C2380
1-111-241-11 ELECT
C2389
1-163-009-11 CERAMIC CHIP
C2397
1-111-241-11 ELECT
Remark
–––––––
50V
16V
16V
Ref. No.
–––––––
C2398
C3001
C3002
C3003
1-102-129-00 CERAMIC
1-102-129-00 CERAMIC
1-102-129-00 CERAMIC
Remark
––––––
20%
16V
(L65HFAR,L75HFAR)
10000PF 10%
50V
10000PF 10%
50V
10000PF 10%
50V
C3005
C3006
C3010
C3011
C3012
1-117-754-11
1-124-589-11
1-161-375-11
1-115-437-11
1-124-638-11
CERAMIC
ELECT
CERAMIC
CAPACITOR
ELECT
3900PF
47uF
20%
0.0022uF 10%
0.1uF
22uF
20%
50V
16V
50V
5.5V
10V
C3013
C3014
C3015
C3016
C3017
1-164-004-11
1-126-155-11
1-124-638-11
1-162-286-31
1-126-301-11
CERAMIC CHIP
ELECT
ELECT
CERAMIC
ELECT
0.1uF
100uF
22uF
220PF
1uF
10%
20%
20%
10%
20%
25V
6.3V
10V
50V
50V
C3018
C3019
C3020
C3021
C3026
1-126-301-11
1-126-301-11
1-164-004-11
1-163-009-11
1-109-889-11
ELECT
ELECT
CERAMIC CHIP
CERAMIC CHIP
ELECT
1uF
1uF
0.1uF
0.001uF
1uF
20%
20%
10%
10%
20%
50V
50V
25V
50V
50V
C3027
C3029
C3030
C3032
C3033
1-126-155-11
1-126-916-11
1-164-004-11
1-164-073-11
1-126-176-11
ELECT
ELECT
CERAMIC CHIP
CERAMIC
ELECT
100uF
1000uF
0.1uF
100PF
220uF
20%
20%
10%
10%
20%
6.3V
6.3V
25V
50V
10V
C3034
C3035
C3039
C3041
C3042
1-126-301-11
1-164-004-11
1-126-154-11
1-164-159-21
1-163-099-00
ELECT
CERAMIC CHIP
ELECT
CERAMIC
CERAMIC CHIP
1uF
0.1uF
47uF
0.1uF
18PF
20%
10%
20%
50V
25V
6.3V
50V
50V
4.7uF
C3043
C3044
C3045
C3046
C3047
1-163-099-00
1-163-093-00
1-163-093-00
1-164-004-11
1-163-021-11
CERAMIC CHIP
CERAMIC CHIP
CERAMIC CHIP
CERAMIC CHIP
CERAMIC CHIP
18PF
10PF
10PF
0.1uF
0.01uF
0.022uF
C3048
C3050
C3051
C3052
C3053
1-102-129-00
1-161-061-11
1-161-494-11
1-161-772-11
1-102-129-00
CERAMIC
CERAMIC
CERAMIC
CERAMIC
CERAMIC
10000PF
0.068uF
0.022uF
0.1uF
10000PF
10%
10%
10%
10%
10%
50V
50V
50V
25V
50V
C3054
C3055
C3056
C3060
C3061
1-102-129-00
1-111-241-11
1-164-004-11
1-164-004-11
1-124-257-00
CERAMIC
ELECT
CERAMIC CHIP
CERAMIC CHIP
ELECT
10000PF
10uF
0.1uF
0.1uF
2.2uF
10%
20%
10%
10%
20%
50V
16V
25V
25V
50V
C3076
C3077
C3080
C3081
C3082
1-163-093-00
1-163-093-00
1-164-159-21
1-164-159-21
1-102-129-21
CERAMIC CHIP
CERAMIC CHIP
CERAMIC
CERAMIC
CERAMIC
10PF
10PF
0.1uF
0.1uF
0.01uF
5%
5%
10%
50V
50V
50V
50V
50V
C3083
C3084
C3101
C3107
! C5001
1-102-129-21
1-102-129-21
1-163-009-11
1-111-241-11
1-136-188-11
CERAMIC
CERAMIC
CERAMIC CHIP
ELECT
FILM
0.01uF
0.01uF
0.001uF
10uF
0.068uF
10%
10%
10%
20%
5%
50V
50V
50V
16V
250V
! C5002
1-136-188-11 FILM
0.068uF
5%
250V
5%
100V
20%
6.3V
10%
25V
20%
16V
10%
50V
20%
50V
(L65HFAR,L75HFAR)
10uF
20%
16V
(L65HFAR,L75HFAR)
10uF
20%
16V
(L65HFAR,L75HFAR)
0.022uF
25V
(L65HFAR,L75HFAR)
0.022uF
25V
(L65HFAR,L75HFAR)
0.0047uF 5%
50V
(L65HFAR,L75HFAR)
0.0047uF 5%
50V
(L65HFAR,L75HFAR)
100uF
20%
16V
(L65HFAR,L75HFAR)
100uF
20%
16V
(L65HFAR,L75HFAR)
0.0015uF 10%
50V
(L65HFAR,L75HFAR)
0.0015uF 10%
50V
(L65HFAR,L75HFAR)
10000PF 10%
50V
(L65HFAR,L75HFAR)
0.0033uF 30%
50V
(L65HFAR,L75HFAR)
20%
25V
(L65HFAR,L75HFAR)
100uF
20%
16V
(L65HFAR,L75HFAR)
47uF
20%
16V
(L65HFAR,L75HFAR)
25V
(L65HFAR,L75HFAR)
10000PF 10%
50V
(L65HFAR,L75HFAR)
47uF
20%
16V
(L65HFAR,L75HFAR)
20%
16V
(L65HFAR,L75HFAR)
10000PF 10%
50V
(L65HFAR,L75HFAR)
100uF
20%
16V
(L65HFAR,L75HFAR)
Part No.
Description
–––––––
––––––––––
1-111-241-11 ELECT
10uF
5%
5%
50V
5%
50V
5%
50V
10%
25V
10%
50V
(L65HFAR,L75HFAR)
47uF
10uF
20%
16V
(L65HFAR,L75HFAR)
0.001uF 10%
50V
(L65HFAR,L75HFAR)
10uF
20%
16V
(L65HFAR,L75HFAR)
When indicating parts by reference
number, please include the board.
8-2
The components identified by mark !
or dotted line with mark ! are critical
for safety.
Replace only with part number specified.
CP-A
Ref. No.
–––––––
! C5005
! C5007
C5010
C5011
Part No.
–––––––
1-115-383-11
1-115-383-11
1-125-554-11
1-124-259-11
Description
––––––––––
CERAMIC
CERAMIC
ELECT(BLOCK)
ELECT
0.001uF
0.001uF
47uF
4.7uF
C5012
C5015
C5017
C5020
C5021
1-110-974-11
1-161-772-11
1-102-822-00
1-115-678-11
1-110-973-11
CERAMIC
CERAMIC
CERAMIC
CERAMIC
CERAMIC
3300PF
0.1uF
390PF
47PF
2200PF
C5025
C5101
C5102
C5103
C5104
1-115-678-11
1-126-926-11
1-126-916-11
1-126-935-11
1-124-525-11
CERAMIC
ELECT
ELECT
ELECT
ELECT
47PF
1000uF
1000uF
470uF
1000uF
20%
20%
20%
20%
1KV
10V
6.3V
16V
25V
C5105
C5106
C5107
C5111
C5112
1-124-910-11
1-126-947-11
1-126-176-11
1-124-455-00
1-111-241-11
ELECT
ELECT
ELECT
ELECT
ELECT
47uF
47uF
220uF
100uF
10uF
20%
20%
20%
20%
20%
50V
35V
10V
16V
16V
C5113
C5114
C5115
C5117
C5124
1-126-162-11
1-111-241-11
1-111-241-11
1-126-162-11
1-124-464-11
ELECT
ELECT
ELECT
ELECT
ELECT
3.3uF
10uF
10uF
3.3uF
0.22uF
20%
20%
20%
20%
20%
C5135
C6001
C6002
C6009
C6010
1-136-163-00
1-111-241-11
1-164-004-11
1-124-589-11
1-164-004-11
FILM
ELECT
CERAMIC CHIP
ELECT
CERAMIC CHIP
0.068uF
10uF
0.1uF
47uF
0.1uF
C6012
C6015
C6020
1-164-081-11 CERAMIC
1-126-965-11 ELECT
1-111-241-11 ELECT
C6032
5%
5%
20%
20%
Remark
–––––––
250V
250V
400V
50V
Ref. No.
–––––––
C6318
Part No.
Description
–––––––
––––––––––
1-115-674-11 CAPACITOR
Remark
––––––
10V
(L65HFAR,L75HFAR)
4.7uF
20%
50V
(L65HFAR,L75HFAR)
0.0027uF 5%
50V
(L65HFAR,L75HFAR)
10uF
C6319
1-126-163-11 ELECT
C6320
1-130-476-00 MYLAR
C6321
1-126-155-11 ELECT
C6322
1-102-129-00 CERAMIC
C6323
1-126-154-11 ELECT
C6324
1-124-465-00 ELECT
C6325
1-126-301-11 ELECT
C6326
1-136-967-11 MYLAR
C6327
1-161-048-00 CERAMIC
50V
16V
16V
50V
50V
C6391
1-162-280-11 CERAMIC
0.0056uF 10%
50V
(L65HFAR,L75HFAR)
82PF
10%
50V
C6392
1-162-280-11 CERAMIC
82PF
5%
20%
10%
20%
10%
50V
16V
25V
16V
25V
! CN501
470PF
22uF
10uF
10%
20%
20%
1-161-052-00 CERAMIC
0.012uF
10%
50V
50V
16V
(L45AR)
50V
(L45AR)
C6033
1-161-052-00 CERAMIC
0.012uF
10%
C6044
C6301
1-164-004-11 CERAMIC CHIP
1-124-465-00 ELECT
C6302
1-126-163-11 ELECT
4.7uF
C6305
1-126-163-11 ELECT
4.7uF
C6306
1-126-163-11 ELECT
4.7uF
C6308
1-126-163-11 ELECT
4.7uF
C6313
1-161-059-00 CERAMIC
C6314
1-126-163-11 ELECT
C6315
1-126-163-11 ELECT
4.7uF
C6316
1-115-673-11 CAPACITOR
3.3uF
C6317
1-126-301-11 ELECT
1uF
10%
5%
500V
25V
50V
1KV
500V
100uF
20%
6.3V
(L65HFAR,L75HFAR)
10000PF 10%
50V
(L65HFAR,L75HFAR)
47uF
20%
6.3V
(L65HFAR,L75HFAR)
0.47uF
20%
50V
(L65HFAR,L75HFAR)
1uF
20%
50V
(L65HFAR,L75HFAR)
0.012uF 5%
50V
(L65HFAR,L75HFAR)
10%
50V
< CONNECTOR >
1-251-483-11 SOCKET, AC INLET
< DIODE >
D1071
D1072
D1201
D2201
D2301
8-719-991-33
8-719-991-33
8-719-991-33
8-719-991-33
8-719-991-33
DIODE
DIODE
DIODE
DIODE
DIODE
1SS133T-77
1SS133T-77
1SS133T-77
1SS133T-77 (L65HFAR,L75HFAR)
1SS133T-77 (L65HFAR,L75HFAR)
D2302
D2303
D3001
D3002
D3003
8-719-991-33
8-719-110-23
8-719-986-73
8-719-986-73
8-719-986-73
DIODE
DIODE
DIODE
DIODE
DIODE
1SS133T-77 (L65HFAR,L75HFAR)
RD11ES-B3 (L65HFAR,L75HFAR)
RB441Q
RB441Q
RB441Q
D3005
D3006
D3009
D3011
D3012
8-719-991-33
8-719-991-33
8-719-109-92
1-810-238-11
1-810-238-11
DIODE
DIODE
DIODE
DIODE
DIODE
1SS133T-77
1SS133T-77
RD6.2ES-B1
ERA83-004V5
ERA83-004V5
D5001
D5003
D5004
D5006
D5010
1-801-763-11
8-719-901-83
8-719-983-22
8-719-901-83
1-808-898-11
DIODE
DIODE
DIODE
DIODE
DIODE
DB155G-S
1SS83
MTZJ-T-77-27A
1SS83
AP0IC-V0
D5012
! D5013
D5101
D5102
D5103
1-803-252-11
1-810-884-11
1-810-795-11
1-803-251-11
8-719-901-83
DIODE
DIODE
DIODE
DIODE
DIODE
ZENER 1.5KE 120A
PHOTO COUPLER PC123U2
RL2Z-LF-C4
SF-24
1SS83
D5104
D5105
D5107
D5108
D5109
8-719-901-83
1-801-991-11
8-719-109-89
8-719-109-89
8-719-109-89
DIODE
DIODE
DIODE
DIODE
DIODE
1SS83
DI SFT14
RD5.6ES-B2
RD5.6ES-B2
RD5.6ES-B2
50V
(L45AR)
0.1uF
10%
25V
0.47uF
20%
50V
(L65HFAR,L75HFAR)
20%
50V
(L65HFAR,L75HFAR)
20%
50V
(L65HFAR,L75HFAR)
20%
50V
(L65HFAR,L75HFAR)
20%
50V
(L65HFAR,L75HFAR)
0.047uF 10%
50V
(L65HFAR,L75HFAR)
4.7uF
20%
50V
(L65HFAR,L75HFAR)
20%
50V
(L65HFAR,L75HFAR)
16V
(L65HFAR,L75HFAR)
20%
50V
(L65HFAR,L75HFAR)
When indicating parts by reference
number, please include the board.
8-3
The components identified by mark !
or dotted line with mark ! are critical
for safety.
Replace only with part number specified.
CP-A
Ref. No.
–––––––
D5111
D5116
D5117
D5125
D5126
D5127
D5128
D6001
Part No.
–––––––
8-719-109-93
8-719-300-45
8-719-110-49
8-719-300-45
8-719-300-45
Description
––––––––––
DIODE
RD6.2ES-B2
DIODE
EM-1Z
DIODE
RD18ES-B2
DIODE
EM-1Z
DIODE
EM-1Z
8-719-300-45 DIODE
8-719-300-45 DIODE
8-719-982-26 DIODE
Remark
–––––––
Ref. No.
–––––––
Q1003
Q1071
Q1101
Part No.
–––––––
1-801-259-11
8-729-993-72
1-801-259-11
Description
––––––––––
TRANSISTOR
TRANSISTOR
TRANSISTOR
TR 2SA1782S
2SA937-Q
TR 2SA1782S
Q1102
Q1201
Q1202
Q2021
Q2022
8-729-902-11
8-729-900-33
8-729-900-33
1-810-471-11
8-729-873-40
TRANSISTOR
TRANSISTOR
TRANSISTOR
TRANSISTOR
TRANSISTOR
2SC2021
DTC144EF
DTC144EF
TR 2SC3331-S-AA
2SD734-E
Q2023
Q2024
Q2025
Q2031
Q2032
1-810-880-11
1-810-471-11
1-810-471-11
8-729-900-33
8-729-030-02
TRANSISTOR
TRANSISTOR
TRANSISTOR
TRANSISTOR
TRANSISTOR
TR 2SA1318-S
TR 2SC3331-S-AA
TR 2SC3331-S-AA
DTC144EF
DTC144ES
Q2201
8-729-900-33 TRANSISTOR
Q2202
1-809-235-11 TRANSISTOR
Q2203
8-729-900-74 TRANSISTOR
Q2302
8-729-140-97 TRANSISTOR
KSA708
Q2303
8-729-140-97 TRANSISTOR
KSA708
Q2351
8-729-900-74 TRANSISTOR
(L65HFAR,L75HFAR)
DTC143TS
(L65HFAR,L75HFAR)
Q2352
8-729-900-74 TRANSISTOR
Q3007
Q3101
! Q5001
8-729-194-57 TRANSISTOR
1-801-259-11 TRANSISTOR
8-729-027-98 TRANSISTOR
DTC143TS
(L65HFAR,L75HFAR)
2SC945-P
TR 2SA1782S
2SK1460LS
Q5002
Q5003
Q5004
Q5101
Q5102
1-809-602-11
8-729-140-97
1-809-602-11
1-801-334-11
8-729-205-97
TRANSISTOR
TRANSISTOR
TRANSISTOR
TRANSISTOR
TRANSISTOR
2SC2274-F-AA
KSA708
2SC2274-F-AA
2SC5070
2SC3668-Y
Q5103
Q5131
Q5132
Q5133
Q5134
8-729-194-57
8-729-205-97
8-729-901-06
8-729-027-43
1-801-878-11
TRANSISTOR
TRANSISTOR
TRANSISTOR
TRANSISTOR
TRANSISTOR
2SC945-P
2SC3668-Y
DTA144EK
DTC114EK-T96
TR 2SC4640S
Q6001
1-801-259-11 TRANSISTOR
EM-1Z
EM-1Z
MTZJ-33B
< FUSE >
! F5001
1-532-297-00 QUICK-ACTING FUSE
250V
2.5A
< IC >
IC101
IC102
IC231
IC301
IC302
1-803-083-11
1-801-758-11
1-803-077-11
1-803-341-11
8-759-353-59
IC
IC
IC
IC
IC
LA71501DML
LC89978M
BH7801AK (L65HFAR,L75HFAR)
MN101D01FAF
LB1643
IC303
IC304
IC341
IC341
IC511
1-801-760-11
1-803-250-11
1-801-341-11
8-759-381-49
8-759-140-85
IC
IC
IC
IC
IC
LA6358NM
BMR03H-04
24LC01B/P (L65HFAR,L75HFAR)
AT24C01A-10PC (L45AR)
uPC1093J
IC631
8-752-053-35 IC
* JK222
CXA1534S (L65HFAR,L75HFAR)
1-251-592-11 SOCKET, RCA-2 (440) (VIDEO IN/OUT)
1-785-500-11 SOCKET, RCA-2 (AUDIO IN/OUT) (L45AR)
1-251-593-11 SOCKET, RCA-2 (330) (AUDIO IN/OUT(L))
(L65HFAR,L75HFAR)
1-251-594-11 SOCKET, RCA-2 (220) (AUDIO IN/OUT(R))
(L65HFAR,L75HFAR)
< COIL >
L1002
L1003
L1007
L1101
L2021
1-410-517-11
1-410-519-11
1-410-509-11
1-410-509-11
1-410-509-11
L3003 1-414-540-11
L3004 1-414-540-11
L3005 1-414-540-11
* L5001!1-411-767-11
L5010 1-414-540-11
L5101
L5102
L5109
L6001
L6090
1-414-540-11
1-414-540-11
1-500-225-11
1-410-511-11
1-414-540-11
INDUCTOR
INDUCTOR
INDUCTOR
INDUCTOR
INDUCTOR
47uH
68uH
10uH
10uH
10uH
INDUCTOR
INDUCTOR
INDUCTOR
FILTER, LINE
INDUCTOR
0uH
0uH
0uH
INDUCTOR
INDUCTOR
FERRITE
INDUCTOR
INDUCTOR
0uH
0uH
0uH
15uH
0uH
< RESISTOR >
1-533-613-11 PROTECTOR, IC 0.8A 50V
1-801-567-11 PROTECTOR 1.25A 125V
< TRANSISTOR >
Q1001
Q1002
1-801-259-11 TRANSISTOR
1-801-878-11 TRANSISTOR
TR 2SA1782S
0uH
< PROTECTOR >
! PR511
! PR512
DTC144EF
(L65HFAR,L75HFAR)
DTA144EL-TL2
(L65HFAR,L75HFAR)
DTC143TS
(L65HFAR,L75HFAR)
(L65HFAR,L75HFAR)
< JACK >
* JK101
JK221
* JK221
Remark
––––––
TR 2SA1782S
TR 2SC4640S
R1001
R1002
R1003
R1004
R1005
1-216-057-00
1-216-065-00
1-216-055-00
1-216-052-00
1-216-043-00
METAL CHIP
METAL CHIP
METAL CHIP
METAL CHIP
METAL CHIP
2.2K
4.7K
1.8K
1.3K
560
5%
5%
5%
5%
5%
1/10W
1/10W
1/10W
1/10W
1/10W
R1006
R1008
R1011
R1012
R1013
1-216-065-00
1-216-097-00
1-216-089-00
1-216-089-00
1-216-123-11
METAL CHIP
METAL CHIP
METAL CHIP
METAL CHIP
METAL CHIP
4.7K
100K
47K
47K
1.2M
5%
5%
5%
5%
5%
1/10W
1/10W
1/10W
1/10W
1/10W
R1014
R1015
R1016
R1017
1-216-055-00
1-216-071-00
1-216-055-00
1-249-412-11
METAL CHIP
METAL CHIP
METAL CHIP
CARBON
1.8K
8.2K
1.8K
390
5%
5%
5%
5%
1/10W
1/10W
1/10W
1/4W
When indicating parts by reference
number, please include the board.
8-4
The components identified by mark !
or dotted line with mark ! are critical
for safety.
Replace only with part number specified.
CP-A
Ref. No.
–––––––
R1018
Part No.
Description
–––––––
––––––––––
1-216-037-00 METAL CHIP
330
5%
Remark
–––––––
1/10W
Ref. No.
–––––––
R2051
Part No.
Description
–––––––
––––––––––
1-216-049-11 METAL CHIP
1K
R1019
R1021
R1022
R1024
R1025
1-216-041-11
1-216-121-00
1-216-125-00
1-216-015-00
1-216-025-00
METAL CHIP
METAL CHIP
METAL CHIP
METAL CHIP
METAL CHIP
470
1M
1.5M
39
100
5%
5%
5%
5%
5%
1/10W
1/10W
1/10W
1/10W
1/10W
R2072
R2073
R2301
1-216-047-00 METAL CHIP
1-249-435-11 CARBON
1-216-065-00 METAL CHIP
820
33K
4.7K
R1028
R1029
R1031
R1038
R1071
1-216-057-00
1-216-081-00
1-216-047-00
1-216-025-00
1-249-414-11
METAL CHIP
METAL CHIP
METAL CHIP
METAL CHIP
CARBON
2.2K
22K
820
100
560
5%
5%
5%
5%
5%
1/10W
1/10W
1/10W
1/10W
1/4W
R2302
1-216-065-00 METAL CHIP
4.7K
R2303
1-216-085-00 METAL CHIP
33K
R2304
1-216-085-00 METAL CHIP
33K
R1072
R1073
R1074
R1076
R1101
1-249-414-11
1-247-804-11
1-249-418-11
1-216-022-00
1-216-057-00
CARBON
CARBON
CARBON
METAL CHIP
METAL CHIP
560
75
1.2K
75
2.2K
5%
5%
5%
5%
5%
1/4W
1/4W
1/4W
1/10W
1/10W
R2305
1-208-810-11 RES,CHIP
15K
R2306
1-208-810-11 RES,CHIP
15K
R2307
1-216-085-00 METAL CHIP
33K
R1102
R1104
R1105
R1201
R1202
1-216-057-00
1-249-417-11
1-216-049-11
1-216-051-00
1-216-041-11
METAL CHIP
CARBON
METAL CHIP
METAL CHIP
METAL CHIP
2.2K
1K
1K
1.2K
470
5%
5%
5%
5%
5%
1/10W
1/4W
1/10W
1/10W
1/10W
R2308
1-208-810-11 RES,CHIP
15K
R2322
1-216-065-00 METAL CHIP
4.7K
R1203
R1301
R2001
R2002
R2003
1-216-065-00
1-216-089-11
1-216-065-00
1-216-677-11
1-216-677-11
METAL CHIP
METAL CHIP
METAL CHIP
METAL CHIP
METAL CHIP
4.7K
47K
4.7K
12K
12K
5%
5%
5%
0.5%
0.5%
1/10W
1/10W
1/10W
1/10W
1/10W
R2323
1-216-083-00 METAL CHIP
27K
R2324
1-216-083-00 METAL CHIP
27K
R2325
1-216-061-00 METAL CHIP
3.3K
R2004
R2005
R2006
R2007
R2008
1-216-109-00
1-216-035-00
1-216-065-00
1-216-677-11
1-216-063-00
METAL CHIP
METAL CHIP
METAL CHIP
METAL CHIP
METAL CHIP
330K
270
4.7K
12K
3.9K
5%
5%
5%
0.5%
5%
1/10W
1/10W
1/10W
1/10W
1/10W
R2326
1-216-061-00 METAL CHIP
3.3K
R2328
1-216-073-00 METAL CHIP
10K
R2009
R2010
R2011
1-216-129-00 METAL CHIP
1-216-083-00 METAL CHIP
1-216-071-00 METAL CHIP
2.2M
27K
8.2K
R2329
1-216-129-00 METAL CHIP
2.2M
R2335
1-216-069-11 RES,CHIP
6.8K
R2011
1-216-057-00 METAL CHIP
2.2K
R2336
1-216-053-00 METAL CHIP
1.5K
R2012
1-216-083-00 METAL CHIP
27K
R2337
1-216-053-00 METAL CHIP
1.5K
R2013
1-216-059-00 METAL CHIP
2.7K
5%
R2338
1-216-053-00 METAL CHIP
1.5K
R2341
1-216-065-00 METAL CHIP
4.7K
R2342
1-216-065-00 METAL CHIP
4.7K
5%
1/10W
(L45AR)
1/10W
1/10W
(L45AR)
1/10W
(L45AR)
1/10W
R2014
R2015
1-216-063-00 METAL CHIP
1-216-083-00 METAL CHIP
3.9K
27K
5%
5%
R2016
1-216-071-00 METAL CHIP
8.2K
5%
R2017
1-216-049-11 METAL CHIP
1K
R2371
1-216-045-00 METAL CHIP
680
R2021
R2022
R2023
R2024
R2025
1-216-083-00
1-216-055-00
1-216-049-11
1-216-017-00
1-249-381-11
METAL CHIP
METAL CHIP
METAL CHIP
METAL CHIP
CARBON
27K
1.8K
1K
47
1
5%
5%
5%
5%
5%
1/10W
1/10W
1/10W
1/10W
1/4W
R2378
1-216-047-00 METAL CHIP
820
R2379
1-216-039-00 METAL CHIP
390
R2026
R2027
R2028
R2029
R2030
1-216-057-00
1-216-057-00
1-216-031-00
1-216-073-00
1-216-081-00
METAL CHIP
METAL CHIP
METAL CHIP
METAL CHIP
METAL CHIP
R2380
1-216-039-00 METAL CHIP
390
2.2K
2.2K
180
10K
22K
5%
5%
5%
5%
5%
1/10W
1/10W
1/10W
1/10W
1/10W
R2382
1-216-085-00 METAL CHIP
33K
R3001
R3002
1-216-081-00 METAL CHIP
1-216-081-00 METAL CHIP
22K
22K
5%
1/10W
5%
1/10W
5%
1/10W
(L65HFAR,L75HFAR)
5%
1/10W
(L45AR)
5%
1/10W
(L45AR)
Remark
––––––
5%
1/10W
(L45AR)
5%
1/10W
5%
1/4W
5%
1/10W
(L65HFAR,L75HFAR)
5%
1/10W
(L65HFAR,L75HFAR)
5%
1/10W
(L65HFAR,L75HFAR)
5%
1/10W
(L65HFAR,L75HFAR)
1%
1/10W
(L65HFAR,L75HFAR)
1%
1/10W
(L65HFAR,L75HFAR)
5%
1/10W
(L65HFAR,L75HFAR)
1%
1/10W
(L65HFAR,L75HFAR)
5%
1/10W
(L65HFAR,L75HFAR)
5%
1/10W
(L65HFAR,L75HFAR)
5%
1/10W
(L65HFAR,L75HFAR)
5%
1/10W
(L65HFAR,L75HFAR)
5%
1/10W
(L65HFAR,L75HFAR)
5%
1/10W
(L65HFAR,L75HFAR)
5%
1/10W
(L65HFAR,L75HFAR)
5%
1/10W
(L65HFAR,L75HFAR)
5%
1/10W
(L65HFAR,L75HFAR)
5%
1/10W
(L65HFAR,L75HFAR)
5%
1/10W
(L65HFAR,L75HFAR)
5%
1/10W
(L75HFAR)
5%
1/10W
(L75HFAR)
5%
1/10W
(L65HFAR,L75HFAR)
5%
1/10W
(L65HFAR,L75HFAR)
5%
1/10W
(L65HFAR,L75HFAR)
5%
1/10W
(L65HFAR,L75HFAR)
5%
1/10W
(L65HFAR,L75HFAR)
5%
1/10W
5%
1/10W
When indicating parts by reference
number, please include the board.
8-5
CP-A
Ref. No.
–––––––
R3004
R3005
R3006
R3007
R3010
Part No.
–––––––
1-216-049-11
1-216-049-11
1-216-049-11
1-216-033-00
1-249-425-11
Description
––––––––––
METAL CHIP
METAL CHIP
METAL CHIP
METAL CHIP
CARBON
1K
1K
1K
220
4.7K
5%
5%
5%
5%
5%
Remark
–––––––
1/10W
1/10W
1/10W
1/10W
1/4W
R3011
R3012
R3013
R3014
R3015
1-249-431-11
1-249-431-11
1-249-437-11
1-249-416-11
1-216-085-00
CARBON
CARBON
CARBON
CARBON
METAL CHIP
15K
15K
47K
820
33K
5%
5%
5%
5%
5%
1/4W
1/4W
1/4W
1/4W
1/10W
R3016
R3017
R3018
R3019
R3020
1-208-810-11
1-216-081-00
1-249-425-11
1-249-425-11
1-216-045-00
RES,CHIP
METAL CHIP
CARBON
CARBON
METAL CHIP
15K
22K
4.7K
4.7K
680
1%
5%
5%
5%
5%
1/10W
1/10W
1/4W
1/4W
1/10W
R3021
R3022
R3023
R3024
R3025
1-216-045-00
1-216-073-00
1-216-049-11
1-216-105-00
1-216-049-11
METAL CHIP
METAL CHIP
METAL CHIP
METAL CHIP
METAL CHIP
680
10K
1K
220K
1K
5%
5%
5%
5%
5%
1/10W
1/10W
1/10W
1/10W
1/10W
R3034
R3035
R3036
R3038
R3042
1-216-089-00
1-216-061-00
1-216-049-11
1-216-055-00
1-249-405-11
METAL CHIP
METAL CHIP
METAL CHIP
METAL CHIP
CARBON
47K
3.3K
1K
1.8K
100
5%
5%
5%
5%
5%
1/10W
1/10W
1/10W
1/10W
1/4W
R3043
R3044
R3046
R3047
R3049
1-216-295-11
1-249-415-11
1-249-429-11
1-216-109-00
1-216-085-00
METAL CHIP
CARBON
CARBON
METAL CHIP
METAL CHIP
0
680
10K
330K
33K
5%
5%
5%
5%
5%
1/10W
1/4W
1/4W
1/10W
1/10W
R3050
R3051
R3052
R3053
R3054
1-216-085-00
1-216-073-00
1-216-073-00
1-216-083-00
1-216-073-00
METAL CHIP
METAL CHIP
METAL CHIP
METAL CHIP
METAL CHIP
33K
10K
10K
27K
10K
5%
5%
5%
5%
5%
1/10W
1/10W
1/10W
1/10W
1/10W
R3055
R3056
R3057
R3058
R3059
1-249-436-11
1-216-065-00
1-249-419-11
1-216-073-00
1-249-425-11
CARBON
METAL CHIP
CARBON
METAL CHIP
CARBON
39K
4.7K
1.5K
10K
4.7K
5%
5%
5%
5%
5%
1/4W
1/10W
1/4W
1/10W
1/4W
R3060
R3061
R3062
R3063
R3064
1-212-946-11
1-216-055-00
1-216-051-00
1-216-059-00
1-216-081-00
FUSIBLE
METAL CHIP
METAL CHIP
METAL CHIP
METAL CHIP
3.3
1.8K
1.2K
2.7K
22K
5%
5%
5%
5%
5%
1/2W
1/10W
1/10W
1/10W
1/10W
R3065
R3074
R3081
R3092
R3101
1-216-081-00
1-216-085-00
1-216-073-00
1-249-409-11
1-216-037-00
METAL CHIP
METAL CHIP
METAL CHIP
CARBON
METAL CHIP
22K
33K
10K
220
330
5%
5%
5%
5%
5%
1/10W
1/10W
1/10W
1/4W
1/10W
R3102
R3106
R3110
R5001
R5002
1-216-101-00
1-216-037-00
1-216-029-00
1-202-724-00
1-216-035-00
METAL CHIP
METAL CHIP
METAL CHIP
SOLID
METAL CHIP
150K
330
150
2.7M
270
5%
5%
5%
10%
5%
1/10W
1/10W
1/10W
1/2W
1/10W
R5003
R5004
1-216-049-11 METAL CHIP
1-216-103-00 METAL CHIP
1K
180K
5%
5%
1/10W
1/10W
Ref. No.
–––––––
R5005
R5006
R5007
Part No.
–––––––
1-216-295-00
1-216-073-00
1-216-073-00
Description
––––––––––
METAL CHIP
METAL CHIP
METAL CHIP
0
10K
10K
5%
5%
5%
Remark
––––––
1/10W
1/10W
1/10W
R5009
R5010
R5011
R5101
R5102
1-216-092-11
1-247-885-00
1-247-885-00
1-249-411-11
1-216-039-00
RES,CHIP
CARBON
CARBON
CARBON
METAL CHIP
62K
180K
180K
330
390
5%
5%
5%
5%
5%
1/10W
1/4W
1/4W
1/4W
1/10W
R5103
R5104
R5105
R5106
! R5110
1-249-414-11
1-249-422-11
1-249-410-11
1-249-414-11
1-212-867-00
CARBON
CARBON
CARBON
CARBON
FUSIBLE
560
2.7K
270
560
27
5%
5%
5%
5%
5%
1/4W
1/4W
1/4W
1/4W
1/4W
R5111
R5112
R5114
! R5120
R5121
1-249-414-11
1-216-063-00
1-216-017-00
1-240-259-11
1-249-394-11
CARBON
METAL CHIP
METAL CHIP
FUSIBLE
CARBON
560
3.9K
47
8.2
12
5%
5%
5%
5%
1/4W
1/10W
1/10W
1/4W
1/4W
R5123
R5132
R5133
R5134
R5135
1-249-420-11
1-249-423-11
1-249-428-11
1-249-424-11
1-216-013-00
CARBON
CARBON
CARBON
CARBON
METAL CHIP
1.8K
3.3K
8.2K
3.9K
33
5%
5%
5%
5%
5%
1/4W
1/4W
1/4W
1/4W
1/10W
R6001
R6002
1-216-057-00 METAL CHIP
1-216-049-11 METAL CHIP
2.2K
1K
R6003
1-216-059-00 METAL CHIP
2.7K
R6007
R6008
R6010
R6012
R6018
1-216-111-00
1-216-115-00
1-217-735-11
1-216-055-00
1-216-059-00
METAL CHIP
METAL CHIP
FUSIBLE
METAL CHIP
METAL CHIP
390K
560K
680
1.8K
2.7K
5%
5%
5%
5%
5%
R6019
1-216-051-00 METAL CHIP
1.2K
5%
R6301
1-216-073-00 METAL CHIP
10K
R6302
1-216-073-00 METAL CHIP
10K
R6303
1-216-073-00 METAL CHIP
10K
R6304
1-216-097-00 METAL CHIP
100K
R6306
1-216-073-00 METAL CHIP
10K
R6307
1-216-073-00 METAL CHIP
10K
R6309
1-216-089-00 METAL CHIP
47K
R6310
1-216-118-00 RES,CHIP
750K
R6311
1-216-089-00 METAL CHIP
47K
R6312
1-216-091-00 METAL CHIP
56K
R6317
1-216-059-00 METAL CHIP
2.7K
When indicating parts by reference
number, please include the board.
8-6
5%
1/10W
5%
1/10W
(L65HFAR,L75HFAR)
5%
1/10W
(L65HFAR,L75HFAR)
1/10W
1/10W
1/4W
1/10W
1/10W
(L45AR)
1/10W
(L45AR)
5%
1/10W
(L65HFAR,L75HFAR)
5%
1/10W
(L65HFAR,L75HFAR)
5%
1/10W
(L65HFAR,L75HFAR)
5%
1/10W
(L65HFAR,L75HFAR)
5%
1/10W
(L65HFAR,L75HFAR)
5%
1/10W
(L65HFAR,L75HFAR)
5%
1/10W
(L65HFAR,L75HFAR)
5%
1/10W
(L65HFAR,L75HFAR)
5%
1/10W
(L65HFAR,L75HFAR)
5%
1/10W
(L65HFAR,L75HFAR)
5%
1/10W
(L65HFAR,L75HFAR)
The components identified by mark !
or dotted line with mark ! are critical
for safety.
Replace only with part number specified.
MC-1
CP-A
Ref. No.
–––––––
R6318
Part No.
Description
–––––––
––––––––––
1-216-067-00 METAL CHIP
5.6K
R6320
1-216-063-00 METAL CHIP
3.9K
R6321
1-216-061-00 METAL CHIP
3.3K
R6322
1-216-088-00 METAL CHIP
43K
R6323
1-216-065-00 METAL CHIP
4.7K
R6324
1-216-073-00 METAL CHIP
10K
R6325
1-216-065-00 METAL CHIP
4.7K
R6326
1-216-121-00 METAL CHIP
1M
R6327
1-216-097-00 METAL CHIP
100K
R6328
1-249-429-11 CARBON
10K
Remark
–––––––
5%
1/10W
(L65HFAR,L75HFAR)
5%
1/10W
(L65HFAR,L75HFAR)
5%
1/10W
(L65HFAR,L75HFAR)
5%
1/10W
(L65HFAR,L75HFAR)
5%
1/10W
(L65HFAR,L75HFAR)
Ref. No.
–––––––
*
TM-1
Part No.
Description
–––––––
––––––––––
A-6794-580-A MC-1 BOARD, COMPLETE
*********************
Remark
––––––
< CAPACITOR >
C8001
1-161-063-00 CERAMIC
0.1uF
10%
50V
1.8K
820
270
150
5%
5%
5%
5%
1/4W
1/4W
1/4W
1/4W
< CONNECTOR >
5%
1/10W
(L65HFAR,L75HFAR)
5%
1/10W
(L65HFAR,L75HFAR)
5%
1/10W
(L65HFAR,L75HFAR)
CN801
1-251-531-11 SOCKET (12P)
< RESISTOR >
R8001
R8002
R8003
R8004
5%
1/10W
(L65HFAR,L75HFAR)
5%
1/4W
(L65HFAR,L75HFAR)
1-249-420-11
1-249-416-11
1-249-410-11
1-249-407-11
CARBON
CARBON
CARBON
CARBON
< SWITCH >
S8002
1-762-173-11 SWITCH, EP (1P-1T)
< SWITCH >
S6001
1-692-957-11 SWITCH, SLIDE (1P-2T) (CH SW)
*
*
*
< TRANSFORMER >
T2001
! T5001
1-431-150-11 TRANSFORMER, OSC 70KHz
1-427-930-11 TRANSFORMER, PULSE POWER
VR631
VR632
VR632
VR633
VR634
VR634
1-228-748-11 RES, ADJ, METAL 10K (INPUT LEVEL)
(L75HFAR)
1-228-994-00 RES, ADJ, METAL 10K (INPUT LEVEL)
(L65HFAR)
1-228-993-00 RES, ADJ, METAL 4.7K (SEP.LOW)
(L65HFAR,L75HFAR)
A-6794-546-A TM-1 BOARD, COMPLETE (L75HFAR)
A-6794-560-A TM-1 BOARD, COMPLETE (L65HFAR)
A-6794-568-A TM-1 BOARD, COMPLETE (L45AR)
********************
3-966-986-01 HOLDER, IR
3-976-271-01 HOLDER, FL
*
*
< VARIABLE RESISTOR >
VR631
◊
◊
◊
< FLUORESCENT INDICATOR >
A7101
1-517-676-11 TUBE, FLUORESCENT INDICATOR
< CAPACITOR >
C7101
C7131
C7132
C7133
C7134
1-228-747-11 RES, ADJ, METAL 4.7K (SEP.LOW) (L75HFAR)
1-228-995-00 RES, ADJ, METAL 22K (ST.DBX FILTER)
(L65HFAR,)
1-228-747-11 RES, ADJ, METAL 4.7K (SEP.LOW) (L75HFAR)
1-228-993-00 RES, ADJ, METAL 4.7K (SEP.HIGHT) (L65HFAR)
1-124-259-11
1-162-291-31
1-162-291-31
1-162-291-31
1-162-291-31
ELECT
CERAMIC
CERAMIC
CERAMIC
CERAMIC
4.7uF
560PF
560PF
560PF
560PF
20%
10%
10%
10%
10%
50V
50V
50V
50V
50V
< CONNECTOR >
VR635
1-228-995-00 RES, ADJ, METAL 22K (VCO)
(L65HFAR,L75HFAR)
CN711
* CN712
1-251-394-11 SOCKET, RIBBON (13P)
1-251-589-11 SOCKET, RIBBON (5P)
< VIBRATOR >
< DIODE >
X1001
X1002
X3001
X3002
X3003
1-760-597-11
1-767-494-11
1-579-220-11
1-767-167-11
1-767-707-11
CRYSTAL, OSC 3.579545MHz
CRYSTAL OSC 3.582056MHz
CRYSTAL, OSC (32KHz)
CRYSTAL OSC 14.31818MHz
CRYSTAL OSC 14.32823MHz
D7101
D7102
D7103
D7104
D7151
8-719-991-33
8-719-991-33
8-719-991-33
8-719-991-33
8-719-301-58
DIODE
DIODE
DIODE
DIODE
DIODE
1SS133T-77
1SS133T-77
1SS133T-77
1SS133T-77
SEL2910D-D
D7152
D7153
D7154
D7171
D7179
8-719-301-58
8-719-301-58
8-719-301-58
8-719-991-33
8-719-991-33
DIODE
DIODE
DIODE
DIODE
DIODE
SEL2910D-D
SEL2910D-D
SEL2910D-D (L75HFAR)
1SS133T-77 (L75HFAR)
1SS133T-77
(L65HFAR,L75HFAR)
When indicating parts by reference
number, please include the board.
8-7
The components identified by mark !
or dotted line with mark ! are critical
for safety.
Replace only with part number specified.
TM-1 TM-2 VP-1
Ref. No.
–––––––
D7181
Part No.
Description
–––––––
––––––––––
8-719-991-33 DIODE
Remark
–––––––
1SS133T-77 (L65HFAR)
< IC >
IC711
1-801-355-11 IC
Ref. No.
–––––––
*
◊
*
◊
*
◊
Part No.
–––––––
A-6794-547-A
A-6794-561-A
A-6794-569-A
MN12510
< COIL >
L7101
1-500-225-11 FERRITE
< CAPACITOR >
0uH
< TRANSISTOR >
Q7151
Q7152
Q7153
Q7154
8-729-029-66
8-729-029-66
8-729-029-66
8-729-029-66
TRANSISTOR
TRANSISTOR
TRANSISTOR
TRANSISTOR
Description
Remark
––––––––––
––––––
TM-2 BOARD, COMPLETE (L75HFAR)
TM-2 BOARD, COMPLETE (L65HFAR)
TM-2 BOARD, COMPLETE (L45AR)
*********************
DTC114ES
DTC114ES
DTC114ES
DTC114ES (L75HFAR)
C7211
1-102-973-00 CERAMIC
100PF
C7212
1-102-973-00 CERAMIC
100PF
5%
50V
(L75HFAR)
5%
50V
(L45AR ,L75HFAR)
< CONNECTOR >
CN722
CN722
1-251-589-11 SOCKET (5P), RIBBON (L75HFAR)
1-251-525-11 SOCKET (4P), RIBBON (L45AR)
< RESISTOR >
< DIODE >
R7121
R7122
R7123
R7124
R7131
1-249-414-11
1-249-414-11
1-249-414-11
1-249-414-11
1-249-429-11
CARBON
CARBON
CARBON
CARBON
CARBON
560
560
560
560
10K
5%
5%
5%
5%
5%
1/4W
1/4W
1/4W
1/4W
1/4W
R7132
R7133
R7134
R7135
R7136
1-249-429-11
1-249-429-11
1-249-429-11
1-249-439-11
1-249-439-11
CARBON
CARBON
CARBON
CARBON
CARBON
10K
10K
10K
68K
68K
5%
5%
5%
5%
5%
1/4W
1/4W
1/4W
1/4W
1/4W
R7137
R7138
R7151
R7152
R7153
1-249-439-11
1-249-439-11
1-249-408-11
1-249-408-11
1-249-408-11
CARBON
CARBON
CARBON
CARBON
CARBON
68K
68K
180
180
180
5%
5%
5%
5%
5%
1/4W
1/4W
1/4W
1/4W
1/4W
R7154
1-249-408-11 CARBON
180
5%
D7201
D7202
8-719-301-58 DIODE
8-719-301-58 DIODE
SEL2910D-D
SEL2910D-D
< JACK >
JK721
JK721
1-785-499-11 JACK, RCA-3 (L45AR)
1-785-158-11 JACK, RCA-3 (L75HFAR)
< RESISTOR >
R7201
R7202
R7211
1-249-408-11 CARBON
1-249-408-11 CARBON
1-247-804-11 CARBON
180
180
75
R7212
1-249-417-11 CARBON
1K
R7213
1-249-417-11 CARBON
1K
1/4W
(L75HFAR)
5%
1/4W
5%
1/4W
5%
1/4W
(L45AR ,L75HFAR)
5%
1/4W
(L75HFAR)
5%
1/4W
(L45AR ,L75HFAR)
< SWITCH >
< RECEIVER >
RR711
S7201
S7202
1-475-047-11 PACK UNIT, IR RECEIVER
1-771-288-11 SWITCH, PUSH 1P-1T (POWER)
1-771-288-11 SWITCH, PUSH 1P-1T (EJECT)
< SWITCH >
S7101
S7102
S7103
S7104
S7105
1-771-288-11
1-771-288-11
1-771-288-11
1-771-288-11
1-771-288-11
SWITCH, PUSH 1P-1T (ATR)
SWITCH, PUSH 1P-1T (TR+)
SWITCH, PUSH 1P-1T (TR-)
SWITCH, PUSH 1P-1T (CH UP)
SWITCH, PUSH 1P-1T (CH DOWN)
S7106
S7107
S7108
S7109
S7110
1-771-288-11
1-771-288-11
1-771-288-11
1-771-288-11
1-771-288-11
SWITCH, PUSH 1P-1T (PAUSE/STILL)
SWITCH, PUSH 1P-1T (FF)
SWITCH, PUSH 1P-1T (REW)
SWITCH, PUSH 1P-1T (PLAY)
SWITCH, PUSH 1P-1T (STOP)
S7111
S7112
S7113
S7114
S7120
1-771-288-11
1-771-288-11
1-771-288-11
1-771-288-11
1-771-288-11
SWITCH, PUSH 1P-1T (REC)
SWITCH, PUSH 1P-1T (ERASE)
SWITCH, PUSH 1P-1T (SERCH)
SWITCH, PUSH 1P-1T (PRESET)
SWITCH, PUSH 1P-1T (ALL CLEAR)
*
*
A-6794-554-A VP-1 BOARD, COMPLETE (L65HFAR,L75HFAR)
A-6794-567-A VP-1 BOARD, COMPLETE (L45AR)
********************
3-947-425-01 HOLDER, LED
*
< CAPACITOR >
< VIBRATOR >
X7101
◊
◊
1-233-491-11 CERAMIC OSC 4.000MHz
C1805
C1806
C1807
C1808
C1809
1-102-129-00
1-102-129-00
1-126-154-11
1-164-004-11
1-126-301-11
CERAMIC
CERAMIC
ELECT
CERAMIC CHIP
ELECT
10000PF
10000PF
47uF
0.1uF
1uF
10%
10%
20%
10%
20%
50V
50V
6.3V
25V
50V
C1810
C1811
C1831
C1832
C1833
1-102-129-00
1-102-129-00
1-162-207-31
1-162-207-31
1-162-207-31
CERAMIC
CERAMIC
CERAMIC
CERAMIC
CERAMIC
10000PF
10000PF
22PF
22PF
22PF
10%
10%
5%
5%
5%
50V
50V
50V
50V
50V
C1834
C1835
1-162-207-31 CERAMIC
1-102-129-00 CERAMIC
22PF
10000PF
5%
10%
50V
50V
When indicating parts by reference
number, please include the board.
8-8
VP-1
Ref. No.
–––––––
C1836
C1837
C2901
C2902
Part No.
–––––––
1-102-129-00
1-164-004-11
1-126-176-11
Description
––––––––––
CERAMIC
CERAMIC CHIP
ELECT
1-164-004-11 CERAMIC CHIP
Remark
–––––––
10000PF 10%
50V
0.1uF
10%
25V
220uF
20%
10V
(L65HFAR,L75HFAR)
0.1uF
10%
25V
(L65HFAR,L75HFAR)
C2903
1-164-004-11 CERAMIC CHIP
0.1uF
C2904
1-164-004-11 CERAMIC CHIP
0.1uF
C2905
1-164-004-11 CERAMIC CHIP
0.1uF
C2906
1-164-004-11 CERAMIC CHIP
0.1uF
C2907
1-164-004-11 CERAMIC CHIP
0.1uF
C2908
1-164-004-11 CERAMIC CHIP
0.1uF
C2910
1-164-004-11 CERAMIC CHIP
0.1uF
C2911
1-164-004-11 CERAMIC CHIP
0.1uF
Ref. No.
–––––––
R2904
1-251-588-11
1-251-670-11
1-251-395-11
1-251-591-11
1K
Remark
––––––
5%
1/10W
(L65HFAR,L75HFAR)
MISCELLANEOUS
**************
10%
25V
(L65HFAR,L75HFAR)
10%
25V
(L65HFAR,L75HFAR)
10%
25V
(L65HFAR,L75HFAR)
10%
25V
(L65HFAR,L75HFAR)
10%
25V
(L65HFAR,L75HFAR)
6
52
54
1-693-424-11 TUNER (RF/TU/IF)
1-698-912-11 MOTOR, ROTOR CYL DC 2W
1-698-913-11 MOTOR, STATOR CYL DC 2W
104
110
111
169
1-810-691-11
1-810-690-11
1-801-326-11
1-763-142-11
10%
25V
(L65HFAR,L75HFAR)
10%
25V
(L65HFAR,L75HFAR)
10%
25V
(L65HFAR,L75HFAR)
PHOTO DIODE PN263L-NC
LED LN59L
PHOTO COUPLER SG-105F
MOTOR, CAPSTAN DC3W
ACCESSORIES & PACKING MATERIALS
********************************
*
1-475-752-11 COMMANDER, STANDARD (RMT-V241)
(L75HFAR)
1-475-753-11 COMMANDER,STANDARD(RMT-V242)
(L45AR ,L65HFAR)
1-782-945-11 CABLE, A/V (-3) (L65HFAR,L75HFAR)
1-782-946-11 CABLE, NTSC ANT
3-864-075-11 MANUAL INSTRUCTION (SPANISH) (L75HFAR)
3-864-076-11 MANUAL INSTRUCTION (SPANISH)
(L45AR ,L65HFAR)
3-976-267-01 CUSHION (FRONT)
*
!
3-976-268-01 CUSHION (BACK)
1-790-254-11 CORD, POWER
< CONNECTOR >
CN181
CN181
* CN182
* CN182
Part No.
Description
–––––––
––––––––––
1-216-049-11 METAL CHIP
SOCKET, RIBBON (12P) (L45AR)
SOCKET, RIBBON (15P) (L65HFAR,L75HFAR)
SOCKET, FFC (7P) (L45AR)
SOCKET, FFC (12P) (L65HFAR,L75HFAR)
◊
◊
< IC >
IC181
IC291
1-801-761-11 IC
1-801-156-11 IC
LA70011L
LA7256 (L65HFAR,L75HFAR)
< COIL >
L2901
1-410-509-11 INDUCTOR
**************
HARDWARE LIST
**************
10uH (L65HFAR,L75HFAR)
< RESISTOR >
R1801
R1802
R1803
1-216-073-00 METAL CHIP
1-216-059-00 METAL CHIP
1-216-071-00 METAL CHIP
10K
2.7K
8.2K
R1803
1-216-073-00 METAL CHIP
10K
R1804
1-216-045-00 METAL CHIP
680
R1805
R1806
R1807
R1808
R1831
1-216-045-00
1-216-065-00
1-216-049-11
1-216-049-11
1-216-295-00
METAL CHIP
METAL CHIP
METAL CHIP
METAL CHIP
METAL CHIP
680
4.7K
1K
1K
0
R1833
R1834
R2901
1-216-039-00 METAL CHIP
1-216-067-00 METAL CHIP
1-216-053-00 METAL CHIP
390
5.6K
1.5K
R2902
1-216-080-00 METAL CHIP
20K
R2903
1-216-049-11 METAL CHIP
1K
5%
5%
5%
1/10W
1/10W
1/10W
(L45AR)
5%
1/10W
(L65HFAR,L75HFAR)
5%
1/10W
5%
5%
5%
5%
5%
#1
#2
#3
#4
7-685-647-79
7-685-645-79
7-685-646-79
7-685-661-19
SCREW +BVTP
SCREW +BVTP
SCREW +BVTP
SCREW +BVTP
3X10 TYPE2 N-S
3X6 TYPE2 N-S
3X8 TYPE2 N-S
4X12 TYPE2 N-S
1/10W
1/10W
1/10W
1/10W
1/10W
5%
1/10W
5%
1/10W
5%
1/10W
(L65HFAR,L75HFAR)
5%
1/10W
(L65HFAR,L75HFAR)
5%
1/10W
(L65HFAR,L75HFAR)
When indicating parts by reference
number, please include the board.
8-9E
8-9
The components identified by mark !
or dotted line with mark ! are critical
for safety.
Replace only with part number specified.
SLV-L45AR/L65HFAR/L75HFAR
Sony Corporation
9-921-689-11
Home A&V Products Company
–8-10
108 –
98G02039-1
Printed in Japan © 1998.7
Published by General
Engineering Dept. (Osaki East)