1
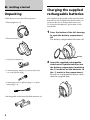
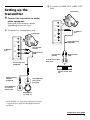
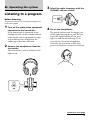
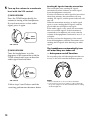
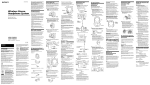
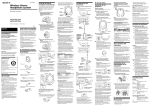
3-254-600-12(1)
Wireless Stereo
Headphone System
Operating Instructions
MDR-RF820RK
MDR-RF850RK
© 2003 Sony Corporation
WARNING
Welcome!
To prevent fire or shock hazard, do not
expose the unit to rain or moisture.
Thank you for purchasing the Sony
MDR-RF820RK/RF850RK Wireless Stereo
Headphone System. Before operating the unit,
please read this manual thoroughly and retain it
for future reference.
Some features are:
• Wireless system that allows you to listen to a
program free from the restriction of a cord
• High fidelity sound reproduction
• A compact transmitter with an AC power
adaptor (supplied) enables simple charging of
the headphone batteries. Just by placing the
headphones on the transmitter, headphone
batteries can be charged.
• Comfortable Circum-aural headphones with
self adjusting head band
• Automatic ON/OFF function on headphones
to preserve battery power
To prevent fire or shock hazard, do not
place objects filled with liquids, such as
vases, on the apparatus.
To avoid electrical shock, do not open the
cabinet. Refer servicing to qualified
personnel only.
Do not install the appliance in a confined
space, such as a bookcase or built-in cabinet.
Hereby, Sony Corp., declares that this equipment is
in compliance with the essential requirements and
other relevant provisions of Directive 1999/5/EC.
For details, please access the following URL :
http://www.compliance.sony.de/
This product is intended to be used in the
following countries.
CEK version: United Kingdom
CED version: Germany, Sweden, Denmark,
Finland, Norway, Belgium,
Switzerland, Austria,
Netherlands, France, Portugal,
Italy, Spain
To check for version, please refer to the barcode
label located on the top of the box.
2
Notes on receiving
performance
This system utilizes very high frequency signals
in the 800 MHz band so the receiving
performance may deteriorate due to the
surroundings. The following examples illustrate
conditions that may reduce the reception range
or cause interference.
• Inside a building with walls containing steel
beams.
• An area with many steel file cabinets, etc.
• An area with many electrical appliances
capable of generating electromagnetic fields.
• The transmitter is placed on a metal
instrument.
• An area facing a roadway.
• Noise or interfering signals exist in the
surroundings due to radio transceivers in
trucks, etc.
• Noise or interfering signals exist in the
surroundings owing to wireless
communication systems installed along
roadways.
Table of contents
Getting started
Unpacking ...................................................... 4
Charging the supplied rechargeable
batteries .................................................... 4
Setting up the transmitter ............................ 7
Operating the system
Listening to a programme ............................ 9
The effective areas of the transmitter ....... 11
Replacing the ear pads ............................... 11
Additional information
Precautions ................................................... 12
Troubleshooting .......................................... 12
Specifications ............................................... 13
3
N Getting started
Unpacking
Check that you have the following items:
• The headphones (1)
Charging the supplied
rechargeable batteries
The supplied rechargeable nickel-metal hydride
batteries are not charged from the first time you
use them. Be sure to charge them before use.
To charge the headphones, place them on the
transmitter.
1 Press the button of the left housing
to open the battery compartment
lid.
• The transmitter (1)
The battery compartment lid comes off.
Button
• AC power adaptor (1)
2
• Unimatch plug adaptor (1) (stereo mini jack
y stereo phone plug)
Insert the supplied rechargeable
nickel-metal hydride batteries into
the battery compartment matching
the 3 terminals on the batteries to
the 3 marks in the compartment.
Do not use rechargeable batteries other
than the supplied ones.
• Connecting cord (1) (phono plugs y stereo
mini plug), 1 m
• Rechargeable nickel-metal hydride batteries (2)
4
3
Close the battery compartment lid.
Right
housing
Left housing
When the indicator does not light in
green
4
Connect the supplied AC power
adaptor to the transmitter.
Transmitter
to an AC outlet
AC power
adaptor
(supplied)
to DC IN 9V jack
5
Rest the headphones on the
transmitter so that the
headphones’ contact point meets
the transmitter’s contact pin while
making sure that the charging
indicator lights in green.
Charging is completed in about 16
hours and the charging indicator goes
off.
When placing the headphones on the
transmitter, be sure to hold them level
with both hands and that the right and
left housings are placed straight down
on the transmitter, and then tilt them
back as illustrated above.
Check if the right and left headphones are rested
on the transmitter correctly. The indicator will
not light up if the headphones’ contact point does
not meet the transmitter’s contact pin. Remove
the headphones and replace them on the
transmitter again so that the indicator lights in
green.
To recharge the headphone battery
after use
Place the headphones on the transmitter after
use. Since the built-in timer recognizes when
charging is complete, there is no need to remove
the headphones from the transmitter after
charging.
Notes
• The transmitter automatically turns off while charging
the batteries.
• This system is designed to charge only the supplied
rechargeable batteries type BP-HP550 for safety. Note
that other types of rechargeable batteries cannot be
charged with this system.
• If dry batteries are installed, they cannot be charged.
• Do not attempt to use the supplied BP-HP550
rechargeable batteries for other components. They are
for use with this system only.
• Charge in an environmental temperature of between
0˚C and 40˚C (between 32˚F and 104˚F).
continue to next page
5
Charging and usage hours
Approx.
Notes on Batteries
Approx. usage time*
1
changing hours MDR-RF820RK MDR-RF850RK
1 hour
80 minutes*3 75 minutes*3
16 hours*2
18 hours*3
15 hours*3
1
* at 1kHz, 1mW+1mW output
*2 hours required to fully charge empty batteries
*3 Time stated above may vary, depending on
the temperature or conditions of use.
Using the headphones with dry
batteries (sold separately)
Commercially available (size AAA) dry batteries
can also be used to power the headphones.
Install the batteries in the same manner as
described in steps 1 through 3 of “Charging the
supplied rechargeable batteries.”
When dry batteries are installed, the battery
charge function is not activated.
Battery life
(Using Sony alkaline battery LR03/AM-4(N))
Battery
Approx. hours*1
MDR-RF820RK
28 hours*2
MDR-RF850RK
24 hours*2
*1 at 1kHz, 1mW+1mW output
*2 Time stated above may vary, depending on
the temperature or conditions of use.
6
• Do not charge a dry battery.
• Do not carry a dry battery together with coins
or other metallic objects. It can generate heat if
the positive and negative terminals of the
battery accidentally come into contact with
metallic objects.
• If you are not going to use the unit for a long
time, remove the battery to avoid damage
from battery leakage or corrosion.
Checking the remaining battery
power
Pull up the self-adjusting band and check the
power indicator located on the upper part of the
right housing. The batteries are still serviceable
when the indicator lights in red.
Charge the rechargeable batteries or install new
dry batteries if the power indicator light dims,
flashes, or the sound becomes distorted or noisy.
Note
The rechargeable nickel-metal hydride batteries should
be replaced with new ones when they last only half the
expected time after a proper recharging. The
rechargeable batteries type BP-HP550 are not
commercially available. You can order the batteries from
the store where you purchased this system, or at your
nearest Sony dealer.
Setting up the
transmitter
1 Connect the transmitter to audio/
video equipment.
B To connect to LINE OUT or REC OUT
jacks
Transmitter
1
2
3
CHANNEL
Select one of the hookups below
depending on the jack type:
A To connect to a headphones jack
NOISE FILTER
ON
OFF
INPUT
A
Transmitter
to INPUT A
jack
L
INPUT
B
R
1
2
3
CHANNEL
DC IN 9V
!
NOISE FILTER
Connecting cord
(supplied)
ON
OFF
INPUT
A
to INPUT B
jacks
Left channel
(white)
L
INPUT
B
Right channel
(red)
R
DC IN 9V
!
Left channel
(white)
Right channel
(red)
to LINE OUT or REC
OUT jacks
Connecting cord
(supplied)
Stereo system, VCR,
etc.
Unimatch plug
adaptor
(supplied)
to headphones
jack (stereo
mini jack)
to headphones
jack (stereo
phone jack)
WALKMAN*,
TV, VCR, etc.
* WALKMAN is a registered trademark of Sony
Corporation to represent Headphone Stereo
products.
continue to next page
7
C To connect to TV, etc.
If noise occurs when the transmitter is
connected to your TV or VCR, set the
NOISE FILTER switch to ON.
to INPUT B
jacks
Transmitter
2 Connect the supplied AC power
adaptor to the transmitter.
to an AC
outlet
Transmitter
1
2
3
CHANNEL
NOISE FILTER
ON
OFF
INPUT
A
Left channel
(white)
L
INPUT
B
AC power
adaptor
(supplied)
Right channel
(red)
R
DC IN 9V
!
to DC IN 9 V jack
Connecting cord
(supplied)
to stereo mini jack
Notes
• Use only the supplied AC power adaptor. Do not use
any other AC power adaptor.
Polarity of the plug
• If the connected equipment has the AVLS (Automatic
Volume Limiter System) function, be sure to turn the
function off when using the transmitter. Otherwise,
you will have to turn up the volume of the
headphones, and that may cause noise.
TV, etc.
Notes
• If you connect the transmitter to LINE OUT or
REC OUT jacks of an audio reproducer such as an
MD player or CD player, do not set the NOISE
FILTER switch to ON. Otherwise, volume will be
limited.
• The NOISE FILTER switch is active only in the
case of the connection shown in diagram A on
page 7 and C. In diagram B, the switch has no
effect.
• When the transmitter is placed on or near a TV, it
may pick up a noise.
In such case, place the transmitter away from the
TV.
8
N Operating the system
3 Select the radio frequency with the
CHANNEL selector switch.
Listening to a program
Before listening
CHANNEL
1
2
3
To prevent your ears from being damaged, first
lower the volume.
1 Turn on the audio/video equipment
connected to the transmitter.
If the transmitter is connected to the
headphone jack, set the volume control
of the audio source equipment as high
as possible but not so high that the
audio signal becomes distorted.
2 Remove the headphones from the
4 Put on the headphones.
The power indicator on the upper part
of the right housing glows red. Be sure
to put the right housing (R) on your
right ear and the left housing (L) on
your left ear. Wear the headphones
vertically on your head so that auto
power on function is properly activated.
transmitter.
The transmitter’s power indicator will
light in red.
continue to next page
9
5 Turn up the volume to a moderate
level with the VOL control.
TUN
E
A MDR-RF850RK
Press the TUNE button briefly for
automatic tuning of the headphones.
If you do not receive a clear audio
signal, press it again.
TUNE
button
VOL control
The headphones automatically turn
off when they are taken off
— Auto power on/off function
Do not pull up the self-adjusting band when not
in use, as this will consume the battery power.
TUN
E
B MDR-RF820RK
Tune the headphones in to the
frequency of the transmitter with the
TUNE control until you can hear the
audio signal loud and clear.
Sending RF signals from the transmitter
The transmitter starts sending RF signals
automatically when it detects an audio signal
from the equipment connected.
If it does not detect an audio signal for more than
about four minutes, the transmitter will stop
sending RF signals, and the power indicator will
turn off.
When the transmitter receives an audio signal
again, it starts sending the RF signals, and the
power indicator will light in red again.
If the audio signal is very weak, the transmitter
does not send RF signals. If the transmitter is
connected to a headphone jack, make sure the
volume of the equipment connected is set to 5 – 6
or higher.
You may not hear the beginning of the sound
from the headphones until the transmitter starts
sending the RF signals after detecting an audio
signal.
TUNE
control
VOL control
Follow steps 3 and 5 above until the
receiving performance becomes better.
10
Notes
• If hiss is heard, move closer to the transmitter.
• You may hear some noise when you disconnect the
AC power adaptor from the transmitter before taking
off the headphones.
The effective areas of
the transmitter
The optimum distance is up to approximately
100 m without the system picking up some
interference. However, the distance may vary
according to the surroundings and environment.
If the system picks up some noise while using it
within the above mentioned distance, reduce the
distance between the transmitter unit and the
headphones, or select another channel.
Replacing the ear pads
The ear pads are replaceable. If the ear pads
become dirty or worn out, replace them as
illustrated below.
The ear pad is not commercially available. You
can order replacements from the store where you
purchased this system, or at your nearest Sony
dealer.
1 Remove the old ear pad by pulling
it out of the groove on the housing.
Notes
• When you use the headphones inside the effective
areas of the transmitter, the transmitter can be placed
in any direction from the listener.
• Even within the signal reception area, there are some
spots (dead spot) where the RF signal can not be
received. This characteristics is inherent to RF signals,
and does not indicate malfunction. By slightly moving
the transmitter, location of the dead spot can be
changed.
2 Place the new ear pad on the driver
unit and insert the edge of the pad
into the groove as illustrated.
Make sure that the entire edge of the ear pad is
securely inserted into the groove.
11
N Additional information
Troubleshooting
Precautions
• If the transmitter is not to be used for a long
period of time, disconnect the AC power
adaptor from the AC outlet by holding the
plug. Do not pull on the cord.
• Do not leave the wireless stereo headphone
system in a location subject to direct sunlight,
heat or moisture.
Notes on headphones
Preventing hearing damage
Avoid using headphones at high volume.
Hearing experts advise against continuous, loud
and extended play. If you experience a ringing in
your ears, reduce the volume or discontinue use.
Caring for others
Keep the volume at a moderate level. This will
allow you to hear outside sounds and to be
considerate to the people around you.
If you have any questions or problems
concerning the system that are not covered in this
manual, please consult the nearest Sony dealer.
Be sure to bring the headphones and the
transmitter to the Sony dealer when requiring
repair work.
Problem
Solution
No sound/
Muffled
sound
Check the connection of the audio/
video equipment or the AC power
adaptor.
Check that the audio/video
equipment is turned on.
Turn up the volume on the connected
audio/video equipment, if the
transmitter is connected to the
headphones jack.
MDR-RF820RK:
Change the radio frequency with the
CHANNEL selector on the
transmitter, then tune the headphones
with the TUNE control.
MDR-RF850RK:
Change the radio frequency with the
CHANNEL selector on the
transmitter, then press the TUNE
button again.
The mute function is activated.
Use the headphones near the
transmitter.
The headphones’ POWER indicator
light is weak or turned off.
• Charge the supplied rechargeable
batteries or if the POWER indicator
is still off after charging the
supplied rechargeable batteries, take
the headphones to a Sony dealer for
replacement of the rechargeable
battery.
If you connect the transmitter to the
LINE OUT or REC OUT jacks of an
audio reproducer, make sure that the
NOISE FILTER switch is set to OFF.
Make sure that the NOISE FILTER
switch is set to either ON or OFF (If
the switch gets stuck between ON and
OFF, the sound will be cut off).
12
Problem
Solution
Distortion
If the transmitter is connected to the
headphone jack, volume of the
connected audio/video equipment.
General
Change the radio frequency with the
CHANNEL selector on the
transmitter.
Carrier frequency
The headphones’ POWER indicator
light is weak or turned off.
• Charge the supplied rechargeable
batteries or if the POWER indicator
is still off after charging the
supplied rechargeable batteries, take
the headphones to a Sony dealer for
replacement of the rechargeable
battery.
Channel
Ch1, Ch2, Ch3
Modulation
FM stereo
If you connect the transmitter to LINE
OUT or REC OUT jacks of an audio
reproducer, make sure that the NOISE
FILTER switch is set to OFF.
Loud
background
noise
Specifications
Move closer to the transmitter. As
you move away from the transmitter,
more noise is likely to be heard.
If the transmitter is connected to the
headphones jack, turn up the volume
of the connected audio/video
equipment.
MDR-RF820RK:
Change the radio frequency with the
CHANNEL selector on the
transmitter, then tune the headphones
with the TUNE control.
MDR-RF850RK:
Change the radio frequency with the
CHANNEL selector on the
transmitter, then press the TUNE
button again.
863.5 – 864.5 MHz
Frequency response
MDR-RF820R : 20 – 20,000 Hz
MDR-RF850R : 10 – 22,000 Hz
Transmitter TMR-RF850R
Power source
DC 9 V: supplied AC power
adaptor
Audio input
phono jacks/stereo mini jack
Dimensions
Approx. 133 × 124 × 136 mm
(5 1/4 × 5 × 5 3/8 in.)
(w/h/d)
Mass
Approx. 195 g (7 oz.)
Headphones MDR-RF820R, MDR-RF850R
Power source
Supplied rechargeable nickelmetal hydride batteries BPHP550 or commercially available
(size AAA) dry batteries
Mass
Approx. 270 g (9.6 oz.) incl.
batteries
Design and specifications are subject to change without
notice.
The headphones’ POWER indicator
light is weak or turned off.
• Charge the supplied rechargeable
batteries or if the POWER indicator
is still off after charging the
supplied rechargeable batteries, take
the headphones to a Sony dealer for
replacement of the rechargeable
battery.
If you connect the transmitter to the
LINE OUT or REC OUT jacks of an
audio reproducer, make sure that the
NOISE FILTER switch is set to OFF.
13
14
15
Deutsch
Svenska
Härmed intygar Sony Corp. att detta högtalarsystem står i
överensstämmelse med de väsentliga egenskapskrav och övriga
relevanta bestämmelser som framgår av direktiv 1999/5/EG.
Mer information finns på webbadressen:
http://www.compliance.sony.de/
Den här produkten är avsedd att användas i följande länder.
Version CEK: Storbritannien
Version CED: Tyskland, Sverige, Danmark, Finland, Norge,
Belgien, Schweiz, Österrike, Nederländerna,
Frankrike, Portugal, Italien, Spainien
Produktens version framgår av streckkodsetiketten på lådans översida.
Dansk
Undertegnede, Sony Corp., erklærer herved, at følgende udstyr
overholder de væsentlige krav og øvrige relevante krav i direktiv
1999/5/EF.
Yderligere oplysninger findes på http://www.compliance.sony.de/
Dette produkt er beregnet til brug i følgende lande.
CEK-version: Storbritannien
CED-version: Tyskland, Sverige, Danmark, Finland, Norge,
Belgien, Schweiz, Østrig, Holland, Frankrig,
Portugal, Italien og Spanien.
Øverst på kassen findes en stregkode, hvor du kan se, hvilken
version kassen indeholder.
Suomi
Sony Corp. vakuuttaa täten, että tämä laite on direktiivin 1999/5/
EY oleellisten vaatimusten ja sitä koskevien direktiivin muiden
ehtojen mukainen.
Lisätietoja on seuraavassa Web-sivustossa:
http://www.compliance.sony.de/
Tämä tuote on tarkoitettu käytettäväksi seuraavassa maissa.
CEK-malli: Iso-Britannia
CED-malli: Saksa, Ruotsi, Tanska, Suomi, Norja, Belgia, Sveitsi,
Itävalta, Alankomaat, Ranska, Portugali, Italia, Espanja
Näet version pakkauksen yläosassa olevasta viivakooditarrasta.
Norsk
Herved erklærer Sony Corp.at dette utstyret er i
overensstemmelse med vesentlige krav og andre relevante
bestemmelser som fremgår av direktiv 1999/5/EC.
Gå til denne URL-en for mer informasjon:
http://www.compliance.sony.de/
Dette produktet er ment for bruk i følgende land:
CEK-versjon: Storbritannia
CED-versjon: Tyskland, Sverige, Danmark, Finland, Norge,
Belgia, Sveits, Østerrike, Nederland, Frankrike,
Portugal, Italia, Spania
Du kan sjekke versjon ved å se på strekkode-etiketten på toppen av esken.
Ελληνικά
ΜΕ ΤΗΝ ΠΑΡΟΥΣΑ Η Sony Corp. ∆ΗΛΩΝΕΙ ΟΤΙ H ΣΥΣΚΕΥΗ
ΣΥΜΜΟΡΦΩΝΕΤΑΙ ΠΡΟΣ ΤΙΣ ΟΥΣΙΩ∆ΕΙΣ ΑΠΑΙΤΗΣΕΙΣ ΚΑΙ ΤΙΣ
ΛΟΙΠΕΣ ΣΧΕΤΙΚΕΣ ∆ΙΑΤΑΞΕΙΣ ΤΗΣ Ο∆ΗΓΙΑΣ 1999/5/ΕΚ.
Για περισστερες λεπτοµέρειες, παρακαλούµε να
επισκεφθείτε την παρακάτω ηλεκτρονική διεύθυνση (URL):
http://www.compliance.sony.de/
Αυτ το προϊν προορίζεται για να χρησιµοποιηθεί στις
παρακάτω χώρες.
Εκδοση CEK: Ηνωµένο Βασίλειο
Εκδοση CED: Γερµανία, Σουηδία, ∆ανία, Φιλανδία,
Nορβηγία, Bέλγιο, Ελβετία, Aυστρία,
Ολλανδία, Γαλλία, Πορτογαλία, Iταλία, Ισπανία
Για να ελέγξετε την έκδοση, παρακαλούµε ανατρέξτε στην
ετικέτα µε τον κωδικ ραβδώσεων που βρίσκεται στο επάνω
µέρος του κουτιού.
Hiermit erklärt die Sony Corporation, dass sich dieses Gerät in
Übereinstimmung mit den grundlegenden Anforderungen und den
anderen relevanten Vorschriften der Richtlinie 1999/5/EG befindet.
Erläuterungen dazu finden Sie unter folgendem URL:
http://www.compliance.sony.de/
Dieses Gerät kann in folgenden Ländern verwendet werden.
Version CEK: Großbritannien
Version CED: Deutschland, Schweden, Dänemark, Finnland,
Norwegen, Belgien, Schweiz, Österreich,
Niederlande, Frankreich, Portugal, Italien, Spanien
Wenn Sie nachsehen wollen, um welche Version es sich bei Ihrem Modell
handelt, schauen Sie bitte nach dem Strichcodeetikett oben auf dem
Karton.
Español
Por medio de la presente, Sony Corp. declara que el equipo cumple
con los requisitos esenciales y cualesquiera otras disposiciones
aplicables o exigibles de la Directiva 1999/5/CE.
Para obtener más información, visite la dirección URL siguiente:
http://www.compliance.sony.de/
Este producto está destinado a utilizarse en los siguientes países:
Versión CEK: Reino Unido
Versión CED: Alemania, Suecia, Dinamarca, Finlandia, Noruega, Bélgica,
Suiza, Austria, Holanda, Francia, Portugal, Italia, España
Para comprobar la versión, consulte la etiqueta del código de barras
situada en la parte superior de la caja.
Nederlands
Hierbij verklaart Sony Corp. dat dit toestel in overeenstemming is
met de essentiële eisen en de andere relevante bepalingen van
richtlijn 1999/5/EG.
Ga naar de volgende URL voor meer informatie:
http://www.compliance.sony.de/
Dit product is bestemd voor gebruik in de volgende landen:
CEK versie: Verenigd Koninkrijk
CED versie: Duitsland, Zweden, Denemarken, Finland,
Noorwegen, België, Zwitserland, Oostenrijk,
Nederland, Frankrijk, Portugal, Italië, Spanje
De versie vindt u op het barcode label boven op de doos.
Italiano
Con la presente Sony Corp. dichiara che questo apparecchio è
conforme ai requisiti essenziali ed alle altre disposizioni
pertinenti stabilite dalla direttiva 1999/5/CE.
Per ulteriori informazioni, accedere al seguente indirizzo URL:
http://www.compliance.sony.de/
Il presente prodotto è destinato all'utilizzo nei paesi elencati di
seguito.
Versione CEK: Regno Unito
Versione CED: Germania, Svezia, Danimarca, Finlandia,
Norvegia, Belgio, Svizzera, Austria, Olanda,
Francia, Portogallo, Italia, Spagna
Per verificare la versione, fare riferimento all'etichetta con il
codice a barre situata sulla parte superiore della scatola.
Português
A Sony Corp., declara que este equipamento está conforme com os
requisitos essenciais e outras provisões da directiva 1999/5/CE.
Para saber mais pormenores, aceda ao seguinte URL :
http://www.compliance.sony.de/
Este produto destina-se a ser utilizado nos seguintes países:
Versão CEK: Reino Unido
Versão CED: Alemanha, Suécia, Dinamarca, Finlândia, Noruega,
Bélgica, Suíça, Áustria, Países Baixos, França,
Portugal, Itália, Espanha
Para verificar a versão, consulte a etiqueta do código de barras
localizada na parte de cima da caixa.
Français
Par la présente, Sony Corp. déclare que cet appareil est conforme
aux exigences essentielles et aux autres dispositions pertinentes
de la directive 1999/5/CE.
Pour de plus amples informations, veuillez vous reporter à l’URL
suivante : http://www.compliance.sony.de/
Ce produit est conçu pour être utilisé dans les pays suivants.
Versions CEK : Royaume-Uni
Version CED : Allemagne, Suède, Danemark, Finlande, Norvège, Belgique,
Suisse, Autriche, Pays-Bas, France, Portugal, Italie, Espagne
Pour connaître la version que vous utilisez, veuillez vous reportez au
code barre situé sur la partie supérieure de la boîte.
Printed in Korea