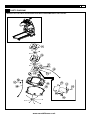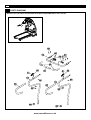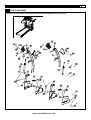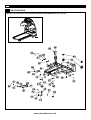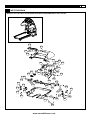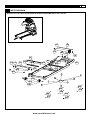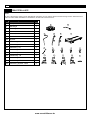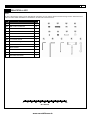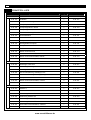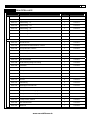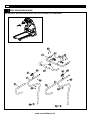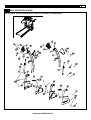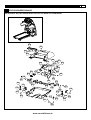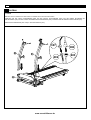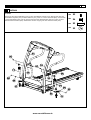
1
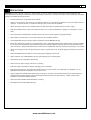
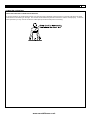
USER’S MANUAL
9.35e MOTORIZED TREADMILL
9.35e MOTORISIERTES LAUFBAND
MODEL NUMBER: 9.35e
USER WEIGHT LIMITATION: 395lbs
MAXIMALES BENUTZERGEWICHT: 180 KG
UK: TOLL FREE CUSTOMER SERVICE NUMBER: 0800-097 2100
DE: SERVICENUMBER: +49 (911) 810 59 24
SERIAL NUMBER (found on frame) – SERIENNUMMER (auf Rahmen)
GB
DE
2
9.35e TREADMILL
INDEX – INHALTSVERZEICHNIS
1. English
P. 3
2. Deutsch
P. 47
www.smoothfitness.co.uk
9.35e TREADMILL
3
PRECAUTIONS
WARNING: To reduce the risk of burns, fire, electric shock, or injury to persons, read the following important precautions and
information before operating the treadmill. It is the responsibility of the owner to ensure that all users of this treadmill are adequately
informed of all warnings and precautions.
•
Use the treadmill only as described in this manual.
•
Place on a level surface, with 6 feet (2 m) of clearance behind it. Do not place the treadmill on any surface that blocks air
openings. To protect the floor or carpet from damage, place a mat under the treadmill.
•
When choosing a location for the treadmill make sure that the location and position permit access to a plug.
•
Keep the treadmill indoors, away from moisture and dust. Do not put the treadmill in a garage or covered patio, or near
water.
•
Do not operate the treadmill where aerosol products are used or where oxygen is being administered.
•
Keep children under the age of 12 and pets away from the treadmill at all times.
•
The treadmill should not be used by persons weighing more than 396 lbs (180 kg).
•
Never allow more than one person on the treadmill at a time. Wear appropriate exercise clothing when using the treadmill.
Do not wear loose clothing that could become caught in the treadmill. Athletic support clothes are recommended for both
men and women. Always wear athletic shoes. Never use the treadmill with bare feet, wearing only stockings, or in sandals.
•
When connecting the power cord, plug the power cord into a grounded circuit. No other appliance should be on the same
circuit.
•
Always straddle the belt and allow it to start moving before stepping onto the belt.
•
Always examine your treadmill before using to ensure all parts are in working order.
•
Allow the belt to fully stop before dismounting.
•
Never insert any object or body parts into any opening.
•
Follow the safety information in regards to plugging in your treadmill.
•
Keep the power cord away from the incline wheels and do not run the power cord underneath your treadmill. Do not
operate the treadmill with a damaged or frayed power cord.
•
Always unplug the treadmill before cleaning and/or servicing. Service to your treadmill should only be performed by an
authorized service representative, unless authorized and/or instructed by the manufacturer. Failure to follow these
instructions will void the treadmill warranty.
•
Never leave the treadmill unattended while it is running.
•
The equipment is for Class B (Home Use).
www.smoothfitness.co.uk
4
9.35e TREADMILL
POWER REQUIREMENTS
Power Requirements:
IMPROPER CONNECTION OF THE EQUIPMENT GROUNDING CONNECTOR CAN RESULT IN A RISK OF AN ELECTRIC
SHOCK. CHECK WITH A QUALIFIED ELECTRICIAN OR SERVICE MAN IF YOU ARE IN DOUBT AS TO WHETHER THE
PRODUCT IS PROPERLY GROUNDED. DO NOT MODIFY THE PLUG PROVIDED WITH THE PRODUCT, IF IT WILL NOT FIT
THE OUTLET; HAVE A PROPER OUTLET INSTALLED BY A QUALIFIED ELECTRICIAN.
This treadmill can be seriously damaged by sudden voltage changes in your home’s electrical power. Voltage spikes, surges and
noise interference can result from weather conditions or from other appliances being turned on or off. To reduce the possibility of
treadmill damage, always use a surge protector (not included) with your treadmill.
This treadmill must be grounded to reduce the risk of electrical shock. Grounding provides a path of least resistance for electric
current, should the treadmill malfunction. This treadmill comes with an electrical cord having an equipment-grounding conductor
and a grounding plug. Always plug the power cord into a surge protector, and plug the surge protector into an appropriate outlet
that is properly installed and grounded in accordance with all local codes and ordinances.
This product is for use on a nominal 230-volt circuit, and has a grounding plug that looks like the plug illustrated in the drawing
below.
www.smoothfitness.co.uk
9.35e TREADMILL
5
PREASSEMBLY
Open the boxes:
You are now ready to open the boxes of your new equipment. Make sure to inventory all of the parts that are included in the boxes.
Check the Hardware Comparison Chart for a full count of the number of parts included for this product to be assembled properly. If
you are missing any parts or have any assembly questions call your local Smooth Retailer.
Gather your tools:
Before starting the assembly of your unit, make sure that you have gathered all the necessary tools you may require to assemble
the unit properly. Having all of the necessary equipment at hand will save time and make the assembly quick and hassle-free.
Clear your work area:
Make sure that you have cleared away a large enough space to properly assemble the unit. Make sure the space is free from
anything that may cause injury during assembly. After the unit is fully assembled, make sure there is a comfortable amount of free
area around the unit for unobstructed operation.
Invite a friend:
Some of the assembly steps may require heavy lifting. It is recommended that you obtain the assistance of another person when
assembling this product.
User Weight Limitation:
Please note that there is a weight limitation for this product. If you weigh more than 180 Kg (396 lbs). it is not recommended
that you use this product. Serious injury may occur if the user’s weight exceeds the limit shown here. This product is not
intended to support users whose weight exceeds this limit.
Care and maintenance:
1.
The safety level can be maintained only if it is examined for damage and wear.
2.
Replace the defect components immediately and stop to use the equipment until repair.
3.
Always care that you mount on the equipment steady before you start to use the equipment. Dismount from the equipment
after all parts are stop.
4.
Always check the easily wear components like pulley ets. To prevent danger.
5.
There is an emergency stop to prevent dangers, you can stop the treadmill immediately by actuated the emergency stop for
emergency dismount.
www.smoothfitness.co.uk
6
9.35e TREADMILL
CONTENTS CHECKLIST
Carton contents:
For your convenience, we have identified the contents of the shipping carton. Please check to make sure you have all of the
components before assembly. This chart is provided to help you identify the components used in the assembly of this product.
No.
Description
Qty.
A
Computer
1
B
Front Handlebar Assembly
1
C
Handlebar
2
D
Upright Assembly Left
1
E
Upright Assembly Right
1
F
Main Frame Assembly
2
310
Adjustable Cylinder
2
303
Upright Cover - LL
1
304
Upright Cover - LR
1
305
Upright Cover - RL
1
306
Upright Cover - RR
1
311
Upright Plastic Shroud - LL
1
312
Upright Plastic Shroud - LR
1
313
Upright Plastic Shroud - RL
1
314
Upright Plastic Shroud - RR
1
315
Adjustable Cylinder Cover - Upper
2
A
B
C
310
311
D
303
E
F
304
312
www.smoothfitness.co.uk
313
305
314
306
315
9.35e TREADMILL
HARDWARE COMPARISON CHART
Hardware chart:
For your convenience, we have identified the hardware used in the assembly of this product. This chart is provided to help you
identify those items that may be unfamiliar to you.
No.
Description
Qty.
804
M8 x 15mm Bolt
2
805
M8 x 50mm Bolt
12
806
#8 x 19mm Screw
16
807
#8 x 19mm Screw
16
826
M8 Nut
2
843
M8 x 15 mm Bolt
4
845
13 x 42mm Axle
2
846
8 x 23mm Washer
2
A
5mm Wrench
1
B
8mm Wrench
1
C
Wrench
1
D
5mm Allen Wrench
1
E
Spanner
1
MILLIMETERS
www.smoothfitness.co.uk
7
8
9.35e TREADMILL
PARTS LIST
No.
Description
9.35-100
Qty.
Order No.
Console Assembly
9.35-101
Overlay
1
9.35-101
9.35-102
Computer Insert
1
9.35-102
9.35-103
Console PC Board
1
9.35-103
9.35-104
Console Housing - Upper
1
9.35-104
9.35-105
Console Housing - Bottom
1
9.35-105
9.35-106
Safety key Base
1
9.35-106
9.35-107
Safety Key
1
9.35-107
9.35-108
Safety Key Wire - Upper
1
9.35-108
9.35-109
Computer Wire - Upper
1
9.35-109
9.35-110
Computer Ground Wire
1
9.35-110
9.35-111
Hand Pulse Wire - Upper
2
9.35-111
9.35-112
E - Prom
1
9.35-112
9.35-113
Motion Control Board
1
9.35-113
9.35-114
Motion Control Board Wire
1
9.35-114
9.35-115
Motion Control Sensor Wire
2
9.35-115
9.35-116
Water Bottle Holder
2
9.35-116
9.35-200
Handle Bar Assembly
9.35-201
Handle Bar Upright
2
9.35-201
9.35-202
Handle Bar Upright Foam Grip
2
9.35-202
9.35-203
Front Handle Bar
1
9.35-203
9.35-204
Front Handle Bar Foam Grip-Short
1
9.35-204
9.35-205
Front Handle Bar Foam Grip-Long
2
9.35-205
9.35-206
Hand Pulse Set
2
9.35-206
9.35-207
Motion Control
2
9.35-207
9.35-208
Motion Control Base
2
9.35-208
9.35-300
Upright Assembly
9.35-301
Upright-L
1
9.35-301
9.35-302
Upright-R
1
9.35-302
9.35-303
Upright Cover-LL
1
9.35-303
9.35-304
Upright Cover-LR
1
9.35-304
9.35-305
Upright Cover-RL
1
9.35-305
9.35-306
Upright Cover-RR
1
9.35-306
9.35-307
Safety Key Wire - Middle
1
9.35-307
9.35-308
Computer Wire - Upper
1
9.35-308
www.smoothfitness.co.uk
9.35e TREADMILL
PARTS LIST
No.
Description
Qty.
Order No.
9.35-309
Motion Control Sensor Wire - Middle
2
9.35-309
9.35-310
Adjustable Cylinder
2
9.35-310
9.35-311
Upright Plastic Shroud – LL
1
9.35-311
9.35-312
Upright Plastic Shroud – LR
1
9.35-312
9.35-313
Upright Plastic Shroud – RL
1
9.35-313
9.35-314
Upright Plastic Shroud – RR
1
9.35-314
9.35-315
Adjustable Cylinder Cover - Upper
2
9.35-315
9.35-316
Fixing Inserts
2
9.35-316
9.35-400
Base Frame Assembly
9.35-401
Base Frame
1
9.35-401
9.35-402
Safety Key Wire - Lower
1
9.35-402
9.35-403
Computer Wire -Lower
1
9.35-403
9.35-404
Power Switch Plate Cover
1
9.35-404
9.35-405
Power Switch Plate
1
9.35-405
9.35-406
Power Breaker
1
9.35-406
9.35-407
Power Switch
1
9.35-407
9.35-408
Fold UP Support
1
9.35-408
9.35-409
Foot Locker
1
9.35-409
9.35-410
Foot Locker Spring
1
9.35-410
9.35-411
Shock
1
9.35-411
9.35-412
Fix Bolt Sets
2
9.35-412
9.35-413
Front Caster
2
9.35-413
9.35-414
Rubber Cushion
2
9.35-414
9.35-415
Level Adjuster
2
9.35-415
9.35-416
Base Frame End Cap
2
9.35-416
9.35-417
Cushion
2
9.35-417
9.35-418
Transportation Wheel Bracket
2
9.35-418
9.35-419
Transportation Wheel Bracket
1
9.35-419
9.35-420
Spring
1
9.35-420
9.35-421
Rear Transportation Wheel
1
9.35-421
9.35-422
Plastic Insert
1
9.35-422
9.35-423
Fold Up Support Wheel
1
9.35-423
www.smoothfitness.co.uk
9
10
9.35e TREADMILL
PARTS LIST
No.
Description
9.35-424
9.35-500
Bushing
Qty.
Order No.
2
9.35-424
Motor Assembly
9.35-501
Motor Hood
1
9.35-501
9.35-502
Elevation Motor
1
9.35-502
9.35-503
Elevation Gear Sleeve
1
9.35-503
9.35-504
Driving Motor
1
9.35-504
9.35-505
Motor Holder
1
9.35-505
9.35-506
Driving Belt
1
9.35-506
9.35-507
Motor Control Board
1
9.35-507
9.35-508
Elevation Control Board
1
9.35-508
9.35-509
Elevation Support Tube
1
9.35-509
9.35-510
Elevation Support Tube Cover – Left
1
9.35-510
9.35-511
Motor Bottom Cover
1
9.35-511
9.35-512
Deck Frame Side Cover – Left
1
9.35-512
9.35-513
Plastic Clamp – Top
2
9.35-513
9.35-514
Plastic Clamp – Bottom
2
9.35-514
9.35-515
Elevation Support
2
9.35-515
9.35-516
Elevation Support Cap
2
9.35-516
9.35-517
Deck Rubber Cushion
2
9.35-517
9.35-518
Rear Vent Cover
1
9.35-518
9.35-519
ELEVATION SUPPORT TUBE COVER - Right
1
9.35-519
9.35-520
DECK FRAME SIDE COVER - Right
1
9.35-520
9.35-600
Running Deck Assembly
9.35-601
Running Belt
1
9.35-601
9.35-602
Side Rail
2
9.35-602
9.35-603
Side Rail End Cap – Left
1
9.35-603
9.35-604
Side Rail End Cap - Right
1
9.35-604
9.35-605
Running Deck
1
9.35-605
9.35-700
Deck Frame Assembly
9.35-701
Deck Frame
1
9.35-701
9.35-702
Front Roller Shaft
1
9.35-702
9.35-703
Front Roller Tube
1
9.35-703
www.smoothfitness.co.uk
9.35e TREADMILL
PARTS LIST
No.
Description
Qty.
Order No.
9.35-704
Roller Bearing 6202
4
9.35-704
9.35-705
Rear Roller Shaft
1
9.35-705
9.35-706
Rear Roller Tube
1
9.35-706
9.35-707
Running Deck Support Tube
1
9.35-707
9.35-708
Deck Frame – Rear
1
9.35-708
9.35-413
Rear Caster
2
9.35-413
9.35-800
Fastening
9.35-801
Screws #6 × 12mm
12
9.35-801
9.35-802
Screws #4 × 6mm
12
9.35-802
9.35-803
Screws #8 × 12mm
8
9.35-803
9.35-804
Bolt M8 x 15mm
2
9.35-804
9.35-805
Bolt M8 x 50mm
16
9.35-805
9.35-806
Screw #8 x 19mm
25
9.35-806
9.35-807
Screw #8 x 19mm
18
9.35-807
9.35-808
Screws M5 × 10mm
3
9.35-808
9.35-809
Screws #8 × 16mm
36
9.35-809
9.35-810
C Fixed
1
9.35-810
9.35-811
Bolts M10 × 30mm
1
9.35-811
9.35-812
Bearing
1
9.35-812
9.35-813
Washer 12 x 5 x T1.0mm
8
9.35-813
9.35-814
Nylon Nut M10
7
9.35-814
9.35-815
Axle M8 x 35mm
1
9.35-815
9.35-816
Screws M14 × 90mm
2
9.35-816
9.35-817
Bearing
4
9.35-817
9.35-818
Screws M10 × 35mm
10
9.35-818
9.35-819
Screws#8 × 10mm
7
9.35-819
9.35-820
Screws#8 × 50mm
2
9.35-820
9.35-821
Bolts M10 × 63mm
1
9.35-821
9.35-822
Fixed Block
8
9.35-822
9.35-823
Bolts M8 × 120mm
1
9.35-823
9.35-824
Plate Washer 10 x 30 x T3.0mm
2
9.35-824
9.35-825
Spring
1
9.35-825
9.35-826
M8 Nylon Nut
3
9.35-826
www.smoothfitness.co.uk
11
12
9.35e TREADMILL
PARTS LIST
No.
Description
Qty.
Order No.
9.35-827
Screws M8 × 20mm
6
9.35-827
9.35-828
Spring Washer 8 x 13 x T2.0mm
10
9.35-828
9.35-829
Washer 16 x 8 x T3.0mm
2
9.35-829
9.35-830
Screws M10 × 136mm
1
9.35-830
9.35-831
Screws M10 × 90mm
1
9.35-831
9.35-832
Screws M8 × 25mm
8
9.35-832
9.35-833
Hexagon Nut M6
8
9.35-833
9.35-834
Bolts M6 × 70mm
3
9.35-834
9.35-835
Washer
3
9.35-835
9.35-836
Axle M10 x 40mm
1
9.35-836
9.35-837
C Fixed
2
9.35-837
9.35-838
Bolts M10 × 43mm
2
9.35-838
9.35-839
Cushion Pad
8
9.35-839
9.35-840
Screws M10 × 40mm
1
9.35-840
9.35-841
Screws M6 × 10mm
2
9.35-841
9.35-842
Screws M10 × 52mm
1
9.35-842
9.35-843
Allen Head Bolt M8 × 15mm
4
9.35-843
9.35-845
Bolt 13 × 42mm
2
9.35-845
9.35-846
Washer 23 x 8 x T2.0mm
2
9.35-846
www.smoothfitness.co.uk
9.35e TREADMILL
PARTS DIAGRAM
A MAJORITY OF THE PARTS SHOWN HERE HAVE BEEN PREASSEMBLED AT THE FACTORY.
www.smoothfitness.co.uk
13
14
9.35e TREADMILL
PARTS DIAGRAM
A MAJORITY OF THE PARTS SHOWN HERE HAVE BEEN PREASSEMBLED AT THE FACTORY.
www.smoothfitness.co.uk
9.35e TREADMILL
PARTS DIAGRAM
A MAJORITY OF THE PARTS SHOWN HERE HAVE BEEN PREASSEMBLED AT THE FACTORY.
www.smoothfitness.co.uk
15
16
9.35e TREADMILL
PARTS DIAGRAM
A MAJORITY OF THE PARTS SHOWN HERE HAVE BEEN PREASSEMBLED AT THE FACTORY.
www.smoothfitness.co.uk
9.35e TREADMILL
PARTS DIAGRAM
A MAJORITY OF THE PARTS SHOWN HERE HAVE BEEN PREASSEMBLED AT THE FACTORY.
518
501
819
820
820
502
825
824
505 823
503
824
826
827
504
507
828
814
829
821
508
814
809
830
516
506
519
510
513
512
831
822
516
509
514
819
809
819
515
513
827
517
514
806
511
809
www.smoothfitness.co.uk
515 520
827
17
18
9.35e TREADMILL
PARTS DIAGRAM
A MAJORITY OF THE PARTS SHOWN HERE HAVE BEEN PREASSEMBLED AT THE FACTORY.
602
602
603
601
832
809
604
605
822
818
www.smoothfitness.co.uk
9.35e TREADMILL
PARTS DIAGRAM
A MAJORITY OF THE PARTS SHOWN HERE HAVE BEEN PREASSEMBLED AT THE FACTORY.
702
703
704
840
814
704
707
704 706
705
422
708
841
836
701
837
704
835
834
835
834
814
839
413
838
828
828
828
833
www.smoothfitness.co.uk
833
833
828
833
19
20
9.35e TREADMILL
ASSEMBLY
STEP 1:
Remove your treadmill from the carton and place it on the floor in an open area.
Connect the Middle Section Computer Wire (308) to the Lower Section Computer Wire
(403) and the Middle Section Safety Key Wire (307) to the Lower Section Safety Key Wire
(402). Insert any extra cable length into the Left Upright (301).
Insert the Left and Right Uprights (301)(302) into the Base Frame (401).
307
402
www.smoothfitness.co.uk
308
403
9.35e TREADMILL
ASSEMBLY
STEP 2:
First connect the Motion Control Wire Middle Section (309) to Motion Control Wire
Lower Section (207) as shown.
804
X2
Insert the Handlebar (201) into the Upright Tube (301)(302) and secure using two
M8 x 15mm Bolts (804), Four M8 x 50mm Bolts (805) to Base Frame (401).
805
X8
309
207
www.smoothfitness.co.uk
21
22
9.35e TREADMILL
ASSEMBLY
STEP 3:
Attach the Front Handlebar (203) on the Upright Tube (301)(302) and secure using
four M8 x 50mm Bolts (805).
www.smoothfitness.co.uk
805
X4
9.35e TREADMILL
ASSEMBLY
STEP 4:
Connect the Upper Section Computer Wire (109) to the Middle Section Computer
Wire (308) and the Upper Section Safety Key Wire (108) to the Middle Section
Safety Key Wire (307).
Connect the Upper Section Hand Pulse Wires (111) to Lower Section Wires (206)
and Upper Section Motion Control Wires (115) to Lower Section Wires (309) for
each side.
Attach the Upright Cover RL (305) and Upright Cover LR (304). Secure using four
#8 x 19mm Screws (806) and four #8 x 19mm Metal Screws (807).
www.smoothfitness.co.uk
806
X4
807
x4
23
24
9.35e TREADMILL
ASSEMBLY
STEP 5:
First Fix the Ground Wire (110) to the Upright Tube (301) and secure using one #8 x 19mm Metal
Screws (807).
Attach the Upright Cover RR (306) and the Upright Cover LL (303) to the Upright Tube(302)and
(301). Secure using four #8 x 19mm Screws (806) and four #8 x 19mm Metal Screws (807).
807
301
www.smoothfitness.co.uk
806
x4
807
X4
9.35e TREADMILL
ASSEMBLY
STEP 6:
Put Adjustable Cylinder Cover – Upper(315)into Adjustable Cylinder (310). Attach the Adjustable
Cylinder (310) to the Left Upright (301), one 13 x 42mm Bolt (845) and two M8 × 15mm Allen Head
Bolt (843).Upper , one Washer(846)and one Nylon Nut(826)bottom. Repeat this procedure on
the Right Upright (302).
www.smoothfitness.co.uk
826
X2
843
X4
845
X2
846
X2
25
26
9.35e TREADMILL
ASSEMBLY
STEP 7:
Attach the Upright Plastic Shroud - LL (311) , Upright Plastic Shroud - LR (312) and Adjustable
Cylinder Cover – Upper(315)to the Upright - L (301) and secure with four #8 x 19mm Screws
(806) and five #8 x 19mm Screws (807). Repeat the procedure on the Right Upright (302) to
attach the Upright Plastic Shroud RL (313) , Upright Plastic Shroud RR (314) and Adjustable
Cylinder Cover – Upper(315).
www.smoothfitness.co.uk
806
X8
807
X10
9.35e TREADMILL
ASSEMBLY
STEP 8:
Secure by tightening the Fix Bolts Sets (412). The Fix Bolts Sets (412) are pre-assembled to the Base Frame
(401) at the factory.
www.smoothfitness.co.uk
27
28
9.35e TREADMILL
STABILIZER ADJUSTMENT
FOLLOW THESE INSTRUCTIONS TO LEVEL YOUR TREADMILL:
An uneven floor or improper stabilizer level can cause the treadmill to wobble during use as well as the incline adjustment to
function incorrectly. Please follow the procedure described below to make sure the treadmill stabilizer is adjusted correctly prior to
use. You may need the assistance of another person to perform this adjustment.
First locate the two adjustable stabilizers under the base frame. Then simply rotate them in or out to adjust the level of
the treadmill. When properly adjusted the treadmill should sit firmly on both stabilizers and all cushions.
Locate the two adjustable stabilizers under the base frame.
Treadmill should sit firmly on both stabilizers and all cushions.
www.smoothfitness.co.uk
9.35e TREADMILL
FOLDING INSTRUCTIONS
How to fold up the treadmill:
Your treadmill can be folded up for space saving storage. To do this follow the instructions here:
C
LI
C
K
Lift the deck carefully from rear.
You will hear a click sound when the lock engages.
www.smoothfitness.co.uk
29
30
9.35e TREADMILL
UNFOLDING INSTRUCTIONS
How to unfold the treadmill:
To unfold the treadmill for use follow the instructions here:
Release Lever
Tip the release lever with your foot…peels.
… and carefully let down the deck.
www.smoothfitness.co.uk
9.35e TREADMILL
TRANSPORT INSTRUCTIONS
TRANSPORT INSTRUCTIONS:
To roll away for storage simply grab the rear deck, lift slightly and roll to desired location.
Lift the deck from the rear so that the treadmill rests on the front transportation wheels.
Roll to a desired location.
www.smoothfitness.co.uk
31
32
9.35e TREADMILL
COMPUTER OPERATION
Calories/Calories Per Hour
A
B
Time/Distance
Preset Programs
C
D
Motion Control
Incline UP/DOWN
E
F
Enter
Message Center
G
H
Safety Key
Stop
I
J
Start
Mode
K
L
Speed UP/DOWN
Heart Rate
M
N
Incline/Level
POWER ON:
Set the POWER SWITCH, located on the bottom of the left handle bar upright tube, to ON and insert the SAFETY KEY.
SLEEP MODE:
The computer will automatically enter SLEEP MODE if left idle for 3 minutes without any input in POWER ON status. Press any
button to return to POWER ON status when the computer is in SLEEP MODE.
3 SECONDS ALERT:
To ensure you are well prepared before the belt starts moving, every time you press the START button to start the belt, the
SPEED window will countdown 3 seconds with the LED showing “3-2-1” then the belt will start moving.
PAUSE/STOP:
When the treadmill is running, press the STOP button to pause the treadmill. All figures on the displayed on the LED will freeze.
Press START to resume the program and all displays will continue the performance until the program finishes. If you continue
pressing the STOP twice, then all data will return to 0 and the treadmill will return to POWER ON status. If there is no action
within 3 minutes, the treadmill will return to POWER ON status.
www.smoothfitness.co.uk
9.35e TREADMILL
33
COMPUTER OPERATION
ENGLISH/METRIC CONVERSION:
The treadmill computer display can show ENGLISH and METRIC information. The factory should have the proper setting on this
for different markets. In case that the treadmill needs to be converted between METRIC and ENGLISH readout, please follow the
procedure as below:
1.
Set the POWER SWITCH to ON. Press the START button on the computer and hold it. Insert the SAFETY KEY then
release the START button. The computer will sound one short beep and METRIC LED light up.
2.
Press the START button to switch between METRIC/ENGLISH and press the STOP button to confirm the selection and
return to the POWER ON status.
QUICK START:
When the treadmill is in POWER ON status, press the START button to activate the QUICK START program. The speed will start
from 0.5MPH/0.8KMPH. Press the SPEED UP/DOWN button to change the speed. Press the INCLINE switch to elevate the
treadmill. The TIME, CALORIES and DISTANCE will count up from 0.
PROGRAM:
To select other programs, you will need to select the USER first. The computer display would show the USER CODE after you
press any pre-set program button.
The computer will display the factory default setting:
CALORIES window will display the default user 1 weight: 68KG/150LB
TIME window will display the default user 1 height: 170CM/67”
SPEED window will display the default user 1 code: U1
INCLINE window will display the default user 1 age: 35
HEART RATE window will display the default user 1 pulse: 157
If the user 1 information has been changed and saved, then the POWER ON status will show the last saved user 1 information
instead of the factory default setting.
Press the SPEED UP/DOWN button to select the USER CODE from U1 to U9 then press the ENTER button to confirm the user
code. If the user information has been previously input, press the ENTER button again and hold it for 5 seconds then the
computer will skip the user information set up procedure. To input the new user information, please follow the procedure as
below:
WEIGHT set up – After the User Code confirmation procedure, The CALORIES/CAL PER HOUR display will show the default or
previous setting and begin blinking. Press the SPEED UP/DOWN button to adjust the user weight information then press ENTER
to confirm.
HEIGHT set up – After the WEIGHT set up procedure, the TIME/DISTANCE display will show the default or previous setting and
begin blinking. Press the SPEED UP/DOWN button to adjust the user height information then press ENTER to confirm.
AGE set up – After the HEIGHT set up procedure, the INCLINE/LEVEL display will show the default or previous setting and begin
blinking. Press the SPEED UP/DOWN button to adjust the user age information then press ENTER to confirm.
GOAL COURSE TIME:
When the computer is in POWER ON status press the
button on the console. The LED on
button will light up. Then you
have to select the user code. After completed the user profile setup, the TIME LED will light up and show the preset time as
30:00 and blank. Press the SPEED UP/DOWN buttons to set your ideal workout time then press the ENTER button to confirm.
Then press the START button to start. After pressing the START button the TIME counts down from the preset time. The other
information counts up until the treadmill stops. The Speed starts from 2MPH/3.2KMPH and the incline starts from level 0. Press
the SPEED UP/DOWN buttons to adjust the speed. Press the INCLINE UP/DOWN buttons to adjust the incline level.
During exercise press STOP to pause the program. Speed and Incline Level return to the beginning levels while
the other information (Time, Distance, Calories) is paused. To recall values and resume exercising press START. Pressing the
STOP button again within 30 seconds returns all data to zero and the computer returns to POWER ON status. If no buttons are
pressed within 30 seconds the computer automatically returns to POWER ON status and all data returns to zero.
www.smoothfitness.co.uk
34
9.35e TREADMILL
COMPUTER OPERATION
GOAL COURSE DISTANCE:
button on the console. The LED on
button lights up. Then you have
When the computer is in POWER ON status press the
to select the user code. After completed the user profile setup, the DISTANCE LED will light up and show the preset distance as
0 and begin blinking. Press the SPEED UP/DOWN buttons to set up the ideal distance then press the ENTER button to confirm.
Then press the START button to start. After pressing the START button the DISTANCE counts down from the preset distance.
The other information counts up until the treadmill stops. The Speed starts from 2MPH/3.2KMPH and incline starts from level 0.
During exercise press STOP to pause the program. Speed and Incline Level return to the beginning levels while the other
information (Time, Distance, Calories) is paused. To recall values and resume exercising press START. Pressing the STOP
button again within 30 seconds returns all data to zero and the computer returns to POWER ON status. If no buttons are pressed
within 30 seconds the computer automatically returns to POWER ON status and all data returns to zero.
GOAL COURSE CALORIES:
When the computer is in POWER ON status press the
button on the console. The LED
button lights up. Then you have to
select the user code. After completed the user profile setup, The CALORIES LED will light up and show the preset calories
burned as 0 and blinking. Press the SPEED UP/DOWN buttons to set up the desired calories then press the ENTER button to
confirm. Then press the START button to start. After pressing the START button the CALORIES count down from the preset
calories. The other information counts up until the treadmill stops. The Speed starts from 2MPH/3.2KMPH and the incline starts
from level 0. Press the SPEED UP/DOWN buttons to adjust the speed. Press the INCLINE UP/DOWN buttons to adjust the
incline level.
During exercise press STOP to pause the program. The Speed and Incline Level return to the beginning levels while the other
information (Time, Distance, Calories) is paused. To recall values and resume exercising press START. Pressing the STOP button
again within 30 seconds returns all data to zero and the computer returns to POWER ON status. If no buttons are pressed within
30 seconds the computer automatically returns to POWER ON status and all data returns to zero.
KILLER HILLS:
When the treadmill is in PROGRAM SELECT status, press the
button. Then you have to select the user code. After
completed the user profile setup, the LEVEL display will show 01 and be blinking. There are total of 12 different workout levels
that can be selected. Press the SPEED UP/DOWN button to select the level then press the ENTER button. The TIME LED will
show a pre-set workout time of 24 minutes. Press the SPEED UP/DOWN button to adjust the time, 4 minutes per segment for
every adjustment. Press the ENTER button to confirm the workout time then press the START button to start the program. The
program will start with 2 minutes in MIN. GRADE% and 2 minutes in MAX. GRADE%. Repeat in 4 minute segments until the time
counts down to zero.
Pre-set speed 2.0MPH/3.2KMPH, adjust the speed using the SPEED UP/DOWN BUTTON,
KILLER HILLS WORKOUT
LEVEL
MIN. GRADE%
1
0
2
1
3
2
4
3
5
4
6
5
7
6
8
7
9
8
10
9
11
10
12
11
MAX. GRADE%
4
5
6
7
8
9
10
11
12
13
14
15
www.smoothfitness.co.uk
9.35e TREADMILL
35
COMPUTER OPERATION
SPEED INTERVAL:
When treadmill is in PROGRAM SELECT status, press
button. Then you have to select the user code. After completed the
user profile setup, the LEVEL display will show a blinking 01. There are a total of 12 different workout levels that can be
selected. Press the SPEED UP/DOWN button to select the level then press the ENTER button. The TIME LED will show a preset workout time of 24 minutes. Press the SPEED UP/DOWN button to adjust the time, 4 minutes per segment for every
adjustment. Press the ENTER button to confirm the workout time then press the START button to start the program. The
program will start with 2 minutes in MIN. SPEED and 2 minutes in MAX. SPEED. Repeat this in 4 minutes segments until the
time counts down to zero.
Pre-set INCLINE LEVEL at 0%. Adjust the incline level using the INCLINE UP/DOWN button during the workout.
LEVEL
1
2
3
4
5
6
7
8
9
10
11
12
MIN. SPEED mph
1.8
2.0
2.2
2.4
2.6
2.8
3.0
3.2
3.4
3.6
3.8
4.0
SPEED INTERVAL WORKOUT
MAX. SPEED mph LEVEL
MIN. SPEED kph
3.0
1
2.9
3.4
2
3.2
3.8
3
3.5
4.2
4
3.8
4.6
5
4.2
5.0
6
4.5
5.4
7
4.8
5.8
8
5.1
6.2
9
5.4
6.6
10
5.8
7.0
11
6.1
7.2
12
6.4
MAX. SPEED kph
4.8
5.4
6.1
6.7
7.4
8.0
8.6
9.3
9.9
10.6
11.2
11.5
WEIGHT LOSS:
button. Then you have to select the user code. After
When the treadmill is in PROGRAM SELECT status, press the
completed the user profile setup, the LEVEL will display a blinking 01. There are a total of 12 different workout levels that can be
selected. Press the SPEED UP/DOWN button to select the level then press the ENTER button. The TIME LED will show a preset workout time of 30 minutes. Press the SPEED UP/DOWN button to adjust the time, 5 minutes per segment for every
adjustment. Press the ENTER button to confirm the workout time then press the START button to start the program. The
program will start with 2 .5minutes in MIN. SPEED/GRADE% and 2.5 minutes in MAX. SPEED/GRADE%. Repeat in 5 minute
segments until the time counts down to zero.
WEIGHT LOSS WORKOUT
MIN.
MAX.
MINI.
LEVEL
SPEED ml SPEED ml
GRADE%
1
1.6
2.8
0
2
1.8
3.0
0
MAX
GRADE%
3
4
3
4
5
6
7
8
9
10
11
2.0
2.2
2.4
2.6
2.8
3.0
3.2
3.4
3.6
3.2
3.4
3.6
3.8
4.0
4.2
4.4
4.6
4.8
1
1
2
2
3
3
3
4
4
5
6
7
8
9
10
11
12
13
12
3.8
5.0
4
14
WEIGHT LOSS WORKOUT
MIN.
MAX.
MINI.
LEVEL
SPEED km SPEED km GRADE%
1
2.6
4.5
0
2
2.9
4.8
0
3
3.2
5.1
1
4
3.5
5.4
1
5
3.8
5.8
2
6
7
8
9
10
11
12
4.2
4.5
4.8
5.1
5.4
5.8
6.1
www.smoothfitness.co.uk
6.1
6.4
6.7
7.0
7.4
7.7
8.0
2
3
3
3
4
4
4
MAX
GRADE%
3
4
5
6
7
8
9
10
11
12
13
14
36
9.35e TREADMILL
COMPUTER OPERATION
5K SELF LEARNING/COMPETITION:
When the treadmill is in PROGRAM SELECT status, press the
button. Then you have to select the user code. After
completed the user profile setup, the DISTANCE LED will show 5(KM)/3(MILE). For new users, there is a pre-set speed and
incline% program in the computer. Press the START button to start the program. The user can change the speed and
increase t