1
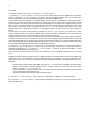
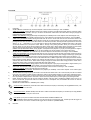
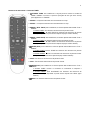
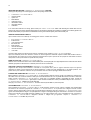
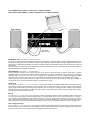
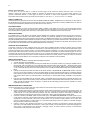
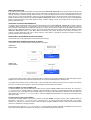
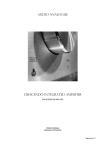
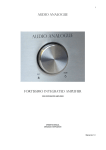
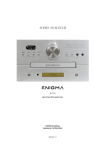
AUDIO ANALOGUE
CHERUBINI vt
TUNER/USBDAC
OWNER’S MANUAL
MANUALE D’ISTRUZIONI
Manual rev1.0
2
3
Dear Audiophile,
congratulations and thank you for choosing CHERUBINI VT Tuner/USBDAC.
The CHERUBINI VT Tuner/USBDAC is an extremely interesting and innovative product. It is not just a Tuner but also
includes an entire high performance USBDAC section. The CHERUBINI VT Tuner/USBDAC can be seen as two different
audio sources combined in a single piece of equipment, each source corresponding to a different working mode: Tuner Mode and
USBDAC Mode.
The specific circuits for each mode are completely separated physically and just one section at a time is supplied, according to the
selected mode (This avoids any kind of interference between the two signal paths). Instead, the analogue output stage is the same
for both of the modes. It is composed by an Op Amp stage followed by a vacuum tube output stage configured as buffer to mix the
Op Amp cleanness and filter capability with the typical audio colours of a vacuum tube. Everything has been realized according to
the well known Audio Analogue experience in mixed solid state/vacuum tube technology. The power supply is based on a
toroidal transformer and each section has its own voltage regulator stage.
The tuner is based on a high performance circuit already used by Audio Analogue on its tuner products. The whole tuner
section has been realized in a metallic separated box to shield the RF interference and a special buffer stage has been put between
the tuner section and the output stage to further decrease the RF noise.
The USBDAC section is composed by a dedicated section which, working on the USB data, supplies a SPDIF digital audio signal.
The digital audio signal is then converted into an analogue one by a high performance DA section composed by: a 96 KHz/24Bit,
very low recovered system clock Burr Brown receiver (residual jitter less than 50ps!) and a 24 Bit/192KHz Enhanced Multilevel Delta
Sigma architecture DAC (The conversion circuit is placed on a separated board to avoid any high frequency disturbance on the
audio signal).
The CHERUBINI VT Tuner/USBDAC is controlled by a microcontroller and both the switches on the front board and the
remote switches have different functions depending on the mode the unit is working on. The CHERUBINI VT
Tuner/USBDAC has a very reliable low emission display to not interfere with the audio signals.
All the components, passive and active have been chosen considering their electrical characteristics and sound performance too.
The USBDAC permits you to connect the Hi-Fi system to the PC or MAC via a USB connection. In this way the PC/MAC sees the
Hi-Fi system as its audio board and everything which is played on the PC/MAC is reproduced by the Hi-Fi System. This opens up a
wide spread of possibilities which we think will be soon appreciated by every, also “old style”, audiophile:
•
•
•
Listening to tracks in any format (MP3, WMA, FLAC, APE and so on…..) which you have in your PC via a software player.
In such cases, according to the player, you can also control the PC (Next track, Previous track, Play, Stop, Pause) by the
CHERUBINI VT Tuner/USBDAC front switches or remote.
Listening to an on-streaming tuner. On the web there are a lot of tuner stations which transmit on-streaming, so a lot of
stations from everywhere in the word can be listened to.
Listening to audio movie tracks which are playing on the PC.
The CHERUBINI VT Tuner/USBDAC has also a SPDIF Out which can be sent to an external DA converter.
The CHERUBINI VT Tuner/USBDAC has the Trigger Out connections so it can switch on/off another unit of the audio
chain.
4
Caro Audiofilo,
congratulazioni e grazie per aver scelto il CHERUBINI VT TUNER/USBDAC.
Il CHERUBINI VT TUNER/USBDAC non è solo una radio ma include anche una sezione USBDAC ad alte prestazioni.
Pertanto il CHERUBINI VT TUNER/USBDAC può essere visto come due differenti sorgenti audio in un solo apparecchio,
ciascuna corrispondente a due diverse modalità di funzionamento: Tuner Mode e USBDAC Mode.
I circuiti specifici per ciascuna modalità sono fisicamente separati e ciascuna sezione viene alimentata a seconda della modalità in
funzione (questo per evitare qualsiasi tipo di interferenza tra i due differenti percorsi di segnale). Invece lo stadio analogico di uscita
è comune. Si tratta di uno stadio costituito da una parte a Op Amp seguita da una sezione valvolare configurata a buffer. In questo
modo si riescono a miscelare la pulizia e le proprietà di filtraggio dello stadio a operazionale con le caratteristiche di “colore” della
parte a valvola. Il tutto secondo la ormai nota esperienza di Audio Analogue nell’utilizzo della tecnologia a stato solido
insieme a quella a tubi. L’alimentazione è basata su un trasformatore toroidale e ciascuna sezione ha il proprio regolatore di
tensione.
La radio si basa su un circuito ad alte prestazioni già utilizzato da Audio Analogue per i suoi prodotti Tuner. L’intera
sezione è realizzata all’interno di un contenitore metallico separato al fine di schermare la radiofrequenza e tra la sezione tuner e il
circuito di uscita è stato interposto uno speciale buffer per ridurre ulteriormente il rumore RF.
L’USBDAC è realizzato con una sezione a se stante che lavorando sul flusso di dati USB ricava un segnale digitale audio SPDIF.
Tale segnale viene quindi convertito in analogico da una sezione di conversione digitale-analogico ad alte prestazioni composta da:
un ricevitore 96 KHz/24Bit, very low recovered system clock (jitter residuo inferiore di 50ps!) e un convertitore digitale analogico Burr
Brown 24 Bit/192KHz ad architettura Enhanced Multilevel Delta Sigma. Il circuito di conversione è realizzato su una scheda separata
in modo da evitare qualsiasi disturbo ad alta frequenza sul segnale audio analogico).
Il CHERUBINI VT Tuner/USBDAC è controllato da un microcontrollore che gestisce i vari comandi sul frontale e il
telecomando. Sia i tasti sul telecomando che i tasti e comandi sul frontale hanno diverse funzioni a seconda della modalità di
funzionamento dell’apparecchio. Il CHERUBINI VT Tuner/USBDAC è dotato di un display molto affidabile e a bassa
emissione al fine di non interferire con il segnale audio.
Tutti i componenti, sia passivi che attivi, sono stati scelti considerando sia le loro caratteristiche elettriche che le loro proprietà
sonore.
L’USBDAC permette di collegare l’impianto Hi-Fi al PC o al MAC utilizzando la connessione USB. In questo modo il PC/MAC vede
l’impianto Hi-Fi come la sua scheda audio. Pertanto, qualunque segnale audio sul PC/MAC, verrà riprodotto dall’impianto Hi-Fi.
Questo approccio apre nuove e innumerevoli possibilità, che saranno sicuramente apprezzate anche dagli audiofili “vecchio stile”.
Ad esempio:
-
-
Riprodurre brani di qualsiasi formato (MP3, WMA, FLAC, APE, ecc…..) che avete nel vostro PC/MAC. A seconda del Player
utilizzato, è anche possibile controllare il PC/MAC inviando i comandi di: Next track, Previous track, Play, Stop, Pause,
tramite il CHERUBINI VT Tuner/USBDAC.
Ascoltare Web Radio in streaming. Nel web vi sono molte stazioni radio che trasmettono in streaming. Possono pertanto
essere ascoltate stazioni radio da tutto il mondo.
Riprodurre nell’impianto Hi-Fi brani audio di film in riproduzione sul PC.
Il CHERUBINI VT Tuner/USBDAC è inoltre dotato di un’ uscita digitale per collegare un convertitore DA esterno.
Nel CHERUBINI VT Tuner/USBDAC è inoltre presente il collegamento di Trigger OUT così da poter accendere un altro
apparecchio della catena.
5
INTRODUCTION
AUDIO ANALOGUE does not take any responsibility in the following cases:
Whenever the operational procedures related to the use and the maintenance of the equipment as described in this manual are not
respected.
Whenever damages to the equipment occur because of fixing and modifications made by non-authorized staff or because of normal
deterioration of the system.
No part of this manual can be reproduced by any means, transmitted or copied for private or public use without private authorization
from AUDIO ANALOGUE.
The information contained in this manual is related to the data kept by AUDIO ANALOGUE at the moment of the issue of this
publication; AUDIO ANALOGUE has the right to make changes to this document without prior notice.
The equipment has been projected and manufactured according to the Regulations of the Community 89/336/CEE and is marked CE.
This equipment can’t be used for different purposes other than those for which it has been manufactured.
AUDIO ANALOGUE does not take any responsibility for accidents or damage due to improper use of the equipment.
WARNING
Please respect the safety standards contained in this manual before starting to operate the equipment.
Do not open the equipment. No further interventions than those described in this manual should be made. For technical assistance,
please consult a qualified technician or an AUDIO ANALOGUE dealer.
Not respecting the instructions contained in this manual will invalidate the terms and conditions of the guarantee.
NECESSARY PRECAUTIONS FOR SAFETY AND MAINTENANCE
ATTENTION: before starting any operation, use or maintenance of the equipment it is strictly necessary to understand the following
manual.
To avoid any accidents or hazards it is necessary to follow the following regulations.
Activate the equipment only prior checking if the installation has been properly made, and if it is related to the instructions contained
in this manual.
Avoid installing the equipment in places subjected to extremely high temperatures or humidity.
Check that the labels containing information about safety are always visible and in good conditions.
Ensure not to obstruct ventilation and to avoid excessive overheating. The equipment should be kept to a minimal distance of 15 cm
from any object and not to place on carpet or other soft surfaces. Also the installation close to radiators or in small spaces without
ventilation should be avoided.
Do not switch on the equipment until it has not been correctly and completely installed.
Only supply the equipment with the kind of the electric supply as stated on the appropriate label. If in doubt about the kind of supply
available, please consult an expert technician for technical assistance.
The equipment needs to be wired to an earth terminal. The external case is made of metal; a defective connection with the earth
may be dangerous.
In case damage occurs to the supply cable, it should be immediately replaced with the same kind of cable. This operation should be
only made prior to disconnecting the main supply.
Do not place objects on the supply cable and check that this is not positioned across a walk way. The cable should not be knotted or
curly.
Replace the fuses always with other of the same kind.
Do not use the equipment close to water or other liquids. If liquid enters the equipment, the plug should be disconnected from the
socket avoiding touching the metal parts. Competent technical staff should be asked to check the equipment before operating it
again.
Do not place recipients containing liquids on the equipment, even when it is switched off.
Keep the equipment far from sources of heat such as the solar light, kitchens, radiators etc…
Always unplug the supply cable during rainy weather.
Always switch off and unplug the supply cable before cleaning the equipment externally: this operation should be made using a dry
and soft cloth. Never use alcohol based cleaning material.
If the amplifier was carried from an extremely cold environment to and extremely hot one, it could create internal condensation
causing possible malfunctioning.
If this occurs, please wait for at least an hour before using it again to allow it to gradually reach room temperature.
When not used for long periods, please unplug the equipment.
INSTRUCTIONS TO PUT IT OUT OF SERVICE
Consult qualified staff
Follow the regulations of the current legislation regarding recycling and waste disposal.
6
PREMESSA
AUDIO ANALOGUE non accetta responsabilità nei casi in cui:
Le procedure operative di utilizzo e manutenzione dell’apparato descritte nel manuale non siano rispettate.
I danni si verifichino in seguito a riparazioni o modifiche dell’apparato eseguite da personale non autorizzato o a seguito di normale
deterioramento dell’apparato.
Nessuna parte del presente manuale può essere riprodotta con alcun mezzo, trasmessa o copiata per usi pubblici e/o privati senza
la previa autorizzazione di AUDIO ANALOGUE. Le informazioni contenute nel presente manuale sono relative ai dati in possesso di
AUDIO ANALOGUE al momento della pubblicazione; AUDIO ANALOGUE si riserva il diritto di apportare cambiamenti al presente
documento senza alcun preavviso.
L’apparato è progettato e realizzato in conformità alle Direttive Comunitarie 89/336/CEE e 72/23/CEE e risulta marcato CE.
L’apparato non può essere utilizzato per scopi diversi da quelli per cui è stato progettato.
AUDIO ANALOGUE non si assume alcuna responsabilità per incidenti o danni causati da un utilizzo improprio dell’apparato.
AVVERTENZA
Prima di compiere qualunque operazione attenersi alle norme di sicurezza contenute all’interno del manuale
Non aprire l’apparecchio. Nessun ulteriore intervento oltre a quelli descritti in questo manuale dovrebbe essere effettuato. Per
l’assistenza tecnica, rivolgersi a un tecnico qualificato o a un rivenditore AUDIO ANALOGUE.
Il mancato rispetto delle prescrizioni del seguente manuale implica il decadimento della garanzia.
PRECAUZIONI PER LA SICUREZZA E MANUTENZIONE
ATTENZIONE: prima dell’utilizzo o manutenzione dell’apparato o di qualsiasi operazione sullo stesso è necessario prendere visione
del seguente manuale.
Al fine di prevenire ogni pericolo di incidente si impongono le seguenti prescrizioni:
Attivare l’apparato solo dopo aver verificato l’adeguatezza dell’installazione e la conformità alle indicazioni contenute nel presente
manuale.
Non installare l’apparecchiatura in luoghi soggetti a sbalzi eccessivi di temperatura e umidità.
Verificare che le etichette contenenti informazioni sulla sicurezza siano sempre ben visibili ed in buono stato.
Le fessure di ventilazione non devono assolutamente essere ostruite per evitare surriscaldamento dell’apparato. A tal fine,
posizionare l’unità ad una distanza minima di 15 cm da ogni altro ostacolo e non su tappeti, moquette o altre superfici morbide.
Evitare inoltre di installarlo nei pressi di caloriferi o in ambienti chiusi, privi di una appropriata ventilazione.
Non accendere l’apparato finché non è completamente installato in maniera corretta.
Alimentare l’apparato con il tipo di alimentazione elettrica riportato sull’apposita targhetta. In caso di dubbi sul tipo di alimentazione
disponibile, consultare il servizio di assistenza tecnica.
L’apparecchio deve essere sempre collegato a terra. Poiché l’involucro è costituito in metallo, una connessione di terra difettosa o
mancante potrebbe essere pericolosa.
In caso di danneggiamenti al cavo di alimentazione, provvedere immediatamente alla sostituzione con un altro dello stesso tipo.
Questa operazione deve essere effettuata dopo aver disconnesso l’alimentazione primaria.
Non posizionare oggetti sul cavo di alimentazione e verificare che questo non si trovi in una zona di passaggio. Il cavo non deve
essere arrotolato o annodato.
Sostituire i fusibili sempre con altri dello stesso tipo.
Non usare l’apparato in prossimità di acqua o altri tipi di liquidi. Se nell’unità dovesse entrare del liquido, scollegare immediatamente
il cavo di rete dalla presa a muro evitando di toccare le parti metalliche dell’apparecchiatura e rivolgersi al personale tecnico per un
controllo prima del riutilizzo.
Non appoggiare recipienti contenenti liquidi di qualsivoglia natura sopra l’apparato. Anche quando questo è spento.
Tenere l’apparecchio lontano da fonti di calore come la luce solare, cucine, radiatori, etc…
Scollegare sempre il cavo di alimentazione dalla presa durante i temporali.
Spegnere e scollegare sempre l’alimentazione prima di effettuare la pulizia esterna dell’apparato: questa operazione deve essere
effettuata utilizzando un panno asciutto e morbido. Non usare mai solventi o detergenti a base di alcool.
Se l’amplificatore viene trasportato da un ambiente freddo ad un altro caldo, si potrebbe formare condensa al suo interno, causando
possibili malfunzionamenti. Se ciò si dovesse verificare, si prega di attendere almeno un’ora prima dell’uso in modo da permettergli
di raggiungere la temperatura ambiente gradualmente.
In caso di lunghi periodi di inutilizzo, staccare la spina dalla presa di rete.
ISTRUZIONI PER LA MESSA FUORI SERVIZIO
Rivolgersi a personale specializzato.
Seguire le prescrizioni della corrente legislazione in materia di riciclaggio e smaltimento dei rifiuti
7
Front panel
1
1)
2)
3)
4)
5)
6)
7)
8)
9)
2
3
4
5
6
7
8
9
10
LCD display.
STORE / STOP: multifunction key, the function depends on the mode the unit is working in: Tuner or USBDAC.
TUNER mode (STORE): Pressing this button puts the unit in “Storage” mode and is possible to permanently store the current radio station
in the unit’s memory. It is possible to store up to 18 AM and 18 FM stations. Please refer to the “Radio stations storage” paragraph for
further details about storage procedure.
USBDAC mode (STOP): During playback Stops track playback (the availability of this function depends on the software player used)
PREV TRACK / MEMORY DOWN: multifunction key, the function depends on the mode the unit is working in: Tuner or USBDAC
TUNER mode ( MEMORY DOWN): Pressing this button when the unit is in normal mode tunes the radio on the station stored in the
memory allocation that precedes the last selected allocation. When the unit exits the Standby mode and when changing modulation type,
pressing this button tunes the radio on the station stored in the 18th memory allocation. Pressing the button again tunes the radio on the
station n° 17, 16,…, 1 then back to n° 18. If no radio station is stored into the selected allocation, an EMPTY signal shows on the display
and the radio switches back to the previous station. When in “Storage” mode, pressing this button allows you to choose the memory
allocation where you would like to store the selected radio station. Please refer to “Radio stations storage” paragraph for further details
about storage procedure. Please refer to “Stored Radio stations tuning” paragraph for further details about radio station tuning.
USBDAC mode ( PREVIOUS TRACK): During playback, starts previous track playback on your play list, when playback is stopped it
allows you to choose the previous track on your play list. (the availability of this function depends on the software player used).
NEXT TRACK / MEMORY UP: multifunction key, the function depends on the mode the unit is working in: Tuner or USBDAC
TUNER mode (MEMORY UP): Pressing this button when the unit is in normal mode tunes the radio on the station stored in the memory
allocation that follows the last selected allocation. When the unit exits the Standby mode and when changing modulation type, pressing this
button tunes the radio to the station stored in the 1st memory allocation. Pressing the button again tunes the radio on the station n° 2, 3,…,
18 then back to n° 1. If no radio station is stored on the selected allocation, an EMPTY signal shows on the display and the radio switches
back to the previous station. When in “Storage” mode, pressing this button allows you to choose the memory allocation where to store the
selected radio station. Please refer to “Radio stations storage” paragraph for further details about storage procedure. Please refer to
“Stored Radio stations tuning” paragraph for further details about radio stations tuning.
USBDAC mode ( NEXT TRACK): During playback, starts next track playback on your play list, when playback is stopped it allows you to
choose the next track on your play list. (the availability of this function depends on the software player used)
AM/FM /► PLAY/PAUSE: multifunction key, the function depends on the mode the unit is working in: Tuner or USBDAC
TUNER mode (AM/FM): Pressing this button changes modulation type.
USBDAC mode (► PLAY/PAUSE): Starts/Pauses track playback (the availability of this function depends on the software player
used).
▼ SCAN DOWN: the tuning frequency is decreased to reach the first radio station which is has a lower frequency than the one it started
from; if this is not possible a complete scansion of the band is carried out and the present frequency is tuned again by pressing the button.
▲ SCAN UP: the tuning frequency is increased to reach the first radio station which has a higher frequency than the one it started from; if
this is not possible a complete scansion of the band is carried out and the present frequency is tuned again by just pressing the button.
MONO: Pressing this button forces the unit into monophonic playback, when this option is enabled the STEREO LED is turned off. To
return to normal mode, just press this button once. When the unit is in stereophonic mode, the STEREO LED is turned on when the
incoming signal is stereophonic.
SEARCH UP or DOWN / SELECT - STANDBY [Knob / Switch]:
Clockwise rotation: (SEARCH UP). When the knob is rotated clockwise, the frequency is increased by one step (SEARCH function). This
function is active just in Tuner mode.
Anti-clockwise rotation: (SEARCH DOWN). When this knob is rotated anti-clockwise the frequency is decreased by one step (SEARCH
function). This function is active just in Tuner mode.
Push (SELECT): One press and release of the knob switches between TUNER or USBDAC mode.
Push (STANDBY): Keeping this button pushed for some seconds puts the unit in Stand By mode. In Stand By mode the Trigger Out
signal is set to zero, so if a unit is connected via the Trigger Out it is switched off. (STANDBY MODE)
10)
IR receiver.
8
DESCRIZIONE DEL PANNELLO FRONTALE
1)
2)
3)
4)
5)
6)
7)
8)
9)
Display LCD.
STORE / STOP: tasto multifunzione, la funzione dipende dalla modalità di lavoro Tuner o USBDAC.
in modalità TUNER (STORE): Premendo e rilasciando questo pulsante si entra in modalità “memorizzazione” ed è possibile memorizzare
in modo non volatile la stazione selezionata al momento della pressione del tasto. Si possono memorizzare fino a 18 stazioni radio AM e
18 FM. Per maggiori dettagli circa la procedura per memorizzare le stazioni radio si veda il paragrafo: ”Memorizzazione delle stazioni
radio”.
in modalità USBDAC (STOP): Interrompe la riproduzione della traccia se il software player sul PC è in riproduzione. (La disponibilità di
questa funzione dipende dal software player utilizzato)
PREV TRACK / MEMORY DOWN: tasto multifunzione, la funzione dipende dalla modalità di lavoro Tuner o USBDAC.
in modalità TUNER ( MEMORY DOWN): In modalità “normale” la pressione e rilascio di questo tasto permette di sintonizzare la
stazione radio memorizzata nella locazione di memoria precedente all’ultima selezionata. Quando l’apparecchio esce dallo Standby e
quando si commuta da un tipo di modulazione all’altra, la prima pressione del tasto MEMORY DOWN porterà alla sintonia della stazione
radio memorizzata nell’ultima locazione (la diciottesima). Le ulteriori pressioni del tasto porteranno alla sintonia delle stazioni memorizzate
nelle locazioni 17,16,15…1, per poi ripartire dalla diciottesima. Se nella locazione selezionata non risulta memorizzata una stazione radio,
apparirà sul display la scritta “EMPTY” e verrà nuovamente sintonizzata la frequenza presente al momento della pressione del tasto. La
pressione del tasto in modalità “memorizzazione” permette di selezionare la posizione in cui memorizzare la stazione radio selezionata.
Per maggiori dettagli circa la procedura per memorizzare le stazioni radio si veda il paragrafo “Memorizzazione delle stazioni radio”.
in modalità USBDAC ( PREV TRACK ): Durante la riproduzione di una traccia, la pressione di questo tasto provoca il salto alla traccia,
presente nella playlist, precedente a quella riprodotta in quel momento. Quando il player sul PC non è in riproduzione (modalità stop), è
possibile utilizzare questo pulsante per decidere da quale traccia iniziare la riproduzione o per scorrere in ordine decrescente le tracce
presenti nella playlist. (La disponibilità di questa funzione dipende dal software player utilizzato).
NEXT TRACK / MEMORY UP: tasto multifunzione, la funzione dipende dalla modalità di lavoro Tuner o USBDAC.
in modalità TUNER ( MEMORY UP): In modalità “normale” la pressione e rilascio di questo tasto permette di sintonizzare la stazione
radio memorizzata nella locazione di memoria successiva all’ultima locazione selezionata. Quando l’apparecchio esce dallo Standby e
quando si commuta da un tipo di modulazione all’altra, la prima pressione del tasto MEMORY UP porterà alla sintonia della stazione radio
memorizzata nella prima locazione. Le ulteriori pressioni del tasto porteranno alla sintonia delle stazioni memorizzate nelle locazioni 2, 3,
4….18, per poi ripartire dalla prima. Se nella locazione selezionata non risulta memorizzata una stazione radio, apparirà sul display la
scritta “EMPTY” e verrà nuovamente sintonizzata la frequenza presente al momento della pressione del tasto. La pressione del tasto in
modalità “memorizzazione” permette di selezionare la posizione in cui memorizzare la stazione radio selezionata. Per maggiori dettagli
circa la procedura per memorizzare le stazioni radio si veda il paragrafo “Memorizzazione delle stazioni radio”.
in modalità USBDAC ( NEXT TRACK): Durante la riproduzione di una traccia, la pressione di questo tasto provoca il salto alla traccia,
presente nella playlist, successiva a quella riprodotta in quel momento. Quando il player sul PC non è in riproduzione (modalità stop), è
possibile utilizzare questo pulsante per decidere da quale traccia iniziare la riproduzione o per scorrere in ordine crescente le tracce
presenti nella playlist. (La disponibilità di questa funzione dipende dal software player utilizzato).
AM/FM / ► PLAY/PAUSE: tasto multifunzione, la funzione dipende dalla modalità di lavoro Tuner o USBDAC.
in modalità TUNER (AM/FM): la pressione e rilascio di questo tasto consente di commutare tra modulazione di ampiezza e modulazione di
frequenza.
in modalità USBDAC (► PLAY/PAUSE): La pressione di questo tasto attiva la riproduzione da parte del player sul PC oppure ne attiva
o disattiva la pausa durante la riproduzione. (La disponibilità di questa funzione dipende dal software player utilizzato).
SCAN DOWN▼: decrementa la frequenza sintonizzata fino a raggiungere la prima stazione radio di frequenza inferiore a quella di
partenza, se ciò non è possibile viene eseguita una scansione completa della banda e quindi nuovamente sintonizzata la frequenza
presente alla pressione del tasto.
SCAN UP ▲: incrementa la frequenza sintonizzata fino a raggiungere la prima stazione radio di frequenza superiore a quella di partenza,
se ciò non è possibile viene eseguita una scansione completa della banda e quindi nuovamente sintonizzata la frequenza presente alla
pressione del tasto.
MONO: la pressione di questo tasto forza il tuner in riproduzione mono. Quando questa opzione è abilitata, il LED STEREO è spento. Per
ritornare alla modalità normale basterà premere il tasto MONO. Quando il tuner è in modalità stereo, il LED STEREO è acceso, atrimenti è
spento
SEARCH UP o DOWN / SELECT - STANDBY [Manopola / Pulsante]:
Rotazione in senso orario: (SEARCH +). Quando si ruota la manopola in senso orario viene incrementata di uno step la frequenza
sintonizzata (funzione SEARCH). Questa funzione è abilitata solo in modalità Tuner.
Rotazione in senso anti orario: (SEARCH -). Quando si ruota la manopola in senso anti orario, viene decrementata di uno step la
frequenza sintonizzata (funzione SEARCH). Questa funzione è abilitata solo in modalità Tuner.
Premere (SELECT): premere e rilasciare la manopola per passare da modalità TUNER a USBDAC e viceversa.
Premere (STANDBY): mantenere premuta la manopola per alcuni secondi per portare l’apparecchio in STANDBY MODE. In modalità
StandBy l’uscita Trigger Out viene portata a zero, quindi un eventuale apparecchio connesso a tale uscita verrà spento.
10)
Ricevitore IR
9
Back Panel
1
1)
2)
3)
4)
5)
6)
7)
8)
9)
10)
2
3
4
5
6
7
8
S/PDIF DIGITAL OUT: Digital output connector.
RIGHT OUT: Unbalanced right analogue output connector.
LEFT OUT: Unbalanced left analogue output connector.
Input USB: connect it to a USB port of your PC or MAC using a USB cable.
Trigger OUT: Trigger Out connector, See note on Trigger OUT Output.
75 Ohm FM antenna connector.
300 Ohm AM antenna connector.
Fuses. If necessary, replace them with others of the same kind (see back panel).
IEC standard power inlet. Connect here the provided power cord.
Main voltage switch
Descrizione del pannello posteriore
1) S/PDIF DIGITAL OUT: Connettore di uscita digitale.
2) RIGHT OUT: Connettore di uscita analogica right.
3) LEFT OUT: Connettore di uscita analogica left.
4) Input USB: connettere questo ingresso a una porta USB del vostro PC o MAC utilizzando un cavo USB.
5) Trigger OUT: vedi nota sull’uscita Trigger OUT.
6) Connettore per antenna FM da 75Ohm.
7) Connettore per antenna AM da 300Ohm.
8) Fusibili. Se necessario, ripristinare con fusibili dello stesso tipo (come indicato sul pannello posteriore).
9) Presa di rete a norma IEC. Collegare il cavo di alimentazione di rete fornito in dotazione.
10) Interruttore principale.
9
10
10
Description of the remote controller - TUNER Functions:
•
STANDBY TUNER: multifunction key: one press of this button switches the mode
between TUNER and USBDAC. Keeping the button pushed for some seconds puts the unit
in stand by mode.
• SEARCH +: the tuning frequency is increased by one step.
• SEARCH -: the tuning frequency is decreased by one step.
• MEMORY+ (NEXT TRACK): multifunction key, the function depends on the mode the unit is
working in: Tuner or USBDAC:
TUNER mode: for the description of this function refer to the front panel description.
USBDAC mode: NEXT TRACK, for the description of this function refer to the front
panel description. (the availability of this function depends on the software player used).
• MEMORY- (PREV TRACK): multifunction key, the function depends on the mode the unit is
working in: Tuner or USBDAC:
TUNER mode: for the description of this function refers to the front panel description.
USBDAC mode: PREV TRACK, for the description of this function refer to the front
panel description (the availability of this function depends on the software player used).
•
STORE (STOP): multifunction key, the function depends on the mode the unit is working
in: Tuner or USBDAC:
TUNER mode: for the description of this function refer to the front panel description.
USBDAC mode:STOP, for the description of this function refer to the front panel
description (the availability of this function depends on the software player used).
• SCAN +: for the description of this function refer to the front panel description.
• SCAN -: for the description of this function refer to the front panel description.
•
•
AM/FM (PLAY): multifunction key, the function depends on the mode the unit is working
in: Tuner or USBDAC:
TUNER mode: it permits you to commute from AM and FM.
USBDAC mode: ► PLAY/PAUSE, for the description of this function refer to the
front panel description (the availability of this function depends on the software player
used).
MONO: for the description of this function refer to the front panel description.
11
Descrizione del telecomando - Funzioni del TUNER:
•
STANDBY TUNER: tasto multifunzione: la singola pressione commuta la modalità tra
TUNER e USBDAC e viceversa, la pressione prolungata del tasto (per alcuni secondi)
porta l’apparecchio in STANDBY.
• SEARCH +: la frequenza selezionata viene incrementata di uno step.
• SEARCH - : la frequenza selezionata viene decrementatat di uno step.
• MEMORY+ (NEXT TRACK): tasto multifunzione, la funzione dipende dalla modalità: Tuner o
USBDAC:
in modalità TUNER: fare riferimento alla descrizione del pannello frontale
in modalità USBDAC: NEXT TRACK fare riferimento alla descrizione del pannello
frontale (La disponibilità di questa funzione dipende dal player software utilizzato).
• MEMORY- (PREV TRACK): tasto multifunzione, la funzione dipende dalla modalità :Tuner o
USBDAC:
in modalità TUNER: fare riferimento alla descrizione del pannello frontale.
in modalità USBDAC: PREV TRACK, fare riferimento alla descrizione del pannello
frontale (La disponibilità di questa funzione dipende dal player software utilizzato).
•
STORE (STOP): tasto multifunzione, la funzione dipende dalla modalità di lavoro Tuner o
USBDAC.
in modalità TUNER: funzione STORE fare riferimento alla descrizione del pannello
frontale
in modalità USBDAC: STOP, fare riferimento alla descrizione del pannello frontale.
(La disponibilità di questa funzione dipende dal player software utilizzato).
• SCAN+: fare riferimento alla descrizione del pannello frontale.
• SCAN- : Fare riferimento alla descrizione del pannello frontale.
•
•
AM/FM (PLAY): tasto multifunzione, la funzione dipende dalla modalità di lavoro Tuner o
USBDAC.
in modalità TUNER: consente di commutare tra modulazione di ampiezza e
modulazione di frequenza.
in modalità USBDAC: ► PLAY/PAUSE, fare riferimento alla descrizione del
pannello frontale (La disponibilità di questa funzione dipende dal software player
utilizzato).
MONO: fare riferimento alla descrizione del pannello frontale
12
UNPACKING AND CHECKING CHERUBINI VT tuner/usbdac PACKAGE
Carefully open the package to avoid damaging the content. The package should contain:
•
•
•
•
•
•
•
•
1 CHERUBINI VT tuner/usbdac
1 remote controller
1 power cord
2 AAA batteries
1 instruction manual
1 AM 300Ohm antenna
1 FM 75Ohm antenna
1 USB cable
If one of the items listed above is missing, please contact your Audio Analogue retailer. After extracting the smallest items from the
package, pull out the unit carefully. Separate the package from the anti-shock expanded-foam protections. If batteries are not already placed in the
remote controller battery slot, open the slot, insert batteries according to the indicated polarity, then close the battery slot.
APERTURA E ISPEZIONE DELL’IMBALLO
Aprire la scatola di cartone con cautela per non danneggiare il contenuto. L’imballo deve contenere:
•
•
•
•
•
•
•
•
Un CHERUBINI VT tuner/usbdac
Un telecomando
1 Cavo di alimentazione
Due batterie AAA
Questo manuale
1 Antenna AM 300Ohm
1 Antenna FM 75Ohm
1 Cavo USB
Se qualcuno degli oggetti sopra elencati dovesse mancare, contattate il Vostro rivenditore Audio Analogue di fiducia.
Dopo avere estratto le parti di minori dimensioni, estrarre con cautela l’apparecchio dall’imballo. Separare l’imballo dalle imbottiture antiurto in
schiuma espansa. Se le batterie non si trovano già all’interno del telecomando, aprire il coperchio del vano portapile del telecomando ed inserirle
nelle posizioni corrette; quindi chiudere il coperchio del vano portapile.
WHERE TO PLACE THE CHERUBINI VT tuner/usbdac
Place the unit on a flat and hard surface and in a well-ventilated place. Avoid exposing the unit to high temperatures and moisture. Be sure that the
ventilation grids placed on the bottom and on the back panel of the unit are not obstructed.
SCELTA DEL LUOGO IN CUI POSIZIONARE IL CHERUBINI VT tuner/usbdac
L’apparecchio deve sempre essere sistemato in orizzontale su una superficie dura e piana. Si prega di assicurare sempre una opportuna
ventilazione ed evitate di esporre l’apparecchio ad elevate temperature e umidità. Sul fondo dell’apparecchio e nel pannello posteriore, sono
presenti dei fori per la ventilazione, assicurarsi che il posizionamento scelto non ostacoli il passaggio dell’aria attraverso tali fori.
PLUGGING AND CONNECTING THE CHERUBINI VT tuner/usbdac
Before connecting CHERUBINI VT tuner/usbdac to other equipment, please be sure they are all (your PC/MAC too) unplugged from
wall outlets. First of all, connect the antennas to their inputs. Unroll the FM antenna as much as possible. Be sure the main switch is in the OFF
position. Connect CHERUBINI VT tuner/usbdac analog outs to an integrated amplifier or preamplifier line inputs. Connect the
CHERUBINI VT tuner/usbdac digital output to a DAC converter if available, and connect your PC/MAC USB port to the CHERUBINI
VT tuner/usbdac USBDAC input via the USB cable.
Then plug CHERUBINI VT tuner/usbdac and all the other units (the PC/MAC too) to the main power.
COLLEGAMENTO DEL CHERUBINI VT tuner/usbdac
Prima di collegare il CHERUBINI VT tuner/usbdac ad altri apparecchi, verificare che essi, compreso il PC/MAC, siano scollegati dalla
rete elettrica e che l’interruttore principale del CHERUBINI VT tuner/usbdac sia in posizione OFF. Collegare le antenne ai relativi
connettori. Disporre l’antenna FM in modo che risulti il più possibile distesa. Collegare le uscite del CHERUBINI VT tuner/usbdac ad un
ingresso linea dell’amplificatore integrato o del preamplificatore e collegare l’uscita digitale all’ingresso dell’eventuale convertitore DA. Connettere
quindi la porta USB del vostro PC/MAC all’ingresso USBDAC con il cavo USB. Collegare quindi il cavo di alimentazione fornito in dotazione al
CHERUBINI VT tuner/usbdac all’apposita vaschetta e collegare tutti gli apparecchi, compreso il CHERUBINI VT
tuner/usbdac e il PC/MAC alle prese di rete.
13
Use of USBDAC mode: example of connection to a LAPTOP- Notebook
Utilizzo della modalità USBDAC: esempio di collegamento ad un LAPTOP- Notebook
PRight Channel
PLeft Channel
settanta
settanta
Out
SPDIF
L
CHERUBINI
VT TUNER
USBDAC
Trigger
OUT
USB
R
Right Out
Left Out
PH 2
3
4
5
6
REC MONO
PRE
L
R
Verdi 100
Back View
Visione Posteriore
POWERING UP THE CHERUBINI VT tuner/usbdac
Turn on the main switch on the back panel of the unit, then push the Knob (Select) on the frontal panel or push the “STANDBY TUNER” button on
the remote. The display turns on and a presentation message is shown. After that, a “HEATING TUBE” message is displayed and the countdown
will be shown to indicate that the preamplifier vacuum tube is reaching the right working temperature. After about 15 seconds the unit is ready and
fully functional.
If the unit doesn’t turn on, please refer to the troubleshooting section of the present manual. Turn on the PC/MAC and DA converter and then the
integrated amplifier or the preamplifier and power amp.
ACCENSIONE DEL CHERUBINI VT tuner/usbdac
Premere l’interruttore principale posto sul pannello posteriore, quindi, premere la manopola (Select) sul pannello frontale oppure il pulsante
“STANDBY TUNER” sul telecomando. Il display si accende visualizzando un messaggio di presentazione, dopo di che apparirà il messaggio
“HEATING TUBE” e il conto alla rovescia che indica che l’apparecchio sta aspettando che la valvola del preamplificatore raggiunga il regime
termico. Dopo circa 15 secondi l’apparecchio è pronto a rispondere ai comandi che riceve dal telecomando o dai tasti posizionati sul frontale.
Qualora l’apparecchio non si dovesse accendere, consultare la sezione dedicata alla risoluzione dei problemi. Accendere quindi il PC/MAC e il
convertitore DA e dopo, accendere l’amplificatore integrato o il preamplificatore e il finale.
Standby mode
You can put the CHERUBINI VT TUNER/USBDAC in standby mode keeping the “STANDBY TUNER” button on the remote pushed for
some seconds or keeping the Knob (SELECT) on the front panel pushed for some seconds. When the unit is in standby mode, the analogue
circuits and their power supplies are off reducing power consumption. You can set the unit in stand-by mode when unused for short periods and
Switch the unit off with the main switch on the back panel when unused for longer periods. When in Stand by Mode the Trigger Output voltage is
set to zero and so the unit connected is turned off.
Stand-by
Il CHERUBINI VT TUNER/USBDAC può essere posto in stand-by mantenendo premumto il pulsante “STANDBY TUNER” sul telecomando
per alcuni secondi oppure tenendo premuta la manopola (Select) sul pannello frontale per alcuni secondi. Quando l’apparecchio è in stand-by, i
circuiti analogici e le relative alimentazioni sono spente per minimizzare i consumi. Si consiglia di tenere l’apparecchio in stand-by tra un ascolto e
l’altro, e di spegnerlo con l’interruttore principale posto sul pannello posteriore quando l’apparecchio non viene usato per periodi più lunghi. Quando
l’apparecchio entra in Standby mode la tensione dell’uscita Trigger Out viene portata a zero spegnendo l’apparecchio connesso al trigger stesso.
Note on Trigger OUT Output
The CHERUBINI VT tuner/usbdac has a Trigger Out output that gives 12VDC voltage and a 160mA maximum current. That output can
be used to switch on and off a unit which has a proper Trigger In connector with proper electrical requirements. The Trigger Out gives 12VDC when
the unit is in normal function mode and doesn’t give any voltage when the unit is in Stand By mode.
14
Nota sul’ uscita Trigger OUT
Il CHERUBINI VT tuner/usbdac è dotato di una uscita Trigger out che fornisce una tensione continua di 12VDC e una corrente
massima di 160mA. Tale uscita può essere utilizzata per accendere un apparecchio che sia dotato di un ingresso trigger opportuno e con
opportune caratteristiche elettriche. La uscita trigger Out fornisce una tensione di 12VDC quando l’apparecchio è in modalità di normale
funzionamento mentre nessuna tensione è presente sull’uscita quando il CHERUBINI VT tuner/usbdac è in Stand By.
TUNED and STEREO leds
On the right side of the display there are two leds which are labelled TUNED and STEREO. TUNED led turns on when there is a radio station on
the selected frequency (it means the power of the received signal at such a frequency is higher than a set level). STEREO led turns on when the
incoming signal is stereophonic (otherwise it stays off). When in mono mode, it turns off.
LED TUNED E STEREO
Sul lato destro del display si trovano due LED denominati TUNED e STEREO. Il LED TUNED, di colore blue, si illumina quando alla frequenza
sintonizzata è presente una stazione radio (ossia la potenza del segnale ricevuto risulta maggiore di un valore settato). Il LED STEREO, di colore
blue, si illumina quando il segnale ricevuto risulta stereo e rimane spento altrimenti. In modalità monofonica il led resta spento.
RADIO STATION TUNING
It is possible to tune in a radio station by two different functions: SEARCH (it is activated by rotating the knob on the front panel of the unit or
pressing the same function switches on the remote controller) and SCAN (it is activated by pressing one of the SCAN buttons on the remote
controller or by pressing the same function switches on the front panel). The SEARCH function allows you to modify the selected frequency by one
step, while the SCAN function increases/decreases the frequency according to the button you pressed until the unit finds a valid radio station (if this
is not possible, the whole bandwidth is scanned to get back to the frequency level previous to the pressure of the SCAN). The quickest way to tune
in a radio station is to use the SCAN function first then the SEARCH function for fine tuning.
SINTONIA DI UNA STAZIONE RADIO
La frequenza di sintonia può essere modificata secondo due diversa funzioni: SEARCH (attivabile ruotantdo la manopola posta sul pannello
frontale, oppure premendo uno dei tasti SEARCH sul telecomando) e SCAN (attivabile premendo uno dei tasti SCAN del telecomando oppure
premendo l’equivalente tasto sul pannello frontale). La funzione SEARCH permette di modificare di uno step la frequenza selezionata, mentre la
funzione SCAN modifica la frequenza di sintonia nel verso indicato, aumentandola o diminuendola a seconda del comando impartito, fino a trovare
una frequenza per la quale viene rilevata una stazione radio (se ciò non è possibile viene effettuata una scansione completa della banda, e quindi
nuovamente selezionata la frequenza presente al momento dell’attivazione della funzione SCAN). Pertanto il metodo più veloce per sintonizzare
una stazione radio è quello di effettuare una ricerca SCAN e poi affinare la sintonia mediante la funzione SEARCH.
RADIO STATION STORING
It is possible to store up to 18 AM and 18 FM radio stations following this procedure:
1. Tune the radio station you’re interested in.
2. Enter in “memorizing” mode by pressing and leaving the STORE button on the remote controller or by pushing the “STORE” switch on
the front panel. Then on the display you can visualize the content of the first location along with two dots “:” before the location number
that will be flashing. If no radio station has been memorized in this location, you can see the “EMPTY” notice on the display, otherwise
you can visualize the frequency of the radio station memorized, and if possible the relative RDS message which indicates the Station
Name.
3. Pressing and leaving the keys MEM+ and MEM- on the remote controller or the MEMORY▲ and MEMORY▼ switches on the front
panel, run over the various locations and stop on the position where you want to memorize the radio station; it is possible to select the
position directly using the numeric keys. For each location the display will indicate, both the location number and the indication EMPTY
if the location doesn’t contain any memorized station or the frequency and eventual RDS message (if available) of the memorized
station.
4. Press and Leave the STORE button on the remote control or the STORE switch on the front panel to memorize the station in the
selected location and exit from “memorizing” mode; at this point the number of the memorized location will flash for a few seconds on the
display and after the message “Stored” will appear, to indicate that the memorizing procedure has been completed and normal
functioning has been restored.
MEMORIZZAZIONE DELLE STAZIONI RADIO
Si possono memorizzare fino a 18 stazioni radio FM e 18 per la AM. Per la memorizzazione seguire la seguente procedura:
1. Sintonizzare la stazione radio di interesse.
2. Entrare in modalità “memorizzazione” premendo e rilasciando il tasto STORE sul telecomando o il tasto Store sul pannello frontale. Sul
display viene visualizzato il contenuto della prima locazione e i due punti “:” prima del numero della locazione iniziano a lampeggiare. Se
in tale locazione non è stata memorizzata alcuna stazione radio viene visualizzata sul display la scritta “EMPTY”, altrimenti viene
visualizzata la frequenza della stazione memorizzata e, se disponibile, il relativo messaggio RDS indicante il Name Station.
3. Premendo e rilasciando i tasti MEM+ e MEM- sul telecomando oppure i tasti MEMORY▲ e MEMORY▼sul pannello frontale, scorrere
le varie locazioni di memoria e fermarsi nella posizione dove si intende memorizzare la stazione radio, oppure è possibile selezionare
direttamente la posizione utilizzando i tasti numerici del telecomando. Per ogni locazione il display indicherà, oltre al numero della
locazione, l’indicazione EMPTY se nella locazione non è stata memorizzata alcuna stazione o la frequenza e l’eventuale messaggio
RDS (se disponibile ) della stazione memorizzata.
4. Premere e rilasciare il tasto STORE sul telecomando o il tasto STORE sul frontale, per memorizzare la stazione nella locazione
selezionata e uscire dalla modalità “memorizzazione”; a questo punto sul display il numero della locazione memorizzata lampeggerà per
alcuni secondi e successivamente verrà visualizzato il messaggio “Stored”, ad indicare l’avvenuta procedura di memorizzazione
ritornando alla normale esecuzione di funzionamento.
15
RADIO STATION SELECTION
It is possible to quickly jump from stored station to another by pressing the MEMORY▲/ MEMORY▼ buttons on the front panel of the unit or the
MEM+/MEM- buttons on the remote controller. When the unit is in AM mode it is possible to jump from one of the 18 AM stored radio station to the
other: the same thing is possible for FM radio station when the unit is in FM mode. When the unit is turned on or the AM/FM button on the front
panel of the unit or on the remote controller is pressed, the unit will be automatically tuned to the first radio station of the selected mode. It is
possible to select the memory allocations by pressing the MEMORY▲/MEMORY▼ buttons on the front panel of the unit or the MEM+/MEMbuttons on the remote controller. If the memory allocation is empty, an EMPTY message is shown on the display and the unit goes back to the
previously selected frequency.
SINTONIA DELLE STAZIONI RADIO MEMORIZZATE
E’ possibile accedere velocemente alle stazioni radio memorizzate mediante l’uso dei pulsanti MEMORY▲ e MEMORY▼ sul frontale o premendo
i tasti MEM+, MEM- sul telecomando. In modalità AM si possono sintonizzare le stazioni radio AM memorizzate nelle 18 locazioni di memoria
riservate alla AM e analogamente per la modalità FM. All’accensione o in seguito ad una pressione e rilascio del pulsante AM/FM sul frontale o alla
pressione del tasto AM/FM del telecomando, l’accesso alla memoria ripartirà dalla prima locazione della banda selezionata. Mediante i pulsanti
MEMORY▲, MEMORY▼sul frontale o i tasti MEM+, MEM- sul telecomando sarà possibile selezionare le varie locazioni di memoria. Se la
locazione di memoria selezionata risulta vuota, il display mostrerà la scritta “EMPTY” e l’apparecchio sintonizzerà nuovamente la frequenza
presente prima della selezione della locazione.
DESCRIPTION OF THE INFORMATION SHOWN ON THE DISPLAY:
The information shown on the display depends on the mode the unit is working on.
DESCRIZIONE DELLE INFORMAZIONI MOSTRATE SUL DISPLAY:
Le informazioni mostrate sul display dipendono dalla modalità di funzionamento.
TUNER Mode:
Modalità TUNER:
Modulation (AM or FM)
Modulazione (AM o FM)
Frequency
Frequenza
101.20 FM
RTL102.5
RDS message
Messaggio RDS
USBDAC Mode:
Modalità USBDAC:
USB DAC MODE
It shows the command (*)
Visualizza il comando (*)
USB DAC MODE
PLAY
(*) The command is sent by pushing a button on the remote control or a switch on the front, which is displayed for a while on the display and then
disappears. The command can be or not be executed by the player running on the PC/MAC depending on the player used.
(*) Il comando inviato premendo un tasto sul telecomando o un tasto sul frontale viene visualizzato per qualche secondo sul display. Tale comando
può essere o non essere eseguito dal player in esecuzione sul PC/MAC a seconda del Player che si utilizza.
Installing the USBDAC and selecting USBDAC mode
To select the USBDAC mode, push and release the front “Select” knob or push the “STANDBY TUNER” switch on the remote. The CHERUBINI
VT TUNER/USBDAC will check if there is a valid signal on the USB connection. In the case of an invalid signal the message:” Error USB cable
not connected” is shown on the display and the unit will be waiting for a valid signal on the USB connection. When there is a valid signal on the
USB connection the CHERUBINI VT TUNER/USBDAC will start to initialize the USB connection and a message to communicate it will be
shown on the display.
Installazione/Selezione della modalità USBDAC
Per selezionare la modalità USBDAC si deve premere e rilasciare la manopola “SELECT” sul frontale o premere il tasto “STANDBY TUNER” sul
telecomando. Il CHERUBINI VT TUNER/USBDAC controllerà se sia o no presente segnale sulla connessione USB. In caso negativo
indicherà “Error USB cable not connected” e rimarrà in attesa del segnale sull’ingresso USBDAC. Altrimenti procederà alla inizializzazione della
connessione, visualizzando il messaggio sul display.
If it is the first time the CHERUBINI VT TUNER/USBDAC is connected to the PC or MAC via the USB, the initialization could require some
minutes because the PC/MAC has to detect the new device and to find and install the required software drivers.
16
For example, if a Windows operative system is used, when the CHERUBINI VT TUNER/USBDAC is connected the first time to the PC, the
message “Find New Hardware” will be shown on the PC monitor and then the procedure to find and install the required drivers will be started by
the PC. The initialization completion must be waited and a message “Your new hardware is installed and ready to use” shown at the end. After that,
the message “Active” will be shown on the CHERUBINI VT TUNER/USBDAC display.
Se è la prima volta che il CHERUBINI VT TUNER/USBDAC viene collegato al PC o al MAC, la inizializzazione potrebbe richiedere qualche
minuto perché è necessario che il PC/MAC rilevi la nuova periferica e trovi e installi i driver necessari.
Ad esempio nel caso si utilizzi Windows quale sistema operativo quando viene collegato per la prima volta il CHERUBINI VT
TUNER/USBDAC al PC, verrà visualizzato sul monitor del PC il messaggio: “Trovato nuovo hardware” e verrà quindi avviata la procedura
di ricerca e installazione dei driver. Si dovrà pertanto attendere la fine della inizializzazione che verrà comunicata dal messaggio: “Il nuovo
hardware è installato e pronto all’uso”. Dopodichè sul display del CHERUBINI VT TUNER/USBDAC verrà visualizzato il messaggio “Active”.
USB DAC MODE
ACTIVE
After the USB connection is active every sound from your PC or MAC will be played by the Hi-Fi system. So by using any audio/video player on
your PC/MAC you’ll be able to play the music on your PC/MAC on the Hi Fi system. Depending on the player it is also possible to use the HID
functions (Human Interface Device). It means that is possible to send the Play/Pause, Stop, Next e Prev track commands to the software player
running on your PC/MAC via the front switches placed on the CHERUBINI VT TUNER/USBDAC front panel or by its remote control.
Utilizzando un player audio/video sarà quindi possibile riprodurre qualsiasi segnale audio proveniente dal vostro PC/MAC mediante la connessione
USB con il CHERUBINI VT TUNER/USBDAC. A seconda del player è possibile utilizzare le funzioni HID (Human Interface Device) ossia
inviare comandi quali Play/Pause, Stop, Next e Prev track direttamente dai tasti posizionati sul frontale o dai relativi tasti del telecomando, per
comandare il player audio/video sul PC/MAC.
•
Windows PC System requirements
Hardware requirements: CHERUBINI VT TUNER/USBDAC has been designed to work with any PC having a USB port and a
Windows operative System.
Software requirements: the USB interface is available just for: Windows 98, 98 SE, ME, Windows 2000, XP and Vista. Windows 95 or
NT 4.0. is not supported
Note: If a Windows 98 original revision is used, the minimal requirements to update it to the second Edition are the proper USB drivers.
For Windows 98SE and Windows Me, the HID functions, depending on the player, are not perfectly functional.
o
Requisiti per PC Windows
Requisiti Hardware: Il CHERUBINI VT TUNER/USBDAC è stato progettato per lavorare con qualsiasi PC con sistema operativo
WINDOWS che abbia una porta USB.
Requisiti Software: Il supporto per l’USB Audio è disponibile solo per Windows 98, 98 SE, ME, Windows 2000, XP e Vista. Non è
supportato su Windows 95 or NT 4.0.
Nota: Se si utilizza la versione originale di Windows 98, è necessario aggiornarla almeno alla Second Edition per avere i driver USB che
permettano il corretto funzionamento. Per le versioni Windows 98SE e Windows Me, la funzione HID non è perfettamente funzionante.
•
Mac’s requirements:
Hardware requirements: CHERUBINI VT TUNER/USBDAC has been designed to work with any MAC having a USB port.
(G3/G4/G5, Mini, iMac, iBook, and so on).
Software requirements: the support for the audio USB is available for: Mac OS 9.0.4 and its higher revision, and Mac OS X, with driver
USB Audio 1.0.4fb or higher.
o Requisiti per Mac
Requisiti Hardware: Il CHERUBINI VT TUNER/USBDAC è stato progettato per lavorare con qualsiasi Mac che abbia una porta
USB (G3/G4/G5, Mini, iMac, iBook, etc).
Requisiti Software: Il supporto per l’USB Audio è disponibile solo per Mac OS 9.0.4 e superiori, o per Mac OS X, con driver USB Audio
1.0.4fb o superiori.
17
•
Software you can use with the CHERUBINI VT TUNER/USBDAC
Any software able to reproduce an audio signal on your PC or MAC can be used with CHERUBINI VT TUNER/USBDAC. For
example: iTunes, Windows Media Player, Foobar2000.
o Software che può essere utilizzato con il CHERUBINI VT TUNER/USBDAC
Può essere utilizzato qualsiasi software in grado di riprodurre file Audio/Video sul vostro PC o Mac. Ad esempio: iTunes, Windows Media
Player, Foobar2000.
For advice about the CHERUBINI VT TUNER/USBDAC, for information about the available resources to download music for free and for
information and about the free software players, please refer to the Audio Analogue website: www.audioanalogue.com in the
CHERUBINI VT TUNER/USBDAC section.
Per suggerimenti sull’utilizzo del CHERUBINI VT TUNER/USBDAC, per informazioni circa le risorse disponibili per scaricare musica
gratuitamente e legalmente e per avere informazioni sull’uso di software gratuiti per la riproduzione di musica su PC si prega di consultare il sito
Audio Analogue: www.audioanalogue.com nella sezione dedicata al CHERUBINI VT TUNER/USBDAC.
18
SPECIFICATIONS
Parameter
Tuner Mode
Channels:
Output level
Image rejection
Auto Stop Sens
Usable sens
Signal/noise ratio:
FREQ.
USBDAC Mode
Maximum Output voltage (Note1)
Noise level(Nota2)
Supply
Power requirements:
Power consumption (On State)
Power Consumption Trigger In driver, Trigger
IN = 12V
Value
2
FM: 500-700mV; AM: 115-215mV
FM: 70dB min; AM: >40dB min
FM: 18-28dBu; AM: 45-65dBu
FM: 12dBu max; AM: 60dBu max
FM: 60dB min; AM: 40dB min
FM:87.5MHz-108MHz; AM:567kHz-1.6MHz
1.80
-120dBV
115V-220V-230V-240V 50-60Hz
25VA
12V @ 160mA (1.9VA)
Note1: Maximum rms voltage output value
Note2: Band limits 0Hz-22KHz
SPECIFICHE TECNICHE
Parametro
Tuner Mode
Numero di canali:
Output level
Image rejection
Auto Stop Sens
Usable sens
Rapporto segnale/rumore
FREQ.
USBDAC Mode
Massima tensione di uscita(Nota1)
Letto di rumore(Nota2)
Alimentazione
Tensioni di rete:
Assorbimento (Apparecchio acceso)
Assorbimento (Pilotato da Trigger In con
Trigger In a 12V)
Nota1: Valore massimo rms della tensione di uscita
Nota2: Limiti di Banda 0Hz-22KHz
Valore
2
FM: 500-700mV; AM: 115-215mV
FM: 70dB min; AM: >40dB min
FM: 18-28dBu; AM: 45-65dBu
FM: 12dBu max; AM: 60dBu max
FM: 60dB min; AM: 40dB min
FM:87.5MHz-108MHz; AM:567kHz-1.6MHz
1.80 Vrms
-120dBV
115V-220V-230V-240V 50-60Hz
25VA
12V @ 160mA (1.9VA)
19
TROUBLESHOOTING
Symptom
Cause
The unit is in STANDBY mode
Display is off
No sound
No response from the unit
Incorrectly plugged power cord
Burned-out fuses
Display is on
No sound
The unit is on but there is no sound
It is impossible to tune in a radio station
The unit works but the display is off
Remote controller doesn’t work
The USBDAC doesn’t initialize
Faulty or incorrectly plugged connectors
between the unit and the amplifier or
integrated amplifier
Incorrectly selected source on the
preamplifier or integrated amplifier
The unit is in “Storage” mode
Faulty or incorrectly plugged antennas.
Faulty or incorrectly plugged front panel.
No battery/ worn-out battery
You’re standing too far or on an exceeding
angle from the front panel
Fault in the connection during the
initialization
The USB connection is not supported
The USB cable is not correctly plugged in
The USBDAC is correctly initialized but
there is no sound
The main volume of the PC/MAC is muted
or too low
The player is not working
It is not possible to select a Radio station
in Tuner Mode
The frequency limit and the step between
close frequencies is wrong for the nation
where the unit is working
The unit can’t be switched on and off by
the “Trigger in” input , the unit is always
on.
The main voltage switch in the rear panel
is turned on
Remedy
Press the Knob on the front panel of the
unit or the STANDBY button on the remote
controller
Make sure the power cord is correctly
plugged into the wall outlet
Contact your Audio Analogue retailer for
fuse check/replacement
Check cables and their connection
Check that the unit is correctly selected
through the amplifier input
Complete storage procedure by pressing
the STORE button on the front panel or on
the remote controller
Check that the antennas are correctly
plugged and placed (FM antenna has to
be unrolled as much as possible). Try
replacing both the antennas.
Contact your Audio Analogue retailer for
connections check and front panel
replacement
Place/replace battery (2 ‘AAA’ batteries)
Get closer to the unit or reduce angle
Change to tuner mode and then switch
again to USBDAC mode
.Check the software and hardware
requirements are respected
Check the USB cable.
Check that the main volume on your
PC/MAC is enabled and set to a proper
level.
Try with another player. If you have correct
sounds from it, check the configuration of
the previous player and also try to reinstall it.
Check the band limit and the step between
close frequencies is correct for your
nation. Otherwise contact your Audio
Analogue retailer for support in setting the
correct values.
Switch off the main switch in the back
panel.
If the suggested remedies should not work or the problem is not shown in the list above, please contact your local Audio
Analogue retailer.
20
RICERCA GUASTI
Sintomo
Causa
L’apparecchio è in stand by
Display spento
Nessun suono
Nessuna risposta ai comandi
Cavo di alimentazione non correttamente
collegato
Fusibile bruciato nella vaschetta di rete
Display acceso
Nessun suono
Cavi di segnale tra apparecchio e
amplificatore integrato o preamplificatore
connessi non correttamente oppure
difettosi
Rimedio
Togliere l’apparecchio dallo stato di
standby premendo la manopola sul
pannello frontale oppure STANDBY sul
telecomando
Controllare che la spina del cavo di rete
sia ben inserita nella presa di rete
Contattare il vostro rivenditore Audio
Analogue per una verifica ed eventuale
sostituzione del fusibile
Controllare lo stato dei cavi e/o la corretta
connessione
Controllare che l’apparecchio sia
selezionato correttamente con il selettore
degli ingressi dell’amplificatore
Concludere la procedura di
L’apparecchio è acceso ma non si sente
L’apparecchio è in modalità
memorizzazione premendo il pulsante
nessun suono
memorizzazione
Store sul frontale o il tasto Store sul
telecomando.
Controllare il corretto collegamento delle
antenne e la loro disposizione (l’antenna
Non è possibile sintonizzare alcuna
Antenne collegate in modo non corretto o
Fm deve essere il più distesa possibile) .
stazione
difettose.
Eventualmente provare a sostituire le
antenne.
Contattare il vostro rivenditore Audio
L’apparecchio funziona
Scheda frontale non collegata
Analogue per una verifica dei collegamenti
ma il display è spento
correttamente oppure difettosa
ed eventuale sostituzione della scheda
Inserire o sostituire le batterie (2 ministilo
Batterie scariche o mancanti
tipo ‘AAA’)
Il telecomando non funziona
Eccessiva distanza dal pannello frontale
Avvicinarsi di più all’apparecchio o
dell’apparecchio o angolo non corretto
cambiare angolo
Errore di connessione durante la
Passare in modalità Tuner e quindi tornare
inizializzazione
in USBDAC mode
Controllare la connessione del cavo USB
L’USBDAC non si inizializza correttamente Cavo USB non collegato correttamente
sia sul PC/MAC che sul Cherubini
Controllare che i requisiti software e
Connessione USB non supportata
hardware siano rispettati.
Controllare che il volume master non sia in
Il volume Master del PC/MAC è disabilitato
L’USBDAC è inizializzato ma non si sente
mute e nel caso abilitarlo e che non sia
o a un livello troppo basso
nessun suono
settato ad un livello troppo basso.
Provare a riprodurre i suoni con un altro
player, nel caso tutto funzioni
Il player utilizzato non funziona
correttamente controllare le configurazioni
correttamente
del player usato in precedenza e provare
eventualmente a reinstallarlo.
Controllare che i limiti di banda e lo step
Non è possibile selezionare le stazioni in Errati limiti di banda e step per la nazione tra una frequenza e la vicina siano corretti
modalità tuner
di appartenenza
per il proprio paese. In caso contrario
contattare il vostro rivenditore Audio
Analogue per riconfigurare il settaggio.
Non è possibile accendere e spegnere
correttamente l’apparecchio mediante la L’interruttore principale posto nel pannello
Mettere in posizione off l’interruttore
connessione di Trigger IN. L’apparecchio
posteriore è in posizione acceso.
principale posto nel pannello posteriore.
resta sempre acceso.
Se i rimedi suggeriti non dovessero funzionare oppure il problema non è riportato nella lista, contattate il vostro rivenditore
Audio Analogue
Sorgente non selezionata correttamente
sull’amplificatore
21
A. INFORMATION ON DISPOSAL FOR USERS (PRIVATE HOUSEHOLDS)
1 In The European Union
Attention: If you want to dispose of this equipment, please do not use the ordinary dust bin.
Used electrical and electronic equipment must be treated separately and in accordance with legislation that requires
proper treatment, recovery and recycling of used electrical and electronic equipment.
Following the implementation by member states, private households within the EU states may return their used electrical
and electronic equipment to designated collection facilities free of charge*. In some countries* your local retailer may also
take back your old product free of charge if your purchase a similar new one.
*) Please contact your authority for further details.
If your used electrical or electronic equipment has batteries or accumulator, please dispose of these separately before and
according to local requirements.
By disposing of this product correctly you will help ensure that the waste undergoes the necessary treatment, recovery and
recycling and thus prevent potential negative effects on the environment and human health which could otherwise arise
due to inappropriate waste handling.
2. In other countries outside the EU
If you wish to discard this product, please contact your local authorities and ask for the correct method of disposal.
Attention: Your product is marked with this symbol. It
means that used electrical and electronic products
should not be mixed with general household waste.
There is a collection system for these products.
Attenzione: il dispositivo è contrassegnato da questo
simbolo, che segnala di non smaltire le apparecchiature
elettriche ed elettroniche insieme ai normali rifiuti
domestici. Per tali prodotti è previsto un sistema di
raccolta a parte.
For Switzerland: Used electrical or electronic equipment can be returned free of charge to the dealer, even if you don’t
purchase a new product. Further collection facilities are listed on the home page of www.swisco.ch or www. Sens.ch
B. Information on Disposal for Business Users
1.
In the European Union
If this product is used for business purposes and you want to discard it:
Please contact your Audio Analogue dealer who will inform you about the take-back and recycling. Small products (and
small amounts) might be taken back by your local collection facilities.
For Spain: Please contact the established collection system or your local authority for take-back of your used products.
2.
In other Countries outside the EU
If you wish to discard of this product, please contact your local authorities and ask for the current method of disposal.
A. INFORMAZIONI SULLO SMALTIMENTO PER GLI UTENTI (PRIVATI)
1 Nell’Unione europea
Attenzione: Per smaltire il presente dispositivo, non utilizzare il normale bidone della spazzatura!
Le apparecchiature elettriche ed elettroniche usate devono essere gestite a parte in conformità alla legislazione che
richiede il trattamento, il recupero e il riciclaggio adeguato dei suddetti prodotti.
In seguito alle disposizioni attuate dagli Stati membri, i privati residenti nella UE possono conferire gratuitamente le
apparecchiature elettriche ed elettroniche usate a centri di raccolta designati*.
In alcuni paesi*, anche il rivenditore locale può ritirare gratuitamente il vecchio prodotto se l’utente acquista un altro nuovo
di tipologia simile.
*) Per maggiori informazioni di prega di contattare l’autorità locale competente.
Se le apparecchiature elettriche o elettroniche usate hanno batterie o accumulatori, l’utente dovrà smaltirli a parte
preventivamente in conformità alle disposizioni locali.
Lo smaltimento corretto del presente prodotto contribuirà a garantire che i rifiuti siano sottoposti al trattamento, al recupero
e al riciclaggio necessari prevenendone il potenziale impatto negativo sull’ambiente e sulla salute umana, che potrebbe
derivare da un’inadeguata gestione dei rifiuti.
2 In paesi che non fanno parte dell’UE
Se si desidera eliminare il presente prodotto,contattare le autorità locali e informarsi sul metodo di smaltimento corretto.
Per la Svizzera: Le apparecchiature elettriche o elettroniche possono essere restituite gratuitamente al rivenditore, anche
se non si acquista un prodotto nuovo. Altri centri di raccolta sono elencati sulla homepage www.swiso.ch o di
www.sens.ch.
B. INFORMAZION SULLO SMALTIMENTO PER GLI UTENTI COMMERCIALI
1. Nell’Unione Europea
Se il prodotto è impiegato a scopi commerciali. Procedere come segue per eliminarlo.
Contattare il proprio rivenditore Audio Analogue che fornirà informazioni circa il ritiro del prodotto. Potrebbero essere
addebitate le spese di ritiro e riciclaggio. Prodotti piccoli e quantitativi ridotti potranno essere ritirati anche dai centri di
raccolta locali.
Per la Spagna: Contattare il sistema di raccolta ufficiale o l’ente locale preposto al ritiro dei prodotti usati
2. In paesi che non fanno parte dell’UE
Se si desidera eliminare il presente prodotto, contattare le autorità locali e informarsi sul metodo di smaltimento corretto.
22
23
24
Audio Analogue
Manufactured and Distributed by:
AUDIO FUTURA spa
Via Maestri Del Lavoro 583
51015 Monsummano Terme (PT) Italy
Tel. 0572 954513 fax 0572 958099
www.audioanalogue.com - [email protected]