1
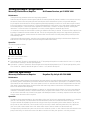
Instruction manuals
for all appliances
and equipment
Unit 21 ‘Como’
7 Hopegood Place
Garran ACT 2605
10 October 2001
Contents
Smeg/Omega rangehood . . . . . . . . . . . . . . . . . . . . . . . . . . . . . . . . . . . . . . 2
Decina spa bath . . . . . . . . . . . . . . . . . . . . . . . . . . . . . . . . . . . . . . . . . . . . . . 2
Smeg/Omega kitchen waste disposal unit . . . . . . . . . . . . . . . . . . . . . . . . . 3
Dux hot water heater . . . . . . . . . . . . . . . . . . . . . . . . . . . . . . . . . . . . . . . . . 3
Brivis central heating system . . . . . . . . . . . . . . . . . . . . . . . . . . . . . . . . . . . . 4
HPM smoke detectors/alarms . . . . . . . . . . . . . . . . . . . . . . . . . . . . . . . . . . . 6
ATA garage door opener . . . . . . . . . . . . . . . . . . . . . . . . . . . . . . . . . . . . . . . 7
Smeg dishwasher . . . . . . . . . . . . . . . . . . . . . . . . . . . . . . . . . . . . . . . . . . . . . 8
Smeg ceramic surface cooktop . . . . . . . . . . . . . . . . . . . . . . . . . . . . . . . . . . 9
Smeg multi-function oven . . . . . . . . . . . . . . . . . . . . . . . . . . . . . . . . . . . . . 10
Smeg microwave oven . . . . . . . . . . . . . . . . . . . . . . . . . . . . . . . . . . . . . . . . 12
Simpson clothes dryer . . . . . . . . . . . . . . . . . . . . . . . . . . . . . . . . . . . . . . . . 14
Door intercom . . . . . . . . . . . . . . . . . . . . . . . . . . . . . . . . . . . . . . . . . . . . . . 14
Smeg/Omega rangehood
Warranty/Maintenance/Repairs:
McCleanes Services ph 02 6239 1080
Maintenance
• Thorough servicing guarantees correct and long-lasting operation.
• Particular care must be paid to the anti-grease grille which must be periodically cleaned in relation to use (at least once every
two months). Remove the anti-grease grille and wash the parts in the dishwasher or by hand, using neutral detergent.
• Any fat deposits should be removed from the appliance periodically depending on amount of use (at least every two months).
Avoid using abrasive or corrosive products. To clean painted appliances on the outside, use a cloth dipped in lukewarm water
and neutral detergent. To clean steel or brass appliances on the outside, it is best to use specific products, following their
instructions. To clean the inside of the appliance, use a cloth (or brush) dipped in denatured ethyl alcohol.
• It is necessary to change the charcoal filters according to utilisation about every six months. To remove the filter: open the hood
by pulling it downwards and then towards the front. Take off the anti-grease grille using the two finger-holes by pushing the
front of the grille upwards, and then remove the charcoal filter from the inside of the anti-grease grille by removing the two
metal retaining wires.
• If the halogen bulbs need changing, open the cover and remove the bulb without touching it with bare hands. Replace the
bulb with one of the same type (again, without touching the bulb with bare hands).
Operation
The controls operate as follows:
0 1
0 1
A
O
M
A
B
C
D
A ON/OFF and first speed switch
B Second speed switch
C Third speed switch (The motor is automatically ON or OFF by opening/closing the hood (unless switch A is set to ‘0’). Opening
the hood works according to the last speed registered.
D Light switch - position ‘A’ (automatic) allows the lights to be automatically regulated ON or OFF by the opening/closing of the
hood. Position ‘M’ (manual) switches the light on. Position ‘0’ (off) switches the light off.
Decina spa bath
Warranty/Maintenance/Repairs:
Royaltee Pty Ltd ph 02 6290 0080
Maintenance
• The recirculatory system (pipework from the bath to the pump and back) should be flushed regularly with a proprietary brand
spa cleaning system. Fill the bath with clear warm water and add to the water either a spa cleaner or a combination of strong
liquid cleaner and mild disinfectant. Turn on the system and run for no more than two minutes. Empty the bath and flush with
clean water. Chrome-plated fittings should be cleaned with warm soapy water to remove traces of disinfectant and cleaners
which could otherwise harm the plating.
• Clean the bath with liquid household detergent (not powder), or with all-purpose liquid cleaners. Do not use coarse abrasives.
If the bath is accidentally scratched, it may be restored using a fine polish such as Brasso. If this is not sufficient, the scratch
can be cut back with either very fine wet and dry paper used liberally with water or car-cutting compounds. After removing the
damage, restore the surface with a car polish.
Operation
• The bath has three operational buttons: the centre button is the on/off switch, and is pneumatically operated (i.e. no electricity
flows to or from this point). The other buttons are air-water mixture controls, which control the amount of aeration.
• The jets in the bath are adjustable for direction by using your index finger and pushing in the desired direction. The jets can
also be used to control water flow. Turn the centre of the jet unit until you obtain maximum power with a fully-open water
flow. Turn it 180º to reduce water flow to 20%. When water volume is reduced, aeration of the water will stop.
• The largest fitting in the bath has a grate over the face and is called the ‘suction’ or ‘drain’. Water is taken from the bath to the
pump via this fitting. You should warn users of the bath to not block this fitting, lean against it, or let hair get near it.
Smeg/Omega kitchen waste disposal unit
Model number:
Warranty/Maintenance/Repairs:
Omega 500
McCleanes Services ph 02 6239 1080
Maintenance
• Use plenty of water when disposing of waste, and the normal passage of soapy water will suffice to keep your unit clean.
However, occasionally seal the sink, half-fill with warm water, add some baking soda and mix to a solution. Switch on and
unplug the sink. The mixture will help to loosen any residual waste, and freshen the disposer.
Operation
1. Remove the sink plug and place it safely out of the way (retain the rubber splash guard in place, however).
2. Turn on the cold water (don’t use hot water), and then switch on the power supply at the wall switch.
3. Only after switching on, commence feeding waste into the disposer. Use a wooden or plastic spatula to push waste through
the rubber splash guard allowing the running water to flush it away as it is ground up.
4. When you have disposed of all of your waste, leave the unit running for a few moments until it has cleared, and then switch off
the power supply.
5. A further few moments are desirable before turning off the water supply. This will ensure that the waste plumbing has also
cleared, and the unit has cleaned itself.
What you can feed into the disposal unit
All forms of vegetable matter, both cooked and raw, egg shells, chicken carcasses, fish, smaller types of bones, etc. Some wellrounded objects such as fruitstones are eventually disposed, but may sit in the bottom of the unit for some time.
What you must not feed into the disposal unit
Do not put metal, plastic, string, glass or cloth items into the disposer. Do not use heavy concentrates of either detergent or bleach.
Do not cram waste into the unit, but rather let it fall in or reduce in the grinding process. Do not use hot water, which causes
grease to congeal in the wastepipe, causing blockages.
If the machine jams or overloads
A jam may occur from time to time (though can be avoided in normal use). This will be indicated by a sudden stop in the grinding
sound, and replaced by a hum. After 5 or 6 seconds, a silence of the motor indicates that the thermal cut out switch has operated.
To unblock the unit, ensure that the power supply to the unit is off, and that no water is allowed to run into the unit. Remove the
rubber splash guard and turn the impellor inside clockwise. Depending upon the cause of the jam, the turning effort may vary. If it
is considerable, use the Rotor Release Tool. Once the impellor is turning freely, replace the splash guard and press the reset button
(the thermal cutout switch located in the base of the unit), which will result in a ‘click’. Turn on the water supply, and the power
supply at the wall switch. If the unit still fails to operate, check the fusebox before calling an Omega Service Agent.
Dux hot water heater
Model number:
Warranty/Maintenance/Repairs:
Forte 250F1-36
Dux Service ph 1300 365 115
Maintenance
• For safe performance, this water heater is fitted with a thermostat, an over-temperature energy cut-out, and a combination
pressure and temperature relief valve. The pressure and temperature relief valves should be checked for adequate performance
or replaced at intervals of not more than 5 years. It is normal for the relief valve and drain outlet pipe to overflow during
heating cycles, though if it discharges more than 20 litres in 24 hours, there may be a problem that requires attention.
• The lever on the relief valve must be pulled to operate the valve at least once every six months.
Caution
If the water heater is left in an operating condition and unused for two weeks or more, a quantity of hydrogen (which is highly
flammable) may accumulate in the top of the water cylinder. To dissipate this gas safely, it is recommended that a hot tap be
turned on for several minutes at a sink, basin or bath, but not a dishwater, clothes washer or other electrical appliance. During this
procedure there must be no smoking, open flame, or any other electrical appliance operating nearby. If hydrogen is discharged
through the tap, it will probably make an unusual sound as with air escaping.
Brivis central heating system
Model number:
Warranty/Maintenance/Repairs:
Wombat SP20 with Honeywell thermostat
Rick Polacsek ph 0412 582 856
Description
This system consists of three major components: a heater, a ductwork system, and a wall control unit (thermostat). The heater
draws air out of the house through a large, centrally-located return-air duct. Once heated, air is then re-distributed to every corner
of the house via a network of smaller ducts, released into each room through ceiling ducts. The system works best with external
doors and windows closed, but is unaffected by the operation of internal doors. However, fumes from candles, fragrant oil burners,
cooking or smoking may be drawn into the system, and can cause staining around outlets. The heater requires electricity to
operate: if this is interrupted for any reason, the unit has safety mechanisms to turn off the gas supply. When power is restored, the
heater will resume normal operations automatically. The unit will operate without a gas supply, but with no heating effect. When
the gas supply is restored, it make take several attempts to start the heater, as air may need to be purged from the gas pipe. To do
this, turn the thermostat off then on, as the unit resets by power off/on.
Warnings
Always press the keys with your fingertip or similar blunt tool. Sharp instruments like pens and pencils will damage the keyboard.
Features
Program up to four time periods and temperature setpoints for each daily schedule, and set different schedules for each day of the
week. Backlit for easy readability of display when a key is pressed. Press the information key for present setting information. Select
fan operation for each period of the day (select models with fan key). Temporarily set the temperature warmer or cooler. Daylight
savings time key for easy switching in and out of daylight savings. Program end of hold (to 255 days). Copy key for programming.
Programming
The keyboard is located behind the thermostat cover with three frequently-used keys by the display. The thermostat display shows
day, time, program period, temperature, system and fan operation selection. The thermostat can be set for four times and up to
eight temperatures for each day of the week (28 independent time and 56 temperature settings). The and keys provide quick
temporary temperature changes to increase your comfort. The Hold Temp key provides energy efficient operation for extended
periods of time.
Before starting the programming procedure, you can use the following chart to organise your program schedule. The factory presets
for time, temperature and fan settings are shown in brackets. If you choose not to program a daytime energy savings period, press
the period key (Leave or Return) until the time is blank. Note that the fan setting feature is only available on select models.
period start time
heat setpoint
cool setpoint
fan
Monday
period start time
heat setpoint
cool setpoint
fan
Tuesday
wake [6:00am]
[21.0ºC]
[25.5ºC]
[auto]
wake [6:00am]
[21.0ºC]
[25.5ºC]
[auto]
leave [8:00am]
[16.5ºC]
[29.5ºC]
[auto]
leave [8:00am]
[16.5ºC]
[29.5ºC]
[auto]
return [6:00pm]
[21.0ºC]
[25.5ºC]
[auto]
return [6:00pm]
[21.0ºC]
[25.5ºC]
[auto]
sleep [10:00pm]
[16.5ºC]
[28.0ºC]
[auto]
sleep [10:00pm]
[16.5ºC]
[28.0ºC]
[auto]
Wednesday
Thursday
wake [6:00am]
[21.0ºC]
[25.5ºC]
[auto]
wake [6:00am]
[21.0ºC]
[25.5ºC]
[auto]
leave [8:00am]
[16.5ºC]
[29.5ºC]
[auto]
leave [8:00am]
[16.5ºC]
[29.5ºC]
[auto]
return [6:00pm]
[21.0ºC]
[25.5ºC]
[auto]
return [6:00pm]
[21.0ºC]
[25.5ºC]
[auto]
sleep [10:00pm]
[16.5ºC]
[28.0ºC]
[auto]
sleep [10:00pm]
[16.5ºC]
[28.0ºC]
[auto]
wake [6:00am]
[21.0ºC]
[25.5ºC]
[auto]
wake [6:00am]
[21.0ºC]
[25.5ºC]
[auto]
leave [8:00am]
[16.5ºC]
[29.5ºC]
[auto]
leave [8:00am]
[16.5ºC]
[29.5ºC]
[auto]
return [6:00pm]
[21.0ºC]
[25.5ºC]
[auto]
return [6:00pm]
[21.0ºC]
[25.5ºC]
[auto]
sleep [10:00pm]
[16.5ºC]
[28.0ºC]
[auto]
sleep [10:00pm]
[16.5ºC]
[28.0ºC]
[auto]
wake [6:00am]
[21.0ºC]
[25.5ºC]
[auto]
leave [8:00am]
[16.5ºC]
[29.5ºC]
[auto]
return [6:00pm]
[21.0ºC]
[25.5ºC]
[auto]
sleep [10:00pm]
[16.5ºC]
[28.0ºC]
[auto]
Friday
Saturday
Sunday
NB. The setpoint range is 7.0ºC to 31.0ºC (heat) and 9.0ºC to 37.0ºC (cool).
Setting the current day and time
1. Press Set Current Day/Time. Note that on initial power-up or after an extended power loss, 1:00pm flashes on the display
until a key is pressed.
2. Press Day until the current day is displayed. Then press Time or Time until the current time is displayed. Note that
tapping the set Current Day/Time will change the time on one-hour increments. Note also that if the current time is Daylight
Savings Time, press Daylight Time until ‘DST’ is displayed.
3. Press Run Program.
Programming the first day
Start by programming the Wake time and temperature (and fan operation on selected models) for any one day:
1. Press Wake. Then press Day until the desired day is displayed.
2. Press Time or Time until the desired Wake time is displayed. Note that program times are in fifteen-minute increments (for
example, 8:00, 8:15, 8:30).
3. Press increase or decrease key on the main panel until the desired Wake temperature is displayed. Note: press Fan to
modify fan operation. ‘Auto’ means that the fan will run only when the heating or cooling equipment is operating. ‘On’ means
that the fan will run continuously for the entire period.
4. Press Heat/Cool Settings to switch to other system temperature setpoints. Note that program times are the same for both
heating and cooling.
5. Press increase or decrease key on the main panel until the desired temperature setpoint is displayed.
6. Press Leave, Return or Sleep and repeat steps 2 to 5 for programming the rest of the day. The first day is now programmed.
Note that you need to repeat all of the above steps for each day of the week that has a different program to the first day set.
Refer to the ‘Copying a Day’ section to copy any program day to another.
7. Press Run Program when all desired days are programmed.
Copying a day
Note: the thermostat must be in the program mode to use the copy feature. Press Wake if not already in this mode.
1. Press Day to select the day to be copied if different to the day displayed.
2. Press Copy. The display will show ‘Copy’.
3. Press Day until the day to be copied to is displayed.
4. Press Copy. Note that ‘donE’ will be displayed for two seconds and then the normal program display will be shown.
5. Repeat all of the above steps for all of the days desired.
6. Press Run Program.
Clearing a program period
Note: the thermostat must be in the program mode to use the clear feature. Press Wake, Leave, Return, or Sleep if not already
in this mode.
1. Press Day to select until the desired day is displayed.
2. Press Leave, Return, or Sleep until the start time and temperature settings are cleared (approximately three seconds). Note
that Wake cannot be cleared.
3. Repeat the above two steps for all of the periods to be cleared.
4. Press Run Program.
Setting temporary temperatures
To change the temperature setting until the next program period, press the increase or decrease key on the main panel until
the desired temperature setpoint is displayed. Note that if or appear under the temperature display, it means that both the
heating and cooling setpoints are being adjusted. Tapping the key will change both the heat and cool points by one degree. Press
the information button after the desired setpoint is reached to check setpoints. Note also that the temporary temperature setting is
displayed for approximately three seconds. The setting is cancelled when the next period starts, or when Run Program is pressed.
Changing temperature settings indefinitely
1.
2.
3.
4.
Press Hold Temp.
Press the increase or decrease key on the main panel to change the setting, if desired.
Press Heat/Cool Settings to change between heat and cool settings.
Press the increase or decrease key on the main panel to adjust temperature settings. The display changes from the setpoint
to the room temperature after approximately three seconds.
5. Press Run Program to cancel the Hold and to return to the program.
Changing temperature setting until a designated day and period
1. Press Hold Temp twice.
2. Press Time or until the desired number of days is displayed (1 to 255 days). For example, ‘18’ will override the daily
programs for 18 days.
3. Press Wake, Leave, Return, or Sleep to select the period in which the program will start. For example, ‘Return’ will stop the
hold at the ‘Return’ period starting time.
4. Press increase or decrease key on the main panel to adjust the temperature setting, if desired. For example, if set to ‘21º’,
the heating equipment will operate when the room temperature is below 21º. Note that when the system is set for Auto, both
heat and cool setpoints are needed. If the system is set for Heat, only the heat setpoint is needed (and conversely, if the system
is set for Cool, then only the cool setpoint is needed).
5. Press Heat/Cool Settings to change between heat and cool settings.
6. Press increase or decrease key on the main panel to adjust the temperature setting, if desired. For example, if set to ‘28º’,
the cooling equipment will operate when the room temperature is above 28º.
IMPORTANT: if the ‘Hold’ needs to be cancelled before the designated time, press Run Program to return to the program.
Setting system and fan
The system default setting is ‘Heat’ and the fan default is ‘Auto’. Use the System and Fan keys to change these settings. The fan
settings can be set for each program period individually. The system selection is for all of the program periods. System settings
control the thermostat operation as follows: ‘Heat’ allows the thermostat to control the heating; ‘Off’ dictates that both the
heating and cooling are off; ‘Cool’ allows the thermostat to control the cooling; and ‘Auto’ allows the thermostat to control both
heating and cooling operations, depending upon indoor temperature. Fan settings control the system fan as follows: ‘On’ dictates
that the fan is on continuously; whilst ‘Auto’ dictates that the fan operates with the equipment.
Setting temporary fan operation
If your thermostat has an operational Fan key, press Fan until the desired fan operation is selected. This fan setting will be in effect
until the next regularly scheduled period starts.
The daylight savings time feature
This feature allows you to adjust the operation for daylight savings with a single key press. When pressed in October (or when
daylight savings begins), the time will go back one hour. In the spring (at the end of daylight savings), the time will go forward one
hour and the display will show ‘DST’. See ‘Setting the current day and time’ section for initial setting instructions. Note that
pressing Daylight Time more than once within a five-minute period will scroll you through various time options (for example: one
hour earlier or later with or without DST). Pressing Daylight Time six times in a five-minute period will return you to the original
setting.
In recovery
The thermostat may at times display ‘In Recovery’, which indicates the computer within the unit is using adaptive intelligence to
avoid cycling of the equipment and to ensure that the temperature ranges that you have set can be reached quickly and efficiently.
It may mean that the equipment begins to warm up (or cool down) sooner than is programmed into the computer, so as to ensure
that the desired temperature is met as soon as is possible. If this feature is not desired, your local service technician can modify the
hardware to use conventional recovery systems instead.
HPM smoke detectors/alarms
Model number:
Warranty/Maintenance/Repairs:
HPM Cat 645/1Sl
Steve Krstin (all electrical) ph 042 582 856
Operation
• The sensitivity of the smoke alarm is temporarily reduced by pressing the ‘Hush’ button on the smoke alarm cover. This silences
the alarm, and replaces the alarm with a ‘chirp’ every 40 seconds. The alarm returns to full sensitivity after five minutes, and
may sound the alarm if particles of combustion are still present. The ‘Hush feature may be used as frequently as required, until
the air clears. However, before using this feature, identify the source of smoke and ensure that safe conditions exist.
• Test the alarm by pushing one unit’s test button for a few seconds. This should sound the alarm on all units if circuitry is active.
If no alarm sounds, check the fusebox to make certain that the alarm is connected and active. Check the back-up battery also.
• To replace the 9 volt battery (the yellow LED will glow, and a chirping noise will emanate from the unit), slide the smoke-alarm
unit to the side, in the direction of the arrow. It then unhinges from the baseplate, and can be removed if desired. The battery
can be accessed without full removal from the hinge.
ATA garage door opener
Model number:
Warranty/Maintenance/Repairs:
Automatic Technology Australia Pty Ltd
W R Engineering ph 02 6280 5988
Operation
• To operate the door, simply press the hand-held transmitter or the wall-mounted transmitter for two seconds and the door will
automatically open or close. The door can be stopped during an opening or closing cycle by pressing the transmitter again. The
next actuation will move the door in the opposite direction.
• Every time a transmission is made from the remote transmitter, a new security code is generated. The number of possible code
combinations runs into the billions, greatly enhancing the security of the system. Code ‘grabbing’ is almost impossible.
• If the door is closing or opening and hits an obstruction or is restricted in any manner, it will automatically reverse. The amount
of resistance required to reverse the operation can be adjusted, but is initially set during installation of the door.
• If the maximum opening or closing capacity of the door is exceeded, the courtesy light will flash and the overload LED on the
door panel will flash. If the overload LED lights up without flashing, this indicates that the garage door mechanism requires
servicing.
• The courtesy light is set to be activated automatically upon an opening or closing cycle, and can also be operated by the
remote control unit without opening the door using one of the four buttons on the unit. The light will stay on for approximately
three minutes (this time can be adjusted to a maximum of ten minutes).
• If the door-opening motor is left running for any reason, the auto-run timer will turn the motor off after thirty seconds.
• The door is equipped with a manual override device, which disengages the motor from the drive chain. Once power is restored
to the unit, the lever can be reset to re-engage the drive. This function is key-operated from outside the door, and is a manual
lever from the inside.
Storing door opening and closing codes into the remote control
The memory in each remote controller can store up to twenty-seven different transmitter codes. To store a new set of codes:
1. Press and hold the ‘DOOR CODE’ button on the control panel of the door closer motor unit.
2. Whilst holding in this button, press the desired transmitter button (of the four) you want for at least two seconds. Release the
button and pause for another seconds. Press the transmitter button once more for two seconds. Release the button once more.
3. Release the ‘DOOR CODE’ button on the door closer motor unit.
4. Press the button to see if it operates the door. Additional transmitters can be added as per the steps outlined here.
Additional transmitters can be added as per the steps outlined here.
Storing other codes into the remote control (light code)
Each transmitter can be set to store a light code, which operates the light on the motor unit. To store a light code:
1. Press and hold the ‘LIGHT CODE’ button on the control panel of the door closer motor unit.
2. Whilst holding in this button, press the desired transmitter button (of the four) you want for at least two seconds. Release the
button and pause for another seconds. Press the transmitter button once more for two seconds. Release the button once more.
3. Release the ‘LIGHT CODE’ button on the door closer motor unit.
4. Press the button to see if it operates the light.
Additional transmitters can be added as per the steps outlined here.
Setting of courtesy light time
The default time for the courtesy light to remain on after activation is three minutes. This can be changed as follows:
1. Press and hold the ‘AUTO CLOSE TIME’ button and the ‘FORCE MARGIN SET’ button on the door closer motor unit.
2. Whilst holding in both buttons, press the green ‘OPEN’ button on the motor unit. Each button press adds ten seconds to the
light activation time. To decrease the light activation time, press the red ‘CLOSE’ button instead. Each button press deducts ten
seconds from the light activation time.
3. To recall the factory-set defaults for light activation, press and hold in both the ‘AUTO CLOSE TIME’ and the ‘FORCE MARGIN
SET’ buttons on the door closer motor unit, and whilst holding these two buttons, press the ‘RESET’ button for two seconds.
The default time will be recalled.
Interruption to power
If the unit has had a power outage, the green ‘OPEN’ light will flash rapidly. To reset, close the door (by hand). Depress the green
‘OPEN’ button until the door is fully open, then release the button. Depress the red ‘CLOSE’ button until the door fully closes, then
release the button. The door should now be reset back to normal operation.
Smeg dishwasher
Model number:
Warranty/Maintenance/Repairs:
Smeg/Omega SA622X
McCleanes Services ph 02 6239 1080
Warnings
• Before loading dishes, remove the largest scraps of food to avoid blocking the filter. Very dirty pans or frying pans must be
soaked in water before they are placed in the dishwasher to allow food waste to be removed more easily. Always put pans in
the bottom basket. Never place plastic items above the heating elements: they may melt. Never touch the heating elements
during a washing cycle or just after a wash is finished. Only wash dishes and cutlery suitable for washing in a dishwasher.
Bone, wood and aluminium products or composites are generally not suitable.
• Knives and cutlery receive a better wash if placed in the basket with their handles pointing downwards. However, you may
prefer to point knives downwards to avoid injury when handling the tips.
• If you open the door during a washing cycle, you must wait at least one minute with the door ajar before starting the
dishwasher again (by closing the door).
• It is generally better to wait at least twenty minutes after the end of a program before emptying the dishes, so that they will be
dry and not too hot. Empty the bottom basket first, so as to avoid drops of water that may be left on items in the top basket.
General notes
• Only use the dishwasher fully loaded, to save energy. Use the washing program best-suited for the type of load.
• The detergent and rinse-aid dispensers are on the inside of the door. The detergent dispenser is on the left and the rinse-aid on
the right. Fill the dispenser with detergent before each wash (rinse-aid is optional, but useful for glasses in particular).
IMPORTANT: use only detergents specifically intended for dishwashers. If insufficient detergent or powder is added, the dirt will
not be completely eliminated, whilst excessive detergent will cause foaming and pollution, and unnecessary waste.
• Rinse-aid can be poured into the rinse-aid dispenser. When full, the dispenser will show ‘full’ on the indicator. Rinse-aid is
added to the last rinse cycle of the washing operation to speed up drying time and to prevent formation of stains and scale
deposits on dishes and glassware. To adjust the dosage, rotate the selector on the dispenser to the desired position: the dose is
proportional to the numbers indicated. If dishes are sticky or have whitish streaks, reduce the dose. If washes dishes are dull or
show round marks, increase the dosage.
• The vigorous washing action of the bottom spray arm means that the bottom basket is the best place for the dirtiest dishes and
pans. Make sure that there is a gap between each dish or pan, and allow water to move vertically between each item. Pans
must always be upside-down, with dirty surfaces exposed to the jets of the bottom spray arm for maximum effectiveness.
• The top basket is intended for smaller items and less heat-resistant objects such as plastic bowls. The top basket can be used in
two different positions, depending upon the height of the dishes. Pull the basket out to its limit, turn and stop the limiter on
the right-hand side through 90º, push the runner towards the dishwasher and then raise the basket and insert the lower set of
wheels into the runner. Restore the end stop limiter to its original position. Load items in the top basket with cups and dirty
surfaces facing downwards.
• Dishes with glazed colours withstand washing, but more delicate colours will fade with frequent dishwashing. Silver cutlery
may stain if it comes into contact with foods containing sulfur, such as eggs or legumes. These stains can be removed using
silverware polish. Handmade items are rarely suitable for washing, as are old knives with blades glued into the handle. Certain
types of glass will become cloudy with constant use: wash these using the ‘delicate’ cycle, or the least-vigorous program.
Operation
• To switch on the dishwasher, load dishes, fill the dispenser(s), check that the spray arms swing freely, and that the door is shut.
The water tap should also be turned on for the dishwasher, and power connected. To select the program best suited to the
dishes to be washed, comply with the table shown in these instructions.
• To start the dishwasher, set the program desired on the program selector and/or the relative buttons, then press the start/stop
button. To set the desired program on the selector, turn the pointer to the number corresponding to the program required. If
you have chosen the wrong program, stop the dishwasher first, make the new setting and restart the dishwasher using the
start/stop button once again. To switch off the dishwasher at any time, press the start/stop button.
Maintenance
• To clean the outside surfaces and the inside of the door of the dishwasher, use a damp, soft cloth. Never use abrasives or acid
detergents. The door seals must be cleaned with a damp sponge. The outside surface can be cleaned with normal detergents.
• There is a water intake filter on the line into the dishwasher, near the stopcock outlet, that requires periodic cleaning. Turn off
the tap, unscrew the end of the water filler hose, remove the filter and clean it gently under a jet of running water, then replace
the filter and screw the hose back into place (remember to turn the tap back on again).
• The spray arms can be removed easily for periodic cleaning to prevent fouling. To remove the top arm, simply unscrew the
retainer ringnut. The lower arm is removed by pulling it up. Wash both thoroughly under a jet of water, and put back in place.
• The filter unit (which sits in the base of the dishwasher) should be removed, inspected and cleaned regularly. To extract, rotate
the two tangs that project upwards slightly anticlockwise and lift out. Remove the internal cage by pushing from below, and
separate it from the external microfilter. The internal filter is then simply separated from the internal cage by pulling up the
filter from its seat. Clean the filters in running water using a stiff plastic brush. It is essential to clean filters carefully as
instructed above, as the dishwasher will not operate with a fouled or damaged filter unit. Note also that the bottom mesh tray
can be removed for cleaning also.
Switch settings
Each setting dictates a different detergent usage, pre-wash, wash, rinse and heated dry cycle. Here is a summary of each,
corresponding to the numbers available on the selector:
1. Soak: pans and dishes awaiting completion of the load. Simply a pre-wash, with no detergent, heat, rinsing or drying.
2. Strong: very dirty dishes and pans, with a pre-wash cycle, a hot (65ºC) wash, two cold rinses, a hot rinse and dry.
3. Normal: for normal usage, with a pre-wash, a 60ºC wash, one cold rinse, a hot rinse and dry.
4. Rinse only: no detergent use, and simply a cold rinse, a hot rinse, and a heat dry for dishes that require ‘refreshing’.
NB. Only use the soak position with a partial load.
Smeg ceramic surface cooktop
Model number:
Warranty/Maintenance/Repairs:
Smeg SA604SS (60cm)
McCleanes Services ph 02 6239 1080
Warnings
• The ceramic surface is resistant but not unbreakable. Impact with heavy or sharp objects can break or crack the top. If the top
is cracked or broken at any time, switch off power to the unit and do not use the appliance until repaired.
• Do not use the cooktop as a working surface: it is easily scratched.
• Special care must be taken when children are present as they are unlikely to see if the hot surface warning lights (residual heat
indicators) are on. As a precaution, treat the surface as hot at all times. The residual heat indicators remain lit until the element
has cooled to below 60ºC (which is safe to touch).
• Always keep pan handles pointing to the side, and never over the front of the cooktop.
• The surface temperature is limited to 600ºC and only in the surface area directly above the element that is heated.
Operation
• Heat output is controlled by the infinitely-variable switches. These are marked from 1 to 11, with 11 being the maximum heat.
The controller has a noticeable ‘click’ at position 5, which is the most often used position since water can be held at boiling
point. To bring water to boil, turn the controller to 11 until the water is boiling, then return to position 5 to 7 to hold at boiling
temperature.
• The best pans to use should have thick, flat, smooth, and solid bottoms. Glass cookware is suitable but will be slower to heat
than good-quality copper or cast-iron. Lightweight aluminium pans are not advisable. Pans with distorted bottoms are less
efficient and are best avoided.
• Do not slide cookware across the surface, as this can scratch the surface.
• Spillovers should be avoided if at all possible. This is especially important if the pot contains liquid with sugar or salt. Therefore,
extra special care should be taken with jams, toffee or caramel. Plastic or tinfoil can also melt if they come into contact with
the surface, and care should be taken with these elements.
Dealing with spillovers
Remove spillovers or soiling from the surface immediately and while the glass is still hot, with a razor-blade scraper. Any metal (not
plastic) razor-blade scraper is suitable, and can be purchased cheaply from any hardware store. After scraping the surface, clean
with a paper towel. Wipe and clean pan base before returning it to the element, as residue can stain or pit the surface.
Cleaning
There are several types of cleaner that are suitable for use on ceramic tops, and can be found in supermarkets and hardware stores.
Do not use scouring powders, plastic, nylon or metal cleaning pads as they may scratch the surface. Do not use strong chemical
cleaners, oven cleaner, chlorine bleach or ammonia, as these may etch the surface. The trim edge may be cleaned with nonabrasive cleaners only.
Smeg multi-function oven
Model number:
Warranty/Maintenance/Repairs:
Smeg/Omega SA360X/1
McCleanes Services ph 02 6239 1080
Warnings
• As a guide, lower all cooking temperatures by 30ºC, as fan-forced cooking requires lower temperatures.
• Do not use covered roasting dishes, oven bags or add additional moisture to your cooking (this upsets the moisture balance).
The oven compartment is thermo-sealed, which means only small amounts of cooking vapours escape during the cooking
process. Heat and moisture is retained resulting in faster cooking times at lower temperatures and with less drying-out of food.
• Do not grill with the door open. Static grilling is possible for quick grilling only with the door closed.
Cleaning
• Side racks are removed by pulling the racks upwards and slightly to the centre of the oven. The racks fit in most dishwashers
for cleaning, otherwise use Scotchbrite or steel soap pads to keep clean. Replace the side racks by slotting into the back liner.
• Before cleaning the oven, always switch off power and allow the oven to cool down. If fat and food splashes are left, they will
bake on and prove difficult to remove later. The oven should be wiped with a damp cloth on a regular basis. External surface,
buttons and selector knobs should be wiped with a damp cloth using a cream cleaner or spray-on wipe-off all-purpose cleaner
that is suitable for painted surfaces. Do not use chemical or abrasive cleaners or materials.
• The interior of the oven will get dirty and require periodic maintenance. The oven strips down for easy cleaning: first remove all
internal racks and trays, then remove the pull-out roof liner, then the side racks, followed by the bottom tray. The back liner is
able to be removed if required. Once the interior is stripped of hardware, the cavity can be sprayed with a commercial oven
cleaner and wiped clean with paper towels.
Note about commercial oven cleaners
There are several brands of oven cleaners that are available from supermarkets and which spray foam and are generally causticbased. These products are fine to use on the inside of the oven. You can clean the side racks, oven interior, roof liner, oven racks
and trays. Always follow the directions on the product. Never spray these cleaners onto any stainless steel or white-painted parts of
the oven. Be very careful.
• The fan blade of the oven gets quite dirty. It is held on by a knurled nut with a left-hand (reverse) thread. This blade can be
either removed and washed or sprayed with oven cleaner and sponged off.
• Once the oven racks and side racks have been removed, they can be cleaned with scouring pads, steel wool, and abrasive
cleaners. Note that the side-racks fit easily into a dishwasher. The enamel trays can be cleaned with hot water and detergent,
and abrasive cleaners.
• Be warned, however, that the stainless steel exterior of your oven can be easily scratched and once marked, the scratch is
almost impossible to remove. Take care of the stainless steel exterior by wiping down with a damp cloth and an abrasive-free
cleaner. Methylated spirits works well to remove finger marks. There are also commercial stainless steel cleaners available. Be
careful that they do not polish the surface, as this will leave a mark on the brushed finish of the oven.
Operation
• The oven is primarily a fan-forced oven, though static (non-fan) cooking is an option.
• Always cook meats elevated on the wire rack or grill tray. The moving air from the fan ensures that the food is cooked
completely without turning.
• Do not open the oven door often to test food or to baste.
• Watch you cooking times carefully: this oven heats very quickly on ‘fan-forced’ and ‘fan grill’ settings.
• Temperatures above 200ºC are not normally required. For fan-forced cooking, 160º to 175ºC is very effective.
• The use of 250ºC (or maximum thermostat) with conventional cooking (static use) should be done with caution.
• The oven will preheat in under five minutes under normal conditions. During winter, condensation in the oven increases, and
during this time we recommend that preheating take place for ten minutes with the fan function.
• A small orange lamp on the front of the control panel illuminates to show that the oven is heating. It switches off once the
desired oven temperature is reached. This lamp should switch on and off during normal cooking, even when grilling.
• The oven light comes on automatically when any cooking function is selected. Replacement bulbs are available, and can be
screwed in behind the glass cover. Do not overtighten, and only use bulbs that are suitable for high-temperature use.
• The oven has an additional cooling fan to provide cooling and ventilation around the oven cavity. This fan operates
automatically, and you will feel warm air flowing out from under the bottom of the oven door. When opening the oven door,
open slightly to allow the fan to capture steam from the oven. This is an important tip to avoid condensation in operation.
• The oven has a removable roof liner, which protects the oven from grease spatters. The liner pulls out easily, and should be
washed using normal detergents (it can be washed in the dishwasher) after roasting or grilling.
• The lower element cover is the bottom shelf of the oven. With any fan function, oven-proof dishes can be placed directly on
this base. It is removable for cleaning once the side racks are removed. This is only required if a spill-over has occurred, or
during the six-monthly cleaning maintenance.
Cooking function symbols
The following chart explains the use of symbols. Fan grilling recommendations and a fan-forced cooking chart follow.
Fan-forced
Element surrounds fan for
even heating
Fan grilling
Full grill element with fan
distribution
Conventional grilling
Top element, close door
Fan grilling
Part grill element with fan
distribution
Conventional grilling
Top element, close door
reduced wattage
Fan grilling chart (in pre-heated oven)
Fan-forced cooking chart (in pre-heated oven)
food
shelf
ºC
time
food
shelf
ºC
time
Steak
4
180 - 190
8-10 minutes
Baked whole fish
2
160
20 minutes
Lamb or pork chops
3
160 - 175
8-12 minutes
Roast pork fillet
2
160
40 minutes
Chicken pieces or wings
3
160 - 175
10-15 minutes
Roast chicken
2
160
100-120 minutes
Chicken fillets
3
160 - 175
10-15 minutes
Meat loaf
2
160
60 minutes
Kebabs
3
160 - 175
10-15 minutes
Quiche
2
160
20-25 minutes
Sausages
3
160 - 175
10-15 minutes
Lamb curry
2
140 - 160
120 minutes
Fish fillets
3
150 - 160
15-20 minutes
Meat pie
1
150 - 160
60 minutes
Fish fingers
3
160 - 175
10-15 minutes
Lasagne
2
160 - 175
30 minutes
Hash browns
4
180 - 190
8-10 minutes
Apple or fruit pie
3
160
40 minutes
Cheese toppings
3
160 - 175
8-10 minutes
Apple crumble
2
160
40-50 minutes
Cheese on toast
4
180 - 190
6-8 minutes
Sponge cake
3
160
25 minutes
Condensation
Often from new owners of Smeg ovens there is concern about the level of steam and condensation inside the oven. A greater level
of moisture than is normally expected inside the oven is quite normal and helps to keep the food moist during cooking. The
amount of moisture is dependent on the food type, i.e. if it is fresh, defrosted, or still frozen when cooking. Climatic conditions also
play a part. During winter, it pays to preheat the oven for a longer period than normal to reduce condensation.
Safety thermostat
If the oven gets too hot for any reason, a thermal cut-out switch operates. The oven will resume operation after it cools sufficiently.
.
Smeg microwave oven
Model number:
Warranty/Maintenance/Repairs:
Smeg SA-31MX
McCleanes Services ph 02 6239 1080
Warnings
•
•
•
•
•
•
•
•
•
•
Do not subject the door to strain or weight: this can cause the oven to fall forwards, and can damage the seal on the door.
Do not operate the oven empty, as this will damage the oven.
Do not attempt to dry clothes, newspapers or other materials in the oven.
Do not use recycled paper products as they may contain impurities which may damage the oven.
Remove wire or metal twist ties from paper or plastic bags before placing in oven.
Do not heat items in closed containers unless they are suitable for microwaving. Examples of this are sealed plastic containers,
glass jars, tins, and whole eggs in a shell.
If any utensil or cup is warm to touch after one minute of heating (on HI) whilst immersed in a cup of cold water, the item is
not suitable for microwaving.
Avoid all cookware or dishes with metal trim or gold or silver designs. The exception to this is the use of small strips of foil
which may be used to shield thinner or uneven areas of food from overcooking.
Cover items loosely to allow steam to vent, and open very carefully to avoid burns. Wax paper can be used to absorb spatters
and extra moisture during the heating process.
Allow for standing time after removal of microwaves. Food will continue to cook for a short period of time.
Operation
• When setting the controls, every time a button is pressed, a beep can be heard. Note that the unit does not operate with the
door open. After cooking, the cooling fan will operate for five minutes.
• The oven has a maximum power output of 950 watts. The variable output settings offer increments of 20 per cent with each
setting, as follows: HI = 100%, MID-HI = 80%, MID = 60%, MID-LOW = 40%, and LOW = 20%.
Maintenance
• Keep the inside of the oven clean. When food spatters or if liquids spill, wipe with a damp cloth. Mild detergent can be used if
the oven gets very dirty. The use of harsh detergent or abrasive cleaners is not recommended.
• The outside surface should be cleaned with soap and water, rinsed and dried with a soft cloth. To prevent damage to the
operating parts inside the oven, use water sparingly.
• If the control panel becomes wet, clean with a soft dry cloth. Do not use harsh detergent or abrasive cleaners.
• If steam accumulates inside or around the outside of the oven door, wipe with a soft cloth.
• To clean the glass tray, remove and wash in warm sudsy water. The roller guide can be removed and cleaned at this time to
avoid excessive noise: simply wipe clean in mild sudsy water or a dishwasher. Always replace and use the roller guide and tray.
Microwave cooking
1. Press the POWER button. The display will show ‘ :0’. Press the POWER button again (as many times as is required) to set the
desired power setting. This is indicated in the display.
2. Turn the DIAL KNOB for the desired cooking time. For example, to set ‘18 minutes’, turn the knob right or left until ‘18:00’
appears in the display. Time can be set from 10 seconds to 60 minutes.
3. Press the START button. The oven will now cook for the indicated time at the indicated power setting.
4. At the end of the cooking time, four beeps will be heard. The indicator and oven lights will go off, and the display panel will
return to zero. The turntable will stop turning. It is possible to interrupt the process at any time by either pressing the STOP
button, or by opening the door.
Time defrost
During a defrosting operation, turn the food over after hearing a four-beep by four times to complete the defrost.
1. Press the DEFROST button twice.
2. Turn the DIAL KNOB for the desired defrosting time. For example, to set ‘18 minutes’, turn the knob right or left until ‘18:00’
appears in the display. Time can be set from 10 seconds to 60 minutes.
3. Press the START button. The oven will now defrost for the indicated time.
4. At the end of the defrosting time, four beeps will be heard. The indicator and oven lights will go off, and the display panel will
return to zero. The turntable will stop turning. It is possible to interrupt the process at any time by either pressing the STOP
button, or by opening the door.
Weight defrost
During a defrosting operation, turn the food over after hearing a four-beep by four times to complete the defrost.
1. Press the DEFROST button.
2. Turn the DIAL KNOB for the desired defrosting weight. For example, to set ‘2.4kg’, turn the knob right or left until ‘24 00’
appears in the display. Weight can be set from 100g to 2.9kg.
3. Press the START button. The oven will display the required defrosting time.
4. At the end of the defrosting time, four beeps will be heard. The indicator and oven lights will go off, and the display panel will
return to zero. The turntable will stop turning. It is possible to interrupt the process at any time by either pressing the STOP
button, or by opening the door.
Program cooking (one-touch cooking)
One-touch cooking allows you to cook or reheat many of your favourite foods by using just one button. To increase the quantity,
press the chosen button until the number in the display matches the desired quantity to cook (except for muffins and dinner
plate).
• For frozen pizza, press the FROZEN PIZZA button. The number ‘2 00’ is displayed. After 1.5 seconds, the display is changed
into the cooking time of the quantity, and the oven begins cooking. Press the FROZEN PIZZA button once more, and the
number ‘3 00’ is displayed. Note that you should use only one frozen pizza at a time, and that you should only use frozen
pizza. If the cheese does not melt, cook for a few seconds longer.
• For dinner plates, press the DINNER PLATE button. The number ‘3 00’ is displayed. After 1.5 seconds, the display is changed
into cooking time of quantity, and the oven begins cooking.
• For beverages, press the BEVERAGE button. The number ‘1’ is displayed. After 1.5 seconds, the display is changed into
cooking time of quantity, and the oven begins cooking. Press the BEVERAGE button for as many cups as you have in the
microwave, but do so within the 1.5 seconds before the oven begins the cooking process.
• For muffins, press the MUFFIN button. The number ‘5’ is displayed. After 1.5 seconds, the display is changed into cooking time
of quantity, and the oven begins cooking.
Menu cooking
There is also pre-programmed cooking of five food types (see control panel). There is no need to set cooking time, power or
function for these items.
1. Press the MENU button. The display will show ‘AC-1’.
2. Select the desired cooking menu from the chart on the oven. For example, to cook 200g of vegetables, press the MENU button
again to display ‘AC-2’. If you wish to choose other foods, press the button until the desired menu appears in the display.
3. Press the START button. The oven will now start programmed cooking for menu 2. The cooking time of menu 2 (fresh
vegetable) is 4 or 5.67 minutes. The display will show the cooking time.
4. At the end of the cooking time, four beeps will be heard. The indicator and oven lights will go off, and the display panel will
return to zero. The turntable will stop turning. It is possible to interrupt the process at any time by either pressing the STOP
button, or by opening the door.
Note: AC-1 Baked potato (1ea, 2ea, 3ea); AC-2 Fresh vegetable (200g, 300g); AC-3 Soup (250g, 350g); AC-4 Fish fillets (300g,
500g); AC-5 Meat loaf (500g, 700g).
To interrupt the cooking cycle at any time
Either press the STOP button, or open the door. The oven will immediately stop and no further heating will take place. If no further
cooking is required, press the STOP/CLEAR button, and the display will indicate ‘0’. To continue cooking, close the oven door and
press the START button once more. The oven will restart.
Speedy cooking
1. Press the SPEEDY COOK button. The display will show :30’ in the window.
2. Whenever this button is pressed, cooking time is increased by 30 seconds. The oven will operate two seconds later for the time
indicated on the display.
3. At the end of the cooking time, four beeps will be heard. The indicator and oven lights will go off, and the display panel will
return to zero. The turntable will stop turning. It is possible to interrupt the process at any time by either pressing the STOP
button, or by opening the door.
Child safety lock
The safety lock prevents unwanted oven operation by small children or others. To set, press STOP/CLEAR for two seconds. The
‘LOCK’ indicator lights. To cancel, press STOP/CLEAR for two seconds, after which the ‘LOCK’ indicator light goes off.
Simpson clothes dryer
Model number:
Warranty/Maintenance/Repairs:
Sirocco 450
Appliance Parts and Services ph 6280 5066
Warnings
• The maximum load when dry for this dryer is 4.5kg. Do not attempt to overload the dryer: do not fill to beyond halfway, and do
not cram clothes into the unit.
• Do not dry articles that have been washed, soaked, or spotted with combustible substances such as petrol, degreasers,
drycleaning solvents, vegetable or cooking oils, waxes, etcetera.
• Do not operate unit with filter guard and a clean lint filter, correctly fitted. The lint filter should be removed and cleaned after
every load. Do not use a torn or damaged filter, and do not remove the fringe from the edge of the lint filter.
• Do not operate dryer in an unvented laundry, or without adequate ventilation. Ensure that inlet and outlet points are not
obstructed to prevent dryer from overheating.
• Do not attempt to dry articles made from foam rubber or rubber-like materials, or plastic: such as aprons, bibs, chair covers,
curtains and tablecloths. Do not dry shoes made from plastic. Do not attempt to dry woollen articles.
• Check the care label on clothing to be sure: items that are safe have a circle enclosed by a square. Items that should not be
tumble-dried have a cross through the square and circle.
• A saftety cut-out switch comes into operation if the dryer overheats. To reset, ensure that the lint filter is clean, check to see
that the exhaust outlet is clear, press the safety reset button near the door latch to restart your dryer. You may have to wait up
to ten minutes for the dryer to cool. If the safety cut-out reactivates, contact your nearest service centre.
To remove lint filter
• Pull out the the plastic filter guard and filter from the back of the dryer drum. Use the finger holes, which are there to help you.
• Unsnap the micromesh filter from the guard filter, and wipe or peel off the lint from the filter.
• To refit, make sure that the ‘fingers’ at the centre of the lint filter point towards the filter guard. Snap the filter onto the guard,
making sure that the filter is pushed on all the way. Refit the guard (with filter attached) to the back of the dryer drum. It will
snap into place when you fit it correctly.
Operation
• There are three positions on the heat control: the first is a full sun (hot), suitable for heavy durable items such as towels and
flannelette sheets. The middle position (cool) is for airing clothes and fluffing them up, whilst the half-sun (warm) is intended
for delicate items which can shrink, such as synthetics, underwear, etcetera.
• At the end of your selected drying time, there is an automatic thirteen-minute airing time to cool down the load. Note that
drying time is affected by room temperature and humidity, as well as the load size, wetness, fabric type and construction. To
reduce drying times, spin the load as dry as possible in your washing machine before placing the items in the dryer.
• If you want less than thirty minutes of drying time, you must turn the knob past the 30-minute mark, then back anti-clockwise
to the time desired.
• Check and empty all pockets, as things such as clips, nails, pins and other parts can damage both the dryer and your clothes.
• Close all hooks, eyes and zips which may catch on something else in the load. Clothes or towels with sand or grit should be
washed to remove particles before placing in the dryer.
NOTE that the most common cause of dryer problems relate to dirty or clogged lint filters. It is most important that the lint filter is
clean and clear before each drying load, and that adequate ventilation is available. Note also that overheating and clogged lint
filters can lead to an extreme fire hazard.
Door intercom
Warranty/Maintenance/Repairs:
Steve Krstin (all electrical) ph 042 582 856
Operation
• When the main doorbell is pressed, a tone is emitted at the door intercom, and the two-way speaker circuit is activated to
allow two-way conversation to take place.
• To unlock the door, simply press the ‘unlock’ button on the wall intercom until the door is opened (which can be confirmed
through the intercom). The door is slef-closing, and will lock automatically.
• Note that mains power is required to activate the unit.