1
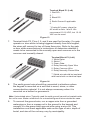
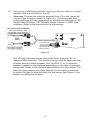
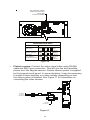
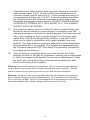
VP Keypad Access Device
Installation and Operation Manual
www.ptisecurity.com
Revised April 2012
800.331.6224
Thank you for purchasing the VP Keypad Access Device. While every
effort has been made to ensure the accuracy of the information in this
document, PTI Security Systems assumes no liability for any inaccuracies
contained herein. We reserve the right to change the information contained
herein at any time and without notice.
NOTE: This equipment has been tested and found to comply with the limits for
a Class B digital device, pursuant to Part 15 of the FCC Rules. These limits are
designed to provide reasonable protection against harmful interference in a
residential installation. This equipment generates, uses, and can radiate radio
frequency energy and, if not installed and used in accordance with the instructions,
may cause harmful interference to radio communications. However, there is
no guarantee that interference will not occur in a particular installation. If this
equipment does cause harmful interference to radio or television reception, which
can be determined by turning the equipment off and on, the user is encouraged to
try to correct the interference by one or more of the following measures:
Reorient or relocate the receiving antenna.
Increase the separation between the equipment and receiver.
Connect the equipment into an outlet on a circuit different from that to which the
receiver is connected.
Consult the dealer or an experienced radio TV technician for help.
This Class B digital apparatus complies with Canadian ICES-003.
Cet appareil numérique de la classe B est conforme à la norme NMB-003 du
Canada.
© 2012 PTI Security Systems
All rights reserved. No part of this publication may be reproduced,
transmitted, transcribed, or translated into any language in any form, by
any means, without written permission of PTI Security Systems.
114A3868
This equipment generates, uses, and can radiate radio
frequency energy and if not installed and used in accordance
with the instruction manual, may cause interference to radio
communications. It has been tested and found to comply with the limits
for a Class A computing device pursuant to Subpart J of Part 15 of FCC
rules, which are designed to provide reasonable protection against such
interference when operated in a commercial environment. Operation of
this equipment in a residential area is likely to cause interference in which
case the user, at his/her own expense, will be required to take whatever
measures may be required to correct the interference.
With the RS485 communication scheme, a keypad can be located
as far as 4000 feet from the controller, which is why shielded twisted
pair cable with ground wire is required for optimal operation.
Voltage drops across long lengths of wire must also be considered. The
farther the device is from the controller, the larger the gauge of wire that
must be used. Refer to the Voltage Drop Calculation QuickDoc for more
information. This document is available on our web site at www.ptiaccess.
com/downloads.
THE SYSTEM WILL NOT OPERATE PROPERLY IF THE
VOLTAGE IS BELOW 12VDC. Extreme care should be taken
when choosing a power supply voltage and current rating. Long
distance runs may require a remote power supply to be installed in line
with an RB5 relay to ensure proper operation.
Contents
Technical Specifications:........................................................................... 1
Installation................................................................................................. 2
Mounting Options ................................................................................. 2
Drive Up Accessibility....................................................................... 2
Walk Up Accessibility........................................................................ 2
ADA Guidelines for Access Control...................................................... 3
Recommendations for Sites ............................................................. 3
Mounting Access Devices .................................................................... 6
Surface Mount ................................................................................. 6
Gooseneck Stand Mount.................................................................. 6
Wall Mount Gooseneck..................................................................... 7
Keypad Adapter Plate....................................................................... 7
Single Bollard.................................................................................... 8
Double Bollard.................................................................................. 8
Installing VP Series Keypads................................................................ 9
Testing the Keypad............................................................................. 16
Operation................................................................................................. 17
VP Keypad Setup Function................................................................. 17
Setup Parameters/Functions.......................................................... 17
Standard Display Messages............................................................... 20
Access Codes and Cards............................................................... 20
Security Checks.............................................................................. 21
Access Response Messages.......................................................... 23
System Maintenance............................................................................... 24
Periodic Visual Inspection................................................................... 24
Periodic Cleaning................................................................................ 24
Cleaning the Housing and Touchpad.............................................. 24
Cleaning the Magnetic Stripe Reader................................................. 24
Troubleshooting ...................................................................................... 25
Test power and communication.......................................................... 25
Test card and code input..................................................................... 27
Test individual devices........................................................................ 28
Test multiple devices or entire site...................................................... 29
Warranty & Disclaimer ............................................................................ 31
Technical Specifications:
Power Supply:
Voltage:
12 – 18 VDC or AC
Current Consumption:
300mA Maximum
Relay Outputs (resistive load):
Maximum Switching Voltage:
30 VAC/DC
Maximum Switching Current:
AC: 10 A (NO) / 3 A (NC)
DC: 5 A (NO) / 3 A (NC)
Maximum Switching Capacity: 1250 VA (NO)
375 VA (NC)
Minimum Permissible Load:
10 mA at 5VDC
Contact Resistance:
100 mΩ Maximum
Life Expectancy:
Mechanical:10,000,000 operations
Electrical:200,000 operations minimum
(at maximum rated load)
Environmental:
Ambient Temperature:
-40°C to +80°C (-40°F to 176°F)
Ambient Humidity:
0% to 100%
Note: The humidity inside the housing for any VP device cannot exceed
100% and must be noncondensing.
1
Installation
MOUNTING OPTIONS
The VP keypad controls entry to or exit from a secured area. It works in
conjunction with a controller and control software. The VP can be used
to control gate access, building access, room access, elevator access,
etc. It is designed for ease of use and flexibility. Both the keypad and the
large LCD are backlit for easy visibility day and night. Mounting height for
devices will vary with local code regarding handicap access, emergency
and fire access, and other regulations.
Before installing the VP, determine where and how the device will be
installed as the mounting location will be determined by how the device is
to be used. If it is to be used for drive up access, it must be installed where
it can be accessed from a vehicle’s driver door. If it is to be used for walk up
access, it must be installed where it is easily accessible to a person on foot.
Drive Up Accessibility
When the VP will be positioned for drive up accessibility, the device must
be mounted within easy reach of the driver of an automobile or light truck.
Most such applications use gooseneck stands that are located on an island
between the entry and exit gates, or to the left side of the gate if a single
gate is used. Local building codes may set a minimum and maximum
height for devices that are accessible by vehicle. Figure 1 shows possible
mounting locations when used for vehicle access.
Walk Up Accessibility
When the VP is used for walk up access, it can be mounted on a stand
or attached to a wall. It can be surface mounted so that it protrudes from
the wall.
Figure 1
2
ADA Guidelines for Access Control
The Americans with Disabilities Act of 1990 (ADA) prohibits discrimination
in and ensures equal access to employment, government services, public
accommodations, transportation, and commercial facilities for persons with
disabilities. Some of the guidelines and requirements from this law can be
applied to access control. Because many local municipalities have much
stricter standards than the ADA, we strongly recommend that owners,
builders, and installers consult a qualified expert in local, state, and federal
interpretations of ADA and similar laws. For more information about the
ADA, visit the ADA web site at www.ada.gov or the Department of Justice
ADA web site at www.usdoj.gov/crt/ada/ or call the ADA Information Line
at (800) 514-0301. Many communities have adopted the Americans with
Disabilities Act (ADA) as the standard for locating devices that the general
public will use.
Recommendations for Sites
The ADA and other similar laws are open to some degree of interpretation
by local authorities and courts. It is in your best interest to familiarize
yourself with the complete requirements for ADA and other similar local
laws. Most important, however, is to work to provide reasonable access to
your services by persons of all abilities. Below are some recommendations
that may help.
• Contact a local inspector or architect who can provide assistance in
designing the access to your facility with respect to ADA and other
similar laws
• Visit the ADA web site or call the information line listed above
• Provide adequate, well-lit signs (written, picture, and Braille)
• Design hallways with adequate room for wheelchairs
• Provide adequate access to all keypads, access devices, and
elevator controls as provided for in ADA
• Use keypads with proximity cards or key fobs and audible signals to
provide greater access flexibility
3
ADA Mounting Requirements
1. Keypads should be mounted so that the top of the number
touchpad is no more than 48 inches above the finished floor with
no obstructions in locations where wheelchair access is available
only from the front. Keypads can be placed higher if a wall mount
gooseneck allows closer access to the keypad.
Figure 2a
2.
Figure 2b
Keypads should be mounted so that the
top of the number touchpad is no more
than 54 inches above the finished floor
with no obstructions in locations where
the wheelchair has sideways access.
Figure 3
3.
Keypads should be mounted so as not
to protrude more than 4 inches from
the wall. If mounted in a bollard or
pylon, it may protrude up to 12 inches.
Items mounted higher on the wall or
ceiling must be 80 inches or higher
above the finished floor.
Figure 4
4
4.
Computer keyboards and other office equipment should be placed
on desks between 28” – 34” tall with no more than 20 inches in
reach depth for obstructed front access or 24 inches in reach depth
for obstructed side reach access. In the first figure below, if X < 20”
then Y = 48”. When X = 20” – 25”, then Y = 44”. X should always be
≤ 25”.
Figure 5b
Figure 5a
All information contained herein is from the ADA web site and the Department
of Justice Code of Federal Regulations Excerpt CFR Part 36 ADA Standards
for Accessible Design revised July 1, 1994. PTI Security Systems is not liable
for the information contained in this document and we strongly recommend that
installers, owners, and builders work with qualified experts in the local, state, and
federal interpretations of ADA and other similar laws. Refer to the ADA Standards
for Accessible Design and Federal regulations for more specific information and
requirements.
5
Mounting Access Devices
The proper mounting height for the VP varies with the application. There
are several options for mounting access devices: surface mount and wall
mount. These can be attached to a wall or installed at an entrance using
a gooseneck or bollard.
Once it has been determined where to install the keypad, the location and
purpose of the device should be noted on a site security wiring plan that is
kept in a safe location for future maintenance and service purposes.
Surface Mount
Surface mounting of keypads is
generally used in conjunction with door
strikes and elevators. Mounting height
is generally 48” – 58” from the finished
floor to the center of the ‘5’ button on
the touchpad. The actual location of
the keypad may be affected by local
building codes.
The type of fasteners required will
depend on the material used to
construct the wall. If the VP is installed
on an exterior wall, make sure the
contact point between the housing and
the wall is sealed with some form of
silicone sealant rated for outdoor use
to prevent moisture and insects from
getting into the housing.
Figure 6
Gooseneck Stand Mount
A gooseneck is commonly used for driveways for vehicle access. The
gooseneck can also be used near doors for wheelchair access or when
sidewalks and landscaping require a freestanding keypad mount away
from the building.
The base plate is equipped with a hole that will accept conduit (¾”
maximum) for the electrical wiring. Ensure the conduit is placed properly
and the wiring is run through the conduit before mounting the gooseneck
stand to the concrete base. The actual location of the gooseneck and the
mounting techniques may be affected by local building codes. Generally,
the keypad should be protected with concrete bollards that prevent
vehicles from hitting the keypad.
There are several different styles of gooseneck stands available. See
Figure 6 for the dimensions of two common styles.
6
Figure 7
Wall Mount Gooseneck
A wall mount gooseneck allows the
keypad to be mounted on a wall. It
may be used for door strikes or for
gates in driveways that run next to a
building wall. A gooseneck can also
be used to assist with wheelchair
access to a device. Mounting
height is generally 48” – 58” from
finished floor to the ‘5’ button on the
touchpad for walk-up access and 45
inches from driveway level to the ‘5’
button on the touchpad for vehicular
access.
Keypad Adapter Plate
A keypad adapter plate is an
Figure 8
aluminum plate used to mount
keypads to stands, bollards, and
goosenecks manufactured by other companies. The installer will
measure, mark, and drill holes in the adapter plate to match with the
stand that they are using. The holes should be countersunk on the same
side as the installed screws so that the keypad will cover the mounting
screws to prevent tampering. The screws and screwholes that are
provided on the aluminum plate match up with the VP keyhole mounting
pattern.
7
Single Bollard
A bollard is used as an attractive and functional stand for
keypads. It helps protect the keypad from being struck by
vehicles. It can be used in driveways for vehicle access
or near doors as a decorative keypad stand. It can be
painted any color to compliment the site. Mounting height
is determined by the height of the pipe on which it is
mounted.
Double Bollard
Similar in design to the single bollard, the
double bollard is taller and has a second
mounting point above the first to allow both
cars and RVs to enter through the same
gate without requiring drivers to get out of
the vehicle to use the keypad. This design
can also be used to mount a Knox Box for
fire safety.
Bollards can also be filled with concrete and
used as barriers to protect keypads, walls,
or gates.
Figure 9a and 9b
8
Installing VP Series Keypads
Power and data communication wiring is the most important wiring
component for VP devices. The VP requires power and communication
lines to be supplied from the controller. We recommend that power and
data communication be run through a single 18 AWG, 4-conductor shielded
cable as this cable works well in most cases. Some installations require
larger gauge wire. See Figure 3 for details on connecting the wiring to the
VP device.
(DC POWER
CONNECTION
SHOWN)
DATA
FROM RELAY
CONTROLLER
POWER
POWER & DATA FROM
POWER SUPPLY AND
CONTROLLER
POWER & DATA
TO OTHER AI
DEVICES
REFER TO GATE OPERATOR OR
DOOR STRIKE MANUFACTURER
INSTALLATION INSTRUCTIONS FOR
PROPER WIRING TO KEYPAD RELAY.
GATE
OPERATOR/
DOOR STRIKE
Figure 10
In addition to the power and communication cable, cables may also be
needed for the intercom, gate operator, door strike, presence detector, or
other device. Never install any other devices in the same run of wire as the
VP. Use a different cable for each device. Most communities require the
wiring to be supplied to the VP through approved electrical conduit. Local
building codes determine the actual installation techniques and wiring
methods. Only licensed contractors should install VP devices.
The installation methods used are critical to trouble-free operation of the
keypad. Most of the problems that surface over time can be traced back to
poor installation techniques or improper wiring.
NOTE: All installations must conform to local building and electrical codes. When
discrepancies exist between local codes and this manual, local code takes
precedence.
9
Following are instructions on installing a VP series keypad and connecting
the wiring run from the system controller:
1.
2.
3.
•
•
•
•
•
•
•
Open the device by removing the four stainless steel button head
machine screws on the front of the keypad case using the security
hex key provided with the unit. The front and back half will separate.
Mount the back plate to the
desired keypad location using the
three-keyed holes. Seal around
the back of each screwhole and
around the back of the wire hole
with an outdoor silicone sealant. If
the keypad is being mounted on a
gooseneck or bollard, run a bead
of silicone in a triangle around the
three screwholes. If the keypad is
being mounted on a wall, before
mounting, run a bead of silicone
in a square around the back of the
Figure 11
keypad about ½ inch from the edge.
Pull the necessary wires through the wire hole on the back of
the housing. Allow an extra 1 foot of wire to remain inside the
housing. After the wire connections are complete, excess wire can
be pushed back into the gooseneck or wall or it can be carefully
positioned inside the keypad housing for future maintenance and
service. Each keypad should have the following wires:
One 18 AWG, 4-conductor, shielded cable coming in from the
controller or from the previous AI device in line.
One 18 AWG, 4-conductor, shielded cable going out to the next AI
device in line (if there is another AI device down the line).
One earth ground wire
One or two 18 AWG, 2-conductor cable(s) coming from the gate
operator or door strike.*
One 18 AWG, 2-conductor, shielded cable coming from the
intercom base station if intercoms are being used.
One RG59U video cable if a pinhole camera is being used.
One 18 AWG, 2-conductor cable for the presence sensor if it is
being used.
* The cable to the door strike or gate operator will only be present if the relay inside
the particular keypad is being used to trigger the door or gate. The controller can
be configured to use relays on the circuit board, on a separate relay board, or
on almost any other AI device to trigger a gate or door. For security reasons, the
relay in the keypad nearest a door or gate should not be the one used to directly
trigger the gate or door.
10
8-32 x 3/8" Screws (qty 3)
Cover hole
with silicone
Chassis Ground
(connected to keypad)
RG 59U Camera Cable
(If optional camera is part
of this device)
Chassis Ground
(connect to Earth Ground
with wire nut and tape)
18GA, 2-Conductor Unshielded Cable
(only if relay in this device used to
trigger Gate/Door Strike)
18GA, 2-Conductor Shielded Cable
(for Intercom)
Earth Ground
(connect to Chassis Ground
with wire nut and tape)
18GA, 4-Conductor Shielded Cable
(RS485, may have more than one
cable to daisy-chain to other Access
Interface devices)
Figure 12
4.
5.
6.
Strip back the outer insulation and shield foil from both of the 18
AWG, 4-conductor, shielded cables (coming from the controller or
previous AI device in line and going out to the next AI device in line),
being careful not to cut the bare shield wire. Strip ¼ inch of insulation
off the end of each of the individual colored conductor wires.
Remove the terminal blocks from the keypad circuit board by sliding
them up and off. The terminal blocks may be somewhat difficult to
remove as a tight electrical connection is necessary. If they are tight,
rock them slightly back and forth while lifting away from the board.
Insert both red wires (coming in from the controller and going out
to the next AI device) into terminal slot 1 on the first terminal block
(P1). Ensure that both wires are seated all the way inside the slot.
Use a flathead precision screwdriver to tighten down the terminal
screw.
Verify that the terminal slot has tightened down on the copper
wire and not on the rubber insulation. There should be no copper
wire showing outside of the terminal slot. Gently tug the wires to
verify that they are tightly held inside the terminal slot. Repeat this
process with each of the remaining wire connections as shown in
Figure 13. Insert both black wires into terminal slot 3 on P1. Ensure
that both wires are seated all the way inside the slot.
11
Terminal Block P1 (Left)
1. Red DC+ *
2. *
3. Black DC4.
5. Earth Ground if applicable
6.
* If using AC power, place the
AC wires in slots 1 and 2. We
recommend 12-18 VDC, but 12-18
VAC can be used.
Figure 13
7.
Terminal block P2, Pins 4, 5, and 6 are used for the relay. If a gate
operator or door strike is being triggered directly from this keypad,
the wires will connect to two of these three pins. Refer to the gate
or door strike manufacturer’s instructions to determine whether it
needs to be connected to the normally open and common or to the
common and normally closed.
Terminal Block P1 (Left)
1. White Data+
2. Shield **
3. Green Data4. Relay Normally Open Wire
5. Relay Common Wire
6. Relay Normally Closed Wire
** Shield wire should be insulated
with heat shrink or electrical tape.
Figure 14
8.
The earth ground wire should be connected in situations where
the keypad is mounted on a wall that is wood, stone, or other
nonconductive material. It is not always necessary when it is
mounted on a bollard or gooseneck.
Note: Uninsulated wires (Typically used for earth ground) cannot be located inside
the unit’s case. Make connections for uninsulated ground wire outside the case.
9.
To connect the ground wire, run a copper wire from a grounded
water pipe or from a copper rod in the ground to the keypad and
connect it to the green earth ground wire using a wire nut. This
installation must meet applicable code as the type of wire, depth of
burial, and size of the rod may vary by municipality.
12
10. Connect any additional features, such as intercom, camera, or gate
operator that are installed on the VP.
• Intercom. Connect the wires to terminal block P3 in the upper left
corner of the board as shown in Figure 15. The connection and
jumper settings will vary depending on whether the intercom is LEF
Single Master Station, LEF Multiple Master Station, or NEM type
intercom. Refer to the manufacturer’s instructions.
LEF (EXCEPT SINGLE MASTER
STATION) AND ALL NEM
INTERCOM TYPES WIRING
TO
OFFICE
- OR TO
OFFICE
LEF SINGLE MASTER
STATION WIRING
TO SPEAKER AND
CALL BUTTON
(CODEXPRESS
AND KEYPAD W/
INTERCOM ONLY)
Figure 15
The VP with Intercom can be connected to an Aiphone LEF or
Aiphone NEM intercom. The intercom wiring must be separate from
all other wiring to either keypad. Use 18 AWG, 2- or 3-conductor
shielded cables for the intercom depending on the type of intercom
being used. Refer to the Aiphone specifications for more detail. The
intercom type jumpers on either keypad circuit board must be set
to match the type of intercom that you are using. See Figure 16 for
details on setting the jumpers.
13
SEE INTERCOM JUMPER
CONFIGURATION TABLE
FOR PROPER
JUMPER PLACEMENT
INTERCOM JUMPER
CONFIGURATION TABLE
INTERCOM TYPE
NEM (ALL)
LEF (ALL BUT
SINGLE MASTER
STATION)
LEF (SINGLE
MASTER STATION)
APEX JUMPER CONFIGURATION
J3 LEF Single
J7
NEM
J6
NEM
LEF
LEF
All Others
J7
NEM
J6
NEM
J3 LEF Single
LEF
LEF
All Others
J7
NEM
J6
NEM
J3 LEF Single
LEF
LEF
All Others
Master
Master
Master
Figure 16
• Pinhole camera. Connect the video signal cable using RG59U
cable and BNC type connectors. This will give the best possible
picture from the keypad camera. Pinhole camera power is supplied
by the keypad circuit board. In some situations, it may be necessary
to install a video amplifier or a video isolator depending on how
the video system is installed. See Figure 17 for information on
connecting the video camera.
TO VIDEO
DISPLAY
EQUIPMENT
CAMERA
(OPTIONAL)
Figure 17
14
• Gate Operators. Most electric gate operators require a normally
open contact (pins 4 & 5). Some electric door strikes require a
normally closed contact (pins 5 & 6). If door strikes are used it is
recommended that they be 12V DC. A shunting diode must then
be installed across the solenoid to prevent ground spikes from
disrupting the keypad communication. DO NOT PLACE A DIODE
ACROSS AC STRIKES AS IT WILL SHORT OUT THE POWER
SUPPLY FOR THE STRIKE.
11. The presence sensor function of the VP series keypad allows the
keypad to be connected to a loop detector or pressure mat that
requires a ‘presence’ in order to use the keypad. This helps prevent
users from walking up and using the keypad in a driveway area
where they might be in danger from vehicles or the gate. Most
often, this is used in connection with a gate operator and loop
detector. The loop detector wires are spliced into and connected to
terminal block P5 in the keypad. The keypad is programmed with
the Presence Required ‘ON’. See Setup Functions for information
on setting up this feature.
12. After all wiring is complete, gently push the excess wire back
through the hole in the wall or gooseneck, leaving just enough slack
to allow the keypad to be opened for service or maintenance. Seal
the back wire hole with outdoor-rated silicone sealant and then
screw the housing back together.
Warning: Use recommended UL installation. Do not connect a gate operator
or door strike to a keypad that is located outside the area it secures. This will
prevent someone from gaining access to your site through vandalism.
Warning: Wiring the relay to the operating device will introduce the operating
device control voltage into the keypad housing. The installer must verify that
this is not high voltage! The VP is not designed for the presence of high voltage
within the keypad case. Relay voltage must not exceed 30 volts.
15
Testing the Keypad
1.
2.
3.
4.
Test the display by applying power to the keypad. The default date
and time should appear on the display after power is applied. The
controller updates the date and time to the remote keypad once
a minute. The date and time on the display should update if the
remote is configured correctly. To verify that the backlight is working,
press the * key. The backlight should come on and the display
will read Please Enter Access Code. If no keys are pressed for 10
seconds, the display will return to the Date/Time and the backlight
will shut off.
To test touchpad operation, press the * key. When the display
shows Please Enter Access Code, press 0, 1, 2, 3, 4, 5, 6, 7, 8, 9.
You should see each digit appear on the display as it is pressed
(you will see an X for each digit if Secure Entry is enabled). After
pressing the # key to transmit the code to the controller, the
display will show Please Wait until a response is returned from the
controller. If the keypad is communicating with the controller, the
display will show either Entry Granted or another corresponding
message.
Test for communications with the controller by powering up the
controller. The date and time at the controller will automatically
update on the keypad and appear in the display. This verifies
communications from the controller to the keypad. Test
communications from the keypad to the controller by entering an
access code into the keypad and pressing the # key.
If the keypad display responds with anything other than Please Wait
before returning to the date and time, the keypad has successfully
communicated with the controller. If you only get a display of Please
Wait and the keypad defaults back to the power-up default time of
12:00, recheck the wiring, baud rate settings, and address settings.
Also ensure that the controller is set to the correct number of
remotes.
16
OPERATION
VP Keypad Setup Function
To enter setup mode:
1.
2.
3.
Press the *, 0, and # keys simultaneously
Enter the factory password: 8898
Press the # key
NOTE: In the event the password is changed and then forgotten, you can
disconnect power from the keypad and then hold the program button while
reconnecting power. This will bypass the password prompt and enter the setup
mode directly. When using this method, you will also be prompted to Restore
Factory Defaults. Select yes to restore all default factory settings including the
site name and password.
Press the # key to advance through each setup parameter. A parameter is
automatically saved when you press # and move to the next parameter. If
the timeout is allowed to occur, the current parameter WILL be saved.
Numeric values are entered directly into the unit using the number keys.
When an option is presented, use the * key to scroll through the available
settings.
There are two (2) ways to exit Setup mode:
• Press the 7, 8, and 9 keys simultaneously
• Go through all of the setup functions
A timeout is built into the system that will exit Setup mode if there is no
input on the keypad for an extended period of time.
Setup Parameters/Functions
Setup parameters in the order displayed by the APEX access device are:
Restore Defaults
*=Yes #=No
Setup Menus
*=chng #=next
This prompt only occurs if the program button is
held while power is applied to the device. Pressing
the * key to select YES will restore all of the factory
defaults. WARNING: This will overwrite all setup
parameters including the setup password and the
site name.
Identifies how to use the keys: the * key is used to
change a parameter and the # key is the enter key to
move to the next menu.
Current Add: 001
New(1-127):
Polling address used by the controller. Any number
from 1 to 127 can be entered. The numbers 0 and
22 cannot be used. Each device connected to the
controller must have a unique address. Factory
default is 1.
* to Change Baud:
9600
The communications baud rate used by the controller.
Scroll through the list of available rates by pressing
the * key. Factory default is 9600.
17
At this point, the basic parameters required for operation have been entered.
If no other options are active or required, you can exit the setup mode.
Following are optional parameters to customize the feel of the site.
Setup Password
* =Change #=No
Tamper Switch:
Disabled
Secure Entry
Disabled
Beep with Key
Enabled
Beep with Access
Enabled
Beep with Alarm
Disabled
Language XX.XX
English
Date Format
US
Allows you to change the setup password from the
factory default of 8898. When YES is selected, the unit
will prompt for the new password. The new password
must be entered twice for verification before it will
be changed. If both passwords entered match, the
password will be changed. Otherwise, a message will
indicate that the passwords do not match.
Controls the use of the tamper sensor. If enabled, the
keypad will not function and an alarm will occur from the
controller if the unit is tampered with. Factory default is
Enabled.
Controls the characters displayed during code entry.
When set to Enabled, the display will show only an X for
each key pressed. When set to Disabled, the numbers
pressed will be echoed to the display. Factory default is
Disabled.
Controls the internal buzzer used to provide audio
feedback for any key press. When set to Enabled, the
buzzer will produce a short beep when a key is pressed.
When set to Disabled, the buzzer will not sound with key
presses. Factory default is Enabled.
Causes the internal buzzer to sound when an access is
granted. A valid access will cause the buzzer to sound
one long beep. All other attempts will cause the buzzer
to sound four short beeps. Factory default is Enabled.
Controls the internal buzzer used to provide audible
feedback when a system alarm occurs. When set to
Enabled, the internal buzzer will sound whenever an
alarm occurs and remain on until the alarm resets from
the controller. When set to Disabled, the internal alarm
buzzer will not sound with an alarm event. Factory
default is Disabled.
Allows user messages to be displayed in one of
seven languages. The other languages are French,
Spanish, Italian, Deutsch (German), Danish, Dutch,
and Norwegian. This affects the user messages and the
setup functions. The XX.XX denotes the revision of the
language firmware. Factory default is English.
Controls how the date is displayed on the screen. Options
are US and European. US format displays MM/DD/YY.
European displays DD/MM/YY. Factory default is US.
18
Time Format
12 Hour
Max. #Attempts:00
(0-10,0=off):
Presence In Req.
Disabled
Card Format
26 Bit
Trip Relay NoCom
Disabled
Com Off Time:005
(1-25 sec):
Extended Codes
Disabled
Setup Complete
Press # key
Controls how the time is displayed. Options are 12
Hour and 24 Hour. The 12 Hour displays the time as
HH:MM:SS followed by am or pm. The hour will be
displayed as 12:00:00 am to 12:00:00 pm. The 24 Hour
format displays the time as HH:MM:SS without the am
or pm indicator. The hour will be displayed as 00:00:00
to 23:59:59. Factory default of 12 Hour.
Sets the maximum number of attempts within a one
minute period before the keypad will prevent further
code entry. If the number is set to three, then after three
successive attempts with invalid codes, the user will be
locked out. The lockout will remain active for 60 seconds
after the last key press. If the user keeps pressing keys
the lockout time will continue to be reset. The maximum
value is 10. The factory default is 000, which disables
the lockout feature.
Used where a vehicle sensor is installed in a drive
or other traffic area. When this feature is Enabled, a
presence needs to be detected (usually by a loop in the
ground under the driveway) before a code or card could
be used. This can also be used with an alternate alarm
system. Factory default is Disabled
Set the format of the cards being used for access.
Options available are 26, 30, 31, and 34. See the card
manufacturer specifications to determine the Bits of the
card. Factory default is 26 Bit.
After any code has been entered the display will read
Access Granted and the relay will be tripped to allow
access. When Enabled, the keypad will allow the relay
to be triggered when the communications are offline.
Enabling this setting compromises site security. Factory
default is Disabled.
Sets the amount of time the keypad should wait before
considering it has lost communication with the controller.
Any value from 1 to 25 seconds can be entered. Factory
default is 5 seconds.
Allows the keypad using a Wiegand device to use the
proximity card (26 bit format) and a 4-digit pin to access
the property when the function is Enabled. This function
provides higher security because the customer must use
the Wiegand device card and an access code. Factory
default is Disabled.
Message displayed when exiting from setup mode.
Pressing the # key will return the device to normal
operation. If no key is pressed, the device will return to
normal operation after a few seconds and all information
will be automatically saved.
19
Standard Display Messages
The standard display message for the VP keypad when no keys have
been pressed is the date and time as shown.
Fri,
08 / 01 / 08
12 : 13 PM
Access Codes and Cards
Depending on how the system is configured, the user will have an access
code that can be entered or a magnetic stripe card that can be swiped.
When the user approaches the keypad, the standard display message will
be shown on the display.
The display and keypad are backlit at a low level to conserve power when
no one is using the device. This low level is sufficient to read the display
at night. As soon as a customer presses the * key, the display comes to
full brightness.
Access Codes. To enter a code, the user presses *. The following message
will be displayed.
* PLEASE ENTER *
ACCESS CODE
The user enters their access code using the touchpad and presses the
# key. The keypad will send the code to the controller and wait for a
response while the keypad goes through the security checks described in
the Security Checks section. The message on the display will change to
the following while waiting for a response.
* PLEASE WAIT *
VERIFYING ACCESS
Magnetic Stripe Cards or Proximity Cards. When the device is set to
use magnetic stripe cards or proximity cards, the user swipes his or her
card through the slot in the card reader or waves the card in front of the
proximity device on the front of the unit.
The magnetic stripe on the card must be aligned to pass through the slot
facing the left side of the reader. If the unit is not able to read the card
correctly through the slot or the Wiegand device or if there is an error on
the card, the following message will be displayed:
Sorry Try Card Again
20
Once the card is read, the keypad will go through the security checks
described in the Security Checks section. If all of the security checks
pass, the keypad will send the card data to the controller and wait for a
response. The message on the display will change to the following while
waiting for a response.
* PLEASE WAIT *
When the keypad receives the response from the controller it will show
the response message in the display. The messages that can be received
from the controller vary depending on the type of response. The various
response messages are shown in the Access Response Messages
section.
Security Checks
A series of security checks are performed by the VP before allowing
entrance. These checks are used to prevent unauthorized access attempts.
When a customer uses an access code, the checks are performed as
soon as the code is entered. If the customer uses a card, the checks are
performed as soon as the card has been swiped in the magnetic stripe
reader or presented to the proximity reader.
Communications Check. The first item checked is the communications
between the units on site and the controller. When the keypad is not
communicating with the controller and the Trip Relay NoComm is disabled,
the unit will display the following message and revert back to the date and
time.
* PLEASE WAIT *
Tamper Check. The VP performs a tamper check to see if the tamper
switch has been enabled. If it is enabled, it ensures that the switch is
secure. If either condition is true or the tamper is disabled, the VP will
proceed to the next security check. If the VP detects tampering, it will
display the following message and no further access attempts will be
allowed.
Sorry -
Tamper Lockout
21
Presence Required Check. After checking the tamper, the VP will check
to see if the Presence in Req option has been selected. If it has been
selected, the VP will check the input to see if a presence has been detected.
If this option has been turned off or if a presence has been detected, the
keypad will continue with the next security check. If the VP does not detect
a required presence, it will display the following message and no further
access attempts will be allowed.
Sorry –
No Presence Det
Maximum Attempts Check
The maximum attempts check is designed to discourage someone from
attempting numbers at random to enter the site. If the Max #Attempts
feature is set to a value other than zero, the VP will check to see if the
user has tried a code more than the allowed times. If not, the VP will allow
the user to enter the access code. If the maximum number of unsuccessful
attempts has been exceeded, the VP will display the following message
and disable any further access attempts. The VP will not allow any further
attempts until it has had 60 seconds without any key being pressed. If a
key is pressed while this message is displayed, the 60 second timer starts
over.
Sorry….
* See Manager *
Trip Relay Offline Check. After the customer has entered their code,
the VP checks to see if the Trip Relay NoCom option has been enabled.
If it has been enabled and the keypad is not in communication with the
controller, then the VP will display the following message and further
access attempts will be allowed.
Access Granted
22
Access Response Messages
There are several standard messages built in to the VP. The types
of messages the VP receives in response to an access request vary
depending on the conditions. The following briefly describes the conditions
and the displayed message.
For a valid Entry:
* Welcome *
Entry Is Granted
For a valid Exit:
* Thank You *
Exit is Granted
When the area is closed (outside of allowed time zone hours):
Sorry –
Area Closed
When the customer is not authorized to enter an area:
Sorry –
Area Denied
When the customer’s code has expired:
Sorry –
Code Expired
When the customer’s card has expired:
Sorry –
Card Expired
When the customer has been suspended:
Sorry –
Access Suspended
When the code the customer entered is not valid:
Sorry –
Access Denied
When the card the customer used is not valid or not read properly:
Sorry –
Try Card Again
23
System Maintenance
The VP keypad requires a minimal amount of maintenance. However,
as with any electronic or mechanical device that is used regularly, a
small amount of maintenance done periodically will extend the life of the
product.
Periodic Visual Inspection
The VP should be inspected monthly. When performing the visual
inspection, look for the following items:
• Damage caused by contact with vehicles, vandalism, etc.
• Damage caused by water, rain, salt spray, etc.
• Breaks or cracks in the sealant where the keypad mounts to the
gooseneck stand or wall
Periodic Cleaning
The keypad should be cleaned at least twice a year. More frequent cleaning
may be required in harsh environments.
Cleaning the Housing and Touchpad
Inspect and clean the housing and touchpad at least once a year. To clean
the housing, spray the unit with a mild household cleaner then wipe it with
a soft cloth. Do not use harsh chemicals, abrasives, or petroleum-based
products as they can damage the finish on the device. Do not immerse the
device in water or use a pressure washer. A small, soft brush (a toothbrush
works well) can be used to clean between the keys on the touchpad.
Remove the VP from the housing to inspect and clean the inside of the
unit. When inspecting the inside of the housing and the VP, look for the
following items:
• Dirt or dust that has collected on the inside of the housing and the
circuit board
• Signs of water damage or corrosion caused by prolonged contact to
water
• Insects or insect droppings
Wipe out the inside of the housing with a soft cloth to remove any debris
that has collected. Do not use cleaners of any kind, including water, to
clean inside the housing or on the circuit board. A small can of compressed
air can be used to remove insects and dust from the circuit board.
Cleaning the Magnetic Stripe Reader
The VP is shipped with a cleaning card for the magnetic stripe reader (if
installed). The cleaning card is a small plastic card with a special cleaning
surface on one side that has been saturated with a cleaning solution. To
clean the reader, swipe the cleaning card several times through the slot
in the reader. Once the card has been used, it should be disposed of.
Additional cards can be ordered from PTI Security Systems. It is advisable
to keep a supply of cards on hand.
24
Troubleshooting
For a New Installation, the typical problems encountered are related to the
installation or configuration process. Start at step 1 in the Troubleshooting
Steps section and proceed until the problem is found and resolved.
For an Existing (previously working) Installation, the first step is to determine
whether anything has been changed at the site. For instance, Has there
been any new construction? This includes any changes to the site,
adding units, reconfiguring units, changing or adding video surveillance
components, changing any electrical wiring, roofing changes, painting,
etc. Even with a small change, wiring can be disturbed or disconnected or
something new can interfere with equipment operation.
• If there has been new construction, start at step 1 in the
Troubleshooting Steps section and proceed until the problem is
found and resolved.
• If the VP is not working, start at step 1 and proceed until the
problem is found and corrected.
• If the VP is receiving power, start at step 4 and proceed until the
problem is found and corrected.
Keep thorough notes during troubleshooting to compare against and to
help find problems, prevent confusion, and save time if site service by a
technician is required.
Test power and communication
Step 1
Does the VP Access Device have Power?
Yes – Proceed to step 2
No – Check Power Supply and Wiring and retest or see Multiple Device Problems
This can be tested by checking the display of the VP. If the display is on or
if any of the LEDs on the board are on, the board has power. If there is no
indication of power from the display or LEDs, use a volt meter to check for
the presence of voltage on connector P1 pins 1 & 3.
Step 2
Is the voltage at the VP, connector P1 pins 1 & 3, greater than 10.5 Volts?
(Use a volt meter to measure the voltage).
Yes – Proceed to step 3
No – Check Power Supply and Wiring and retest
25
Step 3
Is the voltage at the VP, connector P1 pins 1 & 3, greater than 18 Volts?
(Use a volt meter to measure the voltage).
Yes – Voltage is too high, check power supply and retest
No – Proceed to step 4
NOTE: Create a voltage map of the site by sketching out the locations of every
AI device on the site. Use a multimeter to take DC power readings at each device.
Note these readings on the sketch. Any device that is receiving less than 12V is
underpowered and can cause the entire system to lock up.
Step 4
Is the display on the VP blank?
Yes – Replace the VP and retest
No – Proceed to step 5
Step 5
Is the VP communicating with the controller and software?
Yes – Contact Technical Support if the VP is still not working.
No – Check wiring and proceed to step 6
This can be determined by checking the LEDs on the VP board or
by running the system setup report on the controller. When the VP is
communicating with the controller, LEDs D5 and D4 will be blinking. If
neither of the LEDs are blinking, proceed to step 7. See Figure 18 for the
location and function of the LEDs.
Figure 18
26
Step 6
Are any other devices set to the same address as the VP?
Yes – Change one of the devices and retest
No – Proceed to the step 7
This can be determined by checking the addresses on all of the devices
or by disconnecting the VP and running the system setup report on the
controller. If the system setup report shows the remote number (address)
assigned to the VP as being ON LINE with the VP disconnected, then
another device is sharing the same address.
Step 7
Is the maximum number of remotes in the controller set to a number
greater than the address of the VP?
Yes – Contact Technical Support if the VP is still not working.
No – Change the maximum number of remotes and retest
This can be determined by running the system setup report from the controller
or by checking the value under function 14. If the value is lower than the
address of the VP, the controller will not try to communicate with it.
Test card and code input
Use the following steps for troubleshooting keypads, Wiegand devices,
and single door modules. Keep thorough notes during troubleshooting to
compare against and to help find problems, prevent confusion, and save
time if site service by a technician is required.
1.
2.
3.
Try a code or card at the keypad controlling the gate. Be sure the
code or card is one that is known to be working at that location and
time. Try several codes to verify operation. Note which code(s) were
tried and the response at each device as well as the response on
the software event log.
Try the same code(s) or card(s) at other access devices on the
property. Compare the result with the previous step. Try to narrow
down whether multiple devices are affected or just one.
If the problem is narrowed down to one device, it must be
determined if the problem is in the device or the location. Make sure
to allow for access and egress of customers and then remove the
device in question. Switch the device with another similar device
that has been proven to be working. For example, if the entrance
keypad isn’t working, but the exit one is, then switch the two. Be
sure to switch the addresses also. If the problem stays in the same
location, it is probably a wiring issue. Contact a service company to
check the wiring.
27
4.
5.
If there are multiple problems or ongoing issues, the process in the
previous step can be performed for an entire site. Generally, multiple
problems are a sign of problems in the wiring, either from bad
splices, pinched or nicked wires, radio frequency interference, water
in the conduit, or incorrect wire type. To check an entire site, allow for
access and egress of customers and open the housings and unplug
the power and data terminal blocks on every AI device on the site.
When every device on the site is unplugged, add one device back
into the system at a time. Allow that device to function for an hour
and then add in the next device in line. Eventually, a device will be
added that causes the problem to manifest. Switch this device with
one that has been previously added to verify if the problem exists in
the location or in the device.
Verify that all devices are receiving enough power. Create a voltage
map of the site by sketching out the locations of every AI device on
the site. Use a multimeter to take DC power readings at each device.
Note these readings on the sketch. Any device that is receiving less
than 12V is underpowered and can cause the entire system to lock up.
Test individual devices
To test individual devices, use the following procedure:
1.
2.
3.
Try a code or card at the AI device controlling the gate. Be sure the
code or card is one that is known to be working at that location and
time. Try several codes to verify operation. Note which code(s) were
tried and the response at each device as well as the response that
appears on the event log.
Try the same code(s) or card(s) at other access devices on the
property. Compare the result with the previous step. Try to narrow
down which devices are affected.
To determine whether the problem is in the device or the location,
make sure to allow for access and egress of customers and then
remove the device in question. Switch the device with another
similar device that has been proven to be working. For example, if
the entrance keypad isn’t working, but the exit one is, then switch
the two. Be sure to switch the addresses also. If the problem stays
in the same location, it is probably a wiring issue. Contact a service
company to check the wiring.
28
Test multiple devices or entire site
Generally, multiple problems are a sign of problems in the wiring, either
from bad splices, pinched or nicked wires, radio frequency interference,
water in the conduit, or incorrect wire type. To check the entire site for
problems, use the following procedure:
1.
2.
3.
4.
5.
Allow for access and egress of customers and open all device
housings.
Unplug the power and data terminal blocks on every AI device on
the site.
Once every device on the site is unplugged, add one device at a
time back into the system.
Allow the device to function for an hour and then add in the next
device in line.
.Eventually, a device will be added that causes the problem to
manifest. Switch this device with one that has been previously
added to verify if the problem exists in the location or in the device.
If the problem stays in the same location, it is probably a wiring
issue. Contact a service company to check the wiring.
29
SEE INTERCOM JUMPER
CONFIGURATION TABLE FOR
PROPER JUMPER PLACEMENT
LEF (EXCEPT SINGLE MASTER
STATION) AND ALL NEM
INTERCOM TYPES WIRING
TO
OFFICE
- OR TO SPEAKER AND
CALL BUTTON (ONLY
KEYPAD W/ MAG
READER & KEYPAD
W/ INTERCOM)
TO
OFFICE
LEF SINGLE MASTER
STATION WIRING
TO WIEGAND READER
(SEE WIRING TABLE)
CAMERA
(OPTIONAL, ONLY
KEYPAD W/ MAG READER
& KEYPAD W/ INTERCOM)
END OF LINE
RESISTOR (LINE
TERMINATION)
TO PRESENCE
SENSOR
(DC POWER
CONNECTION
SHOWN)
DATA
FROM RELAY
CONTROLLER
POWER
POWER & DATA FROM
POWER SUPPLY AND
CONTROLLER
POWER & DATA
TO OTHER AI
DEVICES
GATE
OPERATOR/
DOOR STRIKE
REFER TO GATE OPERATOR OR
DOOR STRIKE MANUFACTURER
INSTALLATION INSTRUCTIONS FOR
PROPER WIRING TO KEYPAD RELAY.
TO VIDEO DISPLAY
EQUIPMENT
INTERCOM JUMPER
CONFIGURATION TABLE
WIEGAND READER WIRING TABLE
FROM (WIEGAND)
TO (P4 ON KEYPAD)
+DC
(RED)
DATA0 (GRN)
DATA1 (WHT)
LED
(ORN)
GROUND (BLK)
SHIELD GND (SHIELD)
5V
D0
D1
LED
NEM (ALL)
GND
LEF (ALL BUT
SINGLE MASTER
STATION)
INTERCOM TYPE
LEF (SINGLE
MASTER STATION)
Figure 19
30
JUMPER CONFIGURATION
J4
NEM
J5
NEM
LEF
LEF
J4
NEM
J5
NEM
LEF
LEF
J4
NEM
J5
NEM
LEF
LEF
J3
LEF Single
All Others
J3
LEF Single
All Others
J3
LEF Single
All Others
Warranty & Disclaimer
PTI Security Systems warrants its products and equipment to conform
to its own specifications and to be free from defects in materials and
workmanship, under normal use and service, for a period of two years from
the date of shipment. Within the warranty period, PTI Security Systems
will repair or replace, at its option, all or any part of the warranted product
which fails due to materials and/or workmanship. PTI Security Systems
will not be responsible for the dismantling and/or re-installation charges.
To utilize this warranty, the customer must be given a Return Materials
Authorization (RMA) number by PTI Security Systems. The customer
must pay all shipping costs for returning the product.
This warranty does not apply in cases of improper installation, misuse,
failure to follow the installation and operating instructions, alteration,
abuse, accident, tampering, natural events (lightning, flooding, storms,
etc.), and repair by anyone other than PTI Security Systems.
This warranty is exclusive and in lieu of all other warranties, expressed or
implied, including but not limited to the implied warranties of merchantability
and fitness for a particular purpose. PTI Security Systems will not be liable
to anyone for any consequential or incidental damages for breech of this
warranty or any other warranties.
This warranty will not be modified or varied. PTI Security Systems
does not authorize any person to act on its behalf to modify or vary this
warranty. This warranty applies to PTI Security Systems products only.
All other products, accessories, or attachments used in conjunction with
our equipment, including batteries, will be covered solely by their own
warranty, if any. PTI Security Systems will not be liable for any direct,
incidental, or consequential damage or loss whatsoever, caused by the
malfunction of product due to products, accessories, or attachments of
other manufacturers, including batteries, used in conjunction with our
products. This warranty does not warrant the replacement of batteries that
are used to power PTI Security Systems products.
The customer recognizes that a properly installed and maintained security
system may only reduce the risk of events such as burglary, robbery,
personal injury, and fire. It does not insure or guarantee that there will be
no death, personal damage, and/or damage to property as a result. PTI
Security Systems does not claim that the Product may not be compromised
and/or circumvented, or that the Product will prevent any death, personal
and/or bodily injury and/or damage to property resulting from burglary,
robbery, fire, or otherwise, or that the Product will in all cases provide
adequate warning or protection.
PTI Security Systems products should only be installed by qualified
installers. The customer is responsible for verifying the qualifications of
the selected installer.
PTI Security Systems shall have no liability for any death, injury, or damage,
31
however incurred, based on a claim that PTI Security Systems Products
failed to function. However, if PTI Security Systems is held liable, directly
or indirectly, for any loss or damage arising under this limited warranty or
otherwise, PTI Security Systems’s maximum liability will not in any case
exceed the purchase price of the Product, which will be fixed as liquidated
damages and not as a penalty, and will be the complete and exclusive
remedy against PTI Security Systems
Warning: The User should follow all installation, operation,
and maintenance instructions. The User is strongly advised to
conduct Product and systems test at least once each week. Changes
in environmental conditions, electric or electronic disruptions, and
tampering may cause the Product to not perform as expected.
Warning: PTI Security Systems warrants its Product to the User. The
User is responsible for exercising all due prudence and taking necessary
precautions for the safety and protection of lives and property wherever
PTI Security Systems Products are installed. PTI Security Systems does
not authorize the use of its Products in applications affecting life safety.
Notice. Some PTI Security Systems products use 900Mhz wireless
technology. Other devices at the site such as cordless telephones or alarm
components may cause interference that will disrupt the operation of the
system or may be interfered with by the system. PTI Security Systems
assumes no liability for any problems caused by interference. It is the sole
responsibility of the user to identify and correct such problems.
32
For Technical Support, Please Visit:
support.ptisecurity.com
www.ptisecurity.com