1
VERSION 1.721
TaskMaster Management Software User Guide
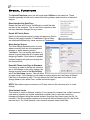
Thank you for purchasing TaskMaster® Management Software for your property. For your utmost satisfaction
with this product, we recommend that you take the time to review this manual. We also offer comprehensive
training to help you become fully accustomed and pleased with your purchase. Please contact Chamberlain
Access Solutions at (888) 528-7826 to arrange training for your site. If you have any difficulties, we strongly
recommend that you review this manual and the online help within TaskMaster first.
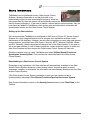
TaskMaster offers the self storage industry’s most comprehensive management package. Renting spaces,
processing payments, and daily tasks are simplified on our EZ Task menu. TaskMaster’s real-time credit card
processing module requires no extra equipment or software. Best of all, the new WebXpress module turns
TaskMaster into a web site allowing customers to rent spaces, pay bills, and view their customer information.
Chamberlain Access Solutions TaskMaster® management software is licensed for use only to the original
purchaser. Refer to the End User License agreement for more details. The license agreement can be viewed at
any time in the Online Help System.
© 2009 Chamberlain Access Solutions
All rights reserved. No part of this publication may be reproduced, transmitted, transcribed, or translated into
any language in any form, by any means, without written permission of Chamberlain Access Solutions.
114A3874
TaskMaster Management Software User Guide
Table of Contents
1
Introduction ..................................................................................................................................1
System Requirements .........................................................................................................2
Computer Requirements ...................................................................................................2
Operating System..............................................................................................................2
Camera Module .................................................................................................................3
Credit Card Processing Module.........................................................................................3
Proximity Cards / Photo ID Badges / Swipe Cards ............................................................3
PayXpress .........................................................................................................................3
Site Graphics .....................................................................................................................3
Central Office.....................................................................................................................3
Networking.........................................................................................................................4
WebXpress ........................................................................................................................4
Opening TaskMaster ...........................................................................................................5
Initial Setup Checklist ..........................................................................................................5
Overview of Function Navigation.........................................................................................9
Daily Operator Tasks..................................................................................................................10
EZ Task .............................................................................................................................11
Searching in TaskMaster...................................................................................................12
Search .............................................................................................................................12
New Client Move In ...........................................................................................................13
Take a Payment ................................................................................................................16
Client Credits ...................................................................................................................17
Vacate Space/Move Out ...................................................................................................18
Transfer.............................................................................................................................19
Lease an Additional Space................................................................................................20
Merchandise Sales............................................................................................................21
Account Management .......................................................................................................22
Alter Menu .......................................................................................................................23
Reports..............................................................................................................................24
List of Clients.....................................................................................................................25
List of Spaces....................................................................................................................26
Other Operator Tasks.................................................................................................................27
Accessing and Editing Client Data ....................................................................................28
Comments .........................................................................................................................28
Name & Address ...............................................................................................................29
Identification ......................................................................................................................29
Billing Info..........................................................................................................................30
Add a Guest ......................................................................................................................30
Documents ........................................................................................................................31
Reversing Payments .........................................................................................................32
NSF Checks ......................................................................................................................32
Refund Client Credits ........................................................................................................33
Merchandise Returns ........................................................................................................33
TaskMaster Management Software User Guide
Discounts & Promotions ....................................................................................................34
Giving a discount to a new renter ....................................................................................34
Promotions in Use (Setup) ..............................................................................................34
Giving a discount to an existing client on an existing space ............................................35
Giving a discount to an existing client renting an additional space ..................................36
Rate Changes ...................................................................................................................37
Rate Change for an existing client on an existing space .................................................37
Rate Change for an existing client renting an additional space .......................................38
Insurance ..........................................................................................................................39
Setting Up Insurance .......................................................................................................39
Selling Insurance to Clients .............................................................................................39
Log In / Log Out.................................................................................................................40
Operator Tools ...........................................................................................................................41
Scrolling Marquee .............................................................................................................42
Task Scheduler .................................................................................................................43
Scheduling a Task ...........................................................................................................43
Task Scheduler Notification Message .............................................................................44
Add A Client ......................................................................................................................45
Wait List ............................................................................................................................46
Rental Inquiries .................................................................................................................47
Add Client to List ...............................................................................................................48
Calculator ..........................................................................................................................48
Setup Tools ................................................................................................................................49
System Setup & Site Setup ...............................................................................................50
System Setup ....................................................................................................................51
Site Setup..........................................................................................................................53
Operator Access Levels ....................................................................................................55
Setup Lease Spaces .........................................................................................................56
Lease Spaces..................................................................................................................56
Display Sequence / Walk Through Order ........................................................................56
Tiered Fees .......................................................................................................................57
Document Merge Fields ....................................................................................................58
Maintenance Tools .....................................................................................................................59
Maintain Letters.................................................................................................................60
Merge Fields for Letters ....................................................................................................61
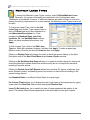
Maintain Lease Types .......................................................................................................66
Maintain Merchandise .......................................................................................................67
Maintain Insurance Carriers ..............................................................................................67
Management Tools.....................................................................................................................68
Automatic Reports.............................................................................................................69
Automatic Reports – Printing ...........................................................................................69
Automatic Reports – E-mail .............................................................................................70
Automatic Reports – FTP ................................................................................................72
Import/Export.....................................................................................................................73
Import ..............................................................................................................................73
Export ..............................................................................................................................73
Demographics & Marketing ...............................................................................................74
TaskMaster Management Software User Guide
Rental Agents....................................................................................................................75
Modules & Other Options ...........................................................................................................76
Camera Module.................................................................................................................77
Electric Module..................................................................................................................79
Water Module ....................................................................................................................80
Credit Card Module ...........................................................................................................81
Setup ...............................................................................................................................81
Credit Card Module Setup within TaskMaster .................................................................81
Batch Control...................................................................................................................82
Using Credit Cards in TaskMaster...................................................................................85
Central Office ....................................................................................................................87
Setting up the FTP or VPN ..............................................................................................87
NOTE: Please discuss firewall settings with your IT professional to ensure data security
at the site, but still allow full communications.Setting Up Central Office at the Main Site 87
Setting Up Central Office at the Main Site .......................................................................88
Setting Up Central Office at the Remote Site(s) ..............................................................89
Using Central Office at the Remote Site(s)......................................................................89
Using Central Office at the Main Site...............................................................................90
Web Sales .........................................................................................................................91
WebXpress........................................................................................................................92
Kiosks................................................................................................................................92
Networking ........................................................................................................................93
Client Server Network......................................................................................................93
Network Setup within TaskMaster ...................................................................................94
Gate Interface....................................................................................................................95
Setting up the Gate Interface...........................................................................................95
Downloading to a Gate Access Control System ..............................................................95
Security Access Screen...................................................................................................96
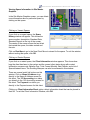
Site Master Graphics.........................................................................................................97
Site Master Graphics Setup.............................................................................................97
Navigating in Site Master Graphics .................................................................................98
Viewing Space Information in Site Master Graphics........................................................99
System Functions.....................................................................................................................100
Backup Data Files ...........................................................................................................101
Automatic System Processing.........................................................................................101
ADP (Automatic Daily Processing) ................................................................................101
AWP (Automatic Weekly Processing)............................................................................101
AMP (Automatic Monthly Processing) ...........................................................................101
AYP (Automatic Yearly Processing) ..............................................................................101
Special Functions ............................................................................................................102
Reset Last Activity Date/Time........................................................................................102
Recalc All Paid to Dates ................................................................................................102
Quick Assign..................................................................................................................102
Reset All Clients Late Days to Standard........................................................................102
Clear Network Locks .....................................................................................................102
Synchronize Access System .........................................................................................103
Reset Access Hours to Standard...................................................................................103
TaskMaster Management Software User Guide
Change Next Invoice .....................................................................................................103
Special Command .........................................................................................................103
Program Update ............................................................................................................103
Help..........................................................................................................................................104
Training ...........................................................................................................................105
Help Menu .......................................................................................................................105
TM Online Help (Help Topics) .......................................................................................105
About TaskMaster .........................................................................................................105
Changes & Fixes ...........................................................................................................105
File Error Messages ......................................................................................................105
Declarations .............................................................................................................................106
Software End User License Agreement ..........................................................................107
Standard 2 Year Equipment Warranty.............................................................................113
Glossary ...................................................................................................................................114
A......................................................................................................................................114
B......................................................................................................................................114
C......................................................................................................................................114
D......................................................................................................................................115
E......................................................................................................................................115
F ......................................................................................................................................115
G .....................................................................................................................................115
H......................................................................................................................................115
I - J ..................................................................................................................................115
K......................................................................................................................................115
L ......................................................................................................................................116
M .....................................................................................................................................116
N......................................................................................................................................116
O .....................................................................................................................................116
P – Q ...............................................................................................................................116
R......................................................................................................................................117
S......................................................................................................................................117
T ......................................................................................................................................117
U – V ...............................................................................................................................117
W – Z...............................................................................................................................117
Index ........................................................................................................................................118
Introduction
•
•
•
•
System Requirements
Opening TaskMaster
Initial Setup Checklist
Overview of Function Navigation
TaskMaster Management Software User Guide
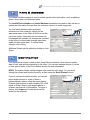
System Requirements
NOTE: If you are using any other software along with ours, it is imperative that you ensure that your
computer specifications more than exceed the combined total requirements for all of the software
loaded on the computer.
Computer Requirements
These computer requirements are the minimum for running the software by itself.
• Pentium 4, 1.4 GHz or higher processor
• 1 GB RAM (higher recommended)
• 4+ GB available hard drive space
• CD ROM (with high storage capacity, such as a CD-RW or DVD-RW, available for
backups)
• SVGA monitor, 800 x 600 resolution minimum
• Sound card and speakers recommended
• Two or more available working ports [RS232 port(s), USB port(s), or Ethernet TCP/IP
port(s)]
• Broadband/high-speed business internet connection (cable, T1, or DSL), always on
connection
• Keyboard and Mouse
• A high quality Laserjet or Inkjet printer (for printing Reports)
• Remote access software for technical assistance. To receive technical support, you
MUST have remote access software installed on your PC
• Anti-virus software such as McAfee Virus Scan, Symantec’s Norton Antivirus, or other
major brand
• Firewall protection is strongly recommended (ensure settings do not interfere with
other applications running the system). This should be set up by a knowledgeable
computer tech as some configuration may be required
• UPS (Uninterruptible Power Supply) power backup and surge protection is
recommended. (Part # PPWRUPSAPCBP350)
Operating System
• Microsoft Windows XP Professional Edition, 32-bit*, with Service Pack 2
or
• Microsoft Vista, 32-bit* with Service Pack 1. (Supported Vista versions: Ultimate,
Home Premium, Business, or Enterprise). All necessary updates and service packs
for Windows should be loaded onto the computer before beginning installation
* Not all operating systems support all software and some third party products (such as card scanners, cameras, or other
peripherals) may not function with some operating systems and/or computers (i.e., 64-bit operating systems may not
support peripherals built for use on 32-bit or earlier platforms). All Chamberlain Access Solutions software and peripheral
products are manufactured to work on a 32-bit platform and are not compatible with a 64-bit platform. Refer to the product
manufacturer’s documentation for compatibility information with the operating system in use. Chamberlain Access Solutions
is not liable for the functioning or reliability of any third party products and any products recommended are only done so
based on historic examples of them working with our product. Chamberlain Access Solutions cannot guarantee any third
party product compatibility or their continued functionality. Future releases, updates, upgrades, or other modifications to
these products may affect their compatibility with Chamberlain Access Solutions products or with other programs on your
computer. We recommend that your computer and network be regularly updated and maintained by a qualified information
technology technician.
2
TaskMaster Management Software User Guide
In addition to the items previously listed, the following are required for operation of
TaskMaster Modules.
Camera Module
• TWAIN Compatible Internet camera (Part # RTASPHOTOCAMERA). Camera
resolution must be approximately 320 x 240
Credit Card Processing Module
In addition to the items listed above, the following are required for operation of the credit
card processing module.
• Current account with Nova Information Systems (now Elavon), Paymentech (now
Chase Paymentech), Echo (now Intuit ECHO), or PCCharge (now VeriFone
PCCharge). An application fee may be required when registering for an account with
one of these companies
• MagTech card swipe (recommended)
• We do not recommend using a wireless keyboard or mouse if you are using the Credit
Card Reader
Proximity Cards / Photo ID Badges / Swipe Cards
The following items are recommended for the operation of peripheral devices.
• Compatible Wiegand interface cards for Proximity devices
• Any 4-line magnetic stripe card for use with swipe reader devices
• Preprogrammed blank or logo-imprinted cards can be purchased from Chamberlain
Access Solutions for either device type
PayXpress
In addition to the items listed above, the following are required for operation of the
PayXpress module.
• TaskMaster management software version 1.537 or higher with PayXpress module
• TaskMaster Credit Card Module
• APEX series keypad version 1.57 or newer with a magnetic credit card reader
Site Graphics
The computer on which the Site Graphics software is running must include the computer
requirements listed above as well as the following.
• PTI Graphics Serial Adapter (Part # PGRASIA)
• 16 MB Video Card or higher
• 1024 x 768 Large Screen Monitor recommended
Central Office
• Business High Speed Internet required with an always online static IP (T1 or Cable) at
the Central Office Site
• High Speed Internet at each remote site
• FTP host server software
• Firewall that is configured so as not to interfere with remote access or Central Office
• Each computer (Main Site and all Remote Sites) must meet or exceed the minimum
system requirements
3
TaskMaster Management Software User Guide
Networking
• Each computer on the network must meet Chamberlain Access Solutions system
requirements
• Each computer must allow remote assistance
• Network must be a client server network with one Server & one or more client
workstations
• Must be installed by a trained and experienced Network IT Professional*
* Chamberlain Access Solutions is not responsible for setting up the network. The user must contract a Network Information Technology
Professional for assistance.
WebXpress
• All TCP/IP Ports Open. Provide the following list to the technician installing your
router:
o Port 80
o Firewall or Router with Port
o Secure Port 443
Forwarding enabled
•
•
Secure Certificate for Microsoft IIS. Available from a variety of providers such as
Network Solutions (www.networksolutions.com), Verisign (www.verisign.com), or
GoDaddy (www.godaddy.com).
Must have a registered Domain Name. Available from a variety of providers such as
Network Solutions (www.networksolutions.com), Domain Bank
(www.domainbank.com), or GoDaddy (www.godaddy.com).
We strongly recommend that installation and setup of all computers and any Chamberlain Access Solutions equipment be
done by a certified, licensed, qualified, and competent technician. Chamberlain Access Solutions can recommend local
dealers and installers, but it is up to the customer to verify their qualifications and negotiate any pricing or contracts unless
we have been specifically contracted in writing to do so for the customer. The above information represents recommended
minimum guidelines. These guidelines are subject to change without notice. With any computer setup or configuration,
some troubleshooting and adjustment of the configuration may be required. This will differ with every computer setup
depending on operating system, software installed on it, quality of components, internet connection, modem connection, or
any other variable introduced into the setup. This troubleshooting and configuration may include purchasing additional
equipment. In no circumstances will Chamberlain Access Solutions be responsible for any damages either incidental or
consequential based on these recommendations.
Computers running any Chamberlain Access Solutions hardware, software, or utilities must meet our computer
requirements. These computer requirements are intended as a minimum guideline for operating our access control system.
If a customer intends to add third party peripherals to the system, they are responsible for ensuring that the products are
compatible with the access control system they have installed.
TaskMaster, PayXpress, and Site Graphics are trademarks of Chamberlain Access Solutions. All rights reserved.
Microsoft Windows, Pentium, Symantec, Norton, McAfee, are all registered trademarks of their respective owners.
4
TaskMaster Management Software User Guide
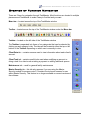
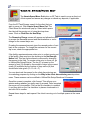
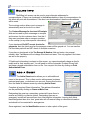
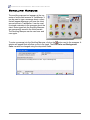
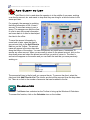
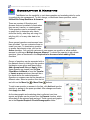
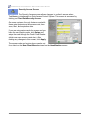
Opening TaskMaster
Double-click on the TaskMaster icon on the
desktop to start the TaskMaster program. Once the
program opens, the Log In screen will appear. Select the
appropriate user name from the Operator drop-down box
and enter the password in the Password box.
After a period of inactivity or if the current user logs out,
this screen will reappear. The first time that you log into
TaskMaster, enter the Operator name and Password that
were specified on the configuration forms.
Initial Setup Checklist
For the best experience with the software, please follow this checklist prior to using the
product. This initial setup is very important and should be done by the highest unrestricted
user (owner, district manager, or high level manager). You may need to review sections that
are located elsewhere within this manual to complete these steps.
Carefully read and review this manual. Also, use this manual while practicing with
the TaskMaster demo data before using it for the actual site.
If the site is a conversion from another software to TaskMaster management
software, verify that all information has been transferred successfully. A
TaskMaster Conversion Follow-up Recommendations document can be found on
our web site or obtained from technical support. This will help you through the
initial process following a conversion.
If your site has not received training on the TaskMaster management software,
please contact your sales representative to get details on training. This is highly
recommended for you to receive the best
performance out of the software.
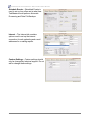
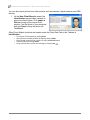
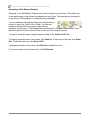
Set up the fields that will be required for
every new rental. On the Taskbar, select
Utilities/Site Setup/Setup New Client
Required Fields. This will bring up a small
window that will allow you to place a
checkmark by any fields that you want to
require with every new rental.
5
TaskMaster Management Software User Guide
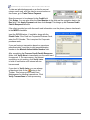
Setup Promotions in Use by the site.
This feature is set up during conversion.
On the Taskbar, select Utilities/Site
Setup/Promotions in Use. Place a
checkmark in the box next to any
promotional discounts that the site offers
or plans to offer. This allows these
discounts to be selected during the
rental process. If your discount is not on
the list, and you need it right away, see
the Discounts section of the manual for
instructions on giving discounts other
than the Promotions in Use.
Add and edit Operators. This feature is set up during conversion when at least one
Unrestricted User should have been created. This unrestricted user (usually an
owner, district manager, or high level manager) should go into the Operators
function and set up all users along with their Operator Access Levels. In the
Taskbar at the top of the screen, select Utilities/System Setup/Operator Setup.
Select Add Operators to add new operators to the system or Edit Operators to
change the access level or inactivate operators that are currently in the system.
When setting authorization levels, consider that there should be at least one
unrestricted user, usually an owner or district manager. Typically, area managers
and high level site managers are level 1; regular site managers are Level 2; and
assistant managers are Level 3.
6
TaskMaster Management Software User Guide
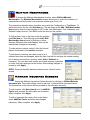
Schedule Events. Select Utilities/System Setup/Schedule Events. From this
screen you can Schedule Automatic Daily Processing (ADP), Automatic Weekly
Processing (AWP), and Automatic Monthly Processing (AMP) by clicking on the
Reschedule button on the right-hand side of the page.
•
In the Schedule Events Window,
Select System – Automatic Daily
Processing (ADP), Daily. Click
Reschedule and set the time at 3:00
am on the next day after the current
day’s date. It is important that ADP
be scheduled after midnight but well
before the next day’s business
hours.
•
Repeat this process to schedule
AWP for the end of week (either the
following Saturday or Sunday
depending on how your company
runs their week). AWP should be
scheduled for 10:00 pm on the last night of the week. It must be before
midnight, but after business hours.
•
Repeat this process to schedule AMP. AMP should be scheduled for 11:00 pm
on the final night of the month. It must be before midnight, but after business
hours and not set to the same time as AWP.
Click OK after the times are set.
NOTE: Your computer must be left on at these times for the processing to work. Click the
X in the upper left-hand corner of the System Maintenance bar to close the screen.
Setup Letters. On the Taskbar, select
Utilities/Maintain Letters. This will
allow you to edit the letters that are
printed by the system welcoming new
customers, collecting on past due
items, etc. A number of default letters
have been provided, but it is
important that you customize the
letters to your site and to conform to
local laws and regulations. We
strongly recommend that all letters be
reviewed by a lawyer or other legal
resource for legality and regulatory requirements prior to using them at the site.
Chamberlain Access Solutions is not liable or responsible if you send out letters
that do not conform to legal requirements for collections and auctions. Refer to the
Maintain Letters section for more details on merge field definitions, customizing
and editing letters, and other related topics.
7
TaskMaster Management Software User Guide
Add your logo to reports, invoices, and receipts, if desired. You must have a
bitmap image of your logo that measures 2 ½” x 1” at 96 dpi. Save this file in the
c:\RTM folder as rptlogo.bmp and as invlogo.bmp. If there are already files of the
same name, click Yes to replace the files. This will place your company logo at the
top of each report, invoice, and receipt.
Run the initial ADP to synchronize the
system. To run the initial ADP, select
Tasks/ADP (Daily Processing). The
Automatic Daily Processing window will
pop up. Click Activate Now to run the
initial ADP.
If this is a new property (not converted
from a previous software), begin data
entry of any current clients into the
system.
Once these steps are complete, the software is ready to use.
8
TaskMaster Management Software User Guide
Overview of Function Navigation
There are 3 bars for navigation through TaskMaster. Most functions are located in multiple
places around TaskMaster to make it easy to find the task you want.
Menu bar – located across the top of the TaskMaster window
Toolbar – located across the top of the TaskMaster window under the Menu bar
Taskbar – located on the left side of the TaskMaster window
The Taskbar is separated into three or four categories that can be selected by
clicking on each category’s tab. The tabs will be located at either the top or the
bottom of the Taskbar depending on which one is currently in view.
Client Data tab – contains screens used to view information about each client’s
account
Client Task tab – contains useful tools used when modifying an account or
doing a task for a client such as taking a payment or adding additional spaces
Maintenance tab – used for general facility maintenance
Master Security tab – this tab only appears if you are using the Master
Security module for access control. It contains the tools and screens for use
within Master Security. This feature is no longer available on current versions of
the software.
9
TaskMaster Management Software User Guide
Daily Operator Tasks
•
•
•
•
•
•
•
•
•
•
•
•
10
EZ Task
Searching in TaskMaster
New Client Move In
Take A Payment
Vacate Space/Move Out
Transfer
Lease an Additional Space
Merchandise Sales
Account Management
Reports
List of Clients
List of Spaces
TaskMaster Management Software User Guide
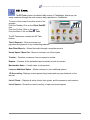
EZ Task
The EZ Task screen is the default Main screen in TaskMaster, where one can
easily maneuver through the most common daily operations in TaskMaster.
To return to this screen from other areas of the
program:
From the Taskbar: Click on the Client Data/EZ
icon.
icon.
From the Toolbar: Click on the
From the Menu: Click on View/EZ Task.
The EZ Task screen contains ten EZ Task
buttons:
Take A Payment – Enter customers rent
payments and payment of any outstanding balances
New Client Move In – Wizard that walks through a complete move-in
Vacate Space / Move Out – Moves a customer out of their space
Transfer – Transfers a customer from one space to another
Reports – Contains all the preloaded reports needed to track a business
Merchandise Sales – A retail center to sell products
Lease an Additional Space – Allows customers to rent additional spaces
123 Accounting –Displays current spaces being leased and any open balances on the
account
List of Clients – Displays all active clients, their guests, and the spaces on each account
List of Spaces – Shows the current inventory of open and rented spaces
11
TaskMaster Management Software User Guide
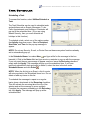
Searching in TaskMaster
There are three fields across the top of the EZ Task screen that can be used for searches.
Client Name – The field at the top center is the Client
Name that TaskMaster is currently focused on. To make
changes to an account, the client’s name must be in focus
in this field. If there is no name in this field, find the client to
edit or work with their information.
Search Here – Look up a client using the Search Here
field by clicking the arrows to each side of the field. The single forward
and backward
arrows scroll through the list of customer names one at a time. As you scroll through the
names, each customer’s name will appear in the Client Name field between the arrows. The
extended forward
and backward
arrows take you to the very beginning
or end
of
your customer list. You can also go directly to a specific client by typing their last name in the
white search field between the arrows.
To Search for a client by space ID or to find out who is in
a specific space, click Search by ID located below the
Search Here field. This brings up the Find a Client by
Space ID window. Type space number in this field and
press OK.
To perform a more in-depth search for a client or to
search inactive clients, click Search by Multiple
Choices below the Search by ID button. This window
allows you to search by Active Clients and Guests,
Inactive Clients and Guests, or All Clients and Guests by
clicking in the appropriate field.
You specify to search by Agreement Number, Business
Name, Cardcode, Check Number, Client ID Code,
Drivers License number, Invoice Number, Space ID, Last
Name, Pass Code, Phone Number, Receipt Number,
Name, Social Security Number, or Vehicle License by
using the drop-down under the Search By field.
The size of the search result list can be limited by typing
a number between 1 and 999 in the Maximum Search
List field.
Once you have narrowed your search using the above fields, a list of results appears in the
lower left-hand corner. Enter a name in the Search For field to narrow the list. Click on an
item in the list to bring up more information in the fields to the right. Once you have found the
correct item, click on it to highlight it and then click on Show to bring up the customer in
TaskMaster.
12
TaskMaster Management Software User Guide
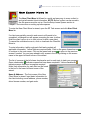
New Client Move In
The New Client Move In Wizard is a quick and easy way to move a client in
and get all needed client information. NOTE: Before a client can be moved in,
the site spaces must be set up. See the Setup Lease Spaces section in
Chapter 5 for instructions on setting up lease spaces.
To enter the New Client Move In wizard, open the EZ Task screen and click New Client
Move In.
If a client was partially moved in and move-in still needs to be
completed, a dialogue box will appear prompting the user to either
finish the client’s move in or to start a move in with a new client.
To cancel the unfinished move-in, click on Inactivate the Client/No
Move-in.
To enter information, tab through each field and complete all
applicable information. Yellow fields are required fields. Click on the green forward arrow
to continue to the next screen. Click on the green back arrow
to return to the previous
screen if needed. You can jump ahead to any screen in the list by clicking on the screen
name in the upper left-hand corner of the wizard.
The list of screens at the left shows checkmarks next to each topic to track your progress.
Green checkmarks indicate screens that have been completed. Yellow checkmarks
indicate screens that have incomplete required
fields. Help information for each field can be found
in the box in the lower left-hand corner of the
wizard.
Name & Address – The first screen of the New
Client Move In wizard. Input basic information for
the client including e-mail address, phone number,
driver license number, and gate code.
13
TaskMaster Management Software User Guide
Identification – Input information to help identify
the customer including date of birth and the type of
vehicle that will be stored. If the site is using the
Camera Module, you can also take a picture of the
client at this time.
Billing – Set up an alternate billing address, if
required, and credit card billing information.
Marketing – Captures general information from
customers, which is used to gather advertising and
demographic information about the local market.
These marketing questions and answers can be
customized to your site. Refer to the
Demographics and Marketing section.
Secondary Contact – Add a guest that
can access the space or a secondary/
emergency contact for the main client. A
secondary contact will receive collection
letters in addition to the regular client.
Emergency contacts will not receive
these letters. Click on Add a Guest or
Edit a Guest for a pop-up screen that
lets you enter or change the guest’s
information.
14
TaskMaster Management Software User Guide
Lease a Space – Contains information about the
space that the customer will be renting. To select a
space, type in the Space ID or click on Need Help
Selecting a Space to see a list of vacant spaces.
Promotions are discounts that are already in the
system and can be changed under Utilities/Site
Setup/Promotions in Use.
When you have completed this screen, click on
Click Here to Accept Rental. This will bring up the
Insurance Coverage screen, which will allow you
to add insurance to the new space.
Merchandise Sales – Enter information here
when customers purchase merchandise in
addition to renting a space. Merchandise items
can be added to the list or edited by going to
Utilities/Maintain Merchandise on the Menu bar at
the top of the main page. Click on any item to
select it. Left-click to add one item. Right-click to
subtract one item.
Payment Screen – Lists all charges due and
allows the user to take a payment on the selected
account. For more information, review the Take A
Payment section.
15
TaskMaster Management Software User Guide
Take a Payment
The Take a Payment button on the EZ task screen is used to access the
payment screen.
To prepay a customer for a certain number of months use the up arrow to
increase the number of months desired. If the customer is prepaying, that prepay amount will
be listed under prepays below open items.
The balance due for a customer appears in the
Balance Due field.
If the customer has multiple spaces, a break down
of the total due will be displayed.
The window in the center of the screen shows a
break down of each fee, rental amount, and
assessment due.
Clicking on the History button shows the record of
all payments made by a customer.
To accept a payment, type the amount the client is paying under the Cash, Check, or Credit
fields (depending on how they are paying). The Check field requires the check number and
bank routing number. The Credit field requires the credit card number and expiration date. A
customer can pay a single amount using multiple forms of payment (cash, check, or credit).
After entering the amount in the correct fields, click Apply Payment . This will bring up the
buttons on the right-hand side of the screen allowing you to accept the payment. If you want
to print a receipt for the client, click Accept & Print Receipt(s). To accept the payment
without printing a receipt, click Accept.
If the client has an overlock on the space, then a reminder will pop up letting you know to
remove the overlock at this time. This space will also appear on the Overlock Report the
next day as a reminder to remove the overlock.
16
TaskMaster Management Software User Guide
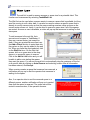
Client Credits
If you take a payment that is more than
the monthly rent, but isn’t actually
prepaying for multiple months, or if you
transfer a client from a more expensive
space into a less expensive space, you
may end up with Client Credits.
Merchandise Returns also create client
credits.
Client Credits is a function of
TaskMaster used to track excess money
that would normally be unaccounted for.
In many other systems, money must be
manually transferred between accounts when a client changes spaces. TaskMaster
temporarily holds this money in Client Credits, but you must decide what to do with it. When
you exit the payment screen with Client Credits still unused, the credits will remain
outstanding in the Account Credit field.
Generally, the system will alert you that there are Client Credits outstanding unless the Allow
Client Credits checkbox is checked. The Client Credits will show at the bottom left of the
screen in the Available Credit field. You will only see this field if there are client credits on an
account. If you click on the Prepay for Month(s) field and select one month, then click twice
on the arrow next to the Account Credit, it will apply the Client Credits to future rent.
If you previously left client credits on the Payment Screen, the next
time you go to the 123 Accounting Screen, you will see a reminder to
disburse the client credits. You can choose to return to the payment
screen to take the credits as a payment, to refund the cash to the
client, to remove the credits from the client account and allow the
company to keep them, or to allow the client to keep the credits on
their account.
NOTE: If you allow a client to have Client Credits on their account and you leave money in
their Client Credits, it is possible for them to receive a late fee for nonpayment of rent the
following month even if there is enough money in client credits to pay their rent. The
manager must apply the funds as a payment to prevent this.
It is possible to set up TaskMaster to accept all overpayments as Client Credits in the
Policies Screen of Site Setup. However, we do not recommend this as the manager will have
to go into each account every month and manually move the Client Credits to payments.
17
TaskMaster Management Software User Guide
Vacate Space/Move Out
The Vacate Space/Move Out button on EZ Task is used to move a client out
of their space and assess any charges or refund any deposits, if applicable.
From the EZ Task Screen, search for the client that you
wish to move out. Click Vacate Space/ Move Out. The
Client Move Out window will pop up. Select which space
the client will be moving out of using the drop-down
menu. Click on Click Here for Next Step.
The Removing Charge screen will appear and allows the user
to prorate the assessed amount and decide whether or not to
charge for the current day’s use.
Prorating the assessed amount gives the unused portion of rent
back to the customer. To charge the customer for the current
day’s use, check the appropriate box.
If the facility requires advance notice prior to a client moving out
of the facility, there may be a fee showing in the Not Enough
Notice field. This fee can be altered or removed by changing
the amount in the field. To require notice prior to move out, go
to Utilities/Site Setup/Policies. The fee (F) is based on the
amount of rent (R) divided by the number of days in the current
month (D) multiplied by the number of days notice (N) that
should have been given (R ÷ D x N = F).
You can also track the reason for the client discontinuing use
for marketing purposes by clicking on the Why is the client discontinuing use drop-down
menu. These answers can be modified in Utilities/Site Setup/Questions & Answers.
Once this screen is complete, click Accept. This will pop up a
window asking whether you really want to proceed. Once accepted,
the move-out is irreversible. Click on the No checkbox to uncheck
it, and then click on the Yes checkbox to place a checkmark in it
and click OK to confirm.
Repeat these steps for each space if the client is moving out of multiple spaces at the same
time.
18
TaskMaster Management Software User Guide
Transfer
The Transfer button on the EZ task screen is used to move a client out of their
space and into another one. It will also apply any charges or deposits from the
old space to the new space, if applicable. The process is similar to vacating a
space.
From the EZ Task Screen search for the client
wish to transfer. Then click Transfer. The
Transferring window will pop up. Select which
client will be transferring out of using the dropmenu. Click on Click Here for Next Step.
that you
space the
down
You can choose to charge the client for the current day’s use by
clicking in the check box next to Charge for Todays Use.
If your facility has a fee for transfers, it will appear in the Transfer
Fee field. You can alter this by typing in the field. To alter the
transfer fee or to require one, go to Utilities/Site Setup/Policies.
You can also track the reason for the client discontinuing use for
marketing purposes by clicking on the Why is the client
discontinuing use drop-down menu. These answers can be
entered or modified in Utilities/Site Setup/Questions & Answers.
Once this screen is complete, click Accept. This will pop up a window
asking whether you really want to proceed. Once accepted, the
transfer is irreversible. Click on the No checkbox to uncheck it, and
then click on the Yes checkbox to place a checkmark in it and click
OK to confirm. A pop-up will appear asking if you want to print a
Client Information page. Select the option you want.
The next screen that appears is the Lease a
Space screen where the new space, rates, and
discounts (if applicable) are selected. Select a
space to move into as during a new client move in.
Complete all required information and click on
Click here to Accept Rental. The system will take
you to the Payment screen.
19
TaskMaster Management Software User Guide
Lease an Additional Space
The Lease an Additional Space button on the EZ Task screen is used to
add a space to an existing customer’s account.
From the EZ Task Screen, search for the client that is renting an additional
space. Click Lease an Additional Space.
Select the space to rent and adjust any discounts if applicable.
If using the camera module and no picture has
been taken yet, take a new picture of the client.
The system allows multiple images to be saved for
each client.
Click on Click Here to Accept Rental. This will
bring up the Insurance Coverage screen, which
will allow you to add insurance to the new space.
Clicking Add will apply the space to the account
and leave a balance due. Click Cancel to cancel
the transaction.
20
TaskMaster Management Software User Guide
Merchandise Sales
The Merchandise Sales button on the EZ Task screen is used to sell
inventory items such as boxes, tape, and locks.
Choose whether this is a client or
a non-client sale. If you are
selling the item to an existing client, search for
the client name and select their account. Click on
Merchandise Sales.
Merchandise items can be added to the list or
edited by going to Utilities/Maintain Merchandise
on the Menu bar at the top of the main page. See
the Maintain Merchandise section.
Click on any item to select it for sale. Double-click the item to add a single item at a time.
Double right-click to subtract a single item at a time. When you have finished, click Accept
to add the item’s charge to the client’s account or click Accept & Pay to go directly to the
Payment screen. If you have begun a merchandise sale and clicked on Accept & Pay and
then need to cancel it for any reason, click Cancel Merchandise Sale under Tasks on the
Menu bar or click Cancel Sale.
21
TaskMaster Management Software User Guide
Account Management
Use the 123 Accounting button on the EZ Task screen to manage account
information for all the spaces that a client is currently leasing along with any
current charges or balances. From this screen, you can also access historical
account information about a client.
Balances, prepays, and client credits are displayed in the ledger lines across the top below
the customer’s name.
The Paid To date for each space is displayed
under the Paid To column in the Current Leased
Spaces screen.
The Remove/Transfer button will move out the
customer or transfer the customer to another
space.
Clicking Remove This Charge will start the move
out sequence.
Assess a Charge/Fee is basically the same as Attach a Fee except that assessing a fee
will link the fee to the account rather attaching it to a specific space.
Detail & Alter Information – views the details of
the selected space. This screen is for maintaining
rates and dates for current recurring charges that
are assessed.
The lease/rental number is displayed below the
client name and to the right of that are the overlock
and lockout check boxes.
If the lockout is checked and the site interfaces with
a gate system, the customer is suspended and will
not be able to enter the site.
It is possible to adjust the Next Assessment date up to 30 days forward.
History – All ledger transactions can be reviewed here. The history can also be printed.
22
TaskMaster Management Software User Guide
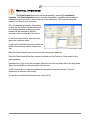
Alter Menu
To access the Alter Menu, click on an item in Description of
charges and then click on the Alter Menu. The middle of the
Accounting screen shows the Current Charges with a
Balance for the client’s account. It provides information on
leased spaces and the open balances on them.
To alter the amount, select the charge, click Alter
Menu, and select Alter Amount. The Display &
Alter Charges window will pop up. Make the
necessary changes to the account and click Apply.
Click Exit.
Clicking Retain Overpaid Rent will keep prepaid
rent. This setting depends on company policy.
Writing off bad debts can be done one charge at a
time by selecting Bad Debt (Write Off) or all
charges on the account by selecting Bad Debt
(Write-Off All). TaskMaster will query for a reason.
To zero out the balance but not list it as a bad debt, click on Zero Out Balance (Alter).
23
TaskMaster Management Software User Guide
Reports
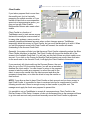
Use the Reports button on EZ Task to manually print out reports. You can add
reports to a Favorites folder to keep often-used reports in one place by clicking
on Favorites – Add/Remove. As you select each report from the menu, a
description of the report will appear in the upper right-hand window.
Some reports provide options to narrow the
date, time, or operator; print an explanation
page, alter the page setup for printing; and
highlight sections of the report to make it
easier to read. Select those options that you
want to customize. Not all reports have all of
these options.
To print a report, click Execute. If Preview
Report is checkmarked, the report will
appear in a window before printing. You can
then print the report by clicking on the Print icon at the top of the window. You can also
click on the Export icon to export the report data to various other formats including Adobe
PDF, HTML, Excel, and Lotus 123.
To e-mail a report, click on one or
more e-mail address from the E-mail
list in the middle of the page. After
customizing the report, click E-mail to
send the report to the selected
address(es). You must have the e-mail
function set up in advance for this to
work. E-mail is set up under
Utilities/System Setup. Select the
Internet tab.
NOTE: Take the time to print and review each report to become comfortable with the data
provided and to help you find the reports that will be most useful to your site. Save these
reports to your favorites for future use.
24
TaskMaster Management Software User Guide
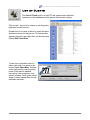
List of Clients
The List of Clients button on the EZ Task screen shows all active
customers in the database and the spaces that they are renting.
Click on the + sign next to a name to see all guests
registered on the account.
Double-click on a name in the list to open the name
& address screen for that person. This screen also
appears when the user right-clicks on the client and
selects Edit Client Data.
To see more information about a
client, right-click on a name in the
list and select Show More. Buttons
on the right can be used to quickly
move to the name & address,
accounting, take a payment, and
reports screens. It also gives a brief
recap of recent transactions for that
particular customer.
25
TaskMaster Management Software User Guide
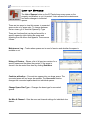
List of Spaces
The List of Spaces button on the EZ Task shows every space on the
property and whether or not it is rented. It also allows some maintenance
and status changes to individual
spaces.
There are two ways to view this screen: in numerical
space order or by space size. To change between
the two views, go to View/List Spaces by Type.
There are functions that can be performed for a
specific space by right-clicking the space and
selecting from the menu that appears. These are as
follows:
Maintenance Log – Tracks when spaces are in need of service and whether the space is
rentable or not.
History of Renters – Shows a list of all previous renters for a
specific space and the dates they rented. If the space is
vacant it can be rented from here by clicking Rent Now.
Combine w/Another – Converts two spaces into one larger space. The
converted space will no longer be rentable. The Unconvert function
changes the converted spaces back into individual spaces.
Change Space Size Type – Changes the lease type for converted
spaces.
Set Mux & Channel – Sets the mux and channel settings for individual door
alarms.
26
TaskMaster Management Software User Guide
Other Operator Tasks
•
•
•
•
•
•
•
•
•
•
•
•
•
•
•
Accessing and Editing Client Data
Comments
Name & Address
Identification
Billing Info
Add a Guest
Documents
Reversing Payments
NSF Checks
Refund Client Credits
Merchandise Returns
Discounts & Promotions
Rate Changes
Insurance
Log In/Log Out
27
TaskMaster Management Software User Guide
Accessing and Editing Client Data
There are five screens used to access or edit data on existing clients:
123 Accounting
Comments
Name & Address
Identification
Billing Info.
These screens can be found under the Client Data Tab on the Taskbar to the left of the
screen. These screens can be selected individually by clicking on the appropriate button on
the Taskbar or you can navigate through each screen in order by clicking the forward and
backward arrow buttons on each side of the Apply button at the bottom of the screen.
Comments
Enter notes for the client by clicking on Add a Comment. TaskMaster will
automatically date and time stamp with the user initials for each entry.
You can scroll through the client’s entire
history in the comment box in the middle of
the screen or it can be printed out for review.
You can also narrow the comments to those
made by a specific operator by changing the
By Operator drop-down.
NOTE: Once a comment is entered into the
customer’s file, it cannot be removed.
28
TaskMaster Management Software User Guide
Name & Address
The Name & Address screen is used to update general client information, such as address,
phone, client name, and business name.
The Invalid Phone Number and Invalid Address checkboxes are used to alert the user to
update that information the next time the customer comes in to make a payment.
You can switch between client and guest
information on this screen by clicking on the
appropriate name in the Client & Guest box at the
top of the screen. Information on this screen can
be changed and updated. All changes are recorded
in the history to record what changes have been
made and who made them. To review these
changes, click History.
Additional Guests can be added by clicking on Add
Guest.
Identification
The Identification screen is used to store Social Security Number, driver license number,
date of birth, and vehicle information for the client. You can also manage photos of a client
or their guests. Refer to the Photo Module section for more information.
NOTE: The system allows multiple images to be saved for each client. You can scroll
through the current and historic photos for a client using the Scroll Photos buttons.
If you do not have the photo module, you can still
import digital pictures or scans of driver’s
license/passport photos using the import feature.
Pictures must be sized to approximately 320 x 240
pixels at 96 dpi. Refer to your digital camera or
scanner user manual for information. To import a
picture, click Import and locate the picture file
stored on the computer.
29
TaskMaster Management Software User Guide
Billing Info
The Billing Info screen can be used to enter alternate addresses for
correspondence. If there is a checkmark in the Active checkbox, then all correspondence for
this client will print with this address. If the box is not checkmarked, then the main address
will be used.
The invoicing section allows you to arrange to
automatically send an invoice to a client.
The Custom Message for Invoices & Receipts
field can be used to print a message on receipts
and invoices for this customer alone. Use this if
they want purchase order or account numbers
on the receipt (or any other specific information).
If you checkmark Do NOT accept checks for
payments, then the check area on the payment screen will be grayed out. You can use this
if a client has paid with an NSF check on multiple occasions.
If you place a checkmark in the Tax Exempt & Number field and enter a tax exempt
number, then TaskMaster will not charge this client rent taxes. This only applies if rent taxes
are set for the property.
If Credit card information is entered on this screen, you can automatically charge a client’s
credit card for their monthly rent. You will need to set the Automatic Process Occurs field
and keep a signed authorization form on file. You can print this form by clicking on Print
Authorization Form.
Add a Guest
The Add a Guest section allows you to add additional
users to the account. This is often used to add spouses, business
partners/employees, or relatives to an account. Access this function
from the Name & Address screen by selecting Add a Guest.
Complete all required Guest information. The address information
can be prefilled by clicking on Same as Main User.
Designating the guest as a secondary contact will cause them to
receive any billing or collection letters. Designating them as an
emergency contact will prevent them from receiving this information. Leaving both fields
blank designates them as a ‘true’ guest who will not receive billing or collection information
and should not be contacted for emergencies.
Once registered, use the Identification screen to take a photo of the guest.
30
TaskMaster Management Software User Guide
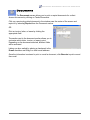
Documents
The Documents screen allows you to print or reprint documents for a client.
Access this screen by clicking on Tasks/Documents.
Click on a previously printed document in the window near the center of the screen and
reprint it by selecting Reprint from the Document section.
OR
Print an invoice, letter, or lease by clicking the
appropriate field.
The section next to the document section allows you to
customize which letter, invoice, or lease to print.
Depending on the document selected, different fields
will be activated.
Letters can be e-mailed by placing a checkmark in the
E-mail checkbox and filling in a valid e-mail address.
Once the information is entered to print or e-mail a document, click Execute to print or send
the e-mail.
31
TaskMaster Management Software User Guide
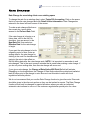
Reversing Payments
The Reverse Payment window can be accessed by selecting Tasks/Reverse A
Payment. This screen can be used to reverse any cash, check, or credit payment that was
made within the last 60 days.
You must first search for the client and
have their account active before reversing a
payment.
To reverse a payment, select the payment
to be reversed and click Reverse Payment.
Click Apply to accept the change. The
payment has been reversed.
Reversing credit card payments requires
additional steps depending on the status of the payment and batch. Refer to the credit card
section for more details.
If you reverse a check or credit card using reverse payments, no NSF fee is charged and the
bank deposit amount is reduced.
NSF Checks
The NSF (Returned Funds) window can be accessed by selecting Tasks/NSF
(Returned Funds). This screen is used to reverse a check payment that has been returned
by the bank due to Non-Sufficient Funds (NSF).
To NSF a check payment, select the payment
that you wish to NSF, place a checkmark in the
NSF checkbox. Click Apply. The check is now
marked as NSF and the client’s account will
immediately be marked with any late fees and
an NSF fee (if your company charges one).
If you reverse a check or credit card using NSF
checks, an NSF fee is charged (if applicable)
and the bank deposit amount is not reduced,
because the check was already deposited.
32
TaskMaster Management Software User Guide
Refund Client Credits
Client Credits on a client’s account can be refunded to the client by selecting
Tasks/Refund Client Credits.
You can elect to refund all or some of the client
credits by placing the amount in the Amount to
Refund field. This field will default to the entire
amount of the outstanding Client Credits. Any
amount that you do not refund will remain as client
credits on the client’s account.
Clicking on the Refund Cash button removes the
full amount from the day’s cash receipts and the
bank deposit, allowing a direct refund. Leave this
box unchecked to print out a voucher that the client can send to the main office for a refund.
Merchandise Returns
Merchandise that has been sold can be returned to inventory and the client’s money
refunded by selecting Tasks/Merchandise Returns.
If merchandise is being returned from a
specific client, search for the client in
TaskMaster and have their account active
before performing the merchandise return.
Click on Tasks/Merchandise Returns.
To return an item, select it from the list and
select the quantity of the item being returned. If
more than one type of item is being returned, be sure to select each item on the list and the
quantity. Click Apply to complete the return. The items will be listed back in the merchandise
inventory and the refunded amount will be listed as a Client Credit on the client’s account.
If the return was for a non-client, click Merchandise Sales. Place a checkmark in the ‘nonclient sale’ checkbox. The Client Name will show General Merchandise Sales as the name.
Click on the red pushpin on the toolbar to ‘Add Client to List’ and return to the EZ Task
screen. Select General Merchandise Sales account from the pinned accounts list on the
lower right toolbar. The Client Name on the EZ Task screen will change to General
Merchandise Sales. Go to Tasks/Merchandise Returns.
To return an item, select it from the list and select the quantity of the item being returned. If
more than one type of item is being returned, be sure to select each item on the list and the
quantity. Click Apply to complete the return.
The credit will appear on the 123 Accounting screen. Select Refund to the Client. Select the
type of refund (cash, check, or credit card) and enter the amount to be refunded.
33
TaskMaster Management Software User Guide
Discounts & Promotions
Giving a discount to a new renter
On the New Client Move In wizard,
select Lease a Space/Promotions.
Many of the most common self storage
promotions are already preset in
TaskMaster. This list must be set up
under Promotions in Use. See
Promotions in Use for additional
instructions.
You can also give a discount on the Lease a Space
screen by entering a discount in the Discount field
on the right-hand side of the screen, if the required
discount isn’t included in the Promotions list. A flat
dollar discount rate can be given by typing in a dollar
amount, or the discount can be a percentage of the
space rate by placing a checkmark in the Use as %
field. If you give a discount in this field, a window will
appear when you accept the rental asking you to set
an ending date to the discount. If the discount will
not expire, click No Ending the Discount. To end the discount after a certain date, input the
date in the box and click Set this Ending Date.
Promotions in Use (Setup)
To set the Promotions to appear on the Lease a Space
screen in the New Client Move In wizard, select
Utilities/Site Setup/Promotions in Use.
Many common self storage discounts and promotions have
already been preprogrammed here for your convenience.
Place a checkmark beside any promotions the site intends
to use. These will appear as options when you rent a new
space.
34
TaskMaster Management Software User Guide
Giving a discount to an existing client on an existing space
To give an existing client a discount on an existing space or on an additional space, go to
the Detail & Alter Information screen by clicking on Tasks/123 Accounting. Select a
space and click Detail & Alter Information.
Enter a discount amount in the Current Discount
Field. If you just type a number in the box, this will
be the dollar amount of the discount. If you click on
the Use as % field then the number will be a
percentage of the rental rate for the space.
If the discount is to become effective on the current
day, click Apply. If the discount is to begin on a
future date, click in the first On check box, type an
amount under the New Discount field and then
select an Effective Date for the discount to begin. If you type a number under the New
Discount field, the system will treat it as a dollar amount unless you checkmark the Use as
% of Rate box.
Give the discount an ending date by clicking in the second On checkbox and giving a $0 or
0% discount on the first billing date after the discount ends. NOTE: It is important to
remember to end discounts. This is the most common mistake that is made when giving a
discount. If you do not put an ending date, then the discount will never end. For example, if
you give a client a free month of rent after they pay for 12 months, but you do not end the
discount, then the client will have free rent forever once they have paid for the first year.
Example A: This client is receiving a 10% discount that begins today
and ends on 03/01/09.
Example B: This client is receiving a 100% discount that begins in the
future on 02/01/09 and ends on 03/01/09. Effectively, the client will
receive one free month of rent in February 2009.
Example C: This is an example of a stepped discount. This client is
receiving $25 off the rental rate for 6 months beginning immediately.
Then the discount is $15 off the rental rate for another 6 months, and
$5 off for the final 6 months. The rate returns to normal on 03/01/2010.
35
TaskMaster Management Software User Guide
Giving a discount to an existing client renting an additional space
From the EZ Task screen, click Lease an
Additional Space to give the client a
discount when the additional space is
rented.
Enter a discount amount in the Discount
Field. If you just type a number in the box,
this will be the dollar amount of the
discount. If you click on the Use as % field
then the number will be a percentage of
the rental rate for the space.
Click on Click Here to Accept Rental. A pop-up will appear asking you to enter an ending
date for the discount. Enter the date on which the discount will end and click Set this
Ending Date. If the discount will never expire, click No Ending the Discount.
A pop-up will appear asking why the customer is
entitled to the discount. Enter a reason and click
Accept. The Insurance Coverage screen will pop up.
Enter the customer’s insurance information and click
Add or click Cancel if there is no insurance
coverage.
36
TaskMaster Management Software User Guide
Rate Changes
Rate Change for an existing client on an existing space
To change the rate for an existing client, select Tasks/123 Accounting. Click on the space
that is to have the rate changed and click Detail & Alter Information. Rate Changes are
entered in the lower left-hand corner of the screen.
To make a rate change effective on
the current day, type a dollar
amount in the Current Rate Field.
If the rate change is to begin on a
future date, click in the first On
checkbox, type an amount in the
New Rate field, then select an
Effective Date for the rate change
to begin.
If you want the rate change to be for
a specific period of time, enter an
ending date for the rate change by
clicking in the next On checkbox and
typing in the rate to take effect on
the first billing date after the rate change ends. NOTE: It is important to remember to end
rate changes. This is the most common mistake that is made when making a rate change. If
you do not put an ending date, then the rate change will never end.
If you give a rate change, the Change of Rate Notice Will Print On field will activate.
Depending on local regulations, the Change of Rate Notice should be printed and mailed at
least 30 days prior to the change in rate. Be sure to set this date to meet with local
regulations and site policies.
We do not recommend that you use the Rate Change function to give discounts. Discounts
should be given in the discount section so they can be tracked in reports. The Rate Change
function should only be changed for special situations where you want an individual
automatic rate increase to occur or if the customer negotiated a special price for a time.
37
TaskMaster Management Software User Guide
Rate Change for an existing client renting an additional space
From the EZ Task screen, select Lease an Additional Space to give the client a rate
change at the same time as you rent the additional space.
To make a rate change that is effective on
the current day, type a dollar amount in the
Rate Field. This will be the actual rental rate
of the space.
Click on Click Here to Accept Rental. A
pop-up will appear asking why the customer
is entitled to the rate change. Enter a reason
and click Accept. The Insurance Coverage
screen will pop up. Enter the customer’s
insurance information and click Add or click
Cancel if there is no insurance coverage.
We do not recommend that you use the Rate Change function to give discounts. Discounts
should be given in the discount section so they can be tracked in reports. The Rate Change
function should only be changed for special situations where you want an individual
automatic rate increase to occur or if the customer negotiated a special price for a time.
38
TaskMaster Management Software User Guide
Insurance
Setting Up Insurance
To bring up the Insurance Carrier window go to
Utilities/Maintain Insurance Info.
Input the insurance carriers that your site uses
to sell insurance to your clients. The insurance
company will provide you with the information to
complete this screen.
You must set up these carriers prior to being
able to select them when renting a space.
Selling Insurance to Clients
While renting a space to a client through the New Client
Move In wizard, on the final screen you will be prompted
to offer insurance coverage.
If the client declines insurance, click Cancel. If the client
wishes to purchase insurance, complete the insurance
forms provided by the insurance company and complete
this screen. You must select a Carrier and input a Policy
and Coverage amount for the screen to activate. The
Current Rate section allows you to change the rate over
time and works like the Rate Change function. When all
necessary information has been input, click Add to add
the insurance to the client’s account.
TaskMaster only assesses the insurance premium with
the monthly rent. All other communications and
paperwork for insurance are handled by the site and the
insurance company.
39
TaskMaster Management Software User Guide
Log In / Log Out
The log in screen appears each time TaskMaster is opened. Enter the Operator ID
and Password to begin.
For security purposes, each time you
need to leave the computer for any length
of time, log out of the program. Click
File/Log In / Logout.
There is also a timed log out that can be
set so that TaskMaster will automatically
log out after a set period of non-use.
To set the automatic logoff, go to
Utilities/System Setup/Operator Setup.
Select the operator Login Name that you
want to automatically log off, click Edit Operator Data, and set the number of minutes in the
Automatic Log off After How Many Minutes field. TaskMaster will automatically log off
that user after the number of minutes set in that field. NOTE: This feature should be set for
every user to maintain an audit trail, preventing one user from making changes under
another user’s sign on. We recommend that the time be set low for any unrestricted or Level
1 users to prevent more restricted users from accessing restricted functions. Daily users and
managers set to level 2 or 3 should be set higher as they will be using the program more
frequently throughout the day and it becomes problematic if they have to log in every few
minutes.
Possible Settings:
Unrestricted Users:
Level 1 Users:
Level 2 Users:
Level 3 Users:
40
5 minutes
5 minutes
45 minutes
45 minutes
TaskMaster Management Software User Guide
Operator Tools
•
•
•
•
•
•
•
Scrolling Marquee
Task Scheduler
Add a Client
Wait List
Rental Inquiries
Add Client to List
Calculator
41
TaskMaster Management Software User Guide
Scrolling Marquee
The scrolling marquee tool appears at the top
center of most client screens in TaskMaster. It
can be used to type a message about a client
that will appear whenever you have the client
account active in TaskMaster. It can be used
for simple reminders to the manager about the
client. Notes typed into the Scrolling Marquee
are permanently saved in the Notes screen.
The Scrolling Marquee can be used over and
over again.
button next to the marquee. A
To enter a message into the Scrolling Marquee, click on the
window will appear that will allow a note to be typed. The Font Color and Background
Color can also be changed using the drop-down fields.
42
TaskMaster Management Software User Guide
Task Scheduler
Scheduling a Task
To access this function, select Utilities/Schedule a
Task.
The Task Scheduler can be used to schedule tasks
and activities such as Events, Messages, To-do,
Calls, Appointments, and Holidays. A reminder will
pop up at the scheduled time. (If you are using
Master Security, then you must schedule all
holidays in this function.)
To schedule a task, select one of the options under
the Activity drop-down menu. Select a Recipient,
Start Date, and Time for the pop-up message to
appear.
NOTE: Do not use Security, E-mail, or Printer Error as these are system functions already
set to automatically pop up.
In the Scheduled Items: box select New
and type a title for the message in the box
beneath it. Click in the Notes field and type a note or reminder to pop up with the message.
If you only want the pop-up message to appear one time, leave the Recurring checkbox
empty and click Apply. The message will pop up at the scheduled time. If you have
previously scheduled a task and want to delete it, select the item in the box under
Scheduled Items: and click Delete .
NOTE: When the Activity is an Event, a list of events
will auto-populate in the Scheduled Items: box. Do not
delete or add any items on this list.
To schedule the message to repeat on a regular
basis, place a checkmark in the Recurring checkbox.
This will activate the recurring tab at the top of the
window and set the message to occur regularly.
Complete the necessary scheduling in the Recurring
tab, click Apply. The message will pop up at the
scheduled time.
43
TaskMaster Management Software User Guide
Task Scheduler Notification Message
A notification message will pop up at the scheduled time. If the
message is scheduled for the Active Operator, the message
will pop up for whoever is logged on to TaskMaster at the
time.
If the message is scheduled for a specific recipient, it will only
appear if that user is logged in to TaskMaster at the assigned
time. If the assigned recipient is not logged in to TaskMaster
at the assigned time for the message to appear, it will appear
within a minute of the next time they sign on to the computer.
When a message pops up on the screen, there are three
options available: acknowledge the message, reschedule the
message, or delete the message.
If you click Acknowledge and then click OK, the message will go away. If it is a recurring
message, it will appear again at its next scheduled time.
If you click Reschedule and then click OK, the message will go away and will reappear one
hour later.
If you click Delete and then click OK, the message will go away. If it is a recurring message,
it will NOT reappear at its scheduled time because you have deleted it.
44
TaskMaster Management Software User Guide
Add A Client
The Add a Client function allows you to quickly add a client to TaskMaster without
using the New Client Move-in wizard. Add a Client is generally used during the initial
setup of TaskMaster when transferring from paper books to software. It is also used for
clients that are to be placed on the waiting list or for clients who purchase merchandise
on a regular basis but do not rent spaces.
Select File/Add a Client. Fill in the required
fields. The only required fields on this page
are First Name and Last Name; however, it is
a good idea to collect all of the other
information.
Once you have completed all necessary
information, click on one of the three accept
buttons:
Accept & Assign a Space Now takes you to
the Lease a Space screen. We do not
recommend that you use this process as it is
more complicated and easier to forget to
complete all of the information. We recommend that you close this window when it opens
and use the New Client Move In wizard from the EZ Task screen.
Accept & Add to Client File button takes you directly to the Name and Address
screen. Use this button only on sites that do not need to do a conversion.
Accept & Go To Wait List is used for clients who are to be added to the Wait List but
are not currently renting a space. This takes you directly to the Wait List screen to
reserve a space type for them.
45
TaskMaster Management Software User Guide
Wait List
The wait list is used to reserve a space or space size for a potential client. This
function can be accessed by selecting Tasks/Wait List.
The Wait list can be used when a person wants to reserve a space that is available, but they
won’t be moving in until a later date. It can also be used to reserve a specific space that is
already in use by someone else so that the person waiting receives notice as soon as the
current renter moves out. Lastly, it can be used to reserve a space size if all of the spaces
are rented. As soon as one is available, a notice will pop up that someone is waiting for that
size space.
To add someone to the wait list, their
account must be open in TaskMaster. If
they are a current renter, just search for
them. If they are a potential new client, use
the Add a Client function to enter them into
the system so they can be added to the wait
list. When you have the client selected, click
on the Wait List icon. On the Wait List
screen, click on a space size in the dropdown or on a specific space to reserve.
Click in the Add to List button and you will
be able to add a note stating the reason
they want the space. You can set the wait list to automatically drop the customer off the list
on a specific date by clicking on Auto Remove and selecting a date. After all information
has been entered, click Accept.
When a renter vacates a space that someone has reserved, a
notification will pop up to alert the operator that someone is
waiting for the space.
Also, if an operator tries to rent the reserved space to a
different person, another notification will pop up to remind
them that the space is reserved. The space can still be
rented to someone else, if the operator chooses.
46
TaskMaster Management Software User Guide
Rental Inquiries
The Rental Inquiries function can be accessed by selecting Tasks/Rental
Inquiries. The Rental Inquiries function records information on potential clients who are
interested in renting but don’t want to be put on the waiting list. This function allows the
operator to follow up at a later date.
Fill in all required information. Depending
on how the site follows up with customers,
a full mailing address or simply a phone
number will be required so that the
customer can be contacted in the future.
In the Size Required box, select the size
space the customer wants.
In the How Contacted drop-down, select the
method the customer used to contact the
site.
Enter the Rate Quoted to the customer for the size space requested.
Enter the Date Needed that the customer provides and the Follow Up Date based on the
site’s practices.
Determine the Type of use the customer intends for the site and enter that in the drop-down.
Select the method the customer used to find the site.
In the Comments box, enter any additional information about the customer. Once all
information is entered, click Accept.
To see who is on the Rental Inquiries list, click List All.
47
TaskMaster Management Software User Guide
Add Client to List
Add Client to List is used when the operator is in the middle of a process, working
on a client’s account, etc. and needs to stop what they are doing for a time but return to the
same spot later.
For example, the manager is updating
the billing information on Mr. Jones’s
account. A new client enters to rent a
space. The manager can Add the client
to a list to save the current information
and come back to it after he has helped
the client in the office.
To save the account information to
come back to later, open the client’s
account and click on the Add Client to
List icon on the Toolbar. The account
name will appear in the drop-down box
along the bottom of the screen. You can now perform any other task in TaskMaster or
access any other account. When you are ready to return to the pinned account, click on the
drop-down arrow and select the pinned account that you wish to return to. The client’s
account will reappear on the screen and you can finish the task that you were previously
working on.
The account will stay in the list until you remove the pin. To remove the client, select the
client and click Add Client to List. The client’s account will be removed from the drop-down
list. There is no limit to the number of accounts that can be added to the list.
Calculator
TaskMaster has a shortcut on the Toolbar to bring up the Windows ® Calculator.
To access this function, click on the Calculator icon on the toolbar.
48
TaskMaster Management Software User Guide
Setup Tools
•
•
•
•
•
•
•
System Setup & Site Setup
System Setup
Site Setup
Operator Access Levels
Setup Lease Spaces
Tiered Fees
Document Merge Fields
49
TaskMaster Management Software User Guide
System Setup & Site Setup
The System Setup and Site Setup screens appear together in TaskMaster. Each screen
consists of a group of tabs that can be used to maintain and set up most of the primary
functions that are custom to your site. Generally, these screens are already set up as part of
the TaskMaster Configuration. NOTE: Unless you are a high level user, we do not
recommend that you make changes in these screens without assistance from technical
support as you can cause problems with the software, corrupt your client data, and even
make illegal changes to the collection process.
You can navigate between the two sections by clicking on the section’s title bar.
50
TaskMaster Management Software User Guide
System Setup
To access System Setup, on the Taskbar, expand the Maintenance Tab and select
System Setup.
Registration – The Registration screen
is reserved for use by technical support.
It shows who the software is licensed to
and what modules are functional. If you
are ever asked for your TM License
Number, it can be found on this screen.
This screen can only be modified by
technical support.
Printers & More – The Printers & More
screen contains basic setup parameters
including printer setup and ADP (Automatic
Daily Processing) setup. The photo source for
the photo module also can be set up here.
Operators – The Operators tab is used to
set up users of the TaskMaster software
and their Authorization Levels. NOTE: It is
a good idea to lock out lower level users
from this function. That can be done in
Utilities/Operator Access Levels.
51
TaskMaster Management Software User Guide
Schedule Events – Scheduled Events is
used to set up how often and at what time
TaskMaster should perform Automatic
Processing and Data File Backups
Internet – The Internet tab contains
options used to set up the internet
connection for web uploading and e-mail
addresses for e-mailing reports.
Custom Settings – Custom settings should
only be changed by technical support. Do not
add or change these settings.
52
TaskMaster Management Software User Guide
Site Setup
To access Site Setup, on the Taskbar, expand the Maintenance Tab and select System
Setup, then select the Site Maintenance (Setup) title bar.
General Data – General Data contains
information for the specific location
including the name & address information.
This information will appear on the top of
all correspondence and reports.
Site Policies – The Site Policies tab
tracks the late fee schedule and fee
charges, as well as other miscellaneous
options. Changes to this page can affect
site collection and fee practices, so be
sure to have these reviewed by someone
familiar with local requirements and
statutes.
Financial Data – On the Financial Data
tab enter the contact info for the credit
card processing service and bank
information as provided by these
institutions.
53
TaskMaster Management Software User Guide
Access – In Access, enter the gate
access hours for the facility. (On Master
Security systems, this controls when
access to the facility is granted. In nonMaster Security systems, these are only
used for merge fields in letters.)
Automatic Letters – In Automatic Letters
you can set up when late letters will be
printed out and how many copies of each
are to be printed.
Automatic Reports – Automatic Reports
allows you to choose which reports are to
be printed during Automatic Processing
and in what order. Also used to set up the
FTP information if reports are to be
uploaded to an FTP site.
Default General Ledger Accounts – Set
up which fees/charges report to which
General Ledger account.
54
TaskMaster Management Software User Guide
Operator Access Levels
To access the Operator Access Levels function, select Utilities/ Operator Access Levels.
TaskMaster offers four levels of security to protect the database and secure sensitive areas
of the program. Each level of security is customized by the end user. If each level is not set
up, any access level given to an operator will allow free access to all TaskMaster functions.
To customize Operator access levels, open the Operator Access
Levels screen. Review the list and click on each function that you
wish to restrict. In the restrictions box, click on the operator level(s)
that you wish to restrict from accessing the function.
Level 3 is the lowest and most restricted access level. Restricting
Level 3 means that any Level 3 users will be unable to access the
function. Only Levels 1, 2, and Unrestricted will be able to access
the function.
Level 2 is less restricted than Level 3. Restricting Level 2 also
restricts Level 3. Restricting Level 2 means that any Level 2 and
Level 3 users will be unable to access the function. Only Levels 1
and Unrestricted will be able to access the function.
Level 1 is less restricted than Level 2 or Level 3. Restricting Level
1 also restricts Levels 2 and 3. Restricting Level 1 means that any
Level 1, Level 2, or Level 3 users will be unable to access the
function. Only Unrestricted users will be able to access the function.
None means that the function is completely unrestricted and anyone can access the
function.
‘PTI Only’ means that no user at the site level will be able to access the function including
Unrestricted users. Only technical support personnel can access this function and turn the
PTI Only designation on or off.
55
TaskMaster Management Software User Guide
Setup Lease Spaces
Access Setup Lease Spaces by clicking on Utilities/ Setup Spaces. This screen is used to
add new spaces to the system. Generally, when TaskMaster is purchased, a configuration
utility is completed by the site which pre-inputs all of the spaces. In this case, the Setup
Spaces screen will not need to be completed. However, should the site add new spaces or
reconfigure their existing spaces, this screen is used to add the new spaces. If new
sizes/types of spaces (other than those already existing) become available, these will have
to be configured under Maintain Lease Types prior to setting them up on this screen.
To set up spaces, click on the space size or type in
above
the left-hand window. Click New (Insert)
the Item Identification window in the center of the
screen. Type the new space number in and press
Enter. If there are more spaces of that size to be
added and they are all consecutive numbers, then
click Add One for each additional consecutive space.
If you make a mistake and need to delete a space,
click on the space to delete and then click Delete.
NOTE: If the company has exceeded the number of
spaces shown on the registration tab, the New/Insert button will not be enabled.
NOTE: Once a space has a history attached to it (i.e. has been assigned a size and/or
rented), do not delete if from TaskMaster as this will affect reporting in other areas of the
system.
Display Sequence / Walk Through Order
The Setup Spaces screen can be used to change the Walk Through
Order for the Walk Through Reports. By moving spaces around in this
area, you can change the sequence/order in which the spaces appear
on the report, allowing the report to accurately reflect the order that the
manager encounters the spaces while performing a walk-through of the
site.
1. To modify the order, click Step 1. Then, click on the Target
space. This is the space that you will move the other selected
spaces in front of.
2. Click Step 2. Highlight a single space or group of spaces to be moved above the
Target Space. To highlight a single space, just click on it. To highlight a group of
spaces consecutively, click and drag over each space. To highlight spaces that are
not next to each other, hold down the Ctrl key while clicking each space that you wish
to select.
3. Click Step 3 to move the spaces selected in Step 2 in front of the target space. It may
take several attempts to get the order exactly right.
56
TaskMaster Management Software User Guide
Tiered Fees
To set Tiered Late fees that change with the rental rate, select Utilities/Site Setup/Tiered
Fees Setup. Unlike flat rate late fees, tiered late fees will only be assessed one time per
month. This allows you to charge higher late fees for more expensive
spaces. It also allows you to make the late fee a percentage of the
space rental rate.
A site can have up to four tiers of fees. The first three tiers are set by
the site and the fourth is for any rental rate above the third tier. Fees
can be in fixed dollar amounts by typing in any number greater than
1.00 ($1.00). Any amount from .01 to .99 is considered a percentage
of the rate. Dollars and percentages can be mixed through the tiers.
For example, it is common to charge a fixed dollar amount fee for
rental rates up to $100; and to charge 15% or $20 (whichever is
greater) for rental rates over 100.
After all Tiered Late Fees are set up, click
OK to input the fees.
Once the tiered late fees are set up, go to
Utilities/Site Setup/Policies and place a
checkmark in the Use Tiered Late Fee
Schedule box.
Additionally, a special command must be
run to ensure that the tiered late fees are
applied to current users as well as new
users. To enter a special command, go to Utilities/ Special Functions/Special Command.
In the box that pops up, type in Set Types Late Fees and click OK. Then type in Set Charges
Late Fees and click OK. This will apply the fees to all users and user accounts as applicable.
57
TaskMaster Management Software User Guide
Document Merge Fields
To change the Document Merge Fields, go to Utilities/Document Merge Fields. After all
information has been input, click OK. These fields can be changed at any time. Document
merge fields contain information that can be automatically merged into letters without having
to update the letter each time.
There are many Document Merge Fields
provided in TaskMaster. Most of the client
contact information, dollar amounts and fees,
business hours, and dates within the software
are Document Merge Fields that appear in
various documents. In most cases, these can be
found under Maintain Letters and inserted into
letters from that screen.
There are some Document Merge Fields that
apply to every account and need to be changed
regularly. This includes custom messages that can appear at the bottom of invoices, the
date and time of the next auction, and other miscellaneous dates and time that can be used
for anything that the site needs.
58
TaskMaster Management Software User Guide
Maintenance Tools
The maintenance tools can be found under Utilities on the Menu bar.
These tools are used to maintain and change the most common
tasks in Taskmaster.
•
•
•
•
•
Maintain Letters
Merge Fields for Letters
Maintain Lease Types
Maintain Merchandise
Maintain Insurance Carriers
59
TaskMaster Management Software User Guide
Maintain Letters
The Maintain Letters function is accessed by clicking on Utilities/Maintain Letters.
This is one of the important functions for initial setup of a site in TaskMaster. You should
create a set of letters that can be used for your site. A number of sample letters are available
in the system already, but it is extremely important that these letters are customized to your
site and conform to your local laws and regulations. We strongly recommend that all of your
letters be reviewed by a lawyer or other legal resource for legality and regulatory
requirements prior to using them at
your sites. Chamberlain Access
Solutions is not liable or responsible
for this process and cannot be held
liable if you send out letters that do
not conform to legal requirements.
To change letters that already exist
(either the default system letters or
ones you have created), click on the
folder icon and select the letter you
want. Changes can then be made to
the letter as required in the letter field
at the bottom of the window. When
you have finished a letter, click
Apply.
To create a new letter, click New. Type a name for the new letter and click Create. Click on
the folder icon and select the letter name you just created. Click in the letter field at the
bottom of the window. Begin typing the letter in this area. Open the Merge Fields menu
(indicated by four arrows turned inward). Any place in the letter that you want the system to
automatically insert information such as the client name or the amount owed, place your
cursor in the spot and click on the appropriate Merge Field from the menu. Click Insert to
place the merge field in the letter. You can also refer to the Document Merge Fields list on
the following pages and simply type the appropriate merge field in the letter.
Letters can also be typed in a word processing program such as Microsoft Word and then
copied and pasted into the letter field.
NOTE: Tables, pictures, and graphics will not transfer into the letter. When the letter is
completed, click Save. Click Print Preview to review the letter before sending.
60
TaskMaster Management Software User Guide
Merge Fields for Letters
Miscellaneous Merge Fields - These Fields are primarily used with Document Merge Fields.
Field Name
Merge Field
Description & Location
Current Date
{Cur.Date}
Current Date as of the letter or document printing.
Current Time
{Cur.Time}
Current Time as of the letter or document printing.
Current Date and Time
{Cur.DT}
Current Date & Time as of the letter or document printing.
Next Auction Date
{Auc.Date}
Next Auction Date as set in the Document Merge Field Utility.
Next Auction Time
{Auc.Time}
Next Auction Time as set in the Document Merge Field Utility.
Miscellaneous Date 1
{Mis.Date1}
Miscellaneous Date 1 as set in the Document Merge Field Utility.
Miscellaneous Date 2
{Mis.Date2}
Miscellaneous Date 2 as set in the Document Merge Field Utility.
Miscellaneous Date 3
{Ms.Date3}
Miscellaneous Date 3 as set in the Document Merge Field Utility.
Miscellaneous Date 4
{Mis.Date4}
Miscellaneous Date 4 as set in the Document Merge Field Utility.
Miscellaneous Time 1
{Mis.Time1}
Miscellaneous Time 1 as set in the Document Merge Field Utility.
Today + 10 Days
{Mis.T+10}
Adds 10 days to the current date in the system in order to give a client 10 days notice.
Today + 15 Days
{Mis.T+15}
Adds 15 days to the current date in the system in order to give a client 15 days notice.
Today + 20 Days
{Mis.T+20}
Adds 20 days to the current date in the system in order to give a client 20 days notice.
Facility Merge Fields - These Data Insert fields are coded only to site/facility specific information.
Field Name
Merge Field
Description & Location
Name
{Fac.Name}
Facility Name. Found on the General Data Tab of the Site Setup.
Street
{Fac.Street}
Facility Street Address. Found on the General Data Tab of the Site Setup.
City
{Fac.City}
Facility City. Found on the General Data Tab of the Site Setup.
State
{Fac.State}
Facility State. Found on the General Data Tab of the Site Setup.
Postal
{Fac.Zip}
Facility Zip Code. Found on the General Data Tab of the Site Setup.
Phone
{Fac.Phone}
Facility Telephone Number. Found on the General Data Tab of the Site Setup.
Fax
{Fac.Fax}
Facility Fax Number. Found on the General Data Tab of the Site Setup.
E-Mail
{Fac.Email}
Facility Email Address. Found on the General Data Tab of the Site Setup.
Identity
{Fac.Id}
Facility Identification. Found on the General Data Tab of the Site Setup.
Manager
{Fac.Mgr}
Site Manager’s Name. Found on the General Data Tab of the Site Setup.
Weekday Access Hours From
{Fac.Wafr}
Weekday Gate Access Hours From Time. Found on the Access Tab of the Site Setup.
Weekday Access Hours To
{Fac.Waft}
Weekday Gate Access Hours To Time. Found on the Access Tab of the Site Setup.
Weekend Access Hours From
{Fac.Wefr}
Weekend Gate Access Hours From Time. Found on the Access Tab of the Site Setup.
Weekend Access Hours To
{Fac.Weft}
Weekend Gate Access Hours To Time. Found on the Access Tab of the Site Setup.
Late Letter Fee 1
{Fac.LL1}
Fee assessed on generation of first default letter. Found on the Site Policies Tab of the Site Setup.
Late Letter Fee 2
{Fac.LL2}
Fee assessed on generation of second default letter. Found on the Site Policies Tab of the Site Setup.
Late Letter Fee 3
{Fac.LL3}
Fee assessed on generation of third default letter. Found on the Site Policies Tab of the Site Setup.
Late Letter Fee 4
{Fac.LL4}
Fee assessed on generation of fourth default letter. Found on the Site Policies Tab of the Site Setup.
Late Letter Fee 5
{Fac.LL5}
Fee assessed on generation of fifth default letter. Found on the Site Policies Tab of the Site Setup.
Late Letter Fee 6
{Fac.LL6}
Fee assessed on generation of sixth default letter. Found on the Site Policies Tab of the Site Setup.
NSF Fee
{Fac.Nsf}
Fee assessed during the processing of an NSF check. Found on the Site Policies Tab of the Site Setup.
Overlock Fee
{Fac.Olf}
Fee assessed for processing Overlock. Found on the Site Policies Tab of the Site Setup.
61
TaskMaster Management Software User Guide
Client Merge Fields - The Data Insert Fields are coded only to client specific information.
Field Name
Merge Field
Description & Location
Business Name
{Clnt.Bname}
Client’s Business Name. Found on the Name & Address Screen.
Salutation
{Clnt.Sal}
Client’s Salutation. Found on the Name & Address Screen.
First Name
{Clnt.Fname}
Client’s First Name. Found on the Name & Address Screen.
Last Name
{Clnt.Lname}
Client’s Last Name. Found on the Name & Address Screen.
Street Line 1
{Clnt.Str1}
Client’s Street Address Line 1. Found on the Name & Address Screen.
Street Line 2
{Clnt.Str2}
Client’s Street Address Line 2. Found on the Name & Address Screen.
City
{Clnt.City}
Client’s City. Found on the Name & Address Screen.
State
{Clnt.State}
Client’s State. Found on the Name & Address Screen.
Postal Code
{Clnt.Zip}
Client’s Zip Code. Found on the Name & Address Screen.
Postal-Ext
{Clnt.ZipExt}
Client’s Zip Code Extension. Found on the Name & Address Screen.
Country
{Clnt.Ctry}
Client’s Country. Found on the Name & Address Screen.
Name / Address, Line 1
{Clnt.NA1}
First line used in addressing the client on invoices, letters & Receipts. Will be the Business Name if
there is one. If not, this will be the Client’s first and last name.
Name / Address, Line 2
{Clnt.NA2}
Second line used in addressing the client on invoices, letters & Receipts. If there is a Business Name in
Line 1, this will be the Client’s Name. If the Client’s Name is in Line 1, this will be the first line of the
street address.
Name / Address, Line 3
{Clnt.NA3}
Third line used in addressing the client on invoices, letters & Receipts. If the Client’s Name is in Line 2,
this will be the first line of the street address. If the first line of the Street address is in Line 2, then this
will be the Second line of the Street Address. If there is no second line of the Street Address and if the
first line of the Street Address is in Line 2, this will be the City, State, and Zip Code.
Name / Address, Line 4
{Clnt.NA4}
Fourth line used in addressing the client on invoices, letters & Receipts. If the City, State, and Zip Code
are in Line 3, Nothing will be in this line. If the first line of the street address is in Line 3, then this will be
the second line of the street address. If the first line of the street address is in Line 3 and there is no
second line of the street address, then this will be the city state and zip code.
Name / Address, Line 5
{Clnt.NA5}
Fifth line used in addressing the client on invoices, letters & Receipts. If there is no line 4, then there will
be no line 5. If the second line of the street address is in line 4, then the city, state, and zip code will be
in this line.
Home Phone
{Clnt.Hphone}
Client’s Home Phone Number. Found on the Name & Address Screen.
Work Phone
{Clnt.Wphone}
Client’s Work Phone Number. Found on the Name & Address Screen.
EMail
{Clnt.Email}
Client’s Email. Found on the Name & Address Screen.
Identity
{Clnt.Id}
Client’s Identification Number. Found on the Name & Address Screen (if applicable).
Drivers License
{Clnt.DL}
Client’s Drivers License Number. Found on the Identification Screen.
Social Security #
{Clnt.SS}
Client’s Social Security Number. Found on the Social Security Screen.
Employer
{Clnt.Emp}
Client’s Employer’s Name. Found on the Identification Screen.
Profession
{Clnt.Pro}
Client’s Profession. Found on the Identification Screen.
Date of Birth
{Clnt.DOB}
Client’s Date of Birth. Found on the Identification Screen.
Last NSF Check
{Clnt.LNC}
Last Check returned for Non-Sufficient Funds. Found on the Payment Screen History.
Total Due
{Clnt.TD}
Total amount of all charges due on a clients account. Found on the Payment Screen.
Late Fees Due
{Clnt.LD}
Total amount of late fees for all Lease Items due on a client’s account. Found on the Payment Screen.
Found on the Payment Screen.
NSF Fees Due
{Clnt.ND}
Total amount of NSF fees due on a client’s account. Found on the Payment Screen.
Total Fees Due
{Clnt.FD}
Total amount of all late, letter and NSF fees due on a client’s account. Found on the Payment Screen.
Client Credits
{Clnt.AC}
Total amount of Client Credits that are credited to a client’s account. Found on the Payment Screen.
Last Payment Amount
{Clnt.LP}
Amount of last payment made by client. Found on the Payment Screen History.
Last Receipt Number
{Clnt.LRN}
Last Receipt Number. Found on the Payment Screen History.
Secondary Salutation
{Clnt.2Sal}
Secondary Contact Salutation. Found on the Guest Name & Address Screen.
Secondary First Name
{Clnt.2Fname}
Secondary Contact First Name. Found on the Guest Name & Address Screen.
Secondary Last Name
{Clnt.2Lname}
Secondary Contact Last Name. Found on the Guest Name & Address Screen.
Secondary Street, Line 1
{Clnt.2Str1}
Secondary Contact Street Address Line 1. Found on Guest Name & Address Screen.
Secondary Street, Line 2
{Clnt.2Str2}
Secondary Contact Street Address Line 2. Found on Guest Name & Address Screen.
62
TaskMaster Management Software User Guide
Secondary City
{Clnt.2City}
Secondary Contact City. Found on the Guest Name & Address Screen.
Secondary State
{Clnt.2State}
Secondary Contact State. Found on the Guest Name & Address Screen.
Secondary Postal
{Clnt.2Zip}
Secondary Contact Zip Code. Found on the Guest Name & Address Screen.
Secondary Postal-Ext
{Clnt.2ZipExt}
Secondary Contact Zip Code Extension. Found on the Guest Name & Address Screen.
Secondary Country
{Clnt.Ctry}
Secondary Contact Country. Found on the Guest Name & Address Screen.
Secondary Home Phone
{Clnt.2Hphone}
Secondary Contact Home Telephone Number. Found on the Guest Name & Address Screen.
Secondary Work Phone
{Clnt.2Wphone}
Secondary Contact Work Telephone Number. Found on the Guest Name & Address Screen.
Secondary EMail
{Clnt.2Email}
Secondary Contact Email Address. Found on the Guest Name & Address Screen.
Secondary Access Code
{Clnt.2Acode}
Secondary Contact Access Code. Found on the Guest Security & Access Screen.
Access Code
{Clnt.Acode}
Client’s Gate Access Code. Found on the Guest Security & Access Screen.
Last Refunded Amount
{Clnt.Ramt}
Most recent refund for any space leased to a client. Found on 123 Accounting Screen History.
List Space ID’s
{Clnt.Iids}
Listing of all Lease Items in a client’s account (all spaces and other leased items the client is renting).
Found on the 123 Accounting Screen.
Last NSF Check Amount
{Clnt.LNCa}
Amount of Last NSF on any space leased to a client. Found on the Payment Screen History.
Merchandise Sales Due
{Clnt.Msd}
Total amount due for merchandise in a client’s account. Found on the Payment Screen.
Merchandise Sales Tax Due
{Clnt.Mstd}
Amount of tax owed for all merchandise in a client’s account. Found on the Payment Screen.
Merch Sales + Tax Due
{Clnt.Mtot}
Total amount of merchandise due plus tax in a client’s account. Found on the Payment Screen.
Last Payment Date
{Clnt.Lpdt}
Date the Client last made a payment on any space leased to the client or on any merchandise
purchase. Found on the Payment Screen History.
Total Mo. Rent Rate
{Clnt.Tmrr}
Total monthly rent rate for client for all spaces leased to a client for a normal month. Found on the Detail
& Alter Information Screen.
Total Mo. Discounts
{Clnt.Tmdc}
Total monthly rent rate discount for all spaces leased to a client for a normal month. Found on the Detail
& Alter Information Screen.
Total Mo. Tax
{Clnt.Tmtx}
Total monthly rent rate for all spaces leased to a client for a normal month. Found on the 123
Accounting Screen.
Total Mo. R – D
{Clnt.Tmrd}
Total monthly rent rate for all spaces leased to a client for a normal month minus the discount. Found on
the 123 Accounting Screen.
Total Mo. R – D + Tx
{Clnt.Tmrdt}
Total monthly rent rate for all spaces leased to a client for a normal month minus the discount, plus tax.
Found on the 123 Accounting Screen.
Total Rent Due
{Clnt.Rdue}
Total current rent due for all spaces leased to a client. Found on the Payment Screen.
Total Letter Fees Due
{Clnt.LFdue}
Total current letter fees due for all spaces leased to a client. Found on the Payment Screen.
Total Misc. Due
{Clnt.Xdue}
Total current other fees due for all spaces leased to a client. Found on the Payment Screen.
Total Tax Due
{Clnt.Txdue}
Total Taxes Due for all spaces leased to a client. Found on the 123 Accounting Screen.
Total NonItems Due
{Clnt.Tnid}
Total charges and fees due (such as merchandise items and overlock fee, admin fee, or NSF fees)
except the actual rental rate or late fees. Found on Payment Screen.
Invoice Fee
{Clnt.If}
Invoice Fee. Found in Site Policies under Site Setup.
Statement Fee
{Clnt.Sf}
Statement Fee. Found in Site Policies under Site Setup.
Work Street
{Clnt.Wstr}
Client Employer Street. Found under the Identification screen.
Work City
{Clnt.Wc}
Client Employer City. Found under the Identification screen.
Work State
{Clnt.Wst}
Client Employer State. Found under the Identification screen.
Work Postal
{Clnt.Wzip}
Client Employer Zip Code. Found under the Identification screen.
Total Due/No Prepaid
{Clnt.TDNP}
The total amount due on a client’s account without considering prepaid amounts. Found on the Payment
Screen.
Total Prepaid
{Clnt.TDPP}
Total amount of prepaid money on a client’s account. Found on the Payment Screen.
Last 4 CC Digits
{Clnt.L4CC}
The last four digits of the Client’s Credit Card found on the billing screen.
CC Exp. Date
{Clnt.CCed}
The Client’s Credit Card expiration date found on the billing screen.
CC Type
{Clnt.CCty}
The Client’s Credit Card type found on the billing screen.
CC Card Holder’s Name
{Clnt.CCnm}
The Client’s Credit Card holders name found on the billing screen.
CC Billing Postal Code
{Clnt.CCpc}
The Client’s Credit Card billing zip code found on the billing screen.
Drivers License State
{Clnt.DLST}
Drivers License State as found on the Identification screen.
Other Phone
{Clnt.Ophone}
Cellular / Other phone number found on the Name & Address Screen.
Secondary Other Phone
{Clnt.2Ophone}
Cellular / Other phone number found on the Guest Name & Address Screen.
63
TaskMaster Management Software User Guide
Vehicle Manufacture
{Clnt.Vman}
Vehicle Manufacture as found on the Identification screen.
Vehicle Model
{Clnt.Vmod}
Vehicle Model as found on the Identification screen.
Vehicle Year
{Clnt.Vyr}
Vehicle Year as found on the Identification screen.
Vehicle License No.
{Clnt.Vlic}
Vehicle License Number as found on the Identification screen.
Vehicle State
{Clnt.Vst}
Vehicle State as found on the Identification screen.
Space Charge Merge Fields - These Data Insert Fields are coded only to Space specific information.
Field Name
Merge Field
Description & Location
ID
{Itm.Id}
Space number of the space or lease item.
Description
{Itm.Desc}
Description of the Space or lease item.
Rate
{Itm.Rate}
Current rental rate of the Lease Item
Discount
{Itm.Dcnt}
Current amount discounted off of the Lease Item rate
Next Rate 1
{Itm.NR1}
Rental rate for the first scheduled rate increase
Next Rate 2
{Itm.NR2}
Rental rate for the second scheduled rate increase
Next Rate 3
{Itm.NR3}
Rental rate for the third scheduled rate increase
Next Discount 1
{Itm.ND1}
Amount of the first scheduled discount
Next Discount 2
{Itm.ND2}
Amount of the second scheduled discount
Next Discount 3
{Itm.ND3}
Amount of the third scheduled discount
Current Rate w/o Tax
{Itm.CRx}
Lease Items current rate, less the discount without tax
Current Rate + Tax
{Itm.CRt}
Lease Items current rate, less discount with tax
Next Eff. Rate
{Itm.NER}
Amount of next effective rate, less any scheduled discounts
Next Eff. Discount
{Itm.NED}
Amount of next effective discount
Next Eff. Rate Date 1
{Itm.NE1}
Effective date of the first scheduled rental rate increase
Next Eff. Rate Date 2
{Itm.NE2}
Effective date of the second scheduled rental rate increase
Next Eff. Rate Date 3
{Itm.NE3}
Effective date of the third scheduled rental rate increase
Lease Number
{Itm.LN}
The lease number for this Lease Item
Late Fee 1
{Itm.LF1}
Lease Item’s first late fee
Late Fee 2
{Itm.LF2}
Lease Item’s second late fee
Late Fee 3
{Itm.LF3}
Lease Item’s third late fee
Late Fee 4
{Itm.LF4}
Lease Item’s fourth late fee
Daily Late Fee
{Itm.DLF}
Amount of Lease Item’s daily late fee
Paid To Date
{Itm.PDTO}
The date rent is paid to for the Lease Item
Next Assessment
{Itm.NXTA}
The date that the next rent assessment will be
Assessment Day
{Itm.Aday}
The day of the month that rent for the Lease Item is assessed
Space Rent Due
{Itm.Rdue}
Amount of rent due for the Lease Item
Space Late Fees
{Itm.Ldue}
Amount of late fees due for the lease item
Space Rent Tax Due
{Itm.Rtax}
Amount of rental tax due for the Lease Item
Space Late Fees Tax Due
{Itm.Ltax}
Amount of late fee tax due for the Lease Item
Space Rent + Tax Due
{Itm.Rtd}
Amount of rent and taxes due for the Lease Item
Space Late + Tax Due
{Itm.Ltd}
Amount of late fees and taxes due for the Lease Item
Total Space Charges Due
{Itm.TD}
Total amount due for the Lease Item, including rent, fees and taxes
Letter Fees
{Itm.LtrF}
Amount of letter fees due for a Lease Item
Late & Letter Fees
{Itm.LLF}
Amount of late and letter fees due for a Lease Item
Late, Letter & Tax
{Itm.LLT}
Amount of late and letter fees due plus tax for a Lease Item
Space Attached Fees
{Itm.Afee}
Amount of attached fees due for a Lease Item
Attached Fees + Tax
{Itm.AFT}
Amount of attached fees plus tax due for a Lease Item
Next Eff. Rt – Dscnt +Tax
{Itm.Nrdt}
Next effective rate less the discount plus tax for a Lease Item
Refund Voucher Number
{Itm.RFVN}
Refund Voucher Number. This number is found on the Documents Screen.
64
TaskMaster Management Software User Guide
Owner-Business Name
{Itm.Bname}
Primary Client’s Business Name. Found on the Name & Address Screen.
Owner-Salutation
{Itm.OSal}
Primary Client’s Salutation. Found on the Name & Address Screen.
Owner-First Name
{Itm.OFname}
Primary Client’s First Name. Found on the Name & Address Screen.
Owner-Last Name
{Itm.OLname}
Primary Client’s Last Name. Found on the Name & Address Screen.
Owner-Street 1
{Itm.OStr1}
Primary Client’s Street Address, Line 1. Found on the Name & Address Screen.
Owner-City
{Itm.OCity}
Primary Client’s City. Found on the Name & Address Screen.
Owner-State
{Itm.OState}
Primary Client’s State. Found on the Name & Address Screen.
Owner-Postal Code
{Itm.OZip}
Primary Client’s Zip Code. Found on the Name & Address Screen.
Owner-Postal-Ext
{Itm.OZipExt}
Primary Client’s Postal Code Extension. Found on the Name & Address Screen.
Owner-Country
{Itm.OCtry}
Primary Client’s Country. Found on the Name & Address Screen.
Owner-Name/Address Line 1
{Itm.ONA1}
First line used in addressing the primary client on invoices, letters & Receipts. Will be the Business
Name if there is one. If not, this will be the Client’s first and last name.
Owner-Name/Address Line 2
{Itm.ONA2}
Second line used in addressing the primary client on invoices, letters & Receipts. If there is a Business
Name in Line 1, this will be the Client’s Name. If the Client’s Name is in Line 1, this will be the first line
of the street address.
Owner-Name/Address Line 3
{Itm.ONA3}
Third line used in addressing the primary client on invoices, letters & Receipts. If the Client’s Name is in
Line 2, this will be the first line of the street address. If the first line of the Street address is in Line 2,
then this will be the Second line of the Street Address. If there is no second line of the Street Address
and if the first line of the Street Address is in Line 2, this will be the City, State, and Zip Code.
Owner-Name/Address Line 4
{Itm.ONA4}
Fourth line used in addressing the primary client on invoices, letters & Receipts. If the City, State, and
Zip Code are in Line 3, Nothing will be in this line. If the first line of the street address is in Line 3, then
this will be the second line of the street address. If the first line of the street address is in Line 3 and
there is no second line of the street address, then this will be the city state and zip code.
Owner-Name/Address Line 5
{Itm.ONA5}
Fifth line used in addressing the primary client on invoices, letters & Receipts. If there is no line 4, then
there will be no line 5. If the second line of the street address is in line 4, then the city, state, and zip
code will be in this line.
Leased Date
{Itm.Ldt}
The leased date is found next to the lease number on the Detail and Alter Information field.
Standard Rate
{Itm.StdR}
The standard rate is the undiscounted rate for a specific space size.
Next Rate 1 – Current Rate
{Itm.NR1LR}
This is the amount that the rate will change (up or down) at the next rate change. Found on the Detail &
Alter Information field.
Total Charges Due + Total Clients
Non Spaces
{Itm.CDNI}
This it the total of all charges due on a space + all charges due that aren’t associated with a specified
space. Found on the Payment Screen.
Security Deposit On Hand
{Itm.SOH}
Security Deposit on Hand can be found on the Detail & Alter Information screen.
65
TaskMaster Management Software User Guide
Maintain Lease Types
To access the Maintain Lease Types function, select Utilities/Maintain Lease
Types. Generally, this screen will already be completed in the Configuration when
TaskMaster is purchased. However, if additional spaces are added or there is a need to
change the pricing requirements for current spaces, the Maintain Lease Types screen will
be used.
To Add a new Lease Type, click on the Add
Lease Type radio button. Type a space name or
size in the Enter field and a short description in
the Abbreviated Description box. Then,
complete the Standard Rates, Late Fees,
Locations, GL, and Add/Edit Sizes sections.
When you have completed all sections, click
Apply.
To Edit a Lease Type, click on the Edit Lease
Type box. Make any necessary changes, and then click Apply. To make a space type
inactive, select it from the list and click Inactive, then click Apply.
Clicking on Display Order will change the order in which the spaces display on the Rent
Roll reports and on the New Client Move-in and Lease A Space screens.
Clicking on Do Not Attach Sub Items allows you to create a monthly charge for items such
as moving blankets or pallets that will be rented monthly but do not require an individual
inventory of specific spaces.
Clicking on Exclude from SqFt Reports allows items such as RV spaces, mailboxes, sign
rental, blankets, pallets, and shelving units to be rented to a client without including in the
square footage reports.
Use Standard Rates to modify the Street Rates for a space type.
For Current Clients allows you to change the rate for all clients in that space type by typing
a new rate in the Next Rate field and then setting the Effective Date.
Lease To Be Used allows you to specify the type of lease agreement that applies to the
space. This allows different lease agreements to be used based on the type of space.
66
TaskMaster Management Software User Guide
Maintain Merchandise
To access the Maintain Merchandise function, select Utilities/Maintain
Merchandise. The Maintain Merchandise screen allows you to control the inventory of
merchandise sold by the site such as boxes, bubble wrap, locks, etc.
The original merchandise items should be set up with the Configuration of TaskMaster. To
add a new item to the list, click Add Item >>. This will bring up the Add / Edit Merchandise
Item window. Enter the Item Number or UPC code, Item Description, Unit of Measure, and
General Ledger Account. Click OK to enter the item into the system.
To Edit an item, click on the item on the list and then
click Edit Item >>. This will bring up the Add / Edit
Merchandise Item window for that item to allow
changes. Price per item and Cost per item can be
entered and changed as necessary.
To make an item inactive, select it from the list and
place a checkmark in the Inactive checkbox.
To add items to inventory as orders come in or to
subtract items that are damaged, select the item from the list and type the number coming
into or being removed from inventory under Add or Subtract as
necessary. You can also track reorder points and amounts, quantities
on order, and price changes on this screen. After making changes to
inventory, click Apply.
NOTE: Once merchandise has been discontinued, it should not be
reused.
Maintain Insurance Carriers
Access the Maintain Insurance Carriers function by clicking on Utilities/Maintain
Insurance Info. This screen allows a site to add, edit, or inactivate the insurance carrier.
The information on this screen will be provided by the insurance carrier(s).
To add a carrier, click New (Insert) next to Add/Edit
Carrier and complete the information as necessary.
When complete, click Apply.
To edit or inactivate the carrier, click on the Name
under Add/Edit Carrier and make any changes
necessary. When complete, click Apply.
67
TaskMaster Management Software User Guide
Management Tools
•
•
•
•
68
Automatic Reports
Import/Export
Demographics & Marketing
Rental Agents
TaskMaster Management Software User Guide
Automatic Reports
Reports can be scheduled to automatically print, e-mail, or upload to an FTP server for
management review. To schedule and maintain automatic reports, select Utilities/Site
Setup/Automatic Reports.
Automatic Reports – Printing
In the Automatic Reports tab of Site Setup, select the Scheduled Event from the dropdown menu. Scheduled events include:
o
o
o
o
o
o
o
Morning (Opening the Day) – These reports print during ADP in the morning.
Evening (Closing the Day) – Print by selecting File/Print/End of Day Reports.
End of Week (Month to Date) – These reports print automatically at the time set for the event in
the Schedule a Task function.
End of Month – These reports print automatically at the time set for the event in the Schedule
a Task function.
End of Year – These reports print automatically at the time set for the event in the Schedule a
Task function.
Audit – Print by selecting File/Print/Audit Reports.
Area Manager– Print by selecting File/ Print/Area Manager’s Set.
After selecting the Scheduled Event, click on the report that you want to print and then click
Insert >>. If you need to remove an event, highlight the report and click << Remove.
Continue selecting and inserting reports until each report that you want printed during the
Scheduled Event has been selected. After all selected reports for an event are selected,
and Move Down
buttons to change
highlight individual reports and use the Move Up
the report order. Click Apply to complete the setup for the event. Repeat this process for
each Scheduled Event to be scheduled.
New Month Starts on What Day allows a site to change the beginning of its reporting
month from the 1st to another date for accounting purposes.
The fields on the right side of the screen can be used to customize Automatic Reports. Click
Highlight Auto Reports to add highlight lines that make the reports easier to read. Weekly
reports are normally generated with month-to-date totals. By clicking on For Weekly: True
Week, these reports will only show the totals for the week. Include Spaces in Maintenance
With Totals allows you to select whether spaces that aren’t currently rentable due to
maintenance needs will be included in square footage calculations and other totals in the
reports.
69
TaskMaster Management Software User Guide
Automatic Reports – E-mail
The Automatic E-mail Reports are similar to the Automatic Reports Printing except that there
are three steps/screens that must be completed.
Step 1: Select the Scheduled Event and insert reports as in the Automatic Reports Printing
process for the following Scheduled Events:
o
o
o
Evening – Email 1
Evening – Email 2
Evening – Email 3
o
o
o
End of Month – Email 1
End of Month – Email 2
End of Month – Email 3
o
o
o
End of Week – Email 1
End of Week – Email 2
End of Week – Email 3
o
o
o
End of Year – Email 1
End of Year – Email 2
End of Year – Email 3
The Email 1, Email 2, and Email 3 after each type of report refer to E-mail Groups. This
allows you to send a different set of reports to the Manager, District Manager, and the
corporate office (or any other department that you select).
After selecting the Scheduled Event, click on the report to be e-mailed and click Insert >>.
If you need to remove a report, highlight the report and click << Remove. Continue selecting
and inserting reports until each report that you want e-mailed during the Scheduled Event
has been selected. After all selected reports for an event are selected, highlight individual
and Move Down
buttons to change the report order.
reports and use the Move Up
Click Apply to complete the setup for the event. Repeat this process for each Scheduled
Event to be scheduled.
After setting up the reports, select the E-mail/Upload format from the drop-down menu on
the right side of the screen.
70
TaskMaster Management Software User Guide
Step 2: Click on System Maintenance
(Setup). Select the Internet tab. In the lower
left-hand corner of the window, click Add
and input the Recipient Name and E-mail
Address for each person who is to receive
e-mailed reports. Assign each e-mail
recipient into E-mail Groups for End of Day,
End of Week, End of Month, and End of
Year. There are three possible e-mail groups
for each of these reports and these can be
configured as needed. When you have
completed each entry, click Apply.
Step 3: Click on the Maintenance tab on the Taskbar and select Schedule a Task. In the
Activity drop-down menu, select Event. Click on each System – E-mail report (EOW, EOM,
EOD) and schedule the recurring times for these tasks.
71
TaskMaster Management Software User Guide
Automatic Reports – FTP
The Automatic Reports FTP are similar to the Automatic Reports E-mail except that there
are only two steps/screens that must be completed.
Step 1: Select the Scheduled Event and insert reports as in the Automatic Reports Printing
process above for the following Scheduled Events:
o
o
o
o
FTP – Evening
FTP – End of Week
FTP – End of Month
FTP – End of Year
Click on the report to be ftp’d and click Insert >>. If you need to remove a report, highlight
the report and click << Remove. Continue selecting and inserting reports until each report
that you want sent during the Scheduled Event has been selected. After all selected reports
for an event are selected, highlight individual reports and use the Move Up
and Move
Down
buttons to change the report order. Click Apply to complete the setup for the
event. Repeat this process for each Scheduled Event to be scheduled.
After setting up the reports, complete the FTP Address, FTP Port, Passive, FTP Login
Name, FTP Password, and FTP Upload to Folder fields on the right-hand side of the screen.
This information can be obtained from the site IT person or the FTP provider. Click Apply.
Step 2: Click on the Maintenance tab on the Taskbar and select Schedule a Task. In the
Activity drop-down menu, select Event. Click on each of the System – FTP reports (EOW,
EOM, EOD) and schedule the recurring times for these tasks.
72
TaskMaster Management Software User Guide
Import/Export
Import
TaskMaster can import data into its records. These data files must be in a specific format
depending on the type of data. Import functions should only be performed by technical
support.
Export
TaskMaster can export Client Data to a text file or export accounting data to one of three
different Accounting Software Systems (QuickBooks, Solomon, or MAS90).
To export Client Data to a Text file, select File/Import / Export/Export Data/Client
Information. This brings up the General Client Selection window.
Place a checkmark in the appropriate Select
Client Status First checkbox in the upper righthand corner. Customize the data by clicking next
to names to checkmark them or uncheck them.
Further limit the search parameters by selecting
the number of days past due, setting specific
marketing questions, or searching by space size,
tax exempt status, e-mail addresses, or Birth
month. To change your selections at any time,
click Reset Selections. When you have selected
all of the clients, click OK.
The Export window will then appear. Select the Delimiter type. This is the character or
space that will separate the information fields in the report. Select whether you want quotes
around the fields and click OK. The file will be saved in the \RTM\E folder. This file can be
printed out or further exported to Microsoft Excel as needed.
To Export to QuickBooks, select File/ Import/Export /Export Data/QuickBooks. Set up the
Bank Name by clicking on Setup. Click Export. To Export to Solomon Cash Management,
Solomon Cash Disbursement, or MAS90 Accounting Software, click File/ Import/Export
/Export Data/Accounting
Information.
In the Export to Accounting System
window, select the Accounting
System & Type. Complete the
other necessary fields on the
screen and click Export. All
information must exactly match the
Accounting Software or the export
will not work correctly.
73
TaskMaster Management Software User Guide
Demographics & Marketing
TaskMaster has the capability to track demographics and marketing data for a site
for analysis by site management. To add, change, or deactivate these questions, select
Utilities/Site Setup/Questions & Answers.
There are a series of Questions and
Answers that can be asked of clients when
they are rent, transfer, or vacate spaces.
These questions can be reviewed in report
or graph form to determine why clients
chose the facility, what they are using it for,
why they left, or for any other data to be
tracked.
Some general questions and answers have
been provided. You can customize these or
create your own. To deactivate a question
or answer that already exists, click on the
Active checkbox. You can limit customers to one answer per question or allow multiple
answers by clicking on Multiple Answers Allowed. To remind the operator to ask certain
questions, place a checkmark in the Required to be Answered when adding Client
checkbox.
Groups of questions can be separated with a
line between them by clicking on the question
that begins a new group and then clicking
Add a group break line and Apply. When
these answers are viewed from the New
Client Move-in Wizard or from the Transfer
or Vacate a space windows, there will be a
line break above the selected question.
Questions or answers can also be placed in a
different order. Select a question from the list
or Move Down
buttons.
and click on the Move Up
To add a new question or answer to the lists, click Add and type the
question or answer in the space provided. After changes are made,
click Apply then Exit.
As the demographic and marketing data is collected over time,
reports and graphs can be printed from the Reports function, which
allows data to be reviewed and analyzed. These reports and graphs
are in the Reports/Graphs & Charts/Demographics folder.
74
TaskMaster Management Software User Guide
Rental Agents
Outside sales help (Rental Agents) is sometimes used to help get more clients into the site.
These persons are often paid on a commission basis. The Rental Agent Function allows you
to track these charges.
To enter the Rental Agent Function, select
Utilities/System Setup/Rental Agents.
Agent names are entered in the field below
the Active button. Place a checkmark in the
field if the agent is active and remove the
checkmark when they no longer work for the
company.
Flat or Percentage commission can be input
on a single or recurring basis. If a recurring
commission is selected, the frequency of payment must be selected. Once all information is
entered, click Add. Click OK when you are finished entering Agents.
75
TaskMaster Management Software User Guide
Modules & Other
Options
There are 11 modules that can be added to TaskMaster to increase
the functionality of the program. TaskMaster does not require these
modules to function effectively as a site management software;
however, there are many useful tools within these modules that can
help improve the efficiency, sales, and security of a site. If you are interested in purchasing
one or more of the modules, please contact Chamberlain Access Solutions business
development at (800) 331-6224.
•
•
•
•
•
•
•
•
•
•
•
76
Camera Module
Electric Module
Water Module
Credit Card Module
Central Office
Web Sales
WebXpress
Kiosks
Networking
Gate Interface
Site Master Graphics
TaskMaster Management Software User Guide
Camera Module
The Camera Module allows a site to take photographs of a
client, the client’s driver’s license or identification, their vehicle, or
their guests. This helps to prevent thieves from accessing spaces
and allows instant access to a client’s image if there is any doubt
about the person trying to access a space. Should the need arise, a
copy of the photo can be printed out and provided to the police or
other authorities. Each client’s photo is stored in their file and there is
no limit to the number of photos stored for each client. Photos can be
scrolled through at any time on the Identification screen.
Using the Camera Module, follow these steps to take a
client’s photo:
1. Make sure that you have an internet ready USB
camera connected to the computer. Click on the
Maintenance tab on the Taskbar. Select System
Setup/Printers & More/Select Photo Source.
Select the USB camera source from the dropdown list and click Select.
2. On the New Client Move-In wizard, the Identification step provides a chance to take
the client’s photo. Click on Take a Picture to bring up the snapshot window.
3. When the Camera screen pops up, click on the snapshot or take a picture button.
This screen and button will vary depending on the type of internet camera being used.
(The screen shown to the right is from the
iContact® camera.)
If the camera allows, check the format or settings
to verify that the picture output is 320 x 240 at 96
dpi. Depending on the camera type, you may be
able to set the output one time or you may have to
set it every time you take a picture.
77
TaskMaster Management Software User Guide
You can also import photos from other sources such as scanners, digital cameras, and USB
devices:
1. On the New Client Move-In wizard, the
Identification step provides a chance to
import the client’s photo. Click Import a
Picture to bring up the Import Photo
window. Find the photo on your computer
and click Open to bring the photo into
TaskMaster.
Other Photo Module functions are located under the Client Data Tab on the Taskbar in
Identification.
o
o
o
o
o
78
Print copies of client photos by clicking Print.
Open pictures for editing in Microsoft Paint by clicking Paint.
Scroll through all pictures on a client’s file using the Scroll buttons.
Delete a picture by clicking Delete.
Keep a picture as the current one showing by clicking Last .
TaskMaster Management Software User Guide
Electric Module
The Electric Module allows a site to pass on electrical costs to clients that use electricity
within their spaces or connect RVs, mobile homes, or boats (at a marina) to the site’s
electricity. Each space that is being charged for electricity must have an electric meter to
take readings.
If you have purchased the electric module, the
function can be accessed by selecting Utilities/
Power & Water Modules/Electric Module.
Every space on the site will be listed on this
screen. Select a space to be charged for electrical
use. Input the Base Rate. This rate is the monthly
charge for using the service. Input the Usage Rate.
This rate is the charge per unit of electricity. The
Usage Rate will be multiplied by the number of
Units Used each month. Units are often kilowatt hours, but can be any measurement that the
site chooses. Input the Min. to Charge. This rate is the minimum usage rate to charge. Any
usage below this amount will be charged at this rate. Any usage over this amount will be
charged the actual usage rate multiplied by the number of units used.
The first time that the client is connected to the electric meter for their space, the initial
reading will be put in the Last Reading field. Enter this information and click Apply. Repeat
this process for each client that will be charged for electricity.
At the end of the month, click Print List. This provides a printout report of each space so
that the manager can take a current reading at each meter, writing the current reading down
on the report.
The new reading is then entered into the Current Reading field. After entering this
information, click Apply. Do this for all client’s that are set up for electricity, even if they
didn’t use any in the current month and the meter reading is the same.
After all meter readings have been entered into the Current Reading field, click Assess
Charges to assess each client’s account.
If the rates change at the site, click Change Rates. Make any rate
changes and click Apply to set the rate changes for all clients. This
can also be used during the initial setup if everyone’s Base Rate and
Usage Rates are the same.
NOTE: Schedule an event to reoccur each month to remind the manager to read the meters
and add the charge to each account.
79
TaskMaster Management Software User Guide
Water Module
The Water Module allows a site to pass on water costs to clients that use water within their
spaces or connect RVs, mobile homes, and boats (at a marina) to the site’s water. Each
space that is being charged for water must have a water meter to take readings.
If you have purchased the water module, the
function can be accessed by selecting Utilities/
Power & Water Modules/Water Module.
Every space on the site will be listed on this
screen. Select a space to be charged for water
use. Input the Base Rate. This rate is the monthly
charge for using the service. Input the Usage
Rate. This rate is the charge per unit of water. The
Usage Rate will be multiplied by the number of
Units Used each month. Units are often gallons,
but can be any measurement that the site chooses. Input the Min. to Charge. This rate is
the minimum usage rate to charge. Any usage below this amount will be charged at this rate.
Any usage over this amount will be charged the actual usage rate multiplied by the number
of units used.
The first time that the client is connected to the water meter for their space, the initial reading
will be put in the Last Reading field. Enter this information and click Apply. Repeat this
process for each client that will be charged for water.
At the end of the month, click Print List. This provides a printout report of each space so
that the manager can take a current reading at each meter, writing the current reading down
on the report.
The new reading is then entered into the Current Reading field. After entering this
information, click Apply. Repeat this process with each client that is using water (even if
they didn’t use water and the meter reading is the same).
After all meter readings have been entered into the Current Reading field, click Assess
Charges to assess each client’s account.
If the rates change at the site, click Change Rates. Make any
changes and then click Apply to set the rate change for all clients.
This can also be used during the initial setup if everyone’s Base Rate
and Usage Rates are the same.
NOTE: Schedule an event to reoccur each month to remind the manager to read the meters
and add the charge to each account.
80
TaskMaster Management Software User Guide
Credit Card Module
The Credit Card Module allows a site to accept credit cards for payment
through NOVA Systems, PaymenTech, PCCharge Pro, and ECHO. In
addition to purchasing the Credit Card Module, you must also maintain
an account with the credit card processing company. Credit Card
numbers can be typed in or a swipe reader can be purchased to allow
credit cards to be swiped for payment.
Setup
The Credit Card Processor will start automatically when TaskMaster is
icon in the System
started. Right-click on the Credit Card Processor
Tray. Select Site Setup.
In the Site Setup window, click Add. Click the Active checkbox. Enter
the site information and the credit card processing information.
In the drop-down menu for Processor, select the
company being used to process credit card
transactions. Enter the information required by the credit
card processing company.
Verify the Use Internet for Connections box is
checked, and then click Accept and Close.
To add another site, repeat the process. Sites can be
made inactive at anytime by removing the checkmark
from the Active checkbox.
To edit a site, highlight the site name in the window,
make the modifications, select Accept and Close.
Credit Card Module Setup within TaskMaster
Click on the Maintenance tab on the Taskbar and select
System Setup. From the Site Maintenance (Setup)
window, click on the Financial Data tab. At the bottom of
the screen, click on the Include Credit Card Payments with Bank Deposits checkbox if
your bank provides that service. Otherwise, leave the checkbox empty. Input the Credit
Card Processor ID found in the ID Number field of the Credit Card Processor Site Setup
screen. Click Apply.
81
TaskMaster Management Software User Guide
Batch Control
Right-click on the Credit Card Processor
icon in the System Tray.
Select Control. This brings up the Batch Control screen.
Batch Control allows the user to control the batch process including
settling cards, forcing transactions, and reviewing previous transactions
for the site. “Batch” refers to any group of credit card transactions that
have been approved by the credit card company but have not yet been
settled. Before the batch is settled, individual transactions can be voided. After settling the
batch, transactions cannot be changed. Refunds are then done as a new transaction.
When you set up your account
with the credit card processing
company, you will choose
whether to automatically settle
the daily batch during the
middle of the night or require
the manager to manually settle
the daily batch at the end of
the day. We recommend that
you choose automatic
settlement of the daily batch.
To view the transactions for a specific site, click in the Site drop-down menu and select a
site. This will bring up all of the credit card transactions for that site on the current day. To
see previous days, change the From and Through dates at the top of the screen. You can
also elect to see only approved or declined transactions (or both) by clicking in the
Approvals and Declines checkboxes. After making any changes to the screen, click
Refresh. Click Close View to close the screen.
Click Inquire to send an inquiry to the credit card processing company and return an answer
that lets you know how much the current open batch has outstanding. This will appear as a
line in the Batch Window along with the other transactions. After the batch has been settled,
the inquiry will return a $0.00 amount.
Click Clear to void all transactions in a batch. This cannot be done after
the batch is settled. Enter the amount to clear and click Clear/Void Batch.
This clears out all current transactions in the batch but does not settle the
batch.
To settle the batch manually, click Settle. If you have arranged automatic
settlement, this is not required. On the Settle/Close Batch screen enter the
amount to settle, and then click Settle/Close Batch.
82
TaskMaster Management Software User Guide
To void a single transaction, click on the transaction in the window on
the Batch Control screen. Then click Void. Only items that have not
been settled can be voided. Prior to settling a batch, approved items
will appear in light blue. After settling a batch, approved items will
appear in dark blue. This will help distinguish between items that can
be voided and those that cannot.
In the Void a Transaction window, Enter the Reference Number in
the field. The reference number is found at the top of the window.
Click Void. The next time that you enter the Batch Control screen,
the voided transaction will show as approved, but it will be in orange.
This tells you that the transaction was originally approved but later
voided.
It is possible to make a credit card transaction outside of
TaskMaster using the Credit Card Processor. This allows
a credit card transaction that is not done through a
specific client account. This is generally only used when
returning merchandise for credit.
In the Batch Control Screen, click Create to bring up the
Create a Transaction window. Select the site name from
the Select Site drop-down and complete the Name on
Card, Billing Street, and Billing Postal fields. Generally,
you can receive a better rate from the credit card
company if you have the Billing Postal fee completed.
To swipe the card, click Swipe. If you do not have the
actual card, input the Card Number, and Expiration Month and Year. If the card is not
present, place a checkmark in the Card Not Present (MOPO) checkbox.
The CVV2 (Card Verification Value) field is used to help prevent fraud. The CVV2 is a three
or four digit number that appears on the back side of the card and is not stored in the
magnetic strip. The only way to acquire this number is to have the card in front of you. If you
get this number from clients and input it in the field, you can generally receive a better rate
from the credit card company.
American Express
Front of Card above
Card Number
Right Side of Card
Discover Card
Back of Card next to
Card Number in
Signature line
Right Side of Card
MasterCard or Visa
Back of Card next to
Card Number in
Signature line
Right Side of Card
83
TaskMaster Management Software User Guide
To complete the Create a Transaction function, input the Amount of the transaction.
If you are only preauthorizing the card, click Pre-authorize Only and click Create.
Preauthorizing the card sets aside the money in the account, but doesn’t actually transfer
money. This feature is often used as a security deposit for Truck Rentals. If the client returns
the truck with no damage and a full gas tank, then the
money never comes out of the client’s card.
NOTE: TaskMaster doesn’t release these funds if you
don’t use them, the Credit Card Issuer does. Therefore,
when a card is preauthorized for $100, the client will
have $100 less credit to use until the Credit Card Issuer
releases the preauthorization. If the preauthorization is
to be released less than 24 hours after the rental, the
site manager must contact the credit card company to
have the preauthorization released.
When you Preauthorize funds, the Result field on the
Batch Control screen will show Approved with a six digit approval code. This code is used
for a Manual / Forced Transaction if the preauthorized funds are needed. Using the previous
example, if the client returns the truck with damage, the site can repeat the Create a
Transaction process, inputting the six digit approval code in the Manual/Force # field. Then
click Create.
In many cases, this preauthorization process can be done over the telephone with the
client’s Credit Card Issuer. Call the Credit Card Issuer to obtain a six digit approval code that
can be used in a Manual/Force Transaction later, if needed.
Return for Credit is used when a transaction must be voided after the batch is settled. Input
the amount to be returned to the client’s card and click Create.
The Corporate/Purchase Card section is used when a client pays with a small business
corporate card. The Credit Card Processor program can tell which card is a corporate card
and will automatically highlight this section. The
client must provide a Purchase Order Number to
be input in the PO Number field. After inputting
the Tax and PO Number fields, click Create.
The Show Activity button on the Batch Control
screen can be used for troubleshooting credit
card processing activity to see if there are
problems in the process. This
screen is primarily used by
technical support.
84
TaskMaster Management Software User Guide
Using Credit Cards in TaskMaster
On the New Client Move-In wizard, the Billing screen allows you to input credit card
information for regular billing purposes. If the client will be automatically paying each month
with the card, place a checkmark in the Automatically Charge checkbox. The client must
complete an Authorization form to allow this. Click Print Authorization Form to print the
form.
To swipe the card, click Swipe. You can also manually input
the information into the Type, Number, CVV2, Name on Card,
Street, City, State, and Postal Code fields.
The client’s account can be set up to automatically charge the
account if the customer does not pay by a certain date, activate
this feature by filling in the Automatic Process Occurs
On/After Days Past Due field.
To add a service fee for automatic credit card processing, input
the fee in the Service Fee field.
Place a checkmark in the Print Receipt box to automatically print a receipt that can be sent
to the client after each automatic credit card processing.
This information can also be added to a client’s account at a later date in the Billing Info
screen under Client Data on the Taskbar.
85
TaskMaster Management Software User Guide
To take an individual payment on a client’s account
using a credit card, with the client’s account active on
the screen, go to Tasks/Take a Payment.
Enter the amount to be charged in the Credit field.
Click Swipe. You can also enter the Card Number in the field and the expiration date in the
Exp field. Click Apply Payment and then click Accept. This brings up the Process Credit
Card & Response window.
If the client provided you with the credit card information over the phone, place a checkmark
in the MOPO checkbox.
Input the CVV2 Number, if available, along with the
Postal Code. If the Card is a Corporate/Purchase Card,
enter the PO Number. This is required for Corporate
purchase cards.
If you are forcing a transaction based on a previous
preauthorization, input the six digit preauthorization
number in the Manual Authorization Number field.
After completing the Process Credit Card & Response
fields, click Verify Now to immediately run the credit card
for approval. If, for some reason, the internet
connection is not working, click Verify Later
to hold off verification until internet service
has resumed.
If you elect to Verify Later, you can always
go back and click on the
button in the
Toolbar. This brings up the Credit Card
Maintenance for pending transactions. Click
Verify Transactions to finish processing.
86
TaskMaster Management Software User Guide
Central Office
TaskMaster Central Office allows an owner of multiple sites or an owner that lives
far away from the site(s) to manage marketing and financial data remotely. This is also a
useful tool for management companies.
Information can be downloaded from the TaskMaster data for an individual site or from
multiple sites for comparative reporting.
Information from TaskMaster at the remote site(s) is automatically uploaded to the
TaskMaster Central Office main site computer many times each day via FTP (File Transfer
Protocol) or VPN (Virtual Private Network). Depending on the number of remote sites and
the bandwidth of the internet connection(s), data can be transmitted with a low lag time.
Each remote site functions
independently in TaskMaster.
The remote site must be
manned and all client
functions in TaskMaster must
be controlled from that end.
TaskMaster Central Office is
merely a one-way conduit of
data coming from the remote
site to a central computer at
the main office.
TaskMaster Central
Office
Remote Site # 1
TaskMaster Central
Office
Main Office
TaskMaster Central
Office
Remote Site # 2
TaskMaster Central
Office
Remote Site # 3
Setting up the FTP or VPN
We strongly recommend that the FTP or VPN be set up by an experienced, knowledgeable
Network Information Technology professional. We do not provide this service. The FTP or
VPN server should be located at the Main Site and have an always on, static IP, business
high-speed internet connection. Each remote site should have a computer with TaskMaster
and a high-speed internet connection.
NOTE: Please discuss firewall settings with your IT professional to ensure data security at
the site, but still allow full communications.
87
TaskMaster Management Software User Guide
Setting Up Central Office at the Main Site
Technical support must dial into the Main Site computer and upload the main site files. They
will set up two programs; TaskMaster Central Office Disbursement (TMHOD) and
TaskMaster Central Office (TMHO). TMHOD must be placed in the Startup folder. TMHOD
must be running at all times or the Remote Site computers cannot update the data. Click on
TMHO to start the TaskMaster Central Office Control Center. This will allow you to set up
Central Office at the Main Site.
Click Add Site. Input the Name of the first remote
site. Place a checkmark in the Active checkbox to
make the site active. Also, ensure that the Log Start
& End checkbox is checked.
Input the name of the data folder where the site will
upload their information to. If the folder doesn’t exist,
click Create Data Folder. This is where the site
data will be kept on the main computer. The data
folder must be a subfolder of the \RTM\ folder.
Input the name of the Update Folder. If the folder
doesn’t already exist, click Create Update Folder. This is the FTP folder where the update
file log (F-Log) will upload to from the site. TMHOD takes this F-Log file and updates the
Data in the data folder every time the site information uploads into this folder.
Click Save to set up the remote site folders at the main site. Repeat this process for each
remote site.
To rename a site, highlight the site and click Rename. Highlight the site and click Remove to
remove a site from the list. Highlighting a site and clicking Reorder will change the site order
displayed.
88
TaskMaster Management Software User Guide
Setting Up Central Office at the Remote Site(s)
When you purchase Central Office, technical support will turn the
module on at each site within TaskMaster during the configuration.
Once the FTP Server or VPN is set up, each Remote Site will have to
have TaskMaster loaded on the computer and have the Central Office
Transfer set up. To do this, right-click on the Central Office Transfer
Interface icon in the System Tray of the computer and select Setup
from the list.
The Transfer Setup window will appear. If the Central Office is being run through a VPN,
then enter the VPN name in the VPN Field. If Central Office is being run through FTP, then
enter the FTP Address in the FTP Address field. The IT professional should provide this
information along with the Port and Passive settings.
The Login and Password fields must match the Login
and Password for the Update folder created for the
remote site on the main site computer. The Folder
field will be the actual name/path of the update folder
on the main site computer.
Set the Start Time and End Time for the transfer.
Generally, this should be just before and just after
business hours, so that the transfer doesn’t have to
keep working through the night when no information is
being updated. Setting the start time at 12:00 am and
the end time at 11:59 pm will make the process occur
24 hours per day.
Using Central Office at the Remote Site(s)
The first time that Central Office is activated at a remote site, right-click on the Central Office
Transfer Interface icon in the System Tray and select Transfer ALL Files. This will start the
initial update. From that point forward, any time that TaskMaster is
open, the Central Office Transfer will occur based on the intervals set
up. The remote site is not required to do anything for the Central
Office Transfer except to keep TaskMaster open during the day. The
Central Office Transfer Interface will be invisible to the remote site.
89
TaskMaster Management Software User Guide
Using Central Office at the Main Site
Once Central Office is set up at the Main Site and all Remote Sites, the owner or
management company can start using the program.
Click on TaskMaster Central Office to
start the Central Office program. This
is the same screen that lets you set
up Central Office.
To view the data and run reports for a
specific remote site, select the site
from the list and click Launch
TaskMaster. This launches
TaskMaster with the most recent data
from that site. You can tell how
recent the data is by looking at the Last Updated and Last Activity fields. You can run
reports inside TaskMaster on the specific site that you opened and view any data or
customer information for that site.
NOTE: Any changes made in TaskMaster data at the main site will not affect the TaskMaster
running at the remote site. This is a one-way connection.
You can also run comparative reports on multiple sites. Be sure that TaskMaster is closed.
Open the TaskMaster Central Office and click Reports/Consolidated Reports.
The Consolidated Reports window will appear. This allows you
to print many different types of reports that compare/contrast
multiple remote sites or give specific information on a single
remote site. If you have set up the remote sites with group and
region numbers (General Data Tab in Site Maintenance), then you
can use these to limit the site(s) that you run reports on. You can
also customize the Date range in the From and Thru fields, view
Active Sites only (or all sites), and highlight reports. When you
have made your selections, click Execute.
90
TaskMaster Management Software User Guide
Web Sales
TaskMaster interfaces with Online Self Storage’s Web Sales, which allows a site to use
Online Self Storage’s web site to take client payments and rent spaces.
If the site uses Online Self Storage’s (OSS) web
sales, OSS will set up the link and OSS Software
for you, as well as provide training in using the
OSS software. TaskMaster software continues to
operate as designed.
Each morning, the site manager will have to
update TaskMaster and OSS. To perform this
function, select Utilities/Online Self Storage.
This pulls up the Online Self Storage
Upload/Download & Setup.
During the initial setup, the FTP address, Login, Password, Company ID, and Site ID
provided by OSS must be entered at the top of the window. Click Apply.
During the morning update, the manager will click Connect to connect to OSS and update
the list. Then the manager will select each new event from the list and click Process Event.
This takes the payment in TaskMaster.
To cancel or remove an event, select it from the list and click Cancel Event.
91
TaskMaster Management Software User Guide
WebXpress
The WebXpress module allows the site to have a web site on the internet where clients can
rent spaces and pay their bills.
The web site can be designed by a web
design company to be a part of an existing
company web site, or they can create a
complete custom web site for your
company. Chamberlain Access Solutions
does not provide this service; the site must
contract with the web design company
directly.
As client’s visit the site to rent spaces or
pay their bills, the information automatically
updates in TaskMaster as if they had been
at the site in front of the manager.
Kiosks
TaskMaster interfaces with two Kiosks: the SAM and Open Tech Alliance’s Insomniac.
These freestanding computer stations are often used to replace an on-site manager,
allowing clients to rent spaces, pay rent, and perform other basic customer functions from a
computer at the site without needing a manager.
All payment, rental, billing, and other such
functions are still handled in TaskMaster by a
site manager or owner, but the client uses the
Kiosk software.
If you purchase a Kiosk along with TaskMaster, the Kiosk company will set up the link and
Kiosk Software for you, as well as provide training in using the Kiosk software. TaskMaster
software continues to operate the same as shown in this manual.
NOTE: The TaskMaster configuration should be set up to allow client credits so that
customers can pay by credit card at the kiosk. When the site manager sees notification of a
kiosk payment, they must apply the client credit to the client’s account so that the customer
gets credit for the payment. While TaskMaster will recognize the client credit, it will not
automatically apply the credit to the client’s amount due.
92
TaskMaster Management Software User Guide
Networking
TaskMaster can be used on a client server network, allowing multiple users to have the
program open and in use at the same time. Sites can have multiple employees taking
payments, renting spaces, and doing other accounting functions at the same time. This is
often used on large sites with many customers and multiple points of sale. After
purchasing the main TaskMaster license for the server, you must purchase an additional
client license for each client computer that TaskMaster will be networked to. A separate
Pervasive Summit 10 Workgroup License is also required. Up to 10 user workstations
can be set up using Pervasive Summit 10. If more user workstations are needed, then
Pervasive Server must be purchased separately.
Each computer on the network must meet Chamberlain Access Solutions system
requirements (found in chapter 1). The Network should be set up by an experienced,
knowledgeable Network Information Technology professional. Chamberlain Access
Solutions does not provide this service.
The Master Workstation or Server can be used as a point of sale. Therefore, if the site
needs two points of sale, one will function as the Master Workstation (Server) and the
other will be a Client Workstation. This is only for file sharing purposes and has no visible
impact on day-to-day users.
Client Server Network
Master Workstation
(Server)
Client
Workstation
Client
Workstation
Client
Workstation
93
TaskMaster Management Software User Guide
Network Setup within TaskMaster
Once the Network is set up, follow the steps below. These steps should be performed
only by a trained, experienced Network Information Technology professional.
1. Install TaskMaster and Pervasive Summit 10 on the Master Workstation (Server) and
on all Client Workstations.
2. Delete all W3*.* & WB*.* files from the C:\RTM folder and any subfolders on the
Master Workstation (Server) and on all Client Workstations.
3. On the Master Workstation (Server), share the c:\ directory on which TaskMaster is
installed. On all Client Workstations map a drive to the Master Workstation (Server).
4. On all Client Workstations delete all files in the c:\RTM\files folder.
5. On all Client Workstations, right-click on the TaskMaster icon on the desktop and
select ‘Properties.’ Target needs to read C:\rtm\rtm.exe $WS $drive D: The Start In
area must read “mapped drive letter:\rtm” (Ex: D:\ is the mapped drive, thus in the
Start In area it should say D:\RTM)
6. Copy the contents of the rpts folder from the C:\rtm\rpts on the Master Workstation
(Server) to C:\rtm\rpts all Client Workstations.
7. Copy RTM.exe from the C:\RTM folder on the Master Workstation (Server) to the
C:\rtm folder on all Client Workstations.
8. Contact technical support at (888) 528-7826 to activate the Network and verify
operation.
94
TaskMaster Management Software User Guide
Gate Interface
TaskMaster can be interfaced to many Gate Access Control
Systems, allowing clients who do not pay their bills to be
automatically locked out from accessing the property. When the
client pays their bill, then the system can automatically restore the
client’s access privileges or, in the case of checks, wait ten days to restore access. Also, as
new clients are added to TaskMaster, their access code and some client information will
automatically transfer into the Gate Access Control System.
Setting up the Gate Interface
We recommend that TaskMaster be interfaced to the Falcon or Falcon XT Access Control
Systems for a truly integrated system and to increase your satisfaction with the overall
performance of the interface. However, we also offer an interface to many other gate access
control systems, including Frame 500, Demco, Sentinel, MSTC, Minimax, DigiGate, Wham,
and SSI. Generally, these companies will charge a fee for the Gate Interface. If you wish to
set up the gate interface to one of these companies, contact technical support to obtain our
side of the interface and then contact the Gate Access Control System for their side.
Once the interface is set up, open TaskMaster and select Utilities/Special Functions/
Synchronize Access System. This performs the initial download to the Gate Access
Control System.
Downloading to a Gate Access Control System
During day-to-day operations, the Gate Interface will automatically download to the Gate
Access Control System whenever a client change occurs. Anytime a space is rented,
suspended, vacated, or transferred, the information will automatically download into the Gate
Access Control System.
If the Gate Access Control System connection is ever lost, the system can be resynchronized by selecting Utilities/Special Functions/Synchronize Access System.
Gate Access information is input on the Security Access screen under Client Data on the
Taskbar.
95
TaskMaster Management Software User Guide
Security Access Screen
The Security Access screen allows changes to a client’s access when
TaskMaster is interfaced to a Gate Access Control System. This screen is accessed by
clicking on Client Data/Security Access.
On newer systems, the only features used with
these gate systems are the access code, time
zone, alert, and expiration date.
If you are using swipe cards for access and you
have the card swipe reader, click Swipe and
swipe the card through the Credit Card Reader
(which can scan access cards also). After
making any changes to this screen, click Apply.
The access code and custom hours can be set
for a client on the New Client Move-in wizard on the Identification screen.
96
TaskMaster Management Software User Guide
Site Master Graphics
The Site Master Graphics module allows the manager to have a graphic view of the
site that shows the current status of each space from an overhead view. If you have
purchased the Site Master Graphics module, click on Site Master Graphics to open the
module.
The Site Master Graphics view shows the status
of site spaces using color codes to show
Available spaces, Rented spaces, Locked Out
spaces, Vacating spaces, and Spaces In Repair.
Site Master Graphics Setup
The first time that you use Site Master Graphics,
technical support will have to dial into your site’s
computer to set it up. In most cases, a Graphics
Technician will draw the site based on a site
layout map that you provide. In some cases,
either you or the dealer may draw the site.
To customize Site Master Graphics for your site, click Preferences.
This opens the Site Graphics Preferences window. The Space
Colors tab allows you to customize the color code for the space
status types. Select from the Item or Status Type list. Then select
a Background and Text color. Click Apply. Repeat this for each
Item or Status Type.
The Settings tab lets you change the speed of the Blink Interval
(how fast the alarmed spaces blink) and the Panning Interval
(speed of the site panning). The Jump To selections allow the Site
Graphics to stop panning and center on Spaces on Alarm, Spaces
on Door Open, or Spaces on Entrance if checked. Click Apply
after making any changes.
The Other Preferences tab lets you customize the Background
Color and alarm Blink Color. Right Click Menu On, Handles On,
and Rubber Banding are used by technical support if corrections
are needed to the site drawing. We do not recommend that these
be used by the site because an untrained user can corrupt the site
drawing. You can select a Default Center ID for the graphics to
center on when stopped. Click Apply after making any changes.
97
TaskMaster Management Software User Guide
Navigating in Site Master Graphics
Generally, in the Site Master Graphics view, the site will pan on the screen. This allows you
to see each space on the site as the graphics pan over them. This panning can be stopped
at any time by clicking Stop. To restart panning, click Start.
You can maneuver through the site picture using the arrow
buttons to move Up, Down, Left, or Right. You can also
maneuver through the site picture by right-clicking
anywhere on the screen. This changes the mouse pointer to the Move hand pointer. Hold
down the right-click button and move the mouse around to drag the picture.
To jump to a specific space, type the space number in the Center on ID field.
To magnify a specific area of the screen, click Zoom In. To see more of the site, click Zoom
Out. To see the entire site, click Zoom 100%.
If changes are made to the screen, click Refresh to update the view.
To view the screen in full screen mode, click Full Screen.
98
TaskMaster Management Software User Guide
Viewing Space Information in Site Master
Graphics
In the Site Master Graphics screen, you can obtain
more information about a particular space by
clicking on that space.
Clicking on Vacant Spaces
If you click on a vacant space, the Space
History window will appear. This shows the
space number, description, Standard Rate,
Standard Deposit at the top of the screen.
The center of the screen shows the last client
that rented the space, the dates rented and
the rate.
Click on Rent Now to go to the New Client Move-in wizard for the space. To exit the window
without renting the space, click OK.
Clicking on Rented Spaces
If you click on a rented space, the Client Information window appears. This shows how
long the client has been in the system and the current client status along with contact
information, access code, Balance Due, Total Current Monthly, Bad Checks, and a list of
Spaces/Leased items. The Scrolling Marquee can also be accessed in this window.
There are several quick link buttons on this
window. Click on Name & Address to go
directly to the Name & Address screen for
this client. The 123 Accounting icon takes
you directly to the 123 Accounting screen for
this client. The Payment icon takes you
directly to the Payment screen for this client.
Clicking on Client Information Sheet prints a client information sheet that can be placed in
their file. To exit the Client Information Window, click OK.
99
TaskMaster Management Software User Guide
System Functions
• Backup Data Files
• Automatic System Processing
• Special Functions
100
TaskMaster Management Software User Guide
Backup Data Files
It is important to regularly back up the data in TaskMaster. This allows the system
to be restored in the case of a computer data corruption, theft, damage to the computer,
computer crash, or other catastrophic data loss.
To back up the site data, select File/ Backup Data Files. This will backup the data files to
the C:\RTM\Files\Bkup folder. This file can then be copied to an external data source such
as a CD, DVD, Flash Drive, or External Hard Drive. We strongly recommend that this file be
stored on an external data source to protect against computer theft or crash.
There is an automatic system backup that occurs each day when ADP runs. This backup
stores information for the previous seven days. Each day this is overwritten with the new
ADP backup. This backup is used for extra system protection and should not be relied on as
the sole backup.
NOTE: The Restore Data Files feature is restricted to technical support personnel. If you feel
that you need to restore your site data, please contact technical support.
Automatic System Processing
TaskMaster uses Automatic System Processing functions to assess rent and fees, update
reporting, and perform other internal system maintenance. These functions are scheduled
during the initial setup from System Setup/Schedule Events.
ADP (Automatic Daily Processing)
Automatic Daily Processing occurs each day, generally in the middle of the night. After all of
the rents and fees are assessed and the financial information updated, automatic reports are
printed. These are selected from System Setup/Automatic Reports.
AWP (Automatic Weekly Processing)
Automatic Weekly Processing occurs each week, generally on Sunday evening. After the
financial information is updated, automatic reports are printed. These are selected from Site
Setup/Automatic Reports.
AMP (Automatic Monthly Processing)
Automatic Monthly Processing occurs each month, generally on the last day of the month in
the evening. After the financial information is updated, automatic reports are printed. These
are selected from Site Setup/Automatic Reports.
AYP (Automatic Yearly Processing)
Automatic Yearly Processing occurs each Year, generally on the 1st day of the new year in
the morning. After the financial information is updated, automatic reports are printed. These
are selected from Site Setup/Automatic Reports.
101
TaskMaster Management Software User Guide
Special Functions
The Special Functions menu can be found under Utilities on the menu bar. These
functions generally should not be used without the guidance and instruction of technical
support.
Reset Last Activity Date/Time
Resets the Date and Time in TaskMaster to match the date
and time in the computer. This is used if the computer’s date
and time has been changed for any reason.
Recalc All Paid to Dates
Used only by technical support to make corrections to Paid to
Dates on very early versions of TaskMaster. Paid to Dates
are calculated differently by newer versions of Taskmaster.
Quick Assign Spaces
The Quick Assign Spaces function is used
when converting from an old management
software or paper-based system to
TaskMaster. You can quickly add clients to
spaces by going down the list of names and
assigning a space. If this function is needed,
technical support will guide you through the
first few accounts.
Reset All Clients Late Days to Standard
If a change is made to the late fee structure
due to law change or site policy change, the
change must be made in the Site Policies
tab of the Site Setup function. This will affect
any new clients. If the change is to be made to existing clients also, the Reset all Clients
Late Days to Standard is used. This only affects the Late Days and not the Fees; if the
change needs to also affect Fees, contact technical support.
NOTE: Most states require a minimum of 30 days notice to the customer prior to a rate
change.
Clear Network Locks
This function is used on Network modules. If one operator’s computer has a client’s account
open and an operator on another networked computer tries to open the same file, a
message will appear letting the second operator know that they cannot open the file. On
occasion, if the first computer crashes or is turned off without releasing the file, the file will
become stuck. The Clear Network Locks function releases these locked files.
102
TaskMaster Management Software User Guide
Synchronize Access System
Used during the initial interface between TaskMaster and the Gate Access control system.
Reset Access Hours to Standard
Used if a site has custom hours set up for individual clients but needs to change all existing
clients back to the standard hours as set up on Site Setup/Access.
Change Next Invoice Date
Allows a site to change the invoicing for all clients or just those already
being invoiced. It can also remove all invoicing at one time.
Special Command
Special Commands are used by technical support for certain unusual tasks. Do not attempt
to use this function without assistance from technical support.
Download Program Update
Allows a site to update TaskMaster on a computer. This should only be
done under the guidance and instruction of technical support or a trained
representative at your Management Company.
103
TaskMaster Management Software User Guide
Help
There are several ways to get assistance with TaskMaster. We
offer a full range of training, documentation, and technical support
to assist you with your technical issues and questions.
• Training
• Help Menu
104
TaskMaster Management Software User Guide
Training
Comprehensive training is available for every level of user. We strongly recommend that
every site take advantage of this training to help each user become familiar with the
program. This training can be customized to your site’s specific needs. Contact technical
support for more information, scheduling, and costs.
Help Menu
The Help menu offers several levels of Help and assistance. Help Files,
an Online Tutorial, a list of Changes & Fixes in each version, and
definitions of File Error Messages.
TM Online Help (Help Topics)
TM Online Help is available at anytime by
clicking on Help Topics. This brings up the
TaskMaster Online Help. You can search for
Help topics in the Contents or Index, or search
by keyword.
About TaskMaster
Clicking on About TaskMaster brings up a
window that shows the version of TaskMaster
installed on your system and provides links to technical
support and our web site.
Changes & Fixes
Clicking on Changes & Fixes brings up a file that lists the
version of TaskMaster installed on your system and the
additions, changes, and fixes to that version.
File Error Messages
Clicking on File Error Messages brings up a window that lists recent Error Messages in
TaskMaster. This can be used by technical support and your onsite computer technician to
troubleshoot errors.
105
TaskMaster Management Software User Guide
Declarations
Chamberlain Access Solutions Hardware and Software are covered
by the following Agreement and Warranty. These are current as of
your initial purchase of the product. Chamberlain Access Solutions
reserves the right to change these at any time for future purchases,
updates, or upgrades. The End User License Agreement can be
found in the installation of TaskMaster as well as in the Online
Help.
• Software End User License Agreement
• Standard 2-Year Equipment Warranty
106
TaskMaster Management Software User Guide
Software End User License Agreement
Important Notice: This Software End User License Agreement (EULA) is a legal agreement between you (either an individual or, if purchased or
otherwise acquired by or for an entity, an entity) and Chamberlain Access Solutions for the software product that this EULA is contained on. This
includes the software product and any other documentation or media that accompanies it. READ IT CAREFULLY BEFORE COMPLETING THE
INSTALLATION PROCESS AND USING THE SOFTWARE AS IT PROVIDES A LICENSE TO USE THE SOFTWARE AND CONTAINS
WARRANTY INFORMATION AND LIABILITY DISCLAIMERS. In order to use this software, you must first accept the terms of this EULA, and
confirm your acceptance of the terms of this EULA by pressing the 'I Agree' button on the download screen. By installing, copying, or otherwise using
any portion of this software, you are confirming your acceptance of the software and agreeing to become bound by the terms of this EULA. You agree
that this EULA is enforceable like any written negotiated agreement signed by you. If you do not agree to be bound by these terms, then do not install or
use the software in anyway; contact Chamberlain Access Solutions immediately to make arrangements to return the product. If you acquired the software
on tangible media (e.g. CD) without an opportunity to review this license and you do not accept this agreement, do not use the software, contact
Chamberlain Access Solutions immediately within 30 days of purchase or otherwise acquiring of the software to arrange to return the software product.
If you press the 'I Don’t Agree' button on the software download screen you will not be able to install the software.
1.
Definitions
1.1.
“Use” or “use” and "Using" or “using” means to access, install, download, copy or otherwise employ the functionality of the Software.
1.2.
“Computer” means an electronic device that accepts information in digital or similar form and manipulates it for a specific result based on
a sequence of instructions.
1.3.
“Documentation” means any manuals, technical support documents, drawings, diagrams, associated media, printed materials, online or
electronic documentation or help files that accompany this Software or can be obtained from Chamberlain Access Solutions regarding this
Software as of the date of purchase.
1.4.
“Chamberlain Access Solutions” means Chamberlain Access Solutions located at 9160 East Bahia Drive in Scottsdale, Arizona 85260 also
referred herein as “We”, “Our”, and “Us”.
1.5.
“User” or “user” means the registered, licensed purchaser or their assigned representative also referred herein as “You” or “you” or “Your”
or “your”.
1.6.
"Software" means all of the contents of the files, disk(s), CD-ROM(s) or other media with which this EULA is provided, the Chamberlain
Access Solutions software program(s) and third party software programs, in each case, supplied by Chamberlain Access Solutions
herewith, and corresponding Documentation, and all updates of the foregoing that are provided to you by Chamberlain Access Solutions,
including any and all additions, copies, Modules purchased by you, versions, variations, revisions, modifications, or updates of the
program(s).
1.7.
“Module” means any optional software additions, functions, upgrades or components that are not normally included in the base purchase
price, but may be added at purchase or at a later date by paying an additional fee to Chamberlain Access Solutions.
2.
Grant of License
2.1.
Subject to your compliance with all the terms of this EULA and the purchase of the software from Chamberlain Access Solutions,
Chamberlain Access Solutions grants you one single, limited, non-exclusive, personal, non-sublicensable, restricted licence to install and
use the Chamberlain Access Solutions software herewith on a computer in accordance with the purposes and functionality described in the
documentation and only in accordance with this EULA.
2.2.
The Software is protected by copyright laws and international copyright treaties, as well as other intellectual property laws and treaties.
2.3.
The Software is licensed, not sold, to you by Chamberlain Access Solutions upon purchase of this License from Chamberlain Access
Solutions. The License gives you limited rights to use the Software. You do not become the owner of the Software licensed to you.
Chamberlain Access Solutions retains all rights, title and interest in and to the Software, and all copies thereof.
2.4.
All rights not specifically granted in this License, including all U.S. and foreign copyright rights, are reserved by Chamberlain Access
Solutions.
2.5.
The Software in this package and any copies which this License authorizes you to make are subject to this License.
2.6.
The License granted by this EULA covers a single copy of the Software program. You must purchase additional licenses if you intend to
use multiple copies of this Software.
2.7.
You may install and use the Software on a single desktop computer that has a Windows PC operating system that meets our computer
recommendations including desktop PC versions of Microsoft Windows XP Professional, 32-bit with Service Pack 2 and Microsoft Vista,
32-bit with Service Pack 1 (Ultimate, Home Premium, Business, or Enterprise versions) as specified in the Documentation, provided,
however, that, notwithstanding anything contrary contained herein, you may not use the Software on any non-PC product or any embedded
or device versions of the above operating systems, including, but not limited to, mobile devices, internet appliances, set top boxes (STB),
handhelds, PDAs, phones, web pads, tablets, game consoles, TVs, DVDs, gaming machines, home automation systems, kiosks or any other
consumer electronics devices or mobile/cable/satellite/television or closed system based service.
2.8.
The License for the Software granted by this EULA may not be shared, installed or used concurrently on different computers.
2.9.
If the Software is loaded on your network, then you must obtain a separate license to the Software from Chamberlain Access Solutions for
each person accessing the Software through your network, and you agree to pay for and obtain these additional licenses as needed from
Chamberlain Access Solutions.
2.10. You may make one backup copy of the Software in machine-readable form solely for backup purposes, provided your backup copy is not
installed or used on any computer. You must agree to reproduce on any such copy all copyright notices and any other proprietary legends
found on the original. You may not transfer the rights to a backup copy unless you transfer all rights in the Software as provided under the
Transfer section contained herein.
2.11. In addition to the single License granted under this Section, a current Chamberlain Access Solutions authorized dealer may make one (1)
copy of the Software with the user’s permission for the dealer’s exclusive use on either a portable computer or a computer located at the
dealer’s business address, provided the Software on such computer of the current Chamberlain Access Solutions authorized dealer is not
used for any other purpose than initial setup of the user’s single License under this Section or to service and troubleshoot the user’s single
License under this Section. The Chamberlain Access Solutions authorized dealer may NOT maintain more than one single copy of any
software sold by Chamberlain Access Solutions unless the dealer purchases other licenses. The Chamberlain Access Solutions authorized
dealer is also bound by this EULA with regard to the copy it maintains. Dealers who are not currently authorized by Chamberlain Access
Solutions or are put on ‘inactive status’ by Chamberlain Access Solutions are not permitted or eligible under this Section to make a copy of
the Software on any computer to assist a user with setup of the Software.
107
TaskMaster Management Software User Guide
2.12.
3.
Chamberlain Access Solutions software may be made available to you for a 30-day demonstration period for the purpose of evaluating
whether to purchase a license to the commercial version of the program. During this demonstration period, you may receive sales related
demonstration assistance, but you are not entitled to full business support, hard-copy documentation, or other full access assistance, all of
which is available only after the purchase of the Software and entry and acceptance to the terms of Chamberlain Access Solutions' then
current software end user license agreement.
2.13. Beta Testing - In some cases Chamberlain Access Solutions software is made available under pre-commercial release beta testing terms. If
the product you have received with this License is pre-commercial release or beta software, then the following Section applies.
2.13.1.
To the extent that any provision in this Section is in conflict with any other term or condition in this EULA, this Section shall
supersede such other term(s) and condition(s) with respect to the pre-release software, but only to the extent necessary to resolve
the conflict.
2.13.2.
You acknowledge that the software is a pre-release version, does not represent final product from Chamberlain Access Solutions,
and may contain bugs, errors and other problems that could cause system or other failures and data loss. Consequently, the prerelease software is provided to you "AS-IS". Chamberlain Access Solutions disclaims all warranties and liability obligations to you
of any kind, whether express or implied (to the extent permitted by applicable law), with respect to any pre-commercial release
software, including but not limited to, warranties of quality, performance, title, non-infringement, merchantability of fitness for a
particular purpose, and warranties created by course of dealing, course of performance or trade usage. IN NO EVENT SHALL
CHAMBERLAIN ACCESS SOLUTIONS OR ITS SUPPLIERS BE LIABLE FOR ANY INDIRECT, SPECIAL, INCIDENTAL,
PUNITIVE, COVER OR CONSEQUENTIAL DAMAGES INCLUDING WITHOUT LIMITATION DAMAGES FOR
COMPUTER FAILURE OR MALFUNCTION, LOST PROFITS, LOST SAVINGS, LOST BUSINESS, BUSINESS
INTERRUPTION, LOSS OF DATA, LOSS OF USE, WORK STOPPAGE, PENALTIES, FINES OR OTHER INCIDENTAL OR
CONSEQUENTIAL DAMAGES BY ANY PARTY, EVEN IF CHAMBERLAIN ACCESS SOLUTIONS HAS BEEN
ADVISED OF THE POSSIBILITY OF SUCH DAMAGES. WHERE LIABILITY CANNOT BE EXCLUDED FOR PRERELEASE SOFTWARE, BUT IT MAY BE LIMITED, CHAMBERLAIN ACCESS SOLUTIONS' LIABILITY AND THAT OF
ITS SUPPLIERS SHALL BE LIMITED TO THE SUM OF FIFTY DOLLARS (U.S. $50) IN TOTAL.
2.13.3.
You acknowledge that Chamberlain Access Solutions has not promised or guaranteed to you that pre-release software will be
announced or made available to anyone in the future, that Chamberlain Access Solutions has no express or implied obligation to
you to announce or introduce the pre-release software, and that Chamberlain Access Solutions may not introduce a product similar
to or compatible with the pre-release software. Accordingly, you acknowledge that any research or development that you perform
regarding the pre-release software or any product associated with the pre-release software is done entirely at your own risk.
2.13.4.
During the term of this EULA, if requested by Chamberlain Access Solutions, you will provide feedback to Chamberlain Access
Solutions regarding testing and use of the pre-release software, including error or bug reports.
2.13.5.
If you have been provided the pre-release software pursuant to a separate written agreement, your use of the pre-release software is
also governed by such agreement. You agree that you may not and certify that you will not sublicense, lease, loan, rent, assign or
transfer the pre-release software. Upon receipt of a later unreleased version of the pre-release software or release by Chamberlain
Access Solutions of a publicly released commercial version of the software, whether as a stand-alone product or as part of a larger
product, you agree to return or destroy all earlier pre-release software received from Chamberlain Access Solutions and to abide by
the terms of this EULA for any such later publicly released commercial versions of such pre-release software. Notwithstanding
anything in this Section to the contrary, if you are located outside the United States of America, you agree that you will return or
destroy all unreleased versions of the pre-release software within thirty (30) days of the completion of your testing of such
software when such date is earlier than the date for Chamberlain Access Solutions' first public release of the commercial version of
such software.
2.14. Modules
2.14.1.
Certain optional software additions, functions, upgrades and/or components, known as Modules, that are not normally included in
the base purchase price of the License, may be added at purchase or at a later date by paying an additional fee to Chamberlain
Access Solutions.
2.14.2.
Non-purchased Modules may be visible within the software but non-functional until purchased from and activated by Chamberlain
Access Solutions.
2.14.3.
You agree not to access or attempt to access these Modules without purchasing them from Chamberlain Access Solutions.
2.14.4.
Purchase of Module(s) does not confer additional license(s) or entitlements. Upon purchase, the Module(s) become a part of the
Software licensed under and subject to this EULA.
Restrictions & Limitations
3.1.
All rights to Use the Software are granted on condition that such rights are forfeited if you fail to comply with the terms of this EULA.
3.2.
Distribution
3.2.1.
You agree not to make or distribute copies of the Software, or electronically transfer the Software from one computer to another or
over a network.
3.2.2.
You agree not to sell, rent, lease, lend, sublicense, grant a security interest in or otherwise transfer (other than as permitted by the
Transfer Section of this EULA) your licensed rights to the Software or remove any proprietary notices on or in the Software.
3.2.3.
You agree not to use the software to intentionally or unintentionally violate any applicable local, state, national or international
law, or any regulations requirements, procedures or policies in force from time to time relating to the Software.
3.2.4.
You acknowledge and agree that you may not alter, merge, modify, adapt or translate the Software, or decompile, reverse
engineer, disassemble, or otherwise reduce the Software to a human-perceivable form or otherwise attempt to discover the source
code of the Software except to the extent you may be expressly permitted to decompile under applicable law.
3.2.4.1.
You acknowledge and agree that you may not create derivative works based upon the Software.
3.2.4.2.
You shall not use the Software to develop any software or other technology having the same primary function as the
Software, including but not limited to using the Software in any development or test procedure that seeks to develop like
software or other technology, or to determine if such software or other technology performs in a similar manner or has a
similar function as the Software.
108
TaskMaster Management Software User Guide
3.2.4.3.
4.
If it is essential to do so in order to achieve operability of the Software with another software program, you must request
Chamberlain Access Solutions to provide the information necessary to achieve such operability. Chamberlain Access
Solutions has the right to impose reasonable conditions and to request a reasonable fee before providing such information.
Any such information supplied by Chamberlain Access Solutions and any information obtained by you by such permitted
decompiling may only be used by you for the purpose described herein and may not be disclosed to any third party or used to
create any software which is substantially similar to the expression of the Software. Requests for information should be
directed to the Chamberlain Access Solutions Engineering Department. Chamberlain Access Solutions does not guarantee
that such requests will be approved or that such information will be provided.
3.2.4.4.
You may not include the Software (whole or in part) in any commercial package without Chamberlain Access Solutions'
written permission. The Software may not be distributed for profit in any form, including, but not limited to, electronic
information service distribution, bulletin board distribution, user groups, online services, redistribution companies, and
magnetic or optical medium distribution, unless explicitly stated in a separate writing and signed by an authorized
representative of Chamberlain Access Solutions.
3.2.4.5.
You may not alter the Software code for the purpose of redistributing or selling this program as a free or commercial
program under another program name or company name.
3.2.5.
You may not permit other individuals to use the Software except under the terms listed in this EULA.
3.2.6.
You may not separate the component parts of the Software for use on more than one computer.
3.2.7.
If you receive the Software in more than one medium, regardless of the type or size of medium that you receive, you may use only
one medium that is appropriate for your single computer. You may not use or install the other medium on another computer. You
may not loan, rent, lease, lend or otherwise transfer the other medium to another user, except as part of the permanent transfer of
the Software as covered in the Transfer Section of this EULA.
3.2.8.
You shall not copy the Software except as set forth in Section 2. Any copy of the Software that you make must contain the same
copyright and other proprietary notices that appear on or in the Software.
3.2.9.
User Responsibilities
3.2.9.1.
Various states and municipalities have specific limitations and requirements for taxes, fees, customer notifications, auction
processes, collections procedures, etc. It is the user’s sole responsibility to verify the information and conduct their business
in compliance with all applicable laws and codes. Chamberlain Access Solutions strongly recommends that the user verify all
information in the Software that is applicable to their business and make themselves aware of their legal responsibilities,
obligations, and limitations with respect to the use of the Software.
3.2.9.2.
If your national, state, or local laws allow or require rights, liabilities, and warranties that are not expressly a part of this
EULA then you are required to take all reasonable measures to avoid and reduce damages, in particular to make back-up
copies of the Software and your computer data subject to the provisions of this EULA.
3.2.10.
The Software may contain third party software which requires notices and/or additional terms and conditions and are made a part
of and incorporated by reference into this EULA. By accepting this EULA, you are also accepting the additional terms and
conditions, if any, set forth therein.
3.2.11.
Any other party using this Software must comply with this EULA.
3.2.12.
The registered licensed user of this Software is and shall remain ultimately responsible for compliance with all aspects of this
EULA.
Ownership & Title
4.1.
The structure, organization and code of the Software are the valuable trade secrets and confidential information of Chamberlain Access
Solutions. The Software is protected by law, including without limitation the copyright laws of the United States and other countries, and
by international treaty provisions as well as other intellectual property laws and treaties. Except as expressly stated herein, this EULA does
not grant you any intellectual property rights in or to the Software, and all rights not expressly granted are reserved by Chamberlain Access
Solutions.
4.2.
Intellectual Property Rights
4.2.1.
Logos, Trademarks, code, Product Names, belong to us
4.2.1.1.
Chamberlain Access Solutions logos, product names, source code, software structure and organization copyrights, and
trademarks contained in the Software are the property of Chamberlain Access Solutions. Third party trademarks, trade
names, product names and logos may be the trademarks or registered trademarks of their respective owners. You may not
remove or alter any trademark, trade names, product names, logo, copyright or other proprietary notices, legends, symbols or
labels in the Software. This EULA does not authorize you to use Chamberlain Access Solutions' or its licensors' names or
any of their respective trademarks.
4.2.1.2.
All images, photographs, animations, video, audio, music, text, and "applets" incorporated into the Software, the
accompanying printed materials, and any copies of the Software are owned by Chamberlain Access Solutions. This EULA
grants you no rights to use such content. All rights not expressly granted are reserved by Chamberlain Access Solutions.
4.2.1.3.
No rights or licenses are granted by Chamberlain Access Solutions under this EULA, expressly or by implication, with
respect to any proprietary information or patent, copyright, trade secret or other intellectual property right owned or
controlled by Chamberlain Access Solutions, except as expressly provided in this License.
4.3.
Transfer of Software and License
4.3.1.
Only users that purchased the License to the Software directly from Chamberlain Access Solutions or its authorized dealers shall
have the one-time right to transfer this EULA and the Software to another end user. The initial user of the Software may, upon
payment to Chamberlain Access Solutions of the fee required by this Section, make a one-time permanent transfer of this EULA
and the Software only directly to another end user. This transfer must include all copies of the Software, including the backup
copy, Documentation, component parts, the media and printed materials, any upgrades, and this EULA. Such transfer may not be
by way of consignment or any other indirect transfer. The transferee of such one-time transfer must agree to comply with all of the
terms of this EULA, including the obligation not to further transfer this EULA and Software and accompanying documentation.
4.3.2.
In event of such transfer, you must inform Chamberlain Access Solutions in writing within 30 days with all information about the
previous licensee and the new licensee (including, business name, contact person, business address, business phone number,
business email address, and the reason for and date of the transfer).
4.3.3.
Chamberlain Access Solutions charges a fee for this transfer that must be paid prior to the transfer, and you agree to pay such fee
upon a transfer authorized under this Section. You must contact Chamberlain Access Solutions to make arrangements to pay this
transfer fee. Chamberlain Access Solutions reserves the right to deny the transfer of this Software for any reason.
109
TaskMaster Management Software User Guide
4.3.4.
4.3.5.
5.
6.
Software may not be transferred to another person if such transfer has not been paid for.
Your transfer of the Software does not convey any support subscription or rights to future upgrades to the new licensee. Support
subscription plan and future upgrades must be purchased from Chamberlain Access Solutions separately by the new licensee.
4.3.6.
All backups, loaded Software, and other electronic versions of the Software must be deleted or uninstalled from the initial user’s
computer upon a transfer under this Section.
4.3.7.
Upon such transfer meeting these requirements, your License shall then be considered terminated as to you and all of your rights in
this EULA are transferred to the new licensee. Notwithstanding the foregoing, this termination shall not relieve you of your
obligations that have previously accrued under the EULA, which obligations shall survive such transfer and this termination.
4.4.
Export Rules
4.4.1.
None of the Software or underlying information or technology may be downloaded or otherwise exported or re-exported into any
country prohibited by the United States Export Administration Act; to a national or resident of Cuba, Iran, Myanmar (Burma),
North Korea, Sudan, Syria, or any other country to which the U.S. has embargoed goods who intends to transmit or transport the
products back to such country; or to anyone on the U.S. Treasury Department’s list of Specially Designated Nationals or the U.S.
Commerce Department’s Table of Denial Orders. By downloading or using the Software, you are agreeing to the foregoing and
you are representing and warranting that you are not located in, under the control of, or a national or resident of any such country
or on any such list.
License Compliance
5.1.
You agree that Chamberlain Access Solutions or our authorized representative may audit your use of the Software for compliance with the
terms of this EULA at any time, upon reasonable notice of 30 days.
5.2.
In the event that such audit reveals any use of the Software by you other than in full compliance with the terms of this EULA, you shall
reimburse Chamberlain Access Solutions for all reasonable expenses related to such audit in addition to any other liabilities you may incur
as a result of such non-compliance, including payment of additional license fees.
5.3.
Should legal action or arbitration be undertaken to enforce your compliance with this EULA, you agree to pay all court or arbitration costs,
reasonable attorney fees, fines and punitive damages that arise there from for yourself and for Chamberlain Access Solutions.
Warranty
6.1.
Limited Warranty
6.1.1.
Chamberlain Access Solutions warrants that the Software will perform substantially in accordance with the accompanying written
materials for a period of one year from the date of receipt by user if installed and used as directed by Chamberlain Access
Solutions (“Limited Warranty Period”). Any modification or attempted modification of the Software by user shall void this
Limited Warranty. Chamberlain Access Solutions does not warrant, however, that user’s use of the Software will be uninterrupted
or that the operation of the Software will be error-free or secure. During this Limited Warranty Period, user’s sole and exclusive
remedy for the breach of the foregoing Limited Warranty shall be the correction of or replacement of the Software, or if
Chamberlain Access Solutions is unable to correct the Software using commercially reasonable efforts, to terminate this EULA, in
which case only, the user shall receive a full refund from Chamberlain Access Solutions for the amount paid for the License and
Software.
6.1.2.
If applicable law requires any other warranties or implied warranties with respect to the Software, all such warranties are limited in
duration to ninety (90) days from the date of delivery to user. Some states/jurisdictions do not allow limitations on duration of an
implied warranty, so the above limitation may not apply to you.
6.2.
Warranty Disclaimer
6.2.1.
As-is
6.2.1.1.
You expressly acknowledge and agree that use of the Software is at your sole risk. The Software is provided "AS IS", and on
an "AS AVAILABLE" basis. The above Limited Warranty is exclusive and in lieu of and Chamberlain Access Solutions
disclaims all other warranties, whether express, implied or statutory (to the extent permitted by applicable law), with respect
to the Software, including but not limited to, warranties of quality, performance, title, non-infringement, merchantability or
fitness for a particular purpose, and warranties created by course of dealing, course of performance or trade usage. The user
acknowledges that it has relied on no warranties other than the express Limited Warranty set forth above, and that no
warranties are or have been made by Chamberlain Access Solutions' dealers.
6.2.1.2.
Any data downloaded through the use of the Software or from any Chamberlain Access Solutions source (including but not
limited to the Chamberlain Access Solutions web site, Chamberlain Access Solutions FTP site, or remote connection by
Chamberlain Access Solutions employees or representatives) is done at your own discretion and risk (even if recommended
by a Chamberlain Access Solutions employee or representative) and you will be solely responsible for any damages to your
computer system or loss of data that results from the download or use of any such material.
6.2.1.3.
The Software is not designed, intended or licensed for use in Life Safety or hazardous environments requiring fail-safe
controls, including without limitation, the design, construction, maintenance or operation of nuclear facilities, aircraft
navigation or communication systems, air traffic control, and life support or weapons systems. Chamberlain Access
Solutions specifically disclaims any express or implied warranty of fitness for such purposes.
6.2.1.4.
No oral or written information or advice given by Chamberlain Access Solutions, its dealers, distributors, agents or
employees shall create a warranty or in any way increase the scope of the Limited Warranty provided herein.
6.2.1.5.
The Limited Warranty does not apply to software provided to you free of charge, for example, pre-releases, demonstration,
product sampler, all of which are provided “AS IS,” or software that has been altered by you or your representative.
6.2.1.6.
This Limited Warranty is void if failure of the Software has resulted from force majeure, accident, abuse, or misapplication.
Any replacement Software will be warranted for the remainder of the original Limited Warranty Period or thirty (30) days,
whichever is longer.
110
TaskMaster Management Software User Guide
7.
Limitation of Liability
7.1.
TO THE MAXIMUM EXTENT PERMITTED BY APPLICABLE LAW, IN NO CIRCUMSTANCES AND UNDER NO LEGAL
THEORY, TORT, CONTRACT, OR OTHERWISE, SHALL CHAMBERLAIN ACCESS SOLUTIONS, OUR OFFICERS AND
EMPLOYEES (PAST, CURRENT AND FUTURE), OUR SUPPLIERS OR DEALERS BE LIABLE FOR ANY INDIRECT, SPECIAL,
INCIDENTAL, PUNITIVE, COVER OR CONSEQUENTIAL DAMAGES INCLUDING WITHOUT LIMITATION, DAMAGES FOR
COMPUTER FAILURE OR MALFUNCTION, LOST PROFITS, LOST SAVINGS, LOST BUSINESS, BUSINESS INTERRUPTION,
LOSS OF DATA, LOSS OF USE, WORK STOPPAGE, PENALTIES, FINES OR OTHER INCIDENTAL OR CONSEQUENTIAL
DAMAGES BY ANY PARTY, EVEN IF CHAMBERLAIN ACCESS SOLUTIONS HAS BEEN ADVISED OF THE POSSIBILITY OF
SUCH DAMAGES. SOME STATES DO NOT PERMIT DISCLAIMERS OF CERTAIN WARRANTIES OR LIMITATIONS ON
CERTAIN TYPES OF LIABILTY UNDER CERTAIN CIRCUMSTANCES; CONSEQUENTLY SOME OF THE FOREGOING
EXCLUSIONS MAY NOT APPLY TO YOU. IN SUCH STATES, THE LIABILITY OF CHAMBERLAIN ACCESS SOLUTIONS
SHALL BE LIMITED TO THE GREATEST EXTENT PERMITTED BY LAW.
Chamberlain Access Solutions' cumulative liability under this EULA shall be limited to and never exceed the amount of license fees paid
to purchase the Software giving rise to such liability or fifty United States dollars ($50), whichever is greater.
7.2.
Chamberlain Access Solutions, our suppliers, and our dealers shall have no responsibility or liability if the Software has been altered in any
way, or for any failure that arises out of use of the Software with a hardware configuration, platform, or operating system other than that
recommended by Chamberlain Access Solutions.
7.3.
The foregoing limitations on liability are intended to apply to all aspects of this EULA.
8.
Hold Harmless
8.1.
You agree to indemnify, hold harmless and defend Chamberlain Access Solutions, our officers and employees, agents, and dealers at your
expense against any claims or demands, actions, proceedings and suits and all related liabilities, losses, actions, damages, penalties, fines,
settlements, or claims (including all reasonable expenses, costs, and attorneys fees) without limitation arising out of or relating to any use
of, or reliance on, any Chamberlain Access Solutions software or equipment.
9.
Governing Law Jurisdiction
9.1.
This EULA shall be governed by and construed under Arizona law without regard to choice of law provisions, except that questions
affecting any copyright rights shall be determined by the law of the country in which such copyright issued. You hereby consent to the
exclusive jurisdiction and venue of the state and federal courts sitting in Maricopa County, Arizona. In each case, this EULA shall be
construed and enforced without regard to the United Nations Convention on the International Sale of Goods.
10. Enforceability
10.1. If any part of this EULA is found by a court of competent jurisdiction to be invalid, unlawful or unenforceable to any extent, that provision
shall be reformed only to the extent necessary to make it enforceable and will be enforced to the maximum extent permissible, and the
remaining terms, conditions and provisions of the EULA as amended will continue to be valid and enforceable to the fullest extent
permitted by law.
11. User Remedies
11.1. Chamberlain Access Solutions' and its suppliers' entire liability and your exclusive remedy shall be, at Chamberlain Access Solutions'
option, either refund of the purchase price paid for or the repair or replacement of the Software. Outside the United States, neither these
remedies nor any product support services offered by Chamberlain Access Solutions are available without proof of purchase from a
Chamberlain Access Solutions authorized distributor.
11.2. You agree that any legal challenge to this EULA or any dispute or controversy regarding the terms of this EULA must, at the sole option of
Chamberlain Access Solutions, be pursued via binding arbitration in Maricopa County, Arizona, USA. You agree to select an Arbitrator
that is knowledgeable about software and is a member of a major national arbitration association that is acceptable to Chamberlain Access
Solutions and you agree to pay for any and all arbitration fees. You also agree that the arbitration will be binding and shall finally settle any
dispute or controversy regarding the terms of this EULA and that you will pursue no further legal challenges, lawsuits, or appeals before or
after the arbitration. This agreement to arbitrate is also intended to include any disputes, controversy or claims that you may have against
any of Chamberlain Access Solutions' employees, agents, representatives or outside legal counsel arising out of or relating to matters
covered by this EULA. You and Chamberlain Access Solutions agree that the decision from the arbitration may be entered in any court of
competent jurisdiction. You, Chamberlain Access Solutions and the arbitrator shall treat all aspects of the arbitration proceedings,
including without limitation discovery, testimony, other evidence and briefs as confidential.
12. Upgrades and Updates
12.1. Chamberlain Access Solutions may from time to time present programming fixes, modifications, variations, updates and revisions
(collectively “updates”) to you, including version updates to the Software. You may accept or reject such updates to you, including version
updates at your sole discretion as long as you acknowledge that any obligation Chamberlain Access Solutions may have to support the
previous versions of the Software shall be considered to have ended upon the date of availability of the update.
12.2. If the Software is an update to a previous version of the Software, you must possess a valid license to such previous version in order to use
such update. All updates are provided to you on a license exchange basis. You agree that by using an update you voluntarily terminate your
right to use any previous version of the Software. As an exception, you may continue to use previous versions of the Software on your
computer after you use the update but only to assist you in the transition to the update, provided that the update and the previous versions
are installed on the same computer; the previous versions or copies thereof are not transferred to another party or computer unless all
copies of the update are also transferred to such party or computer.
12.3. Notwithstanding any other terms in this EULA, if the Software is licensed as an upgrade or Module, then you may only use the Software of
the Module to upgrade previously validly licensed versions of the Software. You agree that the Module does not constitute the granting of a
second license to the Software (i.e., you may not use the Module separate and in addition to the Software that the Module is upgrading, nor
may you transfer to a third party the originally licensed Software which is being upgraded separate from the Module).
12.4. Unless explicitly stated otherwise, any new features that augment or enhance the current Software, including the release of new updates,
shall be subject to terms of this EULA.
111
TaskMaster Management Software User Guide
13. Agreement
13.1. Complete Agreement
13.1.1.
This EULA constitutes the entire agreement between the parties with respect to the subject matter hereof, and supersedes all prior
or contemporaneous understandings or agreements, written or oral, regarding such subject matter. No amendment to or
modification of this EULA will be binding unless in writing and signed by the Chief Executive Officer of Chamberlain Access
Solutions.
13.1.2.
Installation or use of this Software for any period of time constitutes your acceptance of this EULA and agreement to be subject to
its contents.
13.1.3.
You agree that any varying or additional terms contained in any purchase order or other written notification or document issued by
you in relation to the Software licensed hereunder shall be of no effect.
13.1.4.
The failure or delay of Chamberlain Access Solutions to exercise any of its rights under this EULA or upon any breach of this
EULA shall not be deemed a waiver of those rights or of the breach.
13.1.5.
The terms of this EULA shall be binding upon and inure to the benefit of all permitted transferees and assignees of Chamberlain
Access Solutions and user.
13.2. Termination of EULA
13.2.1.
This License is effective until terminated. You may terminate this License at any time by destroying the Software and related
Documentation and all copies thereof. This License and your right to use the Software will terminate thirty (30) days after receipt
of the Software, unless the Software is registered with Chamberlain Access Solutions with appropriate compensation and
registration information.
13.2.2.
In the event that you fail to comply with this EULA, Chamberlain Access Solutions may terminate the License and you must
destroy or certify in writing the destruction of all copies of the Software in your possession. The termination of this EULA does
not relieve either Chamberlain Access Solutions or user of its rights and obligations that have previously accrued. Terms herein
that by their nature prescribe continuing obligations and rights shall survive the termination or expiration of this EULA.
13.2.3.
This EULA is immediately terminated in the event you are refunded the purchase price for whatever reason and you may no longer
use the Software without the written consent of Chamberlain Access Solutions.
13.2.4.
Upon termination of this EULA you must destroy or certify in writing the destruction of the Software along with any backups and
copies, uninstall it from any computers, and you must no longer use the Software in any way. Chamberlain Access Solutions
reserves the rights as listed in Section 5 to audit your compliance and ensure that you have destroyed all of your copies of the
Software, uninstalled it from any computers and that you are no longer using the Software in any way.
13.2.5.
It is your responsibility to comply with the terms of this EULA and to obey the laws of your jurisdiction. Your rights under this
EULA will terminate immediately and without prior notice if you violate any term of this License, including violating any
applicable laws or rights of any third party including the intellectual property rights of any such third party. You may be subject to
legal action if you continue to use the Software in violation of this EULA.
13.2.6.
Termination of the EULA by either party cancels any rights that you have under this EULA but does not terminate any of
Chamberlain Access Solutions' rights or protection that have accrued under this EULA. All provisions which must survive in order
to give effect to their meaning, shall survive any expiration or termination of this EULA, including without limitation all of your
representations, responsibilities, and indemnification obligations.
14. Technical Support Services
14.1. Chamberlain Access Solutions may provide you with Technical Support services related to the Software. With respect to technical
information you provide to Chamberlain Access Solutions as part of the Technical Support services, Chamberlain Access Solutions may
use such information for its business purposes, including for product support and development. Chamberlain Access Solutions will not
utilize such technical information in a form that personally identifies you.
14.2. Chamberlain Access Solutions Technical Support service may have fees and costs associated with utilizing and engaging such services
with the Software over and above the original purchase price of the License to use the Software. By using or installing the Software and
requesting that Chamberlain Access Solutions provide Chamberlain Access Solutions Technical Support service, you agree to pay to
Chamberlain Access Solutions these fees and costs, including any reasonable collection fees, late fees, and interest in a timely manner as a
part of this EULA.
15. Notice and Contact Information
15.1. All notices, requests, demands and other communications under this EULA shall be in writing and duly given or made: (a) on the date
delivered in person and acknowledged in writing; (b) on the date transmitted by facsimile, if confirmation is received; (c) three days after
deposit in the mail if sent by certified U.S. mail postage prepaid, return receipt requested; and (d) one day after deposit with Federal
Express or other nationally recognized overnight carrier service or overnight express U.S. mail with service charges or postage prepaid.
Such notices, requests, demands or other communications concerning this EULA shall be directed and sent to Chamberlain Access
Solutions’ Customer Service Manager at Chamberlain Access Solutions at the following address or fax number, 9160 East Bahia Drive,
Scottsdale, Arizona 85260, (480) 991-1395 (fax number), or as otherwise designated by Chamberlain Access Solutions.
112
TaskMaster Management Software User Guide
Standard 2 Year Equipment Warranty
Chamberlain Access Solutions warrants products and equipment manufactured by Chamberlain
Access Solutions to conform to its own specifications and to be free from defects in materials and
workmanship, under normal use and service, for a period of two years from the date of shipment.
Within the warranty period, Chamberlain Access Solutions will repair or replace, at its option, all or
any part of the warranted product which fails due to materials and/or workmanship. Chamberlain
Access Solutions will not be responsible for the dismantling and/or re-installation charges. To utilize
this warranty, the customer must be given a Return Material Authorization (RMA) number by
Chamberlain Access Solutions the customer must pay all shipping costs for returning the product to
Chamberlain Access Solutions
This warranty does not apply in cases of improper installation, misuse, failure to follow the installation
and operating instructions, alteration, abuse, accident, tampering, natural events (lightning, flooding,
storms, etc.), and repair by anyone other than Chamberlain Access Solutions.
This warranty is exclusive and in lieu of all other warranties, expressed or implied, including but not
limited to the implied warranties of merchantability and fitness for a particular purpose. Chamberlain
Access Solutions will not be liable to anyone for any consequential or incidental damages for breech
of this warranty or any other warranties.
This warranty will not be modified or varied. Chamberlain Access Solutions does not authorize any
person to act on its behalf to modify or vary this warranty. This warranty applies to Chamberlain
Access Solutions products only. All other products, accessories, or attachments used in conjunction
with Chamberlain Access Solutions equipment, including batteries, will be covered solely by their
own warranty, if any. Chamberlain Access Solutions will not be liable for any direct, incidental, or
consequential damage or loss whatsoever, caused by the malfunction of product due to products,
accessories, or attachments of other manufacturers, including batteries, used in conjunction with
Chamberlain Access Solutions products.
This warranty does not warrant the replacement of batteries that are used to power Chamberlain
Access Solutions products.
The customer recognizes that a properly installed and maintained security system may only reduce
the risk of events such as burglary, robbery, personal injury, and fire. It does not insure or guarantee
that there will be no death, personal damage, and/or damage to property as a result. Chamberlain
Access Solutions does not claim that the Product may not be compromised and/or circumvented, or
that the Product will prevent any death, personal and/or bodily injury and/or damage to property
resulting from burglary, robbery, fire, or otherwise, or that the Product will in all cases provide
adequate warning or protection.
Chamberlain Access Solutions products should only be installed by qualified installers. The customer
is responsible for verifying the qualifications of the selected installer.
Chamberlain Access Solutions shall have no liability for any death, injury, or damage, however
incurred, based on a claim that Chamberlain Access Solutions Products failed to function. However,
if Chamberlain Access Solutions is held liable, directly or indirectly, for any loss or damage arising
under this limited warranty or otherwise, Chamberlain Access Solutions’ maximum liability will not in
any case exceed the purchase price of the Product, which will be fixed as liquidated damages and
not as a penalty, and will be the complete and exclusive remedy against Chamberlain Access
Solutions.
113
TaskMaster Management Software User Guide
Glossary
A
ADP (Automatic Daily Processing): Daily processing that assesses rent and late fees, prints invoices and
reports, and closes the credit card batch. This MUST be run daily, generally before the start of business hours.
This is usually set up to run automatically.
AMP (Automatic Monthly Processing): The monthly processing that computes monthly totals for reporting.
Generally this takes place on the last day of the month and is set up to run automatically.
AWP (Automatic Weekly Processing): The weekly processing that computes weekly totals for reporting.
Generally this takes place on Sunday and is set up to run automatically.
AYP (Automatic Yearly Processing): The yearly processing that computes all yearly totals for reporting.
Generally this takes place on the last day of the last month of the year and is set up to run automatically.
Anti-passback: An access control function meant to prevent tailgating through gates or doors that are
controlled by keypads. It works by preventing a tenant from using the exit keypad if they didn’t key into the
entrance keypad OR preventing a tenant from using the entrance keypad if they didn’t key out the last time
they left the property. They must go to the office to have the manager log them off the property.
Assess: To impose a rate or fee to an account.
Alteration: A change to an account.
B
Boot: To start the computer by pressing the power button on the front of the CPU.
C
Central Office: A module in TaskMaster that allows a main site (headquarters) to run reports and financial
information from remote sites (facility locations).
Client Credits: A function that holds excess funds that have not yet been applied to the rent or fees on a
space. These funds are held in a “bucket” on the tenant’s account until they are applied by the manager.
Client Server Network: A network that has one Master Workstation or Server that acts as an information hub
on the network along with one or more Client Workstations used to access this information.
Client Workstation: A workstation or computer on a Client Server Network used to access information.
Convert: To combine two or more spaces together into one space in TaskMaster.
Converter: A device used to translate one electronic protocol/language to another. For example: RS485 to
RS232 or RS232 to USB.
Cursor: A blinking line, flashing box, arrow, or other symbol on the computer screen that shows you where you
can type or allows you to select an icon or checkbox.
CVV2 (Card Verification Value): A three or four digit number on the back of a credit card that is not stored in
the magnetic strip. This number is used to prevent fraud from stolen credit card numbers.
C:\ : The primary hard drive on most computers is referred to as the ‘C’ drive.
114
TaskMaster Management Software User Guide
D
Device: Keypad, multiplexer, relay board, or other equipment used with the Access Control System.
Desktop: In Microsoft Windows, the main screen of the computer. Usually contains shortcut icons that allow
users to quickly access commonly used programs.
Domain: Unique name used to identify an organization on the internet. Example: www.ptiaccess.com.
Double-click: In a standard computer setup, this means to quickly tap the button on the left side of a mouse twice.
E
EZ Task: The main screen of TaskMaster with shortcuts to the 10 most common functions.
E-mail: Electronic transmission of messages over a network.
F
Field: An area within a program where you can type data. Usually a white box with a cursor.
Firewall: A program or hardware located on a network gateway or server that protects the network from access
by non-authorized users.
FTP (File Transfer Protocol): A standard Internet protocol used to exchange files between computers on the internet.
G
GL (General Ledger): Account codes used for business accounting for reporting purposes.
Group No.: Used to distinguish between remote sites for the Central Office Software or FTP uploading.
Guest: An additional person on an account. May be an emergency contact, secondary contact, or true guest.
H
HTTP (Hyper Text Transfer Protocol): A protocol that defines how web sites are formatted, how they
function, and how they are displayed on the Internet.
Hub: A common connection point for devices (computers, printers, etc) within a Local Area Network.
I-J
Icon: Small pictures on the computer screen that represent functions or programs that can be run by clicking on them.
IP (Internet Protocol): A unique number assigned to identify a computer host on the internet. Also called an IP
Address. Usually represented by groups of numbers separated by a period or “dot”. For example 233.22.354.4
IT (Information Technology): A term referring to the study of computer processing and networks.
ISP (Internet Service Provider): A company that provides access to the internet.
Integer: A term for a whole number without decimals or fractions. Positive integers are greater than zero and
negative integers are less than zero.
Intranet: An in-house web site that serves the employees of a business. May be linked to the Internet but is not
a site accessed by the general public.
K
Kiosk: A freestanding computer station similar to an ATM that allows tenants to rent spaces, make payments,
and move out of spaces, without having to interact with a site representative. TaskMaster can interface with
SAM and Open Tech Alliances Insomniac.
115
TaskMaster Management Software User Guide
L
Late Fees: A charge that may be assessed if the tenant does not pay rent by the required time.
LAN (Local Area Network): Generally, a small network located inside one building or business used to
connect the computers together.
Levels: User rights to access information within TaskMaster. May be Unrestricted, Level 1, Level 2, or Level 3,
with Unrestricted as the highest amount of access and Level 3 as the least amount of access.
Letter Fees: A charge that is assessed when a letter is printed, such as a late letter or auction letter. Even
though this charge may be assessed with a late letter, it is NOT the same as a late fee. This is a separate
charge.
M
Main Site: In Central Office, this is where the software is run from. Usually this is the headquarters.
Master Workstation: A computer that acts as a server on a client server network, but also can be used as a
workstation.
Merge Fields: Variables that may be placed within letters that reference specific information in TaskMaster that
is different for each tenant.
Modem: A device that allows computers to access the internet or another computer through telephone lines.
Multiplexer: A connection point for door alarms within the Access Control system. Also called a Mux.
Mux: see multiplexer.
N
NSF (Non-Sufficient Funds): The state that occurs when a check that is presented against a bank account
does not have enough funds on deposit to cover the check.
Network: Two or more computers and other devices, such as printers, that are connected together into one
system allowing information to be accessed from multiple computers.
Non-Client Sale: A sale of merchandise to a customer who is not an existing tenant or client within the
TaskMaster Database.
O
Open Tech Alliance: A company that sells a kiosk that can be interfaced to TaskMaster.
P–Q
P2P (Peer to Peer): A network setup where each computer on the network acts as the server as needed.
Generally used for small household networks. TaskMaster Networking does NOT work on a Peer to Peer
Network.
PayXpress: A module within TaskMaster that allows tenants to pay rent and fees at the keypad.
Pending Folder: Location where letters, invoices, and automatic credit cards have to be printed if they are not
set to print automatically during the ADP process.
Provider: See ISP.
Protocol: Rules governing transmitting and receiving of data. See RS232, RS485, and USB.
116
TaskMaster Management Software User Guide
R
Region No.: A number used to distinguish between sites for Central Office and FTP uploading.
Relay board: A device used to control lights, elevators, and access. Available from Chamberlain Access
solutions in 2 or 8 channels.
Remote Site: In the TaskMaster Central Office module, these are sites that are connected to the Central Office
but are actually in a different location. Most commonly, these are the actual self storage business locations. In
the Access Control system, a remote site is an unmanned site that is run from a main location.
Right-Click: In a standard computer setup, this means to press and hold the button on the right side of the
mouse while the cursor is placed over an icon
Router: A device used on a network that forwards data on through another network.
S
SAM: A kiosk that can be interfaced to TaskMaster.
Server: A computer that controls and stores information on a network.
Single Click: In a standard computer setup, this means to quickly press the button on the left side of a mouse
one time.
SMTP (Simple Mail Transfer Protocol): An internet protocol used to send e-mail.
Start Bar: see Task Bar
System Tray: An area on the right side of the Windows taskbar (usually in the lower right-hand corner of the
screen) used to display the status of various functions.
T
Taskbar: In TaskMaster, the Taskbar is a bar along the left-hand side of the screen that has icons to access
different parts of the program.
Tiered: Used in reference to late fees. Late fees can be set up in tiers or levels based on the rent amount.
Time Zone: Time Zones are a function of access control systems that work differently with each system. With
the Falcon and Falcon XT Access Control Systems, Time Zones control the hours that a tenant is allowed to
enter the site and the areas that they are allowed access into.
U–V
USB (Universal Serial Bus): A port on computers that connects with USB compatible devices.
VPN (Virtual Private Network): A private network that is configured within a public network (a carrier’s
network or the internet). This allows a less expensive WAN (wide area network) to be created on the internet so
that you don’t actually have to run private lines.
W–Z
WAN (Wide Area Network): 1. A network that generally connects separate buildings/sites owned by one
company so that computers can access information between sites. 2. Another way to reference to the Internet.
Web Access Code: Code used with the WebXpress Module for the client to gain access to WebXpress to
make payments or modify their account.
Workstation: A computer on a network that can be used to access the network.
117
TaskMaster Management Software User Guide
Index
1
123 Accounting Screen, 17, 22, 24, 28, 35, 37, 63, 99
A
About TaskMaster, 105
AC (See also Power), 9, 12, 22, 62
Access, 6, 9, 14, 16, 22, 28, 30, 43, 48, 49, 51, 53, 54, 55, 61,
63, 66, 67, 77, 95, 96, 99, 103, 113, 115, 116, 117, 118
Access Control, 9, 95, 96, 113, 117
Gate Access (See also Access, 54, 61, 63, 95, 96, 103
Access Hours, 61, 103
Access Log, 5, 26, 27, 40, 88, 113
Access System, 95, 103
Accessing & Editing Client Data, 27
Account Information, 22, 23
Accounting, 10, 11, 17, 22, 23, 24, 25, 28, 35, 37, 63, 69, 73,
93, 99, 114
Activate, 37, 39, 94
Active, 11, 12, 25, 30, 32, 33, 44, 48, 74, 75, 81, 88, 90
Active Clients, 11, 12
Add a Client, 41, 45, 46
Add a Guest, 14, 27, 30
Add Operators, 6
ADP (Automatic Daily Processing), 7, 8, 51, 69, 101, 115, 116
Agreement, 2, 12, 106, 107
Agreement Number, 12
Alter Menu, 23
Alternate Address, 14
AMP (Automatic Monthly Processing), 7, 101, 113
Approvals, 82, 84, 86
Area Manager, 69
Assess a Charge, 22
Assessments, 18, 22, 79, 80, 101
Assistant Managers, 6
Attach a Fee, 22
Auction, 58, 61, 115
Audit Reports, 69
Automatic Letters (See also Letters), 54
Automatic Logoff (See Also Log Out), 40
Automatic Reports, 54, 68, 69, 70, 72, 101
Automatic Reports (See also Reports), 54, 68, 69, 70, 72, 101
Automatic System Processing (See also System Processing),
100, 101
Automatically Charge Credit Card, 30, 85
AWP (Automatic Weekly Processing), 7, 101, 113
AYP (Automatic Yearly Processing), 101, 113
B
Backup Data Files, 100, 101
Bad Debt, 23
Balance, 16, 20, 23, 99
Balance Due, 16, 20, 99
Bank, 4, 16, 32, 33, 53, 73, 81, 113
Bank Deposit, 32, 33, 81
Base Rate, 79, 80
118
Batch Control (See also Credit Cards), 82, 83, 84
Bed Debt, 23
Billing, 14, 27, 28, 30, 35, 37, 48, 63, 64, 83, 85, 92
Billing Info, 14, 27, 28, 30, 48, 85
Billing Screen, 14, 27, 28, 30, 35, 37, 48, 63, 64, 83, 85, 92
Business Name, 12, 29, 62, 65
Business Partner, 30
C
Calculator, 41, 48
Camera Module, 3, 13, 20, 29, 30, 51, 76, 77, 78
Card Verification Value, 83, 85, 86
Cash, 16, 17, 32, 33, 73
Central Office, 2, 3, 33, 70, 76, 87, 88, 89, 90
Central Office Module, 2, 3, 33, 70, 76, 87, 88, 89, 90
Certificate, 4
Change Lease Space Type, 26
Change Next Invoice Date, 103
Changes & Fixes, 105
Channel, 26
Check(s), 12, 16, 18, 19, 22, 24, 27, 30, 31, 32, 35, 37, 61, 62,
63, 77, 95, 99, 115
Check Number, 12, 16
Clear Network Locks, 102
Client, 4, 5, 9, 10, 11, 12, 13, 14, 16, 17, 18, 19, 20, 21, 22, 23,
25, 27, 28, 29, 30, 31, 32, 33, 34, 35, 36, 37, 38, 39, 41, 42,
45, 46, 47, 48, 50, 58, 60, 61, 62, 63, 64, 65, 66, 73, 74, 77,
78, 79, 80, 83, 84, 85, 86, 87, 91, 92, 93, 94, 95, 96, 99,
102, 115, 117
Client Credits, 17, 22, 27, 33, 62
Client Data, 9, 25, 27, 28, 50, 73, 78, 85, 95
Client Data Tab, 28
Client Information Sheet, 99
Client Information Window, 99
Client Name, 12, 22, 29, 60
Client Task Tab, 9
Code, 12, 13, 61, 62, 63, 64, 65, 67, 84, 85, 86, 95, 96, 97, 99,
117
Comm Ports, 4, 72, 77, 78, 89, 117
Comments, 27, 28
Commission (See also Rental Agents), 75
Computer, 3, 4, 7, 29, 40, 44, 77, 78, 87, 88, 89, 92, 93, 97,
101, 102, 103, 105, 113, 114, 115, 116, 117
Configuration, 5, 6, 50, 56, 66, 67, 89
Contact PTI, 73, 94, 105
Conversion, 5
Convert, 26
Credit Card Module (See also Credit Cards), 76, 81
Credit Cards, 2, 14, 16, 30, 32, 53, 63, 64, 76, 81, 82, 83, 84,
85, 86, 96, 113, 116
Custom, 30, 50, 58, 92, 96, 103
Custom Messages, 30, 58
Customize, 7, 24, 31, 55, 60, 73, 74, 90, 97
CVV2, 83, 85, 86
D
Daily Operator Tasks, 10
Data, 5, 8, 9, 11, 24, 28, 52, 53, 60, 61, 62, 64, 73, 74, 78, 81,
85, 87, 88, 90, 95, 100, 101, 114, 116
TaskMaster Management Software User Guide
Data Insert Fields (See also Merge Fields), 60, 62, 64
Date of Birth (DOB), 13, 29, 62
Declarations, 106, 107
Declines, 39, 82, 86
Default General Ledger Accounts (See also General Ledger),
54
Demo, 5
Demographics & Marketing (See also Marketing), 68, 74
Deposit, 65, 99, 115
Deposits, 65, 99, 115
Detail & Alter Information, 22, 35, 37, 39, 63, 65
Discounts, 6, 14, 19, 20, 27, 34, 35, 37, 38, 64
Discounts & Promotions, 27, 34
Display Sequence, 56
District Manager, 5, 6, 70
Document Merge Fields (See also Merge Fields), 49, 58, 60,
61
Documents, 8, 12, 16, 27, 30, 31, 58, 60, 61, 62, 63, 64, 65, 85,
94, 103, 115
Download, 87, 91, 95, 103, 107
Download Program Update, 103
Drivers License, 12, 29, 62, 64
DVD, 101
E
Edit Client Data, 25
Edit Operators, 6
Electric Module, 76, 79
E-Mail, 13, 24, 31, 43, 52, 61, 62, 63, 69, 70, 71, 72, 73, 116
E-mail Reports, 70
Emergency Contact (See also Guest), 14, 30, 114
End of Day, 69, 71
End of Day (EOD), 71, 72
End of Month, 69, 70, 71, 72
End of Month (EOM), 71, 72
End of Week, 7, 69, 70, 71, 72
End of Week (EOW), 71, 72
End of Year, 69, 70, 71, 72
Entry, 8, 28, 71
Errors, 43, 105
EULA, 106, 107
Events, 7, 43, 52, 70, 72, 101
Excel, 24, 73
Exit, 17, 74, 99, 113
Export, 24, 68, 73
External Hard Drive, 101
EZ Task, 2, 10, 11, 12, 13, 18, 19, 20, 21, 22, 24, 25, 26, 42,
86
F
F8, 40
Facility, 9, 18, 19, 54, 61, 74, 113
Fax, 61
Fees, 49, 54, 57, 58, 62, 63, 64, 65, 101, 102, 113, 116, 117
Fields, 5, 7, 12, 13, 16, 17, 18, 19, 30, 31, 33, 34, 35, 36, 37,
38, 40, 42, 43, 49, 54, 58, 59, 60, 61, 62, 64, 65, 66, 69, 73,
75, 79, 80, 81, 83, 84, 85, 86, 89, 90, 98
File, 8, 20, 29, 30, 40, 45, 52, 69, 73, 77, 78, 87, 88, 93, 99,
101, 102, 105
Financial Data, 53, 81, 87
Firewall, 3, 4
Flash Drive, 101
Force #, 84
FTP, 3, 54, 69, 72, 87, 88, 89, 91
Function Keys, 40
Functions, 1, 6, 9, 17, 24, 26, 30, 33, 37, 38, 39, 40, 43, 45, 46,
47, 51, 55, 60, 66, 67, 69, 73, 74, 75, 76, 79, 80, 84, 91, 93,
101, 102, 103, 113, 114, 117
G
Gate, 13, 22, 54, 61, 63, 76, 95, 96, 103
Gate Interface, 76, 95
Gate Interface Module, 76, 95
General Data, 53, 61, 90
General Ledger (GL), 54, 67
Glossary of Terms, 113
GoDaddy, 4
Graphics, 60, 76, 97, 98, 99
Guests, 11, 12, 14, 25, 27, 29, 30, 62, 63, 64, 114
H
Hard Drive, 113
Help, 2, 5, 13, 14, 24, 75, 76, 83, 91, 92, 104, 105, 106
Help Menu, 104, 105
History, 16, 22, 26, 28, 29, 62, 63, 99
History of Renters, 26
Host, 3, 114
Hot Keys, 41
HTML, 24, 105
I
ID, 12, 13, 14, 25, 27, 28, 29, 30, 40, 56, 61, 62, 63, 64, 77, 78,
81, 91, 96, 97, 98
Identification, 12, 13, 14, 25, 27, 28, 29, 30, 40, 56, 61, 62, 63,
64, 77, 78, 81, 91, 96, 97, 98
Identification Screen, 13, 25, 27, 28, 29, 30, 56, 61, 62, 63, 64,
77, 78, 96
Import, 29, 68, 73, 78
Import/Export, 68, 73
Inactivate, 6, 13, 67
Inactive, 12, 66, 67, 81
Inactive Clients, 12
Index, 105, 118
Initial Setup Checklist, 1, 5
Initial TaskMaster Setup, 1, 5, 45, 60, 79, 80, 91
Inquire, 82
Insomniac®, 92
Insurance, 20, 27, 39, 59, 67
Internet, 2, 3, 5, 24, 52, 71, 76, 77, 81, 86, 87, 91, 92, 105, 106,
114, 115, 116, 117
Introduction, 1
Invalid Address, 29
Invalid Phone Number, 29
Inventory, 11, 21, 33, 66, 67
Invoice Number, 12
Invoices, 8, 12, 30, 31, 58, 62, 63, 65, 103, 113, 116
IP, 3, 4, 87, 101
119
TaskMaster Management Software User Guide
IT, 4, 5, 6, 7, 9, 12, 15, 17, 18, 19, 21, 23, 24, 25, 26, 28, 29,
31, 33, 35, 40, 42, 43, 44, 45, 46, 48, 51, 56, 57, 60, 65, 66,
67, 72, 74, 83, 84, 89, 91, 94, 97, 99, 109, 114, 115
K
Keyboard, 11, 21, 40, 43, 56
Keypad, 115, 116, 118
Kiosk Module, 76, 92, 115
L
Late Fee Schedule, 53
Late Fees, 32, 57, 62, 63, 64, 66, 113, 117
Late Letters (See also Letters), 54
Law, 7, 60, 102, 107
Lawyer, 7, 60
Lease a Space, 14, 19, 34, 45
Lease an Additional Space, 10, 11, 20, 36, 38
Legal, 7, 60, 102, 107
Letters, 7, 14, 30, 54, 58, 59, 60, 61, 62, 65, 115, 116
Level 1 (See also Operator Access Levels), 6, 40, 55
Level 2 (See also Operator Access Levels), 6, 40, 55
Level 3 (See also Operator Access Levels), 6, 40, 55
Levels, 5, 6, 40, 50, 51, 55, 105
License, 106, 107
License Agreement, 2, 12, 13, 29, 51, 62, 64, 77, 93, 106, 107
List of Clients, 10, 11, 25
List of Spaces, 10, 11, 26
Log (See also Access Log), 5, 26, 27, 40, 88, 113
Log In, 5, 27, 40, 72, 89, 91
Log In / Log Out, 27, 40
Log Out, 27, 40
Logo, 8
M
Mail Order Phone Order (MOPO), 83, 86
Maintain Insurance Carriers, 59, 67
Maintain Insurance Items, 39
Maintain Lease Types, 56, 59, 66
Maintain Letters, 7, 58, 59, 60
Maintain Merchandise, 15, 21, 59, 67
Maintenance, 7, 9, 15, 21, 26, 39, 40, 50, 51, 53, 55, 56, 58,
59, 60, 66, 67, 69, 71, 77, 81, 82, 83, 84, 86, 90
Maintenance Log, 26
Maintenance Tab, 51, 53
Management, 2, 5, 68, 69, 73, 74, 76, 87, 90, 102, 103
Management Company, 90, 103
Management Tools, 68
Manager, 5, 6, 17, 42, 48, 56, 61, 69, 70, 79, 80, 82, 91, 92, 97,
113
Manual Authorization, 86
Marketing, 14, 18, 68, 73, 74, 87
MAS90 ®, 73
Menu Bar, 9, 11, 15, 18, 19, 21, 24, 32, 33, 39, 40, 43, 46, 47,
51, 55, 56, 57, 58, 59, 60, 66, 67, 69, 73, 74, 75, 79, 80, 91,
95, 101, 102, 105
Merchandise, 10, 11, 15, 17, 21, 27, 33, 45, 59, 63, 67, 115
Merchandise Returns, 17, 27, 33
Merchandise Sales, 10, 11, 15, 21, 33, 63
120
Merchandise Sales Screen, 10, 11, 15, 21, 33, 63
Merge Fields, 59, 61
Meter, 79, 80
Microsoft®, 4, 60, 73, 78
Modems, 3, 51
Modules, 2, 3, 9, 13, 20, 29, 51, 76, 77, 78, 79, 80, 81, 89, 92,
97, 113 116
MOPO (Mail Order Phone Order), 83, 86
Mouse, 98, 114 116
Move In, 10, 11, 13, 19, 34, 39, 45, 74, 96, 99
Move Out, 10, 11, 17, 18, 19, 20, 22, 60, 74, 84, 87, 89, 95,
115, 116
Multiplexer (Mux), 26, 114, 115
N
Name, 4, 5, 8, 12, 13, 22, 25, 27, 28, 29, 45, 48, 53, 60, 61, 62,
63, 64, 65, 66, 67, 71, 72, 73, 81, 83, 85, 88, 89, 99, 114
Name & Address, 13, 27, 28, 29, 53, 62, 63, 64, 65, 99
Name & Address Screen, 13, 27, 28, 29, 53, 62, 63, 64, 65, 99
Navigation, 9, 28, 50
Network, 4, 76, 87, 93, 94, 102, 113, 114, 115, 116, 117
Network Solutions, 4
New Client Move In, 10, 11, 13, 19, 34, 39, 45, 66, 74, 77, 78,
85, 96, 99
New Client Move In Wizard, 13, 34
New Month Start, 69
New Rental, 5
Non-Client Sale, 21
Notice, 13, 18, 37, 46, 61, 102, 107
Notification, 44, 46
NSF Checks, 27, 30, 32, 61, 62, 63
O
Open, 4, 11, 16, 23, 25, 55, 78, 82, 89, 90, 92, 93, 95, 97, 102
Open Tech Alliance, 92
Opening TaskMaster, 1, 5
Operator Access Levels, 5, 6, 40, 49, 51, 55
Operator Setup, 6
Operator Tools, 41
Operators, 5, 6, 10, 24, 27, 28, 40, 41, 49, 51, 55, 102
Overlock, 16, 61, 63
Overview, 1, 9
Overview of Function Navigation, 9
Owner, 2, 5, 6, 65, 87, 90, 92
P
Paid To Date, 22, 64
Paint, 78
Panning, 97, 98
Password, 5, 40, 72, 89, 91
Payment, 9, 10, 11, 15, 16, 17, 19, 21, 25, 29, 30, 32, 62, 63,
65, 75, 81, 85, 86, 91, 92, 99
Payment Screen, 15, 16, 17, 30, 62, 63, 65
Payments, 9, 10, 11, 15, 16, 17, 19, 21, 25, 29, 30, 32, 62, 63,
65, 75, 81, 85, 86, 91, 92, 99
PayXpress, 2
PDF, 24
Pervasive®, 93, 94
TaskMaster Management Software User Guide
Photos (See also Camera Module), 20, 29, 30, 51, 77, 78
Picture (See also Camera Module), 13, 20, 29, 77, 78, 98
Pinning an Account, 41, 48
Policy, 23, 39, 102
Ports, 4, 72, 77, 78, 89, 117
Potential Client Inquiries, 41, 47
Power, 9, 12, 22, 62, 79, 80
Preauthorization, 84
Prepay, 16, 17, 23, 63
Print, 16, 24, 30, 31, 33, 37, 69, 70, 72, 78, 79, 80, 85, 90, 116
Printers, 43, 51, 77, 114, 115
Printers & More, 51, 77
Promotions In Use, 6, 14, 27, 34
Q
Questions & Answers (See also Marketing), 18, 74
Quick Assign Spaces, 102
QuickBooks ®, 73
R
Rate, 27, 34, 35, 36, 37, 38, 39, 57, 63, 64, 65, 66, 79, 80, 83,
99, 102, 113
Rate Changes, 27, 37, 79
Receipt, 8, 12, 16, 30, 62, 85
Receipts, 8, 30, 33, 58, 62, 65
Refund, 17, 18, 27, 33, 63, 65
Refund Client Credits, 27, 33
Registration, 51
Relay, 88, 114
Remote Assistance, 3, 4, 94
Remote Devices, 116
Remote Sites, 3, 87, 88, 89, 90, 113, 114, 116
Remove/Transfer, 22
Rent, 2, 11, 17, 18, 20, 23, 26, 30, 34, 35, 36, 38, 39, 45, 46,
48, 63, 64, 66, 91, 92, 99, 101, 113, 115, 116, 117
Rental, 5, 6, 14, 16, 19, 22, 34, 35, 36, 38, 41, 47, 57, 63, 64,
66, 68, 75, 92
Rental Agents, 68, 75
Rental Inquiries, 41, 47
Rented Spaces, 11, 99
Reports, 8, 10, 11, 16, 24, 37, 38, 52, 53, 54, 56, 58, 66, 68, 69,
70, 71, 72, 73, 74, 79, 80, 90, 101, 113
Required Fields, 5, 13, 45
Requirements, 1, 2, 3, 4, 7, 53, 60, 66, 93
Reserve, 45, 46
Reset Access Hours to Standard, 103
Resolution, 3
Restore Data Files, 100
Return for Credit, 84
Returns, 17, 27, 35, 84
Reversing Payments, 27, 32
Router, 4
S
SAM®, 92
Schedule a Task, 69, 70, 72
Schedule Event, 69, 70, 72
Schedule Events, 7, 52, 69, 101
Scheduling a Task, 28, 41, 43, 44
Scrolling Marquee, 41, 42, 99
Search, 12, 18, 19, 20, 21, 32, 33, 46
Search By, 12
Search by ID, 12
Search by Multiple Choices, 12
Search Here, 12
Searching in TaskMaster, 10, 12, 18, 19, 20, 21, 32, 33, 46
Secondary Contact (See also Guest), 14, 30, 62, 63, 114
Secure, 4, 55
Security Access, 95, 96
Security Deposit, 65, 84
Server, 3, 4, 69, 87, 89, 93, 94, 114, 115, 116
Set Mux & Channel, 26
Settle, 82
Setup, 1, 5, 6, 7, 14, 17, 18, 19, 24, 34, 39, 40, 49, 50, 51, 52,
53, 54, 55, 56, 57, 61, 63, 67, 69, 70, 71, 72, 73, 74, 75, 77,
81, 82, 85, 87, 88, 89, 90, 91, 92, 93, 94, 95, 97, 101, 103,
113, 114, 116
Setup Lease Spaces, 49, 56
Setup New Client, 5
Setup Tools, 49
Site Maintenance (Setup) (See Also Site Setup), 81, 90
Site Master Graphics, 60, 76, 97, 98, 99
Site Policies, 18, 19, 37, 53, 61, 63, 102
Site Setup, 5, 6, 14, 17, 18, 19, 49, 50, 53, 57, 61, 63, 69, 74,
81, 101, 102, 103
Social Security Number (SSN), 12, 29
Software End User License Agreement, 106, 107
Solomon Cash Management ®, 73
Space, 10, 11, 12, 14–20, 22, 26, 34–39, 45, 46, 48, 56, 63–67,
73, 74, 77, 79, 80, 95, 97–99, 102, 113
Space ID, 12, 14, 63
Special Commands, 102, 103
Special Functions, 95, 100, 102
Support (See also Technical Support), 2, 6, 50, 51, 55, 73, 84,
88, 89, 94, 95, 97, 102, 103, 104
Swipe Reader, 81, 83, 85, 86, 96
Synchronize, 8, 95, 103
Synchronize Access System, 95, 103
System, 2, 1, 2, 3, 4, 6, 7, 8, 14, 17, 19, 22, 24, 35, 40, 43, 46,
49, 50, 51, 53, 56, 57, 58, 60, 61, 67, 71, 72, 73, 75, 77, 81,
89, 93, 95, 96, 99, 100, 101, 102, 103, 105, 115, 116, 117
System Functions, 43, 100
System Maintenance (Setup) (See Also System Setup), 7, 71,
77, 101
System Processing, 2, 7, 8, 51, 52, 53, 54, 60, 61, 69, 81, 82,
84, 85, 86, 100, 101, 113, 114, 116
System Requirements, 1, 2, 3, 4, 7, 53, 60, 66, 93
System Requirements for Basic TaskMaster, 2
System Setup, 6, 24, 40, 49, 50, 51, 53, 75, 77, 101
System Tray, 81, 89, 100
System Tray Items, 100
T
Take a Payment, 15, 16, 17
Task Scheduler, 7, 28, 41, 43, 44, 52, 70, 72, 101
Taskbar, 5, 6, 7, 9, 11, 28, 30, 31, 39, 51, 53, 55, 66, 67, 71,
72, 77, 78, 85, 95, 96, 116
TaskMaster, 2, 1, 2, 5, 7, 9, 10, 11, 12, 17, 18, 19, 20, 21, 23,
28, 30, 33, 34, 39, 40, 42, 44, 45, 46, 48, 50, 51, 52, 55, 56,
121
TaskMaster Management Software User Guide
58, 60, 66, 67, 73, 74, 76, 78, 81, 83, 84, 85, 87, 88, 89, 90,
91, 92, 93, 94, 95, 96, 101, 102, 103, 104, 105, 106
Tasks, 2, 10, 21, 27, 32, 33, 43, 47, 59, 71, 72, 103
Tax Exempt, 30, 73
TCP/IP, 4
Technical Support, 2, 5, 6, 50, 51, 55, 73, 84, 88, 89, 94, 95,
97, 102, 103, 104
Technician, 4, 97, 105
Tiered Fees, 49, 57
TM License Number, 51
TM Online Help, 105
Toolbar, 9, 11, 40, 48, 86, 97
Trademarks, 2
Training, 2, 5, 91, 92, 104, 105
Transfer, 10, 11, 17, 19, 20, 22, 60, 74, 84, 87, 89, 95, 116
True Week, 69
U
Unrestricted, 5, 6, 40, 55
Unrestricted (See also Operator Access Levels), 5, 6, 40, 55
Unrestricted User, 5, 6, 40
Update TaskMaster, 103
Upload, 69, 70, 72, 88, 91
Usage Rate, 79, 80
User, 2, 4, 5, 6, 13, 15, 18, 25, 28, 29, 30, 43, 50, 55, 82, 93,
97, 105, 106, 107, 115
Utility, 5, 6, 56, 61
Utilities, 5, 6, 7, 14, 15, 18, 19, 21, 24, 39, 43, 56, 57, 58, 59,
60, 66, 67, 69, 74, 75, 79, 80, 91, 95, 102
Vehicle, 12, 13, 29, 64
Verification, 77, 81, 83, 86, 94, 113
Verisign, 4
Version, 94, 105
View, 2, 9, 11, 26, 82, 90, 97, 98, 105
Voids, 82, 83
VPN, 87, 89
W
Wait List, 41, 45, 46
Walk Through Order, 56
Water Module, 76, 79, 80
Web, 2, 5, 52, 76, 91, 92, 105, 114, 115
Web Sales Module, 76, 91
Website, 2, 5, 92
WebXpress, 2, 4, 76, 92
WebXpress Module, 2, 4, 76, 92
Windows, 5, 7, 9, 12, 16, 18, 19, 24, 31, 32, 34, 39, 42, 43, 48,
56, 60, 67, 71, 73, 74, 77, 78, 81, 82, 83, 86, 88, 89, 90, 91,
97, 99, 105
Workstation, 93, 94, 113, 115
Write Off, 23
Z
Zoom, 98
V
Vacant Spaces, 99
Vacate a Space/Move Out, 10, 11, 18, 74
For Technical Support, Please Call:
1-888-528-7826
www.chamberlainaccess.com
122