1
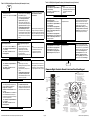
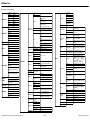
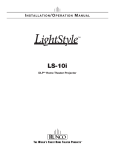
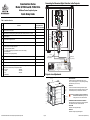
Connecting the Dimension Digital Controller to the Projector
QuantumColor Series
Model Q-1500d and Q-1500d Ultra
LED Home Theater Projection System
Quick Setup Guide
Table 1. Installation Overview
PRIMARY
Step
PRIMARY
Procedure
For Details, Refer to this page
in the Q-1500d Series
Installation/Operation Manual
1
Choose a location for the projector
21
2
Install CineWide lens mounting assembly (stationary base plate or AutoScope lens motor – optional)
29
3
Mount the projector
34
4
Mount the Dimension Digital Controller
35
5
Connect the Dimension Digital Controller to the projector
36
38
6
Connect other external equipment to the Dimension Digital Controller (optional):
• Audio processor or secondary display device
• Control system interface (RS-232)
• 12-volt trigger-activated equipment (retractable screens or screen masking)
• External IR repeater
• Network hub, router or gateway (Ethernet)
7
Connect signal sources to the Dimension Digital Controller
43
8
Connect system components to AC power
48
9
Power up the system and perform optical alignment procedures (refer to Table 2)
49
RJ-11
to DB-9
Adapters
(provided)
SECONDARY
SECONDARY
RS-232
Communication
Cables (provided)
HDMI Cables
(not provided)
Primary and Secondary
Display Control
TRIGGERS
3D SYNC
1
10
Display calibration — Dimension Digital Controller: adjust the following for each input and display
mode (resolution and frame rate); save settings when finished:
• Aspect ratio
• Brightness
• Contrast
• Color level
• Tint
• Sharpness
• White Balance
66
2
Component / SCART
HD1
DisplayPort
r
HD2
Pri. Display Control
US
Sec. Display Control
IR
3
Y
Video 1
Video 2
Pb
Pr
Video 3
HDMI
HDMI 5
HDMI 7
HDMI Out
To Secondary
Display
HDMI 2
HDMI 4
HDMI 6
HDMI 8
Ethernet
HDMI Out
To Sec. Display
HDMI Out
Audio Only
HDMI Out
To Pri. Display
HDMI Out
To Primary
Display
Projector Lens Adjustments
• PROJECTION LENS
Available in three versions: standard throw range (1.94:1 to
2.40:1), short throw range (1.64:1 to 1.86:1) and long throw range
(Q-1500d Ultra only; 2.52:1 to 4.00:1).
Intake Side
Exhaust Side
Projection
Lens
Zoom
Tab
Projection
Lens
Zoom
Tab
Lens
Lock
Focus
Ring
Lens
Lock
Focus
Ring
Horizontal Lens Shift
Control
Vertical Lens Shift
Control
Horizontal Lens Shift
Control
Vertical Lens Shift
Control
Primary
Optical
Engine
• LENS LOCK
Freezes the zoom and lens shift settings to keep the projector
images aligned over time. Use the supplied, 5.0-mm Hex wrench
to lock the lens position. (Turn clockwise two or three turns.)
WARNING Do not attempt any primary lens adjustments
Secondary
Optical
Engine
when the lenses are locked. Doing so may cause
damage to the zoom or lens shift mechanisms.
• HORIZONTAL AND VERTICAL LENS SHIFT CONTROLS
Insert the supplied, 5.0-mm Hex wrench into the opening and turn
it as needed to shift the lens in the desired direction.
• FOCUS RING
Rotate this to focus the projected image.
• ZOOM TAB
Rotate this to change the projected image size.
Q-1500d Series LED Home Theater Projection System Quick Setup Guide
Page 1
020-1091-02 Rev. A (March 2014)
Table 2. Q-1500d Optical Alignment Procedure (with Anamorphic Lenses) (Continued)
Table 2. Q-1500d Optical Alignment Procedure (with Anamorphic Lenses)
START
Dimension Digital Controller
1. Leave system off for now.
2. Connect an active 1080p source to the HDMI 1
connector.
Dimension Digital Controller
1.
2.
3.
Turn on system and select the HDMI 1 input.
Select Calibration -> Adjustment Mode and
set it to Primary.
Select Service -> Test Video and choose
Primary Alignment.
Dimension Digital Controller
1.
2.
Select Calibration -> Adjustment Mode and
set it to Secondary.
Select Service -> Test Video and choose
Secondary Alignment.
Dimension Digital Controller
1. For a ceiling-mounted (inverted) and/or rearprojection installation, select Service ->
Display Device -> Configure ->
Installation -> Picture Orientation and set it
as needed.
2. Select Aspect Ratio and set it to Cinema. On
a Q-1500d/CineWide with AutoScope, this
should position the anamorphic lens transport
in front of the primary lenses.
3. Select Calibration -> Adjustment Mode and
set it to Primary.
4. Select Service -> Test Video and choose
Primary Alignment.
Projector
1. Mount the projector (refer to Mounting
the Q-1500d on page 34).
2. Mount the Dimension Digital Controller
(refer to Mounting the Dimension
Digital Controller on page 35).
3. Connect system components to each
other and to external equipment (refer to
System Interconnections on page 36).
4. Q-1500d/CineWide with AutoScope
only: Install anamorphic lenses in
retracted position (out of the light path)
and ensure that the AutoScope transport
motor AC switch is in the “off” position.
5. Loosen the lock screw for both primary
lenses.
Projector (Align Primary Image with
Screen)
1. Adjust the ceiling mount to correct for
image keystone and clocking.
2. Align the image to the screen by
adjusting the top primary lens zoom,
focus and H/V offset.
3. Tighten the top primary lens lock screw.
Projector (Align Secondary Image with
Screen)
1. Align the image to the screen by
adjusting the bottom primary lens zoom,
focus and H/V offset.
2. Tighten the bottom primary lens lock
screw.
3. Q-1500d/CineWide with AutoScope
only: Remove anamorphic lenses.
Set the AutoScope transport motor AC
switch to the “on” position.
Projector
1. (Re-)install anamorphic lenses.
2. Align the primary image with the screen
by adjusting the top anamorphic lens to
produce the least amount of distortion.
Q-1500d Series LED Home Theater Projection System Quick Setup Guide
Note: All page references given here are
to the Q-1500d Series Installation/
Operation Manual.
Note: At this point the anamorphic lenses
are simply used as weight to maintain the
correct center of gravity while you adjust the
primary lens, so that the projector won’t shift
when you add the anamorphic lenses later.
Notes:
1. You must enter a passcode to access
the Calibration or Service menu.
2. The lock screw locks all lens
adjustments except for focus.
Note: The default warp is 46 pixels on the
left and right sides (x) and 26 pixels at the
top and bottom (y). If more is needed, use
the “Image Alignment” controls to increase
it.
Dimension Digital Controller
1. Select Calibration -> Adjustment Mode and
set it to Secondary.
2. Select Service -> Test Video and choose
Secondary Alignment.
Projector
1. Align the secondary image to the screen
by adjusting the bottom anamorphic lens
to produce the least amount of
distortion.
Dimension Digital Controller (Align Secondary
Image with Primary Image)
1. Select Aspect Ratio and set it to 16:9.
2. Select Calibration -> Adjustment Mode and
set it to Secondary.
3. Select Calibration -> Image Alignment ->
Corner Alignment, check the Primary Test
Pattern and Secondary Test Pattern boxes
and adjust corners.
4. Select Calibration -> Image Alignment ->
Midpoint Alignment, check the Primary Test
Pattern and Secondary Test Pattern boxes
and adjust midpoints.
Projector
Dimension Digital Controller
1. Select Aspect Ratio and set it to Cinema.
2. Select Calibration -> Image Alignment ->
Corner Alignment and adjust corners.
3. Select Calibration -> Image Alignment ->
Midpoint Alignment and adjust midpoints.
Projector
No adjustment needed.
Note: The Primary lens image is usually left
un-warped. This provides the best image
quality and will be un-scaled for 1080p
sources. You can adjust the Primary image
if needed, however, by setting the
Adjustment Mode to Primary, checking
the Primary Test Pattern and Secondary
Test Pattern boxes and adjusting the corners and/or midpoints prior to this step.
No adjustment needed.
Note: The Dimension Digital Controller
saves the Image Alignment (warp) settings
for each aspect ratio. To program additional
aspect ratios, select each one and use the
controls in the Corner Alignment and
Midpoint Alignment menus. Or, select
Calibration -> Copy/Paste -> Aspect
Ratio -> Copy Settings, select a different
aspect ratio and choose Paste Settings.
END
Dimension Digital Controller Remote Control and Front-Panel Keypad
Power On
UP BUTTON
Used to direct-select an aspect ratio
or move the OSD menu cursor up.
When no menus are present on-screen,
this button toggles through
aspect ratios in the following order:
Auto Cinema - Native - Virtual Cinema Cinema - VirtualWide - Letterbox - 4:3 - 16:9
Power Off
Aspect
Ratio
Selection
Number
Buttons
Image
Memory
Preset
Buttons
Video
Source
Selection
Menu Navigation
Buttons
Press to
illuminate
the remote
control
buttons
3D Mode
Selection
(not used)
Page 2
STANDBY LED
Lights amber when
the controller is in
standby mode.
ON/STANDBY BUTTON
Press to go from standby
mode to on mode
or vice versa.
LEFT BUTTON
Used to direct-select an
input or move the OSD
menu cursor to the left.
When no menus are
present on-screen,
this button cycles
through the different
sources in this order:
DisplayPort - HDMI 8 HDMI 7 - HDMI 6 - HDMI 5 HDMI 4 - HDMI 3 - HDMI 2 HDMI 1 - SCART - HD 2 HD 1 - Component Composite 3 - Composite 2 Composite 1
ratio
standby
i
n
p
u
t
enter
i
n
p
u
t
m
e
n
u
ratio
DOWN BUTTON
Used to direct-select an aspect ratio
or move the OSD menu cursor down.
When no menus are present on-screen,
this button toggles through
aspect ratios in the following order:
16:9 - 4:3 - Letterbox - VirtualWide - Cinema Virtual Cinema - Native - Auto Cinema
RIGHT BUTTON
Used to direct-select an
input or move the OSD
menu cursor to the right.
When no menus are
present on-screen,
this button cycles
through the different
sources in this order:
Composite 1 - Composite 2 Composite 3 - Component HD 1 - HD 2 - SCART HDMI 1 - HDMI 2 - HDMI 3 HDMI 4 - HDMI 5 - HDMI 6 HDMI 7 - HDMI 8 - DisplayPort
MENU BUTTON
Press MENU to bring up the
main menu, or to exit the
current menu and return
to the previous one.
ENTER BUTTON
When an item is highlighted
on the OSD, press ENTER
to select that item.
020-1091-02 Rev. A (March 2014)
OSD Menu Tree
Note: Default settings appear in bold type.
Input Source
Composite 1
HDMI 1
Gain
Composite 2
HDMI 2
Offset
Composite 3
HDMI 3
Component
HDMI 4
HD 1
HDMI 5
HD 2
HDMI 6
SCART
HDMI 7
DisplayPort
HDMI 8
Gamma
Display Color Common Settings
Letterbox
Simple (5500K, 6500K, 7500K or 9300K)
Color Gamut
Auto, REC709, SMPTE-C, EBU, Native or
PCE
VirtualWide
Native
PCE
Auto Cinema
Screen 1 / Screen 2
Display Color Projector Settings
Color
Tint
Sharpness
Input Image
Up/Down
Dual / Single
Color
Gain
Calibration
Overscan Mode
(Zoom/Crop)
Tracking
(RGB/Component/SCART signals
only)
Recall ISF Night or ISF Day
Offset
Input Color
Chroma Delay
Noise Filter
Save ISF Night
Display Info.
(read-only)
(Projector Serial Number)
Diagnostics
White, Red, Green, Blue, Yellow, Cyan,
Magenta
Altitude
Auto / High
Network
IP Configuration
DHCP (On / Off), IP Address, Subnet
Mask, Default Gateway, Communication
Test
Color Space
Auto, REC601, REC709,
RGB-PC or RGB-Video
(Not available on Composite 1,
Composite 2 or Composite 3 inputs)
Triggers
1/2/3
Service
Save ISF Day
Memory Preset
Aspect Ratio
Reset Custom 1 and Custom 2 to
Factory Default
Left/Right
Off, 30 Minutes, 60 Minutes, 90
Minutes, 2 Hours or 4 Hours
Width
Up/Down
Output Shift
Signal (read-only)
System (read-only)
Network (read-only)
Field Service
Manufacturing
Height
Miscellaneous
Copy Settings
Paste Settings
Copy Settings
Paste Settings
-50, -49 ... 0 ... 49, 50
-50, -49, 48 ... 0
Screen Masking
0, 1, 2 ... 100
(Top/Bottom/Left/Right/Test Pattern Enable)
Corner Alignment
Top Left / Top Right / Bottom Left /
Bottom Right / Test Pattern Enable
Midpoint Alignment
Center / Top Middle / Left Middle / Right Middle
/ Bottom Middle / Test Pattern Enable
Image Alignment
Adjustment Mode
0, 1, 2 ... 7
(Composite inputs only)
Back / Confirm
Copy/Paste
Recall/Save Custom 1 or Custom 2
-32, -31... 0 ... 31, 32
(HD 1, HD 2 and Component inputs only)
0, 1, 2 ... 63
Both, Primary or
Secondary
OSD Position
Q-1500d Series LED Home Theater Projection System Quick Setup Guide
Front Panel
Brightness
Standby Mode
ISF Calibrated
Splash Configure
HDMI
Auto Power Off
Owner Name
(select a key, then choose a source to
assign to it)
Auto, Floor Front, Ceiling Front, Floor
Rear or Ceiling Rear
Language
English, Français, Deutsch, Italiano,
Español, Svenska,
(Simplified
Chinese),
(Traditional Chinese),
Português,
(Russian),
(Japanese) or
(Korean)
OSD Timer
0 (no timeout) or 5, 6, 7 ... 30 ... 60 sec.
OSD Messages
On / Off
-50, -49 ... 0 ... 49, 50
Sharpness
Phase
(RGB/Component/SCART signals
only)
Information
Low, Medium, High or Off
Engine Configuration
Tint
Width
Sleep Timer
ConstantContrast
00000 ... 08209 ... 65535 or 88999
(extended mode)
Picture Orientation
Display Device Configure
Level (Red / Yellow / Green / Cyan / Blue /
Magenta)
On or Off
SRC 1-7 Keys
SRC 8-14 Keys
Contrast
Left/Right
Memory
Presets
Remote Control
Saturation (Red / Yellow / Green / Cyan / Blue /
Magenta)
SatCo
Rename/Restore
Remote Code
Brightness
Noise Filter
Input Position
Input Names
White Balance (Red / Green / Blue Gain)
Contrast
Overscan
Primary / Secondary /
Dual Alignment
Runco Smart Color (RSC) (On or Off)
Brightness
Grey Bars
Full White
Hue (Red / Yellow / Green / Cyan / Blue /
Magenta)
Cinema
Height
Simple
(1.8, 2.0, 2.2, 2.35 or 2.5)
Color Temp
Virtual Cinema
Picture
Focus
Test Video
Advanced
(0 (2.2 gamma curve),
1, 2, 3 ... 20 (custom gamma tables))
4:3
Screen
Color Bars 2
Mode
(Simple / Advanced)
16:9
Aspect Ratio
Color Bars 1
-100, -99... 0 ... 99, 100 (Red, Green, Blue)
Blank Screen Color
Sidebar Color
Red/Green/Blue = 0, 1, 2, 3 ... 255
Film Mode
(SD sources only)
On / Off
CUE
(Chroma Upsampling
Error)
On / Off
Sync Threshold
0, 1, 2 ... 15
(HD 1, HD 2 and Component inputs only)
HDMI EDID Extension
On / Off (per HDMI input)
Audio Format
Combined / HDMI Out (Pri. Display) /
HDMI Out (Sec. Display) / HDMI Out
(Audio Only)
CEC
On / Off
HPD Toggle Rejection
Auto / On / Off
Logo LED
0 (off), 1, 2 ... 31
Standby LED
On / Off
LCD
0 (off), 1, 2, 3 or 4
Enable
On / Off
Hours
1, 2, 3, 4, ... 8 ... 23, 24
Low Power / Fast Startup
System Reset
ISF Other
Splash Timer
5, 6, 7 ... 15 ... 59, 60
Splash Enable
On/Off
Hor. / Ver.
0, 1, 2 ... 100
Page 3
020-1091-02 Rev. A (March 2014)
Serial Communications
Command
Description
Picture Adjust Commands (Calibration -> Input Image menu)
Note
Connect your control system or PC to
the RS-232 input of the Dimension
Digital Controller as shown in the
diagram at right.
Pri. Display Control
IR
HDMI 5
Configure the RS-232 controller or PC
serial port as follows: no parity, 8 data
bits, 1 stop bit and no flow control. Set
the baud rate to 19200.
The following is a partial list of
supported serial commands. For a
complete list, refer to the Q-1500d
Series Installation/Operation
Manual.
Sec. Display Control
(BRT=[-50...+50])
Sets a value for brightness
RS-232
(CLR=[-50...+50])
Sets a value for color
PC / Control
(CON=[-50...+50])
Sets a value for contrast
(SHP=[-50...+50])
Sets a value for sharpness
(TNT=[-50...+50])
Sets a value for tint
HDMI Out
To Sec. Display
HDMI 7
5
HDMI 6
HDMI 8
HDMI Out
Audio Only
Ethernet
HDMI Out
To Pri. Display
4
9
3
8
1
2
7
2 Receive Data
(to ctrl. system)
to Automation/
Control System
or PC
3 Transmit Data
(from ctrl. system)
5 Ground
(none of the other pins are used)
(MMP=2) or (KEY=50)
Loads “Custom 1” image preset
(MMP=3) or (KEY=51)
Loads “Custom 2” image preset
(MMP=1) or (KEY=49)
Loads “ISF Day” image preset
(MMP=0) or (KEY=48)
Loads “ISF Night” image preset
(SCN?)
Returns the screen setting
(SCN=0) or (KEY=38)
Sets the screen to Screen 1
(SCN=1) or (KEY=39)
Sets the screen to Screen 2
Screen Commands
All commands must be followed by
a carriage return character.
Command
Image Preset Commands
6
Miscellaneous Commands
Description
Power On/Off Commands
(IDN?)
Returns display device numeric identifier (1 = Auto; 50 = Q-1500d)
(PWR=0) or (KEY=2)
Turns projector off
(IIR?)
Returns input resolution
(PWR=1) or (KEY=1)
Turns projector on
(MDL?)
Returns product model name
(IOR?)
Returns output resolution
Input Selection Commands
(INS=3) or (KEY=14)
Selects the Component input
(RMN=[0...65535])
Sets the remote code
(INS=0) or (KEY=13)
Selects the Composite 1 video input
(RMN?)
Returns the remote code
(INS=1) or (KEY=24)
Selects the Composite 2 video input
(ISN?)
Returns Dimension Digital Controller serial number
(INS=2) or (KEY=25)
Selects the Composite 3 video input
(IFV?)
Returns firmware version number
(INS=7) or (KEY=19)
Selects the HDMI 1 input
(INS=8) or (KEY=20)
Selects the HDMI 2 input
(INS=9) or (KEY=21)
Selects the HDMI 3 input
(INS=10) or (KEY=22)
Selects the HDMI 4 input
(INS=11) or (KEY=81)
Selects the HDMI 5 input
(INS=12) or (KEY=82)
Selects the HDMI 6 input
(INS=13) or (KEY=83)
Selects the HDMI 7 input
(INS=14) or (KEY=84)
Selects the HDMI 8 input
(INS=15) or (KEY=85)
Selects the DisplayPort input
(INS=4) or (KEY=17)
Selects the RGB HD 1 input
(INS=5) or (KEY=18)
Selects the RGB HD 2 input
(INS=6) or (KEY=23)
Selects the SCART input
Aspect Ratio Commands
(ASP=1) or (KEY=9)
Selects the 16:9 aspect ratio
(ASP=0) or (KEY=10)
Selects the 4:3 aspect ratio
(ASP=4) or (KEY=44)
Selects the Cinema aspect ratio
(ASP=2) or (KEY=11)
Selects the Letterbox aspect ratio
(ASP=6) or (KEY=46)
Selects the Native aspect ratio
(ASP=3) or (KEY=12)
Selects the VirtualWide aspect ratio
(ASP=5) or (KEY=45)
Selects the Virtual Cinema aspect ratio
(ASP=7) or (KEY=86)
Selects the Auto Cinema aspect ratio
Q-1500d Series LED Home Theater Projection System Quick Setup Guide
(T[1...3][1...7]=[0...1])
12-volt trigger configuration:
[1...3] = Trigger number
[1...7] = Aspect ratio (1 = 16:9, 2 = 4:3, 3 = Letterbox, 4 = VirtualWide, 5 = Cinema,
6 = Virtual Cinema, 7 = Native)
[0...1] = On/off (0 = Cancel previous assignment, 1 = assign)
Example: (T15=1)[CR] assigns Trigger 1 to Cinema aspect ratio.
The following serial commands are used to emulate buttons on the remote control or Dimension Digital Controller front panel.
Each button has its own serial command, so effectively it is as if you were using the IR remote.
These commands provide active OSD responses just like IR remote commands.
(KEY=6)
Down-Arrow (
(KEY=4)
ENTER key
(KEY=52)
EXIT key
(KEY=7)
Left-Arrow (
(KEY=3)
MENU
(KEY=8)
Right-Arrow (
(KEY=5)
Up-Arrow (
) key
) key
) key
) key
© Copyright 2014 Runco International. All rights are reserved.
Trademarks and registered trademarks used in this document are the property of their respective owners.
Page 4
020-1091-02 Rev. A (March 2014)