1
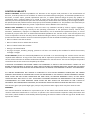
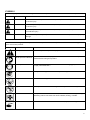
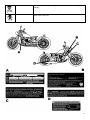
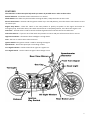
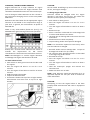
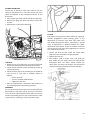
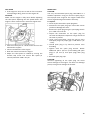
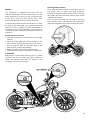
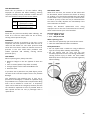
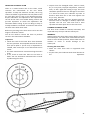
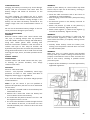
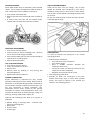
CLEVELAND CYCLEWERKS THA HEIST / HEIST 250CC / HEIST 125CC USER MANUAL 8.1.2011 rev 2 DO NOT RIDE IF YOU ARE UNDER THE AGE OF 16. Always wear all necessary and properly fitting protective equipment when operating this motorcycle. WARNING: To reduce the risk of injury, the user must read and understand the operator's manual before using this product. This manual contains important safety information and instructions, which should be read carefully before operating this vehicle. SAVE THIS MANUAL FOR FUTURE REFERENCE 1 TABLE OF CONTENTS TABLE OF CONTENTS 2 LIMITED WARRANTY 3 SYMBOLS 5 FEATURES 7 OPERATION 10 MAINTENANCE 14 TROUBLESHOOTLNG 25 EMISSIONS WARRANTY 26 NOISE EMISSION WARANTY 28 PRODUCT SPECIFICATIONS 28 WHOLE VEHICLE WIRING 29 WIRING DIAGRAMS ERROR! BOOKMARK NOT DEFINED. 2 LIMITED WARRANTY WHAT IS COVERED: Cleveland CycleWerks LLC. Warrants to the original retail purchaser in the United States of America , that this product is free of defects in material and workmanship and agrees, at Cleveland CycleWerks LLC. discretion, to either repair, provide replacement parts for, or replace (without charge for parts) any product or component with a material defect for a period of 1year from the date of purchase, except as limited below. Warranty service and replacement parts are warranted only for the duration of the warranty on the original product. All replaced parts and products become the property of Cleveland CycleWerks LLC. This product is also covered by an Emissions Control System Warranty, which is separate from and in addition to this warranty. WHAT IS NOT COVERED: This warranty is does not cover any conditions caused by misuse, neglect, negligence, accident operation in any way contrary to the operating instructions in the operator's manual, normal wear, alteration, modification, improper or inadequate maintenance, use of unauthorized replacement parts, or service provided by anyone other than an Authorized Cleveland CycleWerks LLC. Service Center. This warranty does not cover transportation costs for warranty service. Without limiting the above, this warranty is VOID with respect to any product that has been used for rental or commercial purposes or that sustained the following damage: • Bent or broken frame due to abuse • Bent or broken wheel or wheels due to abuse • Bent or broken fender due to abuse • Racing is considered abuse • Any sign of impact, accident, jumping, spinouts or roll over not caused by the condition for which the warranty coverage is sought. TO GET SERVICE: please visit ClevelandCycleWerks.com and send us an email through our contact section. We will respond within 48 hours. A copy of the sales receipt will be required as proof of purchase. Any approved warranty service will be referred to an Authorized Cleveland CycleWerks LLC. Service Center. The cost to transport the product to and from the service center must be paid by the owner. CLEVELAND CYCLEWERKS OBLIGATION UNDER THIS WARRANTY IS STRICTLY AND EXCLUSIVELY LIMITED TO THE REPAIR OR REPLACEMENT OF DEFECTIVE PARTS AND CLEVELAND CYCLEWERKS DOES NOT ASSUME OR AUTHORIZE ANYONE TO ASSUME FOR THEM ANY OTHER OBLIGATION. NO DEALER IS AUTHORIZED TO MODIFY THIS WARRANTY. . ALL IMPLIED WARRANTIES ARE LIMITED IN DURATION TO THE STATED WARRANTY PERIOD,AND ARE HEREBY EXPRESSLY DISCLAIMED IN THEIR ENTIRETY AFTER THE EXPIRATION OF THE STATED 12 MONTH WARRANTY PERIOD. SOME STATES DO NOT ALLOW LIMITATIONS ON HOW LONG, AN IMPLIED WARRANTY LASTS, SO THE ABOVE LIMITATION MAY NOT APPLY TO YOU. CLEVELAND CYCLEWERKS ASSUMES NO RESPONSIBILITY FOR INCIDENTAL, CONSEQUENTIAL OR OTHER DAMAGES. SOME STATES DO NOT ALLOW THE EXCLUSION OR LIMI-‐ TATION OF INCIDENTAL OR CONSEQUENTIAL DAMAGES, SO THE ABOVE LIMITATION OR EXCLUSION MAY NOT APPLY TO YOU. This warranty gives you specific legal rights, and you may also have other rights, which vary from state to state. WARNING: This manual should be considered as a permanent part of the vehicle and should remain with the vehicle when resold or otherwise transferred to a new user or operator. The manual contains important safety information and instructions, which should be read carefully before operating the vehicle. Children under the age of 16 should never operate this vehicle. 3 SAFE OPERATION OF VEHICLE !! WARNING !! This operator's manual contains important safety and maintenance information. Read it carefully and make sure you understand all included information before riding. Failing to follow the warnings contained in this manual could result in SERIOUS INJURY or DEATH. READ ALL INSTRUCTIONS It is important that this manual remain with the vehicle when you transfer it to another user or owner. All information, illustrations, photographs and specifications contained in this manual are based on the latest product information available at the time of publication. Due to improvements or other changes, there may be some discrepancies in this manual. We reserve the right to make product changes at any time, without notice and without incurring any obligation to make the same or similar changes to the vehicle previously built or sold. • Carefully read and understand this manual and all labels and follow the operating procedures described. • A Motorcycle Safety Foundation (MSF) instruction manual may also provided with this motorcycle. Read and understand the contents of that manual before operating the motorcycle . If this motorcycle is resold or otherwise transferred to a new user or operator, the MSF instruction manual should remain with the vehicle. • Always wear a helmet. The operator and passenger (if any) of this vehicle should always wear a helmet approved by agencies such as Department of Transportation (DOT), Safety Helmet Council of America (SHCA), or Snell Memorial Foundation (SNELL). Most motorcycle accident fatalities are due to head injuries. The operator should also wear face shields or goggles, boots or closed-‐toe shoes, gloves, and other appropriate protective clothing. • Take time to get to know this vehicle. The operator's ability to operate this motorcycle safely is largely de-‐ pendent upon the operator's ability to exercise proper judgment. The operator must be of sufficient age, understanding, mental capacity, and physical capability to safely operate this vehicle. This vehicle should only be operated after sufficient practice in an uncongested safe area. Safe operation includes responsibility for the safety of a passenger (if any). We recommend that any inexperienced driver should take a certified course approved by the Motorcycle Safety Foundation. • Ride defensively. A common accident happens when a car suddenly moves into your lane. Most motorcycle collisions happen when a car turns left in front of a motorcycle. Pay extra attention to other vehicles around you. Never expect that they can see you. • Make yourself more visible by wearing bright reflective clothing. Use your horn when it will help others see you. Always use your turn signal before turning. • Do not ride beyond your abilities and never go faster than the posted speed limit. • Never operate this vehicle while under the influence of alcohol, drugs, or medication of any kind. Such operation could be dangerous to yourself and/or others. • Keep your vehicle in a safe condition. Proper maintenance will help ensure a safe ride. Perform all recommended maintenance and inspect your vehicle before each ride. Never modify your vehicle in any way to make it unsafe. NHTSA SAFETY NOTICE If you believe your vehicle has a safety defect, which could cause serious injury or death, you should immediately contact the National Highway Traffic Safety Administration (NHTSA) in addition to notifying Cleveland CycleWerks. If NHTSA receives similar complaints, it may open an investigation and if it finds that a safety defect exists in a group of vehicles, it may order a recall and remedy campaign. However, NHTSA cannot become involved in any individual problems between you, your dealer, or Cleveland CycleWerks. 4 SYMBOLS The following signal words and meanings are intended to explain the levels of risk associated with this product. SYMBOL SIGNAL MEANING DANGER: Indicates an imminently hazardous situation, which, if not avoided, will result in death or serious injury. Indicates a potentially hazardous situation, which, if not avoided, could result in death or serious injury. CAUTION: Indicates a potentially hazardous situation, which, if not avoided, may result in minor or moderate injury. CAUTION: (Without Safety Alert Symbol) Indicates a situation that may result in property damage. Some of the following symbols may be used on this product. Please study them and learn their meaning for safe opera-‐ tion of this product. SYMBOL NAME EXPLANATION Safety Alert Indicates a potential personal injury hazard. Read Operators Manual To reduce the risk of injury, user must read and understand operator 's manual before using this product. Wear Eye Protection Always wear eye protection with side shields (goggles) marked to comply with ANSI Z87.1. Wear Protective Gear Always use an approved helmet and protective gear. Drugs and Alcohol Never use with drugs or alcohol. Age Limit Never permit children under the age of 16 to operate this motorcycle. Toxic Fumes Gas products emit carbon monoxide, an odorless, color- less, poison gas. Breathing carbon monoxide can cause nausea, fainting, or death. Chemical Burns Contains sulfuric acid. Avoid contact with skin, eyes, or clothing. 5 Poison Contains sulfuric acid. Do not ingest and avoid contact with skin, eyes, or clothing. Hula Man, woman or child. Steer clear of the hula. Avoid eye contact, hula is contagious. 6 FEATURES The indicators on the motorcycle help make you aware of possible issues. Refer to them often. Neutral indicator -‐ Illuminates when transmission is in neutral. Choke Switch -‐The choke may be used when starting the bike, it helps the bike run when cold. Electric Start Button -‐ Position and the ignition switch key in the ON position, press the electric start button to start the motorcycle. Engine Stop Button -‐ Place this switch in the OFF position to quickly cut power to the engine and make an emergency stop. At all other times, this switch should remain in the (RUN) position, even when the engine is off. Fuel Valve -‐ The fuel valve is used to control the flow of gasoline from the fuel tank to the carburetor. Fuel Valve Reserve -‐ If you run out of fuel stitch the position to reserve and you will have more fuel in reserve. High beam indicator -‐ Illuminates when headlight is on high beam. Horn -‐The horn is used to warn other motorists. Ignition Switch -‐The ignition switch is used for starting the engine. Speedometer -‐ Shows the speed you are traveling in miles Turn Signal Indicator -‐ Flashes when left or right turn signal is on. Turn Signal Switch -‐ Use this switch to signal a lane change or turn. 7 8 9 OPERATION WARNING: Always wear appropriate protective clothing and accessories: a properly fitting helmet, eye protection (goggles), gloves, over the ankle boots or closed-‐toe shoes, long sleeved shirt or jacket, and long pants. BEFORE YOU RIDE Before you ride the motorcycle the first time, carefully read and understand this manual and all labels and follow the operating procedures described. Also know how to operate all controls. WARNING: Always wear eye protection with side shields (goggles) marked to comply with ANSI Z87.1. Failure to do so could result in objects being thrown into your eyes, resulting in possible serious injury. Every time you ride, first check the condition of the motorcycle to make sure it does not have mechanical problems. WARNING: Do not allow familiarity with product to make you careless. Remember that a careless fraction of a second is sufficient to inflict serious injury. PRE-‐RIDE INSPECTION ITEM TO CHECK Tires • Check air pressure and add air if needed. • Check for excessive wear on tread. • Check for any other tire damage. • Check rims and spokes for possible damage. Check engine lubricant and brake fluid levels. Add lubricant or fluid as needed. SAFETY GEAR A DOT or Snell-‐approved motorcycle helmet is the most important part of your safety gear because it can help prevent a serious head injury. Choose a helmet that fits snugly. Retailers can help in selecting a good quality helmet, which fits properly. Always wear eye protection when you ride. If a rock or branch hit your eyes, you could be severely injured. Wear shatterproof goggles or a face shield. Helmet: DOT or Snell approved on road helmet Eye Protection: Shatter proof ANSI Z87.1 compliant. Gloves: Abrasion resistant gloves for the street Jacket: Wear an abrasion resistant riding jacket. Some jackets have approved crash protection for added protection incase of an incident. Long Pants I Riding Pants: Never wear shorts to ride a motorcycle. Motorcycles can burn, or injure you while riding, always wear long pants. Boots: Footwear should cover your ankles and support them from rolling. WARNING: Not wearing a helmet greatly increases your chances of serious head injuries or death in the event of an accident. If you are riding with a passenger, be sure they are also wearing a helmet and eye protection. WHAT TO CHECK FOR Fluids Lights Be sure headlight, brake light, taillight, and turn signals are working properly. Free play Check clutch lever, brake pedal and throttle grip. Drive Chain Check the condition of the drive chain. Adjust the slack and lubricate as necessary. Fuses Replace fuses as needed. Nuts Bolts Hoses and Cables & Check all nuts and bolts and tighten as needed to appropriate torque specifications. Check all hoses for leaks and cables that may be loose. WARNING: Always inspect your motorcycle each time before riding and make sure it is in a safe operating condition. Failure to inspect the motorcycle before operating could increase the chance of an accident, resulting in serious personal injury or equipment damage. !!!!!!This bike not intended for passengers!!!!!!! Load limit -‐ Make sure you do not exceed the load limit. 10 Cargo -‐ This motorcycle has no cargo racks and is not designed for carrying cargo. Rear suspension -‐ This is a hardtail motorcycle. The rear suspension only has minor adjustment on the seat. correct the problem before using the product. Failure to do so could result in a fire that could cause serous personal injury. STARTING THE ENGINE Insert key into ignition and turn to ON position. LOADING LIMITS AND GUIDELINES This motorcycle is designed to only carry one rider. Do not attempt to carry a passenger as it could damage the motorcycle and injure both riders. Make sure transmission is in neutral. WARNING: Follow all load limits. Improper loading or overloading can affect the stability of the motorcycle and may cause an accident resulting in serious injury or death. Turn the engine stop switch to RUN position. Turn the fuel valve to ON. Kickstand must be up in order for motor to start. This Motorcycle is equipped with a kickstand safety switch. Maximum loading capacity of this motorcycle is 350 lbs. 159 kg. Do not overload the motorcycle. Do not affix anything to the motorcycle, especially on the front as it may affect handling. This Motorcycle not intended for a passenger If air temperature is normal -‐ 50-‐95°F (10-‐35°C) Choke is on the left control, pull it back to engage NOTE: Extensive use of the choke can cause damage to the piston and cylinder wall. Press and hold the electric start button until the engine starts, then release the button. Do not hold the button for more than 15 seconds at a time. NOTE: Do not open throttle while choke is on, as this will flood the engine and make the unit difficult to start. After the engine has started, push the choke tab forward and slowly roll on the throttle to warm up the motor. FUELING/REFUELING THE MOTORCYCLE Always shut off engine before fueling. Never add fuel to a motorcycle with a running engine. Do not smoke or allow flame or spark in the vicinity while the unit is being refueled. Always work in a well-‐ventilated area. Improper handling of fuel could result in serious personal injury. Clean surface around fuel cap to prevent contamination. Twist off fuel cap to fill, it is a screw type filler Add fuel to the bottom of the filler neck. Do not overfill, this will cause vapor lock, please see below: NOTE: Fast idling for more than 5 minutes at normal air temperature can cause exhaust pipe discoloration. WARNING: Overfilling the fuel tank could be hazardous. If you overfill the fuel tank, fuel may overflow when it expands due to heat from engine or sun. Spilled fuel could catch fire or explode, resulting in serious personal injury. Replace fuel tank cap and twist until it is secure If the fuel valve was in the RESERVE position, turn it back to ON. Check for fuel leaks. A leaking fuel cap is a fire hazard and must be replaced with an original manufacturer 's replacement cap immediately. If you find any leaks, If air temperature is high -‐ Above 95°F (35°C) DO NOT TURN CHOKE ON. Slightly open throttle. Start engine. If air temperature is low -‐ Below 95°F (35°C) Turn choke lever on full choke until motor is warmed up. NOTE: Extensive use of the choke can cause damage to the piston and cylinder wall. Start the engine, leaving throttle closed. Do not open throttle while choke is on, as this will flood the engine and make the unit difficult to start. After RPMs pick up, leave choke ON to keep fast idle. 11 Allow motor to warm up and slowly turn choke lever off. Motor should maintain smooth idle. Open the throttle slightly to verify the engine is responding. If it dies, the engine was not sufficiently warm. STOPPING THE ENGINE Shift into neutral and turn the ignition switch OFF . NOTE: Failing to turn the ignition switch off will cause the lights to stay on and will drain battery life. DO NOT turn the engine stop switch off. Reduce the throttle or shift to a higher gear before engine RPMs get too high. Shift to a lower gear before the engine RPMs get too low. When engine RPMs are too high, do not downshift to slow the motorcycle. This could cause damage to the engine. Do not coast or tow the motorcycle for a long period of time while the engine is off. If your speed drops below 9 mph (15 km/h), pull in the clutch lever and shift down to 1st gear to prevent stalling. Emergency Stop: If an emergency stop is necessary, move the engine stop switch to the OFF position. SHIFTING GEARS The motorcycle is equipped with a cable-‐operated clutch. It has five forward gears, one down and four up. Follow the steps below to learn how to shift properly. Always shift while moving in a straight line. Release the throttle grip and pull in the clutch lever completely before shifting. Recognize the engaging point when you release the clutch lever. 12 WARNING: The following instructions are for general use in standard operating conditions. Information in the MSF instruction manual accompanying the vehicle takes precedence over this information. In addition, all drivers should take an accredited course. BRAKING This motorcycle is equipped with a hand-‐operated front hydraulic disc brake and a foot-‐operated rear disc brake. Apply brakes in a progressive fashion to prevent wheel lock-‐up. As a general rule, aim to brake 70%, using the front brake lever. By using both front and rear brakes, you will achieve faster, more stable and effective braking. To slow down or stop the motorcycle, apply the front and rear brakes while downshifting. Slowly increase braking as you feel your speed reduce. In order to prevent stalling, pull in clutch lever before stopping completely. If you apply the brakes too abruptly, you may lock the wheels, slide, and loose control of the motorcycle. If this should hap-‐ pen, release the brakes and steer straight until you have completely regained control. Never ride with your foot resting on the brake pedal or your hand on the brake lever. This could cause your brakes to overheat and will indicate false braking to other motorists. PARKING When possible, park the bike on level ground. If you have no paved surface to park on, make sure the ground is firm. If it is necessary for you to park on a hill, position your rear wheel against the curb at an angle and leave the transmission in gear. While parked, use the side stand for support. Use your foot to guide the side stand down. If you must park on a soft surface, put something solid under the side stand. THEFT PREVENTION TIPS Park the motorcycle in a garage, if possible. When not possible, make certain to park in a well-‐lit area. Never leave the ignition key with the motorcycle. Always use the steering lock, even for a short period of time. o Turn the handlebars left. o Insert the key into the lock on the head tube o Turn the key until the pinion engages with the lock o Your handle bars are now locked and can not be turned Invest in a good quality anti-‐theft device that will secure the motorcycle to a stationary object. Keep the operator's manual, registration, and insurance information with the motorcycle to help authorities find you if it is stolen and recovered. TURNING Before making a turn, reduce your speed. Do not apply the brakes in the middle of a turn or you may cause the rear wheel to lock-‐up and lose control of the motorcycle. NOTE: DO NOT change the position of the clutch lever during a turn. DESCENDING HILLS When traveling down a steep grade, reduce your speed by downshifting rather than braking. Applying your brakes for a long period of time can reduce their effectiveness. 13 MAINTENANCE INSPECTION AND MAINTENANCE SCHEDULE It is very important to inspect and maintain your motorcycle regularly. Follow the guidelines in the chart below. The intervals between periodic services in months are shown. At the end of each interval, be sure to perform and document the maintenance listed. Only an authorized Cleveland CycleWerks service center may maintain, replace, or repair emission control devices and systems. WARNING: Failing to perform recommended maintenance or performing maintenance improperly can lead to an accident and cause serious personal injury, cause noncompliance to emissions regulations, and may void your warranty. If you are not sure how to perform the maintenance items below, contact your CCW authorized service center or Cleveland CycleWerks. Item Fuel Lines Weekly Monthly Quarterly Yearly I L I Air Cleaner * C C I I Throttle Controls * I A I A C I R I I I Spark Plug Valve Clearance * Engine Lubricant * During running-in period, replace every 150 miles. After running-in period, replace every 600 miles. Gearbox Lubricant * Engine Lubricant Filter Screen * Carburetor C C I I C C C C Drive Chain * I A L Battery * I I I I Electric Parts I Bolts, Nuts, Fasteners * I L I Gear in Gearbox I I Fuel Tank I I Tire Pressure Wear * I Steering System * A Chassis * L I Brake Shoe Brake System * I = Inspect and clean, adjust, lubricate, or replace as necessary C = Clean R = Replace L = Lubricate A= Adjust * 1st Scheduled maintenance is crucial to the longevity of your motor. 1st scheduled maintenance should be performed between 150-‐500 miles. This maintenance should include the following items: 1. Visual and performance inspection of: Air cleaner, throttle controls, brake system, all bolts and fasteners, tire pressure and wear pattern, steering system’s proper operation and actuation, chassis inspection. 2. Oil should be changed with approved SAE standard Oil listed in this manual, Oil Filter removed, cleaned and inspected. 3. Valve clearance should be checked to make sure it is within proper manufacturer specification. Valve clearance is typically acceptable at 0.04 -‐ 0.06mm intake and .05-‐.06mm exhaust. Please have all maintenance performed by authorized service center. Tampering with your motorcycle may void applicable warranty. 14 CAUTION: If you operate your motorcycle under severe conditions, it will need maintenance more often than shown in the chart above. Severe conditions include operating under frequent full throttle or in dusty, wet, sandy, or muddy areas, and may void your warranty. If you have questions regarding maintenance intervals for your motorcycle, contact your CCW authorized service center or Cleveland CycleWerks. WARNING: In the event of an accident, have an authorized service center inspect ALL parts, even if they appear to be undamaged. Failure to do so could result in an accident, which could cause injury or death. Let the engine cool before touching any related parts. Do not touch any moving parts while the engine is running. Make sure you have the tools and skills required before attempting to perform any maintenance or repairs. Use the side stand to prevent the motorcycle from falling over. Keep cigarettes, sparks, and flames away from all fuel-‐ related parts. Use a non-‐flammable solvent when cleaning parts. WARNING: Before inspecting, cleaning, or servicing the motorcycle, shut off engine, wait for all moving parts to stop, and disconnect and properly ground the spark plug wire. Failure to follow these instructions can result in serious personal injury or property damage. This section instructs you on how to perform some important routine maintenance. You can perform many of these tasks with the tools provided with the motorcycle. More difficult tasks (such as wheel removal), should be performed by a professional technician. If you do not feel capable of performing any of the tasks , do not hesitate to contact your local Service Center for help. Your local Service Center is equipped with the proper tools and knowledge to help service your motorcycle. If necessary, please contact them to ensure greater quality and reliability. MAINTENANCE RECORD To ensure proper maintenance, keep records. If the motorcycle is sold, be sure to include maintenance records. All scheduled maintenance is considered normal operator cost. If a Service Center performs these tasks, you will be charged. Please use the tables below to keep track of all maintenance performed. Follow these important safety precautions: Always turn the engine off before performing any maintenance or repairs. Miles (km) Odometer Date Performed By Notes 3000 / 5000 6000 / 10000 9000 / 14500 12000 I 20000 15000 I 25000 18000 I 30000 21000 I 35000 24000 I 40000 27000 I 45000 30000 I 48000 33000 I 53000 36000 I 58000 39000 I 63000 42000 I 68000 600 / 1000 15 CHANGING / ADDING ENGINE LUBRICANT Engine lubricant has a major influence on engine performance and service life. Engine lubricant level should be checked before each use of the motorcycle. CAUTION: Do not overfill. Overfilling may cause excessive smoke, oil loss, and engine damage. To change engine lubricant: Lubricant should be changed while the engine lubricant is still warm, but not hot. This allows the lubricant to drain quickly and completely. First oil change is before 600 miles as this is break in. We recommend changing the oil at least every 3000-‐ 4000 miles. Reference the chart below for the appropriate engine lubricant to use based on the temperature range in your area. In general, we recommend 1.12 quarts of SAE 1SW-‐40. Park vehicle on level ground. Start the engine and allow it to run for 3 to 5 minutes. Turn the engine off and allow to cool for at least 3 min-‐ Remove oil cap. Place a container underneath the oil drainage bolt to collect used lubricant as it drains. Unscrew the oil drainage bolt and remove the bolt and washer. Allow lubricant to drain completely. Inspect sealing washer and replace if damaged. NOTE: In very cold weather [below 5°F (15°C)], use SAE10W-‐50 for good starting and smooth operation. NOTE: This should be replaced at least every other time the lubricant is changed. Reinstall washer and oil drainage bolt. Torque oil drainage bolt to 18 ft. lbs. (13.3 Nm) Fill crankcase with specified lubricant as described at the beginning of this section. Reinstall the oil cap. Start the engine and allow it to run for 3 to 5 minutes. Turn the engine off and allow to cool for at least 3 minutes. Hold the motorcycle upright and recheck the lubricant level. Make sure there are no leaks. Always use a 4-‐stroke motor lubricant that meets or exceeds the requirements for API service classification SJ. Check lubricant level before each use. NOTE: Non-‐detergent or 2-‐stroke engine lubricants will damage the engine and should not be used. To check lubricant level: Park vehicle on level ground and use the side stand for support. Start the engine and allow it to run for 3 to 5 minutes. Turn the engine off and allow to cool for at least 3 minutes. Hold the motorcycle upright. Inspect the lubricant level. If lubricant is below the top of the oil sight window, add lubricant until level rises to top of oil sight window. NOTE: Used lubricant should be disposed of at an approved disposal site. See your local oil retailer for more information. CAUTION: Attempting to start the engine before it has been properly filled with lubricant will result in equipment failure. 16 AIR BOX DRAIN HOSE Service the air-‐box drain hose more often if you are riding at full throttle or in rain. Also service any time there are deposits in the transparent section of the drain tube. Place a drain pan under the air box drain tube plug. Remove the plug and allow the tube to drain into the pan. Reinstall the air box drain tube plug. CLUTCH The proper free play of the clutch allows for a gradual, smooth engagement when shifting gears. If the adjustment is incorrect, early wear may result. Free play should be between 3/8 in. and 13/16 in. (10-‐20 mm). If adjustment is needed, perform the upper adjustment steps below. If you are unable to achieve the correct free play using these adjustments, contact your local Service Center. THROTTLE Make sure all nuts and bolts are securely fastened and the throttle assembly is positioned correctly. Check the full rotation of the throttle grip from all steering positions. Check the free play at the throttle grip. It should be 1/16 to 1/4 in. (2-‐6 mm). If needed, adjust as follows: o Loosen lock nut. o Turn the throttle cable adjuster. o Tighten the lock nut. After any adjustments, recheck the full rotation of the throttle grip from all steering positions. WARNING: Do not operate the motorcycle if the throttle grip free play distance is less than 1/16 in. (2 mm) or more than 1/4 in. (6 mm). Operating the vehicle with an incorrect amount of throttle grip free play could cause the rider to lose control, resulting in serious personal injury. Loosen the lock nut and rotate the clutch cable adjuster to the maximum free play possible. Tighten the lock nut. Start engine, hold in clutch lever, and shift into gear. Make sure the engine does not stall and the motorcycle does not move. Slowly release the clutch lever and open the throttle. The motorcycle should accelerate gradually and move smoothly. 17 IDLE SPEED If the engine is cold, start it and run for 10 minutes of stop-‐and-‐go riding, then turn the engine off. CAUTION: Make sure the engine is fully warm before adjusting the idle speed. Adjusting the idle speed before the engine is warm could result in excessive engine wear. Park the motorcycle on a level surface and use the side stand to support. Connect tachometer to the engine. Shift into neutral and start the engine. Adjust the idle speed as needed by turning the throttle stop screw. The correct idle speed (in neutral) should be 1500 ± 50 rpm. SPARK PLUG CAUTION: Use only recommended spark plug: NGK D8TC or a suitable equivalent. Using an incorrect spark plug in the improper heat range for this engine could cause severe engine damage and void the warranty. To replace: Clean any dirt around the spark plug base. Disconnect the spark plug caps and make certain you do not damage the wires. Remove the spark plug using the spark plug wrench pro-‐ vided in the tool kit. Inspect the electrodes on the spark plug for corrosion and deposits. Replace if a large amount of corrosion is present. Using a wire-‐type feeler, check the gap on every new spark plug. The proper gap is .024-‐.028 in. (.6-‐ .7 mm). Thread spark plug in by hand to prevent cross threading. Tighten with the spark plug wrench. Rotate additional 1/8 to 1/4 turn (if reinstalling old spark plug) or 1/2 turn (if new spark plug) after plug seats. Reinstall spark plug caps. CAUTION: Incorrect tightening of the spark plug can cause severe damage to the engine. Too loose can damage piston; too tight can damage the threads . 18 BRAKES This motorcycle is equipped with front and rear hydraulic disc brakes. The brake fluid will drop as the brake pads wear or if there is a leak. To ensure there are no leaks, check the brake system often. Also check the brake pads for wear and the fluid level. If you feel abnormal free play in the brake lever, check for wear on the brake pads. If you discover the brake pads to be worn, replacement them immediately. If the pads are still in good condition, there may be air in the brake system. Visit your local Service Center for assistance . Checking Brake Pad Wear: Brake pad wear differs based on how often you use the brakes, type of riding, and road conditions. Normally brake pads tend to wear quicker on wet and dirty roads. Be sure to check the pads for wear at each maintenance interval. You can inspect the wear on the pads by using the wear indicator mark. If the pads are worn, have them replaced immediately at an authorized service center. Checking Brake Fluid Level: Park the motorcycle on level ground in an upright position. Check the brake fluid level at the reservoir or the sight window. It should be above the lower mark. If if isn't, check for wear on the brake pads. If the pads are worn, replace immediately. Make sure there are no leaks in the fluid lines. Check for loose fittings or damage to the fluid lines. A WARNING: Add DOT3 or DOT4 brake fluid only from a sealed container. Do not mix brake fluid types. Failure to follow this warning could cause the brakes to fail, resulting in serious personal injury. 19 TIRE MAINTENANCE Check the air pressure in all tires before riding. Improper air pressure will affect handling, steering response, traction; tire life, and rider comfort. Be sure tires are inflated to the pressures shown below. Recommended Pressure Front 29 psi ± 1.2 psi Rear (200 kpa ± 8.3 kpa) 36 psi± 0.9 psi (250 kpa ± 6.2 kpa) WARNING: Check the tire pressure carefully while inflating. Too much air in the tire could cause the tire to burst, causing serious personal injury. WARNING: Maintaining correct air pressure in the tires is very important. Too little pressure could allow the tire to rotate off the wheel rim. Too much pressure could cause the tire to burst. Failure to maintain correct air pressure in the tires could cause problems with vehicle operation and stability, causing serious personal injury. TIRE REPAIR When inspecting tires, always check for: Bumps or bulges on the tire (replace if there are any) Cuts or cracks (replace if any fabric is visible) Foreign objects such as nails embedded in tire Excessive wear REPLACING TIRES When tires are worn, the traction of the vehicle will be decreased, which increases the chance of having an accident. Tires should be replaced when the depth on the tread is 1.6 in. (1.5 mm) or less on the front tire or 0.08 in. (2 mm) on the rear tire (as measured from the center of tread). Replace tire immediately if the wear indicators are visible. Always use identical replacement tires. Using improper tires on the unit could cause loss of control, which could increase your risk of accident. Recommended tire size: Front 90/90-‐21 54H Rear 140/70-‐18 67H When replacing a tire: Have the tire replaced by your local service center. Have the wheel balanced after installation. Safety Reminders: Do not replace with a radial tire. Using a different type of tire may affect stability and handling. Do not replace with car tires. The tire may forcefully separate from the rim during installation, causing serious injury or death. Car tires handle differently than motorcycle tires and will negatively affect handling. If you drive over a pothole or any hard object, pull to the side of the road and inspect the tire for possible damage. This motorcycle uses tubeless tires. If your tire is punctured or damaged, it should be replaced using only tubeless tires. A repaired tire may fail while riding and is not as reliable as a new one. A temporary repair can be made in an emergency situation, but the tire should be replaced as soon as possible. Ride at slow speeds and do not carry a passenger with a repaired tire. 20 INSPECTING THE DRIVE CHAIN There is a riveted master link on the chain, which connects the countershaft to the rear wheel sprockets. To keep out moisture and dirt, the o-‐ring chain uses rubber rings between the side plates of the pin and roller links to seal in the lubricating grease. Proper lubrication and adjustment will help extend the life of the chain. You should always perform the pre-‐ride inspection to check the adjustment and lubrication before riding. If you are riding in dusty or muddy conditions remember to maintain and service the chain more often than usual. Before any servicing to the chain occurs to be sure the engine is off and in neutral. You do not need to remove the chain to perform service in the maintenance schedule. Inspection: Check the slack of the lower drive chain between the two sprockets. An acceptable amount of slack is from 3/8 to 9/16 in. (10-‐15 mm). If adjustment is needed, take motorcycle to an authorized service center. The slack should remain consistent along the entire chain. If not, check to make sure there are no kinks or binds. You can sometimes eliminate kinks or binds by lubricating the chain. Inspect chain for damaged rollers, kinks or binds, dry or rusty links, improper adjustment ,excessive wear, or dam-‐ aged and missing o-‐rings. The chain should be replaced if there is damage to the rollers or if there are loose pins. Lubricate any kinks or binds to work them out. If the chain appears too dry or rusty, lubricate. Check both the front and rear sprocket teeth for excessive wear or damage. If needed, replace the sprocket. The use of a new chain with a worn sprocket will cause quick wear to the new chain. CLEANING THE DRIVE CHAIN The drive chain should be cleaned, lubricated, and inspected every time you ride the motorcycle. WARNING: Always inspect the drive chain tension before you ride the motorcycle. Too much slack could allow the drive chain to come off the sprockets, which could cause an accident or result in serious damage to the motorcycle. Cleaning the drive chain: Wash the drive chain with an approved chain cleaner. Dry the chain, then lubricate with chain lubricant or the equivalent. 21 CHARGING BATTERY Charging the battery incorrectly may cause damage. Always read the instructions that came with the battery charger and follow all directions on the battery. For home charging, we suggest you use a trickle charger. A trickle charger can be left connected for a long period of time without causing damage to the battery. Do not leave the battery connected to the charger longer than the recommended amount of time. Do not use an automotive battery charger as this can cause permanent damage to your battery. BATTERY REPLACEMENT WARNING: Batteries contain sulfuric acid. Avoid contact with skin, eyes, or clothing. Always wear eye protection with side shields marked to comply with ANSI Z87.1, along with rubber gloves when working with batteries. Have water available in case acid comes in contact with eyes or skin. Keep all children and bystanders away from the area while this procedure is being performed. Failure to do so could result in fluids entering your eyes, burns, and other possible serious injuries. POISON -‐ CAUSES SEVERE BURNS Contains sulfuric acid. Avoid contact with skin, eyes, or clothing. To prevent accidents, rinse empty container with water. WARNING: Failure to place battery on a level surface may allow fluid to seep or spill out of the battery, resulting in serious personal injury. Clean the cable connectors with a wire brush or sandpaper to remove oxidation . After charging, install new battery with poles facing forward. Put dielectric grease on the battery terminals to avoid corrosion. Attach red positive (+) cable to the positive (+) terminal on the battery. Tighten securely. Attach black negative (-‐) cable to the negative (-‐) terminal on the battery. Tighten securely. WARNING: Always connect the red positive (+) cable first and then the black negative (-‐) cable. Failure to do so could cause the battery to explode, causing serious personal injury. Securely fasten battery inside the battery box, making sure the positive terminal does not touch the side of battery box. WARNING: Make sure seat is in proper position and attached securely when you install it. Failing to install the seat properly could allow the seat to move and cause the rider to lose control, resulting in possible serious personal injuries. Dispose of the old battery in a manner approved by applicable regulations. ANTIDOTE: External -‐ Flush with water Internal -‐ Call physician immediately. Drink large quantities of water or milk. Follow with Milk of Magnesia, beaten eggs, or vegetable oil. Eyes -‐ Flush with water for 15 minutes and get prompt medical attention. NOTE: If you are unsure if you are qualified to perform this operation, take the unit to an authorized service center. The battery is located inside a chrome battery box underneath the seat. Remove the 2 bolts that retain the battery box cover to obtain access to the battery. The make sure the positive contact is on the + and the negative contact is on the -‐. The vent tube should be inserted through the hole in the bottom of the box, so the fumes can vent outside the battery box. Failure to do so will result in corrosion. 22 FUSE REPLACEMENT Some 2010 models have an automatic reset overload switch. This is a black rectangle box inside the false oil tank. Other bikes have a standard 15 amp fuse. Turn off the main switch key. Remove the bolt from the left side cover of false oil tank A small in-‐line fuse box will be located inside, replace with a 15 amp fuse if this fuse is blown. AIR FILTER MAINTENANCE Check the air filter every oil change. The air filter should be checked more frequently if you ride in conditions where there is dirt, sand or other debris. The air filter can be tapped out and lightly blown with air to clean. Do not use compressed air to clean the filter element. It will damage the filter. HEADLIGHT REPLACEMENT Turn off the main key switch. Locate screws to remove headlight lens. Remove lens to access inside of light and bulb Push in bulb holder and turn left (counterclockwise) until tab lines up with grooves. Remove bulb and replace. TAIL LIGHT REPLACEMENT Turn off the main key switch. Locate screw holes in rear lens. Remove lens. Remove bulb by pushing in and turning left (counterclockwise). Replace bulb and reinstall lens. GENERAL LUBRICATION Proper lubrication is important for safe, smooth operation and long life of your vehicle. Be sure that all lubrication is performed during periodic maintenance on the vehicle. Increase number of intervals when you use your motorcycle in severe conditions. Your authorized service center should do the general lubrication as shown in the Maintenance chart. This includes the lubrication of wheel bearings, swing arm bearings, steering shaft holder, cables, etc. TRANSPORTING It is best to transfer the motorcycle in its normal operating position. Drain fuel from carburetor. o Turn fuel valve to the off position. o Turn off the engine. o Place a suitable container beneath the carburetor drain screw. o Loosen the screw and allow the fuel from the carburetor to drain completely. o Retighten the carburetor drain screw. Lock the parking brake lever. Securely tie down the motorcycle at the four wheels with straps, rope, or some other suitable means. Use extra tie downs if you transfer the vehicle in the standing position. Lubricate the following areas with oil or grease as indicated. Bottom fitting of steering shaft -‐-‐ lubricate with lithium (Li) based grease Brake cable Throttle cable Throttle grip 23 CLEANING The motorcycle should be cleaned and polished on a regular basis to keep it looking new longer. NOTE: Do not use high-‐pressure washers such as those found at car washes. They could cause mechanical, electrical and other damage. Use a mild, neutral detergent and water to clean your motorcycle. A mild cleaner, polisher, or degreaser can also be used. Do not use products that contain chemical solvents or harsh detergents. Make sure the engine is cool before cleaning. Wash the motorcycle in a shady area. Direct sunlight can cause water spots and fading . When finished cleaning, inspect the motorcycle for wear or leaks. VEHICLE INDENTIFICATION NUMBER (VIN) AND ENGINE SERIAL NUMBER LOCATION The frame (VIN) and engine serial numbers will be required when you register the motorcycle. You also need these numbers to order parts from your authorized service center or Cleveland CycleWerks. The VIN number can be found on the side of the front forks stamped into a metal plate. The engine serial number can be found stamped into the left side of the crankcase. Write down the serial numbers here for your future reference: VIN: ________________________________________ Engine No: __________________________________ 24 TROUBLESHOOTlNG: This troubleshooting guide is provided to help you find the cause of some common complaints. If these solutions do not solve the problem contact your authorized service dealer. COMPLAINT: Engine is hard to start or does not start at all. 1. Make sure there is adequate fuel in the fuel tank. 2. Check that the engine switch is in the RUN position. 3. Check that the fuel valve is in the ON position. 4. Make sure there is enough fuel reaching the carburetor from the fuel tank and the fuel is free of debris and contaminants. a. Place a suitable container beneath the carburetor drain screw. Loosen the screw and allow the fuel from the carburetor to drain completely, then retighten the carburetor drain screw. b. Run the engine for a few seconds, then turn the engine off. c. Loosen the carburetor drain screw to check that the carburetor has filled back up with fuel. d. If fuel is reaching the carburetor, proceed to step 5. 5. Check the ignition system. WARNING: Do not perform the ignition system check if you are not familiar with this procedure. Performing the test improperly could cause you to get a high voltage electrical shock or cause a fire or explosion. Do not hold the spark plug near the spark plug hole during the test. Do not perform this test if you have a heart condition or wear a pacemaker. Failure to follow the above steps may result in serious personal injury. a. Remove the spark plug and reattach it to the spark plug lead. b. Apply the rear brake lever to make sure the rear wheels are locked. Turn the ignition key to the ON position. Slide the engine switch to the RUN position. Push the START button. If the ignition system is operating properly, a blue spark should jump across the spark plug gap. If there is no spark, take the motorcycle to an authorized service center. COMPLAINT: Engine stalls. 1. Make sure there is adequate fuel in the fuel tank. 2. Check to be sure the spark plug is not fouled. Remove the spark plug and clean it. Replace if necessary. 3. Make sure the fuel valve and fuel tank are not clogged. 4. Check idle speed and adjust, if necessary, following the procedures in Idle Speed Adjustment. 5. Follow the procedures in Checking/Cleaning the Air Filter to be sure the air filter is clean. COMPLAINT: Engine is flooded. 1. Turn the engine stop switch to the OFF position. 2. Close the choke OFF. 2. Open the throttle completely. 3. Push and hold in the start button for 5 seconds. 4. Wait 10 seconds, then turn the engine stop switch to the RUN position. 5. Follow the procedures for starting the engine in high temperatures. 25 EMISSIONS WARRANTY Cleveland CycleWerks LLC. Emission Control Information YOUR WARRANTY RIGHTS AND OBLIGATIONS This emission control system warranty is part of your purchase agreement and applies to the ultimate purchaser (the first person who in good faith purchases the product for purposes other than resale) and each subsequent purchaser. The emission control system warranty period for this vehicle begins on the date the vehicle is first placed into service by the ultimate purchaser and continues for 30 months after that date, or 5,000km, whichever comes first. provided there has been no abuse, neglect or improper maintenance of your vehicle. This vehicle is designed .built and equipped to meet U.S. EPA emission standards for the full useful life of the vehicle. Where a warrantable condition exists, CCW will repair your vehicle at no cost to you, including diagnosis, parts and labor. If an emission-‐related part on your vehicle is defective, the part will be repaired or replaced by CCW. This is your emission control defects warranty. OWNER'S WARRANTY RESPONSIBILITIES As the vehicle owner .you are responsible for the performance of the required maintenance. You should maintain a record of all maintenance performed on your vehicle and retain all receipts covering maintenance on your vehicle. You may not be denied a warranty claim solely because of your failure to ensure the performance of all scheduled maintenance or lack of maintenance records or receipts. You are responsible for presenting your vehicle to an authorized dealer as soon as a problem exists. The warranty repairs should be completed in a reasonable amount of time, not to exceed 30 days. As the vehicle owner, you should be aware that you may be denied your warranty coverage if your vehicle or a part has failed due to abuse, neglect, improper maintenance, or unapproved modifications. WARRANTY COVERAGE: CCW warrants that each new 2010 and later vehicle: is designed, built and equipped so as to conform at the time of initial retail purchase with all applicable regulations of the United States Environmental Protection Agency , and the California Air Resources Board; and is free from defects in material and workmanship which cause such vehicle to fail to confirm with applicable regulations of the United States Environmental Protection Agency or the California Air Resources Board for the periods specified above. Your emission control system warranty covers components whose failure would increase an engine's emission, including electronic controls, fuel injection system, carburetor, the ignition system, catalytic converter, or any other system utilized in this vehicle to control emission if it is originally equipped. Also included may be hoses, connectors and other emission-‐related assemblies. Replacing or repairing other components (including parts, labor, and other costs) not covered by this emission control system warranty or the standard warranty is the responsibility of the owner. Coverage of repairs under this warranty applies only when repairs are completed at an authorized dealer or repair facility. CCW will not cover repairs performed outside of an authorized dealer or repair facility, except to correct an unsafe, emergency condition attributable to CCW. The use of replacement parts not equivalent to the original parts may impair the effectiveness of your vehicle's emission control system. If such a replacement part is used and an authorized dealer determines it is defective or causes a failure of a warranted part, your claim for repair to bring your vehicle into compliance with applicable standards may be denied. If an unsafe, emergency condition exists attributable to CCW, repairs may be performed at any available service establishment, or by the owner, using any replacement part, as long as the operator tries to restore the engine/equipment to its proper configuration as soon as possible. CCW will reimburse the owner for the expenses, including diagnostic charges, not to exceed CCW's suggested retail prices for all warranted parts replaced and labor charges based on CCW's recommended time allowance for the warranty repair and the geographically appropriate hourly labor rate. The owner may reasonably be required to keep receipts and failed parts in order to receive compensation. This Emission Control System Warranty is in addition to the standard Limited Warranty. 26 EXCLUSIONS AND LIMITATIONS: This warranty does not cover the following: Failures or malfunctions of the emission control systems caused by abuse, alteration, accident, misuse, the use of leaded gasoline. Replacement of expendable maintenance items unless they are original equipment defective in material or workmanship under normal use, and the first required replacement interval for the item has not been reached. Expendable maintenance items include but not limited to spark plugs, filters, coolant, lubricants, gaskets, hoses, and belts. Replacements of parts and other services and adjustments for required maintenance. Any vehicle equipped with an odometer or hour meter where the reading is altered so that actual mileage cannot be readily determined. Repairs or replacements as a result of accident, misuse, or use of re-‐ placement parts or accessories not conforming to the original specifications which adversely affect performance Physical damage, corrosion, or defects caused by fire, explosions or similar causes beyond the control of CCW. Failures not caused by a defect in material or workmanship. Use of the vehicle in any type of competitive racing or related events immediately and completely voids this and all other warranties. Failure to follow the recommended jetting chart/altitude adjustments, if applicable, or other unauthorized modifications, will be considered improper maintenance and use of the vehicle, and may result in the denial of warranty claims. LIMITED LIABILITY The liability of CCW under this Emission Control System Warranty is limited solely to the remedying of defects in material workmanship by an authorized dealer at its place of business during customary business hours. This warranty does not cover inconvenience or loss of use of the vehicle or transportation of the vehicle to/from the authorized dealer. CCW is not liable to any person for incidental, consequential or special damages of any description, whether arising out of express or implied warranty or any other contract. Negligence or other tort or otherwise. No express emission control system warranty is given by CCW except as specifically set forth herein. Any emission control system warranty implied by law. including any warranty of merchantability or fitness for a particular purpose is limited to the express emission control system warranty term stated in this warranty . The foregoing statements of warranty are exclusive and in lieu of all other remedies. All express warranties not stated in this warranty are disclaimed. Some states do not allow limitations on how long an implied warranty lasts, so the above limitations may not apply if it is inconsistent with the controlling state law. No dealer is authorized to modify this Emission Control System Warranty. If you have any questions regarding your warranty rights and responsibilities, you should contact: Cleveland CycleWerks LLC. [email protected] or the California Air Resources Board.9528 Telstar Avenue. El Monte, CA 91731 (for California registered vehicles only). 27 NOISE EMISSION WARANTY Cleveland CycleWerks LLC. Warrants that this exhaust system ,at time of sale, meets all applicable U.S. E.P.A. Federal noise standards. This warranty extends to the first person who buys this exhaust system for purposes other than resale, and to all subsequent buyers. Warranty claims should be directed to Cleveland CycleWerks: [email protected] PRODUCT SPECIFICATIONS DIMENSIONS AND DRY MASS: SPROCKET: Overall length ............................. 86.61 in. (2200 mm) Front............................................................ 15 tooth Overall width................................. 28.35 in. (720 mm) Rear.............................................................. 41 tooth Overall height ............................. 40.95 in. (1040 mm) Wheelbase .................................. 59.65 in. (1515 mm) ELECTRICAL: Ground clearance ........................... 5.51 in. (140 mm) Ignition type .......................................................... CDI Seat height ..................................... 25.2 in. (640 mm) Generator system ................................. A.C. Magneto Dry weight.. ...................................... 254 lbs. (115 kg) Battery type, voltage, capacity .................. 12V, 14AH Headlight ........................................ 12V, 30w/30w x 2 ENGINE: Tail Light ........................................... 12V, 21w/15wx 1 Type ...................................... Four stroke. air cooled Neutral indicator ........................................12V, 3w x 1 Number of cylinders ............................................... 1 High beam indicator ...................................12V, 3w x 1 Bore and stroke ............................ 7.0 mm x 65.0 mm Displacement. ................................................ 229cc LUBRICANT: Compression ratio .............................................. 9:2:1 Engine lubricant capacity ................... 40.57 oz. (1.2 I) Carburetor .................................... Constant velocity Air cleaner ... Paper with polyurethane foam element TRANSMISSION: Drive System Type .................... Chain/Manual clutch Gear Ratio 1/2/3/4/5 .................................................. .................................. 2.909/1.867/1.316/1.000/.0833 TIRES: Front ........................................................ 90/90-‐21" Rear ......................................................... 140/70-‐18" FUEL: Fuel tank capacity ................................. 2.3 gal. (8.7 I) BRAKES: Brake type ................................................... Disc/Disc SUSPENSION: Front ............ Telescopic inverted oil dampener shock Rear...... 2 adjustable preload shocks underneath seat 28