1
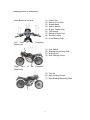
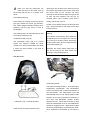
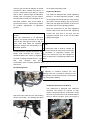
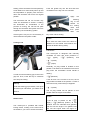
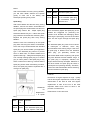
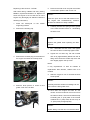
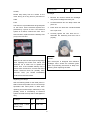
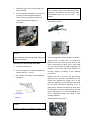
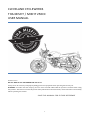
CLEVELAND CYCLEWERKS THA MISFIT / MISFIT 250CC USER MANUAL 8.1.2011 rev 2 DO NOT RIDE IF YOU ARE UNDER THE AGE OF 16. Always wear all necessary and properly fitting protective equipment when operating this motorcycle. WARNING: To reduce the risk of injury, the user must read and understand the operator's manual before using this product. This manual contains important safety information and instructions, which should be read carefully before operating this vehicle. SAVE THIS MANUAL FOR FUTURE REFERENCE 1 Important Notes Knowledge relating to motorcycle run-in An initial run-in of 500 miles is very important for the service life of the motor. Correct run-in during this period can ensure maximum service life and performance. Proper run-in will provide the proper surface engagement for long useful life of the motor’s internal parts. Sufficient run-in ensures a motorcycle’s engine and parts can achieve proper performance over the life of the motorcycle. The most important factor in proper run-in procedure is to make sure the motor is not worked too hard or overheated, as if this happens, it can permanently damage the motors ability to perform properly for the life of the vehicle. Please refer to the Section “Run-in of New Motorcycle” for detailed run-in method. Please carefully read this manual and strictly follow relevant rules or descriptions. Pay special attention to: Warning, Caution, and Notes. Please carefully read this document and keep for further reference. . Warning: follow all warnings, safety gear and procedures. Caution: Follow all operating instructions. Forward Thank you for your selection of CCW brand of THA MISFIT motorcycle. We have applied our existing state-of-the-art production technology and equipment for providing for you with novel, luxury and elegant motorcycles with performance reliability when we design, research, develop, and produce this variant. Driving motor is a very exciting sport and ideal for your transportation means, which may make you enjoy yourself in the process of driving. You shall be familiar with all provisions and requirements mentioned in this instruction manual before driving. This instruction manual overviews correct operation, maintenance, and repair of motorcycle. Follow the under – mentioned specifications which ensure that your motorcycle is always kept in a good condition for a long time of use. The authorized dealers have skilled, trained, and experienced maintenance and repair technicians who may provide for you with best servicing and service. 2 Contents 1. Instructions to Users 2 2. Installing Position of Components 4 Instructions to Users 3. Operating Parts 5 Instructions to the Motorcycle Driver for Driving 4.Instructions to Fuel and Lube Oil Use 10 Safety 5. Run - in of New Motorcycle 10 6. Examination before Driving 12 7. Key Points of Driving 13 8. Examination and Maintenance 16 9. Troubleshooting 29 10 Storage 33 1.Wear a Safety Helmet 11. Technical Data 34 Wearing a safety helmet is the first step of driving When you are driving, you must make sure to be safe at any time. So, you must follow some of important transportation rules and carry out the six of following provisions. safety, which is a very important factor for driving motor. A motorcycle driver must select a high quality safety helmet for protection. Head injury is one of the most serious traffic accidents. Therefore, you must wear safety helmet and suitable goggles when driving motorcycle. 2.Please be familiar with the construction of this motorcycle Your driving skill and your mechanical knowledge are foundation of safety driving. Drilling and exercise should be made on an open site without any vehicle for purpose of familiar with your motorcycle and its operating methods. Please remember that practice makes perfect. 3.Understand your limitation of safety speed The driving speed depends on situation of ground surface, your skills and weather. Understanding of this limitation may avoid occurrence of traffic accidents. At any time, as long as you drive within your practiced and skilled range, you may void occurrence of traffic accidents. 4.Wear suitable clothing Loose, slack and strange clothing may make that you feel uncomfortable and unsafely. When you are sitting on the saddle, wearing suitable and fitted clothing may make that you are free. Gloves, boots, necessary safety helmet, and the others will indicate that you are a qualified motorcycle driver. Selection 3 of high - quality and tight clothing shall be made as practical as possible. 4 5.Pay more attention to drive safely in cloudy and of parts or requesting for special service, these rainy climate number may help dealers provide better service for you. Special attention shall be paid for cloudy and rainy climate. Please remember that the braking distance The frame series number (or VIN) is stamped on the shall be double that of in fine weather. Please keep vertical pipe of the frame. The engine number is away from the manhole, paint, and dirty surface on stamped on the left side of crankcase. using for the road as practical as possible for purpose of indication of main technical data and manufacturer avoidance of slippage. Wet road may possible result of this model of motorcycle. in danger. Sudden turning shall be avoided at the Please write down the series numbers here for time of acceleration. Special attention shall be paid future reference. when passing through railway or bridge etc. Please remember keep safe space with the vehicles ahead. 6.Examination before Driving Frame series number (or VIN) Please carefully read the section “Examination before Driving” and drive pursuant to the driving rules for purpose of your and passengers’ safety. Engine Number Position of Identification Number Frame series number (or VIN) Engine Number Frame series number (or VIN) and engine number is for registration of motorcycle. When placing an order 5 Installing Position of Components Dash Board on the grip Left View Motorcycle Right View Motorcycle of of the the (1) (2) (3) (4) (5) (6) (7) (8) (9) Clutch Grip Switch of Left Grip Speed Meter Ignition Switch Engine Tachometer Tachometer Switch of Right Grip Throttle Control Front Braking Grip (1) (2) (3) (4) Fuel Switch Starting Accelerating Grip Shifting Rod Side Parking Frame Complete Complete (5) Tool Kit (6) Main Parking Frame (7) Rear Braking Retaining Plate 6 Operating Parts immediately fill it with gasoline. Key Milometer(5) This is a kind of odometer may be cleared to zero, which is installed within the odometer, mainly used for recording distance of short distance driving or for calculation of oil consumption. Two pieces of key are supplied together with the motorcycle, where one piece should be Ignition Switch (6) Designed with three positions: properly safekeeping for standby use. (Off) position All the circuits are disconnected and the key may be removed. (ON) position All the ignition circuits are connected and the engine may be started. Don’t press down the key on this position. Headlight on full beam (7) When the headlight is on full beam position, the pilot lamp is ON. Shifting Pilot Lamp (8) The number indicates the current shifting position of this motorcycle. This only shows that the lamp is ON on the NEUTRAL position and is Dash Board OFF on the other positions. Only placing on the NEUTRAL position, the pilot lamp is ON in green. Odometer (1) Turning Lamp(9) For Record of all the running distance of this When you turn left, the left turning lamp will turn motorcycle from putting into service. green; When you turn right, the right turning Speed Meter (2) lamp will turn green For indication driving speed in Mile/h. Tachometer (3) The tachometer shows engine revolution in rpm. Fuel Level Gauge (4) This shows the oil level in the oil tank in liter. When the indicating hand of the oil level gauge is fallen into the red range, please 7 Control System of the Left Grip Horn Button (6) Press down the button that the horn will sound. Control System of the Right Grip Clutch Grip (1) When starting the engine or shifting, firmly hold this grip for shut - off transmission system and for disengagement of clutch. Electric Starting Button (1) Overtaking Lamp Switch (2) Press the pushbutton down, the Hi - beam lamp of headlight is ON. Continuously push this switch when overtaking so that the headlight flashes to remind that the vehicles ahead should pay attention to be overtaken by the vehicle in the rear. Press down the button to connect the starting motor circuit. Place the shift handle on the NEUTRAL position to shut off transmission for purpose of safety when starting. Warning Continuously start the motor. Don’t exceed five Dimming Switch (3) seconds discharging Hi - beam operation each will time. make the Excessively circuit and starting motor abnormally heat. Failing to When the dimming switch is upward moved start after several times of trial, stop to the examine oil supplying system and starting headlight upper beam lamp is ON and the circuit system (Please refer to Section upper beam pilot lamp on the dash board is Troubleshooting) to (upper beam) position, also ON. When the dimming switch is upward moved to (lower beam) Engine Shutdown Switch (2) OFF position position, the lower beam pilot lamp is ON. Change the switch over this position, the engine Air-Inlet Bar (4) When it’s difficult to start the bike, pls pull the air-inlet bar back which will make it easier to start the bike will shut down. The motorcycle is unable to start if re - starting. The switch needs to be ON for starting the motorcycle. ON position Turning signal operation (5) Push the switch to the position , left turning signal lamp is ON and the pilot lamp Change the switch over this position, the circuit is ON and then the motorcycle may be started. on the dash board is also flashing. Push the switch to the position , right turning signal lamp is ON and the pilot lamp on the dash board is also flashing. Stop switch(3) “ 8 ” Normal situation When you stop the motorcycle, pls opening the fuel oil tank cover and then pull out make the lever to this mark, then all the oil tank cap together with the key. Align with the turning light will be on to alarm other the arrow mark on the oil tank cap when driver. covering the tank and then apply the cap into the Front Braking Grip (4) Front braking is to slowly and firmly hold the right grip toward the control grip direction. This variant adopts hydraulic braking. Don’t suddenly hold the grip firmly in case of deceleration. The braking lamp will automatically be ON when firmly holding the grip. Accelerator Rotary Grip (5) The accelerator rotary grip is to control engine rpm. Rotate it toward the driver himself in the time of acceleration and rotate oil tank cap hole together with the key for pressing down until a locking sound occurs. Finally, pull the key out of it. Caution: Don’t directly flush the oil tank cap with high - pressure water so that water cannot flow into the oil tank. Warning Don’t fill with oil excessively. Don’t make the oil splashing on the hot engine. Don’t fill with oil on the top of oil filling orifice. Otherwise, oil will overflow when the oil is expanded due to fuel temperature rise. it away the driver himself in the time of Shutdown the engine before filling with oil deceleration. and turn the key to the OFF switch. No smoking in case of filling with oil. Fuel Oil Cover Accelerating Pedal This variant is designed with 5 - shift speed gear engagement transmission. The transmission lever is connected with a ratchet mechanism in the transmission. The transmission lever will automatically return to the original position after selection of one shift for purpose of selection of next shift. The NEUTRAL position locates ○1 Gasoline Level ○2 Oil Filling Orifice between the low - speed shift and Shift II. Step down the transmission lever on the NEUTTRAL position to engage the low - speed shift. Engage Insert the key to rotate clockwise when the shift by upward lifting the transmission lever. Don’t accelerate or decelerate by two shifts or 9 more for one time due to adoption of ratchet mechanism. When shifting from Shift II to the low - speed shift or from the low - speed on the dash board will be ON. Supporting Bracket shift to Shift II, pass through the NEUTRAL This variant is designed with central supporting position and not stopping on this position. bracket ○2 and side supporting bracket ○1 . Step Provided that it needs to be stopped on the on the pedal lever and lift the rear cargo rack by NEUTRAL position, stop at the middle of right hand. Hold the steering grip by left hand. process from the low - speed shift to Shift II Pull it from the upper rear direction by force to fix for purpose engagement of NEUTRAL the motorcycle on the supporting bracket. position. Place the motorcycle on the side supporting bracket. Step on the end of the side supporting bracket and step down it by force until the Caution: supporting bracket turns to the end and stops against the stopper. When the transmission is on NEUTRAL position, the neutral pilot lamp on the dash board is ON. Although the lamp is ON, the clutch lever shall slowly be released to Caution: determine whether the transmission is on NEUTRAL position. The motorcycle head of shall be upward the slope when placing the motorcycle on the slope Decelerate before shifting towards the low for prevention of supporting bracket from speed shift because the engine will falling. The motorcycle may be engaged on accelerate before the clutch is engaged at Shift I for prevention of supporting bracket from the time of shifting towards the low - speed falling. shift. This measure may prevent unnecessary wear of braking elements and rear wheel. Rear Braking Pedal Warning: Pay attention to examine whether the side supporting frame can normally be returned on the normal position and whether swaying or slack parts can be found before starting. Carburetor Excessive Fuel Device This motorcycle is designed with carburetor excessive fuel system for purpose of easy starting. Under the engine is cooled down, press Step down this pedal and the rear braking device will function. The braking pilot lamp down the excessive fuel rod at the dead bottom point to start the engine. Once the engine is 10 starting, lift the excessive fuel rod upward by insert the ignition key into this lock and then a half distance to continuously warm up until clockwise turn the key until it is unlocked. the temperature is properly risen and then return the excessive fuel rod to the original position. Apply retaining This excessive fuel rod can function only ring of the under the accelerator is closed. If rotating helmet the accelerator for acceleration in the the process of running, the fuel will not pass on locking catch through the excessive fuel system and oil is then supplied by the accelerating system. If the engine is very hot, it is unnecessary to the and press down the key. Push it when closing. use excessive fuel system to start. Caution: Turning Lock Don’t start the motor when the helmet is fastened on the helmet lock because the helmet will disturb driving safety. Fuel Switch This motorcycle is designed with manually controlled oil valve with three positions i.e. (Open), (Reserve), and (Close). (Open) Generally, oil plug handle is located on this position. Fuel flows to the carburetor from the oil plug when the accelerator control handle is rotating. In order to lock the steering grip, first turn the (Reserve) grip left. Then, insert the key to clockwise turn firmly for locking. If the oil level in the oil tank is too low, the oil plug handle is located on the position. 1.6 liter of Warning reserved oil may continuously be supplied. Under the steering grip is locked, never push the motorcycle. Otherwise, you will be out of balance. (Close). The oil plug handle will be placed on this position after the engine is shutdown. Caution: Helmet Lock If the oil plug is placed on the (Open), This motorcycle is provided with helmet locking device, locating on the lower left of the saddle. If you want to unlock the helmet, (Reserve) position, oil will overflow from the carburetor and gasoline with flow into the engine. The gasoline will flow into the engine when the engine is 11 starting, which may result in serious mechanical damage. Notes: After the oil plug RESERVED is position, located filling on the with oil The Initial 800km Up to 5000rpm 1600km Up to 7500rpm 1600km or more Up to 10000rpm immediately and relocate the oil plug handle on the opening position after filling with oil. Instructions to Fuel and Lube Oil Use Fuel Please lead - free gasoline. If the engine presents slightly explosive noise, it may be resulted from using general - use fuel as substitution, which should be replaced. Notes: Use of lead - free gasoline may extend service life of spark plug. Lube Oil Use of high - quality 4 - stroke lube oil may extend service life of spark plug. Selection of lube oil shall be made with Grade SE or SD according to API classification, with a viscosity of SAE10W - 40. If this type of oil can uneasily be available, selection of substitution shall be made according to the following table. Run - in of New Motorcycle The forward shows that the run - in of new motorcycle will play an important role to extend service life of the motorcycle and its performance. See the following table for correct run - in method. 12 Engine rpm Change The engine rpm shall not be kept constantly, which needs to be changed always so that all the components of engine can bear running, the engine shall sufficiently run at idle speed so that lube oil may flow through the key components of the engine. Make maintenance and servicing for the first time. pressure. However, all the component parts It is the most important to make maintenance of the engine will be cooled down when the and repair occurred within the initial driving pressure is released, which may help fit the 1000km. During run - in, all the engine parts parts. At the time of trial run, it is important have been run - in and other parts has been some forces applied on the engine parts engaged. So, all the components shall be may ensure fit, but overloading is not properly adjusted and all the fasteners must be allowed on the engine. fastened. Replace the contaminated lube oil. Avoidance shall be made at certain low Make rpm motorcycle has driven for 1000km to ensure If the engine runs at certain low rpm (low load), it only can be smoothly ground instead of well run - in. As long as the maximum limit used is not exceeded, the engine may be servicing immediately when longer service life and better performance of the engine. Caution: accelerated at any shift. However, within the Maintenance at 1000km driving distance initial 1600km, the maximum acceleration is shall made in accordance not allowed. “Troubleshooting”, of which First Lubricating before Driving the be with “Caution”, “Warning” shall specially be paid. After starting the engine at hot and cold status and before not applied with load or Examination before Driving Carefully examine the following items before driving, of which significance must not be 13 neglected. Items Steering grip Lighting Transmission oil Braking device Pilot lamp Accelerator Tire Horn Clutch Fuel Transmission chain Purpose 1. Smooth 2. Rotate free 3. No clearance or not loosening can be found Operate all the lamps including headlight, tailing lamp, braking lamp, lighting lamp of dash board, turning signal lamp Examine oil level 1. Clearance of rear braking pedal and front braking grip 2. No “sponge” situation due to not flexible braking 3. No oil leakage can be found NETURAL, oil level pilot lamp (or turning signal pilot lamp) 1. Accelerator pulling cable function 2. Flow smoothly and accelerator throttle may reliably be returned to the OFF position 1. Calibrate air pressure 2. Proper tire pattern depth 3. No scoring and cutting can be found Calibrate function 1. Calibrate clearance of pulling cable 2. Smoothly forward Sufficient fuel needed for driving distance 1. Adjust tensioning 2. Properly lubricating 14 Driving Key Points Warning:: If you drive this motorcycle for the first time, we suggest that you preferably exercise on a non - public road until you are familiar with the control and operating method of this motorcycle. Place the side supporting frame on the normally lifting position before driving. Don’t shift to decelerate when turning. Slow down to safe speed before turning. Don’t shift to decelerate during turning. It is most dangerous that you drive by one hand only. Firmly hold the grip with your two hands and step on the pedal with your two feet. Firmly hold the grip by your both hands at any time. On the wet and smooth road, braking and turning capacity will naturally decrease due to small friction force of tire. So, you must decelerate in advance. Follow the traffic rules and limit speed. Engine Starting Examine whether the accelerator switch is placed on ON position and then examine whether the engine shutdown switch is placed on position. Insert the ignition key into the ignition switch and clockwise turn it on the contact point of ON position. If the transmission is NEUTRAL position, the NEUTRAL pilot lamp is ON. Warning: Get a habit to always engage the transmission on NETRUAL position when starting. Firmly hold the clutch grip and then re - start to avoid fly out forward in case of engagement by mistake. 1. Press down the engine starting button to ignite. Don’t rotate the accelerator control grip when starting. Notes: 15 Immediately release the button after engine ignition for purpose of bad effect to the engine. For prevention of thorough discharging of battery, if failing to ignite it after pressing down for 5 seconds, pause for 10 seconds and then restart it. If failing to ignite the engine after repetitive 2 - 3 operation, rotate the accelerator control grip by 1 / 8 – 1 / 4 turns, and then restart it. The motorcycle not in use for a long time or bad atomized fuel may result in difficult starting. Here, start it again and again instead of rotating the accelerator control grip. 2. Ignite it with recoiling starting rod If the battery is thoroughly discharging, ignite it recoiling starting rod. Turn the ignition switch on the ON position. Step the recoiling starting rod down by force. When the engine is under cold status Press the carburetor excessive fuel rod down to tightly close the accelerator. Start it with the starting button. Pull the excessive fuel rod on by a half distance after starting to make the engine can sufficiently warm up, and then pull to return the rod to the original position. The lower ambient temperature is, the longer the warm - up time of the engine is. When the engine is under hot status Open the accelerator control device and turn it by 1 / 8 – 1 / 4 turns. Press the electric starting button to start it. It is unnecessary to use carburetor excessive system when the engine is under hot status. Warning: Don’t start engine in a room with bad or without ventilation because carbon monoxide is of serious toxicity. Don’t keep away from the starting motorcycle at any time under it is unattended. Caution: It shall not run for too long time at an idle speed in case of not driving. Otherwise, the engine is overheated to damage the internal parts or. 16 MAINTENANCE INSPECTION AND MAINTENANCE SCHEDULE It is very important to inspect and maintain your motorcycle regularly. Follow the guidelines in the chart below. The intervals between periodic services in months are shown. At the end of each interval, be sure to perform and document the maintenance listed. Only an authorized Cleveland CycleWerks service center may maintain, replace, or repair emission control devices and systems. WARNING: Failing to perform recommended maintenance or performing maintenance improperly can lead to an accident and cause serious personal injury, cause noncompliance to emissions regulations, and may void your warranty. If you are not sure how to perform the maintenance items below, contact your CCW authorized service center or Cleveland CycleWerks. Item Fuel Lines Weekly Monthly Quarterly Yearly I L I Air Cleaner * C C I I Throttle Controls * I A I A C I R I I I Spark Plug Valve Clearance * Engine Lubricant * During run-in period, replace every 150 miles. Gearbox Lubricant * After run-in period, replace every 600 miles. Engine Lubricant * Filter Screen Carburetor C C I I C C C C Drive Chain * I A L Battery * I I I I I I L I Gear in Gearbox I I Fuel Tank I I Brake Shoe Brake System * Electric Parts * Bolts, Nuts, Fasteners Tire Pressure Wear * I Steering System * A Chassis * L I I = Inspect and clean, adjust, lubricate, or replace as necessary C = Clean R = Replace L = Lubricate A= Adjust * 1st Scheduled maintenance is crucial to the longevity of your motor. 1st scheduled maintenance should be performed between 150-‐500 miles. This maintenance should include the following items: 1. Visual and performance inspection of: Air cleaner, throttle controls, brake system, all bolts and fasteners, tire pressure and wear pattern, steering system’s proper operation and actuation, chassis inspection. 2. Oil should be changed with approved SAE standard Oil listed in this manual, Oil Filter removed, cleaned and inspected. 3. Valve clearance should be checked to make sure it is within proper manufacturer specification. Valve clearance is typically acceptable at 0.04 - 0.06mm intake and 0.05-0.06mm exhaust. Please have all maintenance performed by authorized service center. Tampering with your motorcycle may void applicable warranty. 17 Caution: Start the engine at transmission position, clutch ON position or normal driving position when the driver is sitting on the seat. Initial Start - out of the Motorcycle Firmly hold the clutch rod and stop it for a very short time. Step down transmission rod and engage it on Shift I position. Slowly left rotate the accelerator control grip and simultaneously slowly and stably release the engagement of clutch. Here, the motorcycle will run forward. If changing over the next higher speed shift, first slowly decelerate and then close the accelerator and firmly hold the clutch level rod. Change the transmission lever over the next higher speed shift and release the clutch lever and then slightly rotate the accelerator. Follow the instructions to shift one by one for purpose of maximum - speed shift. Warning: Before initial starting - out, return the side parking rack on the original position against the motorcycle body. Never place it on the other places. Use of Transmission Device The transmission device may make that the engine can stable run within normal range. The transmission ratio can be designed for matching engine characteristic. The driver shall select the most suitable shift under a general condition. Don’t slip the clutch in order to control speed. Shift down the engine if deceleration is necessary so that the engine may run within normal rpm range. Caution: Never run at the speed indicated by the red range of the tachometer at any shift. Driving on Slope When climbing the steep slope, the motorcycle will decelerate due to power drop. Here, you may shift down so that the engine may run within normal power range. Pay attention that shifting must be as rapid as possible for purpose of lack of forward dash force. When run downward the slope, the engine shall shift down for purpose of braking. Remember: Don’t run at too fast speed when running downward the slope. Operation of Braking Device and Parking Method Wrench to turn the accelerator grip outside to make the accelerator fully closed. Simultaneously, uniformly operate rear and front braking device. Shift down to decelerate it. Firmly hold the clutch grip to shift on the NEUTRAL before the motorcycle is stopping. Observe the NEUTRAL pilot 18 lamp for identifying whether it is on NEUTRAL position. Warning: The distance needed for parking will relatively be longer in case of too fast speed. Make sure to estimate the distance between you and the vehicles and objects ahead for safe parking. An inexperienced driver will always use rear braking device only, which will result in fast wear of braking system so that the braking distance becomes longer and longer. It is very dangerous to use the rear braking device or front braking device only, which will cause out - of control due to slip. On the wet road or the other smooth roads and turning location, pay special attention to slightly use braking system. The sudden braking system on the uneven road or smooth road is especially dangerous. If the motorcycle needs to be placed on the slight slope relying on side supporting bracket, engage the engine on Shift I for prevent side supporting bracket from slipping and rolling. Shift it on NEUTRAL position before the engine is starting. Change the ignition switch over the OFF position to shut down the engine. Remove the key from the switch. Properly lock the turning device for purpose of safety. Examination and Maintenance The following table shows the interval of regular maintenance by driving kilometers or by month. When time limit is up, follow the instruction to examine, inspect, lubricate, and maintain the motorcycle. If driving at continuously maximum speed or in the sandy environment, make regular maintenance in accordance with Section “Maintenance” for purpose of ensuring driving reliability. The dealer may provide you with further guidelines. The turning element, vibration isolating element, bearing, and wheel are critical, which are required with expertise and careful repair. For purpose of safety, we suggest that you have the authorized dealer or qualified technician examine or maintain. Caution; One or more elements need to be replaced at the time of regular servicing. We suggest that you will use genuine or equivalent spare parts. No matter how you are a profession or you have repairing experiences, you 19 preferably entrust the authorized dealer or qualified technician to handle those items marked with *. For those items without any marking, follow the instructions mentioned in this section to do them yourself. Warning: Maintenance must be made after correctly run - in through 1000km for a new motorcycle, which may ensure safety of your motorcycle and may normally function. Make sure that regular servicing must be thoroughly made according to this instruction manual. 20 Lubricating Table Initial every 6000km or 6 Every 6000km or 6 months months Accelerator steel cable Lube oil - Clutch steel cable Lube oil - - Grease Items Intervals Speed meter steel cable Driving chain Lubricate with lube oil once every 1000km * Camshaft of braking device - Grease Accelerator control grip - Grease Braking device steel cable Lube oil - - Grease Grease or lube oil - Speed meter gear box and wheel shaft bearing Braking pedal Apply grease once every two years or every Steering shift 20000km Notes: “—” means not required Tool Kits No 1 2 3 4 5 6 7 The tool kit is provided under the right side cover. Remove the right cover to open the tool kits and take the tools out. Description Tool bag 10 x 12mm open ended spanner 14 x 17mm open ended spanner Spark plug socket wrench Spark plug wrench handle Screwdriver set Screwdriver handle Battery Open the right guard plate of the frame to Tool examine the electrolyte level. The electrolyte To help you make regular maintenance, a set level must be kept between the lower limit and of tool is especially provided on the lower right the upper limit. If the electrolyte level is below of the frame. the lower limit, fill it with distilled water up to the upper limit. Never fill it with tapping water. 上限 Upper Limit 下限Lower Limit 21 Warning Don’t fill with sulphuric acid once the battery is put into service. Caution: Don’t bend, clog or change the venting pipe from the battery. Confirm that the venting hose in connected to the battery ventilating parts and the other end is always kept in an open situation. Don’t confuse the venting pipe. The battery shall be installed on the designated location. When the electrical wiring and battery lead is connected on the top of the battery, the pole shall be correctly connected. The red wire must be connected to positive (+) pole and black lead to negative ( - ) pole. Reversely wiring connection will damage charging system and battery. 22 Notes: one. After initial 1000km and every driving 8000km, you will have dealer examine the specific gravity of each cell in the battery with electrolyte specific gravity meter. CR8E B8RC Standard spark plug CR9E B9RE If the standard spark plug is overheated, replace it Spark Plug with this one. After initial 1000km and the later every driving 3000km, remove the carbon accumulated on the spark plug with small metallic wire brush or spark plug cleaner. Re - adjust spark plug Don’t excessively tighten the spark plug or the electrode clearance by 0.6 - 0.8mm with spark threads are staggered for preventing the plug clearance and thickness measuring shim. cylinder cover threads from damaging. When Replace the spark plug after every driving removing the spark plug, don’t let the sundries 6000km. enter into the engine through the spark plug hole. Observe color of the ceramic tip on the spark plug when removing the carbon accumulated. The standard spark plug used for this variant Such color may indicate whether the standard of spark plug can accommodate your application accommodate most working range. If the color type. If the standard plug seems to present of spark plug is different from the standard wet or in black color, it is better suitable to be spark replaced with high - voltage thermal spark plug. authorized dealer before replacing with spark The normally working spark plug is in shallow plug with different thermal resistant range. If grey or cotton yellow. If the spark plug is very the spark plug is improperly selected, the white or seems to be shining, it shows that the engine will be seriously damaged. Selection of spark plug works under overheating condition. the other brands for spark plug will result in Here, the spark plug shall be replaced with a consequence of operating difficulty. Therefore, cold type of spark plug. contact the authorized dealer before selecting motorcycle plug, is you selective, preferably which contact may the the other brands of spark plug. Lube Oil Endurance of engine depends on high - quality lube oil and regular replacement of lube oil. Daily examination of the lube oil level and regular replacement of lube oil are two of the most important tasks which must be done in the Guidelines process of maintenance. for Replacemen Examination of Lube Oil Level t of Spark Plug NGK NHSP Remarks LD CR7E B7RC If the standard spark plug is wet, replace it with this 23 Replacing Lube Oil and L / O Filter 5. out and then replace it with a new one. After initial driving 1000km and every driving 6000km, replace transmission oil. Replace oil when the engine is hot so that the oil in the Remove the side cover and pull the oil filter Caution: engine may thoroughly be drained. Follow the Insert the open end of the filter element into following instructions; the 1. Place the motorcycle on the central supporting bracket. 2. engine and simultaneously examine whether the element is stably installed. 6. Remove the oil filling cap. Carefully examine the spring and the gasket of the filter element before re - assembling the side cover. Caution: Replace the gasket when replacing the filter element. 7. Re - assemble the side cover and tighten the nuts but don’t excessively tighten them. 8. 3. Tighten the oil drain ring. Fill with unused Remove the oil drain plug on the bottom of lube oil by approximately 950ml from the oil the engine and drain the oil sump tank. filling orifice under the oil filter top cover and then slightly tighten the top cover. Notes: If only replacement of lube oil instead of replacement filter element, 1000ml new oil is needed. 9. Start the engine to run for several seconds at idle speed. Caution: 4. Remove three pieces of screw on the guard cover of the oil filter Carefully examine whether oil leakage can be found from the filter guard cover. 10. Shut down the engine and wait for one minute and then examine the oil level from the lube oil viewer. The oil level shall be kept exceeding the “F” (Full) mark. If the oil level is below the “F” (Full) mark, fill with oil up to “F” (Full) mark (as appropriate). Caution: Please always use the lube oil recommended 24 by the section “Instructions to Fuel and Lube Oil Use”. Braking Device Examine the braking device after initial driving 1000km and every driving 3000km. Correct braking operation is important to driving safety. Make sure to remember the braking system must be regularly examined by the qualified dealer. Warning: The braking device concerns personal safety, which must correctly be adjusted. hydraulic oil may not be longer than that stated If the braking system or the braking disc needs to be maintained and repaired, safety, the interval for replacing oil pipe and in the section of maintenance schedule. we uncompromisingly advise that this must be done by the authorized dealer who has full series of tool and skillful technology to perform Braking Hydraulic Oil this in a safest cost - effective way. Warning: Front&rear Braking Device If the braking hydraulic oil is drunk by mistake, Daily examine the hydraulic braking system as eye contact or skin contact, it is harmful. If it is follows: drunk by mistake, induce to vomiting. If eye contact or skin contact, immediately flush with 1. Examine leakage of front wheel braking system; a great deal water and seek medical care at once. 2. Examine leakage or crack of oil pipe; Pay attention to examine the oil level in the front 3. The front braking grip shall be maintained with a certain counter bearing force; and 4. Examine wear of the front wheel braking disc. braking hydraulic oil box. If the oil level drops, fill with recommended hydraulic oil (as approximate). Because the oil remained in the box will automatically flow into the oil pipe at the time of friction of braking disc, the oil level will drop. Filling with braking hydraulic oil shall be deemed as an important item for regular servicing. Disc Brakes The key point for examination of front wheel disc brake and rear wheel disc brake are to check whether the wear is up to limit marking. If it Caution: The wheel disc braking system adopts high exceeds the limit marking, replace the disc brake. pressure braking system. For purpose of 25 Warning: For the newly re - assembled wheel disc braking disc, don’t immediately ride and drive. First grasp and release the braking grip for ○1 Stroke several times to let the braking disc sufficiently extend and spread to restore the counter bearing force of the normal grip and make the braking liquid circulate safely. Caution: Please use the high-strength glue when you assemble the front brake and front axle. ○2 Adjusting Nut Switch of Rear Braking Lamp Muffler Rear Braking Device Adjustment of Rear Braking Pedal First place the pedal at the most comfortable driving position when adjusting the rear braking pedal. Positioning may be made by wrenching the adjusting nut on the pedal and then turn the stroke adjusting nut ○2 to make ○1 keep within in 20 - 30mm range. 26 Turning lamp 12V 10W Caution; Please keep away from the muffler on the motor driving for a long time for prevention of Headlight 1. Remove two screws outside the headlight scald. and pull the headlight assembly out. Fuse 2. Counterclockwise turn the lamp holder and pull it out. The fuse box is provided within left guard plate on the frame. All the electrical systems are 3. Press down the bulb and counterclockwise protected by a piece of fuse. If an electrical system is of failure, examine the fuse. If the fuse is broken, replace it with the standby fuse turn to pull it out. 4. Correctly tighten the new bulb and re assemble the assembly and then lock it (15A) in the fuse box. properly. Caution: Caution: Make sure to use fuse with required amperage when replacing the broken fuse. Never use aluminum foil or steel wire to replace the broken fuse. If the installed standby fuse is broken within a short term, it shows that more This motorcycle is designed with reflective headlight. Don’t access the reflective glass piece for preventing service life of lamp from reducing when replacing the bulb. serious electrical fault has possibly been occurred. Here, you should immediately contact the authorized dealer. Replacing the Lamps See the following table for the rated power in Watt of each lamp. Make sure to use the lamp equivalent with rated power in Watt when replacing the broken lamps. Otherwise, it may possibly result in overloading of electrical system and that the lamp will be damaged too early. Headlight 12V 35W / 35W Braking lamp / Rear 12V 21W / 5W position lamp 27 Turning Signal Lamp The air filter of this motorcycle is made of foam plastic. If the air filter element is clogged by dust and with power output is decreasing, the air inlet resistance will be increasing. With gasoline content in the mixing gas is increasing, fuel consumption will be increasing. Therefore, after every driving 3000km, examine and clean the air 1. Remove two screws on the lamp shade and remove the lamp shade. filter element according to the following procedures. 2. Press down the bulb and left turn it and remove the bulb. 3. Press the newly installing bulb down and right turn it when installing the new lamp. Caution: Pay attention not to excessively tighten two screws for preventing the lamp shade from crushing after installing the lamp shade. Caution: Tailing Lamp / Braking Lamp Replace the bulb of tailing lamp / braking lamp Frequently clean or replace the air filter when driving under dusty condition. according to the following instructions: 1. Remove two screws on the tailing lamp shade and then remove the lamp shade. 2. Press down the bulb and left turn to 1. Remove the left guard plate. 2. Loosen closure screw ○1 of air filter and disengage the pin. Pull the bulb out. Push the bulb and right turn to tighten the bulb when installing. remove the air filter sleeve ○2 . 3. Take out the foam plastic sleeve housing of the air filter. 4. Separate the foam plastic and the external frame. 5. Carburetor Carburetor stability is a foundation to ensure engine performance. The carburetor has been adjusted in an optimized way in the factory Caution; before delivery. Don’t unnecessarily adjust it. Please note that accelerator steel wire clearance Don’t excessively tighten the fixing screws and idle speed need to be adjusted for the when re - assembly the lamp shade. carburetor. Adjust it after initial driving 1000km or every 3000km according to the following procedures. Air Filter Idle Speed RPM Adjustment of Carburetor 28 1. Start the engine to run at idle speed until fully preheated. 2. Turn to close the accelerator and screw in or screw out the idle speed adjusting screw to keep the engine revolution at 1400±100rpm after the engine is preheated. after the accelerator steel wire is adjusted. Don’t increase engine idle speed due to this adjustment. Meanwhile, the switch grip shall automatically return to the oil shut - off position. Adjustment of Clutch Caution: Engine idle speed shall be adjusted under fully preheated condition. Adjustment of Accelerator Steel Wire 1. Loosen the locking nut. 2. Turn the adjustor to adjust the steel wire clearance by 0.5 ~ 1.0mm. 3. Re - tighten the locking nut after adjusting clearance. The clutch adjusting method shall be as follows: Adjust tension of steel wire ○1 of clutch grip. Measure the clutch steel wire by 4mm at the clutch rod before the clutch grip is firmly held and you just feel that the gear engagement is released. If the clutch steel wire clearance is incorrect, adjust it according to the following procedures. Release the nut ○2 and turn the grip tension adjusting ring ○3 and then clockwise turn it to the utmost end. Release the locking nut ○6 of the steel wire adjusting ring and then back and forth turn the steel wire tension adjusting ring ○5 to keep that the clearance is opened by about 4mm. Fine adjustment may be made through the grip tension adjusting ring ○3 . Lock the locking nut ○2 ○1 Locking Nut ○2 Adjustor and ○6 . Meanwhile, apply the sleeve ○4 after properly adjusted. Adjustment of Driving Chain Caution: Examine rotation of accelerator switch grip 29 chain when regularly examining: ○1 Adjusting Bolt (1) Chain pin loosened ○2 Locking Nut ○3 (2) Pin roller damaged Marking (3) Chain knot rusted ○4 Rear Wheel Axes Nut (4) Chain knot not rotated free When adjusting: (5) Excessive wear 1. Support the motorcycle with a central (6) Chain improperly adjusted supporting bracket; If the driving chain has any above - 2. Release the rear wheel axes nut; mentioned trouble, it may possibly be 3. Release the locking nut; and caused by damage chain wheel. Examine the chain wheel as follows; 4. Right and left turn the adjusting bolt to adjust the chain. (1) Chain wheel excessively worn Caution: (2) Wheel tooth broken or damaged Examine both chain wheels after replacing with new chain and replace them (3) Fixing nut of chain wheel loosened (if Cleaning and Lubricating of Driving Chain necessary). Dust on the driving chain will quicken wear of driving chain and chain wheel. Therefore, clean the driving chain with detergent and lubricate it with lube oil specifically used for motorcycle chain or engine lube oil after 15 ~ 20mm every driving 1000km. Adjust the driving chain for every driving Tire 1000km to make that the moveable distance Examine tire air pressure and tire pattern between both chain wheel shall be 20 ~ after initial driving 1000km and every 30mm. driving 3000km. In order to ensure maximum safety and longer service interval, Caution: regularly examine the tire air pressure besides regular servicing. The open end of the connecting point clip on the driving chain shall be installed against Tire Air Pressure rotation direction. If the tire air pressure is insufficient, not only does quicken wear of tire, but also significantly influence driving stability of the motorcycle. Insufficient air pressure will make it difficultly turn. However, excessive ○1 Chain Connecting Clip air pressure will reduce the contact area ○2 Rotation Direction between the tire and the ground so that the wheel is slipping even out of control. Make Examine the following situation of the driving sure that the tire air pressure is within 30 required range. Adjustment of tire air pressure shall be made under cold status of tire. Troubleshooting If the engine fails to start, please examine it according to the following procedures to find Tire air pressure; causes: Front wheel: 225kPa 1. Oil level in the fuel oil tank; Rear wheel: 225kPa 2. Whether the oil flows to the carburetor from the oil plug; Outer Cover Pattern of Tire The driving stability will reduce when driving a motorcycle with excessively worn tire, which may possible result in out - of control. When the outer cover pattern depth on the front wheel is not more than 1.6mm, we recommend that you preferably replace the outer cover of the tire. Replace the tire with a new one if the outer cover 3. Shut off the oil from the carburetor and change the oil plug over the ON position to whether gasoline flows out from the pipe. 4. If making sure that fuel has already reached the carburetor, please examine the igniting system. Warning: pattern depth on the rear tire is not more than Don’t let fuel flow on the ground, which should 2mm. be collected into the container. Don’t let fuel approach the high - temperature engine and exhaust pipe. Keep away from open flame or heat source. No Smoking. Examine the fuel system in an open space. Warning: 1. Remove the spark plug and connect it with high - voltage wire again. For the tires of your motorcycle, their standard shall be as follows: Front wheel: 90 / 90 Rear wheel: 120 / 80 2. Change the igniting switch over ON position and place the shutdown switch of engine on - 18 position to make the spark plug closely - 16 face toward the engine and start the engine. Use of the tires incompliance with the If the igniting system cannot normally work, standard may possibly result in problems. We here blue spark will flash across spark plug sincerely recommend that you select standard clearance. If no spark can be found, have tires. The tire air pressure is very important for normal performance and driving safety of motorcycle. Frequently examine wear and air pressure of tire. the authorized dealer repaired. 31 Warning: Don’t fix the spark plug near the cylinder head when examining. Otherwise, the gasified fuel in the cylinder may possibly be ignited by the spark plug, which may possible result in fire hazard. In order to reduce possibility in case of electric shock, the metallic part on the spark plug closure shall preferably keep close with the unpainted metallic part on the motorcycle body. For avoidance of accidental possibility due to electric shock, all the people attacked by cardiopathy or wearing myocardium frequency modulator should not do this. Shutdown of Engine 1. Examine fuel reserve in the fuel oil tank; 2. Examine intermittent spark of the igniting system; and 3. Examine idle running of engine. Notes: You preferably contact the authorized dealer prior to intend to make any servicing. If motorcycle falls into the warranty period, make sure to contact the dealer before you are ready or intended to repair it by yourself. Otherwise, you will possibly loss basis of warranty claim. 32 Troubleshooting No oil can be found in the carburetor Oil can be found on the carburetor The Engine cannot start or suddenly shut down during running Troubles High - voltage wire can normally ignite but the spark plug cannot ignite. The spark plug can normally ignite but the cylinder compression is bad. Causes 1. No oil in the oil tank Remedies 1. Fill with oil 2.Switch of oil tank not opened 2. Open the switch 3. Clogged switch of oil tank 3. Clean the oil tank and its switch 4.Clogged needle valve hole of the floating switch chamber 5. Clogged the main measuring hole 4. Remove to clean the carburetor 1. Oil dirt on the spark plug 1. Remove to clean it and dry. 2. Broken magnetic core of spark plug or fractured electrode 3. Carbon accumulated on the spark plug 4.Incorrect clearance of the spark plug 2. Replace the spark plug. 1. Leakage from cylinder head gasket or cylinder gasket 2. Loosening spark plug 1. Tighten the screws or replace the gasket. 2. Tighten the spark plug 3. Piston ring jammed 3. Remove to clean the carbon on the rings and grooves. 4. Replace the piston and the piston rings. 5. Replace the cylinder block. 4. Excessively worn piston or piston ring or broken piston rings 5. Excessively worn cylinder 6. Leakage from the air inlet pipe 7. Damage oil seal of crankshaft 1.Excessively worn cylinder and piston The engine can unsteadily and unsmoothly run Abnormal noise of engine The engine can unstably run. Overheated engine 2. Excessively worn needle bearing on the small end and the large end of the connecting rod 3. Too early ignition 3. Remove the carbon. 4. Adjust the clearance. 6. Tighten or replace the rubber ring. 7. Replace the oil seal. 1. Replace the cylinder block and piston. 2. Replace the bearing and relevant parts. 3. Adjust the igniting time. 4. Excessive carbon in the combustion chamber 5. Overheated spark plug 4. Remove carbon on the cylinder head. 5. Replace the spark plug. 1. Water or dirty in the carburetor 1. Clean the carburetor. 2. Clogged oil channel 2. Blow - off through or replace the oil pipe. 3. Replace the oil seal. 3. Leakage from the crankcase 4. Leakage from the connecting point between the carburetor and the engine 5. Too thick or too dilute mixing gas 4. Tighten the screws. 1. Too long at low - speed shift 1. Shifting or control time. 2. Too heavy load or too long running under heavy load 3. Too thick or too dilute mixing gas 2. Control load and intermittently taking a break for cooling down. 3. Adjust the carburetor. 4. Unqualified lube oil of engine or lack of oil in transmission box 5. Slipping clutch 4. Replace with qualified lube oil and shifting 5. Adjust the free stroke or replace clutch box, friction disk and spring. 6. Adjust the tension. 6. Too tensioned chain 7. Braking device not released 5. Remove to clean the carburetor 33 5. Adjust the carburetor. 7. Adjust the clearance of the braking device. Storage If the motorcycle is not in use for a long time in the winter or the other seasons, use suitable materials, equipment or technology to specifically maintain it. Motorcycle When the motorcycle is not in use for a long time, properly make preparation as follows: Clean the entire motorcycle. Support the motor on the central supporting bracket and place it on the hard and even ground to prevent the motorcycle rolling. And then, always left turn the motorcycle grip and lock the operating device. Finally, remove the igniting key for purpose of storage safety. Meanwhile, select a place suitable for storage for a long time. Thoroughly examine the motorcycle if you want to re - use it to ensure that performance of all the parts of the motorcycle is normal for service. Fuel Thoroughly drain the oil tank before storage of the motorcycle. Gasoline is flammable even explosive under a certain condition. Therefore, the motorcycle must not keep close with ignition source and it shall not be parking near easily spontaneous - combustion substances such as grain, coal, and cotton etc. Otherwise, the fuel in the motorcycle will easily result in fire hazard once contact with open flame. Tire Fill the tire by a normal air pressure value. Keep clean for the outside of the tire. Avoid insolation for a long time. Meanwhile, pay attention to moisture prevention. Avoid contact with acid, alkali, and oil for prevention of tire corrosion. Battery When the motorcycle is not in use for a long time, remove the battery from the motorcycle. Fully charge it and then keep away from children. Charge it once a month in summer and once two months in winter. If the battery is placed on the motorcycle for a long time, please charge it once a month. Procedures during Battery Storage Monthly examine electrolyte level. If the electrolyte level drops, please fill with distilled water or pure water immediately up to the maximum level. Never fill with electrolyte or tapping water. Always keep the battery clean. If electrolyte contacts motorcycle, terminal, and lead, it will result in corrosion. If corrosion can be found, please flush with fresh water immediately and apply with grease after drying. The engine failing to start, weak sound of horn, and non - flashing turning lamp shows lack of electricity capacity. Here, you should immediately charge for 15 ~ 20 hours. Pay attention that the battery not in use for a long time under thoroughly discharging situation may possibly be damaged. When the polar plate is white, the battery is under thoroughly discharging situation, or the electrolyte level is below the lower limit, or it cannot be recovery through charging after not in use for a long time, its service life is up. 34 Procedures for Service to Return Motorcycle 1. Clean the entire motorcycle 2. Remove the spark plug. Step down the kick - starting rod to run the engine for several times and then install the spark plug. 3. Re –install the battery Notes: Make sure to first connect the positive pole and then negative pole. 4. Adjust the tire air pressure according to section of “Tire” in this manual. 5. Lubricate the motorcycle according to instructions in this manual. 6. Make examination before driving according to this manual 35 Transmission Device Engine Mass and Volume Dimensional Parameters Items Parameters or Type Model CCW-MISFIT-250 / THA MISFIT Dimensions (L x W x H) in mm 1920X760X1070 Wheelbase in mm 1320 Minimum ground clearance in mm 150 Diameter of turning circle in mm 4100 Castor angle in degree Turning angle of steering grip in degree (left / right) Mass of complete motorcycle in kg 27 Maximum laden mass in kg 150 Axle load in N (front / rear) 733/1129 Oil tank volume in L 15 Model 167FMM-M Type Single - cylinder, 4 - stroke, air - cooled Bore x Stroke (mm) 56.5*49.5/63.5*62.2/67*65 Total displacement in ml 124/197/229 Compression ratio 9.0:1 /9.0:1 /9.2:1 Maximum power @ revolution in kW (r / min) 11.5kw/7000 Nominal power @ revolution in kW (r / min) 6.5/7800 Maximum torque @ revolution in kW (r / min) 16/6000 Minimum fuel consumption ration in g / kW.h 367 Idle Speed - load steady revolution in rpm 1500±100 Igniting method C.D.I Starting method Electric starting / kick starting Lubricating method Pressurized and splashing Type of acceptable oil 10W/40 (Air Cooled Oil is best) Fuel 87 Octane or higher (lead free gasoline) Type of carburetor / oil injector Flat - suction plunger type Type of air filter Polyester foam plastic filter element Air distribution method Middle - mounted cam valve type Type of clutch Wet normal-pressure, multi-disc type Type of transmission Step-down 5-shift, variable speed Primary gear reduction ration 4.056 Last gear reduction ration 2.533 Transmission ration 2.769 Shift I 48 120 Shift II 1.822 Shift III 1.400 Shift IV 1.130 Shift V 0.960 36 Items Parameter or Type Type of Motorcycle Type of rim (front / rear) Spoke / spoke Specification of tire Front 90/90-18 Rear 120/80-16 Tire air pressure (front / rear)in kPa Type of braking device Braking maneuvering method 225/225 Front Disc type Rear Disc type Front Hand Actuated Rear Foot Actuated Type of vibration isolator (front / rear) Spring oil damp / Spring oil damp A7RTC Electrical system Model of spark plug (Alternative part numbers D8RTC / D7EA / D8RC) Type or specification of headlight Semi - closed 12V 35W / 35W Turning lamp 12V Braking lamp / rear position lamp 12V Front position lamp 12V Instrument pilot lamp 12V Specification of fuse 15A Battery 12V 7Ah Electromagnetic vibrating type, basin shaped 12V 1.5A 100dB(A) Model or type of horn Model or type of speed meter Braking performance Performance of complete motorcycle 21W/5W 3W 2W Magnetic induction type Shielded spark plug ignition disturbance inhibitor + inhibited spark plug GB 20073-2006 Type of radio frequency immune device Braking force in N 10W Front ≥440 Rear ≥584 Acceleration noise in dB(A) Exhaust emission pollutant, working condition method in g / km Maximum speed in km / h ≤77 Performance in s ≤15 Climbing capacity in degree ≥22 Economical oil consumption in L / 100km ≤2.10 Minimum steady speed in km / h ≤22.0 Taxing distance in m ≥200.0 Starting - out accelerating time in s ≤14.0 Overriding accelerating time in s Side - rolling slope angle in Left degree, brace rod Right ≤13.0 Side stand parking in degree (left / right) ≥8 Front - rolling slope angle in degree, brace rod ≥6 Side stand parking in degree ≥8 Service Intervals in Miles ≥3000 (≥500 for initial break-in service) Maximum allowable mileage after first valve check ≥12000 Light emitting strength of headlight in cd ≥10000 CO≤5.5 HC ≤ 1.2 NO ≤0.30 ≥80 ≥9 ≥5 37 Warranty Card (for User's Archive) Warranty Serviced by local Distributor Type of Motorcycle Engine S / N Frame Number Color Manufacturing Date Selling - out Date User's Name Contact Telephone Age Gender Degree Vocation Purpose of Purchasing Motorcycle Annual Income Address Post Code Invoice Number Sold by (Sealed) Contact Person Contact Telephone Address Warranty by (Sealed) Contact Person Contact Telephone Address Please send this sheet to your local dealer / distributor. 38 Warranty Card (for User's Archive) Warranty Serviced by local Distributor Type of Motorcycle Engine S / N Frame Number Color Manufacturing Date Selling - out Date User's Name Contact Telephone Age Gender Degree Vocation Purpose of Purchasing Motorcycle Annual Income Address Post Code Invoice Number Sold by (Sealed) Contact Person Contact Telephone Address Warranty by (Sealed) Contact Person Contact Telephone Address Please send this sheet to your local dealer / distributor. 39 NOTE: Warranty is offered by CCW’s local Distributor, Warranty not offered or serviced by CCW Warranty Record Warranty Date Troubles or Causes 40 Serviced by Remarks Copyright: No reproduction, reference, or duplication of any part in this manual permitted without consent from CCW. All the information, narratives, pictures, and specifications in this manual shall be subject to the latest variant of motorcycle when publishing. CCW reserves rights to modify and amend it possible inconsistency between the manual and the actual product due to improvement or the other changes. All the data shall be subject to change without prior notice. Product configuration and parts supply depend on countries and regions. Please contact local authorized dealers in detail. 41