1
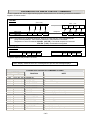
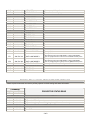
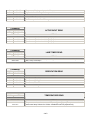
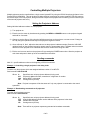
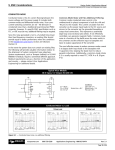
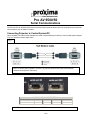
Pro AV 9500/50
Serial Communications
The Proxima Pro AV 9500/50 RS-232 serial communications protocol allows control of the projector by an external
control system, such as AMX or Crestron.
Connecting Projector to Control System/PC
Use a standard null modem cable available from most computer/Electronics stores or use the cable pinout diagram
(Fig.1) to assemble custom length cable.
Fig.1
Note: To ensure proper operation, connect only properly wired RS-232 serial communication
cables to the projector’s control port.
Baud Rate
19200
COMMUNICATIONS PORT SETTINGS
Data Bits
Stop Bits
Parity
8
1
None
Flow Control
None
Note: The projector keypad, IR remote and RS-232 external control will function simultaneously.
1 of 6
PROXIMA PRO AV 9500/50 CONTROL COMMANDS
Control commands are used to adjust various projector characteristics or to emulate key presses from the built-in
keypad or IR remote control
FORMAT
(ASCII code)
Control Sys. Æ Projector
C
0
1
CR
Response
ASCII
ProjectorÆControl
1
code
ACK
CR
ASCII Code
C
0
1
CR
Response
1
ACK
CR
LF*
HEX Code
43 hex
30 hex
31 hex
0D hex
ProjectorÆControl
31 hex
06 hex
0D hex
0A hex
Notes: The Proxima Pro AV 9500/50 does NOT require Line Feed “0A hex” in the command syntax
Delay Recommendations: 10ms between characters; 100ms between commands
Responses to Control Commands: 06h 0Dh (ACK CR) = Command accepted and executed
3Fh 0Dh (? CR) = Command not recognized
EXAMPLES
“POWER ON”
ASCII
C
0
HEX 43 hex
0
30 hex 30 hex
CR
“NORMAL” ASCII
0D hex
C
HEX 43 hex
1
* Projector response may contain “Line Feed”
Note: “Display” should be set to OFF in Setting Menu to prevent OSD message displays
Proxima Pro AV 9500/50 COMMAND CODES
COMMAND
ASCII
HEX
C00
43h 30h
C01
43h 30h
C02
43h 30h
C05
43h 30h
C06
43h 30h
C07
43h 30h
C09
43h 30h
C0A
43h 30h
C0B
43h 30h
C0C
43h 30h
C0D
43h 30h
C0E
43h 30h
C0F
43h 30h
C10
43h 31h
C1C
43h 31h
FUNCTION
30h
31h
32h
35h
36h
37h
39h
41h
42h
43h
44h
45h
46h
30h
43h
POWER ON
POWER OFF
POWER OFF
INPUT 1 SELECT
INPUT 2 SELECT
INPUT 3 SELECT
VOLUME +
VOLUME AUDIO MUTE ON
AUDIO MUTE OFF
NO SHOW ON
NO SHOW OFF
AV REGULAR SIZE
AV WIDE SIZE
MENU ON
NOTE
"Power Off?" will appear on screen
Increments projector Volume by one
Decrements projector Volume by one
Video Mute ON
Video Mute OFF
Sets display to 4:3 aspect ratio
Sets display to Anamorphic aspect ratio
Displays main Menu on the screen
2 of 6
F
31 hex 46 hex
CR
0D hex
C1D
C1E
C27
C30
C31
C3A
C3B
C3C
C3D
C3F
C43
C44
C46
C47
C4A
C4B
C5D
C5E
C70
43h 31h 44h
43h 31h 45h
43h 32h 37h
43h 33h 30h
43h 33h 31h
43h 33h 41h
43h 33h 42h
43h 33h 43h
43h 33h 44h
43h 33h 46h
43h 34h 33h
43h 34h 34h
43h 34h 36h
43h 34h 37h
43h 34h 41h
43h 34h 42h
43h 35h 44h
43h 35h 45h
43h 37h 30h
MENU OFF
CLEAR DISPLAY
IMAGE
DIGITAL ZOOM +
DIGITAL ZOOM POINTER RIGHT
POINTER LEFT
POINTER UP
POINTER DOWN
SELECT KEY
FREEZE ON
FREEZE OFF
ZOOM DOWN
ZOOM UP
FOCUS DOWN
FOCUS UP
LENS SHIFT UP
LENS SHIFT DOWN
FULL LAMP MODE
C71
43h 37h 31h
HALF LAMP MODE 1
Removes main Menu from the screen
Clears On Screen Display
2 Lamp Mode
1 Lamp Mode
When switching from HALF LAMP MODE 1 to HALF LAMP MODE 2
(and vice versa) there will be a 30 second FULL MODE transition period.
1 Lamp Mode
C72
C89
C8A
C8E
C8F
43h 37h 32h
43h 38h 39h
43h 38h 41h
43h 38h 45h
43h 38h 46h
HALF LAMP MODE 2
AUTO PC ADJUST
PRESENTATION TIMER
KEYSTONE +
KEYSTONE -
When switching from HALF LAMP MODE 2 to HALF LAMP MODE 1
(and vice versa) there will be a 30-second FULL MODE transition period.
Auto-adjust Total Dots, Fine Sync and Position
PROXIMA PRO AV 9500/50 STATUS REQUEST COMMANDS
Status request commands are used to poll the projector to obtain setting and status information.
COMMAND
ASCII
HEX
43h 52h 30h
CR0
RESPONSE
00
30h 30h
80
38h 30h
40
34h 30h
20
32h 30h
02
30h 32h
10
31h 30h
PROJECTOR STATUS READ
DETAILS
Projector lamp is ON
Projector is in Standby mode
Projector lamp just powered ON (going through 30 sec. Countdown)
Projector lamp just powered OFF and is cool down cycle
No key input
Power failure
3 of 6
08
28
88
04
24
30h
32h
38h
30h
32h
38h
38h
38h
34h
34h
Temperature Warning and power is ON
Projector in Cool Down cycle after power failure
Projector operating normally after temperature warning occurred
Lamps OFF in Power Management mode
Cool down cycle after Power Management shutdown
COMMAND
ASCII
HEX
43h 52h 31h
CR1
RESPONSE
1
31h
2
32h
3
33h
ACTIVE INPUT READ
DETAILS
Input 1 currently selected and being displayed
Input 2 currently selected and being displayed
Input 3 currently selected and being displayed
COMMAND
ASCII
HEX
43h 52h 33h
CR3
RESPONSE
xxxx xxxx
LAMP TIMER READ
DETAILS
Two sets of four digit numbers representing total number of accumulated lamp hours for
each, Lamp 1 and Lamp 2
COMMAND
ASCII
HEX
43h 52h 34h
CR4
RESPONSE
11
31h 31h
00
30h 30h
01
30h 31h
10
31h 30h
ORIENTATION READ
DETAILS
Front Screen, Floor Mount
Front Screen, Ceiling Mount
Rear Screen, Floor Mount
Rear Screen, Ceiling Mount
COMMAND
ASCII
HEX
43h 52h 36h
CR6
RESPONSE
xx.x xx.x
TEMPERATURE READ
DETAILS
Temperature at thermal sensor near LCD panel [space] [space] Temperature at thermal
sensor near lamp. Units are in Celsius. Intended for service purposes only
4 of 6
COMMAND
ASCII
HEX
43h 52h 37h
CR7
RESPONSE
00
30h 30h
01
30h 31h
02
30h 32h
03
30h 33h
10
31h 30h
11
31h 31h
20
32h 30h
22
32h 32h
LAMP MODE READ
DETAILS
FULL LAMP MODE: All Lamps OFF
FULL LAMP MODE: Lamp No. 1 = ON, Lamp No. 2 = OFF
FULL LAMP MODE: Lamp No. 2 = ON, Lamp No. 1 = OFF
FULL LAMP MODE: All Lamps ON
HALF LAMP MODE 1: All Lamps OFF
HALF LAMP MODE 1: Lamp No. 1 ON, Lamp No. 2 OFF
HALF LAMP MODE 2: All Lamps OFF
HALF LAMP MODE 2: Lamp No. 2 ON, Lamp No. 2 OFF
COMMAND
ASCII
HEX
43h 52h 39h
CR9
RESPONSE
STAND BY
AV Mode
Go PC adj.
No signal
¾¾¾¾¾
COMMAND
HEX
43h 52h 41h
RESPONSE
30h 30h 0D
30h 31h 0D
30h 32h 0D
30h 33h 0D
PC TYPE READ
DETAILS
Projector is powered OFF and is in Stand by mode
Current source is Video
PC system is set to AUTO
No source on current input
Where ¾¾¾¾¾ is name of the current RGB source signal type
MUTE STATUS READ
DETAILS
Video and Audio Mute are OFF
Video Mute is ON
Video Mute is OFF
Video and Audio Mute are ON
5 of 6
Controlling Multiple Projectors
Multiple projectors can be controlled from a single control system/PC by using the RS-232 loop-through feature in the
Proxima Pro AV 9500/9550. This can be done by daisy-chaining (connecting the control system/PC RS-232 output to
the RS-232 input of the first projector, taking the RS-232 output of that projector and connecting it to the RS-232 input
of the second projector and so on).
Setting the Projector’s Address
Setting individual address numbers for each projector.
1) Turn projector on.
2) Enter the service menu by simultaneously pressing the MENU and IMAGE buttons on the projector keypad
and hold for 2 seconds.
3) Change to service Group 10 by using the left/right arrow keys on the projector or remote control. Change to
No.3 by using the up/down arrow keys on the projector keypad or remote.
4) Once at Group 10, No.3, adjust the data value to set the projector’s address number (Press the VOLUME
up/down button on the projector keypad or remote control to change data value). The data value set must be
different for each projector to be controlled and can be a number in the range of 0-999.
5) Exit the service menu and turn the projector off by pressing the POWER button twice. Allow the projector to
cool down and power it back up for the new address to take effect.
Sending commands
Add “A” + specific address number to the beginning of RS-232 command.
Example 1 Controlling a single projector in the daisy chain
To switch only the projector which was assigned address number 15 to INPUT2.
Send command: A015C06 CR
Where A
015
C06
CR
Specifies that a unique projector address is being used
Projector’s address number, entered as a 3-digit base 10 number
Select INPUT 2 command
Carriage return (0D hex)
Note: Projector’s response will be the same as if only one projector is connected to the control
system/PC.
Example 2 Broadcasting commands to all projectors
To power ON all projectors at once.
Send command: AFFFC00 CR
Where A
FFF
C00
CR
Specifies that a unique projector address is being used
Is the 3-digit address number used to address all the projectors in the chain.
POWER ON command
Carriage return (0D hex)
Note: There will be no projector responses generated to broadcast commands.
6 of 6