1
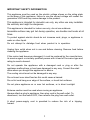
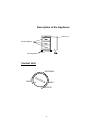
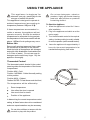
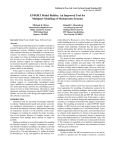
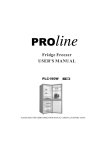
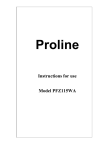
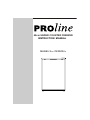
48cm UNDER COUNTER FREEZER
INSTRUCTION MANUAL
MODEL No.: PFZ90WA
Thank you for buying this upright freezer. To ensure that you get the best results from
your new freezer, please take time to read through these simple instructions in this booklet.
Please ensure that the packaging material is disposal of in accordance with the current
environmental requirements.
If the appliance is visibly damaged, do not connect it to the power supply, contact the store from
where you purchased the appliance.
ELECTRICAL CONNECTION
UK ONLY
For your safety please read the following information
Warning This appliance must be earthed.
This appliance operates from 220-240 volts and should be protected by a 13 amp fuse in the plug.
The appliance is supplied with a standard 13 amp 3 pin plug fitted with a 13 amp fuse.
Should the fuse require replacement, it must be replaced with a fuse rated at 13 amp and
approved to BS1362.
If the mains plug which is fitted is unsuitable for the socket outlet in your home or is removed
for any other reason, please follow the instructions below on how to wire a 13 amp 3 pin plug.
How to wire a 13 amp plug.
Important. The wires in the mains lead on this appliance are coloured in accordance with the
following code:
Green and Yellow – Earth
Blue – Neutral
Brown – Live
As the colours may not correspond with the markings
identifying the terminals in your plug proceed as follows:
the Green and Yellow wire must be connected to the
the terminal in the plug which is marked with the letter E or
with the earth symbol
or coloured green and yellow.
The Blue wire must be connected to the terminal marked
N or coloured black.
The Brown wire must be connected to the terminal marked L or
Coloured red.
Make sure the mains cord is held securely under the cord clamp.
1
THANK YOU FOR PURCHASING THIS PROLINE PRODUCT
This booklet contains the information you will require to install and operate your new
appliance.
It is important and worthwhile spending time to fully read this booklet so you will
understand how to operate the appliance safely and efficiently.
Please keep this booklet in a safe place so that you can refer to it when required.
Safety information
This information is provided in the interest of your safety. Please read the following
carefully before carrying out the installation or use of the appliance.
If you are discarding an old freezer or refrigerator with a lock / catch fitted to the
door, ensure that it is left in a disabled condition to prevent the entrapment of young
children when playing.
As old refrigeration equipment may contain CFC’s which will damage the ozone
layer, when disposing of any refrigeration equipment please contact your local waste
disposal department for advice on the correct method of disposal
This appliance must only be used for its intended purpose i.e. the freezing and storage
of domestic edible foodstuffs and should not be used for any other purpose
If the mains cable becomes damaged, it must be replaced by the manufacturer, its
service agent or a similarly qualified person to avoid a hazard.
Installation
Position the appliance and allow to stand for two to three hours before it is turned on
for the first time to allow the system to settle. Do not position next to any heat source
e.g. cooker, boiler or in direct sunlight etc.
A clearance of 10 cm must be left between the sides of the appliance and any adjacent
cabinets or walls to allow for adequate air circulation. The appliance is not designed
for recessed installation (“building in”).
Install on a good firm level surface, and any unevenness of the floor should be
corrected prior to installation, slight unevenness can be overcome by adjusting the
front feet.
NOTE: If the appliance is positioned on a carpet, soft floor covering you should readjust the front feet once the appliance has had time to settle.
2
IMPORTANT SAFETY INFORMATION
This appliance must be used on the electric voltage shown on the rating plate
on the base of this appliance, failure to use the correct voltage will render the
guarantee VOID and may cause damage to the product.
This appliance is intended for domestic use only, any other use may invalidate
the warranty and might be dangerous.
This appliance is intended for indoor use only, do not use outdoors.
Accessible surfaces may get hot during operation, use handles and knobs at all
times.
To protect against electric shock do not immerse cord, plugs, or appliance in
water or other liquid.
Do not attempt to dislodge food when product is in operation.
Unplug from outlet when not in use and before cleaning. Remove food before
cleaning the appliance.
If the mains lead becomes damaged, it must be replaced by the manufacturer,
its service agent or similarly qualified person with a lead of the same type and
rating to avoid a hazard.
Do not operate the appliance with a damaged cord or plug or after the
appliance malfunctions or has been damaged in any way. Consult the retail
store where you bought the appliance for advice.
The cooling circuit must not be damaged in any way.
Do not insert over sized food as this could cause a hazard.
Do not let cord hang over edge of the surface, or touch hot surfaces.
Do not place appliance on or near hot surfaces, or in direct sunlight.
Extreme caution must be used when moving an appliance.
Always attach a plug to appliance, then plug cord in the wall outlet. To
disconnect, turn the switch OFF, then remove the plug from wall outlet.
A short power-supply cord is provided to reduce the risk of a tripping
hazard.
3
Description of the Appliance
Control unit
Storage Baskets
door
Level Adjusters
Control Unit
NORMAL
MIN
MAX
SUPER
4
USING THE APPLIANCE
Do not use detergents, abrasive
powders, highly perfumed cleaning
products, wax polishes or products
containing alcohol.
T h i s a pp l i a n c e i s de s i g n e d f or
domestic use only, specifically for the
storage of edible foodstuffs.
This appliance is designed to operate in
ambient temperatures (surrounding air
temperature) between 16 and 32
To Start the Appliance
1. Allow the appliance to stand for 2 hours
If these temperatures are exceeded i.e.,
colder or warmer, the appliance will not
operate correctly. Should the ambient
temperatures be exceeded for long periods,
after installation.
2. Plug in the appliance and switch on at the
the temperature in the freezer section will rise
above -18 and foo d spoilage may occur.
setting. A midway setting is usually suitable
mains supply.
3. Turn the thermostat control to the required
for normal operation (see thermostat control).
Before Use
4. Leave the appliance for approximately 4
.Remove all securing tapes and foam under
.the condenser at the back of the cabinet.
Wash the inside of the appliance with lukewarm
water with a little bicarbonate of soda added (5ml
to 0.5 litre of water). Do not use soap or
detergent as the smell may linger. Dry the
appliance thoroughly.
hours for the correct temperature to be
reached before placing food inside.
Thermostat Control
The thermostat control situated in the control
panel regulates the temperature of the freezer
compartment.
Position MIN - Cold
Position NORMAL- Colder.Normally setting
at this position.
Position MAX - Coldest
Position SUPER -To fast freeze much hot food,
NORMAL
MIN
The temperature will be affected by:
MAX
SUPER
Room temperature
How often the door is opened
How much food is stored
Position of the appliance
In determining the correct temperature control
setting, all these factors have to be considered
and some experimentation may be necessary
Do not allow children to tamper with the
controls or play with the product.
5
INSTALLATION
POSITIONING THE APPLIANCE
Do not keep your appliance in a room where the temperature is likely to fall below 16ºC
(61ºF) at night, especially in winter, as it is designed to operate in ambient temperatures
between +16 and +32ºC (61 and 90ºF). At lower temperatures the appliance may not
operate, resulting in a reduction in the storage life of the food.
Do not place the appliance near cookers or radiators or in direct sunlight, as this will
cause extra strain on the appliance sfunctions. If installed next to a source of heat or
fridge, maintain the following minimum clearances.
Choose a well-ventilated location with no less than 10cm clearance around the freezer.
Place the freezer in a location with a firm base. In order to prevent vibration and
excessive noise. Level the freezer by adjusting the two front feet.
DO NOT PLACE THIS PRODUCT IN AN EXCES SIVELY COLD OR HUMID AREA S U C H A S A
GARAGE O R CELLAR ETC.
If the product has been stored or delivered in a non vertical orientation.
WAIT 24 HOURS BEFORE PLUGGING IN AND SWITCHING
O N TH IS PRODUCT.THE COOLANT FLUID NEEDS TIME
T O SETTLE .
DO N O T STORE FOOD IN T H E FREEZER UNTIL IT HAS
BEEN RUNNING FOR AT LEAST 4 HOURS.
UNDER NO CI CUM STANCES MUST TH E COOLANT
CIRCUIT BE DAMAGED.
THIS PRODU CT I S INTE NDED FOR DOM EST IC US E ONLY, AN Y OTHE R USE M AY
INVALIDA TE THE WARRAN TY AND MIGHT BE DANGEROUS
If you are discarding an old appliance with a lock or catch fitted to the door, ensure that it is
left with the door catch disabled and in a safe condition to prevent children getting trapped
inside.
We suggest you contact your local authority for information on the correct and safe
method of disposal.
Dispose of all packaging in an environmentally friendly way.
Your freezer is suitable for the long-term storage of commercially frozen foods and can be
used to freeze and store fresh food.
If there is a power failure, do not open the door. Frozen food should not be affected if the
failure lasts for less than 12 hrs. If the failure is longer, then the food should be checked
and either eaten immediately or cooked and then re-frozen.
NOISES INSIDE THE FREEZER
If you have not owned a freezer before, you may notice that it makes some rather unusual
noises. Most of these are perfectly normal, but you should be aware of them!
6
GURGLING, WHOOSHING
These noises are caused by circulation of refrigerant in the cooling system. It has become
more pronounced since the introduction of CFC free gases. This is not a fault and will not
affect the performance of your freezer.
HUMMING, PURRING OR PULSATING
This is the compressor motor working, as it pumps the refrigerant around the system.
SHOPPING FOR FROZEN FOODS
Your Freezer is 4 star.
When you are buying frozen food, look at the Storage Guidelines on the packaging. You
will be able to store each item of frozen food for the period shown against the 4 star
rating. This is usually the period stated as ‘Best Before’, on the front of the packaging.
CHECK THE FREEZER TEMPERATURE
Check the temperature of the frozen food cabinet in the shop where you buy your frozen
foods. It should show a temperature lower than -18°C.
CHOOSE PACKS CAREFULLY
Take a quick look at the frozen food package and make sure it is in perfect condition.
PURCHASE FROZEN FOOD LAST
Always buy frozen products last on your visit to the supermarket.
KEEP FROZEN FOODS TOGETHER
When you are going around the supermarket and when you are travelling home, if you
keep all the frozen foods together they will help to keep each other cold.
STORE FOOD STRAIGHT AWAY
Don’t buy frozen food unless you can freeze it straight away. Special insulated bags can
be bought from most supermarkets and hardware shops. These keep frozen food cold for
longer.
FREEZING FRESH FOOD
See the technical data sheet at the rear of this booklet for the maximum permissible amount
in kilograms of fresh food that can be frozen in any 24-hour period with a room temperature
of 25°C. Never freeze more than the maximum permissible.
Set the temperature control to "Super" 24 hours before introducing the fresh food.
2 hours is sufficient for less than 2Kg of fresh food.
The compressor will work continuously whilst on the “Super” setting.
Return the temperature setting to normal after a further 24 hours, 2 hours if less than 2Kg.
It is not necessary to use this setting when introducing ready frozen food.
7
TO THAW FROZEN FOODS
1. Cover food loosely.
2. Thaw at room temperature. Don’t forget that thawing in a warm area encourages the
growth of bacteria.
3. Always make sure there are no ice crystals in the food before cooking, particularly
with meat. These crystals indicate that the food is not fully thawed. They result in lower
temperatures when cooking. Lower cooking temperatures may not destroy bacteria.
4. Cook food as soon as possible after thawing.
5. Drain off and throw away any liquid lost during thawing.
THAWING FROZEN VEGETABLES
For some foods, thawing before cooking is unnecessary. Vegetables and pasta can be
added directly to boiling water or steam cooked. Frozen sauces and soups can be put into
a saucepan and heated gently until thawed.
OVEN THAWING FROZEN FOODS
Many microwaves and ovens have thaw settings. To avoid bacterial build up, only use
these if you intend to cook the food immediately afterwards.
SAFETY TIPS
Never re-freeze anything that has thawed out unless you cook it again, to kill off harmful
bacteria. Never re-freeze thawed shellfish.
FREEZING FRESH FOOD (TIPS)
Use quality food and handle it as little as possible. Freeze food in small quantities, it
freezes faster, takes less time to thaw and enables you to eat it in the quantity you need.
First, estimate the amount of food you will be freezing. Use the Thermostat Control Dial
to make your freezer colder (about -30° C), it will therefore freeze quicker and keep in
the goodness. However you should use it sparingly to conserve energy.
PROLONGED OFF PERIODS
If the refrigerator is not in use for a long period of time, proceed as follows:
Disconnect the refrigerator from the main supply by removing the plug from the socket.
Clean and dry the inside as instructed under the heading of cleaning the appliance.
Leave the door open to prevent any unpleasant smells from building up while the
appliance is not in use.
If there is a power failure for a short time keep the door closed check the contents of the
refrigerator every so often.
8
POWER FAILURE
If there is a power failure for a short time less than 12 hours keep the door
closed.Frozen food should not be affected if the failure lasts for less than 12
hours.
Extra protection can be given by covering the appliance with two or three thick
blankets.
If a long power failure is anticipated, try to get the foodstuff into another appliance or
cold store, if possible.
If the power cut is longer than 12 hrs then check the content of the freezer.
If the food has defrosted, cook and refreeze the food or it should be eaten
immediately. Never refreeze food that as been defrosted.
CLEANING AND MAINTENANCE
Before any cleaning or maintenance is carried out you must disconnect the appliance
from the mains supply by removing the plug, never remove the plug by pulling on the
mains cord. Remove the plug by pulling on the plug itself.
It is recommended that when cleaning the appliance, both the inside and outside, can be
cleaned using warm water and a little bicarbonate of soda. Use 1 teaspoon to 1.2 liters
of water
Do not use detergents, abrasive powders, highly perfumed cleaning products, wax
polishes or cleaning products containing bleach or alcohol.
External Cleaning, wash the outer cabinet with warm soapy water.
Do NOT use abrasive products. There are sharp edges on the underside of the product
so care should be taken when cleaning.
Once or twice a year dust the compressor at the back of the appliance, with a brush or
Vacuum cleaner, as an accumulation of dust will affect the performance of the
appliance and Cause excessive electricity consumption.
Warning:
The refrigerating system must not be damaged at any time.
DEFROSTING THE FREEZER
The freezer will need defrosting periodically (when the frost is more than 3mm thick).
Turn the temperature control to “MIN” and unplug from the mains socket.
Hold the plug itself. Do not remove the plug by pulling on the mains cord.
Remove all the frozen food and wrap in thick blankets to retain the cold or move it to
another freezer.
Leave the freezer door open with a suitable container under the front to catch the
water as the frost melts.
When the freezer is fully defrosted, clean the inside (see the section on cleaning and
maintenance). Then close the door and connect to the mains, now set the temperature
control to your required setting (usually the “Normal” setting).
Leave the freezer running for approximately 4 hours before re-introducing the frozen
food.
9
Reversing the door
This refrigerator has been built with the door hinges on the right. If you wish to
change the opening direction, follow the instructions below:
1. Remove the upper hinge cover (6) first.
2. Remove the two screws (1) that hold the upper hinge (5) (right side) to the fridge
body. Remove the upper hinge (5).
3. Lift the door and place it on a padded surface to prevent scratching it.
4. Reverse the hole cover plate (7) from the left side to the right.
5. Remove the two screws (8) that hold the lower hinge (2) and remove the lower
hinge (2).
6. Remove the left front foot (4) and transfer it to the right side.
7. Before fitting the lower hinge (2), swap over the hinge pin (9) and the foot (3) to
the other side of the lower hinge (2). Then install the lower hinge (2) onto the left
side of the lower frame with two screws (8).
8. Position the door in place making sure the door seats onto the lower hinge (2).
9. Align the door in the closed position secure the upper hinge (5) in the top fame on
left side with two screws (1). Remember, do not tighten the two screws (1) until
the top of the door is leveled with the top of the fridge.
10. Install the upper hinge cover (6) on the upper hinge.
FIGURE 1 - REPRESENTATIVE POSITION OF COMPONENTS PRIOR TO
DOOR REVERSAL.
FIGURE 2 - RFRPERSENTATIVE POSITION OF COMPONENTS AFTER
DOOR REVERSAL.
10
Troubleshooting
Before calling for service please check the following points.
The freezer is not working
Check the plug is inserted correctly into the wall socket.
Check there is power to the wall socket by plugging in another appliance, if the
other appliance works check the fuse in the freezer plug.
The freezer is noisy when running
Check the freezer is level and it is not in contact with another appliance or kitchen
furniture.
The freezer does not cool sufficiently
If the door has been opened too often, or it has been left open for a while it will take time
for the freezer to reach its set temperature.
Check the airflow over the rear of the freezer has not been reduced due to insufficient
clearance.
The following characteristics should not be looked upon as a problem
A gentle trickling sound caused by coolant flowing through the pipe.
Compressor operating at high temperatures.
Prolonged idle periods
If you are going to leave the freezer idle for any period of time, proceed as follows:
Disconnect the freezer from the mains supply by removing the plug from the wall
socket. Clean and dry the inside as instructed under the heading of cleaning the
freezer.
Leave the door open to prevent any unpleasant smells from building up while the freezer
is not in use.
Maintenance
Moving your Freezer
Hold the freezer around its sides or base when moving it. Under no circumstance should
it be lifted with the edges of the top surface.
Location
Do not locate your Freezer near a heat source, EG cooker, boiler or radiator. Also avoid
direct sunlight in lean-to’s or sun lounges.
Leveling the Freezer
Make sure the Freezer is level. Use the rotating leveling feet at the front. If the Freezer is
not level, the doors and magnetic seal alignments will be affected.
Servicing
Repairs and maintenance of the appliance, should only be performed by a qualified
service agent.
11
Do’s and don’ts
Do- Clean and defrost your appliance regularly (See “Defrosting”)
Do- Leave lettuce, cabbage, parsley and cauliflower on the stem.
Do- Wrap raw meat and poultry loosely in polythene or aluminium foil. This prevents
drying.
Do- Wrap fish and offal in polythene bags.
Do- Check contents of the compartments every so often.
Do- Store commercially prepared food in accordance with the instructions given on the
packets.
Do- Always choose high quality fresh food and be sure it is thoroughly clean before
freezing it.
Do- Wrap all food in aluminium foil or food quality polythene bags and make sure any
air is excluded.
Don’t- Cover the shelves with any protective materials which may obstruct air
circulation.
Don’t- Store poisonous or any dangerous substances in your freezer. It has been designed
for the freezing of edible foodstuffs only.
Don’t- Consume food which has been frozen for an excessive length of time.
Don’t- Leave the door open for long periods, as this will make the appliance more costly
to run and cause excessive ice formation.
Don’t- Use sharp edged objects such as knives or forks to remove the ice.
Don’t- Use hairdryers, or electrical appliances for defrosting only use item
recommended by the manufacturer.
Don’t- Put hot food into the appliance. Let it cool down first.
Don’t- Put liquid-filled bottles or sealed cans containing carbonated liquids into the
freezer as they may burst.
Don’t- Give children ice-cream and water ices direct from the freezer The low
temperature may cause ‘freezer burns’ on the lips.
Don’t- Try to keep frozen food which has thawed; it should be eaten within 24 hours or
cooked and re-frozen.
12
Technical data
Brand
Proline
Appliance type
Freezer
Star rating
Total gross volume (l.)
90 L
Total storage volume (l.)
64 L
Freezing capacity (kg/24h)
3.0 kg/24h
Climate Class +Ambient Range
Energy class (1)
A
Power consumption (kWh/year) (2) 190 kWh/year
Supply voltage (V/Hz)
220-240V~/50 Hz
Noise [dB(A)re 1 pW]
<39 dB(A)
Refrigerating agent
R600a/32g
Outside dimensions (W x D x H)
480mm x500 mm x 840mm
Insulation Blowing Gas
(1)Energy
class:
A…..G
(A=economical....G=less economical)
(2) The real power consumption depends on using conditions and
appliance location.
910mm
420mm
480mm
580mm
13
IMPORTANT DISPOSAL INSTRUCTIONS
As a responsible retailer we care about the environment.
As such we urge you to follow the correct disposal procedure for your product
and packaging materials. This will help conserve natural recourses
and ensure that it is recycled in a manner that protects health and the
environment.
You must dispose of this product and its packaging according to local laws and regulations. Because
this product contains electronic components, the product and its accessories must be disposed of
separately from household waste when the product reaches its end of life.
Contact your local authority to learn about disposal and recycling.
The product and its accessories should be taken to your local collection point for recycling.
Some collection points accept products free of charge.
If something doesn't seem to work
If there is something about your appliance which you do not understand and you live in the UK
you can phone our help line during normal office hours on: 0113 2793520
Calls are charged at standard rates.
We apologise for any inconvenience caused by minor inconsistencies in these
instructions, which may occur as a result of product improvement and development.
Kesa UK, HU1 3AU 24 / 04 / 2008
14