1
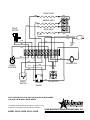
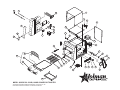
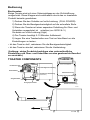
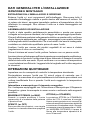
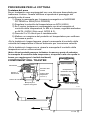
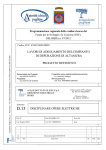
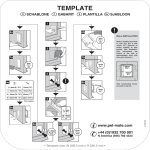
®
®
CONVEYOR
TOASTER
MODEL
QCS3-1600B-CE
QCS
SERIES
®
Installation and
Operation
Instructions
2M-Z9713 Rev. - 4/19/2006
®
®
January 3, 2013 BBE
®
QCS-1
GENERAL INSTALLATION DATA
INSPECTION & ASSEMBLY
UNCRATING AND INSPECTING
Unpack the unit and components from the shipping container. Remove
all visible packing material and those from inside the cooking chamber. If
damage is discovered, file a claim immediately with the carrier that handled
the shipment. Do not operate the unit if it was damaged during shipping.
ASSEMBLY AND INSTALLATION
The unit was shipped fully assembled and ready to plug into a standard
outlet specified for its voltage and amp draw. Before making any electrical
connection to this unit, check that the power supply is adequate for the
voltage, amperage and requirements stated on the rating plate. If improper
electrical supply is determined, contact a qualified electrician prior to using
the unit.
Level unit using the adjustable feet under the unit (approximately 1/2"
adjustment).
Before using the unit for the first time, wipe down the exterior with a damp
cloth.
Allow enough space around the toaster for adequate ventilation. Do not
operate the unit without the crumb tray properly positioned. Overheating
and poor toasting may occur. Read all labels on the unit and follow their
instructions.
DAILY OPERATION
Set the heat control knobs to desired temperature.
Always allow 10 minutes of preheat time before loading the unit with product.
Failure to allow sufficient preheat time will result in unsatisfactory cooking
until the unit reaches operating temperature.
ROTARY POWER SAVER SWITCH
For toasters equipped with a Rotary Power Saver Switch, turn clockwise
or counterclockwise to get in the following positions.
FULL POWER
STANDBY
When in this position your equipment The standby position reduces
is at full power and ready to use.
the power consumption by 75%.
Using this position during the quiet
OFF ROTARY
Two off positions are provided, a single times will save electricity, and
rotation to either direction will shut the keep the toaster warm. When
needed, turn the switch to FULL
unit off.
POWER. Recovery time is about
30 seconds.
COOKING PROCEDURES
BREAD TOASTING
Some toasters are equipped with a swinging heat shutter at the toaster
entrance. This shutter will move out of the way as the product passes
under it.
1) Turn the power saver to FULL POWER.
2) Set the conveyor speed to HIGH.
3) If your toaster is equipped with separate top and bottom heat
controls set them both at HIGH (QCS2 & 3 Only)
4) Allow warm up time of 5 to 10 minutes.
5) Place a sample product on the conveyor belt to test the settings.
•If toasting is too light, turn conveyor speed control counterclockwise to a
slower speed.
•If toasting is too dark, turn heat control to a lower heat.
(NOTE: Some products may require adjustment of the top and
bottom heat controls in order to achieve the desired results)
TOASTER COMPONENTS
FRONT
LOAD UP
SPEED CONTROL
CRUMB TRAY
HEAT CONTROLS
(QCS2 & 3)
HIGH LIMIT RESET
AIR INTAKE FAN
UNLOAD TRAY
POWER
SAVER SWITCH
POWER CORD
IL1141
),
CLEANING
Preventive maintenance for your Holman toaster consists of the following
recommended cleaning procedures. To keep your toaster in its top
operating condition, these steps should be performed on a daily or weekly
as indicated.
A. Clean air intake on bottom of unit.
B. For lightly soiled conveyor belts, turn conveyor speed control to fastest
setting (100) and wipe with a damp cloth (daily) For heavily soiled
conveyors, turn conveyor speed control to fastest setting and wipe with
a light abrasive pad (as needed).
C. Turn main power saver switch to the OFF position. Disconnect unit from
power source.
D. After the unit cools, remove interior crumb tray (as shown below) and
clean. Slide crumb tray back into position.
E. Wipe exterior surface of unit.
FRONT HEAT
BRN
BRN
MIDDLE HEAT
BRN
BRN
DRIVE
MOTOR
REAR HEAT
BRN
BRN
BRN
BLK
BRN
BLK
WHI
BRN
BLU
BLK
MAJ
RED
BRN
FAN SWITCH
RED
SPEED
CONTROL
ORG
BLK
BLK
BLK
BLK
RESET
SWITCH
FAN MOTOR
POWER
SAVER
NOTE: DRIVE MOTOR, FOR 240V USE BLACK AND BLUE WIRES,
FOR 208V USE BLACK & WHITE WIRES.
THIS DRAWING CONTAINS INFORMATION CONFIDENTIAL TO STAR MFG. INT'L. INC.
NO REPRODUCTION OR DISCLOSURE OF ITS CONTENTS IS PERMITTED.
MODEL: QCS-2-1200B, QCS-3-1600B
STAR MANUFACTURING INTERNATIONAL INC.
065500
9
Rev A
04/3/2001
40
37
1
38
3
4
39
2
36
29
32
31
30
28
35
33
8
34
5
6
17
11
7
8
26
9
41
24
11
18
25
19
20
21
22
15
42
13
14
12
10
16
23
SK2128
MODEL: QCS/RCS-2-1200B, 1600B CONVEYOR TOASTER
THIS DRAWING CONTAINS INFORMATION CONFIDENTIAL TO STAR MFG. INT'L. INC.
NO REPRODUCTION OR DISCLOSURE OF ITS CONTENTS IS PERMITTED.
Rev C
6/23/2006
PARTS LIST
QCS-3-1600B -CE
Conveyor Toasters
Key
Number
1
2
3
4
5
6
7
8
9
10
11
12
13
14
15
16
17
18
19
20
21
22
23
24
25
26
28
29
30
31
32
33
34
35
35
36
39
40
41
42
Part
Number
Number
Per
Unit
HC-101371
1
HH-402470
1
2E-200574
1
HG-402144
1
2U-200561
1
2U-200509
1
HA-120243
2U-200590
1
2R-Z8879
1
2A-202902
1
HA-112261
2
2P-Z8779
1
2P-200648
1
2P-150015
1
2P-115501
4
2P-115502
1
HC-115381
1
HG-115389
1
2R-200562
1
2A-Z9394
2
2P-200736
2
2P-200700
2
2A-202905
1
SP-160028
1
2B-200602
1
2B-200603
3
HA-100561
1
HH-402465
1
2R-200788
1
Crumb Tray Mounting Hardware
2C-200067
3
2C-200101
3
2B-200764
1
2A-200284
1
HI-100573
1
2E-200551
1
2P-402728
1
SP-118042
1
HB-120261
2E-200566
1
2R-200708
2
2R-200768
1
2R-200769
1
2M-200897
1
HG-402533
1
HL-197862
4
HV-198030
4
HL-197863
4
HI-101116
1
2C-200067
3
2C-200101
3
2R-200709
4
NOT ILLUSTRATED
2E-200387
1
2R-Z8879
1
2E-Y7874
1
HB-120276
HJ-140027
1
2K-200465
1
1L-Z12397
1
August 31, 2012, Rev. I
January 3, 2013 BBE
Description
ENCLOSURE
PANEL, BACK QCS3
SWITCH, FAN CERAMIC
BRACKET, FAN SWITCH
MOTOR, FAN
MOTOR, DRIVE, FAN NOT INCLUDED
MOTOR, DRIVE 3286 BB, LOW, FAN NOT INCL.
FAN BLADE, DRIVE MOTOR
SHAFT, DRIVE
BUSHING, REAR
SPROCKET, DRIVEN (25B11 X 5/16”)
SPROCKET, DRIVE (25B32 X 5/16”)
CHAIN, DRIVE
JUMPER, TERMINAL BLOCK, SMALL, 2 POS.
JUMPER, TERMINAL BLOCK, SMALL, 3 POS.
BLOCK, TERMINAL, 4 POS.
BLOCK, TERMINAL, 11 POS.
GUARD, FAN MOTOR
SPRING BRACKET
2" BEARING SPRING
BEARING, FRONT TEFLON
SHAFT, IDLER
BELT, CONVEYOR (14” X 35 1/2")
LINK, CONVEYOR BELT 14”
LINK, MASTER CONVEYOR BELT
TRAY, PULL-OUT QCS3
CRUMB TRAY, QCS-3
CRUMB TRAY GUARD
60 Hz
50 Hz
SCREW, 6-32 X 1/4 PHIL TRUSS SS
WASHER, #6 LOCK MED SS
LOAD-UP WIRE RACK
E-CLIP
BAFFLE, AIR FLOW
SWITCH, ROTARY POWER SAVER
ANTI-SPIN PLATE
SWITCH, SPEED CONTROL ASSY
500 OHM
SWITCH, HIGH LIMIT RESET
CAP, KNOB
KNOB, SPEED CONTROL
KNOB, POWERSAVER
LABEL, CONTROL PANEL
QCS
RETAINER, ELEMENT
QCS
HEATER TUBE, QUARTS 208V (All 4 available in kit PS-120299)
HEATER TUBE, QUARTS 220V HEATER TUBE, QUARTS 240V QCS3-1600B-CE also
CRUMB TRAY ASSEMBLY
QCS-3
SCREW 6-32 X 1/4 THP SS
WASHER #6 SPLIT SS
LEG, 1” CHROME PLASTIC
CORD, FAN TO TERMINAL PLUG
FAN BLADE, DRIVE MOTOR
CORD SET, POWER, CEE7/VII
240V 50 Hz
CORD SET, POWER
220V, 240V
BUSHING, CORD HEYCO
EXTREME PRESSURE MULTIPURPOSE SYNTHETIC GREASE (80°F TO 400°F) , TUBE 4 oz.
IMPORTANT: WHEN ORDERING, SPECIFY VOLTAGE OR TYPE GAS DESIRED
INCLUDE MODEL AND SERIAL NUMBER
Some items are included for illustrative purposes only and in certain instances may not be available.
13
PAGE
OF
1
1
PARTS LIST
RCS Conveyor Toasters
HEATER TUBES
Key
Number
38
37
38
37
38
37
Description
HEATER TUBE METAL, TOP
HEATER TUBE METAL, BOTTOM
HEATER TUBE METAL, TOP
HEATER TUBE METAL, BOTTOM
HEATER TUBE METAL, TOP
HEATER TUBE METAL, BOTTOM
37
38
RCS HEATER TUBES
15
208V
208V
220V
220V
240V
240V
August 31, 2012, Rev. I
Part
Number
Number
Per
Unit
2N-209114
2N-209198
2N-209113
2N-209192
2N-209112
2N-209194
2
2
2
2
2
2
®
®
GRILLE-PAIN À
TRANSPORTEUR
MODÈLE
SÉRIES QCS
®
Manuel d’Installation
et de
Fonctionnement
®
®
2M-Z9713 Rev. - 4/19/2006
®
QCS-1
INSTALLATION GÉNÉRALE
INSPECTION & ASSEMBLAGE
DEBALLAGE ET INSPECTION
Enlevez l’appareil et les composantes de la caisse. Enlevez tout l’emballage
de la caisse et de la chambre de cuisson. Si vous découvrez une avarie,
déposez une réclamation avec le transporteur qui a assuré l’expédition.
N’utilisez pas l’appareil s’il a été endommagé pendant l’expédition.
ASSEMBLAGE ET INSTALLATION
Cet appareil a été transporté assemblé complètement et prêt à brancher dans
une prise standard pour les normes de tension et le débit en ampères. Avant
de faire une connexion électrique à cet appareil, vérifiez que l’alimentation
électrique est suffisante pour la tension, l’intensité du courant électrique
et les spécifications marqués sur la plaque signalétique. Si vous trouvez
une mauvaise alimentation électrique, contactez un électricien avant de
l’utiliser.
Nivelez l’appareil en utilisant le piétage variable sous l’appareil.
(approximativement une régulation de ½ po).
Avant d’utiliser l’appareil pour la prochaine fois, essuyez la paroi avec un
chiffon humide.
Assurez-vous d’avoir assez d’espace autour du grille-pain pour l’aération
suffisante. N’utilisez pas l’appareil sans le plateau à miettes en position
correcte. La surchauffe ou le mauvais grillage peut présenter. Lisez toutes
les étiquettes sur l’appareil et suivez leur mode d’emploi.
UTILISATION QUOTIDIENNE
Réglez les commandes de chaleur à la température désirée.
Laissez toujours 10 minutes pour le temps de préchauffage avant de
charger l’appareil avec le produit. Défaut d’assurer assez de temps de
préchauffage résultera dans une cuisson non satisfaisant jusqu’à ce que
l’appareil atteigne une température d’utilisation.
SELECTEUR ROTATIF POWER SAVER (économiseur d’alimentation)
Pour les grille-pain qui comportent un Sélecteur Rotatif Power Saver (économiseur
d’alimentation) tournez à droite ou à gauche pour les réglages suivants.
FULL POWER (pleine puissance)
Lorsqu’il est à cette position, l’appareil est
à pleine puissance et prêt à utiliser.
OFF ROTARY (arrêt rotatif)
Il y a deux positions d’arrêt, une seule
rotation à l’un ou l’autre sens éteindra
l’appareil.
STANDBY (attente)
La position « Standby » réduit
l’alimentation de 75%. Utilisez cette
position pendant les périodes d’inactivité
et vous économiserez l’électricité et
le grille-pain restera chaud. Une fois
nécessaire, tournez le sélecteur à
FULL POWER (pleine puissance). Le
temps de récupération est environ 30
secondes.
LES PROCÉDURES DE CUISSON
GRILLAGE DU PAIN
Quelques grille-pain comportent un obturateur de température qui se
balance à l’entrée. Cet obturateur se déplace lorsque le produit passe
là-dessous.
1) Tournez le sélecteur « power saver » à FULL POWER
(pleine puissance)
2) Réglez la vitesse du transporteur à HIGH (haut)
3) Si votre grille-pain comporte des commandes de la température
du bas et du haut, réglez les deux à HIGH (haut)
(seulement QCS2 & 3)
4) Laissez préchauffer le grille-pain pendant 5 à 10 minutes.
5) Faites un essai avec un petit pain pour essayer les réglages.
• Si le grillage est trop pâle, tournez la commande de vitesse de
transporteur dans le sens contraire aux aiguilles d’une montre à une
vitesse plus lente.
•Si le grillage est trop foncé, réglez la commande de chaleur à une
température plus basse.
(REMARQUE : Certains produits peuvent exiger le réglage de la
commande de vitesse pour arriver à un résultat désiré.)
LES COMPOSANTES DU GRILLE-PAIN
Avant
Charger
Commande de
vitesse
Plateau à
miettes
Commandes
de chaleur
(QCS2 & 3)
Bouton de reset
(pour prévenir la surchauffe)
Ventilateur de l’entrée d’air
Plateau de
retour
Interrupteur de power saver
(économiseur d’alimentation)
Cordon d’alimentation
IL1164
),
NETTOYAGE
Les procédures suivantes de nettoyage sont recommandées pour l’entretien
préventif pour votre grille-pain Holman. Pour maintenir votre grille-pain
dans une condition de fonctionnement supérieure, suivez ces étapes
quotidiennement ou hebdomadairement.
A. Nettoyez l’entrée d’air en bas de l’appareil.
B. Pour les bandes transporteuses légèrement sales, tournez la commande
de vitesse au réglage le plus vite (100) et essuyez avec un chiffon humide
(chaque jour). Pour les transporteurs très sales, tournez la commande
de vitesse au réglage le plus vite et essuyez avec un tampon abrasif et
doux (comme nécessaire).
C. Mettez le sélecteur power saver en position OFF (arrêt). Débranchez
l’appareil de la source d’alimentation
D. Laissez refroidir l’appareil, enlevez le plateau à miettes (comme le
démontre au-dessous) et nettoyez. Remplacez le plateau à miettes en
position.
E. Essuyez la paroi extérieure de l’appareil.
®
®
Durchlauf
TOASTER
MODEL
®
QCS SERIES
Installationsund Bedienungsanleitung
®
®
2M-Z9713 Rev. - 4/19/2006
®
QCS-1
GENERELLE HINWEISE
ÜBERPRÜFUNG & ZUSAMMENBAU
Auspacken und Überprüfen
Entnehmen Sie das Gerät und die Zubehörteile aus dem Transportbehälter.
Entfernen Sie sämtliche Verpackungsmaterialien auch aus dem Backraum
des Toasters. Wenn Sie eine Beschädigung feststellen wenden Sie sich
umgehend an den Spediteur. Nehmen Sie, während des Transports
beschädigte Geräte, nicht in Betrieb.
Inbetriebnahme
Das Gerät wird komplett montiert und Steckerfertig für Steckdosen mit den
erforderlichen Volt und Amperewerten ausgeliefert. Versichern Sie sich
vor Anschluss des Geräts ob die Werte der Anschlusssteckdose mit den
erforderlichen Werten des Geräts übereinstimmen. Beauftragen Sie eine
qualifizierte Person, sollte der Elektroanschluss nicht den Erfordernissen
entsprechen oder sollten Sie sich dessen unsicher sein .
Richten Sie das Gerät mit den justierbaren Füßen aus.
Vor der ersten Inbetriebnahme reinigen Sie das Gerät außen mit einem
feuchten Tuch..
Achten Sie, aufgrund der Hitzeentwicklung, auf genügend Abstände nach
allen Seiten. Benutzen Sie das Gerät nur wenn das Krümeltablett richtig
positioniert ist. Lesen Sie die Aufkleber auf dem Gerät und folgen Sie
den Anweisungen.
Tägliche Vorbereitung
Drehen Sie den Temperaturschalter auf die gewünschte Position
(Temperatur).
Lassen Sie das Gerät 10 Minuten vorheizen bevor Sie damit toasten. Ohne
diese Vorheizzeit ist kein optimales Ergebnis gewährleistet.
Energiespardrehschalter
Sollte der Toaster mit einem Energiespardrehschalter ausgerüstet sein
drehen Sie diesen in beide Richtungen um folgende Einstellungen zu
erreichen.
STANDBY
Volle Leistung
In dieser Position wird die volle In der Standby Position wird der
Energieverbrauch um 75 % reduziert. Sie
Leistung abgerufen und das Gerät ist
können somit in ruhigeren Zeiten Strom
Arbeitsbereit.
sparen und halten den Toaster trotzdem
OFF ROTARY
Eine Umdrehung des Schalters gleich
in welche Richtung schaltet das Gerät
komplett aus.
warm . Sobald Sie den Toaster wieder
einsetzen schalten Sie auf volle Leistung
(Full Power). Sie benötigen 30 Sekunden
um wieder die Arbeitstemperatur zu
erreichen.
Bedienung
Brot toasten
Einige Toaster sind mit einer Schwingklappe an der Zufuhröffnung
ausgerüstet. Diese Klappe wird automatisch durch das zu toastende
Produkt beiseite geschoben.
1) Drehen Sie den Schalter auf volle Leistung (FULL POWER).
2) Drehen Sie die Bandgeschwindigkeit auf die schnellste Stufe.
3) Wenn der Toaster mit einer separaten Schaltung für Ober- und
Unterhitze ausgerüstet ist schalten (nur QCS2 & 3 )
Sie beide auf volle Leistung (High)
4) Der Toaster benötigt 5-10 Minuten Aufheizzeit.
5) Legen Sie eine Toastscheibe zum Test auf das Band um die
Einstellungen zu testen.
• Ist das Toast zu hell, reduzieren Sie die Bandgeschwindigkeit.
• Ist das Toast zu dunkel, reduzieren Sie die Heizleistung.
(Achtung: einige Produkte benötigen eine unterschiedliche
Einstellung von Ober- und Unterhitze um das gewünschte Resultat
zu erreichen.)
TOASTER COMPONENTS
Vorderseite
Produkteinschub
Geschwindigkeitseinstellung
Krümeltablett
Überheizsicherung
Schalter für Heizleistung
(QCS2 & 3)
Ventilator für Frischluftzufuhr
Ausgabetablett
Energiesparschalter
Elektrische Zuleitung
IL1180
),
Reinigung
Beugen Sie Wartungs- und Reparaturaufwand vor, indem Sie das Gerät
regelmäßig reinigen . Um die volle Leistungsfähigkeit des Toaster zu
gewährleisten müssen die nachfolgenden Schritte je nach Nutzungsintensität
täglich oder wöchentlich durchgeführt werden.
A. Reinigen Sie die Luftzufuhr an der Unterseite des Geräts.
B. Reinigen Sie das Transportband täglich mit einem feuchten Tuch oder
mit einen rauen Schwamm, je nach Verschmutzungsgrad .
C. Schalten Sie das Gerät aus. Trennen Sie das Gerät vom Stromnetz.
D. Nach abkühlen des Geräts entnehmen Sie das Krümeltablett um es zu
reinigen, danach schieben Sie es wieder in den Toaster.
E. Wischen Sie das Gerät von außen feucht ab.
®
®
TOSTAPANE CON
TRASPORTATORE
Modello
Serie QCS
®
Istruzioni per
l’installazione ed il
funzionamento
®
®
2M-Z9713 Rev. - 4/19/2006
®
QCS-1
DATI GENERALI PER L’INSTALLAZIONE
ISPEZIONE E MONTAGGIO
ESTRAZIONE DALL’IMBALLAGGIO E ISPEZIONE
Estrarre l’unità e i suoi componenti dall’imballaggio. Rimuovere tutto il
materiale d’imballaggio visibile e quello dentro alla camera di cottura. Se
si notano dei danni, sporgere immediato reclamo al trasportatore che ha
effettuato la consegna. Non attivare l’unità se è stata danneggiata nel
trasporto.
ASSEMBLAGGIO ED INSTALLAZIONE
L’unità è stata spedita perfettamente assemblata e pronta per essere
collegata ad una presa standard, del voltaggio ed amperaggio specificato.
Prima di effettuare qualsiasi collegamento elettrico a questa unità, verificare
che la linea sia adeguata per voltaggio, amperaggio e per quanto indicato
sulla targhetta delle caratteristiche. Se si constata che essa è inadeguata,
contattare un elettricista qualificato prima di usare l’unità.
Livellare l’unità per mezzo dei piedini regolabili di cui essa è dotata
(regolazione di circa un centimetro).
Prima di iniziare ad usare l’unità, pulirne l’esterno con un panno umido
Lasciare intorno al tostapane sufficiente spazio per una adeguata ventilazione.
Non mettere in funzione l’unità prima di aver sistemato il vassoio di raccolta
delle briciole nella sua sede. Si può verificare o un eccesso di temperatura
o una tostatura insufficiente. Leggere tutte le targhette sull’unità e seguirne
le istruzioni.
OPERAZIONI QUOTIDIANE
Impostare con le manopole di controllo la temperatura desiderata.
Preriscaldare sempre l’unità per 10 minuti prima di caricarla con il
prodotto. La mancanza di un preriscaldamento sufficiente provocherà una
cottura insufficiente fino a quando l’unità avrà raggiunto la temperatura
operativa.
Interruttore a manopola per il risparmio energetico
Per i tostapane equipaggiati con l’Interruttore a Manopola per il Risparmio
Energetico: girare la manopola in senso orario o antiorario nelle seguenti
posizioni:
ATTESA (or STANDBY)
MASSIMA POTENZA (or MAX)
Quando in questa posizione il vostro La posizione ATTESA (or STANDBAY)
apparecchio è al massimo della potenza riduce del 75% il consumo di energia.
Usare questa posizione nei momenti di
e pronto all’uso.
calma consentirà di risparmiare elettricità
SPENTO (or OFF)
e mantenere il tostapane caldo. Quando
Sono previste due posizioni, una singola necessario girare la manopola su MAX.
rotazione in ciascuna direzione spegnerà (or MASSIMA POTENZA) Il tempo di
l’unità.
ritorno alla temperatura operativa è di
circa 30 secondi.
PROCEDURE PER LA COTTURA
Tostatura del pane
Alcuni tostapane sono equipaggiati con una chiusura basculante per
trattenere il calore. Questa chiusura si sposterà al passaggio del
prodotto sotto di essa.
1) Girare la manopola per il risparmio energetico su MASSIMA
POTENZA or MAX(FULL POWER)
2) Regolare la velocità del trasportatore su ALTA (HIGH)
3) Se il vostro tostapane è equipaggiato con due manopole di
controllo della temperatura, in alto e in basso, regolarle ambedue
su ALTA (HIGH) (Solo mod. QCS2 & 3).
4) Dare da 5 a 10 minuti per il riscaldamento.
5) Mettere un campione del prodotto sul trasportatore per verificare
la messa a punto.
•Se la tostatura è troppo leggera, girare la manopola di controllo della
velocità del trasportatore in senso antiorario per una minore velocità.
•Se la tostatura è troppo scura, girare la manopola di controllo della
temperatura ad un calore minore.
(Nota: Alcuni prodotti possono richiedere la messa a punto di ambedue
le manopole di controllo della temperatura, sia quella in alto che quella in
basso, per raggiungere i risultati desiderati)
COMPONENTI DEL TOASTER
Fronte
Caricamento
Controllo della
velocità
Vassoio
delle briciole
Controlli della
temperatura
(QCS2 & 3)
Reimpostazione
(Automatico alto limite)
Ventilatore per
l’entrata dell’aria
Vassoio di scarico
Manopola per il
risparmio energetico
Cavo di alimentazione
IL1163
),
PULIZIA
La manutenzione preventiva per il vostro tostapane Holman consiste
nelle seguenti procedure di pulizia raccomandate. Per mantenere il vostro
tostapane nelle migliori condizioni operative dovranno essere eseguite le
seguenti operazioni a cadenza giornaliera o settimanale, come indicato:
A. Pulire l’entrata dell’aria sotto l’unità.
B. Per cinghie del trasportatore leggermente sporche , portare la manopola
del controllo della velocità del trasportatore al massimo (100) e strofinare
(giornalmente) le cinghie con un panno umido. Per cinghie molto sporche,
portare la manopola del controllo della velocità del trasportatore al
massimo (100) e strofinare le cinghie con un abrasivo leggero (secondo
la necessità).
C. Girare la manopola del risparmio energetico sulla posizione OFF. Staccare
la spina dell’apparecchio.
D. Quando l’unità si è raffreddata, togliere il vassoio delle briciole (come
mostrato qui sotto), pulirlo e farlo scorrere nuovamente nella sua
posizione.
E. Pulire la superficie esterna dell’unità.
®
®
TOSTADORA
TRANSPORTADORA
MODELO
SERIE QCS
®
Instrucciones de
Instalación y
Operación
®
®
2M-Z9713 Rev. - 4/19/2006
®
QCS-1
INFORMACIÓN GENERAL DE INSTALACIÓN
INSPECCIÓN Y MONTAJE
DESEMPAQUETACIÓN E INSPECCIÓN
Desempaqueta la unidad y sus componentes del cajón de transporte.
Remueva toda la materia visible de empaquetar y la de encima del
compartimiento de cocinar. Si daño está descubierto, presente una
reclamación inmediatamente a la transportista. No opere la unidad si hay
daño que ocurrió durante el transporte.
MONTAJE E INSTALACIÓN
La unidad era transportada completamente montada y lista para enchufarse
en una toma de corriente estándar, especificada por su voltaje y sus
necesidades de amperaje. Antes que hacer cualquier conexión eléctrica con
esta unidad, chequee usted que el suministro de electricidad es suficiente
para el voltaje, los amperios, y los requisitos explicados en la placa de
información de la unidad. Si un suministro de electricidad incorrecto está
encontrado, póngase en contacto con un electricista titulado antes de usar
la unidad.
Nivela la unidad con las patas ajustables debajo de la unidad (se puede
ajustar aproximadamente ½ pulgada).
Antes de usar la unidad por primera vez, enjugue la superficie exterior con
una tela húmeda.
Deje espacio suficiente por todos lados de la tostadora para asegurar
ventilación satisfactoria. No opere la unidad sin la caja de migas instalada
en su posición apropiada. La unidad puede calentarse demasiado o
tostar de una manera mala. Lea las etiquetas en la unidad y siga sus
instrucciones.
OPERACIÓN DIARIA
Ajuste los tiradores del control de la calefacción a la temperatura
deseada.
Antes de cargar la unidad con el producto, siempre deja 10 minutos para
que el tostador se caliente. El fracaso de dejar tiempo suficiente para
calentar antes de cargar a la unidad resultará en la cocina insatisfactoria
hasta que la unidad llega a su temperatura de operación.
TIRADOR ROTATORIO PARA SALVAR ELECTRICIDAD
Por tostadores equipados con el Tirador Rotatorio para Salvar Electricidad,
doble en el sentido de las agujas del reloj o en el sentido contrario a las
agujas del reloj para llegar a las posiciones siguientes.
PODER COMPLETO
RESERVA
Mientras en esta posición, su unidad
funciona con su poder completo y está
lista para usar.
La posición “Reserva” reduzca el
consumo de poder un 75%. Si use esta
posición mientras los tiempos que no
están ocupados, salvará electricidad y la
tostadora se quede caliente. Cuando es
necesario, ponga el tirador en la posición
de Poder Completo (FULL POWER). La
unidad dura 30 segundos en regresar
a su temperatura inicial.
COMO APAGAR EL ROTATORIO
Hay dos posiciones en que la unidad puede
estar apagada, una rotación en cualquier
dirección apagará la unidad.
PROCEDIMIENTOS DE COCINAR
COMO TOSTAR EL PAN
Algunas tostadoras están equipadas con un obturador de calefacción
balanceo a la entrada de la tostadora. Este obturador se mueva cuando
el producto pasa debajo de ello.
1) Ponga el tirador de conservar el poder en la posición de Poder
Completo (FULL POWER).
2) Ponga el transportador a la velocidad más alta (HIGH).
3) Si la tostadora está equipada con tiradores separados de la
calefacción superior e inferior, ponga ambos en la posición de Poder
Completo (FULL POWER).
4) Deja un tiempo de entre 5 y 10 minutos para que la tostadora se
caliente.
5) Ponga un producto en la cinta transportadora como una muestra
para probar las posiciones de los tiradores.
•Si el producto está tostando demasiado ligeramente, doble el control de
la velocidad de la cinta transportadora en sentido contrario a las agujas
del reloj para llegar a una velocidad más despacio.
•Si el producto está tostando demasiado oscuramente, baje la
calefacción.
(NOTA: Para conseguir los resultados deseados, algunos
productos pueden requerir el ajuste de los tiradores que controlan
la calefacción superior e inferior)
COMPONENTES DEL TOSTADOR
PARTE ADELANTE
BANDEJA
DE CARGAR
CONTROL DE
VELOCIDAD
CAJA DE
MIGAS
CONTROL DE
CALEFACCIÓN
(QCS2 & 3)
TERMOJTATO DE ALTL
(HI-LIMIT)
VENTILADOR QUE PERMITE
LA ENTRADA DEL AIRE
BANDEJA DE
DESCARGAR
TIRADOR PARA
CONSERVAR LA ELECTRICIDAD
CABLE ELÉCTRICO
IL1165
),
LIMPIEZA
Mantenimiento preventivo por su tostadora Holman consiste en los siguientes
procedimientos de limpieza, que están recomendados. Para asegurar que
su tostadora se queda en su condición de operación mejor, usted debe
hacer estos pasos cada día o semana como está indicado abajo.
A. Limpie el ventilador que permite la entrada del aire debajo de la
unidad.
B. Por una cinta transportadora ligeramente sucia, ponga el transportador
en la velocidad más alta y enjugue con una tela húmeda (diariamente).
Por una transportadora fuertemente sucia, ponga la cinta transportadora
en la velocidad más alta y enjugue con un trapo ligeramente abrasivo
(cuando es necesario).
C. Para conservar la electricidad, doble el tirador a la posición apagada
(OFF).
D. Cuando la unidad se enfríe, remueva la caja de migas interior y límpiela.
Cuando termine, regrese la caja a su posición inicial.
E. Enjugue la superficie exterior de la unidad.