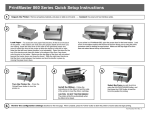
1
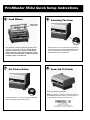
Load paper on th
Adjust the right t
oad
Rear
Paper
Path
PrintMaster
green lever and
socket
on the left852si
side Quick Setup Instructions
r source/outlet.
nect
Power and Cableright. NOTE: Th
not attempt to m
2 Load Rear Paper
Path
Connect are
Power and Cable
lever
back down
the1printer
ng the front of the
of the rear panel.
2
Power and Cable
L
n Printer On
Connect the printer cable from the host computer to
the printer port on the right side of the rear panel.
Connect the power cable to the socket on the left side
of the rear panel and to a power source/outlet.
Paper Path
*NOTE: Left and right side of the printer are
referenced with operator facing the front of the
printer.
3
Load Bottom Paper Path
Load paper on the 3 pins of the left and right tractors.
Adjust the right tractor for paper width by releasing the
green lever and sliding the tractor either to the left or
right. NOTE: The left tractor is not adjustable. Do
not attempt to move it. When done, lock the green
lever back down.
4
4
Turn P
Turn Printer On
aper on the 3 pins of the left and right tractors.
printer
cable
from
the
host
computer
to
he right
tractor
for computer
paper
width
the
ble
from
the host
to by releasing
ort
onand
the sliding
right
side
of
the rear
panel.
ever
the
tractor
either
to the left or
right
side
of the
rear
panel.
NOTE: The left tractor is not adjustable. Do
powertocable
to it.
theWhen
socketdone,
on the
leftthe
side
empt
move
lock
green
ble to the socket on the left side
anel
and to a power source/outlet.
ack
down.
o a power source/outlet.
Loading paper in the bottom tractor is similar to the
rear tractor. Just load paper on the 3 pins of the left
and right tractors. Adjust the right tractor for paper
width by releasing the green lever and sliding the
tractor either to the left or right. NOTE: The left
tractor is not adjustable. Do not attempt to move
it. When done, lock the green lever back down.
Turn the printer on by pressing the ONLINE button
located on the front panel of the printer.
and right side of the printer are
t side
of the printer
are front of the
with
operator
facing the
ator facing the front of the
Load
Adjus
green
right.
not a
lever
6
PrintMaster 852si Quick Setup Instructions
5
6
Load Ribbon
bon Install
tructions
Selecting The
Selecting The Form
Ribbon Install
Instructions
Printer Online
Load the ribbon cartridge by following the instructions
located on the inside of the front lid. NOTE: Do not
tighten the ribbon after installation. If the printer
starts printing very light or will not print at all upon
start up, make sure the ribbon cartridge is properly
snapped in place on the left side.
7
Put Printer Online
ructions
Do not
printer
all upon
properly
Put the printer back “on line” by pressing the ONLINE
button. (The green light should come on).
With the printer “off line”, select the form you wish to
print by pressing the UNLOAD/CHANGE button until
the form name appears on the display. Press the
LOAD/FEED button to load the form.
8
Send Job To Printer
With the printer “off line”, selec
print by pressing the UNLOAD
the form name appears on the
LOAD/FEED button to load the
Send your print job to the printer...
Note: If you plan to do continuous feed print jobs with any of
the PrintMaster 850 Series printers, we recommend that you
purchase the optional Paper Guide (part# 91187)
1517 Townline Road
Benton Harbor, MI 49022
Ph. (800) 368-4636 Fax: (269) 925-8539
Web: www.printek.com E-mail: [email protected]