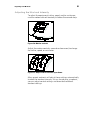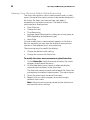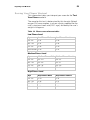
1
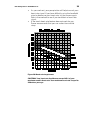
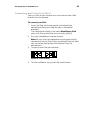
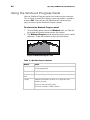
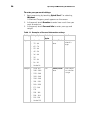
Chapter 3 Introducing Users to the P80 Console The P80 console offers clear visuals and a touch-screen layout that encourages program exploration. Multiple preset workouts are designed to help individual users meet their fitness goals, and the console keys and durable motion controls are responsive and easy to use. Important: Please review the following sections in this guide with your users before allowing them to use the fitness equipment: Important Safety Instructions Using the Safety Clip (for treadmill only) Educating Users 38 Operating and Maintaining the P80 Console Changing the Default Language The Welcome screen displays in a default language selected for your region. To change the default language before beginning your workout: 1. On the Welcome screen, touch the language icon. Figure 9: Language icon 2. On the Language screen, select your language choice and touch OK. The screens will now display in your preferred language. Using the Touch Heart Rate Feature Note: Touch heart rate performance may vary based on a user’s physiology, fitness level, age, and other factors. You may experience an erratic readout if your hands are dry, dirty, or oily, or if the skin on your palms is especially thick. Wearing hand lotion can also cause an erratic readout. In addition, make sure that the sensors are clean to ensure proper contact can be maintained. To use the touch heart rate feature, place the palm of your hands directly on the metal heart rate sensors on the equipment’s handlebars. To ensure an accurate heart rate readout, make sure you follow these tips: Both hands must grip the sensors for your heart rate to register. It takes a number of consecutive heartbeats (15-20 seconds) for your heart rate to register. When gripping the sensors, do not grip tightly. Keep a loose, cupping hold. Holding the grips tightly can affect the reading. Introducing Users to the P80 Console 39 As you work out, your perspiration will help transmit your heart rate signal. If you have difficulty using the handheld grips to determine your heart rate, try the sensors again later in the workout to see if you can obtain a heart rate signal. If the touch heart rate feature does not work for you, Precor recommends that you use a chest transmitter strap. Figure 10: Heart rate target zones CAUTION: Your heart rate should never exceed 85% of your maximum aerobic heart rate. Your maximum heart rate is equal to 220 minus your age. 40 Operating and Maintaining the P80 Console Using a Chest Strap Transmitter WARNING Signals used by the Chest Strap Transmitter (or heart rate strap) may interfere with pacemakers or other implanted devices. Consult your physician and the manufacturers of your Chest Strap Transmitter and implanted device before using a Chest Strap Transmitter. Wearing a chest strap transmitter during your workout provides steady heart rate information. For the equipment to detect your heart rate, you must grip the touch heart rate sensors or wear a chest strap transmitter while exercising. In the presence of both touch and wireless data, the touch data takes precedence and will display. Note: To receive an accurate reading, the strap needs to be in direct contact with the skin on the lower sternum (just below the bust line for women). To use a chest strap transmitter: 1. Carefully dampen the back of the strap with tap water. Important: Do not use deionized water. It does not have the proper minerals and salts to conduct electrical impulses. 2. Adjust the strap and fasten it around your chest. The strap should feel snug, not restrictive. 3. Make sure that the chest strap is right-side-up, lies horizontally across, and is centered in the middle of your chest. 4. Test the chest strap placement by checking the heart rate function on the equipment. If a heart rate is registering, your chest strap placement is correct. If the equipment does not register a heart rate, readjust the strap and recheck the heart rate function. Introducing Users to the P80 Console 41 Using the View Channels and View Buttons There are three primary screen views that make certain information visible during your workout. You can change the look and information provided on the screen by at anytime using the Views button. Workout View – Shows panels, icon bar, and the status bar. This view allows you to focus fully on your workout. Status View – Shows only the status bar and icon bar, leaving the center of the console for media viewing. Media View – Shows only media and the Views and Channel buttons. This view allows you to focus on media. Note: The name of the Channels button changes depending on the media you are using. For example, if you are watching a workout guide, the name of the button will be Videos. PrevaTM Net Featured View – Shows the Internet content and provides full Internet browser access. Changing Screen Views The Views icon appears at the bottom right of the workout screen when the Personal Progress panel is visible. Figure 11: Views icon To get to this panel: Press Quick Start. Press Workouts, select a preset workout, and then press GO. Select the Featured Workout on the Welcome screen by pressing GO. To change views: 1. The default view is the Workout View. Slide the panels side to side on the screen to see the media panel. 2. Press Views twice to see the Status view. 3. Press Views a third time to make the Status Bar disappear leaving only the Media view. 42 Operating and Maintaining the P80 Console Using the Media Panel Use the Media panel to select a media source. To choose a media source: 1. On a Workout Progress panel, touch the Media icon, or slide the right edge of the next panel across the screen. Figure 12: Media icon 2. The Media panel describes the current media selection. Navigate this panel using the buttons to the right of the box. Table 8. Media buttons Button Action Previous Channel Returns you to the previous media source or TV channel. TV Channels Displays the channel list. Workout Guides Displays a list of tutorial videos. iPod® Changes the source to iPod and updates the Media panel. Off Turns off all media. Introducing Users to the P80 Console 43 Connecting and Using Your iPod® You can listen to your favorite music and control your iPod directly from the console. To connect your iPod: 1. Insert the iPod into the connector at the top of the console and place your iPod securely in the pocket provided. The media panel displays the words Now Playing iPod along with the name of the song currently playing. 2. Plug your headphones into the console. Note: Be sure that the headphones are plugged into the console and not the iPod. If they are plugged into the iPod, you will not be able to adjust the volume using the console keys. 3. To pause, touch the pause button. Figure 13: Track buttons 4. To hear a different song, touch the track buttons. 44 Operating and Maintaining the P80 Console Using the Workout Progress Panel Use the Workout Progress panel to customize your workout. This is the first panel that displays once you select a workout or press GO. If you are on the Media panel, there are two ways to return to the Workout Progress panel. To return to the Workout Progress panel: 1. On the Media panel, touch the Workout icon, or slide the right edge of the next panel across the screen. 2. The Workout Progress panel describes the current media selection. There are buttons to the right of the box. Figure 14: Workout Progress icon Table 9. Workout Progress buttons Button Action Workouts Displays a list of goals and preset workouts available on that equipment. Duration Set the length of your workout. Personal Info Enter your age and weight. Target Choose Distance or Calories as a target for your workout session. Maximum distance: 50 miles. Maximum calories: 5000 calories. 45 Introducing Users to the P80 Console Using the Preva Net Icon WARNING For Treadmills: Do not use typing or web surfing features while walking at speeds that exceed a slow and relaxed leisurely pace. Always stabilize yourself by holding a stationary handle bar while using typing or web surfing features. For AMT and EFX: Always stabilize yourself by holding a stationary handle bar while using typing or web surfing features. The PrevaTM Net option provides Internet content and full Internet browser access. You can enabled or disabled this function in your facility systems settings. To open PrevaTM Net: 1. On the Welcome screen, touch Workouts or QuickStart™ to begin a workout. Once your workout begins, the PrevaTM Net icon appears at the bottom of your screen. 2. Touch the PrevaTM Net icon. Figure 15: Preva Net icon 3. On the PrevaTM Net panel, select one of the following options: Featured - displays feeds of specific interest during a workout All - displays a larger selection of feeds Web - opens a browser window Off - turns off the PrevaTM Net feature 46 Operating and Maintaining the P80 Console Chapter 4 Beginning Your Workout CAUTION: If you are using a treadmill, be sure to attach the security clip to your clothing before starting your workout. The P80 console offers many different workout options. The following sections explain the type of workouts available and how to get started using them. Starting a QuickStart™ Workout The QuickStart workout begins your workout in the Manual mode. Default calculations, such as calories burned, are based on a 150 pound (68 kg), 35-year old individual. You can complete a workout using the default values, or you can personalize the settings. To begin exercising immediately: 1. Touch Quick Start. The words Enjoy Your Workout (or Starting Treadmill when using the treadmill) appear on the screen and the Manual workout begins. Note: For treadmills, the equipment begins a three-second count down 3, 2, 1, before the belt starts moving. 2. At any time during a workout, you can press Pause. When you press it, the workout pauses and you can choose to Resume or Finish your workout. If you choose to finish a workout, the Workout Summary screen displays your workout status for that session. 48 Operating and Maintaining the P80 Console Starting a Featured Workout The Featured Workout appears in a panel on the Welcome Screen. Use Featured Workouts to explore the fitness benefits of preset programs and to add variety to your workout. To begin a Featured Workout, touch Go on the Featured Workout panel. Starting a Preset Workout Preset workouts are a great way to tailor your workouts to your fitness goals, stay challenged, and add variety to your sessions. Preset workouts use age and weight to calculate calories and heart rate targets. You can enter this information at the start of the workout. If no information is entered, the workout uses the equipment default settings to calculate workout values. To begin a preset workout: 1. On the Welcome screen, touch Workouts. A Workouts screen appears. 2. Each goal heading on the screen can be expanded to view the workouts available in that goal group. To view available workouts for a particular goal, touch a workout heading for that goal. 3. To start a specific workout, touch the workout name, then touch GO. The words Enjoy Your Workout appear on the screen and the Manual workout begins. Note: For treadmills, the equipment begins a three-second count down 3, 2, 1, before the belt starts moving. 49 Beginning Your Workout 4. Anytime during a workout, you can press Pause. When pressed, the workout pauses and you can choose to Resume or Finish your workout. To continue your workout, touch Resume. If you choose to finish a workout, the Workout Summary screen displays your workout status for that session. Table 10. Preset workout descriptions Goal Workout Details Lose Weight Choose from several courses designed to encourage weight loss. Be Fit Maintain your fitness level so you can stay active and fit. Get Toned Tone your legs. Pick a focus of calf, thigh, or gluteal region. Push Performance Choose a high-intensity interval or work on distance training. Test Your Fitness Test your fitness level based on your age and weight. Ending a Workout To end your workout, press Pause, and then Finish. A summary screen for your current workout appears. The measurements include: Distance Calories Duration Average movement rate/min (or the appropriate measure based on equipment type) Average Heart Rate Personal Information and Progress Settings Before you begin the fitness tests or the heart rate program, you are prompted to enter personal information in the Workout Progress panel. This information may include age, weight, or a length of time for that workout session. The equipment uses this information to compute your energy expenditure during that workout if you are tracking status such as calories or watts. 50 Operating and Maintaining the P80 Console To enter your personal settings: 1. Begin exercising by touching Quick Start™ or selecting Workout. A Workout Progress panel appears on the screen. 2. In the panel, touch Duration to enter how much time you want to exercise. 3. In the panel, touch Personal Info to enter your age and weight. Table 11. Examples of Personal Information settings Setting Setting Options Default Access Value Age 35 Admin/Tech: Enter age as a value or a None range. 170 Admin/Tech: Enter weight as a value or None a range. • Over 85 • 75 - 84 • 65 - 74 • 55 - 64 • 45 - 54 • 36 - 44 • 35 • 25 - 34 • 18 - 24 • Under 18 Weight • Over 310 • 290 - 309 • 270 - 289 • 250 - 269 • 230 - 249 • 210 - 229 • 190 - 209 • 171 - 189 • 170 • 150 - 169 • 130 - 149 • 110 - 129 • Under 110 Detail Beginning Your Workout 51 Adjusting the Workout Intensity To adjust the equipment incline, speed, and/or resistance, use the motion controls located just below the console keys. Figure 16: Motion controls Adjust the motion controls, upward or downward, to change the incline, speed, or resistance. Figure 17: Adjust motion controls up or down Many preset workouts will adjust these settings automatically to meet the workout intensity. At any time during a workout, you can adjust control settings and override the default workout settings. 52 Operating and Maintaining the P80 Console Viewing Your Workout Status While Exercising The Status Bar contains status measurements and is visible across the top of the viewing screen. Information displayed in the Status Bar helps you measure how your body is responding to the exercise session. The default status measurements displayed are: Total Distance Calories Burned Time Remaining Average Speed (displayed as strides per minute, pace, or RPM depending on equipment type) Heart Rate You can modify how a measurement appears in the Status Bar. For example, you can view the length of your exercise session as time elapsed, or as time remaining. There are two ways to modify the display: Change the default value setting. Change the view on the Status Bar. To modify the status measurement using the Status Bar: 1. On the Status Bar, touch the corner arrow on the status category to pull down the menu. 2. On the drop-down menu, touch an alternate display measurement to display in the Status Bar. The alternate measure moves to the top of the Status Bar and replaces the default measurement. The menu closes. 3. Touch the arrow again to retract the menu. 4. Repeat with any status category to customize your workout status view. Note: Administrators and registered service technicians can override status settings. 53 Beginning Your Workout Scoring Your Fitness Workout This information helps you interpret your score for the Test Your Fitness workout. The score for this test is determined by this formula: Rate of oxygen (O2) consumption, in ml per minute, modified for the user’s maximum heart rate (220 - age), divided by the user’s weight in kilograms. Table 12. Fitness score reference tables Low Fitness Level Age Low Fitness Male Low Fitness Female 28 - 39 < 35 < 28 40 - 49 < 35 < 26 50 - 59 < 29 < 24 60 and over < 24 < 22 Medium Fitness Level Age Medium Fitness Male Medium Fitness Female 28 - 39 35 - 42 28 - 33 40 - 49 32 - 39 26 - 31 50 - 59 29 - 36 24 - 29 60 and over 24 - 31 22 - 26 High Fitness Level Age High Fitness Male High Fitness Female 28 - 39 > 42 > 33 40 - 49 > 39 > 31 50 - 59 > 36 > 28 60 and over > 31 > 26