1
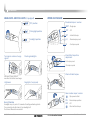
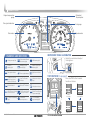
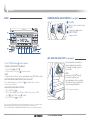
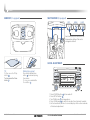
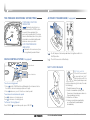
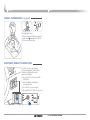
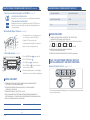
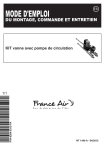
MAINTENANCE
Scheduled Maintenance
Normal Usage
Severe Usage*
Engine Oil & Filter
Replace
7,500 or 12 mos.
Replace
3,750 or 6 mos.
Tire Rotation
Perform
7,500
Perform
7,500
Battery Condition
Inspect
7,500
Inspect
Same As Normal
Drive Belts
1st Inspect
Add.Inspect
60,000 or 72 mos.
15,000 or 24 mos.
Inspect
Same As Normal
HYUNDAI ELANTRA TOURING
Vacuum Hose
Inspect
7,500
Inspect
Same As Normal
Quick Reference Guide
Drive Shaft & Boots
Inspect
15,000
Inspect
7,500 or 6 mos.
Air Cleaner Filter (Engine)
Inspect
Replace
7,500
30,000
Replace
More Frequently
Climate Control Air Filter
(for Evaporator and Blower Unit)
Replace
15,000
Replace
More Frequently
Air Conditioning Refrigerant
Inspect
15,000
Inspect
Same As Normal
Brake Hoses & Lines
Inspect
15,000
Inspect
Same As Normal
Front Brake Disc / Pads, Calipers
Inspect
15,000
Inspect
More Frequently
Rear Brake Disc / Pads
Inspect
15,000
Inspect
More Frequently
Electronic Throttle
Inspect
15,000
Inspect
Same As Normal
Exhaust Pipe & Muffler
Inspect
15,000
Inspect
Same As Normal
Steering Gear Box, Linkage & Boots /
Lower Arm Ball Joint, Upper Arm Ball Joint
Inspect
15,000
Inspect
More Frequently
Suspension Mounting Bolts
Inspect
15,000
Inspect
Same As Normal
Fuel Tank Air Filter
Inspect
Replace
15,000
30,000
Inspect
Replace
Same As Normal
Same As Normal
Automatic Transaxle Fluid
Inspect
40,000 or 48 mos.
Replace
60,000
Coolant
1st Replace
Add.Replace
120,000 or 120 mos.
Replace
30,000 or 24 mos.
Same As Normal
Brake Fluid
Inspect
15,000
Inspect
Same As Normal
Fuel Line, Fuel Hoses & Connections
Inspect
30,000
Inspect
Same As Normal
Manual Transaxle Fluid
Inspect
40,000 or 48 mos.
Replace
80,000
Parking Brake
Inspect
30,000
Inspect
More Frequently
Vapor Hose & Fuel Filler Cap
Inspect
30,000
Inspect
Same As Normal
Fuel Filter
Inspect
30,000
Replace
Same As Normal
Tensioner / Idler - Timing Belt
Inspect when the timing belt is replaced
Valve Clearance
Inspect
60,000
Inspect
Same As Normal
Timing Belt
Replace
90,000 or 108 mos.
Replace
60,000 or 72
mos.
Spark Plugs (Iridium Coated)
Replace
100,000 or 120
mos.
Replace
More Frequently
*See Owner’s Manual for details.
Looking for more detailed information? This Quick Reference Guide does not replace your vehicle’s Owner’s Manual.
If you require additional information or are unsure of a specific issue, you should always refer to the vehicle’s Owner’s
Manual or contact your authorized Hyundai dealer.
The information contained in this Quick Reference Guide was correct at the time of printing; however, specifications and
equipment can change without notice. No warranty or guarantee is being extended in this Quick Reference Guide, and
Hyundai reserves the right to change product specifications and equipment at any time without incurring obligations. Some
vehicles are shown with optional equipment. Specifications apply to U.S. vehicles only. Please contact your Hyundai dealer
for current vehicle specifications.
NP150-82011-B
(Rev 7/23/10)
Printing XX/XX/XX
Roadside Assistance: 1-800-243-7766
www.hyundai.com
Consumer Affairs:
XM® Radio:
1-800-633-5151
1-800-967-2346
Table of Contents
Audio (Steering wheel audio control)
14
AUX, USB and iPod port
15
Basic safety precautions
04
Headlights
and fog lights
Instrument
cluster
Trip
computer
Cruise control
system
Wiper and
washer
Central door lock switch
06
Page08
Page10
Page11
Page18
Page09
Child-protector rear door lock
07
Climate control
13
Clock adjustment
17
Cruise control system
18
Electronic stability control
20
Front seat adjustment
02
Fuel filler lid
07
Headlights and fog lights
08
Headrest adjustment
02
Instrument cluster
10
Instrument panel illumination
11
ON
Occupant classification system
04
Outside rearview mirror
05
Rear seat folding
03
Remote keyless entry
06
Seat belt adjustment (Front seat)
03
Seat warmer
17
Streering wheel audio control
15
Sunroof
16
Tilt and telescopic steering wheel
05
Tire pressure monitoring system
18
Transmission
19-20
Trip computer
11
Wiper and washer
09
MIST
INT
OFF
T
FRON
Outside
rearview mirror
Page05
Tilt and
telescopic
Steering wheel
Page05
Audio
Page14
REAR
OFF
LO
HI
Climate control
Transmission
Seat warmer
Page13
Page19-20
Page17
BEFORE DRIVING
FRONT SEAT ADJUSTMENT
REAR SEAT FOLDING
Forward and backward
Seat cushion height (for driver’s seat)
(if equipped)
Seatback angle
HEADREST ADJUSTMENT
SEAT BELT ADJUSTMENT (Front seat)
Height adjustment
Pull up to raise.
Press button and
push down to lower.
Lock knob
Forward/Rearward adjustment
To adjust the headrest rearward, pull
the headrest all the way forward, then
release.
Pull headrest gently forward to allow
adjustment to 3 different positions.
02 I Quick Reference Guide
HYUNDAI ELANTRA TOURING
Quick Reference Guide I 03
BEFORE DRIVING
OPEN AND CLOSE
BASIC SAFETY PRECAUTIONS
TILT AND TELESCOPIC STEERING WHEEL (if equipped)
Whenever operating the vehicle, make sure that you and your occupants are
properly wearing your seat belts. Small children should always ride in the
rear seat in the appropriate child restraint system (see the Owner’s Manual
for child safety details). Never place children under 13 years old in the front
seats to avoid injury that may result from air bag deployment. Always refer
to the Owner’s Manual for complete safety precaution information.
NOTE
If the driver’s seat belt is not fastened when the ignition key is turned to the
ON or START position, the seat belt reminder light will blink and the warning
chime will sound for approximately six seconds to remind the driver to fasten
the driver’s seat belt.
Tilt
Telescopic
(if equipped)
NOTE: Do not adjust while driving.
1. Push the lever downward.
2. Set the angle and height.
3. Pull the lever upward.
OCCUPANT CLASSIFICATION SYSTEM
OUTSIDE REARVIEW MIRROR (if equipped)
Passenger air bag off indicator
The occupant classification system
will disable the right front passenger’s
air bag under certain conditions (light on).
The light will not illuminate when the
passenger’s air bag is enabled.
Refer to the Owner’s Manual for a
complete description of this system.
Adjusting
Move the selecting switch to the
R (right) or L (left).
Depress the appropriate direction
(
) on the switch.
Middle position
Lock the control.
04 I Quick Reference Guide
HYUNDAI ELANTRA TOURING
Quick Reference Guide I 05
OPEN AND CLOSE
CENTRAL DOOR LOCK SWITCH
CHILD-PROTECTOR REAR DOOR LOCK
Lock ( )
Push the child safety lock to
the lock ( ) position.
Unlock ( )
Allows opening the rear door handle
from inside and outside the vehicle.
All doors will lock
LOC
K
All doors will unlock
REMOTE KEYLESS ENTRY (if equipped)
FUEL FILLER LID
Lock ( )
NOTE
After adding fuel, always reinstall
the fuel cap onto the filler neck by
rotating it clockwise until it clicks
one time.
Failure to do this may result in
the Check Engine light illuminating.
Press the button
Once - Lock
Twice - Confirmation chirp
Unlock ( )
Press the button
Once - Unlock driver’s door
Twice - Unlock all doors
Tailgate unlock (
)
NOTE: Tailgate does not pop open
Alarm (
)
Press and hold
Press any button to turn off panic
06 I Quick Reference Guide
HYUNDAI ELANTRA TOURING
Quick Reference Guide I 07
LIGHT AND WIPER
HEADLIGHTS AND FOG LIGHTS (if equipped)
WIPER AND WASHER
Windshield wiper / washer
OFF position
MIST
Parking light position
OFF
ON
T
MIS
OFF
NT
FRO
- Intermittent wipe
LO
LO
- Normal wiper speed
HI
HI
- Fast wiper speed
INT
LO
HI
Headlight position
Turn signals and lane change
signals
OFF - Off
INT
REAR
OFF
INT
MIST - Single wipe
Intermittent wipe time
adjustment
Flashing headlights
ON
MIS
T
INT
OFF
NT
REAR
Fast wiper speed
OFF
INT
FRO
Slow wiper speed
LO
HI
Wash with brief wipes
Will signal 3 times with half
movement of stalk for lane change.
ON
High beam
MIST
Fog lights (if equipped)
OFF
T
FRON
REAR
OFF
INT
INT
LO
HI
Rear window wiper / washer
- Spray washer fluid
ON
Escort Function
Headlights may stay on for 30 seconds after exiting and locking vehicle.
Press remote lock button twice to turn headlights off.
See Owner’s Manual for more detail.
08 I Quick Reference Guide
T
MIS
OFF
NT
FRO
INT
REAR
OFF
INT
LO
HI
HYUNDAI ELANTRA TOURING
ON - Normal wipe operation
OFF - Off
- Wash with brief wipes
Quick Reference Guide I 09
INSTRUMENT CLUSTER
Engine temperature
gauge
Odometer/
Trip computer
Turn signal indicators
Fuel gauge
Tachometer
Speedometer
INSTRUMENT PANEL ILLUMINATION
WARNINGS AND INDICATORS
Air bag warning light
Parking brake & Brake
fluid warning light
ABS warning light
Seat belt
warning light
Charging system
warning light
Engine oil pressure
warning light
Turn signal indicator
Front fog light indicator*
High beam indicator
Low Tire Pressure
Indicator
Malfunction indicator
light
Cruise SET indicator*
Shift pattern indicator
TPMS (Tire Pressure
Monitoring System)
malfunction indicator
Cruise indicator*
Rotate the control knob to adjust
the brightness.
TRIP COMPUTER (if equipped)
Press the TRIP button to select
function as follows:
RANGE
(Electronic Stability
ESC ESC
Control) indicator
Low fuel level warning
light
ESC (Electronic Stability
Control) OFF indicator
Electric Power Steering
system warning light
Low washer
warning indicator
Door and tailgate
open warning light*
Distance
to empty
AVG.
Average fuel
consumption
* : if equipped
AVG.
Tripmeter
10 I Quick Reference Guide
HYUNDAI ELANTRA TOURING
Average speed
Quick Reference Guide I 11
CLIMATE CONTROL
Mode buttons
MAX A/C button
Rear window defroster button
Air intake control button
Front window defroster button
Fan speed control knob
Temperature control knob
Air conditioning button
DEFROSTING / DEFOGGING
REAR WINDOW DEFROSTER
AIR INTAKE CONTROL
MODE SELECTION
1. Press the front
windshield defrost
control.
2. Set the temperature
control to the warmest
setting.
Outside (fresh)
air position
3. Set the fan speed to
the highest setting.
Press to activate/deactivate
the rear defroster.
12 I Quick Reference Guide
Recirculated
air position
HYUNDAI ELANTRA TOURING
Changing the direction of
the air flow as follows:
MAX A/C-Level
Floor Level
Face Level
Floor/
Defrost-Level
Bi-Level
Defrost-Level
Quick Reference Guide I 13
MULTIMEDIA
AUDIO
STEERING WHEEL AUDIO CONTROL (if equipped)
G VOLUME
Raises or lowers speaker volume.
M MODE
Changes the audio source.
; SEEK / PRESET
Changes station.
AUX, USB AND iPod PORT (if equipped)
Press POWER button
Use the input jack to connect an
external audio device and listen
to it through the audio system in
your vehicle.
to turn radio on.
s TUNING / LISTENING TO CHANNELS
1. Press FM/AM or XM® .
2. Rotate Audio Control knob to desired channel.
NOTE
A clear view of the southern sky is recommended to ensure XM ® radio reception.
s SETTING PRESET MEMORY BUTTONS (FM/AM/XM®)
Press and hold any preset button (1-6) until audible beep is heard
to store current channel.
s ADJUSTING THE SOUND CONTROL
1. Press TUNE knob .
2. Select “Bass, Middle,Treble, Balance, Fader” by pressing on TUNE
knob . Rotate TUNE knob to adjust.
3. Press TUNE knob when done.
NOTE
To operate your iPod® through
the vehicle’s audio system,
a Hyundai adapter cable is required.
This cable can only be purchased
at your local Hyundai dealer.
iPod® is a trademark of Apple Inc.
Please refer to your Owner’s Manual for more detailed information on how to use your audio system.
Complimentary XM® subscription ends three months following the vehicle date of sale.
Please contact XM® Radio at 1-800-XM-RADIO (1-800-967-2346) to renew your XM® subscription.
14 I Quick Reference Guide
HYUNDAI ELANTRA TOURING
Quick Reference Guide I 15
FEATURES
SUNROOF (if equipped)
SEAT WARMER (if equipped)
OFF
HIGH
LOW
Each time you push the button, the
temperature setting of the seat is
changed as follows:
CLOCK ADJUSTMENT
Tilt
Sliding the sunroof
To tilt up, press the Tilt Up
button .
To close, press the Close
button .
Press and hold Slide Open
button to desired opening,
then release.
To close, press and hold the
Close button .
Outside Temp
86 F
1.
2.
3.
4.
5.
16 I Quick Reference Guide
Clock
PM
2:19
Press POWER button to turn radio off.
Press SETUP button .
Turn TUNE knob to change hours.
Press TUNE knob to switch to minutes, then turn knob to adjust.
Unit automatically returns to normal display within a few seconds
of final clock adjustment.
HYUNDAI ELANTRA TOURING
Quick Reference Guide I 17
FEATURES
DRIVING
TIRE PRESSURE MONITORING SYSTEM (TPMS)
AUTOMATIC TRANSMISSION (if equipped)
TPMS MALFUNCTION
INDICATOR
Illuminates when there is a
malfunction with the TPMS system.
Inspect all tires and adjust tire
pressure to specification. If the lamp
remains illuminated, have the system
checked by an authorized Hyundai
dealer as soon as possible.
LOW TIRE PRESSURE
INDICATOR
Illuminates if one or more of your
tires is significantly under-inflated.
1
(
) : To shift, depress the brake pedal when the ignition switch is in
the ON position.
CRUISE CONTROL SYSTEM (if equipped)
(
Cruise indicator
) : The shift lever can be shifted freely.
SHIFT LOCK RELEASE
Shift-lock override
If the shift lever cannot
be moved from the P
(Park) position with the
brake pedal depressed,
continue depressing the brake, then do
the following:
Cruise set indicator
To set a cruising speed
1. Press and the CRUISE indicator will illuminate in the instrument cluster.
Accelerate to desired cruising speed (above 25 mph).
2. Press and remove your foot from the accelerator pedal.
1. Carefully remove the cap .
2. Insert a screwdriver (or key) into
the access hole and press down on
the screwdriver (or key).
3. Move the shift lever.
4. Have your vehicle inspected by
an authorized Hyundai dealer
immediately.
To accelerate or decelerate speed
Press
Press
to increase set cruising speed.
to decrease set cruising speed.
To Cancel Cruising Speed
Press CANCEL
or press brake pedal, or press ON/OFF
18 I Quick Reference Guide
.
HYUNDAI ELANTRA TOURING
Quick Reference Guide I 19
DRIVING
MEMO
MANUAL TRANSMISSION (if equipped)
Engaging reverse
When shifting into R (Reverse) gear, lift
the collar tab up and then shift into
R (Reverse) gear position.
ELECTRONIC STABILITY CONTROL (ESC)
The ESC system is an electronic
system designed to help the driver
maintain vehicle control under
adverse conditions.
s To turn the ESC off, press the ESC
OFF button.
s ESC off indicator will display in
instrument cluster.
s To turn ESC on, press it again.
s System defaults to ON position at start.
20 I Quick Reference Guide
HYUNDAI ELANTRA TOURING
Quick Reference Guide I 21
ELANTRA TOURING CUSTOMER DELIVERY CHECK LIST (continued)
Tire Pressure Monitoring System (TPMS) – Page 18
LOW TIRE PRESSURE INDICATOR
Illuminates if one or more of your tires is significantly under-inflated.
TPMS MALFUNCTION INDICATOR
Illuminates when there is a malfunction with the TPMS system.
Have the system checked by an authorized Hyundai dealer as
soon as possible.
ELANTRA TOURING CUSTOMER DELIVERY CHECK LIST
HYUNDAI OWNER
DEALERSHIP NAME
SALES CONSULTANT
DATE
VIN
PREVIOUS VEHICLE
Windshield Wiper / Washer – Page 09
MIST
OFF
ON
MIST
OFF
T
FRON
INT
s To activate wipers move the switch down to
one of the three positions (INT, LO, HI).
s To adjust "INT" speed rotate dial.
REAR
OFF
INT
LO
HI
LO
HI
s To spray washer fluid, pull lever toward you.
s Push lever up for a single wiper pass.
BEFORE DELIVERY
o CONFIRM “GOOD BATTERY” AND STAPLE TEST TICKET HERE
ß MIDTRONICS TEST 600A(2.4L) OR 550A(2.0L)
o VERIFY ALL TIRE PRESSURES ARE 32PSI (5.5JХ15, 6.0JХ16 or 7.0JХ17)
LF
LR
RF
RR
o VERIFY ALL REMOTE FUNCTIONS: LOCK / UNLOCK / ALARM
o VERIFY VEHICLE IS CLEAN, IN GOOD CONDITION,
FREE OF CHIPS AND SCRATCHES
Clock Adjustment – Page 17
o ENSURE FLOORMATS ARE SNAPPED INTO PLACE (if applicable)
1. Press POWER button
2. Press SETUP button
Outside Temp
86 F
Clock
PM
2:19
3. Turn TUNE knob
to turn radio off.
.
to change hours.
4. Press TUNE knob to switch to minutes,
then turn knob to adjust.
WALK THE CUSTOMER THROUGH EACH OF
THE FOLLOWING KEY DELIVERY FEATURES
Manual Climate Control - Pages 12 ~13
5. Unit automatically returns to normal display
within a few seconds of final clock adjustment.
DURING DELIVERY
o DEMONSTRATE AUDIO SYSTEM OPERATION INCLUDING PRESETS
(OPTIONAL - iPod ® CABLE AVAILABLE)
o CONSIDER OWNER’S PREVIOUS VEHICLE TO EXPLAIN WIPER/
HEADLIGHT FUNCTIONS
ß To speed up front windshield defogging, increase temperature and fan speed and
o DEMONSTRATE HOW TO SET THE CLOCK
o EXPLAIN AND REVIEW FIRST SERVICE PROCEDURE AND AMERICA’ S
BEST WARRANTY—PROVIDE SERVICE REPRESENTATIVE BUSINESS CARD
o ASK IF CUSTOMER HAS ANY QUESTIONS
Sales Consultant
Date
Sales Manager
Customer
Date
@
Email
Date
then select defrost button.