1
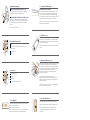
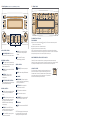
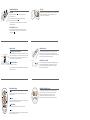
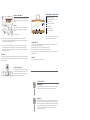
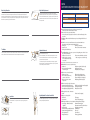
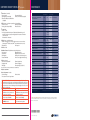
AZERA
QUICK REFERENCE GUIDE
INSTRUMENT PANEL
3: Adjustable Pedals
Turn the ignition key to the ON position with the selector lever in the
Park (P) position and push the switch.
ESC
OFF
16
9
If you move the
portion of the switch, the pedals move rearward.
If you move the
portion of the switch, the pedals move forward.
10
5
4
14
7
2
4: Headlights and Fog Lights
8
15
1
A HEADLIGHT SWITCH
AUTO
To operate the headlights, turn the switch on the end of the lever:
OFF – Headlights are off
– Parking lights
– Headlights
AUTO – Auto Light (If Equipped)
NOTE: The ignition must be in the ON position to turn on the headlights.
ON
3
A
OFF
OFF
6
11
High Beam Activation: Push the lever forward
Flash-To-Pass Feature: Pull the lever towards you and release
AUTO
11
ON
OFF
B FOG LIGHT SWITCH
OFF
B
13
Rotate the switch to the ON position.
NOTE: Fog lights will only function on low beam.
12
1: IMS (Integrated Memory System) (If Equipped)
SET
1
2
The Integrated Memory System controls are located on the
driver's door trim.
MEMORIZING DRIVER POSITION
1. Place the shift lever into Park (P) while the ignition switch is ON.
2. Adjust the driver's seat, outside rearview mirrors and steering wheel
column (with electric tilt and telescopic type) to the
desired position.
3. Push the SET button on the IMS until the signal beeps.
4. Within five seconds, push button 1 or 2 until the signal beeps twice.
The beep confirms that the positions are memorized in the I.M.S.
MIST
A
MIST
OFF
AUTO
F
OFF
LO
AUTO
PULL
HI
S
LO
HI
5: Windshield Wiper / Washer
A WIPER SPEED
The windshield wiper switch has four positions: intermittent or AUTO
(if equipped), low speed, high speed and mist. For mist (single wipe),
move the lever up one position.
B
MIST
OFF
AUTO
TO ACTIVATE THE MEMORIZED POSITION
B INTERMITTENT OPERATION
F
LO
1. Place the shift lever into Park (P) while the ignition switch is ON.
2. When you push button 1 or 2, the driving position will be
With the windshield wiper switch in the INT position, the interval
between wipes can be varied by turning the intermittent wiper switch.
PULL
HI
S
automatically adjusted to the position recorded for that button.
See Owner’s Manual for conditions in which IMS will not operate.
C
MIST
OFF
AUTO
C WIPE / WASH OPERATION
F
LO
To use the windshield washer, pull the wiper / washer lever toward
you. When the washer is operated, the wipers automatically make
two passes across the windshield. The washer continues to operate
until the lever is released.
PULL
HI
S
2: Electronic Stability Control (ESC)
ESC
OFF
The ESC system is designed to help the driver maintain vehicle
control under adverse driving conditions. The indicator light in the
instrument panel will illuminate for 6 seconds after the key is turned
ON. If the light remains illuminated, take your car to a Hyundai dealer.
If you turn the system off by pressing the ESC switch, the ESC OFF
indicator will illuminate and stay on. In the ESC OFF mode, the
stability control will be deactivated. Adjust your driving accordingly.
To turn the system back on, press the switch again. The ESC OFF
indicator will turn off.
D
MIST
OFF
AUTO
F
LO
HI
MIST
OFF
PULL
AUTO
S
LO
HI
D AUTO WIPER OPERATION (If Equipped)
When the windshield wiper switch is placed in the AUTO position, the
rain sensor, located on the windshield behind the rearview mirror,
senses the amount of rainfall and controls for the appropriate length
of the intervals between wipes appropriately.
6: Adjustable Steering Wheel
10: Occupant Classification System
A POWER ADJUSTABLE STEERING COLUMN (If Equipped)
To adjust the steering wheel to the desired position, operate the
adjusting switch on the left side of the steering wheel.
A
B MANUAL ADJUSTABLE TILT AND TELESCOPIC STEERING COLUMN
Pull the lever downward to unlock the steering wheel. Adjust the
steering wheel up or down and forward or backward to the desired
position. After adjustment, securely tighten the lever by pushing
it upward.
B
PASSENGER AIR BAG OFF INDICATOR
PASS AIR BAG OFF
The indicator will illuminate when you turn the ignition key to ON or
START. The light will not illuminate when the passenger's air bag is
enabled. The occupant classification system will disable the right
front passenger's air bags under certain conditions (light on). Refer to
the Owner’s Manual for a complete description of this system.
NOTE: The driver's air bag and the side impact air bag are not part of
the occupant classification system.
NOTE: Do not adjust while driving.
11: Seat Warmer (If Equipped)
A
7: Steering Wheel Audio Controls
MODE
A MODE
VOL
B SEEK – Press once to change tracks. Press and hold to fast
B
M
U
T
E
D
forward or rewind.
C VOLUME (
/
The front seats can be electrically heated individually when the
ignition switch is on. When the switch is on, a number ranging from 1
to 5 is displayed on the switch (5 = warmest setting). To turn off the
seat warmer, set the switch to 0.
NOTE: The seat warmer may not operate if the ambient temperature
is warm.
)
D MUTE
12: Transmission / Shiftronic™ (If Equipped)
8: Cruise Control
A
RES
ACCEL
D
B
CANC
EL
C
ON
OFF
A RES (Resume) / ACCEL
B CANCEL
C COAST / SET
COAS
T
SET
D ON / OFF – Press to activate the system.
Whether the vehicle is stationary or in motion, sports mode is selected
by pushing the selector lever from the D position into the manual
gate. To return to D range operation, push the selector lever back into
the main gate. In sports mode, moving the selector lever backwards and
forwards can make rapid gearshifts simple. In contrast to a
manual transaxle, the sports mode allows gearshifts with the
accelerator pedal depressed.
UP (+): Push the lever forward once to shift up one gear.
DOWN (-): Pull the lever backwards once to shift down one gear.
SKIP: By rapidly moving the selector forward or backward twice, it is
possible to skip one gear.
NOTE: Shift lever in Neutral (N), Drive (D), or Reverse (R) position still
allows for the ignition key to be turned off.
13: Power Rear Sunshade (If Equipped)
9: Clock Adjustment
There are three control buttons for the digital clock. Their functions are:
H
M
R
3:27
H: Push “H” to advance the hours.
M: Push "M" to advance the minutes.
R: Push "R" to reset minutes to ":00". Continue to press and hold the
“R” button to toggle between military time and standard time.
The rear window shade switch is located on the center console.
Press the curtain switch to raise or lower the rear window curtain.
NOTE: When the shift lever is shifted into Reverse (R), the rear
window curtain will automatically lower if the curtain is in the
raised position.
15: Climate Control
14: Audio System (AM / FM / Cassette / 6-CD / MP3 Audio System Shown)
SCAN P
A
B FM/AM
CD
O
3
A
2
1
TEMP
TEMP
INFO N
C
AUDIO
PUSH
PUSH
CONTROL ENTER
POWER
D
SEEK
TRACK
VOLUME
G
E
1 FF
2 RDM
3
4 REW
5 RPT
6 MARK
F
H
DIR
CAT
K
FILE
TUNE
L
AUDIO SYSTEM CONTROLS
P SCAN ALL – Press and hold SCAN for
2 seconds to scan through the preset
channels.
D PUSH POWER/VOLUME – Push to turn
the radio on/off. Turn to adjust the volume.
N INFO – Press INFO to display
title/artist/category information.
AM/FM RADIO CONTROLS
M TUNE – Press to adjust the audio settings:
Equalizer, Bass, Midrange, Treble, speaker
Balance and speaker Fade.
B FM/AM – Press to select the radio FM/AM
frequency band.
F SEEK/TRACK – Press to find the
next/previous radio station on the
frequency band.
L PRESET STATION SELECT BUTTONS –
Save up to six stations in each audio mode
(AM/FM1/FM2/XM1/XM2/XM3).
CD/MP3 CONTROLS
A
(CD EJECT) – Press to stop and eject
a CD.
K DIR/CAT – Press to change MP3 directories.
J BOOKMARK
E RDM (RANDOM) – Press to change the
CD mode: Random Disc, Random Directory
(MP3 only) and Random Off.
F SEEK/TRACK – Press to select the
XM RADIO CONTROLS
C XM – Press XM to activate XM mode. Press
again to scroll through XM1/XM2/XM3
bands.
M CHANNEL – To change channels, turn the
TUNE knob. To select the channel, press
the TUNE knob. Alternatively, use the
SEEK/TRACK arrows to move through
channels rapidly.
K CATEGORY – Use the DIR/CAT arrow
buttons to change the music genre. Press
the TUNE knob to make the selection.
P SCAN – Press SCAN to only play the first
10 seconds of each channel.
AUTO
OFF
MODE
A/C
DUAL
M
J
I
PASS
next/previous track on the CD.
G FF – Press and hold to fast forward.
H REW – Press and hold to rewind.
I RPT (REPEAT) – Press to change the CD
mode: RPT Track, RPT DIR, RPT OFF.
M FILE SEARCH
O CD/MP3 – Press to activate the CD/MP3
mode.
NOTE: The time it takes for the audio system
to recognize an MP3 CD may vary greatly
depending on the folder layout on the CD.
TO REMOVE FROST OR FOG ON
THE WINDSHIELD:
1. Set the air flow control to the defrost
position. (The A/C will turn on automatically and the
"Fresh" mode will be activated.)
2. Set the fan speed control to the maximum speed.
3. Set the temperature control to the desired setting.
NOTE: If the air conditioner filter for the evaporator blower is not replaced per the scheduled
maintenance section, excessive window fogging may result. This filter is located in the evaporator
housing behind the glove box. Your dealer can replace this filter for you.
DUAL TEMPERATURE CONTROL SELECTION SWITCH
Press the DUAL button to operate the driver and passenger side temperatures individually
Press the DUAL button again to deactivate DUAL mode (The indicator light on the button goes off).
The passenger side temperature will be set to the same as the driver side temperature.
AIR QUALITY SYSTEM
The air quality system incorporates a sensor that measures the level of
pollution in the outside air. The system will automatically switch over to
recirculated mode if the level of air pollutants increases. Press the automatic
air recirculation button to turn the air quality system on. The light on the
button be illuminate when the system is activated.
A
INSTRUMENT PANEL (CONTINUED)
ADDITIONAL FEATURES & INFORMATION
Power Front Seat Adjustment (If Equipped)
16: Trip Computer/Odometer
A LUMBAR CONTROL
TRIP COMPUTER
Trip
ODO
2457 mi
Distance
To Empty
Pushing in the MODE switch when the ignition switch is in ON
position changes the display as follows:
TRIPMETER
DISTANCE TO EMPTY
AVERAGE SPEED
DRIVE TIME
AVERAGE FUEL CONSUMPTION
B SEATBACK ANGLE
Move the control forward or backward to recline the seatback.
151.9 mi
To adjust the lumbar support, press the switch.
C SEAT HEIGHT AND FORWARD / BACKWARD
A
B
Raising/lowering the front of the control will raise/lower the front
part of the cushion. Raising/lowering the back of the control will
raise/lower the rear part of the cushion.
C
170 mi.
ODO
2457 mi
ODO
2457 mi
The windows may be opened by depressing the appropriate window
switch and closed by pulling up on the switch.
*To reset the displayed distance to 0 while viewing TRIP A or TRIP B, press
the reset switch for a few seconds.
TO
AU
19 MPH
Power Windows
With the key ON, press the MODE switch to toggle through the
following display modes:
ODO: Records the total distance traveled in miles.
TRIP A: Total distance traveled since the last tripmeter reset.*
TRIP B: Total distance traveled since the last tripmeter reset.*
TO
AU
Average
Trip Odometer
AUTO UP / DOWN (FRONT WINDOWS)
To fully open the window automatically, press the switch fully down.
To fully close the window automatically, pull the switch fully up.
NOTE: Ignition switch must be on.
Window Lock Switch
Elapsed
Time
08:04
ODO
2457 mi
To disable the passenger front and rear power windows, press the
window lock switch. To revert to normal operation, press the window
lock switch a second time.
NOTE: Ignition switch must be on.
Average
Immobilizer System
ODO
2457 mi
The immobilizer system is an anti-theft device, designed to deter automobile
theft. Please refer to your Owner’s Manual for more information.
C
M
B
IR
R
O
R
L
R
A
Outside Rearview Mirrors
Fuel Cap
ADJUSTING
1. Move the select switch A to right or left to activate the
After adding fuel, always reinstall the fuel cap fully and make sure it
clicks at least three times. Failure to do this may result in the
“Check Engine” light illuminating.
corresponding mirror.
2. Adjust the mirror angle by depressing the appropriate
perimeter switch as illustrated. B
3. Place the select switch in the middle position to deactivate
the perimeter switch.
POWER FOLDING (If Equipped)
Both left and right outside rearview mirrors can be folded for
parking in narrow areas by pressing the outside rearview mirror
folding switch. C
Sunroof Controls
A OPENING/CLOSING THE SUNROOF
B
TILT
UP
Press the SLIDE OPEN button momentarily to activate the one-touch
feature. Press the button for less than .5 second intervals to move the
sunroof one step at a time. To close the sunroof, press the TILT UP
button and hold it until the sunroof is closed.
TO
AU
SLIDE
OPEN
Passenger
AUTOMATIC DOOR LOCKING
AU
TO
B TILTING THE SUNROOF
Press the TILT UP button.
To close the sunroof, press the SLIDE OPEN button and hold it until
the sunroof is closed.
Remote Keyless Entry
A
B
A LOCK
Press to lock all doors and arm the alarm. Press again to hear
confirmation chirp.
B UNLOCK
C
D
The central door locking switch is located on the driver's and front
passenger's armrest. It is operated by depressing the door lock
switch. If any door is open when the switch is depressed to the LOCK
position, the door will remain locked when closed.
Driver
TO
AU
A
Central Door Locks
Press to disarm the alarm and unlock the driver’s door. Press again
within four seconds to unlock all doors.
C TRUNK UNLOCK
Press for longer than one second to release the trunk lid.
D PANIC
Press to activate the horn and flashing lights for 30 seconds. Press
again to turn off panic mode.
LH
Your Hyundai is equipped with a feature that will automatically lock
all the doors when the Selector Lever is shifted to the D (Drive)
position and the brake pedal is depressed. See your Hyundai
dealer to configure this feature.
Child-Protector Rear Door Lock
To engage the child-protector feature so that the door cannot be
opened from the inside, move the child-protector lever to the
LOCK position and close the door. Move the lever to the
UNLOCK position when normal door operation is desired.
To open the door from the outside, pull the outside door handle.
ON
OFF
Rear View Mirror/Compass/HomelinkB
Trunk Lid Control Button
A Homelink® Channel 1 Button
The trunk lid control button, located in the vehicle
glove box, is used to prevent unauthorized access to
the trunk.
B Homelink® Channel 2 Button
C Status Indicator LED
H
LOCKING
To activate the trunk lock system so that the trunk can
only be opened with the master key, perform the
following:
C
A
B
1. Open the glove box.
F Dimming On/Off Button
E
D
F
G
3. Close the glove box and lock the glove box with the master key. When leaving a key with
a parking lot attendant or valet, perform steps 1 to 3 above and leave the sub key with the
attendant. The sub key can start the engine and operate door locks only. The trunk can never
be opened with the sub key.
RELEASING
To release the trunk lock feature, open the glove box with master key and set the trunk lid control
button to the ON position (depressed). In this position the trunk will open with the trunk lid release
lever or transmitter.
G Compass Control Button
H Display
To set or operate your Homelink®, refer to your
Owner’s Manual for detailed instructions.
2. Set the trunk lid control button to the OFF position (not depressed). In the OFF position,
the trunk cannot be unlocked with the trunk release lever or trunk open button of transmitter.
It can only be opened using the master key.
D Homelink® Channel 3 Button
E Rear Light Sensor
COMPASS FUNCTION
The Compass can be turned ON and OFF and will remember the last state when the ignition is
cycled. To turn the display feature ON/OFF:
1. Press and release the button to turn the display feature OFF.
2. Press and release the button again to turn the display back ON.
Additional options can be set with press and hold sequences of the button and are detailed in
the Owner’s Manual.
HOMELINK3
See your Owner’s Manual for more information
TO UNLOCK USING THE KEY
To open the trunk lid, insert the key into the key slot
located on the underside of the trunk lid and turn it
clockwise to unlock. The trunk compartment light
illuminates when the trunk lid is opened.
Two Types Of Keys
MASTER KEY (M)
M
This key is for general use. It will open all locks on your vehicle. One side of
the key has the Hyundai logo and the other side has the "M" symbol.
SUB KEY (S)
S
Similar to the master key, this key will only function in the ignition and the
door locks, but it will not operate the trunk and the glove box. One side of the
key has the Hyundai logo and the other side has an "S" symbol. Leaving your
sub key with a parking attendant will ensure that your vehicle's trunk, trunk
lid release, glove box compartment and rear trunk access may not be
unlocked in your absence.
AZERA
CUSTOMER DELIVERY CHECK LIST: SALES COPY
Basic Safety Precaution
Wiper Blade Replacement
Whenever operating the vehicle, make sure that you and your occupants are properly wearing your
seat belts. Small children should always ride in the rear seat in the appropriate child restraint
system (see the Owner’s Manual for child safety details). Never place children under 13 years old in
the front seats to avoid injury that may result from air bag deployment. Always refer to the Owner’s
Manual for complete safety precaution information.
To replace the wiper blades, turn the ignition on and place the
windshield wiper switch in the LO position. Turn the ignition switch
off when the windshield wiper is in the fully up position. Remove the
windshield wiper blade with the LOCK lever pressed. Replace with a
new wiper blade.
HYUNDAI OWNER
DEALERSHIP NAME
SALES CONSULTANT
DATE
VIN
Tire Inflation
Check tire pressure at least once a month when the tires are cold. Refer to the tire pressure label for
correct pressure. See the Owner’s Manual for the correct tire pressure label location.
Adjustable Headrests
To raise the headrest, pull it up.
To lower the headrest, push it down while pressing the lock knob.
To remove the headrest, raise it as far as it can go, then press the
lock knob while pulling upward.
Tilt the headrest forward to three different positions by pulling the
headrest forward. To adjust the headrest rearward, pull it fully forward
to the farthest position and release it.
Exterior – Walk around vehicle; check for cleanliness, dents and scratches.
• Confirm tire pressure and oil level has been checked.
Interior – Check for loose papers and cleanliness.
• Assure audio system is at appropriate level, driver’s seat is back and tilt steering is in the
up position.
The Delivery – Walk around vehicle with customer; point out locking fuel filler lid. Proceed
to Trunk area.
✓ Trunk – Use remote to open trunk. Demonstrate key operation and trunk release.
❏
Point out large opening and low loading height. Also locate:
❏ Trunk light
❏ Emergency trunk release
❏ Spare tire/tools
❏ Rear seat release knobs - demonstrate
❏ Emergency fuel filler lid release
✓ Second Row Seating – Use remote to open rear doors by pushing remote “unlock” selector
❏
twice. Point out/demonstrate:
❏ Child-protector rear door lock
❏ Center armrest, drink holders, door bottle
❏ Child seat anchors, seat tether
holders, storage areas, seat back storage
anchors and automatic locking
rear seatbelts
Exit second row, lock car with remote and proceed to Driver’s area.
✓ Driver’s Area – Use remote to open driver’s door.
❏
❏ Adjust seat
❏ Adjust steering wheel (tilt/telescopic)
❏ Fasten seatbelt/adjust shoulder
❏ Adjust active headrest
belt anchor height
❏ Adjustable pedals (if equipped)
■ Driver’s door - point-out/demonstrate:
❏ Trunk remote release
❏ Power windows/window lock/
power door locks/release
❏ Mirror switch – have customer
adjust mirrors
❏ Bottle holder and indoor storage
❏ Remote locking fuel filler lid release
❏ Power folding mirrors (if equipped)
❏ IMS (Integrated Memory System)
■ Driver’s controls (left to right) – demonstrate:
❏ Instrument Panel illumination switch
❏ ESC Electronic Stability Control (if equipped)
❏ TCS Traction Control System (if equipped)
❏ Turn signals (left/right)
❏ Headlights (low/high/high beam flash)
❏ Wiper/washer controls
Cup Holders
Height Adjustable Front Seat Shoulder Belt
Cup holders are located on the main console and in the center of the
rear seat armrest. The cup holder can be opened by pushing at its
top edge.
To raise the height adjuster, pull it up. To lower, push it down while
pressing the height adjuster button.
■ Steering wheel controls – demonstrate:
❏ Audio
❏ Cruise Control (if equipped)
■ Gauges – point out/explain:
❏ Tachometer
❏ Speedometer
❏ Fuel gauge
❏ Coolant temperature gauge
■ Warnings and indicators – point out/explain the following indicators and lights:
❏ Check engine – Malfunction Indicator
❏ Immobilizer warning light
Light (MIL)
❏ Automatic transmission position indicator
❏ Airbag warning
❏ Charging system warning
❏ Anti-lock brake system (ABS) (if installed)
❏ Trunk lid open
❏ Seatbelt warning light (driver’s side)
❏ Door ajar
❏ Turn signal indicator
❏ Low fuel level
❏ High beam indicator
❏ Front fog light indicator
CUSTOMER DELIVERY CHECK LIST (CONTINUED)
✓ Driver’s Area – (continued)
❏
❏ Low oil pressure
❏ Parking brake/Low brake fluid
❏ Electronic Stability Control (ESC) indicator
(if equipped)
❏ Low washer fluid level
❏ Cruise control indicators (if equipped)
■ Trip Computer – press button repeatedly to cycle through display
❏ Distance to empty
❏ Average speed (MPH)
❏ Average fuel consumption (MPG)
❏ Distance traveled
✓ Center Stack
❏
❏ Clock – set clock
❏ OCS (Occupant Classification System) – Explain that children under the age of 13
must ride in the rear seat, properly wearing seatbelts. Refer customer to information
in Owner’s Manual.
❏ Hazard switch – demonstrate
■ Audio System – explain/demonstrate:
❏ Radio – Demonstrate/preset one station. Have customer set one or more stations.
Demonstrate XMTM Satellite controls (XMTM comes with 3 months of free service).
❏ Equalizer (EQ)
❏ CD operation
■ Climate Controls
✓ Additional Features – Explain/demonstrate the following features:
❏
❏ Seat warmers
❏ Illuminated glove box
❏ Transmission
❏ Bag hook (side of center console)
❏ Parking brake
❏ Passenger door bottle and storage area
❏ Center drink holders
❏ Center console (upper and lower storage)
■ Overhead console
❏ Rear view mirror/Homelink>
❏ Sunglass holder
❏ Map light
❏ Sun visor/vanity mirror
❏ Sunroof (if equipped)
❏ 3-way dome light (on/off/door)
Have customer release hood using Hood Release (left side/under dash).
✓ Engine Compartment
❏
✓ Service Department – Introduce
❏
❏ Service Manager
❏ Set customer’s first service appointment
❏ Service Advisor
AUTO LOCK/AUTO UNLOCK – Your new Hyundai Azera is equipped with an Auto Door
Lock and Unlock feature. This feature can automatically lock and unlock all the vehicle’s doors
when a pre-selected condition has been met. To help us tailor the vehicle to your preferences,
please take a moment to review the following user-selectable settings for the Auto Door Lock
and Auto Door Unlock feature:
■ Auto Lock
■ Auto Unlock
❏ Disabled – The Automatic Door Lock feature ❏ Disabled – The Automatic Door Unlock feature
is disabled. (Factory Setting) Standard Power
is disabled. (Factory Setting) Standard Power Door
Door Lock function is not affected.
❏ Shift Lever-Linked – Doors lock when the
shift lever is placed in Drive (D).
❏ Speed – Doors lock when the car reaches
12.4MPH (20 km/h).
Sales Consultant
MAINTENANCE
Normal Usage
Severe Usage
Steering Gear Box, Linkage & Boots /
Lower Arm Ball Joint
Inspect
7.5K
Inspect
More Frequently
Fuel Lines, Fuel Hoses & Connections
Inspect
7.5K
Suspension Mounting Bolts
Inspect
7.5K
Vapor Hose and Fuel Filler Cap
Inspect
7.5K
Engine Oil and Filter
Replace
7.5K
Replace
3K
Air Conditioner Filter (for Evaporator and
Blower Unit)
Replace
every
12 mos.
or 10K
Inspect
More Frequently
Replace
30K
Air Conditioning Refrigerant
Inspect
15K
Automatic Transaxle Fluid
Inspect
Replace
15K
105K
Brake Hoses and Lines
Inspect
15K
Brake Pads, Calipers and Rotors
Inspect
15K
Inspect
More Frequently
Driveshafts and Boots
Inspect
15K
Inspect
7.5K
Exhaust Pipe and Muffler
Inspect
15K
Power Steering Pump, Belt and Hoses
Inspect
15K
Fuel Tank Air Filter
Inspect
Replace
15K
30K
Brake Fluid
Inspect
30K
Drive Belt
Inspect
30K
Rear Brake Pads / Linings, Parking Brake
Inspect
30K
Inspect
More Frequently
Vacuum Hose
Inspect
7.5K
Crankcase Ventilation Hose
Inspect
30K
Air Cleaner Filter (Engine)
Inspect
Replace
15K
30K
Inspect
More Frequently
Coolant
Replace
60K
Fuel Filter
Replace
37.5K
Valve Clearance
Inspect
60K
Electronic Throttle Control
Inspect
30K
Spark Plugs (Iridium Coated)
Replace
97.5K
Replace
More Frequently
(Autotensioner, ALT, P/Str’g, A/C, W/pump)
*All Units Displayed In Miles
Lock function is not affected.
❏ Shift Lever-Linked – Doors unlock when the
shift lever is placed in Park (P).
❏ Key Out – Doors unlock when the key is
key is removed from the ignition.
Looking For More Detailed Information? This Quick Reference Guide does not replace your vehicle’s Owner’s Manual.
If you require additional information or are unsure of a specific issue, you should always refer to the vehicle’s Owner’s
Manual or contact your dealer.
Date
*NP150-M7000*
Customer
For Additional Maintenance Schedule Information See Your Owner’s Manual
Date
NP150 - M7000 11/06