1
Scanned by TuXaMaT.
My Home Page
http://www.tuxamat.h12.ru
Owner's Manual
YA020A1 F
OWNER'S MANUAL
Operation
Maintenance
Specifications
information in this Owner's Manual is current at the time of publication. However, Hyundai reserves the right to make
changes at any time so that our policy of continual product improvement may be carried out.
This manual applies to all current Hyundai models and includes descriptions and explanations of optional as well as
standard equipment. As a result, you may find material in this manual that does not apply to your specific vehicle.
FOREWORD
Thank you for choosing Hyundai. We are pleased to welcome you to the growing number of discriminating
people who drive Hyundais. The advanced engineering and high-quality construction of each Hyundai we
build is something of which we're very proud.
Your Owner's Manuaf will introduce you to the features and operation of your new Hyundai. It is suggested
that you read it carefully since the inforrnation it contains can contribute greatly to the satisfaction you
receive from your new car.
The manufacturer also recommends that all service and maintenance on your car be performed by an
authorized Hyundai dealer. Hyundai dealers are prepared to provide high-quality service, maintenance and
any other assistance that may be required.
HYUNDAI MOTOR COMPANY
Note: Because future owners will also need the information included in this manual, if you sell this Hyundai,
please leave the manual in the vehicle for their use. Thank you.
Copyright 2000 Hyundai Motor Company. All rights reserved. The material in this publication may not be
reproduced in any form without written permission from Hyundai Motor Company.
A020A01A-AAT
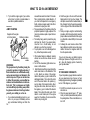
RESPONSIBILITY FOR MAINTENANCE
The maintenance requirements for your new Hyundai are found in Section 5. As the owner,
it is your responsibility to see that all maintenance operations specified by the manufacturer
are carried out at the appropriate intervals. When the vehicle is used in severe driving
conditions, more frequent maintenance is required for some operations. Maintenance
requirements for severe operating conditions are also included in Section 5.
CAUTION: MODIFICATIONS
YOUR HYUNDAI
Modification of components may void the manufacturer's warranty
Your Hyundai should not be modified in any way. Modifications may adversely
affect the safety, durability and performance of your Hyundai. Components
which are subjected to modification or are added to the vehicle resulting in
consequential damage are not covered by the vehicle manufacturers warranty.
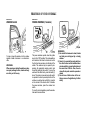
TWO-WAY RADIO INSTALLATION CAUTION
Your vehicle is equipped with electronic fuel injection and cruise control. It is
possible for an improperly installed/adjusted two-way radio to adversely affect
electronic systems. For this reason, we recommend that you carefully follow the
radio manufacturers' instructions or consult your Hyundai dealer for precautionary measures or special instructions.
A100A01LGAT
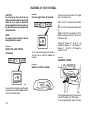
GUIDE TO HYUNDAI GENUINE
PARTS
1. What are Hyundai Genuine Parts?
Hyundai Genuine Parts are the same
parts used by Hyundai Motor Company to manufacture vehicles. They are
designed and tested for the optimum
safety, performance, and reliability to
our customers.
2. Why should you use genuine parts?
Hyundai Genuine Parts are engineered
and built to meet rigid original manufacturing requirements. Using imitation, counterfeit or used salvage parts
are not covered under the Hyundai
New Vehicle Limited Warranty or any
other Hyundai warranty. In addition,
any damage to or failure of Genuine
Hyundai Parts caused by the installation or failure of an imitation, counterfeit or used salvage part is not covered by Hyundai Motor Company.
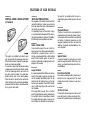
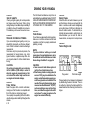
3. How can you tell if you purchasing
Hyundai Genuine Parts?
Look for the Hyundai Genuine Parts
Logo on the package (see below).
The export specifications are written
in English only.
Hyundai Genuine Parts are only sold
through authorized Hyundai Dealership and Service Center.
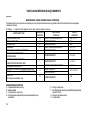
TABLE OF CONTENTS
SECTION
PAGE
1.
A GUIDED TOUR — Features of Your Hyundai
1-1
2.
BEHIND THE WHEEL — Driving Your Hyundai
2-1
3.
TROUBLE ON THE ROAD — What to do in an Emergency
3-1
4.
KEEPING THOSE GOOD LOOKS — Corrosion Prevention
& Appearance Care
5.
THE KEY
4-1
TROUBLE-FREE OPERATION — Vehicle
Maintenance Requirements
5-1
6. SATURDAY MECHANICS — Do-lt-Yourself Maintenance
6-1
7. EMISSION CONTROL SYSTEM
7-1
8.
THINGS YOU SHOULD KNOW — Consumer Information
8-1
9.
VEHICLE SPECIFICATIONS
9-1
10. INDEX
10-1
SAFETY AND VEHICLE DAMAGE WARNING
This manual includes information titled as WARNING, CAUTION and NOTE.
These titles indicate the following:
WARNING:
This indicates that a condition may result in harm or injury to you or other persons if
the warning is not heeded. Follow the advice provided with the warning.
CAUTION:
This indicates that a condition may result in damage to your vehicle or its equipment
if the caution is not heeded. Follow the advice provided with the caution.
NOTE:
This indicates that interesting or helpful information is being provided.
FEATURES OF YOUR HYUNDAI
1. AGUIDEDTOUR
Features of Your Hyundai
B010A01A-GAT
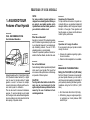
FUEL RECOMMENDATIONS
Use Unleaded Gasoline
NOTE:
For some countrles, Hyundai vehicles are
designed to use leaded gasoline. When you
are going to use leaded gasoline, ask to
Hyundai dealer whether leaded gasoline In
your vehlcle Is avallable or not.
B010B01A-AAT
What About Gasohol?
Gasohol (a mixture of 90% unleaded gasoline
and 10% ethanol or grain alcohol) may be used
in your Hyundai. However, if your engine develops driveability problems, the use of 100%
unleaded gasoline is recommended.
Fuels with unspecified quantities of alcohol, or
alcohols otherthan ethanol, should not be used.
B010E01A-AAT
Gasolines for Cleaner Air
To help contribute to cleaner air, Hyundai recommends that you use gasolines treated with
detergent additives, which help prevent deposit
formation in the engine. These gasolines will
help the engine run cleaner and the Emission
Control System performance.
B010F01A-AAT
Operation in Foreign Countrles
If you are going to drive your Hyundai in another
country, be sure to:
o Observe all regulations regarding registration and insurance.
o Determine that acceptable fuel is available.
B010001S-AAT
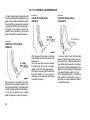
Unleaded gasoline with a Pump Octane Rating
of 87 (Research Octane Number 91) or higher
must be used in Hyundai vehicle. If leaded
gasoline is used, it will cause the catalytic
converter to become ineffective and the emission control system to malfunction.
This can also result in increased maintenance
expense. To avoid accidental use of leaded
fuel, the large nozzle used with leaded gasoline
at service stations can not be inserted into fuel
tank opening of Hyundai vehicle.
Do not Use Methanol
Fuels containing methanol (wood alcohol) should
not be used in your Hyundai. This type of fuel
can reduce vehicle performance and damage
components of the fuel system.
CAUTION:
Your Hyundai's New Vehicle Limited Warranty may not cover damage to the fuel
system and performance problems that are
caused by the use of methanol or fuels
containing methanol.
ZB020A1-Q
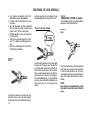
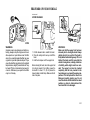
BREAKING IN YOUR NEW HYUNDAI
During the First 2,000 km (1,200 miles)
No formal "break-in" procedure is required with
your new Hyundai. However, you can contribute to the economical operation and durability of
your Hyundai by observing the following recommendations during the first 2,000 km (1,200
miles).
o Don't drive faster than 88 km/h (55 mph).
o While driving, keep your engine speed (rpm,
or revolutions per minute) between 2000
and 4000 rpm.
FEATURES OF YOUR HYUNDAI
o Use moderate acceleration. Don't start,
despress the, accelerator pedal fully.
o For the first 300 km (200 miles), try to avoid
hard stops.
o Don't lug the engine (in other words, don't
drive so slowly in too-high a gear that the
engine "bucks": shift to a lower gear).
o Whether going fast or slow, vary your speed
from time to time.
o Don't let the engine idle longer than 3 minutes for a catalytic converter-equipped engine.
o Don't tow a trailer during the first 2,000 km
(1,200 miles) of operation.
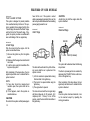
carrying a spare key is recommended in case
you accidentally lock one key inside the car.
Record Your Key Number
BBHOAOIA-GAT
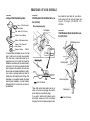
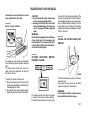
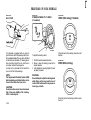
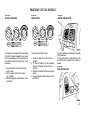
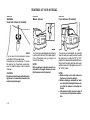
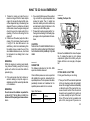
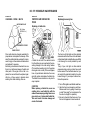
IMMOBILIZER SYSTEM (If Installed)
The immobilizer system is an anti-theft device,
designed to deter automobile theft.
B880B03A-GAT
Keys
B030A01A-AAT
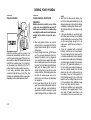
KEYS
For greater convenience, the same key operates all the locks in your Hyundai. However,
because the doors can be locked without a key,
1-2
A code number is stamped on the number plate
that came with the keys to your Hyundai. This
key number plate should not be left with the
keys but kept in a safe place, not in the vehicle.
The key number should also be recorded in a
place where it can be found in an emergency.
If you need additional keys, or if you should lose
your keys, your authorized Hyundai dealer can
make new keys if you can supply the key
number.
All of the locks fitted to the vehicle are operated
by the same key. However, since it is possible
to lock the doors without the use of the key,
care should be exercised to ensure that the key
does not become locked inside the vehicle by
mistake.
NOTE:
If you make your own dupllcate key, you wlll
not be able to cancel the system or start the
engine.
FEATURES OF YOUR HYUNDAI
B880C02A-GAT
B880D02A-QAT
Key Numbers
Limp home proccdures
The vehicle key number is recorded upon a
metal tag attached to the keys when the vehicle
is first delivered to you.
The key number should be recorded and kept
in a safe place in case the need to order further
keys arises. New keys are available from any
Hyundai dealer by quoting the reievant key
number.
In the interest of security, the metal tag attached to the keys which bears the key number
should be removed from the key ring after you
receive your new vehicle. In addition, key numbers cannot be provided by Hyundai for security reasons.
If you need additional keys or if you should lose
your keys, your authorized Hyundai dealer can
make new keys.
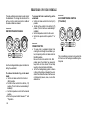
In case the immobilizer waming indicator blinks
for five seconds when the ignition key is tumed
to "ON" position, this indicates that the immobilizer system is out of order. And you cannot
start the engine without the limp home procedures with ignition key.
The following procedure is how to start the
engine with the function of the limp home. (0,1,
2, 3 as a sample password).
NOTE:
You can get the limp home password when
the vehicle is first delivered to you. If you do
not have the password, consult your authorized Hyundai dealer.
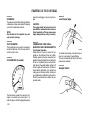
1. To set the password you may tum the ignition key "ON" and then tum it "OFF" according to the digit numbers, then the immobilizer indicator will blink along with the operation of the ignition key. For example, tum the
ignition key once for digit number "1", and
twice for "2", and so on. However, for the
digit number "0", you must tum the ignition
key for 10 times.
2. Waitfor3~10seconds.
3. You may set the remaining number of digits
by following the same procedures 1 and 2.
4. If all of four digits have been tried successfully, tum the ignition key "ON" and check
that the immobilizer indicator illuminates.
From this ttme, you have to start your engine
within 30 seconds. If you start your engine
after 30 seconds, your engine will not start.
NOTE:
If the engine dies whlle drivlng after limp
home procedure, you can start your engine
within 8 seconds without limp home procedure again.
5. If the immobilizer indicator blinks for five
seconds, you have to try the limp home
procedure again from the beginning.
After doing the limp home procedure, you have
to consult with your authorized Hyundai dealer
as soon as possible.
CAUTION:
o If you fail to try the limp home procedure
wlth the sequence of three tlmes, you
have to wait for about one hour to do the
limp home procedure again.
o If you can not start your engine in spite of
limp home procedure, have your vehicle
towed by an authorized Hyundai dealer.
1-3
FEATURES OF YOUR HYUNDAI
B070A01A-GAT
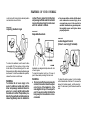
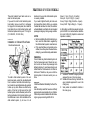
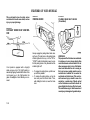
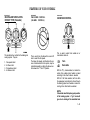
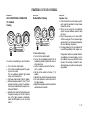
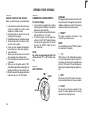
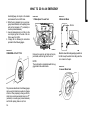
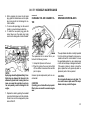
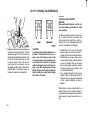
THEFT-ALARM SYSTEM
This system is designed to provide protection
from unauthorized entry into the car. This system is operated in three stages: the first is the
"Armed" stage, the second is the "Alamn" stage,
and the third is the "Disarmed" stage. If triggered, the system provides an audible alarm
siren with blinking of the tum signal lamp.
have left the car. If the system is armed
while a passenger(s) remains In the car, the
alarm may be activated when the remainlng
passenger(s) leaves the car.
CAUTION:
Avoid trylng to start the engine while the
system is armed.
B070D01A-GAT
B070C03A-GAT
Disarmed Stage
Alarm Stage
UNLOCK
B070B01A-GAT
Armed Stage
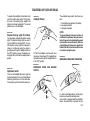
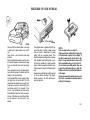
Park the car and stop the engine. Arm the
system as described below.
1) Remove the ignition key from the ignition
switch.
2) Make sure that the engine hood and trunk lid
are locked.
3) Lock the doors using the transmitter of the
keyless entry system.
After completion of the steps above, the tum
signal lamp will blink once to indicate that the
system is armed.
NOTE:
1) If any door, trunk lid or engine hood
remains open, the system will not be
armed.
2) If this happens, rearm the system as
described above.
CAUTION:
Do not arm the system untll all passengers
1-4
LOCK
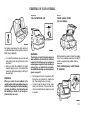
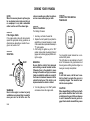
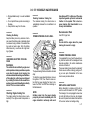
The alarm will be activated if any of the following occurs while the car is parked and the
system is armed.
1) A front or rear door is opened without using
the transmitter or the ignition key.
2) The trunk lid is opened without using the
ignition key.
3) The engine hood is opened.
The siren will sound and the tum signal lamp
will blink continuously for 30 seconds. (E.C
only/Except E.C : 3 times). To tum off the
system, unlock the door with the transmitter or
the ignition key.
PANIC (If installed)
The system will be disarmed when the following
step is taken:
The driver's or passenger's door is unlocked by
depressing the "UNLOCK" button on the transmitter or the ignition key.
After completion of the steps above, the tum
signal lamp will blink twice to indicate that the
system is disarmed.
NOTE:
Once the system has been disarmed, it can
not be rearmed except by repeatlng the
arming procedures.
FEATURES OF YOUR HYUNDAI
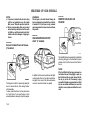
B070E02A-GAT
Panic Stage (If installed)
1. Push the "PANIC" button on the transmitter.
2. At the same time, the siren will sound continuously.
3. To tum off the system, push the "PANIC"
button again on the transmitter.
sure that doors will not be opened accidentally.
Also, when combined with the proper
use of seat belts, locklng the doors helps
keep occupants from belng ejected from
the car in case of an accident.
o Before opening the door, always look for
and avold oncoming trafflc.
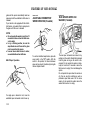
B070F01A-QAT
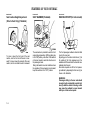
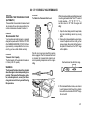
Keyless Entry System
Locking doors
1. Close all doors.
2. Push the "LOCK" button on the transmitter.
3. At the same tlme all doors lock, the turn
signal lamp will blink once to indicate that
the system is armed.
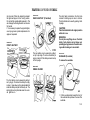
B040B01A-AAT
Locking and Unlocking Front Doors
With a Key
LOCK
UNLOCK
Unlocking doors
1. Push the "UNLOCK" button on the transmitter.
2. At the same time all doors unlock, the tum
signal lamp will blink twice to indicate that
the system is disarmed.
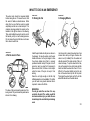
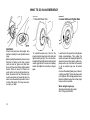
B040A01A-AAT
DOOR LOCKS
WARNING:
o Unlocked doors can be dangerous. Before you drive away (especlally if there
are chlldren in the car), be sure that all
the doors are securely closed and locked
so that the doors cannot be Inadvertently
opened from the Inside. Thls helps as-
o The door can be locked or unlocked with a
key.
o Lock the door by tuming the key toward the
front of the vehicle and unlock it by turning
the key toward the rear.
The doors can be locked without a key.
To lock the doors from the outside, first push
the inside lock switch to the "LOCK" position,
then close the door.
NOTE:
o When locking the door this way, be careful not to lock the door wlth the ignltion
key left in the vehlcle.
o To protect against thieves, always removethe ignltion key, close all windows,
and lock all doors when leavlng your
vehicle unattended.
FEATURES OF YOUR HYUNDAI
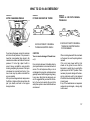
8040O01A AAT
Locking from the Inside
LOCK
UNLOCK
To lock the doors from the inside, simply close
the door and push the lock switch to the "LOCK"
position. When this is done, neither the outside
nor the inside door handle can be used.
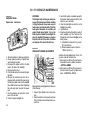
Your Hyundai is equipped with a "child-protector" rear door lock assembly. When the lock
mechanism is engaged, the rear door cannot be
opened from the inside. Its use is recommended
whenever there are small children in the rear
seat.
To engage the child-protector feature so that
the door cannot be opened from the inside,
move the child-protector lever to the "LOCK"
position and close the door. Move the lever to
the opposite direction of "LOCK" position when
normal door operation is desired.
If you wish to be able to open the door from the
outside, the outside door handle will function
normally.
forward during braking or in an accident and
strike vehicle passengers.
B080A01A AAT
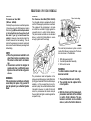
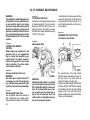
ADJUSTABLE FRONT SEATS
WARNING:
Never attempt to adjust the seat while the
vehicle is movlng. This could result in loss
of control, and an accident causing death,
serious injury, or property damage.
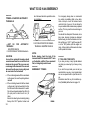
B080601A-AAT
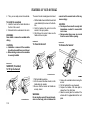
Adjusting Seat Forward and Rearward
B140A01S-AAT
REAR SEAT WARNING
BMOE02A-AAT
CHILD-PROTECTOR REAR DOOR
LOCK
For the safety of all passengers, luggage or
other cargo should not be piled higher than the
top of the seatback. In addition, do not place
objects on the rear shelf as they may move
1-6
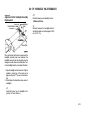
To move the seat toward the front or rear, pull
the lock release lever upward. This will release
the seat on its track so you can move it forward
or rearward to the desired position.
When you find the position you want, release
the lever and slide the seat forward or rearward
FEATURES OF YOUR HYUNDAI
on its track until it locks into the desired position
and cannot be moved further.
B080C01A-AAT
Adjusting Seatback Angle
recllned. There is greater risk that the driver
and passenger wlll slide under the belt whlch
may result in serious Injury if a crash occurs
when the seatback Is recllned.
B080O02A-AAT
o Do not operate the vehlcle wlth the headrests removed as severe Injury to an
occupant may occur In the event of an
accident. Headrests may provlde protection agalnst severe neck Injuries when
properlyadjusted.
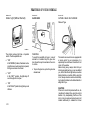
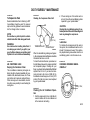
Adjustable Headrests
B080E01A-MT
Lumbar Support Control
(Driver's seat only) (If installed)
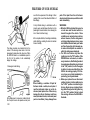
To recline the seatback, lean forward to take
your weight off it, then pull up on the recliner
control lever at the outside edge of the seat.
Now lean back until the desired seatback angle
is achieved. To lock the seatback into position,
release the recliner control lever.
WARNING:
To mlnlmlze rlsk of severe injury in the
event of a collislon or sudden stop, both the
driver and passenger seatbacks should always be in a nearly upright position while
the vehlcle Is In motlon. The protectlon provlded by the seat belts and airbags may be
reduced significantly when the seatback is
Headrests are designed to help reduce the risk
of neck injuries.
To raise the headrest, pull it up. To lower it,
push it down while pressing the lock knob.
WARNING:
o Formaximumeffectlvenesslncaseofan
accident, the headrest should be adjusted so the top of the headrest is at the
same helght as the top of the occupanf s
ears. The use of a cushlon that holds the
body away from the seatback is not recommended.
To adjust the lumber support, turn the handle
on the inboard side of the seat. To increase the
amount of lumbar support, pull the lever forward. To decrease it, push the lever toward the
rear.
FEATURES OF YOUR HYUNDAI
B080F01S-AAT
B100A01A-GAT
B130A01A-AAT
Seat Cushion Height Adjustment
(Driver's Seat Only) (If Installed)
SEAT WARMER (If Installed)
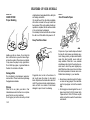
REAR SEAT ENTRY (For 3-door model)
The seat warmer is provided to warm the front
seats during cold weather. With the ignition key
in the "ON" position, push either of the switches
on the rear console to warm the driver's seat or
the passenger's seat.
During mild weather or under conditions where
the operation of the seat warmer is not needed,
keep the switches in the "OFF" position.
The front passenger seatback should be tilted
to enter the rear seat.
By pulling up on the recliner control lever (1) at
the outside of the front passenger seat, the
seatback will tilt forward and the seat will automatically slide forward.
Rear seat occupants can tilt the front passenger seatback by depressing the foot lever (2) as
shown in the illustration.
To raise or lower the front part of the seat
cushion, tum the front knob forward or rearward. To raise or lower the rear part of the seat
cushion, tum the rear knob forward or rearward.
WARNING:
Passengers slttlng In the rear seat should
be careful not to accidentally press the foot
lever (2) whlle the vehicle Is movlng, as thls
may cause the seatback to move forward
and Injure a front seat occupant.
1-8
FEATURES OF YOUR HYUNDAI
B050A01A-AAT
B060A03A-GAT
WINDOW GLASS
POWER WINDOWS (If installed)
To raise or lower the window, turn the window
regulator handle clockwise or counter-clockwi'se.
WARNING:
When opening or closlng the wlndows, make
sure your passenger's arms, hands and body
are safely out of the way.
The power windows operate when the ignition
key is in the "ON" position. The main switches
are located on the driver's armrest and control
the front and rear windows on both sides of the
vehicle. The windows may be opened by depressing the appropriate window switch and
closed by pulling up the switch. To open the
window on the driver's side, press the switch(1)
down. The window moves as long as the switch
is operated. In order to prevent operat'on of the
windows, a window lock switch(2) is provided
on the armrest of the driver's door. To disable
the power windows, press the window lock
switch.
To revert to normal operation, press the window
lock switch a second time.
WARNING:
1) Be careful that someone's head, hands
and body are not trapped by a closlng
window.
2) Never try to operate the maln switch on
the driver's door and the Indlvldual door
window switch in opposlng directions at
the same tlme. If thls Is done, the window will stop and cannot be opened or
closed.
3) Do not leave children alone In the car.
Always remove the Ignition key for their
safety.
FEATURES OF YOUR HYUNDAI
B040G02A-GAT
B150A02A-QAT
CENTRAL DOOR LOCKING SYSTEM
(If Installed)
SEAT BELT PRECAUTIONS
All occupants of the vehicle should wear their
seat belts at all times. Indeed, your province's
laws may require that some or all occupants of
the vehicle use seat belts.
The possibility of injury or the severity of injury
in an accident will be decreased if this elementary safety precaution is observed. In addltlon,
the following recommendations are made:.
B150B01A GAT
Infant or Small Child
This system is controlled by the driver's door
lock and operates the passenger door locks.
When the driver's door is locked, the passenger
doors are locked automatically.
If a rear door is open when the door lock switch
in depressed, it will remain locked when closed.
If the front passenger door is open when the
door lock switch is locked, the outside door
handle must be held in the raised position.
When the door is closed, the door will remain
locked. All doors will be unlocked automatically
whenever the driver's door is unlocked wnether
by key or door lock switch.
Some countries require the use of child restraint systems for infants and small chlldren.
Whether this is required by law or not, it is
strongly recommended that a child restraint
seat or infant restraint system be used for
infants or small children weighing less than 18
kilograms (40 pounds).
B150C01A-AAT
Larger Children
It is recommended that all children who are too
large for child seats occupy the rear seat and
use the available lap/shoulder belts. The lap
portion should be fastened snug on the hips
and as low as possible. Check belt fit periodically. A child's squirming could move the belt
out of position.
If the larger child (over age 13) is in the front
seat, the child should be securely restrained by
the seat belt. Under no circumstances should
the child be allowed to stand or kneel on the
seat. Children are afforded the most safety in
the event of an accident when they are restrained by a proper restraint system in the rear
seat.
B150D01A-AAT
Pregnant Women
The use of a seat belt is recommended for
pregnant women to lessen the chance of injury
in an accident. When a seat belt is used the lap
belt portion, it should be placed as low and
snugly as possible on the hips, not across the
abdomen. Forspecific recommendations, consult a physician.
B150E01A-AAT
Injured Person
A seat belt should be used when an injured
person is being transported. When this is necessary, you should consult a physician for recommendations.
ZB090F1-A
One Person Per Belt
Two people (including children) should never
attempt to use a single seat belt. This could
increase the severity of injuries in case of an
accident.
B150Q01AAAT
Do Not Lie Down
To reduce the chance of injuries in the event of
an accident, and to achieve maximum effectiveness of the restraint system, all passengers
FEATURES OF YOUR HYUNDAI
should be sitting up and the front seats should
be in an upright position when the car is moving. A seat belt cannot provide proper protecfion if the person is lying down in the rear seat
or if the front seat is in a reclined position.
WARNING:
Sitting in a reclined position or lying down
when your vehicle is in motion can be dangerous. Even If you buckle up, your safety
belts can't do thelr job when you're reclined.
The shoulder belt can't do Its job because it
won't be agalnst your body. Instead, it wlll
be in front of you. In a crash you could go
into it, recelving serious neck or other injuries.
The lap belt can't do its job either. In a crash
the belt could go up over your abdomen.
The belt forces would be there, not at your
pelvlc bones.
This could cause serious internal injuries.
For proper protectlon when the vehicle is in
motion, have the seatback upright. Then sit
back in the seat and wear your safety belt
properly.
B160A01A-AAT
CARE OF SEAT BELTS
Seat beltsystems should never be disassembled
or modified. In addition, care should be taken to
assure that seat belts and belt hardware are not
damaged by seat hinges, doors or other abuse.
WARNING:
When you return the rear seatback to its
upright position after the rear seatback was
folded down, be careful not to damage the
seat belt webbing or buckle. Be sure that the
webbing or buckle does not get caught or
pinched in the rear seat.
AB9SOA3-B
HEIGHT ADJUSTABLE FRONT SEAT
SHOULDER BELT (If installed)
B160B01A-AAT
Periodic Inspectfon
It is recommended that all seat belts be inspected periodically for wear or damage of any
kind. Parts of the system that are damaged
should be replaced as soon as possible.
B160C01A-AAT
Keep Belts Clean and Dry
Seat belts should be kept clean and dry. If belts
become dirty, they can be cleaned using a mild
soap solution and warm water. Bleach, dye,
strong detergents or abrasives should not be
used because they may damage and weaken
thefabric.
B160D01A-AAT
When to Replace Seat Belts
Entire in-use seat belt assembly or assemblies
should be replaced if the vehicle has been
involved in an accident. This should be done
even if no damage is visible. Additional questions concerning seat belt operation should be
directed to your Hyundai Dealer.
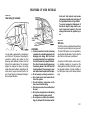
You can adjust the height of the shoulder belt
anchor to one of the 4 positions.
If the height of the adjusting seat belt is too near
your neck, you will not be getting the most
effective protection. The shoulder portion should
be adjusted so that it lies across your chest and
midway over your shoulder nearest the door
and not your neck.
To adjust the height of seat belt anchor, lower
or raise the height adjuster into an appropriate
position when the height adjuster button is
pushed.
Release the button to lock the anchor into
position. Try sliding the release button to make
sure that it has locked into the position.
FEATURES OF YOUR HYUNDAI
WARNING:
o Thehelghtadjustermustbelnthelocked
position whenever the vehicle is moving.
o Themisadjustmentof heightoftheshoulder belt could reduce the effectiveness
of the seat belt in a crash.
there is a sudden stop or impact, however, the
belt will lock into position. It will also lock if you
try to lean forward too quickly. Check to make
sure that the belt is property locked and that the
belt is not twisted.
B180A01A-GAT
Adjusting Your Seat Belt
B210A01A-AAT
To Release the Seat Belt
(R.
Ta
B200A01S-QAT
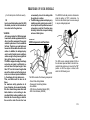
SEAT BELTS-Driver's 3-Point System
with Emergency Locking Retractor
To Fasten Your Belt
The seat belt is released by presslng the release button in the locking buckle. When it is
released, the belt should automatically draw
back into the retractor.
If this does not happen, check the belt to be
sure it is not twisted, then try again.
To fasten your seat belt, pull it out of the
retractor and insert the metal tab into the buckle. There will be an audible "click" when the tab
locks into the buckle.
The seat belt automatically adjusts to the proper length only after the lap belt is adjusted
manually so that it fits snugly around your hips.
If you lean forward in a slow, easy motion, the
belt will extend and let you move around. If
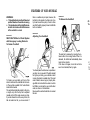
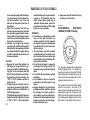
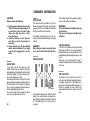
You should place the belt as low as possible on
your hips, not on your waist. If the belt is located
too high on your body, you could slide under it
in case of accident or a sudden stop. This could
result of death, serious injury or property damage. Both arms should not be under or over the
belt. Rather, one should be over and the other
under, as shown in the illustration.
Never wear the seat belt under the arm nearest
the door.
rrr
ai
b)
to
FEATURES OF YOUR HYUNDAI
B220A01A-AAT
B220B01A-AAT
B220C01A-AAT
SEAT BELTS (2-Point Static Type)
(Rear Seat Center)
To Fasten Your Seat Belt
Adjusting Your Seat Belt
To Release the Seat Belt
With a 2-point static type seat belt, the length
must be adjusted manually so it fits snugly
around your body. Fasten the belt and pull on
the loose end to tighten. The belt should be
placed as low as possible on your hips, not on
your waist. If the belt is too high, it could
increase the possibility of your being injured in
an accident.
When you want to release the seat belt, press
the button in the locking buckle.
To fasten a 2-point static type belt, insert the
metal tab into the locking buckle. There will be
an audible "click" when the tab locks into the
buckle. Check to make sure the belt is property
locked and that the belt is not twisted.
WARNING
The center lap belt latchlng mechanism Is
different f rom those for the rear seat shoulder belts. When fastening the rear seat shoulder belts or the center lap belt, make sure
they are Inserted Into the correct buckle to
obtain maximum protectlon from the seat
belt system and assure proper operation.
FEATURES OF YOUR HYUNDAI
B230A01A-GAT
CHILD RESTRAINT SYSTEM
(If installed)
Children riding in the car should sit in the rear
seat and must always be restrained to minimize
the risk of injury in an accident, sudden stop or
sudden maneuver. According to accident statistics, children are safer when properly restrained in the rear seats than in the front seat.
Larger children should use one of the seat belts
provided.
You are required by law to use safety restraints
for children. If small children ride in your vehicle
you must put them in a child restraint system
(safety seat).
For smaller children, you must use a commercially available child restraint system that meets
the requirements of ECE-R(Economic Commission of Europe-Regulation)-16.
Children could be injured in a crash if their
restraints are not properly secured. For small
children and babies, a child seat or infant seat
must be used. Before buying a particular child
restraint system, make sure it fits your car seat
and seat belts, and fits your child. Follow all the
instructions provided by the manufacturer when
installing the child restraint system.
WARNING:
o A child restraint system must be placed
in the rear seat. Never install a child or
infant seat on the front passenger's seat.
Should an accident occur and cause the
1-14
o
o
o
o
o
passenger side airbag to deploy, it could
severely injure or klll an Infant or child
seated in an infant or child seat Thus,
only use a child restraint in the rear seat
of your vehicle.
Since a safety belt or child restraint system can become very hot if it Is left in a
closed vehicle, be sure to check the seat
cover and buckles before placing a child
there.
When the child restraint system Is not In
use, store It In the trunk or fasten it with
a safety belt so that it will not be thrown
forward in the case of a sudden stop or
an accident.
Children who are too large to be in a
child restraint should slt In the rear seat
and be restrained with the available lap/
shoulder belts.
Always make sure that the shoulder belt
portion of the outboard lap/shoulder belt
Is positloned midway over the shoulder,
never across the neck. Movlng the child
closer to the center of the vehicle may
help provide a good shoulder belt f it. The
lap belt portion of the lap/shoulder belt
or the center seat lap belt must always be
positioned as low as possible on the
child's hips and as snug as possible.
If the seat belt will not properly fit the
child, we recommend the use of an approved booster seat In the rear seat in
order to raise the child's seating height
so that the seat belt will properly fit the
child. Before purchasing a booster seat,
make sure that it meets appllcable ECE
R-16 and that It Is satlsfactory for use
with thls vehicle.
o Never allow a child to stand up or kneel
on the seat.
o Never use an infant carrler or child safety
seat that "hooks" over a seatback; it may
not provide adequate security in an accident.
o Never allow a child tobeheldinaperson's
arms while they are in a moving vehicle,
as this could result in serious injury to
the child In the event of an accident or a
sudden stop. Holding a child In a moving
vehicle does not provide the child with
any means of protection durlng an accident, even If the person holding the child
is wearing a seat belt.
FEATURES OF YOUR HYUNDAI
8230601E-GAT
B230C01A-QAT
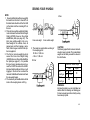
Using a Child Restraint System
Child Restraint Hook Holder Nut Location (4 Door)
Cover, Child Restraint
Hook Holder
Bolt, Holder (5/16'-30mm)
then install the hook holder for your child restraint system with the bolt and spacer and
torque to 1.7-2.6 kgf.m (12.3-18.8 Ib.ft, 16.725.5 N.m)
Rear seat package tray
Anchorages
Washer, Conical Spring
B230E01A-GAT
Child Restraint Hook Holder Nut Location (3/5 Door)
Holder, Child Restraint Hook
Blanking covers
Spacer, Child Restraint
Hook Holder
Retainer Washer
SSAHOOB
For small children and babies, the use of a child
seat or infant seat is strongly recommended.
This child seat or infant seat should be of
appropriate size for the child and should be
installed in accordance with the manufacturer's
instructions. It is further recommended thatthe
seat be placed in the vehicle's rear seat since
this can make an important contributton to safety.
Your vehicle is provided with three holes for
installing the child restraint anchor fittings. The
anchorage nut is welded beneath the sheet
metal to permit installation of a child restraint
anchorage fitting for a child seat, as shown in
the illustration.
Covering shelf
Tether strap hook
Front of Vehicle
Three child restraint hook holder nuts are located on the rear seat package tray and the
anchor holes are covered with plugs.
If you want to install a child restraint system
hook holder, remove one of the 3 anchorage
trim plugs from the rear seat package tray trim,
Back panel —
Front of Vehicle
FEATURES OF YOUR HYUNDAI
Three child restraint hook holder nuts are located on the back panel.
If you want to install a child restraint system
hook holder, remove one of the 3 anchorage
trim plugs from the back panel, then install the
hook holder for your child restraint system with
the bolt and spacer and torque to 1.7-2.6 kgf .m
(12.3-18.8 Ib.ft, 16.7-25.5 N.m).
B230G01A-GAT
Installation on Outboard Rear Seats
On outboard rear seats
To install a child restraint system in the outboard rear seats, extend the shoulder/lap belt
from its retractor. Install the child restraint system, buckle the seat belt and allow the seat belt
to take up any slack. Make sure that the lap
portion of the belt is tight around the child
restraint system and the shoulder portion of the
belt is positioned so that it cannot interfere with
the child's head or neck. After installation of the
child restraint system, try to move it in all
directions to be sure the child restraint system
is securely installed.
If you need to tighten the belt, pull more webbing toward the retractor. When you unbuckle
the seat belt and allow it to retract, the retractor
will automatteally revert back to its normal seated
passenger emergency locking usage condition.
NOTE:
o Before installlng the child restraint system, read the instructlons supplied by
the child restraint system manufacturer.
o If the seat belt does not operate as descrlbed, have the system checked Immediately by your authorized Hyundai dealer.
WARNING:
Do not Install any child restraint system In
the front passenger seat. Should an accident occur and cause the passenger slde
alrbag to deploy, It could severely injure or
kill an Infant or child seated In an Infant or
child seat. Therefore, only use a child restraint system in the rear seat of your vehlcle.
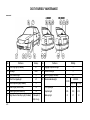
B230H01A-QAT
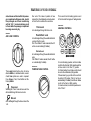
Child Seat Restraint Suitability For Seat Position
Use child safety seats that have been officially
approved and are appropriate for your children.
Child safety seats are classified into the following four groups according to ECE-R-16.
Group 0 : Up to 10 kg (0 - 9 months)
Group 0+ : Up to 13 kg (0 - 2 years)
Group 1: 9kg to 18kg (9 months ~ 4 years)
Group II & III: 15kg to 36kg (4 ~ 12 years)
A child safety seat that has passed tests subject to ECE-R-16 is inscribed with an identiflcation mark: ECE-R-16 (Capital E is circled and
Inspection numbers).
U : Suitable for "universal" category restraints
approved for use in this mass group
UF : Suitable for forward-facing "universal" category restraints approved for use in this
mass group
X : Seat position not suitable for children in
this mass group
FEATURES OF YOUR HYUNDAI
B180B01A-GAT
B180B04A-GAT
Pre-tensioner Seat Belt
(Without A/BAG)
Ordinarily the pre-tensioner seat belt operates
in the same way as E.L.R (Emergency Locking
Retractor) type (When vehicles stop suddenly, the belt will lock into the position. It will
also lock If you try to lean forward too
qulckly.). However, when vehicles crash, the
retractor rewinds the belt webbing. This will
restrain the passenger movement quickly and
also reduce the slack between passenger and
belt webbing.
Pre-Tensioner Seat Belt (With A/BAG)
Your Hyundai vehicle is equipped with driver's
and front Passenger's pre-tensioner seat belts.
The purpose of the pre-tensioner is to make
sure that the seat belts fit tightly against the
occupant's body in certain frontal collisions.
The pre-tensioner seat belts can be activated
alone or, where the frontal collision is severe
enough, together with the airbags.
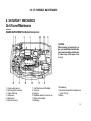
.Passenger's
-side airbag
The seat belt pre-tensioner system consists
mainly of the following components. Their locations are shown in the illustration.
NOTE:
o When the pre-tensioner seat belt Is activated, there may be an exploslon nolse.
Thls nolse Is normal and Is not hazardous.
o Pre-tensioner seat belt Is deslgned to
operate only when a sufflciently severe
Impact occurs and It will be only operated once.
WARNING:
If the pre-tensioner seat belt was actlvated,
never attempt to replace it by yourself. It
must be replaced by an authorized Hyundai
Dealer.
Driver's side airbag
1. SRS airbag waming light
2. Seat belt pre-tensioner assembly
3. SRS control module
The pre-tensioner seat belt operates in the
same way as an Emergency Locking Retractor
(ELR) type of seat belt. When the vehicle stops
suddenly, or if the occupant tries to lean forward too quickly, the seat belt retractor will lock
into position. However, in certain frontal collisions, the pre-tensioner will activate and pull
the seat belt into tighter contact against the
occupant's body.
WARNING:
To obtain maximum benefit from a pretensioner seat belt:
1. The seat belt must be worn correctly.
2. The seat belt must be adjusted to the
correct position.
NOTE:
o Both the driver's and front passenger's
pre-tensioner seat belts will be activated
in certain frontal collisions. The pretensioner seat belts can be activated
alone or, where the frontal collision is
FEATURES OF YOUR HYUNDAI
severe enough, together wtth the alrbags.
The pre-tensioners wlll be activated under these conditions even if the seat
belts are not being worn at the time of
the collision.
o When the pre-tensioner seat belts are
activated, a loud noise may be heard and
fine dust, which may appear to be smoke,
may be vislble in the passenger compartment. These are normal operating conditions and are not hazardous.
o Although it is harmless, the fine dust
may cause skin irritation and should not
be breathed for prolonged perlods. Wash
your hands and face thoroughly after an
accldent in which the pre-tensloner seat
belts were activated.
CAUTION:
o Because the sensor that activates the
SRS airbag is connected wlth the pretensioner seat belt, the SRS airbag warnIng light |^on the instrument panel wlll
bllnk for approximately 6 seconds after
the ignition key has been turned to the
"ON" or "ACC" positions, and then it
should turn off.
o If the pre-tensioner seat belt is not working properly, this warning light will illuminate even if there is no malfunctlon of
the SRS airbag system.
If the SRS airbag warning llght does not
llluminate when the Ignition key Is turned
to "ON" or "ACC", or if it remains llluml1-18
nated after blinklng for approximately 6
seconds, or If It illuminates while the
vehicle is being driven, please have an
authorized Hyundai deaier inspect the
pre-tensioner seat belt or SRS airbag
system as soon as possible.
WARNING:
o Pre-tensioners are designed to operate
only one tlme. After activation, pretensioner seat belts must be replaced.
All seat belts, of any type, should always
be replaced after they have been worn
durlng a collision.
o The pre-tensioner seat belt assembly
mechanisms become hot during activation. Do not touch the pre-tensioner seat
belt assemblles for several minutes after
they have been activated.
o Do not attempt to inspect or replace the
pre-tensioner seat belts yourself. Thls
must be done by an authorized Hyundai
deaier.
o Do not strike the pre-tensioner seat belt
assemblies.
o Do not attempt to service or repalr the
pre-tensioner seat belt system In any
manner.
o Improper handling of the pre-tensloner
seat belt assemblles, and failure to heed
the warnings to not strike, modify, inspect, replace, service or repalr the pretensioner seat belt assemblies may lead
to Improper operation or inadvertent activation and serious injury.
o Always wear the seat belts when driving
or riding in a motor vehicle.
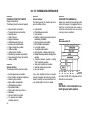
B240A01F-GAT
SUPPLEMENTAL
RESTRAINT
(AIRBAG) SYSTEM (If Installed)
Your Hyundai is equipped with a Supplemental
Restraint (Airbag) System. The indications of
the system's presence are the letters 'SRS AIR
BAG" embossed on the airbag pad cover in the
steering wheel and the passenger's side front
panel pad above the glove box.
The Hyundai SRS consists of airbags installed
under the pad covers in the center of the
steering wheel and the passenger's side front
panel above the glove box. The purpose of the
SRS is to provide the vehicle's driver and/or the
front passenger with additional protection than
that offered by the seat-belt system alone, in
FEATURES OF YOUR HYUNDAI
j of a frontal impact of sufficient severity.
FE:
I sure to read information about the SRS
i the labels provlded on the backside of
i sun visor and in the glove box.
VARNING:
As Its name implies, the SRS is designed
to work wtth, and be supplemental to, the
drlver's and the passenger's three point
seat belt systems and is not a substitute
for them. Therefore your seat belts must
be worn at all times while the vehlcle is in
motion. In addltlon, the airbags deploy
only In certain frontal impact conditions
severe enough to likely cause signiflcant
Injury to the vehicle occupants.
The SRS is designed to deploy the airbags
only when an impact is sufficiently severe and when the Impact angle is less
than 30° from the forward longitudinal
axis of the vehlcle and wfll not deploy in
side, rear or rollover impacts. Additionally, the airbags will only deploy once.
Thus, seat belts must be worn at all
tlmes.
For maximum safety protection in all
types of crashes, all occupants Including
the driver should always wear their seat
belts whether or not an airbag is also
provided at their seating posltlon to minimize the risk of severe injury or death in
the event of a crash. Do not sit or lean
unnecessarily close to the airbag whlle
the vehicle Is in motion.
o The SRS airbag system must deploy very
rapidly to provlde protection in a crash. If
an occupant is out of posltlon because of
not wearing a seat belt, the airbag may
forcefully contact the occupant causlng
serlous or fatal injuries.
The SRSCM continually monitors all elements
while the ignition is "ON" to determine if a
frontal or near-frontal impact is severe enough
to require airbag deployment.
B240B02A-AAT
SRS Components and Functions
The SRS service reminder indicator (SRI) on
the instrument panel will blink for about 6 seconds after the ignition key is tumed to the "ON"
position or after the engine is started, after
which the SRI should go out.
The SRS consists of the following components:
- Driver's Side Airbag Module
- Passenger's Side Airbag Module
- Knee Bolster
- SRS Service Reminder Indicator (SRI)
- SRS Control Module (SRSCM)
1-19
FEATURES OF YOUR HYUNDAI
sure from the expansion of the airbags. Further
opening of the covers then allows full inflation of
the airbags.
parts. If the liquid from the air freshener
does leak onto these areas, wash them with
water immediately.
A fully inflated airbag in combination with a
property wom seat belt slows the driver's or the
passenger's forward motion, thus reducing the
risk of head and chest injury.
WARNING:
o When the SRS Is activated, there may be
a loud noise and flne dust will be released throughout the vehicle. These
conditions are normal and are not hazardous. However, the fine dust generated during airbag deployment may cause
skin Irritatlon. Be sure to wash your hands
and face thoroughly with lukewarm water and a mlld soap after an accident in
which the airbags were deployed.
o The SRS can function only when the
ignition key Is in the "ON" posltion. If the
SRS SRI does not come on, or continuously remains on, after flashing for ataout
6 seconds when the ignition keyisturned
to the "ON" position, or after the engine
is started, or comes on while drlving, the
SRS Is not working properly. If this occurs, have your vehicle immediately inspected by your Hyundai dealer.
o Before you replace a fuse or disconnect
a battery terminal, turn the ignition key to
the "LOCK" position or remove the ignition key. Never remove or replace the air
bag related fuse(s) when the Ignition key
is In the "ON" position. Failure to heed
this warning will cause the SRS SRI to
illuminate.
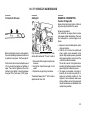
After complete inflation, the airbag immediately
starts deflating, enabling the driverto maintain
forward visibility.
The airbag modules are located both in the
center of the steering wheel and in the front
passenger's panel above the glove box. When
the SRSCM detects a considerable impact to
the front of the vehicle, it will automatically
deploy the airbags.
Passenger's side Airbag
^
Upon
deployment, tearseams molded directly
into the pad covers will separate under pres1-20
CAUTION:
When installing a contalner of liquld alr
freshener inside a vehicle, do not place it
near the instrument cluster nor on the Instrument panel pad surface. If there is any
leakage from the air freshener onto these
areas (instrument cluster, instrument panel
pad or air ventilator), it may damage these
FEATURES OF YOUR HYUNDAI
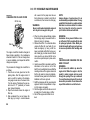
B990602Y-AAT
front seat. Such objects may become
dangerous projectiles and cause Injury If
the supplemental side air bag inflates.
To prevent unexpected deployment of
the side air bag that may result in personal Injury.avoid impact to the side
airbag sensor when the ignition key is
on.
Side Airbag (If installed)
Side airbai
sensor
B240C01Y-GAT
SRS Care
Your Hyundai is equipped with a side airbag in
each front seat. The purpose of the airbag is to
provide the vehicle's driver and/or the front
passenger with additional protection than that
offered by the seatbelt alone. The side impact
airbags are designed to deploy only during
certain side-impact collisions, depending on the
crash severity, angle, speed and point of impact. The air bags are not designed to deploy in
all side impact situations.
WARNING:
o For best protection from the side airbag
system and to avoid being Injuries by the
deploying side airbag, both front seat
occupants should sit in an upright position with the seat belt properly fastened.
The driver's hands should be placed on
the steering wheel at the 9:00 and 3:00
o'clock positions. The passenger's arms
and hands should be placed In thelr laps.
o Do not use any accessory seat covers.
o Use of seat covers could reduce the effect of the system.
o Do not Install any accessories on the
side or near the side airbag.
o Donotuseexcessiveforceonthesideof
the seat.
o Do not place any objects over the airbag
or between the airbag and yourself.
o Do not place any objects (an umbrella,
bag, etc.) between the front door and the
The SRS is virtuaJly maintenance-free and there
are no parts you can safely service by yourself.
The entire SRS system must be inspected by
an authorized Hyundai dealer 10 years after the
date that the vehicle was manufactured.
Any work on the SRS system, such as removing, installing, repairing, or any work on the
steering wheel must be performed by a qualified Hyundai technician. Improper handling of
the SRS system may result in serious personal
injury.
1-21
FEATURES OF YOUR HYUNDAI
WARNING:
o Extreme Hazard! Do not use a reward
facing restraint on a seat protected by an
airbag in front of it.
o Modiflcation to SRS components or wiring, including the addltion of any kind of
badges to the pad covers or modificatlons to the body structure, can adversely affect SRS performance and lead to
possible injury.
o For cleaning the airbag pad covers, use
only a soft, dry cloth or one which has
been moistened with plain water. Solvents or cleaners could adversely affect
the airbag covers and proper deployment of the system.
o Noobjectsshouldbeplacedoverornear
the airbag modules on the steering wheel,
Instrument panel, and the front passenger's panel above the glove box, because
any such object could cause harm if the
1-22
vehicle is In a crash severe enough to
cause the alrbags to inflate.
If the alrbags Inflate, they must be replaced by an authorlzed Hyundai dealer.
Do not tamper with or disconnect SRS
wiring, or other components of the SRS
system. Doing so could result in Injury,
due to accidental firing of the airbags or
by renderlng the SRS inoperatlve.
Do not install a child restraint system in
the front passenger seat positlon. A child
restraint system must never be placed in
the front seat. The Infant or child could
be severely injured by an airbag deployment In case of an accldent.
If components of the airbag system must
be dlscarded, or If the vehicle must be
scrapped, certain safety precautions must
be observed. Your Hyundai dealer knows
these precautlons and can glve you the
necessary informatlon.
Failure to follow these precautlons and
procedures could Increase the rlsk of
personal injury.
If you sell your vehicle, be sure to Inf orm
the new owner of these important points
and make certain that thls manual is
transferred to the new owner.
If your car was flooded and has soaked
carpetlng or water on floorlng, you
shouldn't try to start engine; have the car
towed to authorlzed Hyundai dealer.
II
FEATURES OF YOUR HYUNDAI
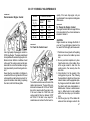
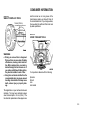
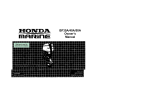
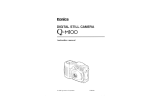
B250A02A QAT
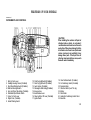
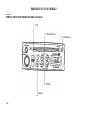
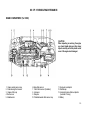
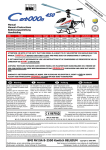
INSTRUMENTS AND CONTROLS
1234
5
6
7 8 7 9 1011 12 13
CAUTION:
When installing the container of llquid air
refresher inside a vehicle, do not place it
near the instrument cluster nor on the crash
pad surface. If there Is any leakage frotn the
air refresher onto these areas (Instrument
cluster, crash pad or air ventllator), It may
damage these parts. If the llquid from air
refresher does leak onto these areas, wash
them wlth water Immediately.
14
1
2.
3.
4.
5.
6.
7.
8.
9.
15161718 19 20
21
Side Air Vent Louver
Headlight Leveling Device (If installed)
Rear Wiper/Washer Switch (If installed)
Multi-Function Lighl Switch
Horn and Driver Side Airbag (If installed)
Windshield Wiper/Washer Switch
Center Air Vent Louver
Digital Clock (If installed)
Hazard Warning Switch
10. Front Fog Light Switch (If installed)
11. Rear Fog Light Switch (If installed)
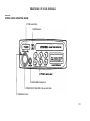
12. Audio System (If installed)
13. Passenger's Side Airbag (If installed)
14. Accessorybox
15. Hood Release Lever
16. Steering Wheel Tilt Lever (If installed)
17. Ignition Switch
18. Rear Defroster Switch (If installed)
19. Air Conditioning Switch (If installed)
20. Cigarette Lighter
21. Overdrive Switch (Auto T/A only)
22. Ashtray
23. Drink Holder
24. Heating/Air Conditioning Control Panel
25. Glove Box
1-23
FEATURES OF YOUR HYUNDAI
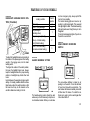
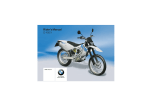
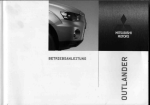
B260A02A-GAT
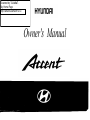
INSTRUMENT CLUSTER AND INDICATOR
1
2
8
9
10 11
3
4
5
12 13 14
15
2
16 17
6 7
18
19
B260A01A
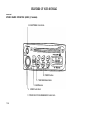
1.
2.
3.
4.
5.
6.
7.
Tachometer (If installed)
Turn Signal Indicator Light
Speedometer
Trip Odometer
Odometer
FuelGauge
Temperature Gauge
1-24
8. Door Ajar Waming Light
9. Immobilizer Waming Indicator Light
(If installed)
10. Parking Brake/Brake fluid Level Waming
Light
11. Charging System Warning Light
12. Seat Belt Warning Light (If installed)
13. Oil Pressure Waming Light
14. Low Fuel Warning Light
15. Malfunction Indicator Light (MIL)
(If installed)
16. ABS Service Reminder Indicator (If installed)
17. Overdrive off Indicator Light (If installed)
18. SRS Service Reminder Indicator
(If installed)
19. High Beam Indicator Light
FEATURES OF YOUR HYUNDAI
B260C01A-AAT
S260F01A-MT
O/D OFF INDICATOR
(Auto T/A only)
When the overdrive switch is turned on, the
overdrive off indicator will go out. This amber
indicator will be illuminated when the overdrive
switch is tumed off (Auto T/A only).
HIGH BEAM INDICATOR
LIGHT
The high beam indicator light comes on whenever the headlights are switched to the high
beam or flash position.
agaln. If the light stays on wlth the englne
runnlng, turn the englne off immediately. In
any Instance where the oll llght stays on
when the engine Is runnlng, the engine
should be checked by a Hyundai dealer
before the car Is drlven again.
B260E02A-GAT
B260H02AAAT
SEAT BELT REMINDER LIGHT
| (If installed)
f he seat belt reminder light comes on until your
seat belt is fastened when the ignition key is
turned from the "OFF" position to "ON" or
"START".
PARKING BRAKE/BRAKE
FLUID LEVEL WARNING
LIGHT
CAUTION:
If you suspect brake trouble, have your
brakes checked by a Hyundai dealer as soon
as possible. Driving your car wlth a problem
In either the brake electrlcal system or brake
hydraullc system Is dangerous, and could
result In serlous injury or death.
B260D01A-AAT
TURN SIGNAL INDICATOR
LIGHTS
The blinking green arrow on the instrument
panel shows the direction indicated by the tum
signals. If the arrow comes on but does not
blink, blinks more rapidly than normal, or does
not blink at all, a malfunction in the turn signal
system is indicated. Your dealer should be
consulted for repairs.
B260P01A-AAT
ABS SERVICE REMINDER
INDICATOR (SRI) (If installed)
When the key is tumed to the "ON" position, the
ABS SRI will come on and then go off in a few
seconds. If the ABS SRI remains on, comes on
while driving, or does not come on when the
key is tumed to the "ON" position, this indicates
that there may be a problem with the ABS.
If this occurs, have your vehicle checked by
your Hyundai dealer as soon as possible. The
normal braking system will still be operational,
but without the assistance of the anti-lock brake
system.
B260G01A-AAT
OIL PRESSURE WARNING
LIGHT
CAUTION:
If the oll pressure warning light stays on
while the englne Is running, serlous engine
damage may result. The oll pressure warning light comes on whenever there Is Insufficient oll pressure. In normal operatlon, It
should come on when the Ignition switch Is
turned on, then go out when the engine Is
started. If the oll pressure warning light
stays on while the engine is running, there
is a serious malfunction.
If this happens, stop the car as soon as it is
safe to do so, turn off the engine and check
the oil level. If the oil level Is low, add engine
oil to the proper level and start the engine
Warning Light Operation
The parking brake/brake fluid level warning
light should come on when the parking brake is
applied and the ignition switch is tumed to "ON"
or "START". After the engine is started, the light
should go out when the parking brake is released.
If the parking brake is not applied, the warning
light should come on when the ignition switch is
tumed to "ON" or "START", then go out when
the engine starts. If the light comes on at any
other time, you should slow the vehicle and
bring it to a complete stop in a safe location off
1-25
FEATURES OF YOUR HYUNDAI
the roadway.
The brake waming light indicates that the brake
fluid level in the brake master cylinder is low
and brake fluid conforming to DOT 3 specifications should be added. After adding fluid, if no
other trouble is found, the car should be
immediately and carefully driven to a
Hyundai dealer for inspection. If further trouble
is experienced, the vehicle should not be driven
at all but taken to a dealer by a professional
towing service.
Your Hyundai is equipped with dual-diagonal
braking systems. This means you still have
braking on two wheels even if one of the dual
systems should fail. With only one of the dual
systems working, more than normal pedal travel and greater pedal pressure are required to
stop the car. Also, the car will not stop in as
short a distance with only a portion of the brake
system working. If the brakes fail while you are
driving, shift to a lower gear for additional engine braking and stop the car as soon as it is
safe to do so.
B260J01S-GAT
ICHARG1NG SYSTEM
| WARNING LIGHT
The charging system waming light should come
on when the ignition is tumed on, then go out
when the engine is running. If the light stays on
while the engine is running, there is a malfunction in the electrical charging system. If the light
1-26
comes on while you are driving, stop, tum off
the engine and check under the hood. First,
make certain the altemator drive belt is in place.
If it is, check the tension of the belt.
And then, have the system checked by your
Hyundai dealer.
CAUTION:
If the drive belt (generator belt) is loosen,
broken, or mlsslon while the vehicle Is driving, there may be a serious malfunction,
engine could overheat because thls belt also
drives the water pump.
B260L01A-GAT
DOOR AJAR WARNING
LIGHT
The door ajar waming light wams you that a
door is not completely closed.
B260M01A-AAT
I LOW FUEL LEVEL
| WARNING LIGHT
The low f uel level waming light comes on when
the fuel tank is approaching empty. When it
comes on, you should add fuel as soon as
possible. Driving with the fuel level waming light
on or with the fuel level below "E" can cause the
engine to misfire and damage the catalytic
converter.
B260B01S-GAT
SRS (Airbag) Service Reminder
Indicator (SRI) (If installed)
The SRS service reminder indicator (SRI) comes
on and flashes for about 6 seconds after the
ignition key is tumed to the "ON" position or
after the engine is started, after wtiich it will go
out.
This light also comes on when the SRS is not
working property. If the SRI does not come on,
or continuously remains on after flashing for
about 6 seconds when you tumed the ignition
key to the "ON" position or started the engine,
or if it comes on while driving, have the SRS
inspected by an authorized Hyundai Dealer.
B270A01A-AAT
BRAKE PAD WEAR WARNING
SOUND
The front disc brake pads have wear indicators
that should make a high-pitched squealing or
scraping noise when new pads are needed.
The sound may come and go or be heard all the
time when the vehicle is moving. It may also be
heard when the brake pedal is pushed down
firmly. Expensive rotor damage will result if the
wom pads are not replaced. See your Hyundai
dealer immediately.
FEATURES OF YOUR HYUNDAI
B260N01A-AAT
Malfunction Indicator Light
B280A01A-AAT
FUEL GAUGE
(If installed)
This light illuminates when there is a malfunction of an exhaust gas related component, and
the system is not functioning properiy so that
the exhaust gas regulation values are not satisfied. This light will also illuminate when the
ignition key is tumed to the "ON" position, and
will go out in a few seconds. If it illuminates
while driving, or does not illuminate when the
ignition key is tumed to the "ON' position, take
your car to your nearest authorized Hyundai
dealer and have the system checked.
B900A01A-GAT
ACOUSTIC WARNING SOUNO
(If Installed)
The acoustic waming chime sounds when the
tail lights are on and the door in driver side is
open. This prevents the battery from discharging when the car is left with the tail lights on.
The chime sounds until the tail lights are tumed
off.
The needle on the gauge indicates the approximate fuel level in the fue) tank. The fuel capacity
is given in Section 9.
WARNING:
Never remove the radlator cap when the
englne is hot. The engine coolant is under
pressure and could erupt and cause severe
burns. Wait until the englne is cool before
removing the radiator cap.
The needle on the engine coolant temperature
gauge should stay in the normal range. If it
moves across the dial to "H" (Hot), pull over
and stop as soon as possible and tum off the
engine. Then open the hood and check the
coolant level and the water pump drive belt. If
you suspect cooling system trouble, have your
cooling system checked by Hyundai dealer as
soon as possible.
B300A01A-GAT
B290A02A-AAT
ENGINE COOLANT TEMPERATURE
GAUGE
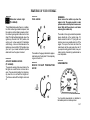
SPEEDOMETER
AX10460A
Your Hyundai's speedometer is calibrated in
kilometers per hour or miles per hour.
1-27
FEATURES OF YOUR HYUNDAI
B310A01A-GAT
ODOMETER
The odometer records the total driving distance
in kilometers or miles, and is useful for keeping
a record for maintenance intervals.
NOTE:
Any alteration of the odometer may void
your warranty coverage.
speed to avoid lugging or over-revving the engine.
B320A01A-GAT
B340A01A AAT
COMBINATION TURN SIGNAL,
HEADLIGHT AND LOW-BEAM SWITCH
Turn Signal Operation
Pulling down on the lever causes the tum
signals on the left side of the car to blink.
Pushing upward on the lever causes the tum
signals on the right side of the car to blink. As
the tum is completed, the lever will automatically retum to the center position and tum off
the turn signals at the same time. If either tum
signal indicator light blinks more rapidly than
usual, goes on but does not blink, or does not
go on at all, there is a malfunctJon in the system.
Check for a bumed-out f use or bulb or see your
Hyundai dealer.
B330A02A-AAT
The tachometer registers the speed of your
engine in revolutions per minute (rpm). It is
useful to help you shift at the appropriate engine
1-28
Lane Change Signal
CAUTION:
The engine should not be raced to such a
speed that the needle enters the red zone on
the tachometer face. This can cause severe
engine damage and may void your warranty.
TRIP ODOMETER
The trip odometer may be used to convenientiy
record trip distances. Push the reset knob to
set the counter to zero.
TACHOMETER (If installed)
B340B01A-AAT
To indicate a lane change, move the lever up or
down to a point where it begins flashing.
The lever will automatically retum to the center
position when released.
B340C01A-AAT
Headlight Switch
FEATURES OF YOUR HYUNDAI
To operate the headlights, tum the barrel on the
end of the multi-function switch. The first position tums on the parking lights, sidelights, tail
lights and instrument panel lights. The second
position tums on the headlights.
B340E01A-AAT
Headlight Flasher
1. Intermittent wiper operation (If installed)
2. Low-speed operation
3. High-speed operation
NOTE:
To prevent damage to the wiper systetn, do
not attempt to wipe away heavy accumulations of snow or ice. Accumulated snow and
ice should be removed manually. If there is
only a llght layer of snow or Ice, operate the
heater In the def rost mode to melt the snow
or ice before uslng the wiper.
B340F01A-QAT
Daytime Running Lights (If installed)
Your Hyundai is equipped with daytime running
lights. The daytime running lights are used to
improve visibility for oncoming traffic. Your vehicle daytime running lights are designed to
remain on continuously when the engine is
operating even though the headlight switch is in
the "OFF" position. However, the daytime running lights will be off while the parking brake is
applied.
The windshield wiper switch has three positions:
To flash the headlights, pull the switch lever
toward you, then release it. The headlights can
be flashed even though the headlight switch is
in the "OFF" position.
B350A02A-GAT
WINDSHIELD WASHER OPERATION
B350A01A-AAT
B340D01A-AAT
High-Beam Switch
WINDSHIELD WIPER AND WASHER
SWITCH
To turn on the headlight high beams, push the
lever forward (away from you). The High Beam
Indicator Light will come on at the same time.
For low beams, pull the lever back toward you.
To use the windshield washer, pull the wiper/
washer lever toward the steering wheel.
If your vehicle is equipped with the intermittent
feature, the washer fluid is sprayed onto the
1-29
FEATURES OF YOUR HYUNDAI
glass and the wipers automatically make two
passes acrosfe the windshield until the lever is
released.
If your vehicle is not equipped with the intermittent feature, only washer fluid is sprayed onto
the glass until the lever is released.
B360C01A-AAT
B390A01A-AAT
ADJUSTABLE INTERMITTENT
WIPER OPERATION (If installed)
REAR WINDOW WIPER AND
WASHER (If installed)
To use the intermittent wiper feature, place the
wiper switch in the "INT" position. With the
switch in this position, the interval between
wipes can be varied in 5 positions by tuming the
Interval Adjuster Switch.
The rear wiper and washer are tumed on by
pushing in on the switch. Washer fluid is sprayed
onto the glass as long as the switch is depressed. Do not operate the washer continuously for more than 15 seconds or when the
fluid reservoir is empty; this could damage the
system.
Do not operate the wiper when the window is
dry; this can result in scratching as well as
premature wiper blade wear. For the same
reason, do not operate the washer when the
washer fluid reservoir is empty.
NOTE:
o Do not operate the washer more than 15
seconds at a time or when the fluid reservoir is empty.
o In icy or freezing weather, be sure the
wlper blades are not frozen to the glass
prior to operatlng the wipers.
o In areas where water freezes In winter,
use windshield washer antifreeze.
Mist Wiper Operation
If a single wipe is desired in mist, move the
windshield wiper and washer control lever up.
1-30
FEATURES OF YOUR HYUNDAI
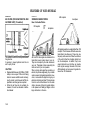
B340Q01A-GAT
HEADLIGHT LEVELING OEVICE SYS-
TEM (If Installed)
To adjust the headlight beam level according to
the number of the passengers and the loading
weight in the luggage area, tum the beam
leveling switch.
The higher the number of the switch position,
the lower the headlight beam level. Always
keep the headlight beam at the proper leveling
position, or headlights may dazzle other road
users.
Listed below are the examples of proper switch
settings. For loading conditions other than those
listed below, adjust the switch position so that
the beam level may be the nearest as the
condition obtained according to the list.
Loading condition
Driver only
Driver + front passenger
Full passengers
(including driver)
Full passengers (including
driver) + full trunk loading
(or light trailer loading)
Driver + full trunk loading
(or maximum trailer loading)
Switch
position
0
0
1
such an emergency stop, always pull off the
road as far as possible.
The hazard waming lights are tumed on by
pushing in on the hazard switch. This causes all
tum signal lights to blink. The hazard waming
lights will operate even though the key is not in
the ignition.
To tum the hazard waming lights off, push in on
the switch a second time.
2
B3BOA01A-AAT
3
REAR WINDOW DEFROSTER
SWITCH
B370A01A-AAT
HAZARD WARNING SYSTEM
The hazard waming system should be used
whenever you find it necessary to stop the car
in a hazardous location. When you must make
The rear window defroster is tumed on by
pushing in on the switch. To tum the defroster
off, push in on the switch a second time. The
rear window defroster automatically tums itself
off after about 15 minutes. To restart the defroster cycle, push in on the switch again after
it has tumed itself off.
1-31
FEATURES OF YOUR HYUNDAI
CAUTION:
Do not clean the Inner side of the rear
wlndow glass wlth an abraslve type of glass
cleaner or use a scraper to remove the
foreign deposlts from the inner surface of
the glass as this tnay cause damage to the
def roster elements.
B360B01A-GAT
Rear Fog Light Switch (If installed)
HOUR - Push "H" to advance the hour indicated.
MIN - Push "M" to advance the minute indicated.
RESET - Push "R" to reset minutes to ":00" to
facilitate resetting the clock to the correct time.
When this is done:
NOTE:
The engine must be running for the rear
window defroster to operate.
B360A01A-GAT
FRONT FOG LIGHT SWITCH
(If Installed)
There are three control buttons for the digital
clock. Their functions are:
To tum on the rear fog lights, push the switch.
They will come on when the headlights are
tumed on.
Pressing "R" between 10 : 30 and 11 : 29
changes the readout to 11 : 00. Pressing "R"
between 11 : 30 and 12 : 29 changes the
readout to 12 : 00.
B420A01A-AAT
CIGARETTE LIGHTER
B400A01A-AAT
DIGITAL CLOCK (If installed)
To tum on the front fog lights, push the switch.
They will come on when the headlight switch is
in the first or second position.
1-32
/
For the cigarette lighter to work, the key must be
in the "ACC" position orthe "ON" position.
To use the cigarette lighter, push it all the way
FEATURES OF YOUR HYUNDAI
into its socket. When the element has heated,
the lighter will pop out to the "ready" position.
Do not hold the cigarette lighter pressed in. This
can damage the heating element and create a
fire hazard.
If it is necessary to replace the cigarette lighter,
use only a genuine Hyundai replacement or its
approved equivalent.
B440A01A-AAT
REAR ASHTRAY (If Installed)
The drink holder is located on the front main
console for holding cups or cans in its holes.
The drink holder can be used by pushing it at its
top edge.
CAUTION:
Place the drink holder In its origlnal position
while not in use.
WARNING:
Do not place anythlng else on the drink
holder. Such objects can be thrown out,
possibly injuring persons in the vehicle during sudden braking or in an accident.
B430A01S-AAT
FRONT ASHTRAY
D
The rear ashtray may be opened by pulling it
out by its top edge. To remove the ashtray to
empty or clean it, lift the ashtray outward and up
at the top edge.
B470A01A-AAT
SUNSHADE (If installed)
To remove the sunshade
B450A03A-AAT
DRINK HOLDER
The front ashtray may be opened by pulling it
out by its grip. To remove the ashtray to empty
or clean it, press down on the spring-loaded tab
inside the ashtray and pull it all the way out. The
ashtray light will only illuminate when the external lights are on.
1. Pull the sunshade knob toward the front of
the sunshade then pull down the rear of the
sunshade.
1-33
FEATURES OF YOUR HYUNDAI
2. Then, you can easily remove the sunshade.
The sunroof can be manually opened or closed.
Pull the handle down and then forward and
up as indicated by the arrows in the illustration.
2. Push the handle at the center to lock the
sunroof in the open position.
3. After tilting up the sunroof, make sure the
handle is secure in place.
1.
To install the sunshade
1. Install the hook into the holder attached on
the front of the sunroof.
2. Slide and lock the sunshade into the catch.
WARNING:
Never Install or remove the sunshade whlle
drivlng.
B460B02A-AAT
CAUTION:
o Installatlon or removal of the sunshade
should be done with the sunroof closed.
o Before drivlng, make sure the sunshade
Is securely Installed.
sunroof and the sunroof sash as thls may
cause an Injury.
CAUTION:
o Do not open the sunroof in severely cold
temperatures or when It Is covered wlth
ice or snow.
o Remove water drops, snow, ice or sand
from the sunroof before openlng.
B460C01A-AAT
To Close the Sunroof
To Remove the Sunroof
B460A01A-AAT
SUNROOF (If installed)
To Tilt Up the Sunroof
AS10672A/AS10673A
1. Pull the handle toward you.
2. After the sunroof has been closed, lock the
handle back into position.
3. Be sure that the sunroof and handle are
securely closed.
AS10670AMS10671A
1-34
WARNING:
Do not close the sunroof if anyone's hands,
arms or other body parts are between the
1. Remove the sunshade before removing the
sunroof.
2. Pull the handle all the way downward.
3. Depress the handles of the base plate to
release them from their holes.
4. Raise the sunroof glass from outside of the
vehicle until it is perpendicular to the roof
panel.
FEATURES OF YOUR HYUNDAI
5. Now, you can easily remove the sunroof
from the roof panel.
WARNING:
o Dp not stand up or extend any portion of
your body out of the opening while the
vehicle is moving.
o Do not slt on top of the vehicle around
the opening
WARNING:
o Never install or remove the sunroof while
drlvlng.
o Never put your hands between the
sunroof and the car's body.
o Do not drlve the vehicle without belng
certain that the sunroof is securely locked
in place.
B490A01A-AAT
INTERIOR LIGHT (with sunroof)
B460E01A-AAT
B460D01A-AAT
Storlng the Sunroof and the Sunshade
To Install the Sunroof
The interior courtesy light has a 3-position
switch. The three positions are:
In the "MIDDLE" position, the interior courtesy light comes on when any door is opened,
then goes out when it is closed.
O "OFF"
1. Insert the flat hinges into the cutouts. Then
supporting the sunroof with your hands,
slowly lower it.
2. Make sure both of the flat hinges are securely inserted into their cutouts.
3. Depress the handles of the base plate and
insert into the holes.
There is a storage bag in the trunk. Place the
sunroof or sunshade into the storage bag and
store it in the trunk.
In the "RIGHT" position, the light stays off
•wen though a door is open.
O "ON"
CAUTION:
o Be careful not to place heavy objects on
the bag, otherwise the sunshade or
sunroof may be deformed or broken.
o When storing the sunroof and sunshade
Into the storage bag, put the sunshade
on top of the sunroof.
In the 'LEFT" position, the light stays on at
all times.
1-35
FEATURES OF YOUR HYUNDAI
B490B01A-AAT
B500A01A-AAT
B510A01A-AAT
Interior Light (Without Sunroof)
GLOVE BOX
OUTSIDE REAR VIEW MIRROR
Manual Type
B490B03A
The interior courtesy light has a 3-position
switch. The three positions are:
o "DR"
In the "MIDDLE" position, the interior courtesy light comes on when any door is opened,
then goes out when it is closed.
o "OFF"
In the "LEFT" position,, the light stays off
even though a door is open.
o "ON"
In the "RIGHT" position, the light stays on at
all times.
1-36
AX10710A
WARNING:
To avoid the possibility of injury in case of
accident or a sudden stop, the glove box
door should be kept closed when the car is
In motion.
o To open the glove box, pull on the glove box
release lever.
The outside rear view mirrors are equipped with
a remote control for your convenience. It is
operated by the control lever in the bottom f ront
corner of the window.
Before driving away, always check that your
mirrors are positioned so you can see behind
you, both to the left and right sides, as well as
directly behind your vehicle. When using the
mirror, always exercise caution when attempting to judge the distance of vehicles behind or
along side of you.
CAUTION:
If the mirror control Is jammed with ice, do
not attempt to break it free using the control
handle or by manipulating the face of the
mirror. Use an approved spray de-icer (not
radiator antifreeze) to release the frozen
FEATURES OF YOUR HYUNDAI
mechanism or move the vehlcle to a warm
place and allow the ice to melt.
B510B01A-AAT
Electric Type (If installed)
CAUTION:
o Do not operate the switch continuously
for an unnecessary length of time.
o Scraping Ice from the mirror face could
cause permanent damage. To remove any
Ice, use a sponge, soft cloth or approved
delcer.
WARNING:
Be careful when judglng the slze or distance
of any object seen In the passenger side
rear view mirror. It Is a convex mirror wlth a
curved surface. Objects seen in this mirror
are closer than they appear.
in the switch for the rear window defroster. The
rearview mirror glass will be heated for defrosting or defogging and will give you improved rear
vision in inclimate weather conditions. Push the
switch again to turn the heater off. The outside
rearview mirror heater automatically tums itself
offafter 15minutes.
B510C01A-AAT
FOLDING THE OUTSIDE REAR VIEW
MIRRORS
B510D01Y-AAT
/'
The outside rear view mirrors can be adjusted
to any direction to give the maximum rear view
vision.
The remote control outside rear view mirror
switch controls the adjustments for both right
and left door mirrors.
OUTSIOE REARVIEW
HEATER (If installed)
MIRROR
To fold the outside rear view mirrors, push them
towards the rear.
The outside rear view mirrors can be folded
rearward for parking in narrow areas.
To adjust the position of either mirror:
1. Move the selecting switch to the right or left
to activate the adjustable mechanism for the
corresponding door mirror.
2. Next, adjust mirror angle by depressing the
appropriate perimeter switch as illustrated.
The outside rearview mirror heater is actuated
in connection with the rear window defroster.
To heatthe outside rearview mirror glass, push
WARNING:
Do not adjust or fold the outside rearview
.mirrors whlle the vehlcle Is moving.
1-37
FEATURES OF YOUR HYUNDAI
Thls could result in loss of control, and an
accident whlch could cause death, serious
injury or property damage.
B530A01A-AAT
B110A02A-AAT
PARKING BRAKE
FOLDING REAR SEAT BACKS
(If installed)
B520A01A-AAT
DAY/NIGHT INSIDE REAR VIEW MIRROR
Your Hyundai is equipped with a day/night
inside rear view mirror. The "night" position is
selected by flipping the tab at the bottom of the
mirror toward you. In the "nighf position, the
glare of headlights of cars behind you is reduced.
1-38
Always engage the parking brake before leaving the car. This also tums on the parking brake
indicator light when the key is in the "ON" or
"START" position. Before driving away, be sure
that the parking brake is fully released and the
indicator light isoff.
o To engage the parking brake, pull the lever
up as far as possible.
o To release the parking brake, pull up the
lever and press the thumb button. Then,
while holding the button in, lower the brake
lever.
WARNING:
The purpose of the f old-down rear seat backs
Is to allow you to carry longer objects than
could otherwise be accommodated. Do not
allow passengers to sit on top of the foldeddown seat back while the car Is moving as
this Is not a proper seatlng position and no
seat belts are avallable for use when the
seat backs are folded down. Thls could result In serious Injury or death In case of an
accident or a sudden stop. Objects carrled
on the folded-down seat back should not
extend hlgher than the top of the front seats.
Thls could allow cargo to slide forward and
cause Injury or damage durlng sudden stops.
FEATURES OF YOUR HYUNDAI
For greater convenience, the entire seat back
may be folded down or the seat backs may be
folded down individually.
o To unlock the seat back, pull up on the seat
back locking knob, then pull forward on the
seat back.
o When you retum the seatback to its upright
position, always be sure it has locked into
position by pulling and pushing on the top of
the seat back.
WARNING:
When you return the rear seatback to its
upright position after being folded down, be
caref ul not to damage the seat belt webbing
or buckle. In addition, do not allow the seat
belt webbing or buckle to get caught or
pinched in the rear seat.
B&40A02A-AAT
ZB320A1 A
TAIL GATE/TRUNK LID
CARGO AREA COVER
(3/5 Door Model)
WARNING:
The tall gate or trunk lld should always be
kept completely closed while the vehicle Is
in motion. If it Is left open or ajar, polsonous
exhaust gases may enter the car resultlng In
serious injury or death to the occupants.
See addltional warnlngs concernlng exhaust
gases on page 2-1.
Nothing should be carried on fop of the luggage
cover. Loose materials could result in injury to
vehicle occupants during sudden braking.
B540E01A-GAT
Trunk Lid Emergency Latch Release
(If Installed)
o The tail gate or trunk lid is opened by first
tuming the key clockwise to release the
lock, then raising the door manually.
o To close, lower the door or lid, then press
down on it until it locks. To be sure the door
or lid is securely fastened, always try to pull
it up again.
1-39
FEATURES OF YOUR HYUNDAI
NOTE:
o If a person is locked in the trunk, he tnay
pull the red painted lever on the inside
latch cover. This will open the trunk lid.
o We're recommending that cars be kept
locked and keys be kept out of the reach
of chlldrcn, and that parents teach their
children about the dangers of playing in
trunks.
WARNING:
The tail gate or trunk lid should always be
kept completely closed whlle the vehlcle Is
in motlon. If it is left open or a]ar, exhaust
gases may enter the ear and serlous illness
may result.
8560A01A-AAT
REMOTE FUEL-FILLER LID
RELEASE
B550A01F-AAT
HIGH-MOUNTED REAR STOP
LIGHT (If installed)
B540D02A-AAT
Remote Tail Gate/Trunk Lid Release
(If installed)
The fuel-filler lid may be opened from inside the
vehicle by pulling up on the fuel-filler lid opener
located on the f ront floor area on the left side of
the car.
The tail gate or trunk lid is opened by pulling the
lever to release the lock, then raising the door
or lid manually.
To close, lower the door or lid, then press down
on it until it locks. To be sure the door or lid is
securely fastened, always try to pull it up again.
1-40
In addition to the lower-mounted rear stop lights
on either side of the car, the high mounted rear
stop light in the center of the rear window also
comes on when the brakes are applied.
NOTE:
If the fuel-filler lid wlll not open because lce
has formed around it, tap llghtly or push on
the lid tarbreak the ice and release the lid.
Do not pry on the lid. If necessary, spray
around the lid with an approved de-lcer fluid
(do not use radlator anti-freeze) or move the
vehlcle to a warm place and allow the ice to
melt.
FEATURES OF YOUR HYUNDAI
B570AOIA-GAT
HOOD RELEASE
\
WARNING:
Gasoline vapors are dangerous. Before refueling, always stop the engine and never
allow sparks or open flames near the filler
area. If you need to replace the filler cap, use
a genuine Hyundai replacement part. If you
open the fuel filler cap durlng high amblent
temperatures, a sllght "pressure sound" may
be heard. Thls Is normal and not a cause for
concern. Whenever you open the fuel filler
cap, turn It slowly.
r'
1. Pull the release knob to unlatch the hood.
2. Press the safety catch lever up and lift the
hood.
3. Hold the hood open with the support rod.
Before closing the hood, retum the support rod
to its clip to prevent it from rattling. Lower the
hood until it is about 1 ft. (30 cm) above the
closed position and let it drop. Make sure that it
locks into place.
WARNING:
Make sure that the support rod has been
released prlor to closing the hood. Always
double check to be sure that the hood is
firmly latched before drlvlng away. If It is not
latched, the hood could fly open while the
vehicle is being driven, causing a total loss
of visibility, which might result in an accldent. The support rod must be inserted
completely Into the hole provided in the
hood whenever you inspect the engine compartment. Thls will prevent the hood from
falling and possibly injurlng you. Do not
move the vehicle with the hood in the raised
position, as vlsion Is obstructed and the
hood could fall or be damaged.
1-41
r
FEATURES OF YOUR HYUNDAI
B580A01A-AAT
B600A01A-AAT
B610A01A-QAT
SUN VISOR
STEERING WHEEL TILT LEVER
(If installed)
HORN (With Airbag) (If installed)
^~~<
AX10890A
Your Hyundai is equipped with sun visors to
give the driver and front passenger either frontal or sideward shade. The sun visors are fitted
on both sides on all models. To reduce glare or
to shut out direct rays of the sun, tum the sun
visor down to block the annoyance.
A vanity mirror is provided on the back of the
sun visor for the front passenger.
NOTE:
The Supplemental Restraint System (SRS)
label containing useful information can be
found on the back of each sun visor.
CAUTION:
Do not place the sun visor in such a manner
that it obscures visibllity of the roadway,
traffic or other objects.
To adjust the steering wtieel:
1. Push the lever downward to unlock.
2. Raise or lower the steering wheel to the
desired position.
3. After adjustment, securely tighten the lever
by pulling it upward.
Press the pad on the steering wheel to sound
thehom.
B610B01A-GAT
HORN (Without Airbag)
WARNING:
Do not attempt to adjust the steering wheel
whlle drlving as this may result In loss of
control of the vehicle wnlch may cause serious injury or death.
Press the pad on the steering wheel to sound
the hom.
1-42
FEATURES OF YOUR HYUNDAI
B670A01A-AAT
B670B02A-AAT
B670C02A-AAT
HEATING AND VENTILATION
ROTARY TYPE (If installed)
FAN SPEED CONTROL
(BLOWER CONTROL)
AIR INTAKE CONTROL
This model has four controls for the heating and
cooling system. They are:
This is used to tum the blower fan on and off
and to select the fan speed.
The blower fan speed, and therefore the volume of air delivered from the system, may be
controlled manually by setting the blower control between the "1" and "4" position.
1.
2.
3.
4.
Fan speed control
Air flow control
Temperature control
Air intake control
This is used to select fresh outside air or
recirculation inside air.
Fresh
Recirculation
With the "P=y rnode selected, air enters the
vehicle from outside and is heated or cooled
according to the other functions selected.
With the "<&f mode selected, air from within
the passenger compartment is drawn through
the heating system and heated or cooled according to the other functions selected.
NOTE:
It should be noted that prolonged operation
of the heating system in "rgs" mode will
give rise to misting of the windshield and
1-43
FEATURES OF YOUR HYUNDAI
side windows and the air withln the passenger compartment will become stale. In addition prolonged use of the air conditioning
with the "c£b " mode selected may result
in the air within the passenger compartment
becoming excessively dry.
ZB440D2-G
AIR FLOW CONTROL
floor vents. This makes it possible to have
cooler air from the dashboard vents and warmer
air from the floor outlets at the same time.
B690A03A-GAT
Floor-Level
Floor-Defrost Level
Air is discharged through the windshield defrost
vents and the floor vents.
If the "Floor-Defrost" mode is selected, the A/C
will be on automatically.(lf installed)
B670E02A-AAT
Face-Level
SelectingI the "Face" mode will cause air to be
discharae3d through the face level vents.
Bi-Level
Air is discfiharged through the face vents and the
1-44
HEATING CONTROLS
Air is discharged through the floor vents.
Defrost-Level
Air is discharged through the windshield defrost
vents.
If the "Defrost" mode is selected, the A/C will be
on automatically.(lf installed)
This is usec
;ed to direct the flow of air. Air can be
directedtotl
othefloor, dashboard outlets, orwindshield. Five
ive symbols are used to represent
Face, Bi-Le
-Level, Floor, Floor-Defrost and DeKDsition.
frost air pos
This is used to tum the heating system on and
off and to select the degree of heating desired.
TEMPERATURE CONTROL
For normal heating operation, set the air intake
control to the fresh air (£Eb) position and the
air flow control to the floor (V') position.
For faster heating, the air intake control should
be set in the recirculate (cSb) position.
If the windows fog up, set the air flow control to
the defrost Cffi) position (The A/C will be on
automatically, if installed.) and the air intake
control to the fresh air (£Eb) position.
For maximum heat, move the temperature control to "Warm".
FEATURES OF YOUR HYUNDAI
B670B01A-AAT
B710A01A-AAT
B710B01A-AAT
BI-LEVEL HEATING
VENTILATION
CENTER VENTILATOR
Your Hyundai is equipped with bi-level heating
controls. This makes it possible to have cooler
air from the dashboard vents and warmer air
from the floor outlets at the same time. To use
this feature:
To operate the ventilation system:
The center ventilators are located in the middle
of the dashboard.
To change the direction of the airflow, tum the
control knob on the middle of the ventilator as
desired.
o Set the air intake control to the fresh air
(£0$ position.
o Set the air flow control at the bi-level
(ty) position.
o Set the temperature control between "Cool"
and "Warm".
o Set the air intake control at the fresh air
position.
o To direct all intake air to the dashboard
vents, set the airflow control to the face
position.
o Adjust the fan speed control to the desired
speed.
o Set the temperature control between "Cool"
and "Warm".
B710C01A-AAT
SIDE VENTILATOR
1-45
FEATURES OF YOUR HYUNDAI
The side ventilators are located on each side of
the dashboard. To change the direction of the
air flow, tum the control knob on the middle of
the side ventilator as desired.
B720A03A-QAT
DEFROSTING/DEFOGGING
To remove the frost or exterior fog on the
windshield:
o Set the air intake control to the fresh (£2>)
position.
o Set the air flow control to the defrost (<ffi)
position. (The A/C will be on automatically, if
installed.)
o Set the temperature control to the warm.
o Set the fan speed control to position "3" or
B740A01A-AAT
AIR CONDITIONING SWITCH
(If Installed)
•4V
B730A01A-AAT
Use the heating/ventilation system to defrost or
defog the windshield:
To retnove the interlor fog on the windshield:
o Set the air intake control to the fresh air
(£E2>) position.
o Set the air flow control to the defrost (<$)
position. (The A/C will be on automatically, if
installed.)
o Set the temperature control at the desired
position.
o Set the fan speed control between "1" and
"4" position.
1-46
OPERATION TIPS
o To keep dust or unpleasant fumes from
entering the car through the ventilation system, temporarily set the air intake control at
thedSb position.
Be sure to retum the control to the £Eb
position wtien the irritation has passed to
keep fresh air in the vehicle. This will help
keep the driver alert and comfortable.
o Air for the heating/cooling system is drawn
in through the grilles just ahead of the windshield. Care should be taken that these are
not blocked by leaves, snow, ice or other
obstructions.
The air conditioning is tumed on by pushing the
A/C button on the heating/air conditioning control panel.
FEATURES OF YOUR HYUNDAI
B740B02A-AAT
B740C01A-AAT
B740001A-AAT
AIR CONDITIONING OPERATION
De-Humidified Heating
Operation Tips
o If the interior of the car is hot when you first
get in, open the windows for a few minutes
to expel the hot air.
o When you are using the air conditioning
system, keep all windows closed to keep
hot air out.
o When moving slowly, as in heavy traffic,
shift to a lower gear. This increases engine
speed, which in tum increases the speed of
the air conditioning compressor.
o On steep grades, turn the air conditioner off
to avoid the possibility of the engine over-
(If Installed)
Cooling
To use the air conditioning to cool the interior:
o Turn on the fan control switch.
o Turn on the air conditioning switch by pushing in on the switch.
The air conditioning indicator light should
come on at the same time.
o Set the air intake control to the £2> posifon.
o Set the temperature control to "Cool". ("Cool"
provides maximum cooling. The temperature may be moderated by moving the control toward "Warm".)
o Adjust the fan control to the desired speed.
For greater cooling, tum the fan control to
one of the higher speeds or temporarily
select the dSb position on the air intake
control.
For dehumidified heating:
o Tum on the fan control switch.
o Tum on the air conditioning switch. The air
conditioning indicator light should come on
at the same time.
o Set the air intake control to the fresh air
(£2>) position.
o Set the air flow control to the face ("^J)
position.
o Adjust the fan control to the desired speed.
o For more rapid action, set the fan at one of
the higher speeds.
o Adjust the temperature control to provide the
desired amount of warmth.
During winter months or in periods when the
air conditioner is not used regulariy, run the
air conditioner once every month for a few
minutes. This will help circulate the lubricants and keep your system in peak operating condition.
1-47
FEATURES OF YOUR HYUNDAI
B760A04Y-GAT
B750A01A-AAT
AIR FILTER (FOR EVAPORATOR AND
BLOWER UNIT) (If installed)
STEREO SOUND SYSTEM
How Car Audio Works
FM reception
The airfilter is located in the evaporator behind
the glove box.
It operates to prevent pollutant enter the car
and to purify the air.
CAUTION:
o Replace the filterevery 20,000km (12,000
miles) or once a year. If the car Is being
driven In severe conditlons such as dusty,
rough roads, more frequent air fllter inspectlons and changes are requlred.
o When the air flow rate Is suddenly decreased, It must be checked at authorized dealer.
1-48
/7
AM reception
lonosphere
lonosphere
AM and FM radio signals are broadcast from
transmitter towers located around your city.
They are intercepted by the radio antenna on
your car. This signal is then received by the
radio and sent to your car speakers.
When a strong radio signal has reached your
vehicle, the precise engineering of your audio
system ensures high quality reproduction. However, in some cases the signal coming to your
vehicle is not strong and clear. This can be due
to factors such as the distance from the radio
station, closeness of other strong radio stations
or the presence of buildings, bridges or other
large obstructions in the area.
AM signal reception is usually better than FM
reception. This is because AM radio waves are
transmitted at low frequency. These long, low
frequency radio waves can follow the curvature
of the earth rather than travelling straight out
into the atmosphere. In addition, they curve
around obstructions so that they can provide
better signal coverage. Because of this, clear
AM broadcasts can be received at greater distances than FM broadcasts.
FEATURES OF YOUR HYUNDAI
FM broadcasts are transmitted at high f requency and do not bend to follow the earth's surface.
Because of this, FM broadcasts generally begin
to fade at short distances from the station. Also,
FM signals are easily affected by buildings,
mountains, or other obstructions. These can
result in certain listening conditions which might
lead you to believe a problem exists with your
radio. The following conditions are normal and
do not indicate radio trouble:
Fading - As your car moves away from the
radio station, the signal will weaken and
sound will begin to fade. When this occurs,
we suggest that you select another stronger
station.
Flutter/Static - Weak FM signals or large
obstructions between the transmitter and
your radio can disturb the signal causing
static or fluttering noises to occur. Reducing
the treble level may lessen this effect until
the disturbance clears.
Station Swapping - As an FM signal weakens, another more powerful signal near the
same frequency may begin to play. This is
because your radio is designed to lock onto
the clearest signal. If this occurs, select
another station with a stronger signal.
Multi-Path Cancellation - Radio signals being received from several directions can
cause distortion or fluttering. This can be
caused by a direct and a reflected signal
from the same station, or by signals from
two stations with close frequencies. If this
occurs, select another station until the condition has passed.
1-49
FEATURES OF YOUR HYUNDAI
B750B01Y-AAT
Using a cellular phone or a two-way
radio
When a cellular phone is used inside the vehicle, noise may be produced from the audio
equipment. Thls does not mean that something
is wrong with the audio equipment. In such a
case, use the cellular phone at a place as far as
possible from the audio equipment.
CAUTION:
When uslng a communicatlon system such
a cellular phone or a radio set Inside the
vehlcle, a separate external antenna must
be fitted. When a cellular phone or a radio
set Is used by uslng an Internal antenna
alone, it may Interfere with the vehlcle's
electrlcal system and adversely affect safe
operation of the vehlcle.
1-50
FEATURES OF YOUR HYUNDAI
H900601A-GAT
STEREO RADIO OPERATION (H900B)
5. TUNE select button
4. BAND selector
3. BASSn~REBLE control knob
1. POWER ON-OFF, BALANCE, Volume control knob
2. FADER control knob
1-51
FEATURES OF YOUR HYUNDAI
H900B01B-QAT
1. POWER ON-OFF/VOLUME CONTROL KNOB
The radio unit may be operated when the ignition key is in the "ACC" or "ON" position. Rotate
the knob clockwise to switch the radio unit on
and to increase the volume.
The LCD shows the radio frequency in the radio
mode. Tum the knob counterclockwise to reduce the volume and to switch the radio unit off.
BAL (Balance Control) Knob
Pull and tum the control knob clockwise to
emphasize right speaker sound. (Left speaker
sound will be attenuated) When the control
knob is tumed counterclockwise, left speaker
sound will be emphasized. (Right speaker sound
will be attenuated)
2. FAD (Fader Control) Knob
Tum the control knob clockwise to emphasize
front speaker sound (Rear speaker sound will
be attenuated). When the control knob is turned
counterclockwise, rear speaker sound will be
emphasized (Front speaker sound will be attenuated).
3. BASS Control Knob
Press to pop the knob out and tum to the left or
right for the desired bass tone.
1-52
TREBLE Control Knob.
Further pull-lock position of popped-up knob.
Tum to the left or right for the desired treble
tone.
4. BAND Selector
Pressing the ^ button changes the AM, FM1
and FM2 bands. The mode selected is displayed on LCD.
5. TUNE (manual) Select Button
Press the (+) side or (-) side to increase or to
decrease the frequency. With the button held
down for 0.5 sec. or more, the stop signal
(broadcasting radio wave) is ignored and channel selection continues.
SEEK Operation (Automatic Channel
Selection)
Press the TUNE select button 1 sec. or more.
When the (+) side is pressed, the unit will
automatically tune to the next higher frequency
and when the (-) side is pressed, it will automatically tune to the next lower frequency.
6. PRESET STATION SELECT Button
Six (6) stations for AM, FM and FM2 respectively can be preset in the electronic memory
circuit on this unit.
HOW TO PRESET STATIONS
Six AM and twelve FM stations may be programmed into the memory of the radio. Then,
by simply pressing the band select button and/
or one of the six station select buttons, you may
recall any of these stations instantly. To program the stations, follow these steps:
o Press band selector to set the band for AM,
FM, and FM2.
o Select the desired station to be stored by
seek, scan or manual tuning.
o Determine the preset station select button
you wish to use to access that station.
o Press the station select button for more than
two seconds. A select button indicator will
show in the display indicating which select
button you have depressed. The frequency
display will flash afler it has been stored into
the memory. You should then release the
button, and proceed to program the next
desired station. A total of 18 stations can be
programmed by selecting one AM and two
FM stations per button.
o When completed, any preset station may be
recalled by selecting AM, FM or FM2 band
and the appropriate station button.
FEATURES OF YOUR HYUNDAI
H900A01A-GAT
STEREO RADIO AND CASSETTE TAPE PLAYER OPERATION (H900A) (If installed)
4. TUNE/SEEKSelectButton
5. BANDSelector
7. TAPE EJECT Button
8. TAPE PROGRAM Button
6. PRESET Buttons
3. BASS/TREBLE Control Knob
1. POWER ON-OFF/VOLUME/BALANCE Control Knob
2. FADER Control Knob
1-53
FEATURES OF YOUR HYUNDAI
H900A01B-GAT
1. POWER ON-OFF/VOLUME
CONTROL KNOB
The radio unit may be operated when the ignition key is in the "ACC" or "OW position. Rotate
the knob clockwise to switch the radio unit on
and to increase the volume. The LCD shows
the radio frequency in the radio mode, or the
tape direction indicator in the tape mode. Turn
the knob counterclockwise to reduce the volume and to switch the radio unit off.
TREBLE Control Knob
Further pult-lock position of popped-up knob.
Tum to the left or right for the desired treble
tone.
4. TUNE (Manual) Select Button
Press the (+) side or (-) side to increase or to
decrease the frequency. With the button held
down for 0.5 sec. or more, the stop signal
(broadcasting radio wave) is ignored and channel selection continues.
BAL (Balance Control) Knob
SEEK Operation (Automatic Channel
Pull and tum the control knob clockwise to
emphasize right speaker sound. (Left speaker
sound will be attenuated) When the control
knob is tumed counterclockwise, left speaker
sound will be emphasized. (Right speaker sound
will be attenuated)
Selection)
2. FAD (Fader Control) Knob
Tum the control knob clockwise to emphasize
front speaker sound (Rear speaker sound will
be attenuated). When the control knob is tumed
counterclockwise, rear speaker sound will be
emphasized (Front speaker sound will be atten-
3. BASS Control Knob
Press to pop the knob out and tum to the left or
nght for the desired bass tone.
1-54
Press the TUNE select button 1 sec. or more.
When the (+) side is pressed, the unit will
automatically tune to the next higher frequency
and when the (-) side is pressed, it will automatically tune to the next lower frequency.
5. BAND Selector
Pressing the ^button changes the AM, FM1
and FM2 bands. The mode selected is displayed on LCD.
6. PRESET STATION SELECT Button
Six (6) stations for AM, FM and FM2 respectively can be preset in the electronic memory
circuit on this unit.
HOW TO PRESET STATIONS
Six AM and twelve FM stations may be programmed into the memory of the radio. Then,
by simply pressing the band select button and/
or one of the six station select buttons, you may
recall any of these stations instantly. To program the stations, follow these steps:
o Press band selector to set the band for AM,
FM, and FM2.
o Select the desired station to be stored by
seek, scan or manual tuning.
o Determine the preset station select button
you wish to use to access that station.
o Press the station select button for more than
two seconds. A select button indicator will
show in the display indicating which select
button you have depressed. The frequency
display will flash after it has been stored into
the memory. You should then release the
button, and proceed to program the next
desired station. A total of 18 stations can be
programmed by selecting one AM and two
FM stations per button.
o When completed, any preset station may be
recalled by selecting AM, FM or FM2 band
and the appropriate station button.
7. TAPE EJECT Button
To eject the tape, press the button.
8. TAPE PROGRAM
When you press the button whose arrow is in
the same direction as the tape play arrow in the
display the tape will advance at high speed.
When you press the button whose arrow is in
FEATURES OF YOUR HYUNDAI
the opposite direction to the tape play arrow in
the display the tape will rewind at high speed.
To stop FF or REW action, press the opposite
button. When you press two buttons simultaneously you play the reverse side of the tape
and an arrow will appear in the display to show
tape direction.
1-55
FEATURES OF YOUR HYUNDAI
H920C01A-QAT
STEREO RADIO OPERATION (H920C) (If installed)
3. BASS/TREBLE Control Knob
6. PRESET Buttons
5. TUNE/SEEK Select Button
4. BANDSelector
2. FADER Conlrol Knob
1. POWER ON-OFF/VOLUME/BALANCE Control Knob
1-56
FEATURES OF YOUR HYUNDAI
H920C01B-GAT
1. POWER ON-OFF/VOLUME
CONTROL KNOB
The radio unit may be operated when the ignition key is in the "ACC" or "ON" position. The
clock will be displayed automatically, although
the radio unit has gone out. Press the button to
switch the power on. The LCD shows the radio
frequency in the radio rnode or the CD track
indicator in the CD mode. To switch the power
off, press the button again.
VOLUME Control
Rotate the knob clockwise to increase the volume and tum the knob counterclockwise to
reduce the volume.
BALANCE Control
Pull and tum the control knob clockwise to
emphasize right speaker sound. (Left speaker
sound will be attenuated) When the control
knob is tumed counterclockwise, left speaker
sound will be emphasized. (Right speaker sound
will be attenuated)
2. FAD (Fader Control) Knob
Tum the control knob counterclockwise to emphasize front speaker sound. (Rear speaker
sound will be attenuated) When the control
knob is tumed clockwise, rear speaker sound
will be emphasized. (Front speaker sound will
be attenuated)
3. BASS/TREBLE Control Knob
BASS Control Knob
Press to pop the knob out and tum to the left or
right for the desired bass tone.
TREBLE Control Knob
Further pull-lock position of popped-up knob.
Tum to the left or right for the desired treble
tone.
4. BANO Selector
Pressing the E^Sbutton changes the AM, FM1
and FM2 bands. The mode selected is displayed on LCD.
5. TUNE (Manual) Select Button
Press the (+) side or (-) side to increase or to
decrease the frequency. With the button held
down for 0.5 sec. or more, the stop signal
(broadcasting radio wave) is ignored and channel selection continues.
SEEK Operation (Automatic Channel
Selection)
Press the TUNE select button 1 sec or more,
and releasing will automatically tune the next
available station.
When the (+) side is pressed longer than 1
second and releasing will automatically tune
the next higher frequency and when the (-) side
is pressed longer than 1 second and releasing
will automatically tune the next lower frequency.
6. PRESET STATION SELECT Button
Six (6) stations for AM, FM and FM2 respectively can be preset in the electronic memory
circuit on this unit.
HOW TO PRESET STATIONS
Six AM and twelve FM stations may be programmed into the memory of the radio. Then,
by simply pressing the band select button and/
or one of the six station select buttons, you may
recall any of these stations instantly. To program the stations, follow these steps:
o Press band selector to set the band for AM,
FM, and FM2.
o Select the desired station to be stored by
seek, scan or manual tuning.
o Determine the preset station select button
you wish to use to access that station.
o Press the station select button for more than
two seconds. A select button indicator will
show in the display indicating which select
button you have depressed. The frequency
display will flash after it has been stored into
the memory. You should then release the
button, and proceed to program the next'
desired station. A total of 18 stations can be
programmed by selecting one AM and two
FM stations per button.
o When completed, any preset station may be
recalled by selecting AM, FM or FM2 band
and the appropriate station button.
1-57
FEATURES OF YOUR HYUNDAI
H920C01C-GAT
COMPACT DISK PLAYER OPERATION (H920C) (If Installed)
1. STOP
3. TRACKUP/DOWN
5. EJECTButton
2. FF/REW
REPEAT
1-58
FEATURES OF YOUR HYUNDAI
H920C01D-GAT
1.STOP
o Insert the CD to start CD playback, during
the radio operation.
o Pressthe ESSfl button to stop CD playback
and to change the source to Radio.
2. FF/REW
While the disc is playing, press and hold FF
button to quickly move forward until you reach
the desired section of the track and vice versa.
3. TRACK UP/DOWN
o The desired track on the disc currently being
played can be selected using the track number.
o Pressing the •*< button once increases the
track number by one and pressing the
»*4 button decreases it.
4. REPEAT
'To repeat the music you are listening to, press
the RPT button and to cancel music repeat,
press again.
NOTE:
o To assure proper operation of the unit,
keep the vehlcle Interior temperature
within a normal range by uslng the vehicle's alr condltioning or heatlng system.
o When replaclng the fuse,replaceitwttha
fuse having the correct capacity.
o The preset station frequencles are all
erased when the car battery is disconnected. Therefore, all data will have to be
set again If thls should occur.
o Do not add any oll to the rotating parts.
o Thls equipment is designed to be used
only In a 12 volt DC battery system with
negative ground.
o Thls unit is made of preclslon parts. Do
not attempt to dlsassemble or ad]ust any
parts.
o When drivlng your vehicle, be sure to
keep the volume of the unit set low
enough to allow you to hear sounds comIng from the outslde.
o Do not expose thls equipment (including
the speakers and tape) to water or excesslve moisture.
5. EJECT Button
When the EJECT button is pressed with the CD
loaded, the CD is ejected.
1-59
FEATURES OF YOUR HYUNDAI
B850A01F-AAT
CARE OF DISC
Proper Handling
while the disc is being pulled into the unit by the
self loading mechanism.
Do not pull the unit from the dash immediately
after a disc is inserted or the eject switch has
been pressed. If the unit is pulled out before an
operation is completed, the disc will be unstable
in the unit and may be damaged.
Do not attempt to insert a disc into the unit when
the unit is out of the dash or the power is off.
AB540C1 A
Care of Cassette Tapes
Keep Your Discs Clean
Handle your disc as shown. Do not drop the
disc. Hold the disc so you will not leave fingerprints on the surface. If the surface is scratched,
it may cause the pickup to skip signal tracks.
Do not affix tape, paper, or gummed labels on
the disc. Do not write on the disc.
Damaged Disc
Do not attempt to play damaged, warped or
cracked discs. These could severely damage
the playback mechanism.
Storage
When not in use, place your discs in their
individual cases and store them in a cool place
away from the sun, heat, and dust.
Do not grip or pull out the disc with your hand
1-60
Fingerprints, dust, or soil on the surface of a
disc could cause the pickup to skip signal
tracks. Wipe the surface clean with a clean soft
cloth. If the surface is heavily soiled, dampen a
clean soft cloth in a solution of mild neutral
detergent to wipe it clean. See drawing.
Proper care of your cassette tapes will extend
the tape life and increase your listening enjoyment. Aiways protect your tapes and cassette
cases from direct sunlight, severe cold and
dusty conditions. When not in use, cassettes
should always be stored in the protective cassette case in which they were originally supplied. When the vehicle is very hot or cold, allow
the interior temperature to become more comfortable before listening to your cassettes.
o Never leave a cassette inserted in the player when not being played. This could damage the tape player unit and the cassette
tape.
o We strongly recommend against the use of
tapes longer than C-60 (60 minutes total).
Tapes such as C-120 or C-180 are very thin
and do not perform as well in the automotive
environment.
FEATURES OF YOUR HYUNDAI
Cotton applicator
SSAR042B
Be sure that the cassette label is not loose
or peeling off or tape ejection may be difficult.
Never touch or soil the actual audio tape
surfaces.
Keep all magnetized objects, such as electric motors, speakers or transformers away
from your cassette tapes and tape player
unit.
Store cassettes in a cool, dry place with the
open side facing down to prevent dust from
settling in the cassette body.
Avoid repeated fast reverse usage to replay
one given tune or tape section. This can
cause poor tape winding to occur, and eventually cause excessive internal drag and
poor audio quality in the cassette. If this
occurs, it can sometimes be corrected by
fast winding the tape from end to end several times. If this does not correct the problem,
do not continue to use the tape in your
vehicle.
The playback head, capstan and pinch rollers will develop a coating of tape residue
that can result in deterioration of sound
quality, such as a wavering sound. They
should be cleaned monthly using a commercially available head cleaning tape or special solution available from audio specialty
shops. Follow the supplier's directions carefully and never oil any part of the tape player
unit.
Always be sure that the tape is tightJy wound
on its reei before inserting in the player.
Rotate a pencil in the drive sprockets to
wind up any slack.
NOTE:
Look at a tape before you insert it.
If the tape is loose, tighten it by turning one
of the hubs with a pencil or your finger. If
the label is peeling off, do not put it in the
player. It may cause the tape to Jam in the
drive mechanism when you try to eject it.
Oo not leave tape sitting where they are
exposed to high temperature or, high humldlty, such as on top of the dashboard or
in the player.
If a tape is exposed to extreme heat or cold,
let it reach a moderate temperature before
putting it in the player.
1-61
FEATURES OF YOUR HYUNDAI
B870A01A-QAT
B870C01A-QAT
B870B01Y-AAT
ANTENNA
Manual Antenna
Power Antenna (If installed)
Your car uses a manual stainless steel antenna
to receive both AM and FM broadcast signals.
Pull up the antenna using your fingers, as
shown in the drawing.
The antenna will automatically be extended
when the radio power switch is tumed on while
the ignition key is in either the "ON" or "ACC"
position. The antenna will automatically be retracted and stored when either the radio power
switch is tumed off or the ignition key is set to
the "LOCK" position.
Fixed Rod Antenna (If installed)
Your car uses a fixed rod antenna to receive
both AM and FM broadcast signals.
This antenna is a removable type. To remove
the antenna, tum the antenna counterclockwise. To install the antenna, tum the antenna
clockwise.
CAUTION:
Be sure to remove the antenna before washIng the car In an automatlc car wash or the
antenna may be damaged.
1-62
NOTE:
Before entering an automatic car wash or a
place wlth a low height clearance, be sure
that the antenna is f ully retracted.
NOTE:
o Before turning on the radio, make sure
that no one is near the antenna.
o Before entering an automatlc car wash
or a place with a low height clearance, be
sure that the antenna is retracted and
stored.
o If the antenna is dlrty, be sure to clean It
In order to avoid an operatlon malfunction.
DRIVING YOUR HYUNDAI
2. BEHINDTHE WHEEL - Driving Your Hyundai
WARNING: ENGINE EXHAUST CAN BE DANGEROUSI
Engine exhaust fumes can be extremely dangerous. If, at any time, you smell exhaust fumes inside the vehicle, open the
windows immediately.
o Do not Inhale exhaust fumes.
Exhaust fumes contain carbon monoxide, a colorless, odoriess gas that can cause unconsciousness and death by
asphyxiation.
o Be sure the exhaust system does not leak.
The exhaust system should be checked whenever the vehicle is raised to change the oil or for any other purpose. If you hear
a change in the sound of the exhaust or if you drive over something that strikes the undemeatn side of the car, have the
exhaust system checked as soon as possible by your Hyundai dealer.
o Do not run the engine in an enclosed area.
Letting the engine idle in your garage, even with the garage door open, is a hazardous practice. Never run the engine in your
garage any longer than it takes to start the engine and back the car out.
o Avold idling the engine for profonged perlods with people Inside the car.
If it is necessary to idle the engine for a prolonged period with people inside the car, be sure to do so only in an open area
with the air intake set at "Fresh" and the fan operating at one of the higher speeds so fresh air is drawn into the interior.
If you must drive with the hatchback/trunk open because you are carrying objects that make this necessary:
1. Close all windows.
2. Open side vents.
3. Set the air intake control at "Fresh', the air flow control at "Floor" or "Face" and the fan at one of the higher speeds.
To assure proper operation of the ventilation system, be sure the ventilation air intakes located just in front of the windshield
are kept clear of snow, ice, leaves or other obstructions.
2-1
r
DRIVING YOUR HYUNDAI
C020A01A-AAT
C030A01A-GAT
BEFORE STARTING THE ENGINE
COMBINATION IGNITION SWITCH
To Start the Engine
Before you start the engine, you should always:
1. Look around the vehicle to be sure there are
no flat tires, puddles of oil, water or other
indications of possible trouble.
2. After entering the car, check to be sure the
parking brake is engaged.
3. Check that all windows, and lights are clean.
4. Check that the interior and exterior mirrors
are clean and in position.
5. Check your seat, seatback and headrest to
be sure they are in their proper positions.
6. Lock all the doors.
7. Fasten your seat belt and be sure that all
other occupants have fastened theirs.
8. Turn off all lights and accessories that are
not needed.
9. When you tum the ignition switch to "ON",
check that all appropriate waming lights are
operating and that you have sufficient fuel.
10. Check the operation of waming lights and all
bulbs when key is in the "ON" position.
o If your Hyundai is equipped with a manual
transaxle, place the shift lever in neutral and
depress the clutch pedal fully.
o If your Hyundai has an automatic transaxle,
place the shift lever in "P" (park).
o To start the engine, insert the ignition key
and tum it to the "START" position. Release
it as soon as the engine starts. Do not hold
the key in the "START" position for more
than 15seconds.
NOTE:
For safety, the engine wlll not start If the
shift lever Is not In "P° or "N" Position (Auto
T/A).
C040A01A-AAT
KEY POSITIONS
ACC
START
WARNING:
The engine should not be turned off or the
key removed from the ignition key cyllnder
while the vehicle is In motion. The steering
wheel Is locked by removing the key.
o "START"
The engine is started in this position. It will
crank until you release the key.
NOTE:
Do not hold the key In the "START" position
for more than 15 seconds.
o "ON"
When the key is in the "ON position, the ignition
is on and all accessories may be tumed on. If
the engine is not running, the key should not be
left in the "ON" position. This will discharge the
battery and may also damage the ignition system.
o "ACC"
With the key in the "ACC" position, some electrical accessories (radio etc.) may be operated.
o "LOCK"
LOCK
2-2
The key can be removed or inserted in this
position. To protect against theft, the steering
wheel locks by removing the key.
DRIVING YOUR HYUNDAI
NOTE:
To unlockthe steering wheel, insertthe key,
and then turn the steering wheel and key
simultaneously.
C060A01A-QAT
STARTING (For Carburetor)
Normal Starting Procedu're
1. If your car has manual transaxle, place the
shift lever in neutral and depress the clutch.
If your car has automatic transaxle, place
the shift lever in "P".
2. Tum the key to "START*. Release the key
as soon as the engine starts. If the engine
does not start immediately, do not operate
the starter for more than 15 seconds at a
time. Try again after waiting a few seconds.
1. Press the accelerator pedal all the way to
the floor, then release it.
2. Tum the key to the "START". Release the
key as soon as the engine starts.
WARNING:
Do not start the engine with the transaxle
engaged In gear.
CAUTION:
Do not leave the car unattended durlng this
warm-up period.
If the car is In a garage, be sure that the
garage door is open. Letting the engine
door open, Is a hazardous practlce. Never
run the engine in your garage any longer
than it takes to start the engine and back the
car out.
o Depress and hold the accelerator pedal about
half of the way down while cranking.
NOTE:
If the engine is hard to start at high ambient
ternperatures, hold the accelerator pedal on
the floor during cranking.
o Tum the ignition key to the "START" position, and then release the key and the pedal
when the engine starts.
C060D01A-GAT
Flooded Engine
FLOODED ENGINE
C060B01A-GAT
If the Engine is Cold
COLD ENGINE
C060C01A-GAT
Warm Engine
WARM ENGINE
u
DEPRESS FULLY
ssA2osoE
Depress the accelerator pedal fully and hold it
to the floor until the engine starts. Never "pump"
the accelerator pedal.
DEPRESS 1 AND RELEASE 2 ssA20ooc
DEPRESS 1/2 DOWN
SSA2080D
2-3
DRIVING YOUR HYUNDAI
NOTE:
When it is necessary to warm up the engine
for an extended period, make sure there is
no wastepaper or any other combustlble
matter near the end of the exhaust pipe.
carbon monoxlde gas emitted is odorless
and can cause serlous injury or death.
C070A01A-AAT
OPERATING THE MANUAL
TRANSAXLE
C050B01A-QAT
Normal Conditions:
The Starting Procedure:
C060E01A-QAT
If the Engine Stalls
If the engine stalls or dies after being started,
repeat the approphate starting procedure as
directed above depending on whether the engine is cold, warm or hot.
C050A01A-AAT
STARTING
1. Insert key, and fasten the seat belt.
2. Depress the clutch pedal fully and place the
gearshift lever (manual transaxle) in neutral
or the selector lever (automatic transaxle) in
"P" (park) position.
3. After tuming the ignition key to the "ON"
position, make certain all waming lights and
gauges are functioning properiy before starting the engine.
ON
ACC
START
LOCK
WARNING:
Never run the engine in a closed or poorly
ventilated area any longer than is needed to
move your car in or out of the area. The
2-4
WARNING:
Be sure that the clutch is fully depressed
when starting a manual transaxle vehicle.
Otherwise, there is the potential to cause
damage to the vehicle or Injury to someone
Inside or outside the vehicle as a result of
the forward or backward movement of the
vehicle that will occur if the clutch is not
depressed when the vehicle is started.
4. Tum the ignition key to the "Start" position
and release it when the engine starts.
Your Hyundai's manual transaxle has a conventional shift pattem.
This shift pattem is also imprinted on the shift
knob. The transaxle is fully synchronized in all
forward gears so shifting to either a higher or a
lower gear is easily accomplished.
NOTE:
To shift into reverse, rest the lever In neutral for at least 3 seconds after your car is
completely stopped. Then move the lever
into the reverse position.
CAUTION:
When downshifting from fifth gear to fourth
gear, caution should be taken not to inadvertently press the gear shift lever sideways
in such a manner that second gear Is engaged. Such a drastic downshlft may cause
DRIVING YOUR HYUNDAI
the engine speed to increase to the point
that the tachometer will enter the red zone.
Such over rewing of the engine may possibly cause engine damage.
C070B01A-AAT
Using the Clutch
The clutch should be pressed all the way to the
floor before shifting, then released slowly. The
'clutch pedal should always be used after fully
retuming to the original position. Do not rest
your foot on the clutch pedal while driving. This
can cause unnecessary wear. Do not partially
engage the clutch to hold the car on an incline.
This causes unnecessary wear. Use the parking brake to hold the car on an incline. Do not
operate the clutch pedal rapidly and repeatedly.
C070O02A-AAT
Good Driving Practices
o Never take the car out of gear and coast
down a hill. This is extremely hazardous.
Always leave the car in gear.
o Don't "ride" the brakes. This can cause them
to overheat and malfunction. Instead, when
you are driving down a long hill, slow down
and shift to a lower gear. When you do this,
engine braking will help slow the car.
o Slow down before shifting to a lower gear.
This will help avoid over-rewing the engine,
which can cause damage.
o Slow down when you encountercrosswinds.
This gives you much better control of your
car.
o Be sure the car is completely stopped before you attempt to shift into reverse. The
transaxle can be damaged if you do not. To
shift into reverse, depress the clutch, move
the shift lever to neutral, wait three seconds,
then shift to the reverse position.
o Exercise extreme caution when driving on a
slippery surface. Be especially careful when
braking, accelerating or shifting gears. On a
slippery surface, an abrupt change in vehicle speed can cause the drive wheels to
lose traction and the vehicle to go out of
control.
CAUTION:
o The risk of rollover is greatly Increased if
you lose control of your vehicle at highway speeds.
o Loss of control often occurs if two or
more wheels drop off the roadway and
the driver oversteers to reenter the roadway.
o In the event your vehicle leaves the roadway, do not steer sharply. Instead, slow
down before pulllng back into the travel
lanes.
C070C01A-AAT
To Remove the Ignition Key
ON
START
ACC
LOCK
1. Turn the ignition key to the "ACC" position.
2. Simultaneously push and tum the ignition
key counterclockwise from the "ACC" position to the "LOCK" position.
3. The key can be removed in the "LOCK"
position.
C070E01A-GAT
Recommended Shift Speeds
The shift speeds as shown below are recommended foroptimum fuel economy and performance.
2-5
DRIVING YOUR HYUNDAI
Shift
from-to
1-2or2-1
20km/h(15mph)
2-3 or 3-2
40 km/h (25 mph)
3-4 or 4-3
55 km/h (35 mph)
4-5 or 5-4
75 km/h (45 mph)
Reoommended
C090A01A-QAT
AUTOMATIC TRANSAXLE
CAUTION:
Never shift into "R" or "P" position while
the car is moving.
NOTE:
<^> Depress the brake pedal and push the
button when shifting
^ Push the button when shifting
^ The selector lever can be shifted freely.
For optimum fuel economy, accelerate gradually. The transaxle will automatically shift to the
second, third and overdrive gears.
C090B01A-AAT
The function of each position is as
follows:
o P (Park):
Use to hold the vehicle in place when parked or
while starting the engine; shift the select lever to
the "P" position. Whenever parking the car,
apply the parking brake and shift the selector
lever to the "P" (Park) position.
The highly efficient Hyundai automatic transaxle
has fourforward speeds and one reverse speed.
It has a conventional shift pattem as shown in
the illustration. At night, with the first position of
the multi-function switch, the appropriate symbol on the shift pattem indicator will be illuminated according to the range selected.
2-6
CAUTION:
Never place the selector lever in the "P"
position unless the vehicle is fully stopped.
Failure to observe this caution will cause
severe damage to the transaxle.
C090C01A-AAT
o R (Reverse):
Use for backing up the vehicle. Bring the car to
a complete stop before shifting the selector
lever to "R" position.
C090D02A-AAT
o N(Neutral):
In the "N" position, the transaxle is in neutral,
which means that no gears are engaged. The
engine can be started with the shift lever in "N"
position, although this is not recommended except if the engine stalls while the car is moving.
C090E01A-GAT
o D (Drive):
Use for normal driving. The transaxle will automatically shift through a four-gear sequence,
giving best economy and power. Never downshift manually to '2' position or "L" position
when vehicle speed is more than 95 km/h (60
mph).
C090F01A-MT
o 2 (Second gear):
Use for driving on a slippery road, hill climbing
or engine braking downhill. "2" automatically
shifts between 1st and 2nd gears.
This means that no shift-up to 3rd gear is
performed. However, the shift-up to 3rd gear is
done when the car speed exceeds a certain
value to prevent the engine from over-revving.
Manually move the selector to "D" retuming to
normal driving condition.
DRIVING YOUR HYUNDAI
C090G01A-GAT
o L (Low gear):
Use for driving up a very steep grade or for
engine braking when descending steep hills.
When downshifting to "L", the transaxle will
temporarily remain in second gear until the
vehicle has slowed enough for low gear to
engage. Do not exceed 50 km/h.(30 mph) in low
gear.
C090H01A GAT
NOTE:
o For smooth and safe operatlon, depress
the brake pedal when shifting from "Neutral" position or "Park" position to a forward or reverse gear.
o The brake pedal fully depressed in order
to move the shift lever from the "P"
(Park) position to any of the other positions.
o It \s always posslble to shift from "R",
"N", "D", "2", "L" position to "P" position.
C 090101A-AAT
CAUTION:
o Shift into "R" and "P" position only when
the vehicle has completely stopped.
o Do not accelerate the engine In reverse
or any of the forward positlons with the
brakes applied.
o Always apply the footbrake when shifting from "P" or "N", to "R", "D", "2" or
"L" position.
o Oo not use the "P" (Park) position in
place of the parking brake. Always set
the parking brake, shift the transaxle Into
"P" (Park) position and turn off the ignition when you leave the vehicle, even
momentarily. Never leave the vehicle unattended whlle the engine is running.
o Check the automatic transaxle fluld level
regularly, and add fluid as necessary.
C090N02A-AAT
Good Driving Practices
o Never move the gear selector lever from "P"
or "N" to any other position with the accelerator pedal depressed.
o Never move the gear selector lever into "P"
when the vehicle is in motion.
o Be sure the car is completely stopped before you attempt to shift into "R".
o Never take the car out of gear and coast
down a hill. This may be extremely hazardous. Always leave the car in gear when
moving.
o Do not "ride" the brakes. This can cause
them to overheat and malfunction. Instead,
when you are driving down a long hill, slow
down and shift to a lower gear. When you do
this, engine braking will help slow the car.
o Slow down before shifting to a lower gear.
Otherwise, the lower gear may not be en-
o Always use the parking brake. Do not depend on placing the transaxle in "P" to keep
the car from moving.
o Exercise extreme caution when driving on a
slippery surface. Be especially careful when
braking, accelerating or shifting gears. On a
slippery surface, an abrupt change in vehicle speed can cause the drive wheels to
lose traction and the vehicle to go out of
control.
o Tum the overdrive switch on for good fuel
economy and smooth driving. If engine braking is needed in the "D" range or if repeated
upshifting and downshifting between the 3rd
and 4th gear is needed when climbing a
gentle slope, it is recommended that the
overdrive switch be tumed off. Tum the
overdrive switch back on immediately afterward.
WARNING:
o The risk of rollover Is greatly Increased If
you lose control of your vehicle at highwayspeeds.
o Loss of control often occurs if two or
more wheels drop off the roadway and
the driver oversteers to reenter the roadway.
o In the event your vehicle leaves the roadway, do not steer sharply. Instead, slow
down before pulllng back into the travel
lanes.
2-7
DRIVING YOUR HYUNDAI
C090P01A-QAT
C130A01A-AAT
Overdrive Switch
GOOD BRAKING PRACTICES
WARNING:
Nothing should be carrled on top of the
cargo area cover behlnd the rear seat. If
there were an accldent or a sudden stop,
such objects could move forward and cause
damage to the vehicle or injure the occupants.
AX201!
When the overdrive switch is tumed on, the
transaxle will automatically upshift to the second, third and overdrive gears. When the overdrive switch is tumed off, the transaxle will not
upshift to the overdrive gear. For normal driving, the selector lever should be left in the "D"
position and the overdrive switch tumed on.
If you need to accelerate rapidly, press the
accelerator pedal all the way to the floor. The
transaxle will automatically shift to a lower gear,
depending on the vehicle speed and load.
2-8
o After being parked, check to be sure the
parking brake is not engaged and that the
parking brake indicator light is out before
driving away.
o Driving through water may get the brakes
wet. They can also get wet when the car is
washed. Wet brakes can be dangerous!
Your car will not stop as quickly if the brakes
are wet. Wet brakes cause the car to pull to
one side. To dry the brakes, apply the brakes
lightly until the braking action retums to
normal, taking care to keep the car under
control at all times. If the braking action does
not retum to normal, stop as soon as it is
safe to do so and call your Hyundai dealer
for assistance.
o Don't coast down hills with the car out of
gear. This is extremely hazardous. Keep the
car in gear at all times, use the brakes to
slow down, then shift to a lower gear so that
engine braking will help you maintain a safe
speed.
o Don't "ride" the brake pedal. Resting your
foot on the brake pedal while driving can be
dangerous because it can result in the brakes
overheating and losing their effectiveness. It
also increases the wear of the brake compo
nents.
o If a tire goes flat while you are driving, apply
the brakes gently and keep the car pointed
straight ahead while you slow down. When
you are moving slowly enough for it to be
safe to do so, pull off the road and stop in a
safe place.
o If your car is equipped with an automatic
transaxle, don't let your car creep forward.
To avoid creeping forward, keep your foot
on the brake pedal when the car is stopped.
o Use caution when parking on a hill. Engage
the parking brake and place the gear selector lever in "P" (automatic transaxle) or in
first or reverse gear (manual transaxle). If
your car is facing downhill, tum the front
wheels into the curb to help keep the car
from rolling. If your car is facing uphilt, tum
the front wheels away from the curb to help
keep the car from rolling. If there is no curb
or if it is required by other conditions to keep
the car from rolling, block the wheels.
o Under some conditions your parking brake
can freeze in the engaged position. This is
most likely to happen when there is an
accumulation of snow or ice around or near
DRIVING YOUR HYUNDAI
the rear brakes or if the brakes are wet. If
there is a risk that the parking brake may
freeze, apply it only temporarily while you
put the gear selector lever in "P" (automatic)
or in first or reverse gear (manual transaxle)
and block the rear wheels so the car cannot
roll. Then release the parking brake.
o Do not hold the vehicle on the upgrade with
the accelerator pedal. This can cause the
transmission to overheat. Always use the
brake pedal or parking brake.
C120A02A-AAT
ANTI-LOCK BRAKE SYSTEM
(If installed)
The Anti-Lock Brake System (ABS) is designed
to prevent wheel lock-up during sudden braking
or on hazardous road surfaces. The ABS control module monitors the wheel speed and controls the pressure applied to each brake. Thus,
in emergency situations or on slick roads, your
ABS will increase vehicle control during braking.
NOTE:
During ABS operation, a sllght pulsation
may be felt in the brake pedal when the
brakes are applied. Also, a noise may be
heard in the engine compartment while driving. These conditions are normal and indicate that the antl-lock brake system is functioning properly.
WARNING:
Your ABS will not prevent accidents due to
improper or dangerous driving maneuvers.
Even though vehicle control is improved
during emergency braking, always maintain
a safe distance between you and objects
ahead. Vehicle speeds should always be
reduced during extreme road conditions.
The braking distance for cars equlpped with
an anti-lock braking system may be longer
than for those without it in the following
road conditions.
o Driving on rough, gravel or snow-covered roads.
o Driving with tlre chalns Installed.
o Driving on roads where the road surface
is pltted or has dlfferent surface height.
These roads should be driven at reduced
speeds. The safety features of an ABS
equlpped vehicle should not be tested by
high speed driving or cornerlng. This could
endanger the safety of yourself or others.
C140A01A-QAT
DRIVING FOR ECONOMY
You can save fuel and get more kilometers from
your car if you follow these suggestions:
o Drive smoothly. Accelerate at a moderate
rate. Don't make "jack-rabbit" starts or fullthrottle shifts and maintain a steady cruising speed. Don't race between stoplights.
Try to adjust your speed to that of the other
traffic so you don't have to change speeds
unnecessarily. Avoid heavy traffic whenever possible. Always maintain a safe distance from other vehicles so you can avoid
unnecessary braking. This also reduces
brake wear.
Drive at a moderate speed. The faster you
drive, the more fuel your car uses. Driving at
a moderate speed, especially on the highway, is one of the most effective ways to
reduce fuel consumption.
Don't "ride" the brake or clutch pedal. This
can increase fuel consumption and also increase wear on these components. In addition, driving with your foot resting on the
brake pedal may cause the brakes to overheat, which reduces their effectiveness and
may lead to more serious consequences.
Take care of your tires. Keep them inflated
to the recommended pressure. Incorrect inflation, eithertoo much ortoo little, results in
unnecessary tire wear. Check the tire pressures at least once a month.
Be sure that the wheels are aligned correctly. Improper alignment can result from
hitting curbs or driving too fast over irregular surfaces. Poor alignment causes faster
tire wear and may also result in other problems as well as greater fuel consumption.
Keep your car in good condition. For better
fuel economy and reduced maintenance
costs, maintain your car in accordance with
the maintenance schedule in Section 5. If
2-9
r
DRIVING YOUR HYUNDAI
o
o
o
o
o
o
you drive your car in severe conditions,
more frequent maintenance is required (see
Section 5 for details).
Keep your car clean. For maximum service,
your Hyundai should be kept clean and free
of corrosive materials. It is especially important that mud, dirt, ice, etc. not be allowed to accumulate on the underside of
the car. This extra weight can result in increased fuel consumption and also contribute to corrosion.
Travellightly.Don'tcarryunnecessary weight
in your car. Weight is an enemy of good fuel
economy.
Don't let the engine idle longer than necessary. If you are waiting (and not in traffic),
tum off your engine and restart only when
you're ready to go.
Remember, your Hyundai does not require
extended warm-up. As soon as the engine is
running smoothly, you can drive away. In
verycold weather, however, give your engine
a slightly longer warm-up period.
Don't "lug" or "over*rev" the engine. Lugging
is driving too slowly in too high a gear resultingin the engine bucking.lfthishappens, shift
to a lower gear. Over-rewing is racing the
engine beyond its safe limit. This can be
avoided by shifting at the recom-mended
speeds.
Use your air conditioning sparingly. The air
conditioning system is operated by engine
powerso your fuel economy is reduced when
you use it.
2-10
C150A01A-AAT
SMOOTH CORNERING
Avoid braking or gear changing in comers,
especially when roads are wet. Ideally, comers
should always be taken under gentle acceleration. If you follow these suggestions, tire wear
will be held to a minimum.
C160A01A-AAT
WINTER DRIVING
The more severe weather conditions of winter
result in greater wear and other problems. To
minimize the problems of winter driving, you
should follow these suggestions:
C160B01A-GAT
Snowy or lcy Conditions
To drive your vehicle in deep snow, it may be
neoessary to use snow tires or to install tire
chains on your tires. If snow tires are needed,
it is necessary to select tires equivalent in size
and type to the original equipment tires. Failure
to do so may adversely affect the safety and
handling of your car. Speeding, rapid acceleration, sudden brake applications, and sharp tums
are potentially very hazardous practices. During deceleration, use engine braking to the
fullest extent. Sudden brake applications on
snowy or icy roads may cause skids to occur.
You need to keep sufficient distance between
the vehicle in front and your vehicle. Also, apply
the brake gently.
It should be noted that installing tire chains on
the tire will provide a greater driving force, but
will not prevent side skids.
NOTE:
Tire chains are not legal In all provlnces.
Check province laws before fltting tire
chains.
C160C01A-AAT
Use High Quality Ethylene Glycol
Coolant
Your Hyundai is delivered with high quality
ethylene glycol coolant in the cooling system. It
is the only type of coolant that should be used
because it helps prevent corrosion in the cooling system, lubricates the water pump and
prevents freezing. Be sure to replace or replenish your coolant in accordance with the maintenance schedule in Section 5. Before winter,
have your coolant tested to assure that its
freezing point is sufficient for the temperatures
anticipated during the winter.
C160D01A-AAT
Check Battery and Cables
Winter puts additional burdens on the battery
system. Visually inspect the battery and cables
as described in Section 6. The level of charge
in your battery can be checked by your Hyundai
dealer or a service station.
C160E01A-AAT
Change to "Winter Weight" Oil if
Necessary
In some climates it is recommended that a
lower viscbsity "winter weight" oil be used during cold weather. See Section 9 for recommen-
DRIVING YOUR HYUNDAI
dations. If you aren't sure what weight oil you
should use, consult your Hyundai dealer.
C160F01A-AAT
Check Spark Plugs and Ignition
System
Inspect your spark plugs as described in Section 6 and replace them if necessary. Also
check all ignition wiring and components to be
sure they are not cracked, worn or damaged in
any way.
C160H01A-AAT
C160K01A-AAT
Use Approved Anti-Freeze in Window
Washer System
Carry Emergency Equipment
To keep the water in the window washer system from freezing, add an approved anti-freeze
solution in accordance with instructions on the
container. Window washer anti-freeze is available from Hyundai dealers and most auto parts
outlets. Do not use engine coolant or other
types of anti-freeze as these may damage the
finish.
C160I01A-AAT
Don't Let Your Parking Brake Freeze
C160G01AGAT
To Keep Locks from Freezing
To keep the locks from freezing, squirt an
approved de-icer fluid or glycerine into the key
opening. If a lock is covered with ice, squirt it
with an approved de-icing fluid to remove the
ice. If the lock is frozen intemally, you may be
able to thaw it out by using a heated key.
Mandle the heated key with care to avoid buming your fingers.
NOTE:
The proper temperature for using the immobilizer key is from -40°C to 80°C. tf you heat
the immobilizer key over 80°C to open the
frozen lock, it may cause damage to the
transponder in its head.
Under some conditions your parking brake can
freeze in the engaged position. This is most
likely to happen when there is an accumulation
of snow or ice around or near the rear brakes or
if the brakes are wet. If there is a risk the
parking brake may freeze, apply it only temporarily while you put the gear selector lever in
"P" (automatic) or in first or reverse gear (manual transaxle) and block the rear wheels so the
car cannot roll. Then release the parking brake.
C160J01A-AAT
Don't Let Ice and Snow Accumulate
Underneath
Under some conditions, snow and ice can build
up under the fenders and interfere with the
steering. When driving in severe winter conditions where this may happen, you should periodically check undemeath the car to be sure
the movement of the front wheels and the
steering components are not obstructed.
Depending on the severity of the weather where
you drive your car, you should carry appropriate emergency equipment. Some of the items
you may want to carry include tire chains, tow
straps or chains, fiashlight, emergency flares,
sand, a shovel, jumper cables, a window
scraper, gloves, ground cloth, coveralls, a blanket, etc.
C170A01A-AAT
HIGH SPEED MOTORING
Pre-Trip Inspections
1. Tires;
Adjust the tire inflation pressures for highway
driving. Lowtire inflation pressures will result in
overheating and possible failure of the tires.
Avoid using wom or damaged tires which may
result in reduced traction or tire failure.
NOTE:
Never exceed the maximum tire inflation
pressure shown on the tires.
2. Fuel, engine coolant and engine oil; High
speed travel consumes 1.5 times more fuel
than urban motoring. Do not forget to check
both engine coolant and engine oil.
3. Drive belt;
A loose or damaged drive belt may result in
overheating of the engine.
2-11
DRIVING YOUR HYUNDAI
C180A01A-AAT
USE OF LIGHTS
Check your lights regulariy for correct operation
and always keep them clean. When driving
during the day in conditions of poor visibility, it
is helpful to drive with headlights on low beam.
This enables you to be seen as well as to see.
C190A02A-GAT
TRAILER OR VEHICLE TOWING
If you are considering towing with your car, you
should first check with your Province Department of Motor Vehicles to determine their legal
requirements.
Since laws vary from province to province, the
requirements for towing trailers, cars, other
types of vehicles, or apparatus may differ. Ask
your Hyundai dealer for further details before
towing.
CAUTION:
Do not do any towing with your car during
its first 2,000km (1,200 miles) in order to
allow the engine to properly break in. Failure to heed this caution may result in serious engine or transaxle damage.
C190B01S-AAT
Trailer Hitches
Select the proper hitch and ball combination,
making sure that if s location is compatible with
that of the trailer or vehicle being towed.
Use a quality non-equalizing hitch which distributes the tongue load uniformly throughout the
chassis.
2-12
The hitch should be bolted securely to the car
and installed by a qualified technidan. DO NOT
USE A HITCH DESIGNED FOR TEMPORARY
INSTALLATION AND NEVER USE ONE THAT
ATTACHES ONLY TO THE BUMPER.
C190C01Y-GAT
Trailer Brakes
If your trailer is equipped with a braking system,
make sure it conforms to federal and/or local
regulations and that it is properly installed and
operating correctly.
C190001A-GAT
Safety Chains
Should the hitch connection between your car
and the trailer or vehicle you are towing fail, the
trailer or vehicle could wander dangerously
across other lanes of traffic and ultimately collide with another vehicle. To eliminate this potentJally dangerous situation, safety chains, attached between your car and the trailer or
towed vehicle, are required in most provinces.
C190E03A-GAT
Trailer Weight Limit
NOTE:
If you tow a trailer or vehicle, your car will
require more frequent malntenance due to
the additional load. See Malntenance Under
Severe Usage Conditions" on page 5-4.
CAUTION:
o Never connect a trailer brake system directly to the vehicle brake system.
o When towing a trailer on steep grades (in
excess of 12%) pay close attention to the
engine coolant temperature gauge to ensure the engine does not overheat. If the
needle of the coolant temperature gauge
moves across the dlal towards "H" (HOT),
pull over and stop as soon as it is safe to
do so, and allow the engine to idle until it
cools down. You may proceed once the
engine has cooled sufficiently.
SSA2200B
Tongue load
Total trailer weight
Tongue loads can be increased or decreased
by redistributing the load in the trailer. This can
be verified by checking the total weight of the
loaded trailer and ttien checking the load on the
tongue.
DRIVING YOUR HYUNDAI
NOTE:
1. Neverloadthetrallerwithmoreweightln
the back than in the front. About 60% of
the trailer load should be In the front half
on the trailer and the remaining 40% in
the rear.
2. The total gross vehlcle welght with trailer
must not exceed the Gross Vehlcle Weight
Rating (GVWR) shown on the vehlcle
identlflcation plate (see page 8-1). The
total gross vehlcle welght is the combined weight of the vehlcle, driver, all
passengers and their luggage, cargo,
hitch, trailer tongue load and other optional equipment.
3. The front or rear axle weight must not
exceed the Gross Axle Welght Rating
(GAWR) shown on the vehlcle Identlfication plate (see page 8-1). It is posslble
that your towing package does not exceed the GVWR but exceeds the GAWR.
Improper trailer loadlng and/or too much
luggage In the trunk can overload the
rear axle. Redlstribute the load and check
the axle welght again.
4. The maxlmum permisslble static vertlcal
load on the coupling device is 50 kg.
4 Door
Gross axle welght
Gross vehicle weight
5. The maxlmum permissible overhang of
the coupling point:
3/5 Door : 1,045 mm
4 Door : 1,095 mm
CAUTION:
Thefollowlng specrficatJons are recommended when towing a trailer. The loaded trailer
weight cannot safely exceed the values In
the chart below.
3/5 Door
kg.
With
BrakeType
Without
BrakeType
Maximum Towable Weight
Trailer
Tongue
1.3L
900
50
1.5L
1100
453
50
WARNING:
Improperly loading your car and trailer can
serlous affect its steerlng and braking performance causing a crash in which you may
be seriously Injured.
2-13
T
DRIVING YOUR HYUNDAI
C190F02A-GAT
Trailer or Vehicle Towing Tips
1. Before towing, check hitch and safety chain
connections as well as proper operation of
the trailer running lights, brake lights, and
turn signals.
2. Always drive your vehicle at a moderate
speed (Less than 100 km/h).
3. Trailer towing requires more fuel than normal conditions.
4. To maintain engine braking efficiency and
electrical charging performance, do not use
fifth gear (manual transaxle) or overdrive
(automatic transaxle).
5. Always secure items in the trailer to prevent
load shift while driving.
6. Check the condition and air pressure of all
tires on the trailer and your car. Low tire
pressure can seriously affect the handling.
Also check the spare tire.
7. The vehicle/trailer combination is more affected by crosswind and buffeting.
When being passed by a large vehicle, keep
a constant speed and steer straight ahead.
If there is too much wind buffeting slow
down to get out of the other vehicle's air
turbulence.
8. When parking your car and trailer, especially on a hill, be sure to follow all the normal
precautions. Turn your front wheel into the
curb, set the parking brake fimnly, and put
the transaxle in 1st or Reverse (manual) or
Park (automatic). In addition, place wheel
chocks at each of the trailer's tires.
2-14
9. If the trailer has electric brakes, start your
vehicle and trailer moving, and then apply
the trailer brake controller by hand to be
sure the brakes are working. This lets you
check your electrical connection at the same
time.
lO.During your trip, check occasionally to be
sure that the load is secure, and that the
lights and any trailer brakes are stjll working.
H.Avoid jerky starts, sudden acceleration or
sudden stops.
12.Avoid sharp tums and rapid lane changes.
13. Avoid holding the brake pedal down too long
or too frequentiy. This could cause the brakes
to overheat, resulting in reduced braking
efficiency.
14. When going down a hill, shift into a lower
gear and use the engine braking effect.
When ascending a long grade, downshift the
transaxle to a lower gear and reduce speed
to reduce chances of engine overioading
and/or overheating.
15.lf you have to stop while going uphill, do not
hold the vehicle in place by pressing on the
accelerator. This can cause the automatic
transaxle to overheat. Use the parking brake
orfootbrake.
NOTE:
When towing check transaxle fluld more
frequentiy.
CAUTION:
If overheating should occur when towing,
(temperature gauge reads near red zone),
taklng the followlng actlon may reduce or
elimlnate the problem.
1.
2.
3.
4.
Tum off the air conditioner.
Reduce highway speed.
Select a lower gear when going uphill.
While in stop and go traffic, place the gear
selection in park or neutral and idle the
engine at a higher speed.
WHAT TO DO IN AN EMERGENCY
3. TROUBLE ON THE
ROAD
What to do in an Emergency
D010B01A-AAT
D010C01AGAT
If Engine Doesn't Turn Over or Turns
Over Slowly
If Engine Turns Over Normally but Does
Not Start
j£
D010A01A-AAT
IF THE ENGINE WILL NOT START
CAUTION:
If the engine will not start, do not push or
pull the car to start it. This could result in a
collislon or cause other damage. In addition, push or pull startlng may cause the
catalytic converter to be overloaded and
create a fire hazard.
<jr-~/
AS3S020A
1. If your car has an automatic transaxle, be
sure the gear selector lever is in "N" or "P"
and the emergency brake is set.
2. Check the battery connections to be sure
they are clean and tight.
3. Tum on the interior light. If the light dims or
goes out when you operate the starter, the
battery is discharged.
4. Check the starter connections to be sure
they are securely tightened.
5. Do not push or pull the vehicle to start it. See
instructions for "Jump Starting" on the following pages.
1. Check fuel level.
2. Check all connectors at ignition, coil and
spark plugs. Reconnect any that may be
disconnected or loose.
3. If you smell gasoline, the engine may be
flooded. See starting instructions in Section
2. (For carburetor)
4. Check fuel line in the engine room.
5. If engine still refuses to start, call a Hyundai
dealer or seek other qualified assistance.
D010D01A-AAT
If the Engine Stalls While Driving
1. Reduce your speed gradually, keeping a
straight line. Move cautiously off the road to
a safe place.
2. Tum on your emergency flashers.
3-1
WHAT TO DO IN AN EMERGENCY
3. Try to start the engine again. If your vehicle
will not start, contact a Hyundai dealer or
seek other qualified assistance.
D020A01A-AAT
JUMP STARTING
Negative to the engine
not to the .battery _
Positive to positive
®<
_ ...
Dead battery
Boosterbattery
AX300iA
WARNING:
The gas produced by the battery durlng the
jump-start operation Is highly explosive. If
these instructions are notfollowed exactly,
serious personal injury and damage to the
vehicle may occur! If you are not sure how
to follow thls procedure, seek qualified assistance. Automobile batteries contaln sulfurlc acld. Thls Is polsonous and highly
corroslve. When ]ump startlng, wear protective glasses and be caref ul not to get acld on
yourself, your clothlng or on the car.
o If you should accidentally get acid on your
skin or in your eyes, immediately remove
any contaminated clothing and flush the
3-2
area with clear water for at least 15 minutes.
Then promptly obtain medical attention. If
you must be transported to an emergency
facility, continue to apply water to the affected area with a sponge or cloth.
o The gas produced by the battery during the
jump-start operation is highly explosive. Do
not smoke or allow a spark or open flame in
thevicinity.
o The battery being used to provide the jump
start must be 12-volt. If you cannot determine that it is a 12-volt battery, do not
attempt to use it for the jump start.
o To jump start a car with a discharged battery, follow this procedure exactly:
4. Start the engine in the car with the booster
battery and let it run for a few minutes. This
will help to assure that the booster battery is
fully charged. During the jumping operation,
run the engine in this vehicle at about 2000
rpm.
5. Start your engine using the normal starting
procedure. After the engine starts, leave the
jumper cables connected and let the engine
run at fast idle or about 2000 rpm for several
minutes.
6. Following the exact reverse order of their
being attached, carefully remove the jumper
cables. Remove the negative cable first,
then the positive cable.
1. If the booster battery is installed in another
vehicle, be sure the two vehicles are not
touching.
2. Tum off all unnecessary lights and accessories in both vehicles.
3. Attachtheclampsofthejumpercableinthe
exact order shown on the illustration. That
is, first, attach one clamp of the jumper
cable to the positive (+) post or cable of the
discharged battery. Then attach the other
end of the same cable to the positive (+)
post or cable of the booster battery. Next,
using the other cable, attach one clamp to
the negative (-) post or cable of the booster
battery. Then attach the other end of that
cable to a solid metal part of the engine
away from the battery. Do not connect the
cable to any moving part.
If you do not know why your battery became
discharged (because the lights were left on,
etc.), have the charging system checked by
your Hyundai dealer.
D030A01A-AAT
IF THE ENGINE OVERHEATS
If your temperature gauge indicates overheating, you experience a loss of power, or hear
loud pinging or knocking, the engine is probably
too hot. If this happens, you should:
1. Pull off the road and stop as soon as it is
safe to do so.
2. Place the gear selector lever in "P" (automatic), or neutral (manual transaxle) and set
the parking brake. If the air conditioner is on,
turn it off.
[
WHAT TO DO IN AN EMERGENCY
3. If coolant is running out under the car or
steam is coming out from the hood, stop the
engine. Do not open the hood until the coolant has stopped running or the steaming has
stopped. If there is no visible loss of coolant
and no steam, leave the engine running and
check to be sure the engine cooling fan is
operating. If the fan is not running, turn the
engine off.
4. Check to see if the water pump drive belt is
missing. If it is not missing, check to see that
it is tight. If the drive belt seems to be
satisfactory, check for coolant leaking from
the radiator, hoses or under the car. (If the
air conditioner had been in use, it is normal
for cold water to be draining from it when
you stop).
6. If you cannot find the cause of the overheating, wait until the engine temperature has
retumed to normal. Then, if coolant has
been lost, carefully remove the radiator cap
and add water to bring the fluid level in the
reservoir up to the halfway mark.
7. Proceed with caution, keeping alert for further signs of overheating. If overheating happens again, call a Hyundai dealer for assistance.
SPARE TIRE
The following instructions for the FULL SIZE
spare tire should be observed:
5. If the water pump drive belt is broken or
coolant is leaking out, stop the engine immediately and call the nearest Hyundai dealer for assistance.
Check inflation pressure as soon as practical
afler installing the spare tire, and adjust to the
specified pressure. The tire pressure should be
periodically checked and maintained at the
specified pressure while the tire is stored.
WARNING:
Do not remove the radiator cap when the
Spare Tire Pressure
blown out of the opening and cause serlous
burns.
Handling the Spare Tire
CAUTION:
Serious loss of coolant indlcates there is a
leak in the cooling system and this should
be checked as soon as posslble by a Hyundai
dealer.
WARNING:
While the engine is running, keep hands,
long hair and clothing away from moving
parts such as the fan and drive belts to
prevent injury.
engine is hot. This may allow coolant to be
D040B01A-AAT
D040A01A-GAT
TireSize
FullSize
Inflation Pressure
210kPa(30psi)
Remove the installation bdt to remove the spare
tire. To replace the spare tire in its storage
compartment, tighten the bolt firmly with your
fingers until there is no more play in the spare
tire.
D050A01A-AAT
IF YOU HAVE A FLAT TIRE
If a tire goes flat while you are driving:
1. Take your foot off the accelerator pedal and
let the car slow down while driving straight
ahead. Do not apply the brakes immediately
or attempt to pull off the road as this may
cause a loss of control. When the car has
slowed to such a speed that it is safe to do
so, brake carefully and pull off the road.
Drive off the road as far as possible and
park on firm, level ground. If you are on a
3-3
[
WHAT TO DO IN AN EMERGENCY
divided highway, do not park in the median
area between the two traffic lanes.
2. When the car is stopped, tum on your emergency hazard flashers, set the parking brake
and put the transaxle in P" (automatic) or
reverse (manual transaxle).
3. Have all passengers get out of the car. Be
sure they all get out on the side of the car
that is away from traffic.
4. Change the tire following the instructions
provided on the following pages.
D060A01AAAT
CHANGING A FLAT TIRE
D060B01AAAT
D060C01A AAT
1. Obtain Spare Tire and Tool
2. Block the Wheel
Flat tire
AS30060A
Remove the spare tire and take out the jack,
jack handle, and tool bag from the trunk.
NOTE:
The jack handle is located beneath the luggage mat in the vehicle trunk.
Block the wheel that is diagonally opposite from
the flat to keep the vehicle from rolling when the
car is raised on the jack.
D 060001 A-AAT
3. Loosen Wheel Nuts
The procedure described on the following pages
can be used to rotate tires as well as to change
a flat tire. When preparing to change a flat tire,
check to be sure the gear selector lever is in "P"
(automatic) or reverse gear (manual transaxle)
and that the parking brake is set, then:
3-4
WHAT TO DO IN AN EMERGENCY
The wheel nuts should be loosened slightly
before raising the car. To loosen the nuts, tum
the wrench handle counterclockwise. When
doing this, be sure that the socket is seated
completely over the nut so it cannot slip off. For
maximum leverage position the wrench so the
handle is to the right as shown in the drawing.
Then, while holding the wrench near the end of
the handle, pull up on it with steady pressure.
Do not remove the nuts at this time. Just loosen
them about one-half tum.
D060F01A-AAT
D060G01A-AAT
5. Raising the Car
6. Changing Wheels
0060E01A-AAT
Install the jack handle into the jack as shown in
the drawing. To raise the vehicle, tum the jack
handle clockwise. As the jack begins to raise
the vehicle, double check that it is properly
positioned and will not slip. If the jack is on soft
ground or sand, you may find it necessary to
place a board, brick, flat stone or other object
under the base of the jack to keep it from
sinking.
Raise the car high enough so that the fully
inflated spare tire can be installed. To do this,
you will need more ground clearance than is
required to remove the flat tire.
Use the wrench to loosen the wheel nuts, then
remove them with your fingers. Remove the
wheel cover (if installed) from the wheel and
slide the wheel off the studs and lay it flat so it
cannot roll away. To put the wheel on the hub,
pick up the spare tire, line up the holes with the
studs and slide the wheel onto them. If this is
difficult, tip the wheel slightly and get the top
hole in the wheel lined up with the top stud.
Then jiggle the wheel back and forth until the
wheel can be slid over the other studs.
4. Put the Jack in Place
The base of the jack should be placed on firm,
level ground. The jack should be positioned as
shown in the drawing.
WARNING:
Do not get under the car when It is supported by the jack! The vehicle could fall
and cause serious injury or death. No one
should stay in the car while the jack is being
used.
3-5
WHAT TO DO IN AN EMERGENCY
WARNING:
Wheel covers may have sharp edges. Handle them carefully to avoid possible severe
injury.
Before putting the wheel into place, be sure
that there is nothing on the hub or wheel
(such as mud, tar, gravel, etc.) that Interferes wlth the wheel fitting solldly agalnst
the hub. If there Is, remove It. If there is not
good contact on the mountlng surface between the wheel and hub, the wheel nuts
could come loose and cause the loss of a
wheel. Loss of a wheel may result In loss of
control of the vehlcle. This may cause serious injury or death.
3-6
D060H01A-AAT
D060I01A-GAT
7. Re-install Wheel Nuts
8. Lower Vehlcle and Tighten Nuts
To re-install the wheel cover, hold it on the
wheel and put the wheel nuts on the studs and
tighten them finger tight. The nuts should be
installed with their small diameter ends directed
inward. Jiggle the tire to be sure it is completely
seated, then tighten the nuts with your fingers
again.
Lower the car to the ground by tuming the jack
handle counterclockwise. Then position the
wrench as shown in the drawing and tighten the
wheel nuts. Be sure the socket is seated completely over the nut. do not stand on the wrench
or use an extension pipe over the wrench
handle.
Go around the wheel tightening every other unt
until they are all tight. Then double-check each
nut for tightness. After changing wheels, have a
technician tighten the wheel nuts to their proper
torque as soon as possible.
Wheel nut tightening torque:
Steel wheel & aluminium alloy wheel:
900-1,100 kg.cm (65-80 Ib.ft)
WHAT TO DO IN AN EMERGENCY
0060J01A AAT
0080A02A-GAT
DOBOB01A-AAT
AFTER CHANGING WHEELS
IF YOUR CAR MUST BE TOWED
TOWING A CAR WITH MANUAL
TRANSAXLE
OK FOR AUTOMATIC OR MANUAL
TRANSAXLE EQUIPPED VEHICLE
If you have a tire gauge, remove the valve cap
and check the air pressure. If the pressure is
lower than recommended, drive slowly to the
nearest service station and inflate to the correct
pressure. If it is too high, adjust it until it is
correct. Always re-install the valve cap after
checking or adjusting tire pressure. If the cap is
not replaced, air may leak from the tire. If you
lose a valve cap, buy another and install it as
soon as possible.
After you have changed wheels, always secure
the flat tire in its place in the trunk and retum the
jack', jack handle, and tools to their proper
storage locations.
CAUTION:
Your car can be damaged if towed Incor-
rectlyl
If your car has to be towed, it should be done by
your Hyundai dealer or a commercial tow truck
service. This will help assure that your car is
not damaged in towing. Also, professionals are
generally aware of local laws goveming towing.
In any case, rather than risk damage to your
car, it is suggested that you show this information to the tow truck operator. Be sure that a
safety chain system is used and that local laws
are observed.
0 OK FOR AUTOMATIC OR MANUAL
TRANSAXLE EQUIPPED VEHICLE
WITH NO DAMAGE
If the car is being towed with the rear wheels
on the ground, be sure the parking brake is
released.
If the car is being towed with the front
wheels on the ground, be sure that the
transaxle is in neutral. Also, be sure that the
ignition key is in the "ACC" position. This is
necessary to prevent damage to the steering lock mechanism, which is not designed
to hold the front wheels straight while the car
is being towed.
If any of the loaded wheels or suspension
components are damaged, a towing dolly
must be used.
3-7
WHAT TO DO IN AN EMERGENCY
D080C01A-GAT
TOWING A CAR WITH AUTOMATIC
TRANSAXLE
o NOT
OK
FOR
AUTOMATIC
TRANSAXLE
EQUIPPEDVEHICLE
O OK FOR MANUAL TRANSAXLEssAsiooA
CAUTION:
A car with an automatlc transaxle should
never be towed from the rear with the front
wheels on the ground. This can cause serious damage to the transaxle. If the car must
be towed from the rear, a towing dolly must
be used under the front wheels.
o If the car isbeing towed with the rear wheels
on the ground, be sure the parking brake is
released
o If the car Is belng towed with ali four wheels
on the ground, it can be towed only from the
front. Be sure that the transaxle Is in neutral.
Do not tow at speeds greater than 50 km/h
(25 mph) and for more than 25 km (15
miles).
Be sure the steerlng Is unlocked by placlng
the key in the "ACC" position. A driver must
3-8
be in the towed vehicle to operate the steering and brakes.
0 OK FOR AUTOMATIC OR MANUAL
TRANSAXLE EQUIPPED VEHICLE
NOTE:
Before towing, check the level of the
transaxle fluid. If it Is belowthe "HOT" mark
on the dipstick, add fluid. If you cannot add
fluid, a towing dolly must be used.
D080O01A-AAT
EMERGENCY TOWING
For emergency towing when no commercial
tow vehicle is available, attach a tow cable,
chain or strap to one of the tie-down hooks
under the front of your car. Do not attempt to
tow your vehicle in this manner on any unpaved
surface. This may result in serious damage to
your car.
Nor should it be attempted if the wheels, drive
train, axles, steering or brakes are damaged.
Before towing, be sure the transaxle is in neutral and the key in "ACC" (with the engine off)
or in the "ON" position (with the engine running). A driver must be in the towed car to steer
it and operate the brakes.
D120A01A-QAT
IF YOU LOSE YOUR KEYS
If you lose your keys, many Hyundai dealers
can make you a new key if you have your key
number.
If you lock the keys inside your car and you
cannot obtain a new key, many Hyundai dealers can use special tools to open the door for
you.
Information about the key of immobilizer system (if installed) will be found on page 1-2.
CORROSION PREVENTION AND APPEARANCE CARE
ZE010A1-A
4. KEEPING THOSE
GOOD LOOKS
Corrosion Prevention &
Appearance Care
E010C01A-AAT
E020A01A-AAT
High-Corrosion Areas
If you live in an area where your car is regularfy
exposed to corrosive materials, corrosion protection is particularly important. Some of the
common causes of accelerated corrosion are
road salts, dust control chemicals, ocean air
and industrial pollution.
TO HELP PREVENT CORROSION
You can help prevent corrosion from getting
started by observing the following:
E010D01A-AAT
E010A01A-AAT
CORROSION PROTECTION
Protecting Your Hyundai from Corro-
sion
By using the most advanced design and construction practices to combat corrosion, Hyundai
produces cars of the highest quality. However,
this is only part of the job. To achieve the long
term corrosion resistance your Hyundai can
deliver, theowner's cooperation and assistance
is also required.
E010B01A-AAT
Common Causes of Corrosion
The most common causes of corrosion on your
car are:
o Road salt, dirt and moisture that is allowed
to accumulate underneath the car.
o Removal of paint or protective coatings by
stones, gravel, abrasion or minor scrapes
and dents which leave unprotected metal
exposed to corrosion.
Moisture Breeds Corrosion
Moisture creates the conditions in which corrosion is most likely to occur. For example, corrosion is accelerated by high humidity, particularly when temperatures are just above freezing. In such conditions, the corrosive material is
kept in contact with the car surfaces by moisture that is slow to evaporate.
Mud is a particular enemy of corrosion protection because it is slow to dry and holds moisture
in contact with the vehicle. Even though the
mud appears to be dry, it can still retain moisture and promote corrosion.
High temperatures can also accelerate corrosion of parts that are not properly ventilated so
the moisture can be dispersed. For all these
reasons, it is particularly important to keep your
car clean and free of mud or accumulations of
other materials. This applies not only on the
visible surfaces but particularly to the underside
of the car.
E020B01A-AAT
Keep Your Car Clean
The best way to prevent corrosion is to keep
your car clean and free of corrosive materials.
Attention to the underside of the car is particulariy important.
o If you live in a high-corrosion area—where
road salts are used, near the ocean, areas
with industrial pollution, acid rain, etc.—you
should take exlra care to prevent corrosion.
In winter, hose off the underside of your car
at least once a month and be sure to clean
the underside thoroughly when winter is
over.
o When cleaning undemeath the car, give
particular attention to the components under
the fenders and other areas that are hidden
from view. Do a thorough job; just dampening the accumulated mud ratherthan washing it away will accelerate corrosion rather
than prevent it. Water under high pressure
and steam are particularly effective in removing accumulated mud and corrosive
materials.
o When cleaning lower door panels, rocker
panels and frame members, be sure that
drain holes are kept open so that moisture
can escape and not be trapped inside to accelerate corrosion.
4-1
CORROSION PREVENTION AND APPEARANCE CARE
E020C01A-AAT
E030A01A-AAT
Keep Your Garage Dry
WASHING AND WAXING
Washlng Your Hyundai
Don't park your car in a damp, poorly ventilated
garage. This creates a favorable environment
for corrosion. This is particulariy true if you
wash your car in the garage or drive it into the
garage when it is still wet or covered with snow,
ice or mud. Even a heated garage can contribute to corrosion unless it is well ventilated so
moisture is dispersed.
E020D01A-AAT
Keep Paint and Trim in Good Condition
Scratches or chips in the finish should be covered with "touch-up" paint as soon as possible
to reduce the possibility of corrosion. If bare
metal is showing through, the attention of a
qualified body and paint shop is recommended.
E020E01A-AAT
Don't Neglect the Interior
Moisture can collect under the floor mats and
carpeting to cause corrosion. Check under the
mats periodically to be sure the carpeting is dry.
Use partJcular care if you carry f ertilizers, cleaning materials or chemicals in the car.
These should be carried only in proper containers and any spills or leaks should be cleaned
up, flushed with clear water and thoroughly
dried.
4-2
Never wash your car when the surface is hot
from being in the sun. Always wash your car in
the shade.
Wash your car frequently. Dirt is abrasive and
can scratch the paint if it is not removed. Air
ppllution or acid rain may damage the paint and
trim through chemical action if pollutants are
allowed to remain in contact with the surface. If
you live near the ocean or in an area where
road salts or dust control chemicals are used,
you should pay particular attention to the underside of the car. Start by rinsing the car to
remove dust and loose dirt. In winter, or if you
have driven through mud or muddy water, be
sure to thoroughly clean the underside as well.
Use a hard direct stream of water to remove
accumulations of mud or corrosive materials.
Use a good quality car-washing solution and
follow the manufacturer's directions on the package. These are available at your Hyundai dealer or auto parts outlet. Don't use strong household detergents, gasoline, strong solvents or
abrasive cleaning powders as these may damage the finish.
Use a clean sponge or cloth, rinse it frequently
and don't damage the finish by rubbing too
hard. For stubbom spots, dampen them frequently and remove them a little at a time.
To clean whitewall tires, use a stiff brush or
soap-impregnated steel-wool scouring pad.
To clean plastic wheel covers, use a clean
sponge or soft cloth and water.
To clean cast aluminum alloy wheels, use a
mild soap or neutral detergent. Do not use
abrasive cleaners. Protect the bare-metal surfaces by cleaning, polishing and waxing. Because aluminum is subject to corrosion, be sure
to give aluminum alloy wheels special attention
in winter. If you drive on salted roads, clean the
wheels thoroughly afterwards.
After washing, be sure to rinse thoroughly. If
soapy water dries on the finish, streaking will
result.
When the weather is warm and the humidity
low, you may find it necessary to rinse each
section immediately after washing to avoid
streaking.
After rinsing, dry the car using a damp chamois
or soft, absorbent cloth. The reason for drying
the car Is to remove water from the car so it will
dry without water spots. Don't rub, this can
damage the finish.
If you find any nicks or scratches in the paint,
use touch-up paint to cover them to prevent
corrosion. To protect the paintwork of the car
against corrosion, you must clean your Hyundai
CORROSION PREVENTION AND APPEARANCE CARE
(at least once a month). Give special attention
to the removal of salt, mud and other substances on the underside of the splashboards of the
car. Make sure that the outlets and the underside of the doors are open. Paint damage can
be caused by small accumulation of tar, industrial precipitation, tree resin, insects and bird
droppings, when not removed immediately.
If water alone is not strong enough to remove
the accumulated dirt, use a mild car washing
solution. Be sure to rinse the surface after
washing to remove the solution. Never allow
the solution to dry on the painted surfaces.
E030B01A-AAT
E030C01A-AAT
Polishing and Waxing
Always wash and dry the car before polishing
or waxing or using a combination cleaner and
wax. Use a good quality commercial product
and follow the manufacturer's directions on the
container. Polish and wax the bright trim pieces
as well as the paint.
E030O01A-AAT
When to Wax Again
You should polish and wax the car again when
water no longer beads on a clean surface but
spreads out over a larger area.
E030E01A-AAT
Spot Cleaning
Maintaining Bumpers
Don't use gasoline, strong solvents or corrosive
cleaning agents. These can damage the finish
of the car. To remove road tar, use turpentine
on a clean, soft cloth. Be gentle.
To remove dead insects or tree sap, use warm
water and mild soap or car-washing solution.
Soak the spot and rub gently. If the paint has
lost its luster, use a commercial car-cleaning
polish.
Special precautions must be observed to preserve the appearance of the bumpers on your
Hyundai. They are:
o Do not expose the bumpers to high temperatures. For example, if you have your
car repainted, do not leave the bumpers on
the car if the car is going to be placed in a
high-temperature paint booth.
E040A01A-AAT
CLEANING THE INTERIOR
To Clean the Vinyl Upholstery
To clean the vinyl upholstery, first remove loose
dirt and dust with a vacuum cleaner. Then apply
a solution of mild soap or detergent and water
using a clean sponge or soft cloth. Allow this to
stay on the surface to loosen the dirt, then wipe
with a clean damp sponge or cloth. If all the dirt
stains are not removed, repeat this procedure
until the upholstery is clean. Do not use gasoline, solvent, paint thinner or other strong cleaners.
E040B01A-AAT
o Be careful not to spill battery electrolyte or
hydraulic brake fluid on the bumpers. If you
do, wash it off immediately with clean water.
o Be gentle when cleaning the bumper surfaces. They are made of soft plastic and the
surface can be damaged if mistreated. Do
not use abrasive cleaners. Use warm water
and mild soap or car-washing solution.
To Clean the Leather Upholstery
(If Installed)
In the normal course of use, leather upholstered
surfaces will, like any material, pick-up dust and
dirt. This dust and dirt must be cleaned
off or it may work into the surface of the leather,
causing damage.
Fine leather needs care, and should be cleaned
when necessary. Washing leather thoroughly
with soap and water will keep your leather
lustrous, beautiful and ensure you have many
years of wear.
4-3
CORROSION PREVENTION AND APPEARANCE CARE
Take a piece of cheese cloth and using any
mild soap and lukewarm water, work up a good
lather. Thoroughly wash the leather. Wipe clean
with a slightly damp cloth and dry with soft
cloth. Do this as often as the leather becomes
solled.
During tanning operations, sufficient oils are
incorporated through processing that noneneed
be applied during the life of the leather. Oll
applled to the finlshed surface will in no way
help the leather and may do more harm than
good. Vamishes and fumiture pollshes should
never be used under any conditions.
E040C01A-AAT
Cleaning the Carpets
Use a foam-type carpet cleaner. Cleaners of
this type are available in aerosol cans in liquid
fomn or powder. Read the instructions and follow them exactly. Using a vacuum cleaner with
the appropriate attachment, remove as much
dirt from the carpets as possible. Apply the
foam following the manufacturer's directions,
then rub in overlapping circles. Do not add
water. These cleaners work best when the
carpet is kept as dry as possible.
4-4
E040O01AAAT
Cleaning the Seat Belts
To clean the seat belts, use a cloth or sponge
with mild soap or detergent and warm water. Do
not use strong detergents, dye, bleach orabrasive materials on the seat belts as this may
weaken the fabric.
While Cleaning the belts, inspect them for excessive wear, cuts, fraying or other signs of
damage and replace them if necessary.
E040E01A-AAT
Cleaning the Windows
You may use any household window cleaner on
the windows. However, when cleaning the inside of the rear window be careful not to damage the rear window defroster wiring.
E050A01A-AAT
Any Questions?
If you have any questions about the care of
your car, consult your Hyundai dealer.
VEHICLE MAINTENANCE REQUIREMENTS
5.THEKEYTOTROUBLE-FREE OPERATION
Vehicle Maintenance Requirements
F010A01A-GAT
MAINTENANCE INTERVALS
Service requirements
To assure that you receive the greatest number
of kilometers of satisfying operation from your
Hyundai, certain maintenance procedures must
be performed. Although careful design and engineering have reduced these to a minimum,
those that are required are of the utmost importance.
It is your responsibility to have these maintenance procedures performed to comply with the
terms of the warranties oovering your new
Hyundai. The Service Passport supplied with
your new vehicle provides further information
about these warranties.
F010B01A-AAT
Maintenance Requirements
The maintenance required for your Hyundai
can be divided into three main areas:
o Specified scheduled procedures
o General everyday checks
o Do-it-yourself maintenance
F010C01A-QAT
F010E01A-AAT
Specified Scheduled Procedures
Do-lt-Yourself Maintenance
These are the procedures such as inspections,
adjustments and replacements that are listed in
the maintenance charts starting on page 5-2.
These procedures must be performed at the
intervals shown in the maintenance schedule to
assure that your warranty remains in effect.
Although it is strongly recommended that they
be performed by the factory-trained or distributor-trained technicians at your Hyundai dealer,
these procedures may be performed at any
qualified service facility.
It is suggested that genuine Hyundai service
parts be used for any required repairs or replacements. Other parts of equivalent quality
such as engine pil, engine coolant, manual or
auto transaxle oil, brake fluid and so on which
are not supplied by Hyundai Motor Company or
its distributor may be used without affecting
your warranty coverage but you should always
be sure these are equivalent to the quality of the
original Hyundai parts. Your Service Passport
provides f urther information about your warranty coverage.
If you are mechanically inclined, own a few
tools that are required and want to take the time
to do so, you can inspect and service a number
of items. For more information about doing it
yourself, see Section 6.
F010D01A-GAT
General Everyday Checks
These are the everyday checks you should
perform each time you drive your Hyundai or
when you fill the fuel tank. A list of these items
will be found on page 6-4.
F010F01A-AAT
A Few Tips
o Whenever you have your Hyundai serviced,
keep copies of the service records in your
glovebox. This will help assure that you can
document that the required procedures have
been performed to keep your warranties in
effect. This is especially important when
service is not performed by an authorized
Hyundai dealer.
o If you choose to do your own maintenance
and repairs, you may find it helpful to have
an official Hyundai Shop Manual. A copy of
this publication may be purchased at your
Hyundai dealer's parts department.
F020A01A-GAT
SCHEDULED MAINTENANCE REQUIREMENTS
Inspection should be performed any time a
malfunction is experienced or suspected. Receipts for all emission control system services
should be retained to demonstrate compliance
with conditions of the emissions system warranty.
For severe usage maintenance requirements,
see page 5-4 of this section.
5-1
VEHICLE MAINTENANCE REQUIREMENTS
F030A01A-GAT
SCHEDULED MAINTENANCE
The following maintenance services must be performed to assure good
vehicle control and performance. Keep receipts for all vehicle services to
protect your warranty.
Where both mileage and time are shown, the frequency of service is
determined by whichever occurs first.
F030B02A-GAT
R : Replace I: Inspect and, after inspection, clean, adjust, repair or replace if necessary
DESCRIPTION
NO
KILOMETERSX1000
MONTHS
15
12
30
24
45
36
60
48
75
60
90
72
105
84
120
96
R
R
R
R
R
R
R
R
ENGINE CONTROL SYSTEM MAINTENANCE
1
ENGINE OIL & FILTER (SG OR ABOVE)
2
DRIVE BELT (WATER PUMP, ALTERNATOR & A/CON)
3
See Note (1)
I
FUEL FILTER (MFI)
FUEL LINES, FUEL HOSES & CONNECTIONS
5
TIMING BELT
6
VAPOR HOSE & FUEL FILLER CAP
7
VACUUM CRANKCASE VENTILATION HOSES
8
AIR CLEANER FILTER
9
SPARK PLUGS
10
IGNITION TIMING (CARB ONLY)
11
IDLE SPEED & CO (CARB ONLY)
Note: (1) SF OR LOWER : EVERY 10,000 KM OR 6 MONTHS: "R"
5-2
I
I
R
I
FUEL FILTER (CARBURETOR)
4
I
I
I
R
I
I
I
I
I
I
R
I
I
I
I
I
R
I
R
I
R
I
R
I
R
I
I
I
R
I
I
I
I
I
I
I
I
I
I
I
I
R
I
I
R
I
I
I
VEHICLE MAINTENANCE REQUIREMENTS
F030C05A-QAT
R: Replace
I: Inspect and, after inspection, clean, adjust, repair or replace if necessary
DC-CnirTION
ULoUlll IIUN
NO.
KILOMETERSX1000
MONTHS
15
12
30
24
45
36
I
I
I
60
48
75
60
90
72
105
84
120
96
I
I
I
I
I
GENERAL MAINTENANCE
1
COOLINGSYSTEM
2
ENGINECOOLANT
3
MANUAL TRANSAXLE OIL
4
AUTOMATIC TRANSAXLE European Community Only
I
I
I
FLUID
I
I
I
I
'
See Note (2)
R
Except European Community
5
BRAKE HOSES AND LINES
6
BRAKE FLUID
7
REAR BRAKE DRUMS/LININGS, PARKING BRAKE
8
BRAKE PADS, CALIPERS AND ROTORS
9
R
R
R
I
I
R
I
I
I
I
I
1
I
I
I
I
I
1
I
I
I
I
I
1
I
I
1
I
I
I
I
I
I
1
I
EXHAUST PIPE AND MUFFLER
I
I
I
10
SUSPENSION MOUNTING BOLTS
I
I
I
I
I
1
I
I
I
I
1
I
I
11
STEERING GEAR BOX, LINKAGE & BOOTS/LOWER ARM BALL JOINT
I
I
12
POWER STEERING PUMP, BELT AND HOSES
I
I
I
I
I
1
I
I
I
I
I
1
I
13
DRIVESHAFTS AND BOOTS
I
14
AIR CONDITIONING REFRIGERANT
I
I
I
I
I
1
I
I
15
AIR FILTER (For Evaporatorand Blower Unit)
R
R -
R
R
R
R
R
R
I
I
1
I
I
Note : (2) FOR EVERY 24 MONTHS OR 45,000 KM, WHICHEVER OCCURS FIRST : -R"
5-3
VEHICLE MAINTENANCE REQUIREMENTS
F040A04A-GAT
MAINTENANCE UNDER SEVERE USAGE CONDITIONS
The following items must be serviced more f requently on cars normally used under severe dri ving conditions. Ref er to the chart below f or the appropriate
maintenance intervals.
R: Replace
I: Inspect and, after inspection, clean, adjust, repair or replace
MAINTENANCE
MAINTENANCE ITEM
OPERATION
R
ENGINEOILANDFILTER
R
AIRCLEANERFILTER
R
SPARKPLUGS
TIMINGBELT
R
1
BRAKE PADS, CALIPERS AND ROTORS
REAR BRAKE DRUMS/LININGS,
1
PARKING BRAKE
STEERING GEAR BOX, LINKAGE
1
& BOOTS/LOWER ARM BALL JOINT
1
DRIVESHAFTS AND BOOTS
AUTOMATICTRANSAXLE European community Only
R
FLUID
Except European community
AIRFILTER
R
(For Evaporator and Blower unit)
SEVERE DRIVING CONDITIONS
A - Repeatedshortdistance dri ving
B - Extensiveidling
C - Driving industy, rough roads
D - Driving inareasusingsaltorothercorrosivematerialsorinvery
coldweather
5-4
if necessary
MAINTENANCE
INTERVALS
EVERY 7,500 KM OR 6 MONTHS
MOREFREQUENTLY
MOREFREQUENTLY
EVERY 60,000 KM OR48 MONTHS
MOREFREQUENTLY
DRIVING
CONDITION
A, B, C, F, H
C, E
B,H
D, E, F, G
C, D, G, H
MOREFREQUENTLY
C, D, G, H
MOREFREQUENTLY
C, D, E, F
EVERY 1 5,000 KM OR 1 2 MONTHS
EVERY 45,000 KM
EVERY 40,000 KM
C, D, E, F
MOREFREQUENTLY
C, E
A, C, E, F, G, H
E - Driving in sandy areas
F - Morethan50%drivinginheavycltytrafficduringhotweather
above32°C(90°F)
G - Driving in mountainous areas
H - Towing a'trailer
VEHICLE MAINTENANCE REQUIREMENTS
F060A01A-AAT
F060D01A-AAT
EXPLANATION OFSCHEDULED MAINTENANCE ITEMS
o Fuel lines, fuel hoses and connec-
F060MOIA-AAT
o Engine oil and filter
The engine oil and filter should be changed at
the intervals speclfied in the maintenance schedule. If the car is being driven in severe conditions, more frequent oil and filter changes are
required.
F060B01A-AAT
o Drive belts
Inspect all drive belts for evidence of cuts,
cracks, excessive wear or oil and replace if
necessary. Drive belts should be checked periodically for proper tension and adjusted as
necessary.
F060C01A-AAT
o Fuel filter
A clogged filter can limit the speed at which the
vehicle may be driven, damage the emission
system and cause hard starting. If an excessive amount of foreign matter accumulates in
the fuel tank, the filter may require replacement
more f requently.
After installing a new filter, run the engine for
several minutes, and check for leaks at the
connections.
Fuel filters should be installed by trained technicians.
tions
Check the fuel lines, fuel hoses and connections for leakage and damage. Have a trained
techincian, replace any damaged or leaking
parts immediately.
F060E01A-AAT
Inspect the hose routing to assure that the
hoses do not come in contact with any heat
source, sharp edges or moving component
which might cause heat damage or mechanical
wear. Inspect all hose connections, such as
clamps and couplings, to make sure they are
secure, and that no leaks are present. Hoses
should be replaced immediately if there is any
evidence of deterioration or damage.
o Timing belt
Inspect all parts related to the timing belt for
damage and deformation. Replace any damaged parts immediately.
F060H01A-AAT
o Air cleaner filter
A Genuine Hyundai air cleaner filter is recommended when filter is replaced.
F060Q01A AAT
o Vapor hose and fuel filler cap
The vapor hose and fuel filler cap should be
inspected at those intervals specified in the
maintenance schedule. Make sure that a new
vapor hose or fuel filler cap is correctly replaced.
F060F01A-AAT
o Vacuum, crankcase ventilation hoses
Inspect the surface of hoses for evidence of
heat and/or mechanical damage. Hard and brittle rubber, cracking, tears, cuts, abrasions, and
excessive swelling indicate deterioration. Particular attention should be paid to examine
those hose surfaces nearest to high heat sources, such as the exhaust manifold.
F060J01A-AAT
o Spark plugs
Make sure to install new spark plugs of the
correct heat range.
F060K01A-QAT
o Ignition timing
For basic ignition timing, refer to the Specifications in Seotion 9.
F060L01A-GAT
o Idle speed and CO
After warming up the engine, check and adjust
the idle speed and CO. For detailed service
procedures and specification, refer to the Shop
Manual.
5-5
VEHICLE MAINTENANCE REQUIREMENTS
F070B01A-QAT
F070K01A-AAT
o Cooling System
o Brake hoses and lines
o Exhaust pipe and muffler
Check the cooling system part, such as radiator, coolant reservoir, hoses and connections
for leakage and damage. Replace any damaged parts.
Visually check for proper installation, chafing,
cracks, deterioration and any leakage. Replace
any deteriorated or damaged parts immediate-
Visually inspect the exhaust pipes, muffler and
hangers for cracks, deterioration, or damage.
Start the engine and listen carefully for any
exhaust gas leakage. Tighten connections or
replace parts as necessary.
F070C01A-AAT
F070G01A-AAT
o Engine coolant
o Brake fluid
The coolant should be changed at the
intervals specified in the maintenance schedule.
Check brake fluid level in the brake fluid reservoir. The level should be between "MIN" and
"MAX" marks on the side of the reservoir. Use
only hydraulic brake fluid conforming to DOT 3.
iy.
F070L01A-AAT
o Suspension mounting bolts
Check the suspension connections for looseness or damage. Retighten to the specified
torque.
F070D01A-AAT
o Manual transaxle oil
Inspect the manual transaxle oll according to
the maintenance schedule.
NOTE:
If the oil level Is low, check for possible
leaks before addlng oil. Do not overfill.
F070E03A-AAT
F070H01A-AAT
o Rear brake drums/linings, parking
brake
Check the rear brake drums and linings for
scoring, buming, leaking fluid, broken parts,
and excessive wear. Inspect the parking brake
system including the parking brake lever and
cables. For detailed service procedures, refer
to the Shop Manual.
5-6
With the vehicle stopped and engine off, check
for excessive free-play in the steering wheel.
Check the linkage for bends or damage. Check
the dust boots and ball joints for deterioration,
cracks, or damage. Replace any damaged parts.
F070N01A-AAT
o Automatic transaxle fluid
The fluid level should be in the "HOT range of
the dipstick, after engine and transaxle are at
normal operating temperature. Check the Automatic Transaxle Fluid level with the engine
running and the transaxle in neutral, with the
parking brake properly applied. Use HYUNDAI
ATF SP-II M or GENUINE DIAMOND ATF SPII M when adding or changing fluid.
F070M01A-AAT
o Steering gear box, linkage & boots/
lower arm ball joint
F070J01A-AAT
o Brake pads, calipers and rotors
Check the pads for excessive wear, discs for
run out and wear, and calipers for fluid leakage.
o Power steering pump, belt and hoses
Check the power steering pump and hoses for
leakage and damage. Replace any damaged or
leaking parts immediately. Inspect the power
steering belt for evidence of cuts, cracks, excessive wear, oiliness and proper tension. Replace or adjust it if necessary.
VEHICLE MAINTENANCE REQUIREMENTS
F070P01A-AAT
o Driveshafts and boots
Check the drive shafts, boots and clamps for
cracks, deterioration, or damage. Replaceany
damaged parts and, if necessary, repack the
grease.
F070O01A-AAT
o Air conditioning refrigerant
Check the air conditioning lines and connections for leakage and damage. Check air conditioning performance according to the relevant
shop manual if necessary.
5-7
DO-IT-YOURSELF MAINTENANCE
6. SATURDAY MECHANICS
Do-lt-Yourself Maintenance
Q010A02A-AAT
ENGINE COMPARTMENT (For Multiport Fuel Injection)
CAUTION:
When inspecting or serviclng the englne, you should handle tools and other
heavy objects carefully so that the plastic rocker cover of the englne is not
damaged.
1.
2.
3.
4.
5.
6.
Engine coolant reservoir
Power steering fluid reservoir
Engine oil filler cap
Rockercover
Brakebooster
Brake fluid reservoir
7. Clutch fluid reservoir (If Installed)
8. Aircleaner
9. Relaybox
10. Windshield washer fluid reservoir cap
11. Engine oil level dipstick
12.Sparkplug
13.Radiatorcap
14. Automatic transaxle fluid level dipstick (automatic T/A only)
15.Battery
6-1
DO-IT-YOURSELF MAINTENANCE
G010C01A-QAT
ENGINE COMPARTMENT (For Carburator)
CAUTION:
When inspecting or servicing the englne,
you should handle tools and other heavy
objects carefully so that the plastic rocker
cover of the englne is not damaged.
1. Coolant reservoir
2. Engine oil filler cap
3. Brake booster
4. Brake fluid reservoir
6-2
5. Air cleaner
6. Relay box
7. Windshield washer fluid reservoir cap
8. Engine oil level dipstick
9. Spark plug
10. Radiator cap
11. Batlery
DO-IT-YOURSELF MAINTENANCE
ENGINE COMPARTMENT (For DOHC)
CAUTION:
When inspecting or servicing the engine,
you should handle tools and other heavy
objects carefully so that the plastic rocker
cover of the engine is not damaged.
1.
2.
3.
4.
5.
Engine coolant reservoir cap
Power steering fluid reservoir
Engine oil filler cap
Rocker cover
Brakebooster
6. Brake fluid reservoir
7. Clutch fluid reservoir (if installed)
8. Aircleaner
9. Relaybox
10. Windshield washer fluid reservoir cap
11. Engine oil level dipstick
12. Radiatorcap
13. Automatic transxle fluid level dipstick
(Automatic T/A only)
14. Battery
6-3
DO-IT-YOURSELF MAINTENANCE
G020A01A-AAT
G020C01A-AAT
G030A01A-AAT
GENERAL EVERYDAY CHECKS
Vehicle Interior
The following should be checked each time
when the vehicle is driven:
CHECKING THE ENGINE OIL
Engine oil is essential to the performance and
service of the engine. It is suggested that you
check the oil level at least once a week in
normal use and more often if you are on a trip
or driving in severe conditions.
Engine Compartment
The following should be checked regularly:
o
o
o
o
o
o
o
o
o
o
o
o
o
Engine oil level and condition
Transaxle fluid level and condition
Brake fluid level
Clutch fluid level
Engine coolant level
Windshield washer fluid level
Accessory drive belt condition
Engine coolant hose condition
Airfilter condition
Exhaust system condition
Fluid leaks (on or below components)
Power steering fluid level and condition
Battery Condition
G020B01A-AAT
Vehicle Exterior
The following should be checked monthly:
o
o
o
o
o
o
o
o
o
o
Overall appearance and condition
Wheel condition and wheel nut tightness
Exhaust system condition
Light condition and operation
Windshield glass condition
Wiper blade condition
Paint condition and body corrosion
Fluid leaks
Door and hood lock condition
Tire pressure and condition
(including spare tire)
6-4
o
o
o
o
o
o
o
o
o
o
o
o
o
o
Light operation
Windshield wiper operation
Hom operation
Defroster, heater system operation (and air
conditioning, if installed)
Steering operation and condition
Mirror condition and operation
Tum signal operation
Accelerator pedal operation
Brake operation, including parking brake
Manual transaxle operation, including clutch
operation
Automatic transaxle operation, including
"Park" mechanism operation
Seat control condition and operation
Seat belt condition and operation
Sun visor operation
If you notice anything that does not operate
correctly Or appearto be functioning correctly,
inspect it carefully and seek assistance from
your Hyundai dealer if service is needed.
S030B01A-GAT
Recommended Oil
SH, SG or SG/CD (API) multi-grade and fuel
efficientoil is recommended.
NOTE:
SAE 5W-20 is not recommended for sustained hlgh speed vehicle operation.
DO-IT-YOURSELF MAINTENANCE
G030C01A-AAT
G030O01A-GAT
G360A01A-GAT
To Check the Oil Level
Adding Oil
ENGINE OIL CONSUMPTION
Function of Engine Oil
Engine oil has the primary function of lubricating and cooling the inside of the engine.
Engine oil consumption
It is normal that an engine should consume
some engine oil while normal driving. The cause
of oil consumption in a normal engine are as
follows;
Before checking the oil, warm up the engine to
the normal operating temperature and be sure it
is parked on level ground. Tum the engine off.
Wait a minute, then remove the dipstick, wipe it
off, fully reinsert the dipstick and withdraw it
again. Then note the highest level the oil has
reached on the dipstick. It should be between
the upper ("FULL") and lower ('LOW") range.
i tr >"!«..
If the oil level is close to or below the "L" mark,
add oil until it reaches the "F" mark. To add oil:
1. Remove the oil filler cap by tuming it counterclockwise.
2. Add oil, then check the level again. Oo not
overfill.
3. Replace the cap by tuming it clockwise.
The distance between the "F" and V marks is
equal to about 1 liter of oil.
o Engine oil is used to lubricate pistons, piston
rings and cylinders.
o A thin film of oil is left on the cylinder wall
when a piston moves downwards in the
cylinder. High negative pressure generated
during engine operation sucks some of the
oil into the combustion chamber.
This oil with some oil of the cylinder wall is
bumed by the high temperature combustion
gases during the combustion process.
o The engine oil consumption is strongly effected by the viscosity and quality of oil,
engine rpm and driving condition etc. The
engine oil is more consumed under severe
driving conditions such as high speeds and
f requent acceleration and deceleration than
normal driving condition.
6-5
DO-IT-YOURSELF MAINTENANCE
G040A01A-AAT
CHANGING THE OIL AND FILTER
Oil filler cap
with a wrench of the proper size. Be sure
that a drain pan is in position to catch the oil
as it drains out, then remove the drain plug.
WARNING:
Be very careful when draining the engine oil
as it may be hot enough to burn you!
Drain pl
Oil filter
The engine oil and filter should be changed at
ttiose intervals specified in the maintenance
schedule in Section 5. If the car is being driven
in severe conditions, more frequent oil and filter
changes are required.
The procedure for changing the oil and filter is
as follows:
1. Park the car on level ground and set the
parking brake. Start the engine and let it
warm up until the needle on the temperature gauge moves above the lowest mark.
Tum the engine off and place the gear selector lever in "P" (automatic) or reverse
gear (manual transaxle).
2. Open the hood and remove the engine oil
filler cap.
3. Slide undemeath the car and loosen the
drain plug by tuming it counterclockwise
6-6
4. When the oil has stopped draining, replace
the drain plug using a new washer and retighten by tuming it clockwise.
5. Remove the oil filter. You should be able to
unscrew the filter with your hands. (If your
hands are slippery, try using a cloth between your hands and the filter to give yourself a better grip.) A certain amount of oil will
come out when you remove the filter so be
sure to have your drain pan in place underneath it.
6. Install a new oil filter in accordance with the
instructions on the carton or on the filter
itself. Do not over-tighten. Be sure that the
mounting surface on the engine is clean and
that the old gasket is removed completely.
Lubricate the new gasket on the filter before
installation with clean engine oil.
7. Refill the crankcase with the recommended
engine oil. Refer to the specification in chapter 9 for engine oil capacity.
8. Start the engine and check to be sure no oil
is leaking from the drain plug or oil filter.
9. Shut off the engine and recheck the oil
level.
NOTE:
Always dispose of used engine oil in an
environmentally acceptable manner. tt Is suggested that it be placed in a sealed container
and taken to a service station for reclamation. Do not pour the oil on the ground or
put it into the with household trash.
WARNING:
Used motor oil may cause Irrltation or cancer of the skin if left In contact with the skin
for prolonged perlods of time. Wash your
hands thoroughly with soap and warm water as soon as possible after handllng used
oil.
ZG060A1-A
CHECKING AND CHANGING THE ENGINE COOLANT
WARNING:
Do not remove the radlator cap when the
engine is hot. When the engine is hot, the
coolant is under pressure and may erupt
through the opening if the cap is removed.
You could be seriously burned if you do not
observe this precaution. Do not remove the
cap until the radiator is cool to the touch.
DO-IT-YOURSELF MAINTENANCE
G050B01A-AAT
Recommended Engine Coolant
Ambient
temperature
°C( °F)
-15(5)
-25 (-13)
-35 (-31)
-45 (-49)
Coolant concentration
Antifreeze
solution
Water
35%
40%
50%
60%
65%
60%
50%
40%
G050D01A-AAT
To Change the Engine Coolant
The engine coolant should be changed at those
intervals specified in the vehicle maintenance
schedule in Section 5.
To Check the Coolant Level
CAUTION:
Engine coolant can damage the flnish of
your car. If you sptll engine coolant on the
car, wash it off thoroughly with clean water.
The coolant level can be seen on the side of the
plastic coolant reservoir. The level of the coolant should be between the "LOW and "HIGH"
lines on the reservoir when the engine is cool.
If the level is below the "LOW mark, add
engine coolant to bring it up between "LOW"
and "HIGH'. If the level is low, inspect for
coolant leaks and recheck the fluid level fre-
1. Park the car on level ground, set the parking
brake and remove the radiator cap when
cool.
2. Be sure your drain receptacle is in place.
Open the drain cock on the radiator. Allow
all the engine coolant to drain from the
cooling sys-tem, then securely close the
drain cock.
3. Check Section 9 for the capacity of the
cooling system in your car. Then, following
the manufacturer's directions on the engine
coolant container, add the appropriate quantity of engine coolant to the radiator. Now fill
the radia-tor with clean demineralized or
distilled water. Continue to add demineralized or distilled water in small quantities
until the fluid level stays up in the radiator
neck.
4. Start the engine, top off the radiator with
water and then add engine coolant to the
G050C01A-AAT
Use a high quality ethylene-glycol coolant in a
50/50 mix with water. The engine coolant should
be compatible with aluminum engine parts. Additional corrosion inhibitors or additives should
not be used. The cooling system must be maintained with the correct concentration and type
of engine coolant to prevent freezing and corrosion.
Never allow the concentration of antifreeze to
exceed the 60% level or go below the 35% level
or damage to the coolant system may result. For
proper concentration when adding or replacing
the coolant, refer to the following table.
quently. If the level drops again, visit your
Hyundai dealer for an inspection and diagnosis
of the reason.
6-7
DO-IT-YOURSELF MAINTENANCE
reservoir until the level is between "LOW"
and "FULL".
5. Replace the radiator and reservoir caps and
check to be sure the drain cocks are fully
closed and not leaking.
WARNING:
The coollng fan Is controlled by engine coolant temperature and may sometimes operate even when the engine is not runnlng.
Use extreme caution when worklng near the
blades of the coollng fan so that you are not
injured by a rotatlng fan blade. As the engine coolant temperature decreases, the fan
wlll automatlcally shut off. Thls Is a normal
conditlon.
schedule in Section 5 or whenever engine performance Indicates they should be changed.
Symptoms that suggest poor spark plug performance include engine misflring underload, loss
of fuel economy, poor acceleration, etc. When
spark plugs are replaced, always use spark
plugs recommended by Hyundai. The use of
other spark plugs can result in loss of periormance, radio interference or engine damage.
Recommended Spark Plugs:
Unleaded
NGK
BKR5ES-11
CHAMPION RC10YC4
Leaded
plug at a time. This helps avoid getting the wires
mixed up.
1. Remove the center cover on the engine
rocker cover (DOHC Only).
2. Using a clean cloth, remove any dirt that has
accumulated around the spark plug so it
cannot fall into the cylinder when the spark
plug is removed.
3. To remove the spark plug catde, pull straight
up on the insulated connector, not the cable.
Pulling on the cable may damage the carbon
core conductor.
BKR5ES
RC10YC
G060C01S-QAT
Q060B02A-GAT
REPLACING THE SPARK PLUGS
Changing the Spark Plugs
Unleaded: 1.0 - 1.1 mm (0.039 - 0.043 in.)
Leaded: 0.7 - 0.8 mm (0.028 - 0.032 in.)
/,
DP60120A
The spark plugs should be changed at the
intervals specified in the vehicle maintenance
6-8
You will find it easier to change spark plugs if
the engine is cold. Always change one spark
WARNING:
It Is recommended that the engine be cool
or cold when changlng the spark plugs. If
the engine Is hot, you could burn yourself
on the Insulated connector, the spark plug
or the engine itself.
DO-IT-YOURSELF MAINTENANCE
4. When preparing to remove the old spark
plug, guide the socket down over the spark
plug, being careful not to damage the ceramic insulator.
5. To remove the spark plug, tum the wrench
handle in a counterclockwise direction.
6. To install the new spark plug, guide the
socket down over the spark plug, belng
careful not to damage the ceramic insulator.
Q070A02Y-AAT
G080A01A-AAT
CHANGING THE AIR CLEANER FILTER
WINDSHIELD WIPER BLADES
The replacement of air cleaner filter is performed in the following manner.
NOTE:
Spark plugs should be tightened firmly. Overtightenlng can damage the threads in the
aluminum cylinder head. Leavlng them too
loose can cause the spark plug to get very
hot and possibly result In damage to the
englne.
1. Unsnap the Clips around the cover.
2. When this is done, the cover can be lifted
off, the old filter removed and the new filter
put in its place.
Genuine Hyundai replacement parts are recornmended.
CAUTION:
Operating your vehicle without a proper alr
filter in place can result in excesslve engine
wear.
The wiper blades should be carefully inspected
from time to time and cleaned to remove accumulations of road film or other debris. To clean
the wiper blades and arms, use a clean sponge
or cloth with a mild soap or detergent and water.
If the wipers continue to streak or smear the
glass, replace them with genuine Hyundai replacement parts or their equivalent.
CAUTION:
Do not operate the wipers on dry glass. Thls
can result In more rapid wear of the wiper
blades and may scratch the glass.
7. Replace the cable by pushing the insulated
connector directly down onto the electrode.
Check to be sure it has snapped into place
and can't fall off.
6-9
DO-IT-YOURSELF MAINTENANCE
G090A01A-GAT
G100A02A-QAT
Q100B01A-AAT
FILLING THE WASHER RESERVOIR
CHECKING THE TRANSAXLE OIL
(MANUAL)
To check the Transaxle Fluid Level
Filler plug
The washer fluid reservoir supplies fluid to the
windshield washer system.
A good quality washer fluid should be used to flll
the washer reservoir. The fluid level should be
checked more frequently during bad weather or
whenever the washer system is in more frequent use.
The capacity of the washer reservoir is 3.0
liters (3.2 U.S. quarts).
CAUTION:
o Radiator antifreeze (engine coolant)
should not be used in the washer system
because it will damage the car's finish.
o The washer lever should not be pulled
and the washer should not be operated if
the washer reservoir Is empty. This can
damage the washer fluid pump.
6-10
Transaxle lubricant in the manual transaxle
should be checked at those intervals specified
in the vehicle maintenance schedule in Section
5.
Recommended Oil
Use only API GL-4, SAE 75W/90 in the manual
transaxle.
Manual Transaxle Oil Capacity
The oil capacity of the manual transaxle is 2.15
liters (2.27 U.S. quarts).
WARNING:
It is always better to check the transaxle oil
level when the engine is cool or cold. If the
engine Is hot, you should exercise great
caution to avoid burning yourself on hot
engine or exhaust parts.
Park the car on level ground with the engine off.
1. Using a wrench of the correct size, loosen
the oil filler plug by tuming it counterclockwise and remove it with your fingers.
2. Use your finger or suitable tod to feel inside
the hole. The oil level should be at its bottom
edge. If it is not, check for leaks before
adding oil. To refill the transaxle or bring the
oil level up, add oil slowly unfil it reaches the
proper level. Do not overfiH.
3. Replace the plug, screw it in with your fingers and then tighten securely with the
wrench.
DO-IT-YOURSELF MAINTENANCE
G110A01A-AAT
Q110O01A-GAT
CHECKING THE TRANSAXLE FLUID
(AUTOMATIC)
Transaxle fluid in the automatic transaxle should
be checked at those intervals specified in the
vehicle maintenance schedule in Section 5.
To Check the Transaxle Fluid Level
1. Open the hood, being careful to keep hands,
long hair and clothing clear of any moving
parts.
2. Remove the transaxle dipstick, wipe it clean,
reinsert the dipstick as far as it will go, then
remove it again. Now check the fluid level on
the dipstick. It should be in the "HOT" range
on the dipstick.
G110B02A-AAT
Recommended Fluid
Your Hyundai automatic transaxle is specially
designed to operate with HYUNDAI ATF SP-II
M or GENUINE DIAMOND ATF SP-II M. Damage caused by a nonspecified fluid is not covered by your new vehicle limited warranty.
G110C02A-GAT
Transaxle Fluid Capacity
The fluid capacity of the automatic transaxle is
6.1 liters (6.45 U.S. quarts).
While the engine is idling, apply the brakes and
move the gear selector lever f rom "P" lo each of
its other positions — "R", "N", "D", "2", "L" —
and then retum to "N". With the engine still
idling:
Park the car on level ground with the parking
brake engaged. When the transaxle fluid level
is checked, the transaxle fluid should be at
normal operating temperature and the engine
idling.
Ruid level should be within this range
WARNING:
The transaxle fluid level should be checked
when the englne is at normal operatlng temperature. This means that the englne, radiator, exhaust system etc., are very hot. Exerclse great care not to burn yourself during
thls procedure.
3. If the transaxle fluid level is low, use a funnel
to add transaxle fluid through the dipstick
tube until the level reaches the "HOT" range.
Do not overfill.
6-11
DO-IT-YOURSELF MAINTENANCE
WARNING:
The coollng fan is controlled by engine coolant temperature and may sometimes operate even when the engine Is not runnlng.
Use extreme caution when working near the
blades of the cooling fan, so that you are not
injured by a rotating fan blade. As the engine coolant temperature decreases, the fan
will automatically shut off. Thls is a normal
conditlon.
G120A01A-AAT
CHECKING THE BRAKES
CAUTION:
Because brakes are essential to the safe
operatlon of the car, it is suggested that
they be checked and Inspected by your
Hyundai dealer. The brakes should be
checked and inspected for wear at those
intervals specified in the vehicle malntenance schedule In Sectlon 5.
G120D01A-AAT
To Check the Fluid Level
The fluid level in the brake fluid reservoir should
be checked periodically. The level should be
between the "MIN" and "MAX- marks on the
side of the reservoir. If the level is at or below
the "MIN" mark, carefully add fluid to bring it up
to "MAX". Do not overfill.
Q120E01A-AAT
Adding Brake Fluid
To add brake fluid, first wipe away any dirt then
unscrew the fluid reservoir cap. Slowly pour the
recommended fluid into the reservoir. Do not
overfill. Carefully replace the cap on the reservoir and tighten.
G130A01A-AAT
CHECKING THE CLUTCH FLUID
To Check the Clutch Fluid
o
o
G120B01A-AAT
Checking the Brake Fluid Level
WARNING:
Use caution when handling brake fluid. It
can damage your vision if it gets Into your
eyes. It will also damage your vehicle's palnt
if spilled on it and not removed immediately.
G120C01A-AAT
Recommended Brake Fluid
Use only hydraulic brake fluid conforming to
DOT 3 specifications in your braking system.
Follow the instructions printed on the container.
6-12
WARNING:
Handle brake fluid carefully. It can damage
your vision if it gets into your eyes. Use only
DOT 3 specification fluid from a sealed container. Do not allow the fluid can or reservoir to remaln open any longer than required. This will avold entry of dirt and
molsture whlch can damage the brake system and cause improper operatlon.
The clutch fluid level in the master cylinder
should be checked when performing other under hood services. The system should be
checked for leakage at the same time.
Check to make certain that the clutch fluid level
is between the "MAX" and "MIN" level markings
on the fluid reservoir. Fill as required. Fluid loss
indicates a leak in the clutch system which
should be inspected and repaired immediately.
Consult your Hyundai dealer.
DO-IT-YOURSELF MAINTENANCE
G130B01A-AAT
G140D01S-QAT
To Replace the Fluid
Checking the Compressor Drive Belt
Recommended brake fluid conforming to DOT
3 specification should be used. The reservoir
cap must be fully tightened to avoid contamination from foreign matter or moisture.
A/C
NOTE:
Do not allow any other liquids to contaminate the brake fluid. Seal damage will result.
WARNING:
Use caution when handling brake fluid. It
can damage your vision if you get it in your
eyes. It will also damage your vehicles paint
If spilled on It and not removed Immediately.
G140A01A-AAT
AIR CONDITIONER CARE
Keeping the Condenser Clean
The air conditioner condenser (and engine radiator) should be checked periodically for accumulation of dirt, dead insects, leaves, etc. These
can interfere with maximum cooling efficiency.
When removing such accumulations, brush or
hose them away carefully to avoid bending the
cooling fans.
CAUTION:
Runnlng the air conditioning system for extended periods of time with a low refrlgerant
level may damage the compressor.
8mm
(0.31 in.)
TENSION PULLEY
2. If the air coming out of the in-dash vents is
not cold, have the air conditioning system
inspected by your Hyundai dealer.
CRANK PULLEY
SSA6140B
When the airconditioning is being used regularly, the compressor drive belt tension should be
checked at least once a month.
To check the drive belt tension, press down on
the belt halfway between the engine crankshaft
and compressor pulleys. Pressing with your
finger, you should not be able to deflect this belt
anymore than 8.0 mm. If you have the instruments to check it with a force of 98N (22 Ib.),
the deflection should be approx. 8.0 mm (0.315
inches). If the belt is too loose, have it adjusted
by your Hyundai dealer.
G140C01A-AAT
Lubrication
To lubricate the compressor and the seals in
the system, the air conditioner should be run for
at least 10 minutes each week. This is particularly important during cool weather when the air
conditioning system is not otherwise in use.
Q150A01A-QAT
CHECKING STEERING WHEEL
FREEPLAY
30mm(1.18in.;
Q140B01A-AAT
Checking the Air Conditioner Operation
1. Start the engine and let it run at fast idle for
several minutes with the air conditioner set
at the maximum cold setting.
6-13
DO-IT-YOURSELF MAINTENANCE
To check the steering wheel freeplay, stop the
car with the wheels pointed straight ahead and
gentiy move the steering wheel back and forth.
Use very light finger pressure and be sensitive
to changes in resistance that mark the limits of
the freeplay. If the freeplay is greater than
specified, have it inspected by your Hyundai
dealer and adjusted or repaired-if necessary.
G170A01A-QAT
Q180A01A-GAT
CHECKING BRAKE PEDAL
FREEPLAY
CHECKING BRAKE PEDAL
CLEARANCE
70 mm (2.76 in.)
or more,
Q160A01A-3AT
CHECKING CLUTCH PEDAL
FREEPLAY
With the engine off, press down on the brake
pedal several times to reduce the vacuum in the
brake booster.
Then, using your hand, press down slowly on
the brake pedal until you feel a change in
resistance. This is the brake pedal freeplay.
The freeplay should be within the limits specified in the illustration. If it is not, have it inspected by your Hyundai dealer and adjusted
or repaired if necessary.
With the engine off, press lightly on the clutch
pedal until you feel a change in resistance. This
is the clutch pedal freeplay. The freeplay should
be within the limits specified in the illustration. If
it is not, have it inspected by your Hyundai
dealer and adjusted or repaired if necessary.
6-14
You need a helper to check the brake pedal
clearance. With the engine running, have your
helper press down on the brake pedal several
times and then rtold it down with a force of about
50 kg (490 N). The brake pedal clearance is the
distance from the top surface of the brake pedal
to the asphalt sheeting under the floor mat.
If the brake pedal clearance is not within the
limits specified in the illustration, have it inspected by your Hyundai dealer and adjusted
or repaired if necessary.
DO-IT-YOURSELF MAINTENANCE
G190A01A-GAT
CHECKING
DRIVE
BELTS
WATER PUMP PULLEY
G200A01A AAT
G200601A-AAT
CHECKING AND REPLACING
FUSES
Replacing Accessory Fuse
Replacing a Fusible Link
9.0-10.4 mm
(0.35-0.41 m.)
ALTERNATOR PULLEY
CRANK PULLEY
Drive belts should be checked periodically for
proper tension and adjusted if necessary. At the
same fi'me, belts should be examined for cracks,
wear, fraying or other evldence of deterioration
and replaced if necessary.
Belt routing should also be checked to be sure
there Is no interference between the belts and
other parts of the engine. After a belt is replaced, the new belt should be adjusted again
after two or three weeks to eliminate slack
resulting from initial stretching after use.
A fusible link will melt if the electrical circuits
from the battery are ever overtoaded, thus preventing damage to the entire wiring hamess.
(This could be caused by a short in the system
drawing too much current.) If this ever happens,
have a Hyundai dealer determine the cause,
repair the system and replace the fusible link.
The fusible links are located in a relay box for
easy inspection.
CAUTION:
When replacing a fusible link, never use
anything but a new fusible link with the
same or lower amperage rating. Never use a
piece of wire or a higher-rated fusible link.
This could result in serlous damage and
create a fire hazard.
The fuse box for the lights and other electrical
accessories will be found low on the dashboard
on the driver's side. Inside the box you will find
a list showing the circuits protected by each
fuse.
If any of your car's lights or other electrical
accessories stop working, a blown fuse could
be the reason. If the fuse has bumed out, you
will see that the metal strip inside the fuse has
bumed through. If you suspect a blown fuse,
followthis procedure:
1. Tum off the ignition and all other switches.
2. Open the fuse box and examine each fuse.
Remove each fuse by pulling it toward you
(a small "fuse puller" tool is contained in the
fuse box to simplify this operation).
3. Be sure to check all other fuses even if you
find one that appears to have bumed out.
6-15
T
DO-IT-YOURSELF MAINTENANCE
G210A01A-AAT
CHECKING THE BATTERY
WARNING:
When working with batteries, carefully observe the following precautlons to avold
serious Injurles.
The fluid in the battery contains a strong solution of sulfuric acid, which is poisonous and
highly corrosive. Be careful not to spill it on
yourself or the car. If you do spill battery fluid on
yourself, immediately do the following:
4. Replace the blown fuse by pressing a new
fuse of the same rating into place. The fuse
should be a snug fit. If it is not, have the fuse
clip repaired or replaced by a Hyundai dealer. If you do not have a spare fuse, you may
be able to borrow a fuse of the same or
lower rating from an accessory you can
temporarily get along without (the radio or
cigarette lighter, for example). Always remember to replace the borrowed fuse.
CAUTION:
A burned-out fuse indicates that there is a
problem in the electrical circuit. If you replace a fuse and it blows as soon as the
accessory is turned on, the problem Is serlous and should be referred to a Hyundai
dealer for diagnosls and repair. Never replace a fuse wlth anythlng except a fuse
wlth the same or a lower amperage ratlng. A
hlgher capaclty fuse could cause damage
and create a f Ire hazard.
o If battery fluid is On your skin, flush the
affected areas with water for at least 15
minutes and then seek medical assistance.
o If battery fluid is in your eyes, rinse out your
eyes with water and get medical assistance
as soon as possible. While you are being
driven to get medical assistance, continue
to rinse your eyes by using a sponge or soft
cloth saturated with water.
o If you swallow battery fluid, drink a large
quantity of water or milk followed by milk of
magnesia, eat a raw egg or drink vegetable
oil. Get medical assistance as soon as
possible.
While batteries are being charged (either by a
battery charger or by the vehicle's alternator),
they produce explosive gases. Always observe
these wamings to prevent injuries from occurring:
6-16
DO-IT-YOURSELF MAINTENANCE
o Charge batteries only in a well ventilated
area.
o Do not permit flames, sparks or smoking in
the area.
o Keep children away from the area.
G210B01A-AAT
Checking the Battery
Keep the battery clean. Any evidence of corrosion around the battery posts or terminals should
be removed using a solution of household baking soda and warm water. After the battery
terminals are dry, cover them with a light coating of grease.
G220C01A-AAT
Checking Condenser Cooling Fan
The condenser cooling fan should come on
automatically whenever the air conditioner is in
operation.
G230A03A-OAT
POWER STEERING FLUID LEVEL
Checking Engine Cooling Fan
Use PSF-3 type fluid.
G240A01A-AAT
The power steering fluid level should be checked
daily.
To check the power steering fluid level, be sure
the ignition is "OFP, then check to make certain that the power steering fluid level is between the "MAX" and "MIN" level markings on
the fluid reservoir.
G220B01A-AAT
The engine cooling fan should come on automatically if the engine coolant temperature is
high.
Recommended Fluid
NOTE:
Do not start the engine when the power
steering oil reservoir is empty.
G220A01A-AAT
CHECKING ELECTRIC COOLING
FANS
WARNING:
The radiatorfan iscontrolled by engine coolant temperature and may sometimes operate
even when the engine Is not running. Use
extremecautionwhenworkingneartheblades
of the cooling fan.sothatyouare not injured
by a rotating fan blade. As the coolant temperature decreasesthefanwillautomatically
shut off. This Is a normal condition.
tions (below -20°C). In thls case, If the nolse
stops during warm up, there Is no abnormal
function in the system. Thls is due to a
power steering fluid characteristic in extremely cold conditions.
NOTE:
Grinding noise from the power steering
pump may be heard immedlately after the
engine Is started in extremely cold condi-
POWER STEERING HOSES
It is suggested that you check the power steering hose connections for fluid leakage at those
intervals specified in the vehicle maintenance
schedule in Section 5.
The power steering hoses should be replaced if
there is severe surface cracking, pulling, scuffing or wom spots. Deterioration of the hose
could cause premature failure.
G260A01A-AAT
REPLACING LIGHT BULBS
Before attempting to replace a light bulb, be
sure the switch is tumed to the "OFF" position.
The drawing in the next paragraph shows how
to reach light bulbs so they may be changed.
Be sure to replace the bumed-out bulb with one
of the same number and wattage rating.
6-17
DO-IT-YOURSELF MAINTENANCE
G270A02A-QAT
HEADLIGHT BULB
Replacement instructions:
WARNING
This halogen bulb contains gas under pressure and tf impactad could shatter, resulting
in flylng fragments. Always wear eye protection when servlclng the bulb. Protect the
bulb agalnst abraslons or scratches and
agalnst llqulds when llghted. Turn on the
bulb only when Installed in a headlight. Replace the headlight If damaged or cracked.
Keep the bulb out of the reach of chlldren
and dispose of the used bulb with care.
G290A01A-GAT
HEADLIGHT AIMING ADJUSTMENT
1. Allow the bulb to cool. Wear eye protection.
2. Always grasp the bulb by its plastic base,
avoid touching the glass.
3. Disconnect the power cord from the bulb
base In the back of the headlight.
4. Remove the dust cover.
5. Push the bulb spring for removing the headlight bulb.
6. Remove the protective cap from the replacement bulb and install the new bulb by
matching the plastic base with the headlight
hole. Install the dust cover after retightening
the bulb spring and reconnect the power
cord.
7. Use the protective cap and carton to dispose of the old bulb.
8. Check for proper headlight aim.
6-18
3. See that the vehicle is unloaded (except for
full levels of codant, engine oil and fuel, and
spare tire, jack, and tools).
4. Clean the head lights lens and tum on the
headlight (Low beam).
5. Openthehood.
6. Draw the vertical line (through the center of
each headlight) and the horizontal line
(through the center of each headlight) on the
aiming screen.
1) Horizontal line dimension from ground:
627 mm (24.68 in.)
2) Distance between each vertical line:
1,080mm (42.52 in.)
And then, draw the parallel line at 30 mm (1.18
in.) place under the horizontal line.
7. Adjust each cut-off line of the low beam to
the parallel line with a phillips screwdriver
- VERTICAL AIMING
8. Adjust each cut-off line of the low beam to
the each vertical line with a phillips screwdriver - HORIZONTAL AIMING.
Before performing aiming adjustment, make sure
of the following.
1. Keep all tires inflated to the correct pressure.
2. Place the vehicle on level ground and press
the f ront bumper & rear bumper down several times.
DO-IT-YOURSELF MAINTENANCE
G290B01A-GAT
Adjustment After Headlight Assembly
Replacement
30cnm(1 18in)
Horizontal line •
,Vertical
line
15mm(059ln) •
•W";
Distance between each headlight center:
1,080mm (42.52 in.)
V;
Distance between the headlights and the
wall that the lights are tested against. 3,000
mm (118.11 in.).
Ground line
If the vehicle has had front body repair and the
headlight assembly has been replaced, the
headlight aiming should be checked using the
aiming screen as shown in the illustration. Tum
on the headlight switch. (Low Beam Position)
1. Adjust headlights so that main axis of light is
parallel to center line of the body and is
aligned with point "P" shown in the illustration.
2. Dotted lines in the illustration show center of
headlights.
•H";
Horizontal center line of headlights from
ground : 627 mm (24.68 in.)
6-19
DO-IT-YOURSELF MAINTENANCE
G280A02A-GAT
No.
Part Name
1
Front Fog Light (If installed)
2
Headlight
3
Front Position Light
4
5
Wattage
Wattage
Part Name
No.
27
9
Luggage Compartment Light
5
60/55
10
License Plate Light
5
5
11
Rear Fog Light (If installed)
21
Front Tum Signal Light
21
12
RearCombination Light
Side Repeater Lighl (If installed)
5
4DOOR
3/5DOOR
Except E.C E.C Only
6
Interior Light (With sunroof)
10
Turn Signal Light
21
27
21
7
Interior Light (Without sunroof)
10
Stop/Tail Light
21/5
27/8
21/5
8
High Mounted Rear Stop Light (If installed)
17(ExceptE.C)
Back-up Light
21
27
21
16(E.Conly)
6-20
EMISSION CONTROL SYSTEM
ZHOOOA1-A
7. EMISSION CONTROL SYSTEM
H010A01A-GAT
EMISSION CONTROL SYSTEM
(If Installed)
Your Hyundai is equipped with an emission
control system to meet all requirements of the
Emission prohibition rules of your province,
There are three emission control systems which
are as follows.
1) Crankcase emission control system
2) Evaporative emission control system
3) Exhaust emission control system
In order to assure the proper function of the
emission control systems, it is recommended
that you have your car inspected and maintained by an authorized Hyundai dealer in accordance with the maintenance schedule in this
manual.
H010B01A-AAT
1. CRANKCASE EMISSION CONTROL
SYSTEM
crankcase through the air cleaner. Inside the
crankcase, the fresh air mixes with blow-by
gases, then passes through the PCV valve into
the induction system.
H010O01A-AAT
3. Exhaust Emission Control System
The exhaust emission control system is a highly effective system which controls exhaust emission while maintaining good vehicle performance.
H010C02A-GAT
2. EVAPORATIVE EMISSION
CONTROL SYSTEM (If installed)
H020A01A-GAT
CATALYTIC CONVERTER (If Installed)
The Evaporative Emission Control System is
designed to prevent fuel vapors from escaping
into the atmosphere.
Canister
While the engine is inoperative, fuel vapors
generated inside the fuel tank are absorbed and
stored in the canister. When the engine is
running, the fuel vapors absorbed in the canister are drawn into the induction system through
the purge control solenoid valve.
Purge Control Solenoid Valve
The purge control solenoid valve is controlled
by the ECM; when the engine coolant temperature is low, and during idling, it closes, so that
evaporated fuel is not taken into the surge tank.
After engine warm-up, during ordinary driving, it
opens so as to introduce evaporated fuel to the
surge tank.
Catalytic Converter
The catalytic converter is part of the exhaust
emission control system. Its purpose is to remove certain engine emission products from
the engine's exhaust. It looks something like a
muffler and is located undemeath the car in the
exhaust system.
The positive crankcase ventilation system is
employed to prevent air pollution caused by
blow-by gases being emitted from the crankcase. This system supplies fresh air to the
7-1
EMISSION CONTROL SYSTEM
H020B01A-GAT
About the Catalytic Converter
Exhaust gases passing through the catalytic
converter cause it to operate at very high temperatures. As a result, the introduction of large
amounts of unburned gasoline may cause it to
overheat and create a fire hazard.
This can be avoided by observhig the foltowing:
o Use unleaded fuel only.
o Maintain your engine in good condition. Extremely high converter temperatures can
result f rom improper operation of the electrical, ignition or fuel injection systems.
o If your engine stalls, pings, knocks, or is
hard to start, take your car to your Hyundai
dealer as soon as possible and have the
difficulty corrected.
o Avoid driving with a very low fuel level. If you
run out of gasoline, it could cause the engine
to misfire and result in excessive loading of
the catalytic converter.
o Avoid idling the engine for periods longer
thanlOminutes.
o Your Hyundai should not be either pushed
or pulled to get it started.
This can cause the catalytic converter to
overioad.
o Take care not to stop your Hyundai over any
combustible material such as grass, paper,
leaves or rags. As these materials could
come in contact with the catalytic converter
and could cause a fire.
7-2
Do not touch the catalytic converter or any
other part of the exhaust system while the
engine is running as it is very hot and could
result in bums.
Remember that your Hyundai dealer is your
best source of assistance.
CONSUMER INFORMATION
8. THINGS YOU
SHOULD KNOW
Consumer Information
I010B01A-AAT
I030A01A-AAT
Engine Number
RECOMMENDED INFLATION
PRESSURES
I010A01A-GAT
VEHICLE IDENTIFICATION NUMBER
(VIN)
DP80020A
The engine number is stamped on the engine
block as shown in the drawing.
I020A01A-AAT
TIRE INFORMATION
The tires supplied on your new Hyundai are
chosen to provide the best performance for
normal driving.
The vehicle identification number (VIN) is the
number used in registering your car and in all
legal matters pertaining to its ownership, etc.
It can be found on the identification plate attached to the engine side of the firewall between the engine and passenger compartment.
—r
The tire label located in the glove box gives the
tire pressures recommended for your car. These
pressures were chosen to provide the most
satisfactory combination of ride comfort, tire
wear and stability under normal conditions.
Tire pressures should be checked at least
monthly. Proper tire inflation pressures should
be maintained for these reasons:
o Lower-than-recommended tire pressures
cause uneven tread wear and poor handling.
o Higher-than-recommended tire pressures increase the chance of damage from impacts
and cause uneven tread wear.
8-1
CONSUMER INFORMATION
CAUTION:
Always observe the following:
o Check pressures when the tires are cold.
That is, after the car has been parked f or
at least three hours and hasn't been
drlven more than one mile or 1.6 km
since starting up.
o Check the pressure of your spare tire
each time you check the pressure of
other tires.
o Never overload your car. Be especially
careful about overloading if you equip
your car with a luggage rack or car top
carrier.
I050A02A-QAT
TIRE CHAINS
Tire chains should be installed on the front
wheels. Be sure that the chains are the proper
space and that they are installed in accordance
with the manufacturer's instructions.
To minimize tire and chain wear, do not continue to use tire chains when they are no longer
needed.
WARNING:
When driving on roads covered with snow
or ice, drive at less than 30 km/h (20 mph).
I060A01A-GAT
TIRE ROTATION
I040A01A-QAT
SNOW TIRES
If you equip your car with snow tires, they
should be the same size and have the same
load capacity as the original tires. Snow tires
should be installed on all four wheels; otherwise, poor handling may result.
Snow tires should carry 4 psi (28 kPa) more air
pressure than the pressure recommended for
the standard tires on the tire label on the glove
box, or up to the maximum pressure shown on
the tire sidewall whichever is less.
Oo not drive faster than the speed limit when
your car is equipped with snow tires.
8-2
After rotating, adjust the tire pressures and be
sure to check wheel nut tightness.
WARNING:
Do not mix bias-ply and radial-ply under any
circumstances.
This may cause dangerous handling characteristics.
TIRE BALANCING
A tire that is out of balance may affect handling
and tire wear. The tires on your Hyundai were
balanced before the car was delivered but may
need balancing again during the years you own
the car.
Whenever a tire is dismounted for repair, it
should be rebalanced before being reinstalled
on the car.
I080A01A-AAT
Tires should be rotated every 10,000 km (6,000
miles). If you notice that tires are wearing unevenly between rotations, have the car checked
by a Hyundai dealer so the cause may be
corrected.
TIRE TRACTION
Tire traction can be reduced if you drive on
worn tires, tires that are improperiy inflated or
on slippery road surfaces. Tires should be replaced when tread wear indicators appear. To
reduce the possibility of losing control, slow
down whenever there is rain, snow or ice on the
road.
CONSUMER INFORMATION
I090A01S-GAT
WHEN TO REPLACE TIRES
1.6mm (0.06 in.)
solid bar across two or more grooves of the
tread. Always replace your tires with those of
the recommended size. If you change wheels,
the new wheel's rim width and offset must meet
Hyundai specification.
MOOA01A-AAT
SPARE TIRE AND TOOLS
WARNING:
o Driving on worn-out tires is dangerous!
Worn-out tires can cause loss of braklng
effectiveness, steering control and traction. When replacing tires, never mlx radial and bias-ply tires on the same car. If
you replace radial ttres with blas-ply tires,
they must be installed in sets of four.
o Using tires and wheels of other than the
recommended sizes may cause unusual
handling characteristics that may cause
death, serious injury or property damage.
Your Hyundai is delivered with the following:
Spare tire
Wrench
Jack
Jack handle
The original tires on your car have tread wear
indicators. The tread wear indicators appear
when the tread depth is 1.6 mm (0.06 in.). The
tire should be replaced when these appear as a
8-3
VEHICLE SPECIFICATIONS
J030A01A-GAT
TIRE
9. VEHICLE SPECIFICATIONS
Standard
J010A01A-GAT
MEASUREMENT
Opfi'on
155/80R13
175/70R13
1 85/60 HR 14
Spare
FullSize
mm (in.)
4DR
3/5 DR
Overalllength
Overallwidth
Overall height (unladen)
4,235(166.7)
4,200(165.4)
1,670(65.7)
Wheel base
2,400(94.5)
Wheeltread
Front
Rear
1,670(65.7)
1,395(54.9)
1,395(54.9)
2,400(94.5)
1,435(56.5)
1,425(56.1)
1,435(56.5)
1,425(56.1)
J040A01A-GAT
ELECTRICAL
Battery
Altemator
Starter
MF45AH,MF55AH(12V)
13.5V80A
0.9 KW
AutoT/A
ManualT/A
J020A01A-GAT
0.7 KW
POWER STEERING
Type
Wheel f ree play
Rack stroke
Oilpumptype
Rack and pinion
0-30 mm (0-1. 18in)
J050A01A-AAT
BRAKE
134mm (5.3 in.)
Vanetype
J060A01A-GAT
FUEL SYSTEM
Fuel tank
Liter
Gal
Imp.gal
capacity
45
11.9
9.9
Type
Dual hydraulic with brake booster
Front braketype
Rear brake type
Parking brake
Ventilateddisc
Drum
Cable operated on rear wheel
9-1
VEHICLE SPECIFICATIONS
J070A01A-QAT
ENGINE
ITEMS
1.5MFI(SOHC)
EngineType
IdleSpeed(RPM)
Ingnitiontinning
Firing order
SPECIFICATIONS
1.5MFI(DOHC)
1.3MFI(SOHC)
4-Cylinderin-lineOHC
1.3CARBURETOR
800 ±100
750 ±100
800 ±100
850 ±100
BTDC 9° ± 5°
BTDC 5° ± 5°
BTDC 9° ±5°
BTDC 5° ±5°
1 -3-4-2
J090A01A-GAT
SPARK PLUG
ITEMS
Sparkplug
Spark plug gap
9-2
UNLEADED
NGK:BKR5ES-11
CHAMPION:RC10YC4
1 .0 - 1 . 1 mm (0.039 - 0.043 in.)
LEADED
NGK : BKR5ES
CHAMPION:RC10YC
0.7 - 0.8 mm (0.028 - 0.032 in.)
VEHICLE SPECIFICATIONS
J080A05A-GAT
LUBRICATION CHART
Item
Oil & Coolant Standard
EngineOil
APISG
Q'ty
SAE 20W-40, 20W-50 (ABOVE -1 0°C)
OR ABOVE SAE 1 5W-40W, 1 5W-50 (ABOVE -1 5°C)
SAE 10W-30 (-25° - 40°C)
SAE 10W-40, 10W-50 (ABOVE -25°C)
SAE 5W-20 *1 , *2 (BELOW -1 0°C)
3.3 (3.49 us-qts, 2.9 Imp-qts)
SAE 5W-30 *1 (BELOW 1 0°C)
SAE5W-40*1 (BELOW 20°C)
*1 . Restricted by driving condition and dealing area
*2. Not recommended for sustained high speed vehicle operation
Engineoil consumption
Normal driving condition
MAX. 1L/1500Km
Severe driving condition
MAX. 1L/1000Km
Manual
APIGL-4.SAE75W/90
2.15 liters (2.27 us-qts, 1 .9 Imp-qts)
Auto
HYUNDAI ATF SP-II M or GENUINE DIAMOND ATF SP-II M
6.1 liters (6.45 us-qts, 5.4 Imp-qts)
Powersteering
PSF-3
As required
Brakefluid
DOT3equivalent
As required
Enginecoolant
Ethylene glycol baseforaluminum radiator
5.5 liters (5.7 us-qts, 5.1 Imp-gts)
Transaxle
9-3
INDEX
10. INDEX
A
Airbag
AirCleanerfilter
AirConditioner
Care
Operation
Air Filter (For Evaporator and Blower Unit)
Antenna
Ashtray
Automatic Transaxle
overdrive switch
B
Battery
Bi-Level Heating
Brake
Anti-lock system
Checkingthebrakes
Fluid
Pedal clearance
Pedal free play
Practices
Breaking-ln your new Hyundai
C
CareofCassettetapes
Care of Disk
Catalytic Converter
1-18-1-22
6-9
6-13
1-47
1-48
1-62
1-33
2-8
2-10,6-16
1-45
2-9
6-12
6-12
6-14
6-14
2-8
1-1
1-60
1-60
7-1 - 7-2
Child-Protector Rear Door Look
Child Restraint System
CigaretteLighter
Clock
Clutch
Checkingfluid
Pedal free play
Combination Light
DaytJme running lights
Headlightflasher
Headlight switch
High-beam switch
Lanechangesignal
Tum signal operatjon
Compact Disk Player Operation (H920C)
CoolingFans
Corrosion Protection
Cleaning the interior
Protecting your Hyundai from corrosion
Washing and waxing
D
Door
Centraldoorlocking system
Doorlocks
Locking, unlocking front door with a key
Drive Belts
Driving
Economical driving
Smooth comering
Winter driving
1-6
1-14-1-16
1-32
1-32
6-12
6-14
1-29
1-29
1-28
1-29
1-28
1-28
1-58 - 1-59
6-17
4-3
4-1
4-2
1-10
1-5
1-5
6-13,6-15
2-9
2-10
2-10
10-1
INDEX
E
Emission Control System
Engine
Before starting the engine
Compartment (For carburator)
Compartment (For DOHC)
Compartment (For MFI)
Coolant
Coolant temperature gauge
If the engine overheats
Number
Oil
Oil consumption
Starting
Engine Exhaust Can Be Dangerous
F
Fan Speed Control
Fog Light
Front
Rear
Front Seats
Adjustable front seats
Adjustable headrests
Adjustingseatbackforwardandrearward
Adjusting seatback angle
Lumbar support control
Fuel
Capacity
Gauge
Recommendations
Fuel Filler Lid
Remote release
Fuses
10-2
7-1
2-2
6-2
6-3
6-1
6-6
1-27
3-2
8-1
6-4
6-5
2-4
2-1
1-43
1-32
1-32
1-6
1-7
1-6
1-7
1-7
9-1
1-27
1-1
1-40
6-15
G
General Everyday Checks
Glovebox
H
Hazard Waming System
Headlight
Headlight Leveling Device System
Heating and Ventilation
Rotarytype
High-mounted rearstoplight
Hood Release
Hom
I
Ignition Switch
Immobilizer System
Instrument Cluster and Indicator
Instruments and Controls
Interior Light
Withsunroof
Withoutsunroof
IntermittentWiper
6-4
1-36
1-31
6-18
1-31
1-43
1-40
1-41
1-42
2-2
1-2
1-24
1-23
1-35
1-36
1-30
J
Jump Starting
3-2
K
Keys
If you lose your keys
Positions
1-2
3-8
2-2
INDEX
L
Light Bulb Replacement
Limp home procedure
M
Maintenance Intervals
Explanation of scheduled maintenance items
Maintenance under severe usage conditions
Scheduled maintenance
Service requirements
Mirrors
Day/night inside rearview
Outsiderearview
Manualtype
Electrictype
O
Odometer.
P
Parking Brake
PowerSteering Fluid Level
PretensionerSeatBelt(With A/BAG)
PretensionerSeatBelt(WithoutA/BAG)
6-17
1-3
5-5 - 5-7
5-4
5-2
5-1
1-38
1-36
1-36
1-37
.1-28
1-38
6-17
1-17- 1-18
1-17
R
Rear Seats
Folddown
Rearseatentry
RearWindowDefrosterSwitch
RearWindowWiperandWasher
1-38
1-8
1-31
1-30
S
SeatBelts
2-Pointstatictype
1-13
3-Pointtype
1-12
Adjustableheight
1-11
Adjustingyourseatbelt
1-12-1-13
Careofseatbelts
1-10-1-11
Precautions
1-10
SparkPlugs
6-8
Speedometer
1-27
Starting Procedures
2-3-2-4
Steering Wheel
Freeplay
6-17
Tiltlever
1^2
Stereo Radio and Cassette Tape Player Operation (H900A) ..1-53-1 -55
StereoRadioOperation(H900B)
1-51-1-52
Stereo Radio Operation (H920C)
1-56-1-57
Stereo Sound System
1-48-1-50
SunVisor
1-42
Sunroof
1-34
Sunshade
1-33
T
Tachometer
TheftAlarmSystem
Tires
Balancing
Chains
Changingaflattire
If you have a
Information
Pressure (see glove box)
Replacement
1-28
1-4
flat
tire
8-2
8-2
3-4
3-3
8-1
8-1
8-3
10-3
INDEX
Rotation
Snowtires
Sparetire
Traction
Towing
Emergency
If your car must be towed
Trailerorvehicletowing
Transaxle
Automatic
Automatic transaxle fluid checking
Manual
Manual transaxle oil checking
Trunk
Remote release
8-2
8-2
3-3
8-2
3-8
3-7
2-12
2-6
6-11
2-4
6-10
1-39
1-40
V
Vehicle Identification Number (VIN)
VehicleSpecifications
Ventilation
Centerventilator
Sideventilator
W
Waming Lights
Windows
Manual
Power
WindshieldWiperandWasher
WindshieldWiperBlades
10-4
8-1
9-1
1-45
1-45
1-23-1-26
1-8
1-9
1-28
6-9