1
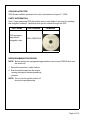
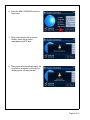
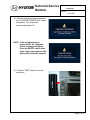
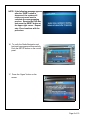
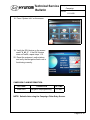
Technical Service
Bulletin
Group
CAMPAIGN
Number
11-01-008
Date
Subject
MARCH, 2011
NAVIGATION REPROGRAMMING - CAMPAIGN T59
Model
2009 SONATA
CIRCULATE TO:
[X] SERVICE ADVISOR
[ ] GENERAL MANAGER [X] PARTS MANAGER
[X] SERVICE MANAGER [X] WARRANTY MGR
[X] TECHNICIAN
[ ] SALES MANAGER
This bulletin supersedes TSB # 08-01-013 to include information that dealers
should inform customers that all navigation and audio settings will be erased
during the map software update procedure.
IMPORTANT: INFORM THE CUSTOMER THAT ALL NAVIGATION AND AUDIO
SETTINGS (PREVIOUS DESTINATIONS, HOME ADDRESSES,
PHONE NUMBERS, RADIO PRESETS, ETC.) WILL BE ERASED
DURING THE MAP SOFTWARE UPDATE PROCEDURE.
IMPORTANT: DEALERS MUST PERFORM THIS CAMPAIGN ON ALL AFFECTED
VEHICLES PRIOR TO CUSTOMER RETAIL DELIVERY AND
WHENEVER AN AFFECTED VEHICLE IS IN THE SHOP FOR ANY
MAINTENANCE OR REPAIR.
IMPORTANT: WHEN A VEHICLE ARRIVES AT THE SERVICE DEPARTMENT,
ACCESS HYUNDAI MOTOR AMERICA'S "WARRANTY VEHICLE
INFORMATION" SCREEN VIA DCS ON-LINE OR WEBDCS TO
IDENTIFY OPEN CAMPAIGNS.
DESCRIPTION:
Select 2009 Sonata Vehicles are equipped with in-car navigation as part of the audio
system. Some navigation systems may experience lock up while in map display mode
or the navigation icons may be incomplete/missing from the display screen.
This bulletin describes the procedure to reprogram the navigation software to repair
these conditions.
NOTE: If the navigation screen is blank or locks up on the Hyundai Logo screen,
but the sound still plays through the speakers, the navigation unit will
need to be replaced. New units already have the new software program
installed.
NOTE: Contact Hyundai Autonet Customer Support for questions relating to the
navigation upgrade procedure (800-648-7577).
IMPORTANT: MAKE A COPY OF THE ACKNOWLEDGEMENT FORM ON THE
LAST PAGE OF THIS TSB FOR THE CUSTOMER TO SIGN AND
INCLUDE WITH THE REPAIR ORDER.
Page 1 of 10
VEHICLES AFFECTED:
2009 Sonata vehicles produced from start of production to August 11, 2008.
PARTS INFORMATION:
One (1) reprogramming DVD disc will be sent to each dealer to be used for updating
the navigation software. Additional discs can be ordered through the PDC.
PART NAME
DVD reprogramming disc for
Navigation units.
PART NUMBER
REMARKS
00201-F9008 DVD
REPROGRAMMING PROCEDURE:
NOTE: Before starting the reprogramming procedure remove any CD/DVD disc from
the audio unit.
1. Record the customer’s radio stations.
2. Start the vehicle and keep the engine
running throughout the reprogramming
process.
NOTE: Do not turn the ignition switch off
during the reprogramming.
Page 2 of 10
Technical Service
Bulletin
Group
Campaign
Number
11-01-008
3. Turn the Radio/Navigation unit ON and
press the “Agree” button on the screen.
4. Push the SETUP button on the control
panel.
5. Press “System Info” on the screen.
Page 3 of 10
6. Press the MAP UPGRADE button on
the screen.
7. When instructed by the on-screen
display, insert the provided
reprogramming DVD disc.
8. The system will automatically verify the
information contained on the disc by
displaying the following screen:
Page 4 of 10
Technical Service
Bulletin
Group
Campaign
Number
11-01-008
9. Press the “YES” button to start the
update process.
NOTE: After pressing “YES”, the system will appear locked for approximately
one minute. DO NOT TURN THE POWER OFF OR PRESS ANY OTHER
BUTTONS.
10. After approximately one minute the
system will display the following
screen:
Page 5 of 10
11. Using a fine-tipped tool or similar
object, press the RESET button near
the upper right corner of the unit.
12. Push the “PWR” button at the upper
left corner of the unit to turn the display
on.
NOTE: The audio volume may be
turned down during the
updating process.
13. After approximately one minute, the
following screen will display indicating
the reprogramming procedure has
begun. This process will take several
minutes to complete.
Page 6 of 10
Technical Service
Bulletin
Group
Campaign
Number
11-01-008
14. After the reprogramming is complete,
the “UPGRADE COMPLETED” screen
will appear. The system will
automatically power off.
NOTE: If the reprogramming is
unsuccessful, the “Upgrade
Failed” message will appear.
Press the RESET switch at the
upper right corner again and the
system will restart the upgrade.
15. Push the “PWR” button to turn the
system on.
Page 7 of 10
NOTE: If the following message appears
after the “PWR” button is
depressed, the system will
require one more reset to
complete the reprogramming
process. Remove the DVD disc
and press the RESET button at
the upper right corner. Repeat
step 15 and continue with the
procedure.
16. To verify the Radio/Navigation unit
has been reprogrammed successfully,
Push the SETUP button on the control
panel.
17. Press the “Agree” button on the
screen.
Page 8 of 10
Technical Service
Bulletin
Group
Campaign
Number
11-01-008
18. Press “System Info” on the screen.
19. Verify the SW Version on the screen
reads “V_A3_3”. If the SW Version
does not match, repeat steps 1-15.
20. Reset the customer’s radio stations
and verify the Navigation/Audio unit is
functioning correctly.
CAMPAIGN CLAIM INFORMATION:
OP CODE
80BA14R1
OPERATION
Navigation Reprogramming
OP TIME
0.3 M/H
NOTE: Submit claim using the Campaign Claim Entry Screen.
Page 9 of 10
I ______________________________________acknowledge that all navigation and
audio settings (previous destinations, home addresses, phone numbers, radio presets,
etc.) will be erased during the map software update procedure.
_______________________________
(Customer Signature)
_______________________________
(Dealer Personnel Signature)
_______________________________
(Dealer Name)
_______________________
(Date)
_______________________
(Date)
_______________________
(Dealer Code)
(Please provide a signed copy to the customer along with the Repair Order and retain
the original for Dealer records)