1
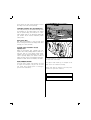
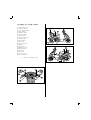
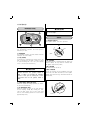
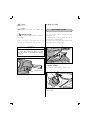
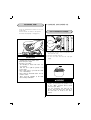
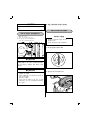
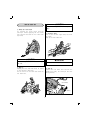
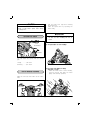
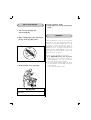
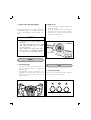
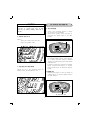
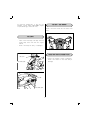
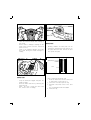
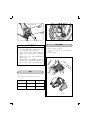
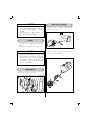
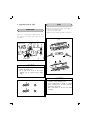
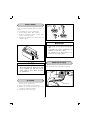
WARNING/CAUTION/NOTE
IMPORTANT
Please read this manual and follow its instructions carefully. To emphasize special information the words WARNING, CAUTION and NOTE
carry special meanings and should be carefully
reviewed.
BREAK-IN INFORMATION FOR
YOUR MOTORCYCLE
The first 1000km(600miles) are the most important in the life of your motorcycle .
Proper break-in operation during this time will
help ensure maximum life and performance
from your new motorcycle.
Hyosung parts are manufactured of high quality
materials, and manufactured parts are finished
to close tolerances. Proper break-in operation
allows the machined surfaces to polish each
other and mate smoothly.
▲WARNING
!
The personal safety of the rider may be involved.
Disregarding this information could result in injury
to the rider.
Motorcycle reliability and performance depend
on special care and restraint exercised during
the break-in period. It is especially important
that you avoid operating the engine in a manner which could expose the engine parts to
excessive heat.
▲CAUTION
!
These instructions point out special service procedures or precautions that must
be followed to avoid damaging the
machine.
Please refer to the BREAK-IN section for specific break-in recommendations.
NOTE: This provides special information to
make maintenance easier or important instructions clearer.
1
FOREWORD
THANK YOU for choosing Hyosung. We at
Hyosung have designed, tested and produced
this motorcycle using the most modern technology available to provide you with many happy,
enjoyable, safe riding. Motorcycling is one of
the most exhilarating sports and insure your
riding enjoyment, you should become throughly
familiar with the information presented in this
Owner's Manual before riding the motorcycle.
All information, illustrations photographs and
specifications contained in this manual are
based on the latest product information available at the time of publication. Due to
improvements or other changes, there may be
some discrepancies in this manual. Hyosung
reserves the right to make changes at any
time.
Please note that this manual applies to all
specifications for all respective destinations and
explains all equipments. Therefore, your model
may have different standard features than
shown in this manual.
The proper care and maintenance that your
motorcycle requires is outlined in this manual.
By following these instructions explicitly you will
insure a long trouble-free operating life for
your motorcycle. Your Hyosung dealer has
experienced technicians that are trained to
provide your machine with the best possible
service with the right tools and equipment.
HYOSUNG MOTORS & MACHINERY INC.
COPYRIGHT HYOSUNG MOTORS & MACHINERY INC.
2
TABLE OF CONTENTS
1. CONSUMER INFORMATION
4
7. INSPECTION BEFORE RIDING
ACCESSORY INSTALLATION AND
PRECAUTION TIPS
BRAKES
TIRES
GASOLINE AND ENGINE OIL
LAMPS
REAR-VIEW MIRRORS
SAFE RIDING RECOMMENDATION
FOR MOTORCYCLE RIDERS
2. NAMES OF EACH PART
3. CONTROLS
6
8. PERIODIC MAINTENANCE
7
9
HOW TO OPEN SEAT
HOW TO USE HELMET HOLDER
HOW TO USE PERSONAL TRUNK
9. MAINTENANCE TIPS
5. GASOLINE AND ENGINE OIL
10
6. THE PROPER OPERATIONS
11
19
FRONT FORK
BRAKES
TIRES
AIR CLEANER
BATTERY
TRANSMISSION
ENGINE OIL AND GASOLINE
INSTRUMENT PANEL
IGNITION SWITCH
4. HOW TO USE
16
23
BRAKE LEVER
FUSES
BATTERY
AIR CLEANER
RUBBER CAP
10. SPECIFICATIONS
3
25
therefore caution should be used when selecting
and installing all accessories.
(5) Certain accessories displace the rider from his or
her normal riding position. This limits the freedom
of movement of the rider and may limit his or
her control ability.
(6) Additional electrical accessories may overload the
existing electrical system. Severe overloads may
damage the wiring harness or create a dangerous situation due to the loss of electrical power
during the operation of the motorcycle.
1.CONSUMER INFORMATION
ACCESSORY INSTALLATION AND
PRECAUTION SAFETY TIPS
There are a great variety of accessories available to
Hyosung owners. Hyosung can not have direct control
over the quality or suitability of accessories you may
wish to purchase. The addition of unsuitable accessories can lead to unsafe operating conditions. It is
not possible for Hyosung to test each accessory on
the market or combinations of all the available
accessories, however, your dealer can assist you in
selecting quality accessories and installing them correctly.
When carrying a load on the motorcycle, mount it as
low as possible and as close as possible to the
machine. An improperly mounted load can create a
high center of gravity which is very dangerous and
makes the motorcycle difficult to handle. The size of
the “load” can also affect the aerodynamics and
handling of the motorcycle. Balance the load between
the left and right side of the motorcycle and fasten it
securely.
Use extreme caution when selecting and installing the
accessories for your Hyosung. We have developed
some general guidelines which will aid you when
deciding whether, and how to equip your motorcycle.
(1) Anytime that additional weight or aerodynamic
affecting accessories are installed, they should be
mounted as low as possible, as close to the
motorcycle and as near the center of gravity as
is feasible. The mounting brackets and other
attachment hardware should be carefully checked
to ensure that it provides for a rigid, nonmovable
mount. Weak mounts can allow the shifting of
the weight and create a dangerous, unstable
condition.
(2) Inspect for proper ground clearance and bank
angle. An improperly mounted load could critically
reduce these two safety factors. Also determine
that the“accessories”does not interfere with the
operation of the suspension steering or other
control operations.
(3) Accessories fitted to the handlebars or the front
fork area can create serious stability problems.
This extra weight will cause the motorcycle to be
less responsive to your steering control. The
weight may also cause oscillations in the front
end and lead to instability problems. Accessories
added to the handlebars or front fork should be
as light as possible and kept to a minimum.
(4) The motorcycle may be affected by a lifting condition or by an instability in cross winds or when
being passed or passing large vehicles.
Improperly mounted or poorly desighed accessories can result in an unsafe riding condition,
MODIFICATION
Modification of the motorcycle, or removal of original
equipment may render the vehicle unsafe or illegal.
SAFE RIDING RECOMMENDATION
FOR MOTORCYCLE RIDERS
Motorcycle riding is great fun and an exciting sport.
Motorcycle riding also requires that some extra precautions
be taken to ensure the safety of the rider and passenger.
These precautions are:
WEAR A HELMET
Motorcycle safety equipment starts with a quality
safety helmet. One of the most serious injuries that
can happen is a head injury. ALWAYS wear a properly approved helmet. You should also wear suitable
eye protection.
RIDING APPAREL
Loose fancy clothing can be uncomfortable and
unsafe when riding your motorcycle. Choose good
quality motorcycle riding apparel when riding your
motorcycle.
INSPECTION BEFORE RIDING
Review throughly the instructions in the“INSPECTION
BEFORE RIDING”section of this manual. Do not for-
4
get to perform an entire safety inspection to ensure
the safety of the rider and its passenger.
①
FAMILIARIZE YOURSELF WITH THE MOTORCYCLE
Your riding skill and your mechanical knowledge form
the foundation for safe riding practices. We suggest
that you practice riding your motorcycle in a nontraffic situation until you are thoroughly familiar with
your machine and its controls. Remember practice
makes perfect.
KNOW YOUR LIMITS
Ride within the boundaries of your own skill at all
times. Knowing these limits and staying within them
will help you to avoid accidents.
②
BE EXTRA SAFETY CONSCIOUS ON BAD
WEATHER DAYS
Riding on bad weather days, especially wet ones,
requires extra caution. Braking distances double on a
rainy day. Stay off of the painted surface marks,
manhole covers and greasy appearing areas as they
can be especially slippery. Use extreme caution at
railway crossings and on metal gratings and bridges.
Whenever in doubt about road condition, slow down!
The frame number ① is stamped on the right side of
the under center in the frame.
SERIAL NUMBER LOCATION
The engine serial number ② is stamped on the
right side of the crankcase assembly.
The frame and/or engine serial numbers are used
to register the motorcycle. They are also to assist
your dealer when ordering parts or referring to
special service information.
Please write down the numbers in the box provided below for your future reference.
Frame number:
Engine number:
5
2.NAMES OF EACH PARTS
①
②
③
④
⑤
⑥
⑦
⑧
⑨
⑩
⑪
⑫
⑬
⑭
⑮
�
�
�
�
�
Rear brake lever
Dimmer switch
Turn signal switch
Horn switch
Ignition switch
Starter button
Light switch
Front brake lever
Throttle grip
Rear carrier
Fuel tank
Personal space
Muffler
Air cleaner
Battery & Fuse
Helmet holder
Oil tank
Seat lock
Center stand
Kick start lever
∙“- - - ”means the invisable parts
6
3.CONTROLS
INSTRUMENT PANEL
▲CAUTION
!
The lack of Engine oil could cause serious damages on the Engine.
SWITCH
① IGNITION SWITCH
The ignition switch has three positions:
ON
③ FUEL GAUGE
It indicates the remaining fuel amount in the fuel
tank. E indicates the fuel tank is empty or nearly
so. (the remaining fuel is 0.8ℓ at E. the capacity
is 4.8ℓ) Fill the fuel tank before E.
G
LOCK
I
LO
② ODOMETER
The odometer registers the total distance that the
motorcycle has been ridden.
KEY
ON
NITIO N
F
PUSH
OF
OF
F
① SPEEDOMETER
The speedometer indicates the road speed in
kilometers per hour.
CK
“ON”POSITION
The ignition circuit is completed and the engine can
now be started. The key cannot be removed from
the ignition switch in this position.
“OFF”POSITION
All electrical circuits are cut off.
▲CAUTION
!
“LOCK”POSITION
To lock the steering, turn the handlebar all the way
to the left. Push down and turn key to the“LOCK”
position and remove the key. All electrical circuits are
disconnected.
ON
LO
⑤ OIL INDICATOR LIGHT
When the engine oil level in the tank becomes
too low requiring“HYPOL OIL”refilling. the indicator will light. When the oil level check light
turns on, the remaining amount of oil has become
approximately 300㎖.
CK
PUSH
7
NITION
F
PUSH
OF
④ TURN SIGNAL INDICATOR LIGHT
When turn signals are being operated. the indicator will flash intermitently.
G
The fuel gauge indicates the remaining
amount whenever the ignition switch is
“ON” or “OFF”
. For checking the remaining
amount of fuel, put the motorcycles on the
center-stand and set the ignition switch is
“ON”.
I
For preventing steal, Lock the steering.
㉠ Turn right the handle
㉡ Turn the key from OFF to Lock.
㉢ Pull out the key while from Lock to OFF.
▲CAUTION
!
HORN SWITCH
ㆍ Check if the steering is locked.
ㆍ When it is not locked, Turn the handle
right a little.
Press the switch to operate the horn.
④ DIMMER SWITCH
② TURN SIGNAL SWITCH
DIMMER SWITCH
TURN SIGNAL SWITCH
It is for left/right turning or changing lanes.
“� ”position - for right turn signal
“� ”position - for left turn signal
“△”Push the switch to cancel the operation.
“
”position - for headlight high beam.
“
”position - for headlight low beam.
▲CAUTION
!
Set the dimmer switch“
running in front or against.
”when other vehicle is
⑤ LIGHT SWITCH
▲CAUTION
!
Turn off the lamp right after completing the turn
or lane change.
If you keep the lamp on, it could cause other
drivers to be confused.
③ HORN SWITCH
LIGHT SWITCH
8
“
”position
All light go off.
4. HOW TO USE
“
”position
The headlight, meter lamp and taillight come
on.
HOW TO OPEN THE SEAT
You can use the helmet holder/Trunk after
opening the seat.
⑥
STARTER BUTTON
Push in the electric starter button to rotate the
stater motor.
To unlock the seat, insert the ignition key into the
lock and turn it counterclockwise.
To lock the seat, push down firmly until the seat
latch snaps into the locked position.
NOTE: If the front or rear brake lever is not
squeezed, the starter motor will not rotate.
▲CAUTION
!
When the starter motor doesn’t rotate within
5 seconds after pushing the button, try again
after 10 seconds for preventing the damage
on battery.
SEAT LOCK
① HELMET HOLDER
To search the helmet holder, open the seat.
STARTER BUTTON
Lock the seat, after hang helmets tail on a
helmet holder.
9
5. GASOLINE AND ENGINE OIL
THE PERSONAL TRUNK
ㆍ Keep the maintenance manual in the personal trunk.
ㆍ Put the helmet as shown in the picture.
ㆍ The trunk laod capacity is 10kg(22 lbs)
HOW TO PROVIDE THE GASOLINE
FUEL TANK CAP
1. Put the key into the seat lock and turn left
and open the seat.
2. Turn the fuel tank cap left.
3. Fill the fuel tank and turn the cap right
tightly.
▲CAUTION
!
ㆍ The trunk could be heated. Don't keep
anything that doesn't endure heat.
ㆍ Don’t keep the fragile.
ㆍ Check if it is locked.
ㆍ The unlocking of trunk could cause serious accident.
ㆍ Take care not to spill the gasoline or oil
in the trunk.
ㆍ Don’t allow water to get inside the trunk
or it could damage.
ㆍ Don’t wash the trunk with water. Use the
vacuum cleaner.
ㆍ Don’t keep the valuables in the trunk
when leaving unattended.
GASOLINE
▲WARNING
!
ㆍ When refueling, always shut the
engine off and turn the ignition. Key
to the “OFF” position. Never refuel
near an open flame.
ㆍ Do not overfill the fuel tank. Do not
fill the fuel tank above the bottom of
the filler tube as shown in the illustration.
10
6. THE PROPER OPERATIONS
▲CAUTION
!
Take care not to spill gasoline during refueling.
HOW TO START THE ENGINE
HOW TO SUPPLY THE ENGINE OIL
1. Open the seat.
2. Turn the oil tank cap left.
3. Fill the oil tank and tighten it.
(Use the recommended oil)
Before riding
ㆍ Check how much the engine oil and
gasoline is left.
ㆍ Put the motorcycle on the centerstand.
① Set the ignition switch“ON”
▲CAUTION
!
LO
A burnt engine is usually a result of engine
starting with no oil in the oil tank. Check the
oil level before starting and avoid costly
damage.
CK
▲CAUTION
NITION
ON
G
F
PUSH
OF
OIL TANK CAP
I
!
② Squeeze the rear brake lever.
ㆍ Don’t mix the unrecommended oil. It could
damage the engine.
ㆍ When refilling the oil tank, Don’t allow the
dust to get inside.
ㆍ Mop the oil spilt.
ㆍ Don’t put the patch on the cap. It could
disturb the oil to be provided and damage
the engine.
11
③ Push the start button without turning the
throttle grip.
ㆍ It is not started easily in the cases as follows.
1)It was long ago to start the engine.
2)There was no gasoline left.
In this case(1.2), push the start button
longer without turning the throttle grip.
④ When the engine is cold, idle it for a while.
▲CAUTION
!
ㆍDon’t idle it indoor where there is little or no
ventilation available.
ㆍThe exhaust gas including carbon monoxide
is extremely poisonous.
▲CAUTION
!
ㆍ Depress the start button right after started.
ㆍ When the start motor doesn’t rotate within 5 seconds after pushing the start button, try again after 10 seconds for preventing the damage on battery.
Start using the kick starter lever
You can start using the kick starter lever when
there is some problem in battery.
① Put the motorcycle on the center stand.
② Set the ignition switch“ON”
③ Press forcefully the kick starter lever.
ㆍ Wnen it doesn’t start after several trial,
turn the throttle grip to ⅛~¼ position.
FULL THROTTLE OPERATION
▲CAUTION
!
▲CAUTION
!
When started, return the kick starter
lever.
When started, return the throttle grip.
12
▲CAUTION
HOW TO START OFF
!
Don’t let the engine run excessively before
riding.
① Return the center
For returning the
motorcycle forward
lever with left hand
right hand.
stand.
center stand, push the
gripping the rear brake
and the rear carrier with
③ Check the safety
Turn on the left turn signal lamp and check
the safety.
Grap up the rear brakd lever.
▲CAUTION
!
▲CAUTION
!
When returning the center stand, Don’
t grip
the seat.
Be careful of the vehicles in back.
② Ride on
Gripping the lever with both hands, be seated
on from leftside of motorcycle.
Put the left foot on the earth and fasten the
rear brake lever.
④ Start off
Depress the rear brake lever and turn the
throttle grip slowly, the motorcycle will start
moving forward.
RETURNING
SLOWLY
13
ㆍ Grip the brake lever right after returning
the throttle grip.
ㆍ Make the speed lower by operating the
brake slowly.
▲CAUTION
!
When turned the throttle grip excessively, it will make quick start which
is dangerous.
▲CAUTION
!
ADJUSTING THE SPEEDS
ㆍ Using either front or rear brake is dangerous and can cause skidding and loss of
control
� The quick brake can cause skidding.
RETURNING
TURNING
You can adjust the speeds with the throttle
grip.
Turning - - - - Get faster
Returning - - - Get slower
� Pay much more attention to driving
when rains or snows.
ㆍ When the brake doesn’t work normally,
keep low speeds and apply the brake
lightly until smoothly operated.
HOW TO OPERATE THE BRAKE
Apply the front and rear brakes at the sametime.
REAR BRAKE
FRONT BRAKE
14
④ Lock the steering for security.
⑤ Pull the ignition key out of the lock and keep it
yourself.
HOW TO STOP AND PARK
① Turn on the turn signal lamp and
return the throttle grip.
BREAKING-IN
LO
CK
During mamufacture only the best possible
materials are used and all machined parts are
finished to a very high standard but it is still
necessary to allow the moving parts to
“BREAK-IN” before subjecting the engine to
maximum stresses. The future performance and
reliability of the engine depends on the care
and restraint exercised during its early life. The
general rules are as follow:
NITION
ON
G
F
PUSH
OF
② When completely stopped, turn off the turn signal lamp. Set the key“OFF”position.
● Keep to these breaking-in speed limit:
Up to 1000km(600miles):Less than 4/5 throttle
● Upon reaching an odometer reading of
1000km(600miles) you can subject the
motorcycle to full throttle operation.
● Do not maintain constant engine speed for
an extended time period during any portion
of the break-in.
Try to vary the throttle position.
I
③ Put the motorcycle on the center stand.
▲CAUTION
!
Don’t park the motorcycle on the slippery or
tilted surface.
15
② BRAKE FLUID
7. INSPECTION BEFORE RIDING
∙ Keep the motorcycle upright and place the
handlebar straight.
∙ Check brake fluid level by observing the
lower limit line on the brake fluid reservoir.
∙ When the level is below the lower limit line,
replenish with brake fluid.
Running inspection once in a day and periodic
maintenance(5,000km or 10,000km)is necessary
for the full performance and preventing accidents.
▲CAUTION
!
∙ Even though the motorcycle is not run for
a long time, the periodic maintence is
necessary.
∙ The engine and muffler is too hot right
after engine stopped. please be caerful
not to be burned.
∙ Don’t inspect the engine indoor where
there is little or no ventilation available.
The exhaust gas is extremely poisonous.
LOWER LIMIT LINE
BRAKES
① THE BRAKE LEVER
TIRES
∙ Turn the front/rear brake adjuster clockwise/or counterclockwise to obtain the
specified play.
∙ After adjusting the play, check there is no
dragging and enough clearance between the
brake lever and grip when the lever is
tightly squeezed.
① THE TIRE PRESSURE
If you see the problem with the tire, adjust the
pressure with the pressure gauge.
OVER
16
NORMAL
SHORT
▲CAUTION
THE GASOLINE AND ENGINE OIL
!
If there are some problem with the tire
pressure or cracks and cuts, it will
decrease the riding stability and lead to
flat tire.
① THE GASOLINE
∙ Check if the remaining gasoline is enough
for running to the destination.
∙ Replenish the gasoline before reaching “E”
mark with the ignition switch in the “ON”
position.
② CRACKS AND CUTS
Check if
1)there are visible cracks and cuts.
2)there are pebbles stuck.
FUEL GAUGE
SCREW
WORN, CRACK
② FUEL RECOMMENDATION
∙ Use unleaded gasoline with an octane rating of
91 or higher (Research method). Unleaded
gasoline can extend spark plug life and exhaust
components life.
∙ If pinking or knocking is experienced, substitute
higher octane grade gasoline or another
brand, because there are differences between
brands.
FOREIGN MATERIAL
③ THE DEPT OF TIRE TREAD
Change the tire if the remaining depth tire
tread becomes 1.6mm(0.06inch)or less.
③ ENGINE OIL
∙ Replenish the Engine oil when the Engine oil
indicator light is on with the ignition switch in
the“ON”position.
WEAR LIMIT INDICATION POSITION MARK
WEAR LIMIT INDICATION
OIL INDICATOR LIGHT
17
Use Hyosung “HYPOL OIL” If They are not
available, a good quality TWO-STROKE engine
oil (nondiluent type) should be used.
THE REAR - VIEW MIRROR
Check if the mirror shows the rear and/or side
views.
THE LAMPS
∙ Check if the head lamp, tail lamp and turn
signal lamp work well with the engine
started.
∙ Check if the lamp are dusty or damaged.
REFLECTOR AND THE NUMBER PLATE
HEAD LIGHT
∙ Check if the reflector is dusty or damaged.
∙ Check if the number is clear and dusty or
damaged.
TURN SIGNAL LAMP
TAIL LAMP
TURN SIGNAL LAMP
18
� CHASSIS
8. PERIODIC MAINTENANCE
The belows show the schedule of periodic
maintenance by mileages. More frequent maintenance must be performed on motorcycles
that are used under severe conditions.
Every
5,000km
Every
10,000km
Throttle cable
Motor oil
←
-
Throttle grip
-
-
Grease
Inspect
Inspect
Inspect
Every
5,000km
Every
10,000km
-
-
Inspect
Brake
Inspect
←
-
Tire
Inspect
←
-
Bolt / Nut
Inspect
←
-
Steering
Inspect
←
-
Drive belt
� LUBRICATION
First
1,000km
First
1,000km
FRONT FORK
Brake hose, cable
Bearing of Steering
stem
Brake lever
∙ Check if there is any noise by bend of front
fork while moving the handle upward and
downward.
∙ Inspect whether the steering stem is well
assembled while moving front fork
up/downwards and/or foreward/backward.
Grease every 2years or
every 20.000km
Grease
←
-
First
1,000km
Every
5,000km
Every
10,000km
Tighten
←
-
� ENGINE
Engine bolt/nut
Air cleaner
Clean
Spark plug
Clean
Clean
Clean
Carburetor
Inspect
←
-
Inspect
←
-
Clean every 3,000km
BRAKES
Engine hose
∙ Turn the front/rear brake adjuster clockwise
or counterclockwise to obtain the specified
play.
Replace every 2years
19
LOWER LIMIT LINE
∙ Check the front/rear brake while running in
low speeds.
∙ Check if there is leakage or damage on the
brake fluid reservoir and the connected
parts are loose.
∙ Check if the vibration damages the brake
hose while moving the handle left/right or
running.
BRAKE PADS
∙ Wearing condition of brake pads can be
checked by observing the wear limit line on
the pads. When the wear exceeds the limit
line, replace the pads.
WEAR LIMIT LINE
BRAKE HOSE
DISC
BRAKE CALIPER
BRAKE FLUID
∙ Keep the motorcycle
handle straight.
∙ Check the brake fluid
lower limit line
∙ When the level is
line, check if there is
∙ How to replenish with brake fluid
1. Clean the brake fluid reservoir around not
to allow dusts to get inside of it.
2. Loosen the screw and open the cap.
3. Replenish with brake fluid to the limit
line.
the recommended brake fluid:DOT4
4. Fasten the cap.
upright and place the
lever by observing the
below the lower limit
leakage.
20
UPPER LIMIT LINE
AIR CLEANER
▲CAUTION
!
∙ D o n ’t r e p l e n i s h w i t h b r a k e f l u i d
over the limit line. It will leak out
of the brake fluid reservoir.
∙ Be careful not to allow dusts or
water to go inside when replenishing.
∙ D o n ’t u s e t h e u n r e c o m m e n d e d
brake fluid.
∙ Brake fluid can damage severely
the plastics or rubbers. When it is
spilt on the parts, mop them up.
1. Remove the left side cover.
2. Take out air cleaner by disassembling 5
screws.
3. Put out the filter.
TIRES
SCREW
Check the tire pressure when it is cold.
Tire Pressure
Front
Rear
Solo riding
1.25 kg/㎠
2.00 kg/㎠
Dual riding
-
-
FILTER
21
▲CAUTION
ENGINE OIL AND GASOLINE
!
∙ When the assembly of air cleaner filter is not completely done, dusts can
go inside and damage severely
engine.
∙ Be careful not to allow water to go
into the filter while washing.
∙ Check if there is leakage around the oil
pump and oil tank.
BATTERY
∙ This motorcycle is equipped with sealed MF
battery.
∙ Charging the battery does not need.
▲CAUTION
!
∙ Check if there is leakage from gasoline
tank, hose and carburetor.
∙ Don’t take off the sealed cap.
∙ Take off the battery when the
motorcycle is not used for a long
time to prevent electric discharge
or leakage. When the battery is
attached on the motorcycle, take
off the (-) terminal.
TRANSMISSION OIL
Check if the transmission oil leaks.
22
9. MAINTENANCE TIPS
FUSES
Check the fuse with the ignition switch“ON”
1. Remove the battery cover.
2. Take out the fuse holder.
3. Open the fuse holder and take out the fuse.
BRAKE LEVER
Check if it is within the required range when
you squeeze the brake lever until feel the
resistance.
FUSE
REAR BRAKE
RANGE
PIN
ADJUSTER NUT
▲CAUTION
!
∙ When it is beyond the required range,
replace the brake shoe.
∙ Fix � part of nut to pin or the serious
accident can be caused by the brake
failure.
▲CAUTION
!
∙ Always be sure to replace the blown fuse
with the correct amperage fuse.
∙ If the replaced fuse is blown in a short
time, it means there are other problems.
Check the other parts.
∙ Don’t pour water on the fuse box when
washing.
23
BATTERY TERMINAL
NON-FLAMMABLE
CLEANING SOLVENT
Clean the battery terminal when it is dusty or
rusted.
1. Deassemble the cover of battery box.
2. Set the ignition switch“OFF”position.
3. Clean the terminal. If there is white dust,
clean it with warm water.
4. Assemble the battery wires and grease the
terminal lightly.
OIL
▲CAUTION
!
∙ Don’t use the cleaning solvent whose
flash point is low when cleaning the
filter.
∙ Assemble the filter completely or
damage severely the engine.
∙ Be careful not to allow water to go
inside the air cleaner filter.
RUBBER CAP OF CABLES
▲CAUTION
!
∙ Keep the battery away from fires.
∙ When disassemble the battery wires, take
off � terminal first with the ignition
switch “OFF” position. When assemble,
� terminal first.
Mope them up with a patch when washing.
AIR CLEANER
RUBBER CAP
1. Take off the air cleaner filter.
2. Wash it with cleaning solvent and dry.
3. Immerse it in motor oil squeeze the oil off
to make it slightly wet with oil.
4. Assemble the air cleaner filter.
24
10. SPECIFICATIONS
DIMENSIONS AND DRY MASS
Overall length ……………………………………………
Overall width ……………………………………………
Overall height ……………………………………………
Wheelbase ………………………………………………
Ground clearance ………………………………………
Dry mass ………………………………………………
1,780mm(70.1in)
660mm(26.0in)
1,065mm(41.9in)
1,221mm(48.1in)
112mm(4.4in)
84kg(185lbs)
ENGINE
Type ………………………………………………………
Intake system ……………………………………………
Number of cylinder ……………………………………
Bore ………………………………………………………
Stroke ……………………………………………………
Piston displacement ……………………………………
Corrected Compression ratio …………………………
Carburetor ………………………………………………
Air cleaner ………………………………………………
Starter system …………………………………………
Lubrication system ……………………………………
Two-stroke, forced air cooled
Reed valve
1
41.0mm(1.614in)
37.4mm(1.472in)
49㎤(3.0cu.in)
7.4:1
SIDEDRAFT V.V.
Polyurethane foam element
Electric and kick
HYOSUNG“CCI”
TRANSMISSION
Clutch …………………………………………………… Dry shoe, automatic, centrifugal type
Reduction ratio ………………………………………… 2.815~0.866(Variable)
Drive system …………………………………………… V-belt drive
25
CHASSIS
Front suspension ………………………………………
Rear suspension ………………………………………
Caster …………………………………………………
Trail ………………………………………………………
Steering angle …………………………………………
Turning radius …………………………………………
Front tire size …………………………………………
Rear tire size …………………………………………
Front brake ……………………………………………
Rear brake………………………………………………
Telescopic, coil spring, oil dampened
Swingarm type, coil spring, oil damped
25。
70mm(2.75in)
45�(right & left)
1.9m(6.2ft)
100/80-10 53J
100/80-10 53J
Disc
Internal expanding
ELECTRICAL
Ignition type ……………………………………………
Ignition timing …………………………………………
Spark plug ………………………………………………
Battery …………………………………………………
Generator ………………………………………………
Fuse ……………………………………………………
Headlight ………………………………………………
Turn signal light ………………………………………
Tail/Brake light…………………………………………
Speedometer light ……………………………………
Oil level indicator light ………………………………
Turn signal indicator light ……………………………
Trunk light ………………………………………………
HYOSUNG“CDI”
23。B.T.D.C.at 4000 r/min
GOLDEN : BP6HS
12V 3Ah/10HR
Magneto
10A
12V 18/18W×2
12V 10W
12V 5/10W
12V 1.7W×2
12V 1.7W
12V 1.7W
12V 2W
CAPACITIES
Fuel tank ……………………………………………… 4.8L(1.3/1.1 US/lmp gal)
Engine oil tank ……………………………………… 1.2L(1.2/1.0 US/lmp qt)
Final gear oil ………………………………………… 80ml(2.7/2.8 US/lmp oz)
26
Prepared by
HYOSUNG MOTORS & MACHINERY INC.
Overseas Service
1st Ed. JUN. 1997
Printed in KOREA
WARNING
Noise Control System(muffler assembly)
TAMPERING WITH NOISE CONTROL SYSTEM PROHIBITED
Owners are warned that the law may prohibit :
(a) The removal or rendering inoperative by any person other than for the
purpose of maintenance, repair or replacement, of any device or element of design incorporated into any new vehicle for the purpose of
noise control prior to its any sale or delivery to the ultimate purchaser or
while it is in use ; and
(b) The use of the vehicle after such device or element of design has been
removed or rendered inoperative by any person.
MAINTENANCE:
The exhaust system of this motorcycle requires no periodic maintenance.
’
The engine should be adjusted to the manufacture’
s specifications and the
spark plug should be kept in good condition. Running the engine with
incorrectly operating spark plug or misadjusted carburetor may cause permanent damage to the catalyst and to the noise control system.