1
Operations (Continued)
Unmute an output
Press the UNMUTE button to unmute all video and audio outputs. All of
the switcher’s Output LEDs flash on for a second.
Troubleshooting
User’s Guide
If the switcher does not properly respond to IR remote control
functions, check the following:
• You may be too far from the switcher. The maximum operating
range is 30 feet.
• You may be too far to the side of the switcher. The remote control
must be pointed within 30 degrees of the switcher’s IR sensor for
best results.
• You may be taking too long to enter the sequence. The unit times
out if no command is received in 5 seconds.
• The two AAA batteries may be dead. Replace the batteries as
shown in figure 1.
• The switcher’s front panel security lockout may be on. Toggle the
security lockout off. See the appropriate switcher’s manual.
• The room lighting may be interfering with the IR signals. Keep
the switcher out of bright light.
• When used with a MAV A/V series switcher, the switcher’s IR
receiver may be disabled. Refer to the MAV 44 / 48 / 84 / 88 Series
Matrix Switchers manual to enable the IR receiver.
IR 501
Small Matrix IR Remote Control
www.extron.com
Extron Electronics, USA
1230 South Lewis Street
Anaheim, CA 92805
800.633.9876 714.491.1500
FAX 714.491.1517
Extron Electronics, Europe
Beeldschermweg 6C
3821 AH Amersfoort, The Netherlands
+800.3987.6673 +31.33.453.4040
FAX +31.33.453.4050
Extron Electronics, Asia
135 Joo Seng Rd. #04-01
PM Industrial Bldg., Singapore 368363
+800.7339.8766 +65.6383.4400
FAX +65.6383.4664
© 2007 Extron Electronics. All rights reserved.
Extron Electronics, Japan
Kyodo Building, 16 Ichibancho
Chiyoda-ku, Tokyo 102-0082
Japan
+81.3.3511.7655 FAX +81.3.3511.7656
68-873-01 Rev. B
09 07
Introduction
About the IR 501
The Extron IR 501 Small Matrix Infrared (IR) Remote Control is an
optional remote control that works with Extron matrix switchers. The
remote control can duplicate most of the matrix switcher’s front panel
control functions and some of RS-232 control functions. The hand-held
remote operates at a carrier frequency of 38 kHz.
N
Refer to the appropriate matrix switcher manual for definitions of
ties, configurations, presets, and audio breakaway; and for more
detailed descriptions of the switcher’s front panel indications.
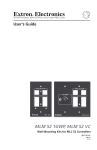
Battery Installation
Install two AAA batteries as shown (figure 1).
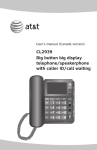
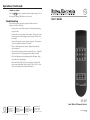
button — The Enter button
c Enter
saves changes when you create a
new tie or configuration.
{function}
buttons
and Output buttons —
d Input
The
button and
button
INPUT
OUTPUT
determine whether the I/O buttons
select an input or output(s) when
pushed.
and Audio buttons —
e Video
The Video and Audio buttons select
video or audio inputs and outputs
when creating or viewing a tie or
when muting an output.
N
The default selection is both video
and audio selection. If you want
to configure both video and audio,
you do not need to push the Video
or Audio button.
and Save buttons — When
f Preset
you push the Preset button before
Figure 1 — Battery installation
See “Sample Operations” for examples of using the IR 501 to perform
various functions.
I/O
INPUT/OUTPUT SELECTION
2
3
4
5
6
7
8
9
0
+10
ENTER
PRESET
SAVE
VIDEO
AUDIO
MUTE
UNMUTE
INPUT
OUTPUT
1
2
3
5
6
7
4
IR 501
SMALL MATRIX REMOTE
you press an I/O button, the I/O
button selects a preset to save or
recall when it is pushed.
IR 501 Buttons
Aim the hand-held unit at the IR detector on the switcher and press the
desired buttons on the remote. The maximum operating range is 30
feet.
1
When you push the Save button Figure 2 — IR 501 buttons
before you push the Preset
button, the current configuration
is saved as a preset when you
push an I/O button.
buttons — The Mute button blanks the screen and/or
g Mute
silences the audio.
The Unmute button unmutes all video and audio outputs.
buttons
Selection buttons — The I/O buttons select inputs
a Input/Output
and outputs to tie. The switcher’s front panel Input LEDs indicate
the selected input or output.
These buttons also select among presets to save or recall.
button — The +10 button is used with the other I/O buttons
b +10
to select numbers higher than 9.
2
IR 501 Small Matrix Remote Control • Battery Installation
IR 501 Small Matrix Remote Control • Operations
3
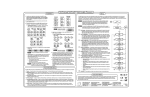
Indications
Switcher Setup and Indications
8
Sample Operations
10
For MAV A/V switchers, the
switcher’s IR receiver is disabled by
default and must be enabled to use
the IR Remote Control. Refer to
the MAV 44 / 48 / 84 / 88 Series
9
Matrix Switchers manual
Figure
3
—
Switcher
to enable the IR receiver.
features
It is not the purpose of this manual to
define the switcher’s front panel indications, but two of the switcher’s
LEDs indicate operation by the IR 501 remote control (figure 3).
N
N
The following examples show operations with specific input, output, and preset numbers. Use your own numbers as desired.
N
The switcher’s Power LED flashes whenever the switcher receives
an IR command. Other switcher indications are identified in the
following examples where appropriate. For detailed descriptions of
how the switcher indicates ties and presets, refer to the appropriate
matrix switcher’s manual.
N
Many operations require a sequence of IR commands. When
multiple IR commands are required, the entire sequence must be
completed within 5 seconds. If a valid sequence is not completed
within 5 seconds, the switcher times out and discards all received
IR commands
MAV SERIES
AV MATRIX SWITCHER
I/O
IR
+dB
-dB
AUDIO SETUP
Other indications are identified where appropriate in the “Operations”
section.
remote sensor — This sensor receives infrared (IR)
h Infrared
signals from the optional IR 501 small matrix universal remote
control. The IR remote control must be pointed within 30 degrees
of this sensor for best results.
LED — This LED blinks off and on to indicate that an IR
i Power
signal has been received.
Setup LED (A/V switchers only) — This LED lights for a
j Audio
second when an improper or unexpected IR command is received.
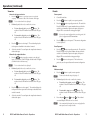
Create ties
By default, you create video and audio (audio follow) ties using the
IR 501. By pushing one extra button you can create audio-breakaway
ties.
1.
N
2.
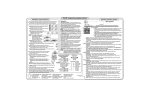
Operation
Most functions can be performed by pushing a similar sequence of
{function}
and
I/O
buttons (figure 4).
• Video and audio operations require only one
{function}
button.
• Video-only or audio-only operations require two {function} buttons
(one to identify the function, one to identify video or audio).
• For numbers higher than 9, press the
applicable
0
through
9
+10
button and then press the
sequence, one or more output sequence[s]) and then the
button.
ENTER
To create video and audio ties, skip to step 3.
Specify video or audio:
a.
For video-only tie(s), press the VIDEO button to specify a
video selection. The switcher’s Video LED remains lit and
the Audio LED goes off.
b.
For audio-only tie(s), press the AUDIO button to specify an
audio selection. The switcher’s Audio LED remains lit and
the Video LED goes off.
5
3.
Press the
lights.
4.
Press the
5.
Press the
,
, and 8 buttons to select outputs 3, 4, and 8.
The switcher’s selected Output LEDs blink.
6.
ENTER button to create the tie. The switcher displays
Press the
the ties as described in the switcher’s manual.
button.
• Creating a set of ties requires at least two sequences (the input
Press the INPUT button to specify an input selection. The
switcher’s Video LED and Audio LED light.
button to select input 5. The switcher’s Input 5 LED
OUTPUT
3
button to specify output selection(s).
4
{function} (s)+ I/O number(s)
(Such as INPUT (video and audio),
(Such as 3 , or +10 + 2 .)
INPUT + VIDEO (video only), orMUTE ,
(for 12)
INPUT + AUDIO (audio only).
Figure 4 — Button sequence
4
IR 501 Small Matrix Remote Control • Operations
IR 501 Small Matrix Remote Control • Operations
5
Operations (Continued)
Presets
View ties
View a tie by input selection
1.
N
2.
Save a preset
Press the INPUT button to specify an input to view the tied
output(s). The switcher’s Video LED and Audio LEDs light.
To view video and audio ties, skip step 2.
If desired, specify video-only or audio-only to view:
a.
To view video-only tie(s), press the VIDEO button. The
switcher’s Video LED remains lit and the Audio LED goes
off.
b.
To view audio-only tie(s), press the AUDIO button. The
switcher’s Audio LED remains lit and the Video LED goes
off.
3.
Press the 5 button to select input 5. The switcher displays the
tied outputs as described in the switcher’s manual.
4.
Allow the switcher’s 5-second input and output button timeout to
deselect the input.
1.
Create all desired ties.
2.
Press the
3.
Press the PRESET button to specify preset mode. The switcher’s
Preset LED blinks and, for preset numbers that are within the
switcher’s total number of inputs and outputs, the Input or
Output LEDs` associated with existing presets light.
N
4.
Press the OUTPUT button to specify an output to view the tied
input. The switcher’s Video LED lights and the Audio LED lights
(or blinks if audio is broken away).
N
2.
If desired, specify video-only or audio-only to view:
a.
b.
3.
4.
To view video and audio ties, skip step 2.
To view video-only tie(s), press the VIDEO button. The
switcher’s Video LED remains lit and the Audio LED goes
off.
AUDIO
To view audio-only tie(s), press the
button. The
switcher’s Audio LED remains lit and the Video LED goes
off.
Press the 5 button to select preset 5. The current configuration
is saved as preset 5.
Press the PRESET button to specify preset mode. The switcher’s
Preset LED lights and, for preset numbers that are within the
switcher’s total number of inputs and outputs, the Input or
Output LEDs associated with existing presets light.
2.
Press the 8 button to select preset 8. The ties that were
previously saved as preset 8 become the current configuration.
Mutes
Mute an output
1.
Press the
N
2.
3.
IR 501 Small Matrix Remote Control • Operations
MUTE
button to specify a mute operation.
To mute video and audio output, skip step to 3.
If desired, specify video-only or audio-only to mute:
a.
To mute the video output, press the VIDEO button. The
switcher’s Video LED remains lit and the Audio LED goes
off.
b.
To mute audio output, press the AUDIO button. The
switcher’s Audio LED remains lit and the Video LED goes
off.
Press only one I/O button ( 1 through 8 ). The switcher’s
associated Output LED flashes on for a second.
N
6
If you save the current configuration to an existing preset, that
preset’s configuration will be overwritten.
Recall a preset
Press the 3 button to select output 3. The switcher displays the
tied input and other outputs tied to that input as described in the
switcher’s manual.
Allow the switcher’s 5-second input and output button timeout to
deselect the output.
button to specify a save preset operation.
1.
View a tie by output selection
1.
SAVE
You can mute multiple outputs, but you can only perform the
mute operation on one output at a time.
IR 501 Small Matrix Remote Control • Operations
7